VALBERG CNF 327 E X742C User manual

EN
WARRANTY CONDITION
This product is guaranteed for a period of 2 years from the date of purchase* against any failure
resulting from a manufacturing or material defect. This warranty does not cover defects or
damage resulting from incorrect installation, improper use or abnormal wear of the product.
*as shown on the sales receipt.
FR
CONDITION DE GARANTIE
Ce produit est garanti pour une période de 2 ans à partir de la date d’achat*, contre toute
défaillance résultant d’un vice de fabrication ou de matériau. Cette garantie ne couvre pas les
vices ou les dommages résultant d’une mauvaise installation, d’une utilisation incorrecte ou
de l’usure anormale du produit.
*sur présentation du ticket de caisse.
NL
GARANTIEVOORWAARDEN
Dit product wordt gegarandeerd voor een periode van 2 jaar vanaf de aankoopdatum*, voor
elke storing die het gevolg is van een fabricagefout of het materiaal. Gebreken of schade door
slechte installatie, onjuist gebruik of abnormale slijtage van het product worden niet gedekt
door deze garantie.
*op vertoon van kassabon.
ES
CONDICIONES DE GARANTÍA
El certificado de garantía de este producto tiene una duración de 2 años a partir de la fecha de
compra* que se limita a los defectos de fabricación y averías del material. Se excluyen de la
garantía deficiencias o daños originados por una mala instalación, errores en la manipulación
o por un uso inadecuado.
*previa presentación del comprobante de compra.
MADE IN PRC
ELECTRO DEPOT
1 route de Vendeville
59155 FACHES-THUMESNIL
FRANCE
972066 - CNF 327 E X742C
INSTRUCTIONS FOR USE ....................02
CONSIGNES D'UTILISATION ....................24
GEBRUIKSAANWIJZINGEN ....................46
INSTRUCCIONES DE USO ....................68
09/2022 – V5
Refrigerator Freezer
Réfrigérateur-congélateur
Koelkast-diepvriezer
Frigorífico-congelador
2/2
CKVBG-Z04

1
2
3
4
5
6
7

2 EN2 EN
Thanks!
Thank you for choosing this VALBERG product.
Chosen, tested and recommended by ELECTRO DEPOT,
the products of the VALBERG brand are easy to use,
reliable and of an impeccable standard.
Thanks to this appliance, you can be sure that each
use will bring you satisfaction.
Welcome to ELECTRO DEPOT.
Visit our website: www.electrodepot.fr

3 EN3 EN
Table of contents
APreview of the
appliance
CUseful information
BUsing the appliance Installation
User interface
Daily use
Cleaning
Replace the lamp
Helpful hints and tips
Troubleshooting
Description of the appliance

4EN
Preview of the appliance
A
Description of the appliance
1Thermostat and Light
2Fridge Balconies
3Fridge Shelves
4Crisper Cover
5Crisper
6Freezer Drawers
7Leveling Feet
NOTE:
Above picture is for reference only. Real appliance probably
is different.

5EN
Using the appliance
B
Installation
Space Requirement
• Select a location without direct exposure to sunlight;
• Select a location with enough space for the refrigerator doors to open easily;
• Select a location with level (or nearly level) flooring;
• Allow sufficient space to install the refrigerator on a flat surface;
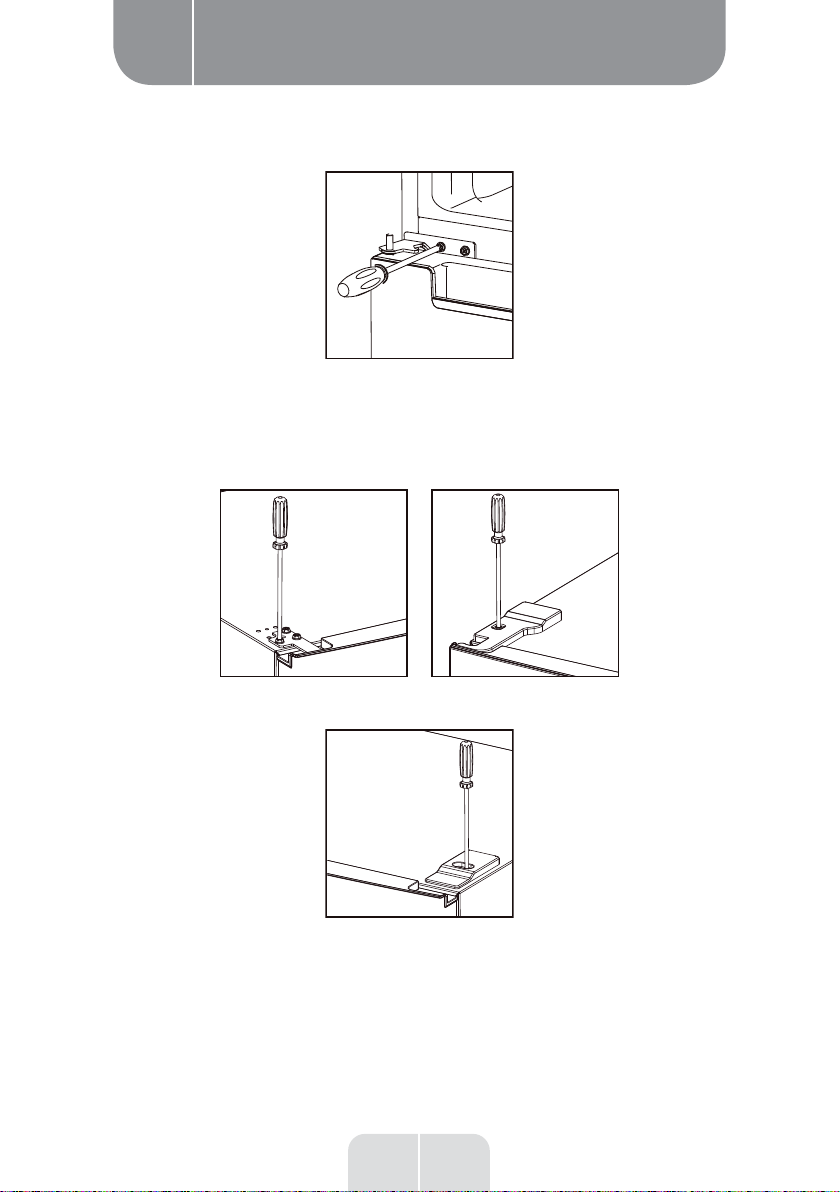
• Allow clearance to the right, left, back and top when installing. This will help reduce power
consumption and keep your energy bills lower.
• Keep at lest 50mm gap at two sides and back.
Positioning
Install this appliance at a location where the ambient temperature corre sponds to the climate
class indicated on the rating plate of the appliance:
for refrigerating appliances with climate class:
- extended temperate: this refrigerating appliance is intended to be used at ambient
temperatures ranging from 10 °C to 32 °C;(SN)
- temperate: this refrigerating appliance is intended to be used at ambient
temperatures ranging from 16 °C to 32 °C;(N)
- subtropical: this refrigerating appliance is intended to be used at ambient
temperatures ranging from 16 °C to 38 °C;(ST)
- tropical: this refrigerating appliance is intended to be used at ambient
temperatures ranging from 16 °C to 43 °C;(T)
Location
The appliance should be installed well away from sources of heat such as radiators, boilers, direct
sunlight etc. Ensure that air can circulate freely around the back of the cabinet. To ensure best
performance, if the appliance is positioned below an overhanging wall unit, the minimum distance
between the top of the cabinet and the wall unit must be at least 50 mm. Ideally, however, the
appliance should not be positioned below overhanging wall units. Accurate leveling is ensured by
one or more adjustable feet at the base of the cabinet. This refrigerating appliance is not intended
to be used as a built-in appliance.

6EN
Using the appliance
B
WARNING:
It must be possible to disconnect the appliance from the
mains power supply; the plug must therefore be easily
accessible after installation.
Electrical connection
Before plugging in, ensure that the voltage and frequency shown on the rating plate correspond
to your domestic power supply. Tha appliance must be earthed. The power supply cable plug
is provided with a contact for this purpose. If the domestic power supply socket is not earthed,
connect the appliance to a separate earth in compliance with current regulations, consulting a
qualified electrician. The manufacturer declines all responsibility if the above safety precautions
are not observed. This appliance complies with the E.E.C. Directives.
Door Reversibility
Before reversing the door, please be prepared below tools and material: straight screwdriver,
cross screwdriver, spanner and the components included in the poly bag:
Left Door Hinge Cover x 1 Left Aid-Closer on Upper
Door x 1
Left Aid-Closer on Lower
Door x 1

7EN
Using the appliance
B
1. Unscrew top hinge cover and then unscrew the top hinge . Then lift upper door and place it on
a soft pad to avoid scratch and damage.
2. Remove the top left screw cover
3. Take off the upper door, take out the screw from the middle hinge by cross screwdriver, then
take off the lower door.

8EN
Using the appliance
B
4. Laying down the refrigerator, take out the adjusting feet as below, then take off the lower hinge
by cross screwdriver.
5. Adjusting the hinge core position of the lower hinge and upper hinge to opposite position
12
6. Install the lower hinge under to the refrigerator like below, screwing in the adjusting feet, make
sure the position in horizon.
7. Detach the Fridge and the Freezer door gaskets and then attach them after rotating.

9EN
Using the appliance
B
8. Install the lower door, adjust and fix the middle hinge onto the cabinet.
9. Place the upper door back on. Ensure the door is aligned horizontally and vertically so that the
seal are closed on all sides before finally tightening the top hinge. Then inert the top hinge and
screw it to the top of unit and then fix hinge cover (in accessary bag) by screw.
10. Fix the screw cover.

10 EN
Using the appliance
B
Space Requirement
• Keep enough space of door open.
• Keep at least 50mm gap at two sides and back.
E
C
DBAF
F F
H
I
G
A600
B685
C1850
Dmin=50
Emin=50
Fmin=50
G1200
H1285
I135°

11 EN
Using the appliance
B
Levelling the unit
To do this adjust the two levelling feet at front of the unit.
If the unit is not level, the doors and magnetic seal alignments will not be covered properly.
Doors
Lengthen Shorten

12 EN
Using the appliance
B
User interface
Temperature setting of fridge compartment
Fridge temperature setting Panel
Super
1 2 A
Operation button
Set button
Short press this button to select running temperature. Keep pressing this button for 3s to select
“Super” mode.
Indicators
1Super mode indicator: the light is on when Super mode is selected.
2Setting Temperature indicators of fridge compartment. The lighted indicat or means related
temperature is selected.
Super mode
Activate super mode:
Keep pressing
button for 3s,super mode will be activated, indicator
S
uper will be lighted.
When super mode is activated, fridge temperature will remain previous setting and can not
be changed by pressing
button.
Quit from Super mode
• Press Set button Afor over 3 seconds
• Or the appliance will automatically restore to original setting when Super mode has
running for more than 50 hours.

13 EN
Using the appliance
B
Temperature setting of freezer compartment
Freezer temperature setting slider:
• This slider in fridge compartment is used to adjust temperature of freezer compartment.
• Slider is positioned toward
,the temperature in freezer compartment will be higher. Contrarily
the temperature in freezer compartment will be lower if the slider is moved toward
.
• Middle position of slider is advised position for normal using.
Temperature setting recommendation
Environment Temperature Fridge Compartment Freezer Compartment
16°C
25°C
32°C
WARNING:
Please never position the slider at left as below.

14 EN
Using the appliance
B
Daily use
First use
Cleaning the interior
Before using the appliance for the first time, wash the interior and all internal accessories with
lukewarm water and some neutral soap so as to remove the typical smell of a brand new product,
then dry thoroughly.
IMPORTANT:
Do not use detergents or abrasive powders, as these will
damage the finish.
Daily use
Position different food in different compartments according to be below table
Refrigerator compartments Type of food
Door or balconies of fridge compartment
• Foods with natural preservatives, such as
jams,juices, drinks, condiments.
• Do not store perishable foods.
Crisper drawer (salad drawer)
• Fruits, herbs and vegetables should be placed
separately in the crisper bin.
• Do not store bananas, onions, potatoes, garlic in
Fridge shelf – middle • Dairy products, eggs
Fridge shelf – top
• Foods that do not need cooking, such as ready-
to-eat foods, deli meats, leftovers.
Freezer drawer(s)/shelf
• Foods for long-term storage.
• Bottom drawer/shelf for raw meat, poultry, fish.
• Middle drawer/shelf for frozen vegetables, chips.
• Top drawer/shelf for ice cream, frozen fruit, frozen

15 EN
Using the appliance
B
Freezing fresh food
• The freezer compartment is suitable for freezing fresh food and storing frozen and deep-frozen
food for a long time.
• Place the fresh food to be frozen in the bottom compartment.
• The maximum amount of food that can be frozen in 24 hours is specified on the rating plate.
• The freezing process lasts 24 hours: during this period do not add other food to be frozen.
In order to get bigger freezing capacity, please put unfrozen food into freezer compartment after
you have started super mode for 26 hours.
Storing frozen food
When first starting-up or after a period out of use. Before putting the product in the compartment
let the appliance run at least 2 hours on the higher settings.
IMPORTANT:
In the event of accidental defrosting, for example the power
has been off for longer than the value shown in the technical
characteristics chart under “rising time”, the defrosted
food must be consumed quickly or cooked immediately and
then re-frozen (after cooked).
Thawing
Deep-frozen or frozen food, prior to be used, can be thawed in the freezer compartment or at
room temperature, depending on the time available for this operation.
Small pieces may even be cooked still frozen, directly from the freezer. In this case, cooking will
take longer.

16 EN
Using the appliance
B
Accessories Movable shelves
The walls of the refrigerator are equipped with a series of runners so that the shelves can be
positioned as desired.
Positioning the door balconies
Door balconies can be disassembled for cleaning. To make the disassembling as follows: gradually
pull the balcony in the direction of the arrows until it comes free, after cleaning, reposition it.
Disassemble the bottom drawer
1.Pull out the bottom drawer to stopper position.
2.Lift up the front of drawer.
3.Pull out the bottom drawer.

17 EN
Useful information
C
Cleaning
For hygienic reasons the appliance interior, including interior
accessories, should be cleaned regularly.
CAUTION:
The appliance may not be connected to the mains during
cleaning. Danger of electrical shock! Before cleaning
switch the appliance off and remove the plug from the
mains, or switch off or turn out the circuit breaker or
fuse. Never clean the appliance with a steam cleaner.
Moisture could accumulate in electrical components,
danger of electrical shock! Hot vapors can lead to the
damage of plastic parts. The appliance must be dry
before it is placed back into service.
IMPORTANT:
Ethereal oils and organic solvents can attack plastic
parts, e.g. lemon juice or the juice form orange peel,
butyric acid, cleanser that contain acetic acid.
• Do not allow such substances to come into contact the
appliance parts.
• Do not use any abrasive cleaners

18 EN
Useful information
C
• Remove the food from the freezer. Store them in a cool
place, well covered.
• Switch the appliance off and remove the plug from the
mains, or switch off or turn out the circuit breaker of fuse.
• Clean the appliance and the interior accessories with a
cloth and lukewarm water. After cleaning wipe with fresh
water and rub dry.
• After everything is dry place appliance back into service.
Replace the lamp
This product contains a light source of energy efficiency class G.
Light source in this product can only be replaced by qualified professionals.
Please contact after-sales service if the light source fails.
The light source shall be removed at the end of the product’s useful life, with sorting and recycling
done separately.

19 EN
Useful information
C
Helpful hints and tips
Hints for freezing
To help you make the most of the freezing process, here are some important hints:
• the maximum quantity of food which can be frozen in 24 hrs. is shown on the rating plate;
• the freezing process takes 24 hours. No further food to be frozen should be added during this
period;
• only freeze top quality, fresh and thoroughly cleaned, foodstuffs;
• prepare food in small portions to enable it to be rapidly and completely frozen and to make it
possible subsequently to thaw only the quantity required;
• wrap up the food in aluminium foil or polythene and make sure that the packages are airtight;
• do not allow fresh, unfrozen food to touch food which is already frozen, thus avoiding a rise in
temperature of the latter;
• lean foods store better and longer than fatty ones; salt reduces the storage life of food;
• water ices, if consumed immediately after removal from the freezer compartment, can possibly
cause the skin to be freeze burnt;
• it is advisable to show the freezing in date on each individual pack to enable you to keep tab of
the storage time.
Hints for storage of frozen food
To obtain the best performance from this appliance, you should:
• make sure that the commercially frozen foodstuffs were adequately stored by the retailer;
• be sure that frozen foodstuffs are transferred from the food store to the freezer in the shortest
possible time;
• not open the door frequently or leave it open longer than absolutely necessary.
Other manuals for CNF 327 E X742C
1
This manual suits for next models
1
Table of contents
Languages:
Other VALBERG Freezer manuals

VALBERG
VALBERG CNF 326 D X742C User manual

VALBERG
VALBERG UF NF 384 E X180C User manual

VALBERG
VALBERG CF 198 E W625C User manual

VALBERG
VALBERG UF NF 240 E S180C User manual

VALBERG
VALBERG UF 242 E W742C User manual

VALBERG
VALBERG 2D 206 E S180C User manual

VALBERG
VALBERG BI CS 249 F W742C User manual

VALBERG
VALBERG CNF 270 E W625C User manual

VALBERG
VALBERG 967845 User manual

VALBERG
VALBERG 967799 UF NF 194 E W180C User manual