VanGaa Lighting SWIFT 121 User manual


INDEX
ⅠPRODUCT MAIN FEATURES………. ..................................................... 01
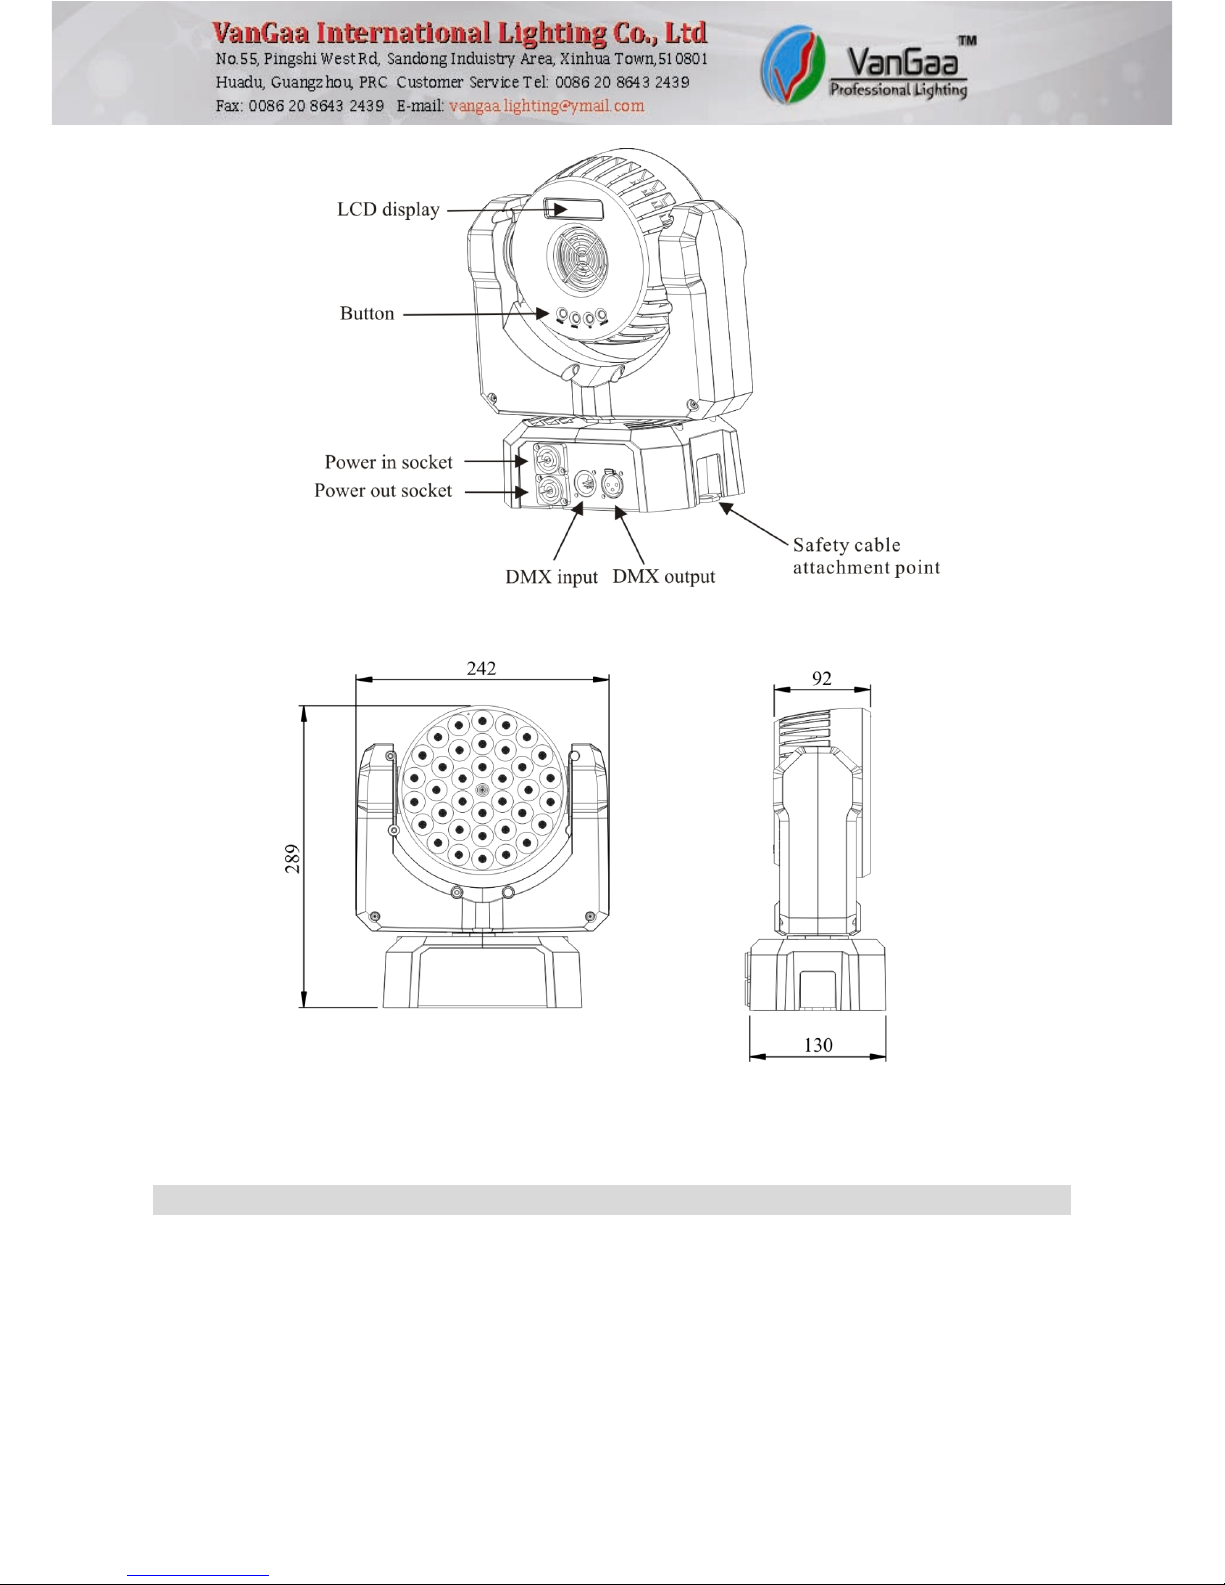
ⅡOVERVIEW AND DIMENSIONS............................................................ 01
ⅢSAFETY INFORMATION ..................................................................... 02
ⅣPOWER CONNECTION........................................................................ 03
INSTALLING ANENUTRIK CONNECTOR ON APOWER CABLE .................................... 03
HANDLING.............................................................................................................. 04
RELAYING POWER TO OTHER DEVICES .................................................................... 04
PHYSICAL INSTALLATION ....................................................................................... 05
HOW TO INSTALL ACLAMP TO THE LIGHTING......................................................... 05
ⅤDMX PROTOCOL................................................................................ 05
STAGE 12 CHANNELS MODE .................................................................................... 06
STAGE 9CHANNELS MODE...................................................................................... 07
STAGE 8CHANNELS MODE...................................................................................... 09
STAGE 5CHANNELS MODE...................................................................................... 09
HVS7CHANNELS MODE.......................................................................................... 10
ⅥBUTTON ............................................................................................ 10
ⅦMENU ................................................................................................ 10
SET MENU ............................................................................................................... 11
DMX MENU.............................................................................................................. 13
MACRO MENU ......................................................................................................... 13
MOTOR RUN MENU ................................................................................................. 13
MANUAL DIMMER MENU.......................................................................................... 14
ⅧTECHNICAL SPECIFICATION.............................................................. 14

Thank you for using our product! Please read this manual carefully and completely. For
technical reference in future, please keep this user manual well. This user manual contains
all installation and operation information of this LED Moving Head Beam Wash Light, it’s
very useful for user to install and operate the light. Please strictly abide by the relevant
instruction for the installation and operation.
This light has very beautiful appearance. Our SWIFT LED Moving Head is a very small and
smart light. But the brightness is very powerful. It owns very good beam light, and very
wonderful color mixing effect. As a SWIFT light, it’s small, but it runs extremely fast. This
light is very suitable for bar, disco, stage, theatre, decoration etc.
This light meets the following criteria:
GB7000.1-2007/IEC60598-1:2003
GB7000.217-2008/IEC60598-2-17:1984+A2:1990
ⅠPRODUCT MAIN FEATURES
36pcs high-power 3W CREE XP-E LED
Excellent mixed color system
Dimmer very smooth
Tight, punchy beam
Compact, silent design
Move quickly
Blue LCD display
Standard DMX-512 communication protocol
Easy for power connection
ⅡOVERVIEW AND DIMENSIONS
-01-

All dimensions are in millimeters
ⅢSAFETY INFORMATION
※Important
Every person involved with the installation, operation and maintenance of this device has to
be qualified and follow the instructions of this manual. Manufacturer will not with
responsibility for those operations which are not according to this Instruction.
Verify that the voltage matches the rated voltage.
When the voltage is 110V , Do not connect more than 10 lightings in total to AC mains
-02-

power in one interconnected daisy chain
When the voltage is 220V , Do not connect more than 20 lightings in total to AC mains
power in one interconnected daisy chain
Before using the fixture, check that all power distribution equipment and cables are in
perfect condition and rated for the current requirements of all connected devices.
Always ground (earth) the fixture electrically.
Avoiding hit the Light when you are move or install the light.
The minimum distance between light-output and the illuminated surface must be more
than 0.5 meters. Keep all combustible materials (for example fabric, wood, paper) at
least 0.2 meters away from the fixture.
Do not expose the fixture to rain or moisture.
Avoid looking directly into the light source (especially those who suffer from epileptic
fits)
Maximum ambient temperature (Ta) is 40°C. Do not operate fixture at temperatures
higher than this.
The Maximum surface temperature is 50°C
When suspending the fixture above ground level, verify that the structure can hold at
least 10 times the weight of all installed devices.
Verify that all external covers and rigging hardware are securely fastened and use an
approved means of secondary attachment such as a safety cable.
ⅣPOWER CONNECTION
INSTALLING A NENUTRIK CONNECTOR ON A POWER CABLE
Put bushing and chuck onto the cable.
Prepare cable as shown above. The power cable must is a three-conductor 2.5mm2cable.
Insert the wire into the terminals and fasten the clamping device by a flat screw driver.
Push insert and chuck into housing (pay attention to the guiding keyway).
Fasten bushing.
-03-

The color-coding schemes and some possible pin identification schemes; if pins are not
clearly identified, or if you have any doubts about proper installation, consult a
qualified electrician.
HANDLING
RELAYING POWER TO OTHER DEVICES
The lightings can be linked in a chain by power cables which installed a blue and a light-gray
connectors on the two ends. The light-gray connector connects to the power out socket of
the first lighting, and the blue connector connects to the power in socket of the subsequent
lighting, and so on.
The power cable must is a three-conductor 2.5mm2cable.
Wire color
Conductor
Symbol
Brown
Live
L
Blue
Neutral
N
Yellow/green
ground
-04-

When the voltage is 110V, Do not connect more than 10 lightings in total to AC mains power
in one interconnected daisy chain.
When the voltage is 220V, Do not connect more than 20 lightings in total to AC mains power
in one interconnected daisy chain.
PHYSICAL INSTALLATION
This lighting can be placed on a horizontal surface such as a stage or clamped to a truss or
similar rigging structure in any orientation using a rigging clamp.
When suspending the fixture above ground level, verify that the structure can hold at least
10 times the weight of all installed devices.
Verify that all external covers and rigging hardware are securely fastened and use an
approved means of secondary attachment such as a safety cable.
HOW TO INSTALL A CLAMP TO THE LIGHTING
1. Choose a clamp with M10 bolt, the bolt is 30~40cm.
2. Screw a M10 nut to the clamp bolt, use a spanner to tighten it.
3. Install the clamp into the base of the fixture as below picture. Using a spanner to make
the clamp, nut, spring washer, flat washer tightly together.
ⅤDMX PROTOCOL
This lighting has five Channels modes, including:
-05-

The default mode is STAGE 12 Channels Mode. If you want to alter it, enter DMX menu.
STAGE 12 CHANNELS MODE
Channel
Value
Function
CH1
000←→019
020←→064
065←→069
070←→084
085←→089
090←→104
105←→109
110←→124
125←→129
130←→144
145←→149
150←→164
165←→169
170←→184
185←→189
190←→204
205←→255
Strobe
shutter open
strobe1(fast to slow)
shutter open
strobe2: opening pulse(fast to slow)
shutter open
strobe3: closing pulse (fast to slow)
shutter open
strobe4: random strobe(fast to slow)
shutter open
strobe5: random opening pulse(fast to slow)
shutter open
strobe6: random closing pulse (fast to slow)
shutter open
strobe7: burst pulse(fast to slow)
shutter open
strobe8: random burst pulse (fast to slow)
shutter open
CH2
000←→255
Global dimming
0~100%
CH3
000←→255
Pan
0~540degree/0~630degree
(the maximum angle base in the setting in menu)
CH4
000←→255
Pan fine
CH5
000←→255
Tilt
0~240degree
CH6
000←→255
Tilt fine
CH7
000←→009
Fixture control settings
No function
HSV Mode
STAGE
Mode
7 Channels Mode
12 Channels Mode
9 Channels Mode
8 Channels Mode
5 Channels Mode
-06-

010←→014
015←→039
040←→044
045←→049
050←→054
055←→059
060←→064
065←→069
070←→074
075←→109
110←→114
115←→119
120←→124
125←→249
250←→255
Reset (hold for 8s)
No function
Normal motor speed
Maximum motor speed
Minimum motor speed
No function
Max. cooling fan speed
No function
Cooling fan speed with temperature adjustment automatically
No function
Fast dimmer
No function
Smooth dimmer
No function
Illuminate display
CH8
000←→009
010←→014
015←→019
020←→024
025←→029
030←→034
035←→039
040←→044
045←→049
050←→054
055←→059
060←→064
065←→069
070←→074
075←→079
080←→084
085←→089
090←→094
095←→099
100←→104
105←→109
110←→114
115←→119
120←→124
125←→129
130←→134
135←→139
Color wheel
Dimmer channel enable
Moroccan pink
Pink
Special rose pink
Follies pink
Fuchsia pink
Surprise pink
Congo Blue
Tokyo Blue
Deep Blue
Just Blue
Medium Blue
Double CT Blue
Slate Blue
Full CT Blue
Half CT Blue
Steel Blue
Lighter Blue
Light Blue
Medium Blue Green
Dark Green
Primary Green
Moss Green
Fern Green
JAS Green
Lime Green
Spring Yellow
-07-

140←→144
145←→149
150←→154
155←→159
160←→164
165←→169
170←→174
175←→179
180←→201
202←→207
208←→229
230←→234
235←→239
240←→244
245←→249
250←→255
Deep Amber
Chrome Orange
Orange
Gold Amber
Millennium Gold
Deep Golden Amber
Flame Red
Open
Color wheel rotation effect
Clockwise, fast →slow
Stop(this will stop wherever the color is at the time)
Counter-clockwise, slow →fast
Open
Random color
Fast
Medium
Slow
Open
CH9
000←→255
Red dimmer
0~100%
CH10
000←→255
Green dimmer
0~100%
CH11
000←→255
Blue dimmer
0~100%
CH12
000←→019
020←→255
Color temperature control
No function
100000K →2500K
STAGE 9CHANNELS MODE
Channel
Value
Function
CH1
000←→255
Red dimmer
0~100%
CH2
000←→255
Green dimmer
0~100%
CH3
000←→255
Blue dimmer
0~100%
CH4
000←→255
Global dimmer
0~100%
CH5
000←→019
020←→064
065←→069
Strobe
shutter open
strobe1 (fast to slow)
shutter open
-08-

070←→084
085←→089
090←→104
105←→109
110←→124
125←→129
130←→144
145←→149
150←→164
165←→169
170←→184
185←→189
190←→204
205←→255
strobe2: opening pulse(fast to slow)
shutter open
strobe3: closing pulse (fast to slow)
shutter open
strobe4: random strobe(fast to slow)
shutter open
strobe5: random opening pulse(fast to slow)
shutter open
strobe6: random closing pulse (fast to slow)
shutter open
strobe7: burst pulse(fast to slow)
shutter open
strobe8: random burst pulse (fast to slow)
shutter open
CH6
000←→255
Pan
0~540degree/0~630degree
(the maximum angle base in the setting in menu)
CH7
000←→255
Pan fine
CH8
000←→255
Tilt
0~240degree
CH9
000←→255
Tilt fine
STAGE 8CHANNELS MODE
Channel
Value
Function
CH1
000←→255
Red dimmer
0~100%
CH2
000←→255
Green dimmer
0~100%
CH3
000←→255
Blue dimmer
0~100%
CH4
000←→255
Global dimmer
0~100%
CH5
000←→255
Pan
0~540degree/0~630degree
(the maximum angle base in the setting in menu)
CH6
000←→255
Pan fine
CH7
000←→255
Tilt
0~240degree
CH8
000←→255
Tilt fine
STAGE 5CHANNELS MODE
-09-

Channel
Value
Function
CH1
000←→255
Red dimmer
0~100%
CH2
000←→255
Green dimmer
0~100%
CH3
000←→255
Blue dimmer
0~100%
CH4
000←→255
Pan
0~540degree/0~630degree
(the maximum angle base in the setting in menu)
CH5
000←→255
Tilt
0~240degree
HVS 7CHANNELS MODE
Channel
Value
Function
CH1
000←→255
Hue
0~100%
CH2
000←→255
Saturation
0~100%
CH3
000←→255
Value
0~100%
CH4
000←→255
Pan
0~540degree/0~630degree
(the maximum angle base in the setting in menu)
CH5
000←→255
Pan fine
CH6
000←→255
Tilt
0~240degree
CH7
000←→255
Tilt fine
ⅥBUTTON
SET/ESC
Call the main menu, or escape the current menu (i.e. return to the upper menu
and give up the selected item or parameter).
UP
Browse the menu item forward or increase the parameter.
DOWN
Browse the menu item backward or decrease the parameter.
ENTER
Confirm the selected item or parameter(i.e. enter the next menu, or escape the
current menu and save the selected item or parameter)
ⅦMENU
Menu Navigation
①SET menu←SET/ESC—Addr:001(DMX mode)─ENTER→DMX menu②
UP↑↓DOWN
SET menu←SET/ESC—ManualDimmer—ENTER→Manualdimmer menu③
UP↑↓DOWN
-10-

SET menu←SET/ESC—Red —ENTER→null
UP↑↓DOWN
SET menu←SET/ESC—Green ─ENTER→null
UP↑↓DOWN
SET menu←SET/ESC—Blue ─ENTER→null
UP↑↓DOWN
SET menu←SET/ESC—Yellow ─ENTER→null
UP↑↓DOWN
SET menu←SET/ESC—Cyan ─ENTER→null
UP↑↓DOWN
SET menu←SET/ESC—Purple ─ENTER→null
UP↑↓DOWN
SET menu←SET/ESC—PureWhite ─ENTER→null
UP↑↓DOWN
SET menu←SET/ESC—Amber ─ENTER→null
UP↑↓DOWN
SET menu←SET/ESC—AllWhite ─ENTER→null
UP↑↓DOWN
SET menu←SET/ESC—3200K ─ENTER→null
UP↑↓DOWN
SET menu←SET/ESC—5600K ─ENTER→null
UP↑↓DOWN
SET menu←SET/ESC—6500K ─ENTER→null
UP↑↓DOWN
SET menu←SET/ESC—8500K ─ENTER→null
UP↑↓DOWN
SET menu←SET/ESC—10000K ─ENTER→null
UP↑↓DOWN
SET menu←SET/ESC—ChangColor ─ENTER→Motor Run Menu④
UP↑↓DOWN
SET menu←SET/ESC—Twinkling ─ENTER→Motor Run Menu
UP↑↓DOWN
SET menu←SET/ESC—Fade ─ENTER→Motor Run Menu
UP↑↓DOWN
SET menu←SET/ESC—Macro ─ENTER→Macro menu⑤
UP↑↓DOWN
①SET MENU
SET Menu:
├Reset Machine
│├Reset:ON
│└Reset:OFF
├Load Parameter
│├Load ON
│└Load OFF
├Master / Alone
│├Master Mode
│└Alone Mode
├Auto / Sound
│├Auto Mode
│└Sound Mode
;Reset the machine
;Do not reset the machine(default)
;Restore factory settings
;Do not restore factory
settings(default)
;(default)
-11-

├MIC Sense:00~99%
├TC Switch
│├TC Switch Mask
││├Switch ON
││└Switch OFF
│└TC Switch Temp
│├TC Temp Cap
│└TC Temp Set
├Scan Setting
│├Reverse Pan
││├Reverse Pan :ON
││└Reverse Pan :OFF
│├Reverse Tilt
││├Reverse Tilt:ON
││└Reverse Tilt:OFF
│├Pan Degree
││├Pan Degree:630
││└Pan Degree:540
│├Scan BlackOut
││├ScanBlackOut:ON
││└ScanBlackOut:OFF
│└Feed Back
│├Feed Back:ON
│└Feed Back:OFF
├Dimmer Curve
│├Square Law
│├Inv Square Law
│└S-Vurve
├Dimmer Speed
│├Dimmer: Smooth
│└Dimmer: Fast
├Dmx Reset
│├Enabled
│├Disabled
├Fan
│├Regulated
│└Full
└Information
├Time:tt/mm/ss
;(default:20)
;Temperature control, it will reduce
the output after over temperature
;Enable the switch(default)
;Disable the switch
(password protected)
;Capture the current temperature
;Set the value of the TC switch
;(default)
;(default)
;Set the max angle rage of the Pan
;(default)
;Black out while the motor runs
;(default)
;Enable pan/tilt position
feedback;(default)
;Disable the feedback
;(default)
;(default)
;Enable reset via DMX;(default)
;Disable reset via DMX
;Fan speed
;Thermostatically regulated(default)
;Max. cooling fan speed
-12-

├Date:mm/dd/yy
└Use Time :hour:
minute
②DMX MENU
DMX Menu:
├DMX Address: 001
├No DMX Signal
│├Stop Run
│├Hold Run
│├Auto Run
│└Sound Run
└DMX Channels
├HSV Mode
└STAGE Mode
├12 Channels
├9 Channels
├8 Channels
└5 Channels
;DMX mode
;Set DMX address
;Run if there is no DMX signal
;(default)
;(default)
③MACRO MENU
Macro Menu:
├Motor Run
│├Auto Run:OFF
│└Auto Run:ON
├Step Quantity:3
├Program Step 01
│├ChangeColor
│├Twinkling
│└Fade
│.......
└Program Step 62
;Programmable auto program
;Motor automatically run or not
;Motor do not run
;Motor automatically run
;0~62 steps(default:3)
;Select one built-in program for the
1st step of the macro
④MOTOR RUN MENU
Motor Run Menu
└Motor Run
├Auto Run:OFF
└Auto Run:ON
;Motor automatically run or not
;Motor do not run
;Motor automatically run
-13-

⑤MANUAL DIMMER MENU
ManualDimmer:
├Light Switch
│├Light ON
│└Light OFF
├Light Red:255
├Light Green:255
├Light Blue:255
├Light Strobe:000
├Scan Pan:0
├Scan Tilt:0
├Scan PanFine:000
├ScanTiltFine:000
└Light Calibrate
├Cal Pan:-128~+127
└Cal Tilt:-128~+127
;(default)
;Red dimmer 0~255(default: 255)
;Green dimmer 0~255 (default: 255)
;Blue dimmer 0~255 (default: 255)
;Blue dimmer 0~255 (default: 0)
;(default: 0)
;(default: 0)
;(default: 0)
;(default: 0)
;Pan calibration(default: 0)
;Tilt calibration(default: 0)
ⅧTECHNICAL SPECIFICATION
Rated input voltage: AC100~240V
Rated frequency: 50/60Hz
Power: 120W
Light sources: 36pcs 3W CREE XP-E LED
LED lifespan: about 50,000hours
LED quantity: 12R+12G+12B
Color mixing: R: 0~255, G: 0~255, B: 0~255
Effect: strobe, fade, color change
Beam angle: 8degree
Rotation Angle: Pan 540degree/630degree, Tilt 240degree, self-correcting
Channel quantity: 5CH, 7CH, 8CH, 9CH, 12CH
Control mode: DMX512, Master/slave, Sound active
Protection grade: IP20
Working environment: indoor
Environment temperature: -30~+40℃
Body size: L242*W130*H289mm
-14-

Weight: 3.4kg
Carton box package size: 350*210*390mm (1pc/carton)
N.W/G.W: 4kg/5kg
Please keep this manual as a reference.
Thanks again for your business. We truly appreciate it!
-15-
Table of contents
Other VanGaa Lighting Lighting Equipment manuals
Popular Lighting Equipment manuals by other brands

ACME
ACME V Inground VI-10QW user manual

ATG Electronics
ATG Electronics iBright HCL-FLT8N-0600E0-F1 user guide

LDR
LDR Canto 1200msr FF 120V mk2 operating instructions

HEPER
HEPER GOLEDO-T 32 LED Installation & maintenance instructions

Fotodiox
Fotodiox PopSpot Ultra 100 user manual

Strand Lighting
Strand Lighting Circular Saw user manual

Gifas-electric
Gifas-electric ApolloLED Eco operating instructions

SL PROLIGHTING
SL PROLIGHTING SL-1R100 user manual

Luminaire led
Luminaire led TSL9 LED Series installation guide

MELINERA
MELINERA 288598 Operation and safety notes

Sealey
Sealey LED3010 instruction manual

Goldine Controls
Goldine Controls Aqua Rite user guide