Vapor Rino 145 User manual

Vapor Rino 145 Owner's Manual Page 1 of 12
OWNERS MANUAL
Vapor Rino 145 –120V
Vapor Steam Cleaning System

Vapor Rino 145 Owner's Manual Page 2 of 12
OWNERS MANUAL INTRODUCTION
View or print the latest version of this manual at www.VaporRino.com/manuals
Vapor Rino 145 - 120
Vapor Steam Cleaning System
INTRODUCTION
CONTENTS
SAFETY INSTRUCTIONS
POWER GROUNDING
FEATURES & PARTS
ACCESSORIES
STARTING UP YOUR MACHINE
INJECTION SYSTEM
MAINTENANCE & CARE
TROUBLESHOOTING
WARRANTY INFORMATION
Important: Before using this machine read these instructions carefully
Before using this machine carefully read this manual. It contains information necessary for safe operation ensuring
the safety of the operators and any persons working nearby. Correctly following this manual enables the user to keep
the machine in good working condition and reduces machine down time. Keep the manual in a suitable place where it
can be easily accessed by the operator when needed. Following of this manual does remove your responsibility to
work in a safe way using all due caution and applying common sense when working with this super heated vapor
steam generating machine. By using this machine, you agree to hold the resellers, vendors, Vapor Rino and the
factory not responsible for any accidents or injuries that may occur during any use of this product. Use at your own
risk. If you do not agree with this do not use this machine. Thank you for your purchase. If you have any questions
please contact your reseller or place of purchase directly.

Vapor Rino 145 Owner's Manual Page 3 of 12
Table of Contents:
TOPIC
PAGE #
Cover Photo (Details may vary over time)
1
Introduction
2
Contents
Safety
Power / Grounding
Features & Parts
Accessories (Details may vary over time)
Starting Up Your Machine
Using the Water/Soap Injector
Maintenance & Care
Trouble Shooting
Warranty
3
4
5
6
7
8
9
10
11
12

Vapor Rino 145 Owner's Manual Page 4 of 12
WARNING
To prevent scalding or burning keep body away from vapor gun output, steam ports and nozzle heads & tips
IMPORTANT SAFETY INSTRUCTIONS
READ ALL INSTRUCTIONS BEFORE USING THIS VAPOR SYSTEM
When using this cleaning system always use basic precautions, including but not limited to the following:
Warning -- To reduce the risk of Machine Damage, fire, electrical shock or injury:
1) Do not leave the appliance plugged in when un attended. Unplug the Vapor Rino from the outlet when not in use, or before
servicing.
2) Turn your machine OFF when you are not planning on using for more than 20 minutes. This will reduce wear and tear and extend the
life of your system. Though it is tempting to leave the unit running all the time it is not recommended. Example: Most people would
never turn on a carpet extractor, shop vac or another power tool and leave it running 8 hours a day while not in use. Just because
your vapor system makes very little sound does not mean it is not taking wear by being left on continuously. The boiler generates
internal heat of well over 356 degrees F. To extend the life of your system consider turning it off when not in regular use.
3) Do not allow the Vapor Rino cleaning System to be used as a toy! Close attention is necessary when the system is in use around
children. NEVER Allow children to use, operate, handle or play with this machine.
4) Use only as described in the manual. Only use original manufacturer attachments.
5) Do not use the Vapor Cleaning System with a damaged cord or plug. If the vapor system has been dropped, damaged, left outdoors,
or submersed in water, arrange to have the system serviced.
6) DO NOT PULL or carry the vapor system by the power cord.
7) DO NOT DRAG the vapor system by the steam hose. This WILL Cause damage.
8) Be careful not to step on or stretch the steam hose or power cord. Never close a door on the cord or hose.
9) ALWAYS Turn the unit OFF before unplugging. Do not unplug by pulling on the power cord
10) ALWAYS, after using detergents clean your injection system. Just run fresh water through the injection system before putting the
unit away for the day. This will avoid having your injection pump becoming sticky and or clogged thus avoiding the need for service.
Always flush this injection system with pure clean water. Warm water works the best for dissolving soapy residue from the pump.
Run for at least 30 seconds+ until no soap is detected using clean fresh water. We provide you with an extra chem jug for this.
11) Do not allow objects to get into/block the output nozzle. Do not try to operate the vapor system with any of the openings blocked.
Keep openings free of anything that may reduce steam flow
12) Keep all body parts of humans and animals away from nozzles and moving parts of the system.
13) Use extra care when using the vapor system on stairs or an incline.
14) Use extra care when cleaning around a water source (swimming pools, spas, toilets, ect.)
15) NEVER use the cleaning system to clean animals or other living creatures.
16) Do not fill the vapor systems boiler refill tank with anything but pure, clean water
17) NEVER use this system outdoors IF it is raining, snowing or there is any precipitation or threat of precipitation. Keep it dry.
18) NEVER EVER Use any flammable or combustible liquids or materials in, on or with this machine!!!
19) Connect to a PROPERLY GROUNDED Outlet ONLY. See grounding instructions.
20) If not in use for more than 1-2 weeks or more you should empty your boiler. Simply loosen the drain nut on the bottom of the
machine and allow the water to drain out. This may reduce the need to have the systems serviced in the long term.
21) Follow the regular cleaning and maintenance recommendations in this manual to maintain the health of your system.

Vapor Rino 145 Owner's Manual Page 5 of 12
Grounding Instructions
WARNING: Your Vapor System MUST BE PLUGGED INTO
A GROUNDED OUTLET (As shown!) or electrical shock or
damage to the unit may occur. Check with a qualified
electrician if you do not know if your outlet is grounded.
Do NOT Modify the plug provided with your Vapor
System. if it will not fit the outlet, then do not use the
system. If it does not fit, you are trying to use the wrong
outlet type.
EXTENSION CORDS: In the likely event that an extension
cord is used with this system, use 10 gauge, 3 wire,
grounded extension cord w/ SJ quality plug type. Always
use a heavy-duty extension cord with three prongs. Use of
a light duty plug will cause damage to the internal circuit
board. 12 gauge wire may be used in lengths under 25
feet. 10 gauge (10 ga is the thickest available) is highly
recommended and can be used in lengths in excess of 50’.
THIS UNIT MUST BE GROUNDED
If the unit should malfunction or break down, grounding provides a path of least resistance of electrical Current to
reduce the risk of electrical shock. The unit is equipped with a cord having an equipment grounding conductor and
grounding plug. The plug must be inserted into an appropriate outlet (like in the picture above) that is properly
grounded in accordance with all local codes and ordinances.
WARNING –Improper connection of the equipment-grounding conductor can result in a risk of electric
Shock. Check with a qualified electrician or service person if you are in doubt. Check whether the outlet is
Properly grounded. Do not modify the plug provide of the steamer –if it will not fit the outlet, have a
proper grounded outlet installed, plug into a different outlet or have one installed by a qualified electrician.
This units is designed for use with a normal 110/120 volt circuit running at either 15 or 20 amps, and that has a
grounded outlet that looks much like the one illustrated above. If for some reason you do not have a 3-prong outlet
you can have a qualified electrician install one for you or run 10-gauge extension cord from a location that does.

Vapor Rino 145 Owner's Manual Page 6 of 12
Vapor Rino Details / Features / Parts
1) Integrated Cart Handle
2) Chemical Injection Tank (Use W/Water or Detergents)
3) Boiler Water Refill Tank
4) Hose Hangers
5) Accessories Basket
1) Main Power Switch (Must activate switches in order!)
2) Boiler Switch (Activate only after main switch is on)
3) Low Water Indicator Light (Orange Lens)
4) Boiler Activity Indicator Light (Green Lens)
5) Internal Boiler Pressure Gauge
6) "Monoblock" Main Steam Hose Outlet Hatch
7) 100% Variable Detergent Injection System Flow Control
8) 100% Variable Steam Flow Control
1) Control Panel
2) Exhaust / Cooling Vent
3) Color Coded Outlet Plug for Injection System
4) Color Coded Inlet Plug for Injection System
5) Easy Remove Heavy Duty Thumb Screws for Handle
6) Ear for Wrapping Cord - One on each side of machine
7) Easy thumb screw Drain Plug for Boiler Maintenance
8) Easy Locking Wheels

Vapor Rino 145 Owner's Manual Page 7 of 12
Accessories
Please Note: Accessory Packages subject to change without notice. The website lists the LATEST INCLUDED Accessories. Everything shown
here WILL be in your 50-pc kit plus more. There is a nice assortment of brushes you will also receive along with the accessories shown below.
See website for more.

Vapor Rino 145 Owner's Manual Page 8 of 12
Starting Up Your Machine
Before You Start:
•Before you use this machine, check to see that the electrical current is the same as the voltage
listed on this units identification plate! Never use a generator with less RUNNING wattage
then 3500 Watts or 5,000 watts if you are going to use a vacuum with it. 6,000 to 10,000 Watt
is recomended IF you use a generator. Never over tax a generator, this will damage the Vapor
Rino electronics! Always use 10 gauge wire when using an extension cord.
Steamer Startup:
•Place the water jugs into the holding rack and connect the color coded plugs.
•Fill the water tank (Marked "Water Only") with pure, clean tap water. Fill to the top.
•Insert the 3 prong power plug into a 120 volt 3 prong power outlet.
•Press the main switch to the on position (#1 on illistration to right). You will see a small orange light glow in the switch. You will also
hear a beep like tone. Once the tone has stopped, wait 3 seconds then press the second switch (#2 on illistration) to the on position.
This switch will also light up.
ONLY FOR FIRST STARTUP WITH AN EMPTY BOILER
If the machine low water alarm is activated (redish-orange light #3 is on + audible alarm), turn the switch #2 off,
leave it off for about 5 seconds and then switch it on again. Filling is automatically performed when
Required by the water level. If the beeping persists turn off all the power buttons and begin again. Be sure to check your water connection.
At this point you will hear some buzzing sounds coming from the machine. This is the transfer pump sending water to your empty boiler. It
takes about 7 minutes for a fully empty boiler to fill up. Once that happens the machine will begin heating up.
•Now that the boiler is full, the heating process will begin. Take notice of the green lensed light (#4). It will blink. Please note that
the green lense has an orange like bulb under it. This will always be this color and is normal. You may have to look close if you are
outdoors or in a bright room to see the blinking light.
•The blinking green lensed light indicates that the heating elements are on and heating up the water.
•For a 120Volt unit it will typically take about 15 minutes to come up to full heat. This does not include the time it takes to fill the
boiler during your very first startup of if the boiler has been drained for storage prior to use.
•Once maximum pressure is reached, the green lensed light will stop blinking and go soild. This means that the system has reached
its maximum pressure and has turned off the heating elements.
•There is a natural variation in steam pressures at full charge. Example: If you charge the unit the
first time it may stop at 10 bars (145 PSI) or a few percent higher or lower. After you pull the
trigger and let some steam out, then stop you may notice that this time it charges a bit higher.
Each time there will be a minor variaton in final pressure. This is normal.
•ATTACH HOSE: Connect your steam hose. Lift the monoblock hatch (#6) and press the hose in
firmly. Press hard and listen for a click. Once locked in place you are ready to begin.
Gun Operation: The gun controls must be set right in order to allow steam to come out
•Holding the gun in your hand press the plastic covered swith on the left. You want the rocker
switch to have the DOWN side pressed down toward your hand. The other switch needs to be in
the opposit direction.

Vapor Rino 145 Owner's Manual Page 9 of 12
•Point your steam gun in a safe direction and pull the red trigger. You should now get steam. If this does not work you may simply
have the buttons in reverse order. If you still have a problem see the trouble shooting seciton of this manual for simple sulutons. You
should now be steaming.
Injection System - Water or Soap
How to operate the hot water / hot chemical injection system
with the 120V Version of the Vapor Rino 145:
1. First fill and warm up your system. Make sure you have steam and it is working
before you attempt to use the injection systems. The Injection system only
works with steam so start with that. If you have trouble getting steam see the
troubleshooting section. Once you have working steam, you can continue.
2. See Figure #001.If you have not already done so, put the plastic "detergent" tank
in place on the top right hand side of the machine. See image to the right.
Connect the two easy color-coded plugs as shown. They simply push into place.
3. It is time to fill the tank. See figure #001 to the right. Note, the tank reads
"Detergent Only". This tank can be filled with either a liquid soap product or
simple tap water. Caution: If you use a soap, be sure it is thinned out to a water
like consistency. Always flush / run the injector with pure water at the end of the
day! For testing, we recommend filling with clean TAP water from your sink. Tap
water is safe to use with the injection system. Filling the injection system with
clean tap water gives you hot water injection. Filling with soap gives you hot soap
injection.
4. The 120 Volt Vapor Rino 145 only injects soap or water at any PSI. To use the injection system on the 120-volt class you must do one of two
things. Either activate the Using the injector on the 120V unit is a simple operation once you know how to use it properly. See button configuration
to see how to activate the injector.
5. Activating the Injection System. Once you are setup, and both tanks are full you are ready. For the
first run you can just fill the “Detergent” tank with simple tap water. Activation is only a push of a
button away! See the illustration directly to the right, Figure # 002. This is a close up of your
steam gun's activation buttons. Switch #1 activates the steam flow. You will see a picture of a
steam cloud on it. This should ALWAYS be on when using the injector. Holding the gun in your
hand, look at the two buttons by your thumb. The rocker switch (#1) needs to have the DOWN side
toward you and the up side away from you. The switch on the right (#2) is the injection pump switch.
During steam only operation this switch should be opposite of the steam switch. When you want to
inject water or soap, simply depress the rocker switch (#2) with the DOWN side of the switch toward
you and your hand. This will activate the injector pump. You will hear s mild buzzing. It may take
some time to fill the lines during the first use. Run it for about 30+ seconds or until you see water.
Both switches are activated by the red button on the gun. Whatever setting you have with the
switches, the red button will activate it when you pull it.
6. If the injector motor runs but nothing happens, try adjusting knob #2 (shown to the right). Make sure
the knob is turned all the way up. Try again. You should now have hot water or soap injection! Welcome to the
Rino work force! Best wishes

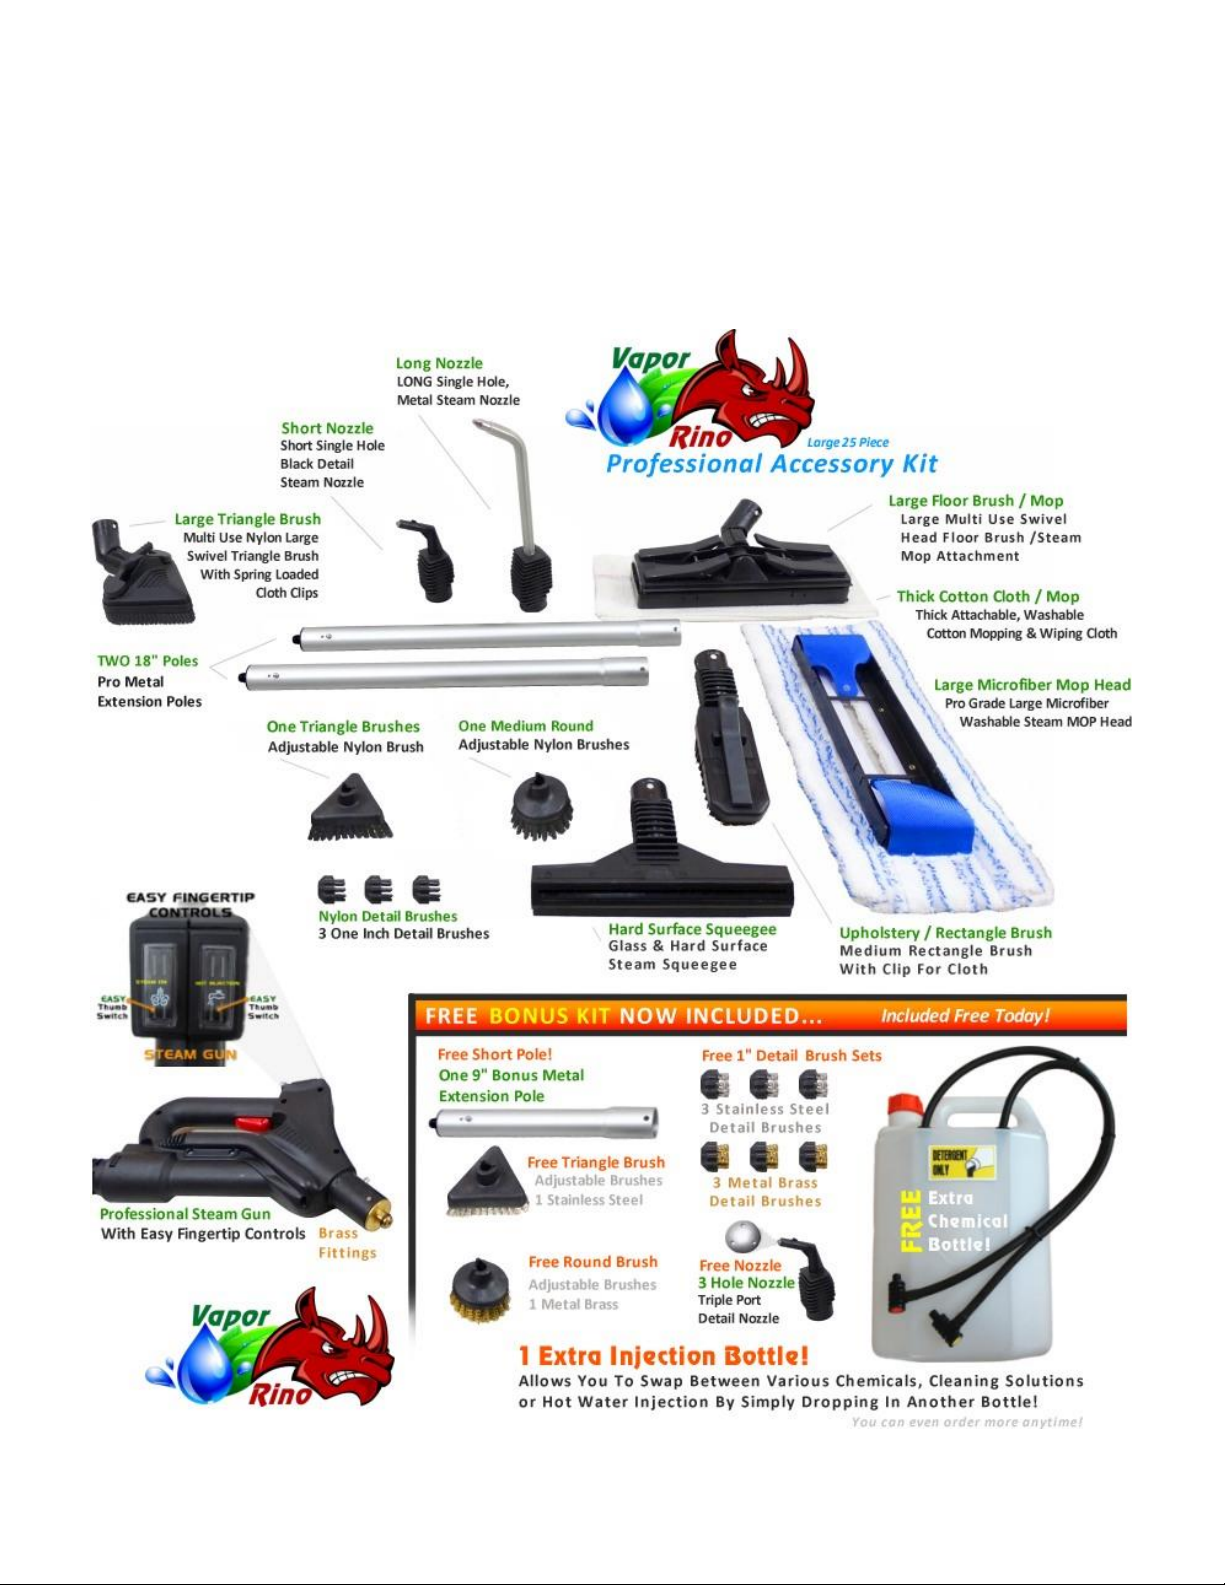
Vapor Rino 145 Owner's Manual Page 10 of 12
Important Care & Maintenance
Low Maintenance: Your Vapor Rino is made using quality materials and as such requires relatively little maintenance, however proper
maintenance and use is critical for reducing the potential for machine down time and service.
All machines, no matter the type eventually require maintenance, service and repair. For this reason it is advisable to keep your original box
and packing material. In the event that your system ever needs repair this will make sending it in to the nearest service center much easier.
Repair and maintenance are both a normal part of using any vapor system (or any other machine) on a regular, professional bases. Remember,
repair is not disaster but rather simple repair is part of any successful working business cycle. Any professional that depends upon one
machine for his or her whole living should have a backup plan. As your business expands and becomes more successful you may want to
consider purchasing a second smaller unit as a back up or to boost production.
✓Use Clean Pure Water: Use only Clean water for your boiler refill tank. Using clean filtered water greatly extends the life and performance of
your machine. You may also use clean tap water for your injection system. Cleaning your boiler is very easy, see cleaning section.
✓Do No Freeze: Never leave your machine out in freezing weather even if stored in your vehicle. If the internal components freeze you can
expect the water filled tubes inside may burst. This may cause serious damage to the machine. NEVER ALLOW TO FREEZE!
✓Store Indoors: Store your machine indoors in a dry room temperature place. Do not store your machine outdoors or in a high humidity
location. It is not recommended to store in a work vehicle as high temperatures & radical changes in temperature may have negative effects.
✓Keep Clean: A clean machine is a happy machine! Take pride in your new Vapor Rino and keep it clean. Wipe down often and clean accessories
after each use. This reduces the likely hood of damage due to foreign matter getting into switches and other components. It also makes your
company look good! Keep it clean, keep it professional!
✓Turn Off: Always turn your machine OFF when not in use for any extended period. Automotive Detailers and other users often turn on their
machine and leave it running upwards of 6 to 10 hours a day without giving it a rest. This is not recommeneded. This is unique to vapor
systems as they make very little sound, thus giving the appearance of not taking any wear. The fact is our high powered Vapor Rino produces
internal temperatures upwards of 356 Degrees Fahrenheit. This intense heat may some cause wear. For this reason it is advisable to press the
OFF button on your steamer if you are not going to use your steamer for more then 20 to 40 minutes. This reduces wear time and may
reduce the frequency of service and repair. Remember, once fully heated the Vapor Rino recovers very fast once turned back on. Contrast
this 6 to 10 hours of non stop usage with your other power tools. Most users would never consider running a shop vacuum, an extractor
motor or other power tool for 8 hours a day no stop for months on end and not expect to require service at some point. Simply turn your
vapor system off when not in use.
✓Drain Boiler: Always empty your boiler if you do not intend on using your machine for more then a 7 to 14 days. Long term storage of your
steamer with water in it may cause a swamp water like effect in your system. This may lead to sensor failure. If your going to pack it away for
the season, empty the boiler before you do
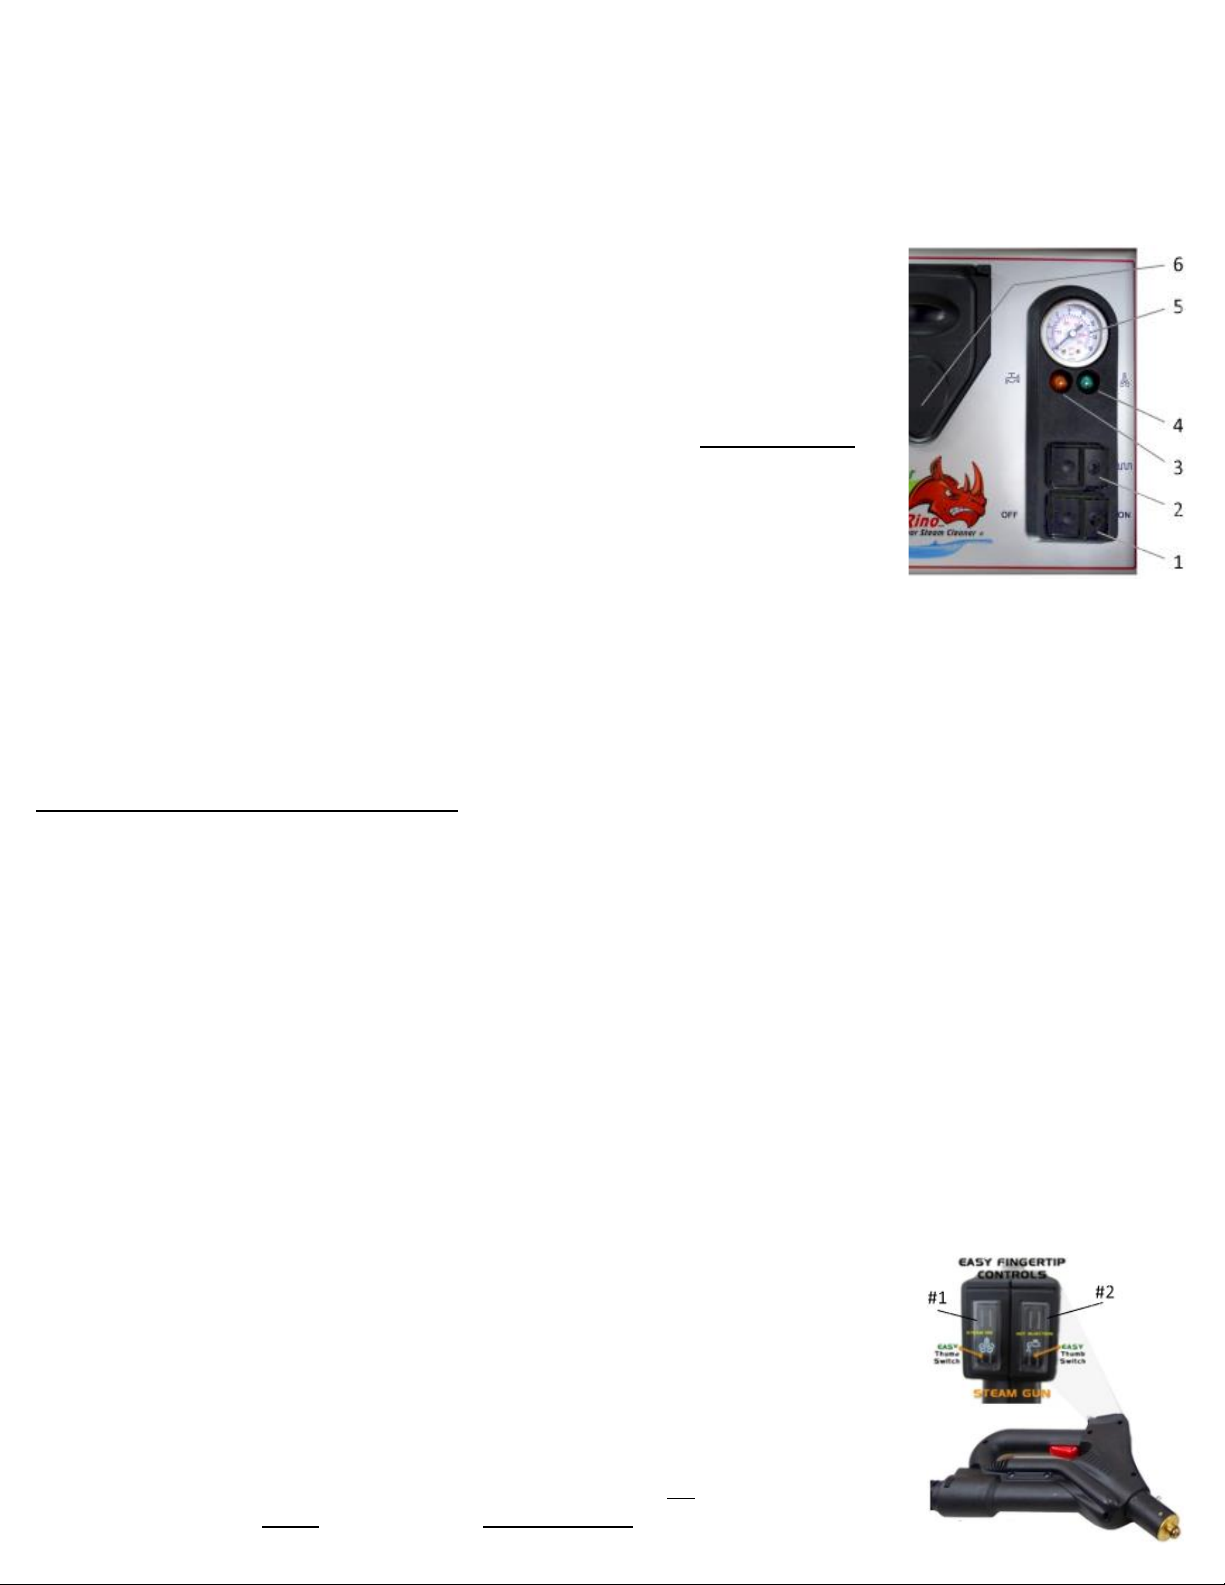
✓How To Drain Boiler: Simply cool down your machine completely making sure their is ZERO pressure reading on the pressure gauge AND the
steamer's body including the bottom are cold to the touch. Let it sit overnight unplugged if you are unsure. Once depressurized and cold drain
the water from the bottom of the machine using the easy thumb screw drain plug. Allow to drain until no more water comes out. It is a fast
and simple process that is strongly recommended. Following this simple procedure may extend the life of your system and reduce the need
for repair or service in the long term.
✓Clean Your Boiler: It is advisable to de-mineralize your boiler after approximately 200 to 400 hours of use. For typical use this means cleaning
your system once every 2 to 8 to weeks. Using filtered water (Strongly recommended) reduces build up of gunk in your boiler.
✓How to Clean Your Boiler: Cleaning is easy. Simply drain the boiler using the drain plug on the bottom of the machine (be sure unit is cold
first!) and empty the water in the refill tank that sits on top of the machine. Use the same kind of solution you would use when cleaning your
coffee maker. Distilled White Vinagar is cheap and works great. See your local grocery store. Fill the top left Jug with this 50/50 solution of
White Distilled Vinagar & water. Turn on the machine and let it pump the solution down into the tank. This may take as much as 7 minutes.
DO NOT LEAVE UNATTENDED! DO NOT HEAT THE MACHINE UP! Once the transfer is complete (pump will stop buzzing) simply turn your
machine off and unplug it. Let it sit for 6 to 12 hours for maximum de-scaling and cleaning effect. NEXT: Drain the boiler completely. Catch and
examine dirty water. Remember, empty it all. Empty the refill tank located on the top of the machine and rinse it out. Fill this tank with fresh
clean water. Put the drain plug back in the bottom of the machine and turn it on. Let the boiler fill but DO NOT HEAT THE MACHINE. Once the
boiler is full, empty the boiler again. Gently rock the machine back and forth to help shake out any dirty material that may be in the boiler.
Repeat this process until you get clean water out of the boiler. Once done, replace the drain plug and go back to normal use. Your boiler is
now tuned up and ready for action.

Vapor Rino 145 Owner's Manual Page 11 of 12
Troubleshooting
HELP ME - SOMETHING IS NOT WORKING!
Troubleshooting Page #1
Take a deep breath - help maybe just a few sentences away! 99% of the time the problem is just a simple adjustment so let's
have a look-see! Most of the calls or E-mails we get regarding a perceived problem with a new machine is simply minor a
misunderstanding on how to operate, proper cords or timing of switches. We will start with the most common problems first.
(Quick Find) Most Common requests for help we get are:
1) Why won't the orange lights turn green?
a) The light bulbs are orange and never turn green. The green lens on the right is your boiler indicator light. It has an orange bulb under it. When it
blinks or goes solid it appears a bit orange. Again, this is normal and is simply the color of the bulb. It is still called the “green light”
2) I have full pressure on the gauge but when I pull the trigger nothing comes out. What can I do?
Don't Worry! There are a few simple possible solutions. If this "Quick fix" doesn't answer the questions do the "walk through" to get it working!
a) First: Be sure you are properly plugged in, all the switch lights are working and you have full pressure on the gauge. If not, see the operating your
machine section.
b) Next: Connect your steam hose to the machine. Be sure it clicks in firmly. Now pull the trigger for several seconds. If nothing comes out...
c) Next: Holding the gun in your hand look at the two buttons by your thumb. The switch on the left (#1 in picture to
the right) activates the steam, it has a picture of a steam cloud on it. This rocker switch needs to have the DOWN
side toward you and the up side away from you. The switch on the right (#2) is the injection pump switch, it has a
picture of a water faucet on it. This needs to be oposite of the steam switch (#1). If the switch on the LEFT (#1) is
set wrong, you will not get steam. When in doubt, try both ways but the down side needs to be down towards your
hand and the other switch (#2) the oposite way. Try steaming now.
d) Next: THIS IS A VERY COMMON ISSUE. Often the steam flow adjustment knob gets turned down. See picture to the
right. If that pressure adjustment gets turned down all the way it shuts off the steam flow. It works much like an
outdoor garden water faucet or hose spigot. Turn it all the way up, full flow, all the way down = off no flow. The
best way to adjust this is to pull the steam gun trigger while turning the knob. This is also how you will adjust steam
flow for various jobs. Just steam and adjust as you watch the steam flow coming out of the nozzle tip.
e) Next: Back to basics. Turn both of the main control buttons on the machine off. Power it down. Now carefully
press the main power button on. You will hear a clear beep like tone. WAIT 4 SECONDS before pressing the top
button. Once that tone stops and you wait 4 seconds turn on the second button. The machine should now be
warming and the “green” light should be blinking. Notice the pressure gauge. Be sure there is steam pressure in
the boiler, if not wait 15 minutes for it warm up. It should end up around 10 bars. This means it is ready. Please
note, a cold machine takes about 15 minutes to heat up to ready temperature. A new machine with an empty
boiler takes longer as the boiler needs to be filled before it can begin heating.
f) Next. Try all of the above again. Be sure the steamer is up to pressure. Check the main switches on the gun. Be
sure both the main buttons are ON on the machine. IMPORTANT: If you turn the buttons on OUT OF ORDER the
unit will not produce steam. Now that you have completed these tasks and the boiler is charged pull the trigger, adjust the thumb button and
adjust the pressure knob.
g) If you still have trouble, give your re-seller a call. Have the unit ready to do a walk through to trouble shoot it on the phone.
h) See website for more troubleshooting and videos.

Vapor Rino 145 Owner's Manual Page 12 of 12
Limited Lifetime VIP Warranty Information
1 Year Parts & Labor | 2 Years Parts | Lifetime Boiler
Warranty is held by the stocking repairing warranty holding distributor associated to your reseller or vendor.
Contact your vendor directly (place you purchased from) for warranty related issues.
Any use of this product constitutes acceptances and approval of the terms of this warranty. The factory warrants to the original
purchaser that this product, excluding accessories shall be free from defects in manufacturing and material, under normal and
reasonable use for a period of one Year parts and labor for internal components. A limited lifetime warranty is granted for the Boiler
and 2 Years on parts from date of sale. The sole and exclusive remedy under this warranty is repair or replacement at the
manufacturers or warranty holders’ option, of any product that proves to be defective in manufacture or materials within the above
stated period. This warranty is NOT transferrable between persons or entities and applies only to the original purchaser as shown on
the original sales receipt. Repair or service does not extend the warranty. Warranty is from the date of original purchase.
Units are not refundable. There will be no cash refunds on equipment that have been used.
For this warranty to apply, the owner must follow the instructions provided in this manual completely. A copy of the original invoice
must accompany the unit when it is returned for service, together with a note explaining the problem. It must be shipped, in a
protective carton, preferable in the original box if possible. The manufacturer recommends that the shipment be insured against loss
or damage in transit. The manufacturer or dealer is not responsible for damage of this kind. You are responsible for all shipping costs
to and from any repair center in the event service is needed.
Certain parts of the equipment are not covered by warranty because they require replacement in the course of use, due to normal
wear and tear, by reason of their characteristics. These are things like cords, hoses, switches, brushes, wheel ect.. The steam hose and
gun is not covered under this warranty. Due to their nature they take heavy abuse and or use and as such may require replacement
from time to time.
The warranty is void if:
1. Damage results from accident, misuse, fire, act of God, improper operating, use of voltage other than indicated on the label ,
or unauthorized repair or alterations, under powered or over taxed generators, use with cut, worn or damaged wires or cords.
2. Do not use distilled water. The boiler has had any substance other than clean pure water added to it.This holds true with any
steam generating device. Some water supplies have very heavy concentrations of minerals, other particles, and even corrosive, toxic
chemicals like fluoride and chlorine just to name a few added by your local government so it is a good idea to use filtered water.
3. The product has been used by an unauthorized person.
The manufacturer, distributor or reseller is not liable for any consequential or incidental damage, including personal injury, property
damage, or monetary loss that may incurred from purchase, use, or improper use of the product. Maximum liability shall not exceed
the purchase price of the product, paid by the original purchaser. All expressed and implied warranties for this product, including
implied warranties of merchantability and fitness for a particular purpose, are limited in duration to the warranty period, and no
warranties, expressed or implied, will apply to the warranty period. Some states do not allow the exclusion or limitation or
consequential damages, so the above exclusion may not apply to you. This warranty gives you special rights which may vary from
State to State. Warranty may change or be updated without notice.
The factory or warranty holder does not authorize any party to assume any other warranty obligation with the sale of this product.
This warranty is NOT transferrable between persons or entities and applies only to the original purchaser as shown on the original
sales receipt. Repair or service does not extend the warranty. Warranty cannot be honored without proof of purchase by the original
owner. Warranty is from the date of original purchase. Use of this product constitutes acceptance of these terms.
For service please call your dealer or place of purchase. They are your point of contact for repair & service.
Other manuals for Rino 145
1
Table of contents
Other Vapor Steam Cleaner manuals