manuals.online logo
Brands
  1. Home
  2. •
  3. Brands
  4. •
  5. Vaughan
  6. •
  7. Lantern
  8. •
  9. Vaughan CL0251 User manual

Vaughan CL0251 User manual

Care Instructions -
Read Before Installation
- This box contains fragile and valuable goods that
have been carefully packed. Please take utmost care
in unpacking the parcel as damage can occur in this
process.
- Please be sure you have received the correct
number of boxes i.e. 1 of 2, 2 of 2 etc.
- Under no circumstances should the product be
lifted out by the neck or light tting.
- If you have received any damaged goods or are
missing any part of your order, please contact our
sales oce as soon as possible
Recycling
-
Recyclable packaging used, please consult with
your local recycling centre for further information.
- Waste electrical products should not be disposed
of with conventional household waste. Please
recycle all parts when possible.
Cleaning Instructions
Brass - all types: Use a soft dry lint free cloth
Bronze, Nickel, Silver & Chrome: Use a dry cloth
only, no chemical cleaners
Glass: We recommend using a strong alcohol such as
isopropyl alcohol. Note: some modern cleaning
solutions can contain chemicals that can leave a
greasy lm on glass.
Gilt Wood: Use a dry cloth only
Ceramic: Use a damp cloth only
Wood: Wax polish i.e. Antique wax
Alabaster: Dust with a soft brush or a clean dry cloth.
Avoid water or water-based cleaners. Any marks that
cannot be removed by dusting must be cleaned by a
specialist.
Lacquered Furniture: Furniture polish
Crystal: Damp cloth
Card/Laminated Shades: Use a Feather duster only
Silk Shades: Gently tap to lift dust
Needlework: Dry-clean
-Any decorative parts made from other materials
must be removed and cleaned separately to avoid
damage - e.g. alabaster.
After choosing a suitable location that meets all the requirements of
the safety information install the unit following the steps overleaf.

- Carefully unpack all parts and check for damage or missing parts
before commencing installation.
- Installation of this product must be carried out by a qualied electrical
contractor.
- Shut o power at the fuse box or circuit breaker box.
- If necessary, remove old xture and all mounting hardware from the
junction box.
-Be sure to follow the steps in the order given.
- The supply wires must be rated for at least 90°C
-This product must be installed in accordance with all applicable
installation codes by a person familiar with the construction and operation of the product and the hazards
involved.
- Ensure that the support for the luminaire is of sucient structural strength and that any xing screws do not
interfere with the connecting cables.
- The light must be mounted on a non-ammable surface as a xed luminaire, and is not suitable for portable
use.
- The unit can get very hot during use. Ensure the unit has cooled before handling.
- Ensure adequate ventilation space is allowed between the unit and any object above, in front or to either
side of the unit. Suggested minimum space is 19½”above and 19½”on all sides.
- To prevent tarnishing, it is advisable to wear gloves at all times when handling the product.
Safety Information - Read Before Installation
VAUGHAN
Installation Guide
www.vaughandesigns.com
French Chateau Lantern
CL0251
Rev 1
3. Push the bar through the
structural support, keeping the
bracket below the ceiling.
Reattach the components
removed in the previous step
above the support and ensure
they are secured tightly.
2. The product must be installed
to a structural support suitable for
the weight of the product. Ensure
you have access to the top of the
mounting support. Drill a hole
through the support and remove
the nuts, the lock washer, the
large washer, and ceiling rose.
Ensure the remaining washers and
nut are far enough down the tube
to allow the tube to be tted the
whole way through the mounting
support.
1. Lift the glass into place in the
product. Secure the glass into
place using the xing method
provided, either fold the copper
tabs round the glass or screw the
brass strips into place.

After choosing a suitable location that meets all the requirements of
the safety information install the unit following the steps overleaf.

- Carefully unpack all parts and check for damage or missing parts
before commencing installation.
- Installation of this product must be carried out by a qualied electrical
contractor.
- Shut o power at the fuse box or circuit breaker box.
- If necessary, remove old xture and all mounting hardware from the
junction box.
-Be sure to follow the steps in the order given.
- The supply wires must be rated for at least 90°C
-This product must be installed in accordance with all applicable
installation codes by a person familiar with the construction and operation of the product and the hazards
involved.
- Ensure that the support for the luminaire is of sucient structural strength and that any xing screws do not
interfere with the connecting cables.
- The light must be mounted on a non-ammable surface as a xed luminaire, and is not suitable for portable
use.
- The unit can get very hot during use. Ensure the unit has cooled before handling.
- Ensure adequate ventilation space is allowed between the unit and any object above, in front or to either
side of the unit. Suggested minimum space is 19½”above and 19½”on all sides.
- To prevent tarnishing, it is advisable to wear gloves at all times when handling the product.
Après avoir choisi un emplacement approprié qui répond à toutes les exigences des informations de sécurité,
installez l'appareil en suivant les étapes indiquées au verso.

- Déballez soigneusement toutes les pièces et vériez qu'elles ne sont pas endommagées ou manquantes
avant de commencer l'installation.
- L'installation de ce produit doit être eectuée par un électricien qualié.
- Coupez le courant au niveau de la boîte à fusibles ou du disjoncteur.
- Si nécessaire, retirez l'ancien appareil et toutes les pièces de montage de la boîte de jonction.
- Veillez à suivre les étapes dans l'ordre indiqué.
- Les ls d'alimentation doivent être prévus pour une température minimale de 90°C.
- Ce produit doit être installé conformément à tous les codes d'installation applicables par une personne qui
connaît bien la construction et le fonctionnement du produit, ainsi que les risques encourus.
- Assurez-vous que le support de la lampe est susamment solide et que les vis de xation n'interfèrent pas
avec les câbles de branchement.
- Le luminaire doit être monté sur une surface ininammable en tant que luminaire xe, et ne convient pas à
une utilisation portable.
- L'appareil peut devenir très chaud pendant son utilisation. Assurez-vous que l'appareil a refroidi avant de le
manipuler.
- Veillez à ce qu'un espace de ventilation susant soit prévu entre l'appareil et tout objet situé au-dessus,
devant ou de chaque côté de l'appareil. L'espace minimum suggéré est de 50cm au-dessus et de 50cm sur
tous les côtés.
- Pour éviter le ternissement, il est conseillé de porter des gants à tout moment lors de la manipulation du
produit.
Informations de sécurité - À lire avant l'installation
www.vaughandesigns.com
French Chateau Lantern French Chateau Lantern
CL0251
6. Attach the bracket to the
Ceiling Box ensuring it is secured
tightly.
5. Having identied the house-
hold wiring, connect the building
supply and the product cables
together in the wire connectors as
shown above. Ground connection
can be found on the ceiling
bracket.
Hot = (Black)
Ground = (Green)
Neutral = (White)
LLEENN
4. Thread the cable through the
ceiling loop and into the threaded
tube until it comes out above the
support.
9. After accessing the bulb, gently
close the door. Close the latch and
ensure it is secure.
8.To access the bulb, pull the latch
to release the door.
7. Secure the ceiling rose in place
against the ceiling using the
threaded ring ensuring it is tightly
tted.
www.vaughandesigns.com
French Chateau Lantern
CL0251
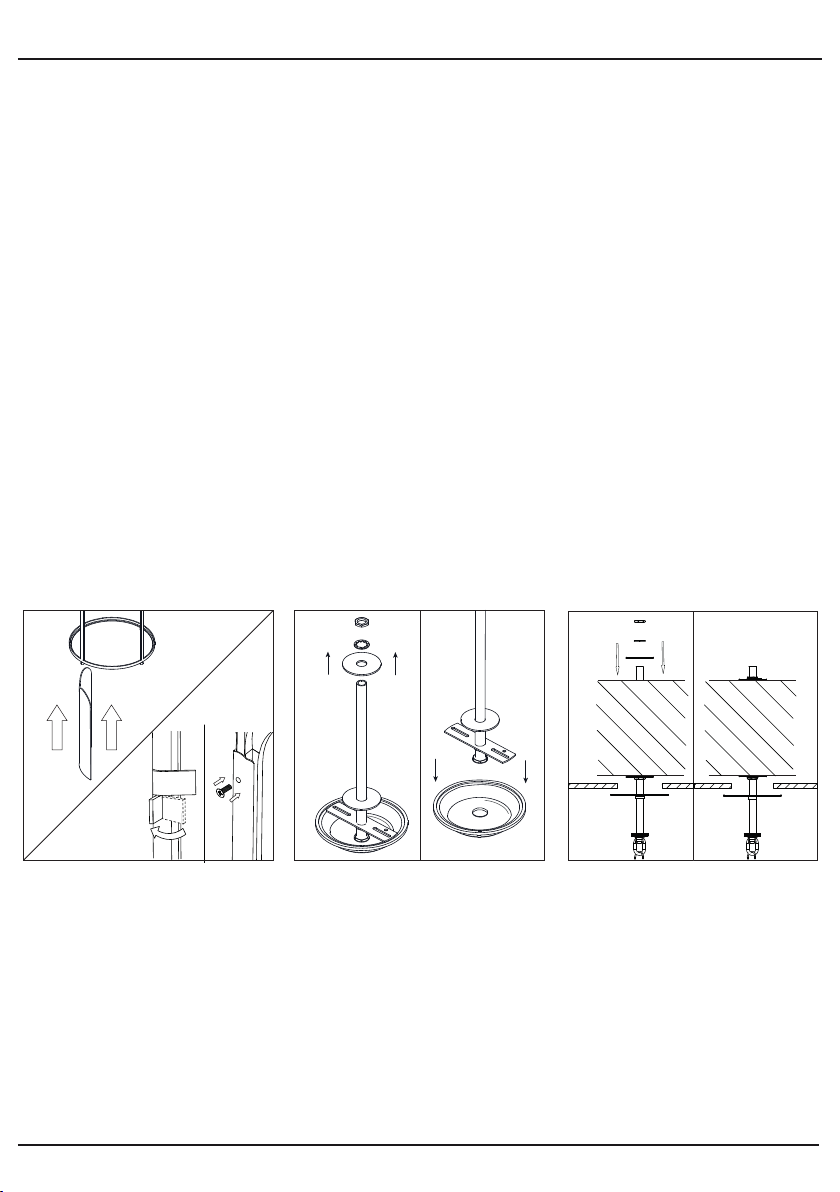
1. Soulevez le verre qui se trouve dans le produit. Fixez le
verre en place en utilisant la méthode de xation fournie,
pliez les languettes de cuivre autour du verre ou vissez les
bandes de laiton en place.
2. Le produit doit être installé sur un support structurel
adapté au poids du produit. Assurez-vous d'avoir accès à
la partie supérieure du support de montage. Percez un
trou à travers le support et retirez les écrous, la rondelle
de blocage, la grande rondelle et la rosace de plafond.
Veillez à ce que les rondelles et l'écrou restants soient
susamment éloignés du tube pour permettre au tube
de traverser entièrement le support de montage.
3. Poussez la barre à travers le support structurel, en
maintenant le support sous le plafond. Rexez les
éléments retirés à l'étape précédente au-dessus du
support et assurez-vous qu'ils sont bien serrés.
4. Faites passer le câble dans la boucle du plafond et dans
le tube leté jusqu'à ce qu'il ressorte au-dessus du
support.
5. Après avoir identié le câblage domestique, connectez
les câbles d'alimentation du bâtiment et les câbles du
produit ensemble dans les connecteurs de ls comme
indiqué ci-dessus.
6. Fixez le support au boîtier de plafond en vous assurant
qu'il est bien serré.
7. Fixez la rosace au plafond à l'aide de la bague letée en
veillant à ce qu'elle soit bien ajustée.
8. Pour accéder à l'ampoule, tirez sur le loquet an de
libérer la porte.
9. Après avoir accédé à l'ampoule, fermez doucement la
Français
1. Levante el vidrio para colocarlo en su lugar en el
producto. Asegure el vidrio en su lugar usando el método
de jación provisto, ya sea doblando las lengüetas de
cobre alrededor del vidrio o bien atornillando las tiras de
latón en su lugar.
2. Compruebe que tiene acceso a la parte superior de la
viga de montaje. Taladre un agujero a través de la viga y
retire las tuercas, la arandela de seguridad, la arandela
grande y el rosetón. Compruebe que las arandelas y
tuercas restantes estén lo sucientemente abajo del tubo
para permitir que este se ajuste completamente a través
de la viga de montaje.
3. Empuje la barra a través de la viga mientras mantiene
el soporte debajo del techo. Vuelva a colocar los
componentes que retiró en el paso anterior por encima
de la viga y compruebe que estén bien asegurados.
4. Pase el cable a través de la presilla del techo y del tubo
con rosca hasta que salga por encima de la viga del
techo.
5. Una vez identicado el cableado de la casa, conecte el
suministro del edicio y los cables del producto juntos en
los conectores de cables como se muestra arriba.
6. Fije el soporte al techo.
7. Asegure el rosetón en su lugar contra el techo
mediante el anillo de rosca y compruebe que esté bien
ajustado.
8. Para acceder a la bombilla, tire del pestillo para abrir la
compuerta.
9. Después de acceder a la bombilla, cierre suavemente la
compuerta. Cierre el pestillo y asegúrese de que este
quede jado de forma segura.
Español
1. Heben Sie das Glas in die vorgesehene Stelle im Produkt.
Befestigen Sie das Glas, indem Sie die angegebene Befesti-
gungsmethode verwenden. Falten Sie entweder die Kupfer-
streifen um das Glas oder schrauben Sie die Messingstreifen an.
2. Stellen Sie sicher, dass Sie Zugang zum oberen Teil des
Befestigungsbalkens haben. Bohren Sie ein Loch durch den
Balken und entfernen Sie die Muttern, die Sicherungsscheibe,
die große Unterlegscheibe und die Deckenrosette.
Vergewissern Sie sich, dass die übrigen Unterlegscheiben und
Mutter sich weit genug unten im Rohr benden, um das Rohr
vollständig durch den Befestigungsbalken zu schieben.
3. Schieben Sie das Rohr durch den Balken, wobei die
Halterung unter der Decke bleiben muss. Fügen Sie die im
vorigen Schritt entfernten Teile wieder über dem Balken an
und stellen Sie sicher, dass Sie fest sitzen.
4. Führen Sie das Kabel durch die Deckenschlaufe und in die
Gewindehülse, bis es über dem Deckenbalken herauskommt.
5. Nach Identikation der Hausstromverkabelung verbinden Sie
die Gebäudeversorgung und die Produktkabel in den
Leitungsverbindern wie oben gezeigt.
6. Montieren Sie die Halterung an der Decke.
7. Befestigen Sie die Deckenrosette mit Hilfe des Gewinderings
an der Decke und stellen Sie sicher, dass sie fest sitzt.
8. Um an die Glühbirne zu gelangen, ziehen Sie an der
Verriegelung, um die Klappe zu entriegeln.
9. Nachdem Sie die Glühbirne herausgezogen haben, schließen
Sie die Klappe vorsichtig wieder. Schließen Sie den Riegel und
vergewissern Sie sich, dass er fest sitzt.
Deutsche
1. Collocare il vetro al suo posto nel prodotto. Fissare il vetro
tramite il metodo di ssaggio fornito, piegando le linguette in
rame intorno al vetro oppure avvitando le strisce in ottone.
2. Il prodotto deve essere installato su un supporto strutturale
adatto a sostenere il peso del prodotto. Assicurarsi di avere
accesso alla parte superiore del supporto di montaggio. Forare
un buco attraverso il supporto e rimuovere i dadi, la rondella di
sicurezza, la rondella grande e la rosetta di copertura. Assicurarsi
che le rondelle e i dadi rimanenti siano sucientemente in
fondo al tubo per permettere al tubo di inserirsi interamente
nel supporto.
3. Spingere la barra attraverso il supporto strutturale, tenendo la
staa sotto il sotto. Reinserire i componenti rimossi al passo
precedente sopra il supporto e assicurarsi che siano ssati
saldamente.
4. Inserire il cavo attraverso l'anello a sotto e il tubo lettato
nché nché non spunta sopra il supporto.
5. Dopo aver individuato l'impianto elettrico domestico,
collegare l'alimentazione dell'edicio ai cavi del prodotto nei
connettori per cavi come mostrato sopra.
6. Collegare la staa alla scatola a sotto assicurandosi che sia
ssata saldamente.
7. Fissare la rosetta di copertura contro il sotto utilizzando
l'anello lettato assicurandosi che sia ben aderente.
8. Per accedere alla lampadina, tirare il fermo per rilasciare lo
sportello.
9. Dopo aver operato sulla lampadina, chiudere delicatamente
lo sportello. Richiudere il fermo e assicurarsi che sia ben saldo.
Italiano
French Chateau Lantern
CL0251
CL0251_US_IG

Other Vaughan Lantern manuals

Vaughan Tufton User manual

Vaughan

Vaughan Tufton User manual

Vaughan Tichfield User manual

Vaughan

Vaughan Tichfield User manual

Vaughan Hawley User manual

Vaughan

Vaughan Hawley User manual

Vaughan Regency Hall User manual

Vaughan

Vaughan Regency Hall User manual

Vaughan Powis User manual

Vaughan

Vaughan Powis User manual

Vaughan Mottisfont CL0130 User manual

Vaughan

Vaughan Mottisfont CL0130 User manual

Vaughan Hawley Lantern CL0353 User manual

Vaughan

Vaughan Hawley Lantern CL0353 User manual

Vaughan Denmead WA0346 User manual

Vaughan

Vaughan Denmead WA0346 User manual

Vaughan Bentworth User manual

Vaughan

Vaughan Bentworth User manual

Vaughan CL0336 User manual

Vaughan

Vaughan CL0336 User manual

Vaughan Bentworth CL0350 User manual

Vaughan

Vaughan Bentworth CL0350 User manual

Vaughan Ovington User manual

Vaughan

Vaughan Ovington User manual

Vaughan Valencay User manual

Vaughan

Vaughan Valencay User manual

Popular Lantern manuals by other brands

BSi iPLASMA installation guide

BSi

BSi iPLASMA installation guide

Outsunny 867-150V00 manual

Outsunny

Outsunny 867-150V00 manual

LED Group ROBUS ALEXANDER RAE484018-01 quick start guide

LED Group

LED Group ROBUS ALEXANDER RAE484018-01 quick start guide

Regent Lighting Solutions Lumina installation instructions

Regent Lighting Solutions

Regent Lighting Solutions Lumina installation instructions

Robert Juliat SULLY 305LF manual

Robert Juliat

Robert Juliat SULLY 305LF manual

BEGA 22 298 Instructions for use

BEGA

BEGA 22 298 Instructions for use

esotec Float 15 operating instructions

esotec

esotec Float 15 operating instructions

I-VALO DAVI Operation and maintenance instructions

I-VALO

I-VALO DAVI Operation and maintenance instructions

olympia electronics GR-108/12L/90 quick start guide

olympia electronics

olympia electronics GR-108/12L/90 quick start guide

WE-EF FLC122 LED Installation and maintenance instructions

WE-EF

WE-EF FLC122 LED Installation and maintenance instructions

Eaton Lumark LEL10BPCI instruction manual

Eaton

Eaton Lumark LEL10BPCI instruction manual

Ferguson Enterprises FL96802 Safety

Ferguson Enterprises

Ferguson Enterprises FL96802 Safety

Maxim Lighting Dover 56094 Quick start manual

Maxim Lighting

Maxim Lighting Dover 56094 Quick start manual

EDM Product 31852 instruction manual

EDM Product

EDM Product 31852 instruction manual

Stahl Tranberg TEF 2457 user manual

Stahl

Stahl Tranberg TEF 2457 user manual

Eterna HALFPIRBK installation instructions

Eterna

Eterna HALFPIRBK installation instructions

WAGNER HERITAGE manual

WAGNER

WAGNER HERITAGE manual

Quoizel HND8206EK installation guide

Quoizel

Quoizel HND8206EK installation guide

manuals.online logo
manuals.online logoBrands
  • About & Mission
  • Contact us
  • Privacy Policy
  • Terms and Conditions

Copyright 2025 Manuals.Online. All Rights Reserved.