VDO DV 6100 Installation instructions

DV 6100
English
Français
Deutsch
Nederlands
Italiano
Español
Dansk
DV 6100 IFU
06/02 ri
Owner’s manual and mounting instruction
Mode d’emploi et manuel d’installation
Bedienungs und Einbauanleitung
Gebruiksaanwijzing en inbouwhandleiding
Istruzioni d’uso e d’installazione
Instrucciones de manejo y de montaje
Betjeningsvejledning og monteringsanvisning
Owner’s manual and mounting instruction
Mode d’emploi et manuel d’installation
Bedienungs und Einbauanleitung
Gebruiksaanwijzing en inbouwhandleiding
Istruzioni d’uso e d’installazione
Instrucciones de manejo y de montaje
Betjeningsvejledning og monteringsanvisning
0
5
25
75
95
100
0
5
25
75
95
100
0
5
25
75
95
100
0
5
25
75
95
100

2
+ 30°
12 V
red / rouge / rot
Blue - white
bleu - blanche / blau - weiß
black / noir / schwarz
yellow / jaune / gelb
AUDIO L/R VIDEO IR
RECEIVER
SPDIF
OUT
+ 12 V
REMOTE
OUT
3 A
0.5 A
0.5 A

3
(1)
(2)
(3)

5
Illustrations Pages 2 - 3
Instructions de montage Page 33
Mode d’emploi Page 37
Abbildungen Seiten 2 - 3
Einbauanleitung Seite 57
Bedienungsanleitung Seite 61
Illustrations Page 2 - 3
Installation instructions Page 9
Operating instructions Page 13
EnglishFrançais
Deutsch
Afbeeldingen Pagina’s 2 - 3
Inbouwaanwijzing Pagina 81
Gebruiksaanwijzing Pagina 85
Nederlands
Figures Pagine 2 - 3
Instruzioni per il montaggio Pagina 105
Istruzioni d’uso Pagina 109
Italiano
Ilustraciones Páginas 2 - 3
Manual de instalación Página 129
Instrucciones de manejo Página 133
Español
Illustrationer Sider 2 - 3
Monteringsvejledning Side 153
Betjeningsvejledning Side 157
Dansk

INSTALLATION INSTRUCTIONS . . . . . . . . . . . . . . . . . . . . . . . . . . . . . 9
Important Information . . . . . . . . . . . . . . . . . . . . . . . . . . . . . . . . 9
Scope of delivery . . . . . . . . . . . . . . . . . . . . . . . . . . . . . . . . . . . 9
Taking safety precautions, Fig. 1. . . . . . . . . . . . . . . . . . . . . . . . . . 10
Electrical connections, Fig. 2 . . . . . . . . . . . . . . . . . . . . . . . . . . . . 10
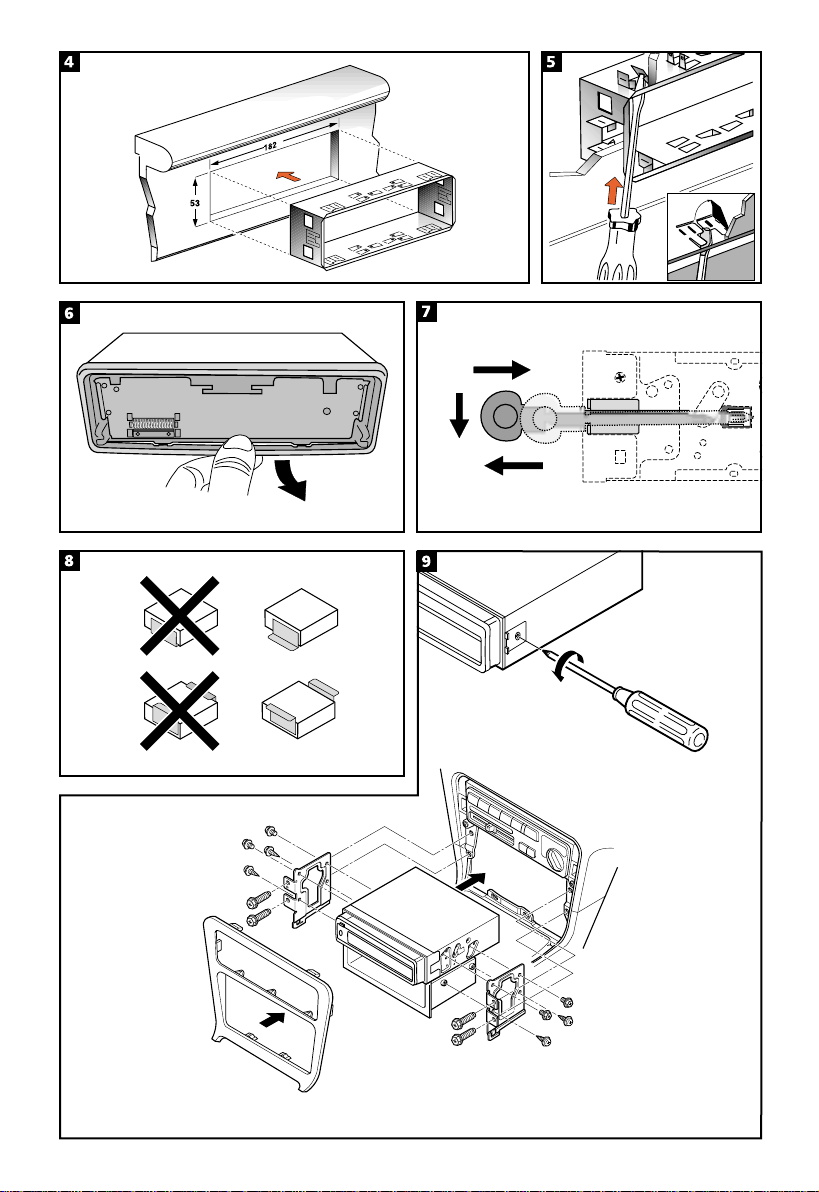
Mounting the unit . . . . . . . . . . . . . . . . . . . . . . . . . . . . . . . . . 11
Preparing the remote control . . . . . . . . . . . . . . . . . . . . . . . . . . . 12
Initial operation. . . . . . . . . . . . . . . . . . . . . . . . . . . . . . . . . . . 12
Checking the vehicle functions. . . . . . . . . . . . . . . . . . . . . . . . . . . 12
GENERAL INFORMATION . . . . . . . . . . . . . . . . . . . . . . . . . . . . . . . 13
Features . . . . . . . . . . . . . . . . . . . . . . . . . . . . . . . . . . . . . . . 13
Notes on the Operation Guide . . . . . . . . . . . . . . . . . . . . . . . . . . . 13
Important information for safe operation . . . . . . . . . . . . . . . . . . . . 14
Class 1 laser product . . . . . . . . . . . . . . . . . . . . . . . . . . . . . . . . 14
Copyright protection . . . . . . . . . . . . . . . . . . . . . . . . . . . . . . . . 14
Region Code Information . . . . . . . . . . . . . . . . . . . . . . . . . . . . . 14
Dolby Digital . . . . . . . . . . . . . . . . . . . . . . . . . . . . . . . . . . . . 14
DISC NOTES . . . . . . . . . . . . . . . . . . . . . . . . . . . . . . . . . . . . . . 15
Disc formats . . . . . . . . . . . . . . . . . . . . . . . . . . . . . . . . . . . . . 15
Handling and cleaning . . . . . . . . . . . . . . . . . . . . . . . . . . . . . . . 15
PREFACE . . . . . . . . . . . . . . . . . . . . . . . . . . . . . . . . . . . . . . . . 16
Detachable front panel . . . . . . . . . . . . . . . . . . . . . . . . . . . . . . . 16
REMOTE CONTROL . . . . . . . . . . . . . . . . . . . . . . . . . . . . . . . . . . 17
FRONT DISPLAY . . . . . . . . . . . . . . . . . . . . . . . . . . . . . . . . . . . . 18
BASIC OPERATION. . . . . . . . . . . . . . . . . . . . . . . . . . . . . . . . . . . 19
Player front controls . . . . . . . . . . . . . . . . . . . . . . . . . . . . . . . . 19
Starting/stopping playback. . . . . . . . . . . . . . . . . . . . . . . . . . . . . 19
Pause (still picture) . . . . . . . . . . . . . . . . . . . . . . . . . . . . . . . . . 19
Fast forward / reverse. . . . . . . . . . . . . . . . . . . . . . . . . . . . . . . . 19
Slow forward / reverse . . . . . . . . . . . . . . . . . . . . . . . . . . . . . . . 20
Skipping chapters/tracks . . . . . . . . . . . . . . . . . . . . . . . . . . . . . . 20
Repeating chapters/tracks . . . . . . . . . . . . . . . . . . . . . . . . . . . . . 20
GOTO mode . . . . . . . . . . . . . . . . . . . . . . . . . . . . . . . . . . . . . 21
On-Screen Display function. . . . . . . . . . . . . . . . . . . . . . . . . . . . . 22
MENU function . . . . . . . . . . . . . . . . . . . . . . . . . . . . . . . . . . . 23
Selecting audio language . . . . . . . . . . . . . . . . . . . . . . . . . . . . . . 23
Selecting subtitle language (DVD only) . . . . . . . . . . . . . . . . . . . . . . 23
Selecting viewing angle (DVD only) . . . . . . . . . . . . . . . . . . . . . . . . 23
ADVANCED OPERATION . . . . . . . . . . . . . . . . . . . . . . . . . . . . . . . 24
MP3 disc playback . . . . . . . . . . . . . . . . . . . . . . . . . . . . . . . . . 24
Extra function control . . . . . . . . . . . . . . . . . . . . . . . . . . . . . . . 24
k
CONTENTS
7
English

PLAYER SETUP . . . . . . . . . . . . . . . . . . . . . . . . . . . . . . . . . . . . . 25
Initial setup . . . . . . . . . . . . . . . . . . . . . . . . . . . . . . . . . . . . . 25
Speaker setup . . . . . . . . . . . . . . . . . . . . . . . . . . . . . . . . . . . . 26
Audio setup . . . . . . . . . . . . . . . . . . . . . . . . . . . . . . . . . . . . . 26
Preferences . . . . . . . . . . . . . . . . . . . . . . . . . . . . . . . . . . . . . 26
MAINTENANCE AND CARE . . . . . . . . . . . . . . . . . . . . . . . . . . . . . . 27
Replacing batteries of the remote control . . . . . . . . . . . . . . . . . . . . 27
Cleaning of the remote control and the removable control panel. . . . . . . . 27
TROUBLESHOOTING. . . . . . . . . . . . . . . . . . . . . . . . . . . . . . . . . . 28
Service . . . . . . . . . . . . . . . . . . . . . . . . . . . . . . . . . . . . . . . . 28
GLOSSARY & INTERNET LINKS . . . . . . . . . . . . . . . . . . . . . . . . . . . . 29
Interesting Internet links . . . . . . . . . . . . . . . . . . . . . . . . . . . . . . 29
CONTENTS
8

Important Information
AOnly trained specialists may install the system.
AObserve the automotive industry quality standards.
AFire hazard. During drilling, be careful not to damage hidden cable harnesses, the fuel tank
and fuel lines.
ANever drill into supporting or safety-relevant chassis parts.
It is essential to observe the following when installing components in the passenger
compartment:
AEnsure that the driver has a clear all-round view.
AIncreased risk of injury in the event of an accident. Do not install components in the inflation
range of the airbag or in areas where the head or knees may knock against them.
AInstall only in vehicles with a 12 V on-board voltage and the negative pole on the chassis. Risk
of malfunctions, damage and vehicle fire if installed in unsuitable vehicles.
ADo not damage cables of the safety systems (airbag etc.). (Lines are normally specially
marked, e.g. by labels.)
ADo not use inspection lamps to test the voltage, since excessively high currents can damage /
destroy electronic components.
ADo not use any pinch or cut connectors. Solder all cable connections. Insulate all solder points
with shrinkable hose or insulating tape.
AIf there are earth connections on the chassis, insert toothed washers. Remove paint and dirt
first, if necessary.
AUse only the parts included with the unit to ensure proper installation. The use of
unauthorized parts can cause malfunctions.
AAvoid installing the unit where it would be subject to high temperature, such as from direct
sunlight, or from hot air, from the heater, or where it would be subject to dust, dirt or excessive
vibration.
Scope of delivery
1 DVD Player
1 Remote control
1 External remote control receiver with cable (6 m)
1 Power supply lead (3 m) incl. flying fuses
1 Audio cable (3 m), Stereo
1 Video cable (3 m)
1 DIN mounting bracket
2 Removal tool
4 Screw M5x6mm
4 Screw M4x6mm
1 Plain washer 5 mm
1 Nut M5
1 DCP case (protective case for detachable control panel)
1 DFU / Service fiche
INSTALLATION INSTRUCTIONS
9
English

Taking safety precautions, Fig. 1
ABefore starting work, disconnect the earth cable from the vehicle battery’s negative terminal
in order to prevent short circuits. For this purpose, follow the vehicle manufacturer’s safety
instructions (alarm system, airbag, immobiliser, etc.).
Electrical connections, Fig. 2
☞Route all cables with care. For the cabling, refer to the connection illustration on the
cover pages and the following table.
☞Do not cut off non-assigned cables. Instead, wrap them up and fix them to one side. They
may be necessary for retrofitting additional functions.
Power supply connection
Cable colour Category Connection
Yellow Input + 12 V permanent positive (must be rated for a current of at least 3 amps)
Red Input + 12 V ignition positive (switched plus)
Black Input Battery negative (vehicle chassis)
Blue/white Output 12 V Remote out (max. output current: 0.5 amps)
AOnly connect electrical signals to suitable connecting points in the vehicle.
AIf connection is made directly to the battery, protect the positive lead (red lead) with a 10 A
fuse close to the battery (max. distance 10 to 15 cm).
■12 V permanent positive (yellow):
☞Connect yellow lead to a suitable connector with 12 V permanent positive.
AThis connection should be rated for a current of at least 3 amps.
■12 V ignition positive (red):
☞Connect red lead to a suitable 12 V circuit switched through the ignition.
■12 V Remote out (blue/white):
☞Connect blue/white lead to the remote input of accessory units (for example a multimedia
interface box).
■Battery negative (black)
☞Connect black lead to a suitable ground (vehicle chassis).
AV out connection
☞Connect the yellow “VIDEO” plug to the Video input of your multimedia system.
☞Connect the “AUDIO-L” (white) and the “AUDIO-R” (red) lead to the left and right line or
AUX input of your multimedia system.
☞If applicable, connect the optical SPDIF output to the appropriate input of your
multimedia system.
Remote control receiver
☞Connect the remote control receiver connector to the “IR” socket at the fly-lead on the
back of the unit.
INSTALLATION INSTRUCTIONS
10

Mounting the unit
ADo not install the unit where it would be subject to high temperature, such as from direct
sunlight, or from hot air, from the heater, or where it would be subject to dust, dirt or excessive
vibration. Sufficient air circulation is essential for the perfect function of the unit.
Front/rear mounting
The DVD Player can be properly installed either from “Front” (conventional DIN front-mount)
or “Rear” (JIN rear-mount installation, utilizing threaded screw holes at the sides of the unit
chassis). For details, refer to the following installation methods.
■Note before installing, Fig. 3
❏The unit must be installed horizontally. A deviation of + 30 degrees is possible. Larger
deviations may result in malfunctions.
❏A rigid connection to the vehicle body is a prerequisite for correct functioning of the DVD
Player.
DIN mounting
The DVD Player can be installed into a vehicle’s DIN radio slot using the installation sleeve
provided.
■Installing the unit
1. Insert metal sleeve into the DIN opening and press appropriate tags outwards with a
screwdriver (Fig. 4 - 5). Take care not to damage hidden parts in the dashboard.
2. Be sure you have connected all required cables to the player.
3. Push the player into the mounting frame until it engages.
■Removing the unit, Fig. 6 - 7
1. Remove the detachable operating panel. Push up the metal holder until it clicks in.
2. Insert a finger into the groove in the front of the frame and push down a little to unlock
the frame. Then pull out to remove the frame.
(When reattaching the frame, point the side with the groove downwards.)
3. Insert the supplied removal tools into the grooves at both sides of the unit (1).
4. Push the removal tools up or down a little until they engage in the small brackets at either
side of the unit (2).
5. Pull the removal tools smoothly to remove the unit from the dashboard (3).
JIN mounting, Fig. 9
1. Remove the two small brackets on either side of the unit with a screw driver.
2. Remove the frame as described under “Removing the unit”.
3. Fasten the vehicle specific mounting brackets to the unit. Select a position where the screw
holes of the bracket and the screw holes of the main unit become aligned and tighten the
screws at 2 places on each side.
Use either screws M5 x 6 mm or M4 x 6 mm, depending on the shape of the screw holes in
the bracket.
Note: The mounting sleeve and the outer frame are not used for JIN mounting.
INSTALLATION INSTRUCTIONS
11
English

Securing the DVD player using the mounting brackets, Fig. 5
If installation of the DVD Player in a DIN slot is impossible or undesirable, it can be installed
in alternative installation locations using the supplied mounting brackets (e.g., in the glove
box, in the luggage compartment or under the seats).
■Attaching mounting brackets
Fasten the brackets to the player housing using the supplied screws.
The DVD player can then be secured in the desired installation location using suitable
screws.
■Suspended installation
If suspended installation is required for the DVD player (e.g., under the rear shelf), the
mounting brackets can be attached to the player in the reversed position.
Preparing the remote control
Inserting the batteries
☞Open the battery compartment on the
back of the remote control.
☞Insert two new AAA size batteries. Pay
attention to correct polarity (marked in
the compartment).
☞Close the battery compartment.
Initial operation
1. Reconnect the battery.
2. Restore complete functioning of the electrical system (clock, onboard computer, alarm
system, airbag, immobiliser, etc.).
3. Switch on the ignition.
4. Press the Ibutton on the front of the DVD Player. Then activate the Rbutton with
either a ballpoint pen or thin metal object.
5. Insert a DVD/VCD/Audio CD or MP3 disc into the DVD Player.
6. Check the perfect functioning of audio and video in combination with the installed
multimedia system. Refer to the instructions in the user manual part of this booklet.
Checking the vehicle functions
ACheck the safety-relevant vehicle functions only when the car is stationary or moving at low
speed. Only perform check in an open area.
Brake system, alarm system, lights, immobiliser, speedometer, onboard computer, clock.
INSTALLATION INSTRUCTIONS
12
+
+
–
–

Features
❏1-DIN housing for standard radio DIN slot
❏Detachable Control Panel with Vacuum Fluorescent Display
❏Compatible with PAL and NTSC DVD / Video CD
(plays discs recorded in either PAL or NTSC format)
❏Audio/Video output:
Composite Video (Cinch);
L/R stereo analog audio outputs (Cinch) for connection to existing head unit aux inputs
Optical SPDIF output
❏Multi-subtitle and multi-audio soundtrack languages function
❏Multi-angle function
❏Parental Control
❏IR remote control and additional IR remote receiver.
Notes on the Operation Guide
The following reading aids are used to simplify this Operation Guide:
☞requests you to do something.
:shows the unit’s reaction.
❏identifies a list.
ASafety instructions and warnings contain important information for the safe use of the unit.
Disregarding this information could result in material damage, injury or even death. Please follow
this information carefully.
GENERAL INFORMATION
13
English

Important information for
safe operation
AFor traffic safety reasons, use the DVD
Players' menus only before starting a journey or
when the vehicle is stationary.
AMake all inputs via the remote control
only when the vehicle is stationary, or have the
passenger make them. Otherwise, you may
endanger the occupants and other road users.
AFor safety reasons, the driver should not
watch video or operate the DVD Player while
driving. Please note that it is illegal in certain
countries to watch or operate a video source
whilst driving.
AFor reasons of safety please ensure that
the removable operating panel is always
flipped up (closed) when driving.
AAvoid inserting any foreign objects into
the slot of this player.
Failure to observe this may cause malfunction
due to the precise mechanism of this unit.
AKeep the volume level low enough to be
aware of road and traffic conditions.
Class 1 laser product
ACAUTION: Any inappropriate use of the
device may expose the user to visible/invisible
laser rays which exceed the limits for Class 1
laser products.
ADo not open covers and do not repair
yourself. Refer servicing to qualified
personnel.
Copyright protection
This product incorporates copyright
protection technology that is protected by
method claims of certain U.S. patents and
other intellectual property rights owned by
Macro vision Corporation and other rights
owners. Use of this copyright protection
technology must be authorized by Macro
vision Corporation, and is intended for
home and other limited viewing uses only
unless otherwise authorized by Macro vision
Corporation. Reverse engineering or
disassembly is prohibited.
Region Code Information
This mobile DVD Player is designed and
manufactured to play DVD discs with Region
codes 2 and 0.
Dolby Digital
Manufactured under license from Dolby
Laboratories.
“Dolby” and the double-D symbol are
trademarks of Dolby Laboratories.
Confidential unpublished works.
© 1992-1997 Dolby Laboratories. All rights
reserved.
GENERAL INFORMATION
14
CLASS 1
LASER PRODUCT

Disc formats
Supported formats
The following 8 cm and 12 cm discs are
supported:
❏DVD (single-sided discs only)
❏Video CD
❏CD Audio
❏MP3 (CD-ROM)
Formats which are not supported
❏DVD-ROM
❏DVD-R/ DVD-RAM
❏CDV
❏CD-G
❏Photo CD
❏DVDs with a Region code other than “2”
and “0”
Handling and cleaning
Handling DVDs and CDs
❏Avoid leaving fingerprints on the disc
when removing it.
❏Always store discs in their protective
covers.
❏Always ensure that discs are clean and
dry before inserting.
❏Protect discs from heat and direct
sunlight.
❏Dirt, dust, scratches and warping discs
will cause malfunction.
❏Do not place stickers or make scratches
on discs.
❏Do not warp discs.
Disc cleaning
Use a dry soft cloth to wipe the surface.
If the disc is quite dirty, use a soft cloth
slightly moistured with isopropyl (rubbing)
alcohol.
Never use solvents such as benzine, thinner
or conventional record cleaners as they may
mar the surface of the disc.
Preparing new discs with rough
spots
New discs may have some roughness around
the edge. The DVD Player may not work
properly or the video/sound reproduction
may skip if such discs are used.
☞Use a ballpoint pen, etc., to remove
roughness from the edge of the disc.
DISC NOTES
15
English
RolfEgonFüchtenschnieder
andBand
Ball-point pen
Roughness

Detachable front panel
Take the removable operating panel with
you, whenever you leave the vehicle. Keep
the panel in its protective case. Always
replace the operating panel before driving
off.
Removing the operating panel
1. Open the front by pressing the Ibutton.
2. Push the RELEASE button in the middle of
the operating panel and pull it from its
metal bracket.
3. Push the metal bracket back up until you
hear a 'click' sound.
Re-inserting the operating panel
☞Push the operating panel on both sides
until it snaps into place. A 'click' sound
should be heard.
Note: If the front panel fails to lock into
position properly, pressing control buttons
may not function and the display may be
missing some segments.
In this case press the Ibutton and then re-
install the front panel again.
Precautions when handling
☞Do not drop the front panel.
☞Do not push on the display or control
buttons when detaching or re-installing
the front panel.
☞Do not touch the contacts on the front
panel or on the main unit body. It may
result in poor electrical contact.
☞If any dirt or foreign substances adhered
on the contacts, they can be removed
with a clean and dry cloth.
☞Do not expose the front panel to high
temperatures or direct sunlight.
☞Keep away any volatile agents (e.g.
benzene, thinner, or insecticides) from
touching the surface of the front panel.
☞Do not attempt to disassemble the front
panel.
16
PREFACE
1
2
3

1OPOWER . . . Switch the DVD player ON / OFF
20-9. . . . . . . . Numeric key buttons
3GOTO . . . . . . . Adjust the VFD Display brightness level
. . . . . . . . . . . . During playback: GOTO mode
4P. . . . . . . . . Start playback, Pause (still picture)
5S. . . . . . . . . . Stop playback
68/2. . . . . . . DVD: Next / previous chapter
. . . . . . . . . . . . VCD/CD/MP3: Next / previous track
. . . . . . . . . . . . In MENU mode: move the cursor up/down
7SUBTITLE . . . . Select the SUBTITLE language (depending on the DVD disc)
8AUDIO . . . . . . Select the audio soundtrack (depending on the DVD disc)
9SETUP . . . . . . Display the SETUP menu of the DVD player
0TITLE . . . . . . . Display the DVD title menu (depending on the DVD disc)
qMENU . . . . . . Display the DVD root menu of the DVD disc
wANGLE . . . . . . Select the viewing angle (depending on the DVD disc)
eENTER . . . . . . Confirm a selection
r</>. . . . . Start fast forward / fast reverse
. . . . . . . . . . . . In MENU mode: move the cursor left/right
tSLOW . . . . . . . Switch slow motion playback on / off
zREPEAT . . . . . Switch on and select Repeat mode
uDISPLAY . . . . Display time information (during playback)
REMOTE CONTROL
17
English
POWER
1
4
7
2
5
8
0
3
6
9
REPEAT
D
I
SC
C
O
N
T
R
O
L
SLOW
SKIP
SKIP
AUDIO
TITLE
SUBTITLE
SETUP
ANGLE
MENU
ENTERREW FF
GOTO
DISPLAY
117
16
15
14
13
2
5
7
9 11
12
10
6
3
4
8

1D. . . . . . . . Disc type indicator (DVD, VCD, CD, MP3)
2L/M. . . . . . . . Playback status indicator (play / pause)
3d. . . . . . . . Disc indicator (spinning around when disc is in playback / pause mode)
4REPEAT 1 . . . Repeat mode indicator
5CHP . . . . . . . . DVD chapter indicator
6TRK . . . . . . . . VCD/CD/MP3 track indicator
7REMAIN . . . . . Remaining time display indicator
8DOLBY . . . . . . Dolby Digital Audio is selected for the inserted DVD
DIGITAL
9r. . . . . . . raudio sound is selected for the inserted DVD (DTS Pass Through
. . . . . . . . . . . . via optical output)
0ANGLE . . . . . . Viewing angle indicator. Lights up if the inserted DVD provides multiple
. . . . . . . . . . . . viewing angles
q0 : 49 : 12. . . . Time display according to the selected display mode (elapsed/remaining)
w20 . . . . . . . . . DVD: chapter number
. . . . . . . . . . . . VCD/CD/MP3: track number
e3. . . . . . . . . . . DVD title number
rTITLE . . . . . . . DVD title indicator
tL R . . . . . . . . . Audio channel indicator
FRONT DISPLAY
18
DVD
VCD
CD
MP3 LR
REPEAT 1 REMAIN DOLBY
TITLE CHP TRK ANGLE DIGITAL
1
4
14 12 111315
5 6 7
8
10
9
2
3

Player front controls
Switching on/off – POWER
To switch on the player:
☞Switch on the ignition.
☞Press the POWER button on the player.
To switch off the player:
☞Press the POWER button on the player,
or:
☞Switch off the ignition.
Loading a disc
☞Press the Ibutton on the player.
The front panel will fold down slowly.
☞Insert the disc with printed side facing
up.
:The player starts playback automatically.
Ejecting a disc – E
☞Press the Ibutton.
☞Let the panel fully fold down, then press
the Ebutton on the operating panel.
☞Remove the disc and close the front
panel.
Resetting the unit – RESET
The RESET button has to be activated for the
following reasons:
❏Initial installation of the unit when all
wiring is completed.
❏The player does not respond to any of
the function buttons.
❏Error symbol on the display.
☞Activate the RESET button with either a
ballpoint pen or thin metal object.
Front display brightness – GOTO
In STOP mode:
☞Press GOTO on the remote control to
adjust the brightness of the VFD display
in the following order.
Brightness level:
4 –> 3 –> 2 –> 1 –> 4 ...
Choosing a higher brightness level will
increase the VFD lighting.
Starting/stopping playback
■DVD
☞Press the Sbutton to stop playback.
The player stores the current disc
position.
☞Press the Pbutton to resume playback
at the stored position.
☞Press the Sbutton twice to stop the
playback and to go back to the initial
track/chapter of the inserted disc.
The player is now in STOP mode.
■VCD/CD/MP3
☞Press the Sbutton to stop playback.
The player is now in STOP mode.
☞Press the Pbutton to start playback at
the initial track of the inserted disc.
Pause (still picture)
☞Press the Pbutton during playback.
☞Press the Pbutton once again to
resume normal playback.
Fast forward / reverse
☞Press the REW <or >FFW button
during playback.
Each time the button is pressed, the
speed of fast forward / reverse changes
as follows:
Normal playback –> 2× –> 4× –> 6× –> 8×
19
English
BASIC OPERATION

Slow forward / reverse
☞Press the SLOW button during playback.
The speed of slow forward /reverse
changes according to the disc as follows:
■DVD:
Normal playback –> SF 2× –> SF 4× –> SF 6×
–> SR 8× –> SR 2× –> SR 4× –> SR 6× –> SF 8×
–> Normal playback –> ...
■VCD:
Normal playback –> SF 2× –> SF 4× –> SF 6×
–> SF 8× –> Normal playback –> ...
Skipping chapters/tracks
☞Press one of the SKIP 8/2buttons
during playback.
☞Press the 8button to jump to the next
chapter (DVD) or track (VCD/CD).
☞Press the 2button to jump to the
previous chapter (DVD) or track
(VCD/CD).
Note: For some VCD2.0 discs (PAC playback
control), the 8/2buttons may not be
available.
Repeating chapters/tracks
☞Press the REPEAT button one or more
than once to select the REPEAT mode
according to the disc as follows:
■DVD:
❏CHAPTER REPEAT ON:
The current chapter is repeated.
:The front display shows “REPEAT 1”.
❏TITLE REPEAT ON:
The current title is repeated.
:The front display shows “REPEAT”.
❏REPEAT OFF:
The repeat function is switched off.
■VCD/CD:
❏REP - ONE:
The current track is repeated.
:The front display shows “REPEAT 1”.
❏REP - ALL:
All tracks of the inserted disc are
repeated.
:The front display shows “REPEAT”.
❏REPEAT OFF:
The repeat function is switched off.
Note: The REPEAT feature is not supported
for VCD2.0 with PBC.
20
BASIC OPERATION

GOTO mode
To move to a certain title/chapter or to a
certain time of the diss.
During playback:
☞Press the GOTO button to enter the
GOTO mode.
■DVD:
☞Press the GOTO button once.
:The screen shows:
☞Press the GOTO button twice.
:The screen shows:
☞Use key 0-9to enter the desired
TITLE/CHAPTER or hh:mm:ss.
☞Use 44 or 66 to select TITLE/CHAPTER/
TIME input.
☞Press ENTER to confirm your entry.
■VCD/CD:
☞Press the GOTO button once.
:The screen shows:
☞Use key 0-9to enter the desired mm:ss.
Note that the input time must be less
than the total time of the track currently
played.
☞Press ENTER to confirm your entry.
Note: The GOTO function is not available in
MP3 playback mode.
BASIC OPERATION
21
English
TITLE 01 / 03 CHAPTER / 039003
TITLE 01 / 03 TIME _ _ : _ _ : _ _
GO TO _ _ : _ _

On-Screen Display function
☞Press the DISPLAY button during
playback to display different time
information of the current disc on the
screen.
Example:
■DVD:
☞Press DISPLAY once:
The following information is shown on
the screen:
❏current title number and total number
of titles,
❏current chapter number and total
number of chapters, and
❏elapsed total time.
☞Press DISPLAY again.
☞Press DISPLAY for the third time:
☞Press DISPLAY for the fourth time:
☞Press DISPLAY for the fifth time:
The message on the screen will be
cleared.
■VCD:
Each time the DISPLAY button is pressed, the
displayed time changes in the following
order:
❏SINGLE ELAPSED
❏SINGLE REMAIN
❏OFF
■MP3:
Each time the DISPLAY button is pressed, the
displayed time changes in the following
order:
❏CHAPTER ELAPSED
❏CHAPTER REMAIN
BASIC OPERATION
22
TITLE 02 / 05 CHAPTER 001 / 027
01 : 14 : 39
TITLE REMAIN
01 : 14 : 39
CHAPTER ELAPSED
00 : 12 : 24
CHAPTER REMAIN
00 : 03 : 56
Other manuals for DV 6100
1
Table of contents
Other VDO Car Video System manuals