VDO MS 6200 User manual

English
Français
Deutsch
Nederlands
ItalianoDansk
VRM 6200
Owner’s manual and mounting instruction
Mode d’emploi et manuel d’installation
Bedienungs- und Einbauanleitung
Gebruiksaanwijzing en inbouwhandleiding
Istruzioni d’uso e d’installazione
Betjeningsvejledning og monteringsanvisning

A
+12V
[A2]
[A4] [A6] [A8] [A7]
RR FR FL RL
B

Contents
General information . . . . . . . . . . . . . . . . . . . . . . . . . . . . . . . . . . . . . . . . 4
Notes on operating instructions. . . . . . . . . . . . . . . . . . . . . . . . . . . . . . . . . 4
Safety instructions . . . . . . . . . . . . . . . . . . . . . . . . . . . . . . . . . . . . . . . . 4
Class 1 laser product . . . . . . . . . . . . . . . . . . . . . . . . . . . . . . . . . . . . . . . 4
Operation . . . . . . . . . . . . . . . . . . . . . . . . . . . . . . . . . . . . . . . . . . . . . . 5
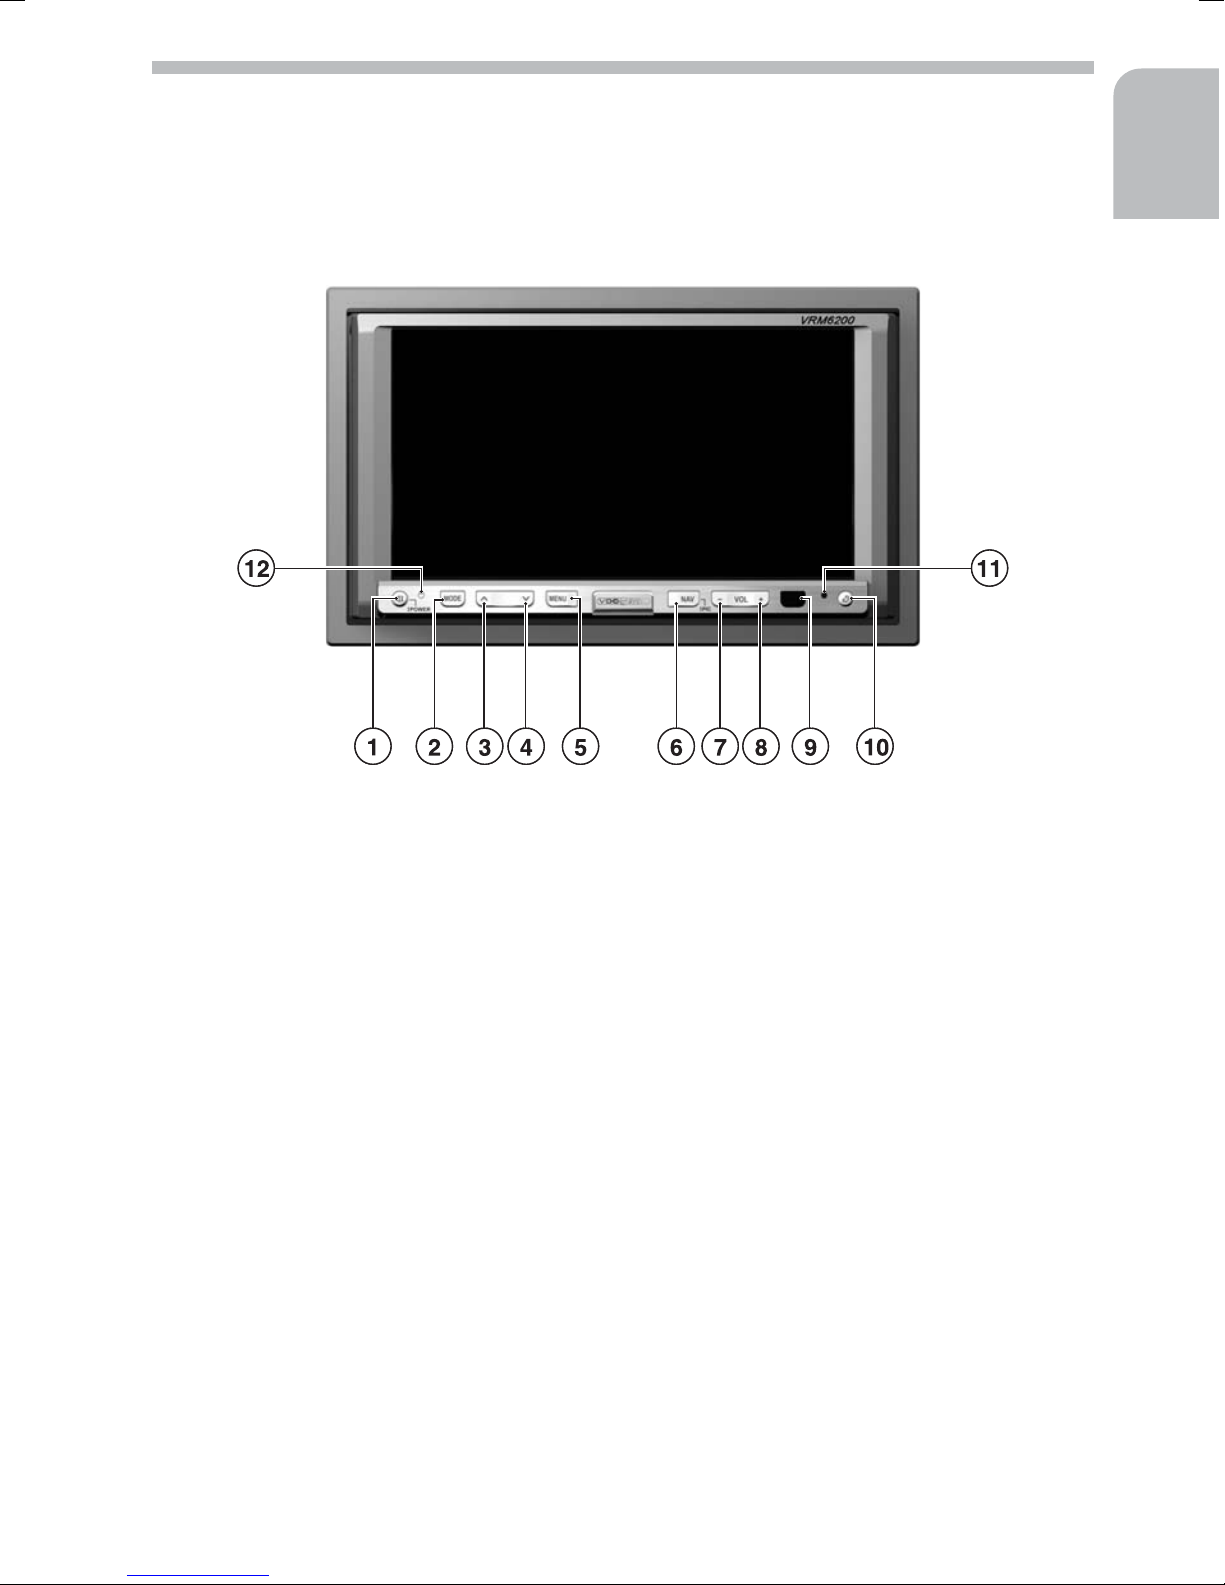
Control elements. . . . . . . . . . . . . . . . . . . . . . . . . . . . . . . . . . . . . . . . . 5
Touchscreen . . . . . . . . . . . . . . . . . . . . . . . . . . . . . . . . . . . . . . . . . . . 6
SD card reader . . . . . . . . . . . . . . . . . . . . . . . . . . . . . . . . . . . . . . . . . . 6
Remote control for the rear zone . . . . . . . . . . . . . . . . . . . . . . . . . . . . . . . . 7
Switching on/off . . . . . . . . . . . . . . . . . . . . . . . . . . . . . . . . . . . . . . . . . 8
TFT monitor . . . . . . . . . . . . . . . . . . . . . . . . . . . . . . . . . . . . . . . . . . . 8
Adjusting the volume . . . . . . . . . . . . . . . . . . . . . . . . . . . . . . . . . . . . . . 9
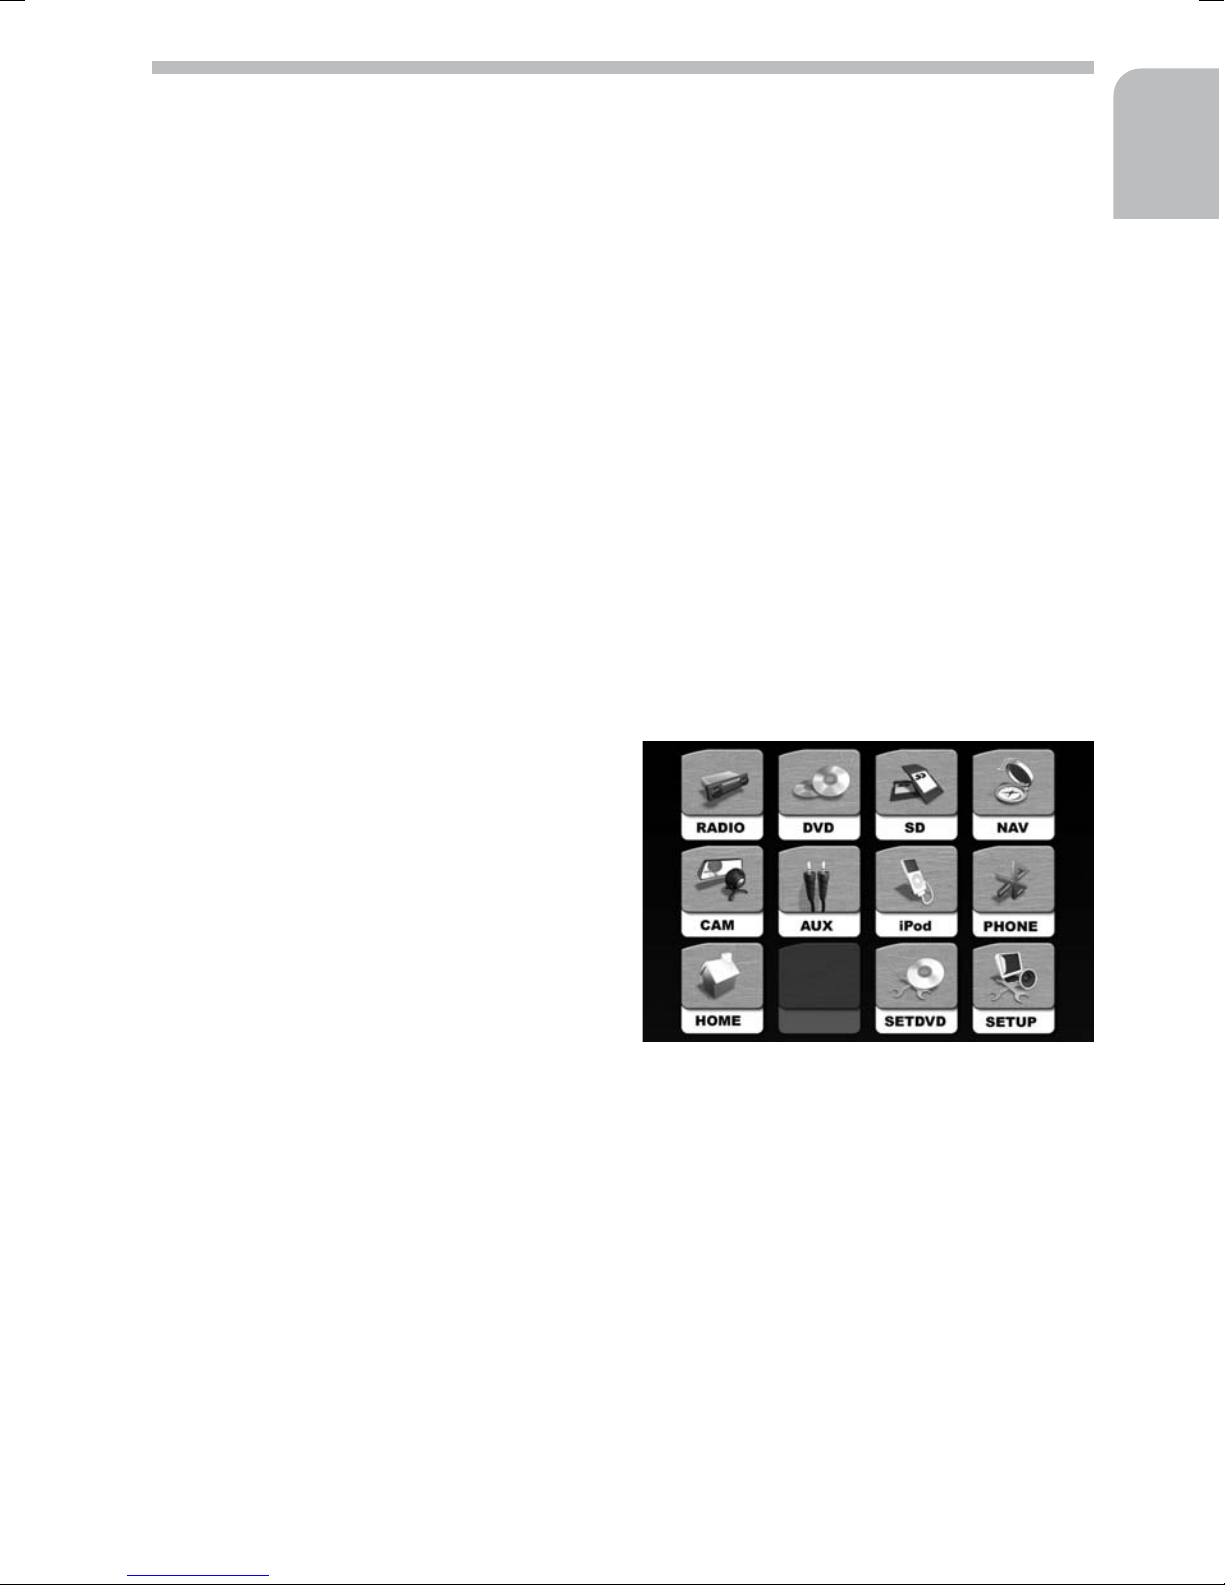
Main menu . . . . . . . . . . . . . . . . . . . . . . . . . . . . . . . . . . . . . . . . . . . . 9
Video during driving . . . . . . . . . . . . . . . . . . . . . . . . . . . . . . . . . . . . . . 10
Reversing camera . . . . . . . . . . . . . . . . . . . . . . . . . . . . . . . . . . . . . . . . 10
Sound settings . . . . . . . . . . . . . . . . . . . . . . . . . . . . . . . . . . . . . . . . . 10
Rear zone operation . . . . . . . . . . . . . . . . . . . . . . . . . . . . . . . . . . . . . . 11
Radio menu . . . . . . . . . . . . . . . . . . . . . . . . . . . . . . . . . . . . . . . . . . . 12
DVD player . . . . . . . . . . . . . . . . . . . . . . . . . . . . . . . . . . . . . . . . . . . 15
CD audio playback . . . . . . . . . . . . . . . . . . . . . . . . . . . . . . . . . . . . . . . 20
MP3/WMA playback . . . . . . . . . . . . . . . . . . . . . . . . . . . . . . . . . . . . . . 21
iPod playback . . . . . . . . . . . . . . . . . . . . . . . . . . . . . . . . . . . . . . . . . . 22
Displaying JPEG images. . . . . . . . . . . . . . . . . . . . . . . . . . . . . . . . . . . . . 23
Hands-free mode with Bluetooth . . . . . . . . . . . . . . . . . . . . . . . . . . . . . . . 24
Navigation . . . . . . . . . . . . . . . . . . . . . . . . . . . . . . . . . . . . . . . . . . . 25
Settings . . . . . . . . . . . . . . . . . . . . . . . . . . . . . . . . . . . . . . . . . . . . . . 26
SETUP menu. . . . . . . . . . . . . . . . . . . . . . . . . . . . . . . . . . . . . . . . . . . 26
DVD setup menu . . . . . . . . . . . . . . . . . . . . . . . . . . . . . . . . . . . . . . . . 27
Troubleshooting. . . . . . . . . . . . . . . . . . . . . . . . . . . . . . . . . . . . . . . . . . 29
Specifications . . . . . . . . . . . . . . . . . . . . . . . . . . . . . . . . . . . . . . . . . . . 30
Maintenance and care . . . . . . . . . . . . . . . . . . . . . . . . . . . . . . . . . . . . .30
Installation instructions . . . . . . . . . . . . . . . . . . . . . . . . . . . . . . . . . . . . . . 31
IMPORTANT INFORMATION . . . . . . . . . . . . . . . . . . . . . . . . . . . . . . . . . . 31
Taking safety precautions . . . . . . . . . . . . . . . . . . . . . . . . . . . . . . . . . . . 31
Making the electrical connections . . . . . . . . . . . . . . . . . . . . . . . . . . . . . . . 32
Installing the unit. . . . . . . . . . . . . . . . . . . . . . . . . . . . . . . . . . . . . . . . 34
Connecting the unit . . . . . . . . . . . . . . . . . . . . . . . . . . . . . . . . . . . . . .34
Contents 3
English

Please read this information carefully and follow all the instructions outlined below.
This will ensure reliable operation and durability of your unit.
Keep the packaging and operating instructions in a safe place in order to pass them on to a
subsequent owner in the event of selling the unit at a later date.
Notes on operating instructions
The following reading aids are used to simplify these operating instructions:
☞asks you to perform an action.
:shows the unit’s reaction.
✎provides extra info.
❑identifies a list.
ASafety instructions and warnings contain important information for safe use of the unit.
Failure to observe this information may result in material damage or personal injury. Therefore,
please observe this information with particular care.
Safety instructions
AMake all inputs via the remote control only when the vehicle is stationary, or have the pas-
senger make them. Otherwise, you may endanger the occupants and other road users.
APlease make certain that all persons using your multimedia system have access to this manual, and
that they read the instructions and suggestions concerning system operation prior to use.
AOnly look at the monitor if it is safe to do so. Find a suitable place to stop should you need to
look at the screen for a longer period of time.
AFor safety reasons, the driver should not watch television or operate the multimedia system
while driving. Please note that it is illegal in certain countries to watch or to operate the television
when driving.
AWhen setting the volume, please make sure that traffic noises (horns, sirens, emergency vehi-
cles, etc.) are still audible.
Class 1 laser product
ACAUTION: Any inappropriate use of the device may ex-
pose the user to invisible laser rays which exceed the limits
for Class 1 laser products.
ADo not attempt to open or repair the device yourself.
This work should be performed by an authorised service
agent.
General information
4
CLASS 1
LASER PRODUCT

English
5
Control elements
The functions of the VRM 6200 can be accessed using the buttons on the TFT monitor or
directly via the touchscreen. In addition, the functions for the rear zone can be controlled
using the supplied remote control when there is a rear monitor connected.
■Control elements on the TFT monitor
1. l/POWER . . . . Muting on/off: Press briefly when the unit is switched on.
Switch on unit: Press briefly when the unit is switched off.
Switch off unit: Press and hold when the unit is switched on.
2. MODE . . . . . . . . . Source switching
3. j. . . . . . . . . . . . Next station/title/menu item
4. k. . . . . . . . . . . . Previous station/title/menu item
5. MENU . . . . . . . . . Call up main menu.
6. NAV . . . . . . . . . . . Switch to navigation system (if connected).
7. VOL – . . . . . . . . . Reduce volume
8. VOL + . . . . . . . . . Increase volume
9. . . . . . . . . . . . . . . Infrared receiver
10. F. . . . . . . . . . . . Press briefly: Open/close monitor fully.
Press and hold: Swivel monitor until the desired viewing angle is reached.
11. . . . . . . . . . . . . . . Microphone for the Bluetooth®hands-free unit
12. RESET . . . . . . . . . Unit reset: Press using a pointed object.
Operation

■Control elements on the front of the unit
13. . . . . . . . . . . . . . . Disc indicator: Lights up red when a disc is inserted.
Lights up green when there is no disc inserted.
14. e. . . . . . . . . . . . . Load/eject disc.
15. . . . . . . . . . . . . . . SD card slot
Touchscreen
The VRM 6200 is equipped with a touch-sensitive screen. Many of the unit functions can be
controlled using the touchscreen.
■Function areas
This section describes the function areas of the touchscreen for DVD and VCD playback, dis-
play of JPEG images, etc.
A . . . . . . . . . Back to main menu (MAIN)
B . . . . . . . . . Displays current playback infor-
mation
C . . . . . . . . . Select previous chapter/image
D . . . . . . . . . Select next chapter/image
E . . . . . . . . . Display of on-screen control ele-
ments (depending on operating
mode)
F . . . . . . . . . During DVD/VCD playback: Dis-
plays the ‘GOTO’ menu directly.
SD card reader
■Switching to SD card
The built-in SD card reader can be used to play MP3 and WMA audio files. JPEG images can
also be displayed on the monitor (see “Displaying JPEG images”).
☞Insert an SD card in the SD card reader.
☞Press the MODE button on the TFT monitor repeatedly until “SD” is displayed in the upper
section of the screen.
✎Instructions for using the SD card menu can be found under “MP3/WMA playback”.
Operation
6

English
7
Remote control for the rear zone
If there is a rear monitor connected to the multimedia system, the passengers in the rear of
the vehicle can control the rear zone functions using the remote control.
R-SRC . . . . . Activate/deactivate rear zone and select playback
source for the rear monitor
0 ... 9 . . . . . . Number keys: Direct access to title/chapter/track
l. . . . . . . . Muting on/off
-/-- . . . . . . . . GOTO function for jumping directly to a specific
title/chapter or to a specified time during DVD/VCD
playback.
TITLE. . . . . . . Show DVD title menu.
ROOT . . . . . . DVD: Show DVD main menu.
VCD: Activate/deactivate PBC.
OK . . . . . . . . Start/pause playback /
Confirm selection.
4,6,8,2. Direction keys: Move cursor left/right/up/down
x. . . . . . . DVD: Next chapter;
VCD/CD/MP3: Next title
JPEG: Next image
y. . . . . . . DVD: Previous chapter;
VCD/CD/MP3: Previous title
JPEG: Previous image
S. . . . . . . . Stop playback
P. . . . . . . . Start/pause playback
ZOOM . . . . . . Set zoom mode
<. . . . . . . . Fast rewind
>. . . . . . . . Fast forward
K. . . . . . . Slow motion on/off
T. . . . . . . Switch on REPEAT and select mode
AUDIO . . . . . Select audio language (depends on DVD)
SUB-T . . . . . . Select language for subtitles (depends on DVD)
ANGLE . . . . . Select camera angle (depends on DVD)
A. . . . . . . Set start and stop markers and then repeat sequence from A to B
Operation

Switching on/off
To switch on the unit:
☞Press the lPOWER button on the TFT monitor.
To switch off the unit:
☞Press and hold down the lPOWER button on the TFT monitor, or
☞switch off the ignition.
TFT monitor
■Opening and closing the monitor
☞Press the Fbutton on the TFT monitor to open or close the monitor.
■Setting the viewing angle
The viewing angle of the TFT monitor can be set as follows:
☞Press and hold down the Fbutton until the desired viewing angle is attained,
or:
☞set the desired viewing angle using the “Screen Tilt” option in the setup menu. See
“Setup menu”.
✎If the Auto Open function is activated (“AUTO OPEN ON”), the monitor returns to the
vertical position after being switched off. The viewing angle originally selected is restored
after the monitor is switched on again.
■Auto Open function
The Auto Open function lets you automatically control the opening and closing of the TFT
monitor when switching the unit on/off.
For information on these settings, see “Setup menu”.
■Monitor mechanism
If there is an object blocking the path of the TFT monitor as it is extending, a protective cir-
cuit automatically stops the monitor from extending any further.
☞In this case, press the Fbutton on the TFT monitor or switch the unit off and then on
again.
■Setting the display parameters (OSD menu)
☞Press and hold down the NAV button on the TFT monitor until the OSD menu for the display
parameters appears.
☞Select the desired parameter using the 8or 2buttons on the remote control.
☞Set the values using the VOL– and VOL+ buttons on the TFT monitor or the 4or 6buttons
on the remote control.
✎For the radio, DVD, SD card reader, iPod, Bluetooth and NAV sources, only the “BRIGHT”
parameter (brightness) can be set.
Operation
8

9
Adjusting the volume
☞Press the VOL– or VOL+ button on the TFT monitor to adjust the volume.
✎If the button is held down, the volume changes continuously.
AWhen setting the volume, please make sure that traffic noises (horns, sirens, emergency vehi-
cles, etc.) are still audible.
MUTE function
☞Press the lbutton on the TFT monitor.
:This mutes the unit.
☞Press the lbutton again to deactivate the mute function.
✎The mute function can also be deactivated by adjusting the volume with the VOL–- or VOL+
buttons.
✎If the muting signal of a mobile phone is connected to the unit, the unit is automatically
muted during a telephone call.
Main menu
The main menu can be called up as follows:
☞Touch area A (top left) on the touchscreen, or
☞press the MENU button on the TFT monitor.
The following options are available in the main menu:
RADIO . . . . . Switches to radio mode and calls
up the radio menu
DVD . . . . . . Switches to DVD/VCD/CD play-
back
SD . . . . . . . . Calls up the SD card menu
NAV* . . . . . Switches to navigation system
CAM* . . . . . Switches to reversing camera
mode
AUX* . . . . . Switches to AUX-IN input mode
iPod* . . . . . Calls up the iPod menu
PHONE*. . . . Calls up the Bluetooth menu
HOME . . . . . Back to previous menu
SETDVD . . . Calls up the DVD menu
SETUP . . . . . Calls up the setup menu
* Can only be selected when a suitable unit is connected.
■Alternative source selection
☞Press the MODE button on the TFT monitor repeatedly until the desired source is displayed
in the upper section of the screen.
:The selected source is displayed on the TFT monitor.
✎Sources that are not available or not connected cannot be selected.
Operation
English

Video during driving
For reasons of driving safety, video images are only displayed on the TFT monitor of the mul-
timedia system following selection of one of the video sources (“AUX-IN”, “DVD”, etc.)
when the hand brake is applied.
Reversing camera
If a reversing camera is connected to the multimedia system, the image from the reversing
camera appears on the TFT monitor when reverse gear is engaged.
Sound settings
☞Press and hold down the MENU button on the TFT monitor until the audio menu is dis-
played, or
☞on the touchscreen, touch the area in which the audio settings are displayed (e.g. in the
RADIO, CDDA, MP3 or iPod menus).
☞On the touchscreen, touch the buttons next to the desired setting (EQ, BASS, TREBLE, etc.)
to change the value.
✎You can also choose the desired setting by pressing the MENU button on the TFT monitor
several times.
You then set the values using the VOL– and VOL+ buttons on the TFT monitor.
☞Touch the 8symbol on the touchscreen to quit the menu again.
Function Adjustment range Description
EQ User Selection of a preset sound style.
Under “User” you can set user-specific values for BASS and
TREBLE.
Flat
Jazz
Pop
Classic
BASS -7 ... +7 For setting the bass
TREBLE -7 ... +7 For setting the treble
FADE -9 ... +9 For setting the volume fade front <-> rear
BAL -9 ... +9 For setting the volume balance left <-> right
LOUD off, levels 1-4 For switching the loudness function on/off and setting the
intensity
✎Bass and treble settings can only be made if the “User” option is set under “EQ”.
✎When the LOUDNESS function is activated, “LOUD” is displayed on the screen along with
the selected level.
Operation
10

11
Rear zone operation
The multimedia system allows two different sources to be played simultaneously if there is
an additional monitor connected to the AV output for the rear zone. The rear-seat passengers
can control the functions for the rear zone using the supplied remote control. See “Remote
control” for information on these functions.
■Calling up the rear zone menu and selecting the source
☞Touch the headphone symbol (1) in one of
the setup menus to call up the rear zone
menu.
☞Select the source to be displayed on the
rear monitor.
Or:
☞Press the R-SRC button on the remote
control to select the desired source.
Or:
☞Press and hold down the MODE button on
the TFT monitor to activate the rear zone.
■Switching off the rear zone
☞Touch the OFF symbol (2) in the rear zone menu, or
☞press and hold down the MODE button on the TFT monitor.
■Quitting the rear zone menu
Touch the 8symbol (3) in the rear zone menu.
■Restrictions with multi-zone operation
The DVD and SD card sources cannot be selected simultaneously for the front unit and the
rear zone, as the front and rear zones share the same multimedia processor. In this case, the
multimedia system always switches to the same source (DVD or SD) for both zones.
When the DVD or SD card source is selected for the rear zone, the front unit switches to a
simplified menu display.
Operation
English

Radio menu
☞On the touchscreen, touch the RADIO symbol in the main menu, or
☞press the MODE button on the TFT monitor repeatedly until “TUNER” is displayed in the
upper section of the screen.
:The multimedia system switches to radio mode and the radio menu appears.
The following information and functions appear in the radio menu:
1. . . . . . . . . . Displays the current source.
Touch this area to call up the
main menu.
2. . . . . . . . . . Display of the current waveband
3. . . . . . . . . . Display of the current preset sta-
tion
4. . . . . . . . . . Display for stereo reception
5. . . . . . . . . . Display of the programme name
6. . . . . . . . . . List of stored stations.
Touch briefly: Call up the desired
station preset.
Touch for longer (3 seconds):
Store the set station in this preset location.
7. . . . . . . . . . Display of the sound style setting
8. . . . . . . . . . Display of the current loudness setting
9. . . . . . . . . . Display of the selected rear zone operating mode
10. . . . . . . . . Display of the current volume setting
11. . . . . . . . . Selection of the programme type (PTY, FM only)
12. . . . . . . . . Display of the current time
13. . . . . . . . . Selection of the waveband: FM-1, FM-2, FM-3, AM-1, AM-2
14. . . . . . . . . Activation of the Auto Store function in the current waveband
15. . . . . . . . . Search for the previous station with a strong signal
16. . . . . . . . . Search for the next station with a strong signal
17. . . . . . . . . Manual search downwards
18. . . . . . . . . Manual search upwards
19. . . . . . . . . Activation of automatic retuning (AF, FM only)
20. . . . . . . . . Activation of traffic announcements (TA, FM only)
21. . . . . . . . . Display of the current reception frequency
22. . . . . . . . . Display of the programme type
23. . . . . . . . . Activation of the scan function (all station memories of the current waveband)
Operation
12

13
Selecting the waveband
☞Touch the BAND symbol (13) on the touchscreen to change the waveband.
✎The following wavebands are available: FM-1, FM-2, FM-3, AM-1 and AM-2.
Tuning into stations
Stations can be tuned/scanned in a number of ways:
■Automatic search
☞Touch the yor xsymbol on the touchscreen to tune to the next station with a strong
signal in the currently selected waveband.
✎If TA is active, the radio will search only for stations from which traffic announcements
can be received.
■Setting the frequency manually
☞Touch the >or <symbol on the touchscreen to change the reception frequency
incrementally.
Station preset
■Storing a station
You can store 6 stations for each waveband in preset locations P01 to P06.
☞Tune to the desired waveband and station.
☞Touch the desired preset location in the list for at least 3 seconds to store the selected sta-
tion in this location.
■Recalling stored stations
☞Tune to the desired waveband.
☞Touch the desired preset location in the list to call up the desired station.
■Scanning receivable stations
☞Touch the SCAN symbol on the touchscreen to briefly scan all of the stored stations in the
current waveband.
☞Touch the symbol again to stop the scanning process.
■Auto Store (AS)
Activate this function to automatically store up to 6 stations with strong signals in the cur-
rent waveband.
☞Touch the Auto Store symbol (14) on the touchscreen to start the Auto Store process.
✎All stations manually stored in the preset locations of the current waveband are overwritten.
Operation
English

■PTY search (only on FM)
This function allows you to search for stations of the desired programme type.
☞Touch the PTY symbol on the touchscreen to display the list of available programme types
(genres).
☞Select the desired programme type to start a search for a radio station of the selected
programme type.
✎PTY is not supported by all RDS stations and is not available in all countries.
■AF retuning (only in FM):
The radio continuously checks a series of alternate frequencies (AF) for the selected station
and automatically chooses the best frequency.
☞Touch the AF symbol on the touchscreen to switch the AF function on or off.
✎Deactivate this function only if you hear brief interruptions in transmission or if the unit
automatically switches to an undesired station (e.g. to another regional station belonging
to the selected programme).
■Traffic announcements (TA)
Activate this function if you wish to listen to traffic announcements (TA), e.g. during play-
back of other sources or when the unit is set to mute.
☞Touch the TA symbol on the touchscreen to switch the TA function on or off.
✎The automatic search only responds to stations that transmit traffic announcements (TA
stations).
✎If the radio has not been tuned to a station with TA, it will automatically search for a sta-
tion broadcasting traffic announcements.
■Traffic announcements from other stations – EON
With the RDS function EON (Enhanced Other Networks) you will hear traffic announcements
even if the set station does not transmit its own traffic information but is operating on a
network with other stations.
If you have activated “TA”, stations with EON will be treated like TA stations, i.e. the search
will also stop at these stations.
✎When a traffic announcement is made, the unit switches to a traffic information station
linked to EON. The programme name of the traffic information station is displayed during
the traffic announcement.
After the announcement, the unit returns to the previous programme.
Operation
14

15
DVD player
■Supported formats
All 12-cm discs based on the following standards are supported:
❑DVD-Video 5 and 9
❑DVD-Video 10 and 18 (must be turned over)
❑Video CD, Super Video CD
❑CD-Audio (CDDA)
❑MP3 and WMA files (on DVD+R/RW, DVD-R/RW and CD-R/W)
❑JPEG images (on DVD+R/RW, DVD-R/RW and CD-R/W)
■Formats not supported
❑DVD-RAM
❑Open-session DVD+R/RW, DVD-R/RW and CD-R/RW
❑CDV
❑CD-G
❑Kodak Photo CD (previously CDI format)
❑DVDs with region codes other than “2” or “0”
Note: As a rule, self-burned CDs are supported. However, depending on the blank disc and
burning program used, playback difficulties may arise. CD-R/RW, DVD+R/RW and DVD-R/RW
must be closed.
ADo not insert unusually-shaped discs or other objects into the DVD player. If you ignore these
recommendations, you risk damaging your unit.
■Correct handling of DVDs and CDs
❑Avoid putting finger marks on the infor-
mation side of the disc.
❑Always store discs in their protective co-
vers.
❑Always ensure that discs are clean and dry
before inserting them.
❑Protect discs from heat and direct sun-
light.
❑Discs that are dirty, dusty, scratched or
deformed can lead to malfunctions.
❑Do not add any stickers to the disc.
❑Do not scratch the surface of the disc.
❑Do not deform discs.
■Cleaning discs
❑Use a soft, dry cloth to wipe the surface.
❑Always wipe in a straight line from the inside out to the edge.
❑For discs that are extremely dirty, use a soft cloth lightly soaked with isopropanol (isopro-
pyl alcohol).
❑Never use solvents such as benzene, thinners or conventional record cleaner. These sub-
stances can destroy the disc surface.
Operation
English
RolfEgonFüchtenschnieder
andBand

Loading a disc
☞Press the Fbutton on the TFT monitor to open the TFT monitor.
☞Carefully slide the disc into the player’s disc slot with the printed side facing upwards until
it is drawn in.
:The player begins playback automatically.
Removing a disc
☞Press the ebutton on the front of the unit.
:The disc is ejected.
☞Remove the disc.
■Resetting the disc mechanism
If it is not possible to remove a disc in the normal way, you can reset the disc mechanism by
pressing and holding down the ebutton. The disc is ejected and the disc mechanism is ready
for operation again.
Switching to DVD playback
If a DVD is already inserted in the player:
☞Press the MODE button on the TFT monitor repeatedly until “DVD” is displayed in the
upper section of the screen.
Or:
☞On the touchscreen, touch the DVD symbol in the main menu.
:Disc playback begins.
DVD operation using the touchscreen
During playback:
☞Touch function area E (bottom centre) of the touchscreen to display the on-screen control
elements.
L/M. . . . . . . Start playback, pause (freeze
frame)
S. . . . . . . . Stop playback
<. . . . . . . . Fast rewind
>. . . . . . . . Fast forward
T. . . . . . . Switch on REPEAT and select
mode
A. . . . . . . Set start and stop markers and
then repeat sequence from A to
B
AUDIO . . . . . . Select dialogue language (DVD)
or audio channel (VCD)
SUB.T . . . . . . Select language for subtitles
Q. . . . . . . . Display DVD main menu.
Operation
16

English
17
Starting/stopping playback
☞Touch the Ssymbol on the touchscreen to stop playback.
✎The player stores the current position on the disc.
☞Touch the L/Msymbol to continue playback at the stored position.
☞Touch the Ssymbol twice to return to the first track/chapter of the inserted disc.
✎The player is now in STOP mode.
■Video CDs with PBC (playback control)
Video CDs with PBC can be played with or without a menu:
☞Press the ROOT button on the remote control to switch between playback with or without
PBC.
✎With “PBC ON” the repeat function and the function for direct title selection using the
number pad are not available.
✎PBC is automatically deactivated again when random play, scan or fast forward/rewind
are activated.
Pause (freeze frame)
☞Touch the L/Msymbol during playback.
☞Touch the L/Msymbol again to continue playback.
Skip chapter/title
☞Touch the yor xsymbol during playback, or
☞during playback, touch area C (left) or D (right) on the touchscreen to jump to the previ-
ous or next chapter.
✎This function may not be available with some VCD2.0 discs.
Fast search forwards/backwards
☞Touch the <or >symbol during playback.
✎Each time the symbol is pressed, the fast forward/rewind speed changes as follows:
2x –> 4x –> 8x –> 20x –> Normal.
Calling up the DVD menu
☞During playback, touch function area E (bottom centre) of the touchscreen to display the
on-screen control elements.
☞Touch the Qsymbol to call up the DVD main menu.
☞Touch the desired menu item to start playback.
Or:
☞Select the desired menu item using the 4,6,8and 2buttons on the remote control.
☞Then press the OK button to confirm the selection and start playback.
☞Press the TITLE button to open the next menu on the DVD.
Operation

Repeating a chapter/title
☞Touch the Tsymbol once or several times during playback to set REPEAT mode as follows:
❑DVD: Repeat Title, Repeat Chapter, Repeat Off.
❑VCD/CD: Repeat Single, Repeat Off.
❑MP3: Repeat Single, Repeat Folder, Repeat Off.
■Marking and repeating a film sequence (A->B)
☞Touch the Asymbol during playback to specify the beginning of a desired film sequence.
☞Touch the Asymbol again to specify the end of the desired film sequence.
:The player now repeats the marked film sequence continuously.
☞Touch the Asymbol again to exit the function and return to normal playback.
GOTO function
For jumping directly to a specific title/chapter or to a specified time.
During playback:
☞Touch function area F (top right) of the touchscreen to activate the GOTO function.
☞Touch the desired category: Title/chapter or time (for DVD) and time or title (for VCD).
☞Using the number pad, enter the desired time or the desired title/chapter and confirm
with “OK”.
Selecting the camera angle (DVD only)
When the “ANGLE MARK” (camera angle) function is activated, the camera symbol is dis-
played on the screen when a scene with alternative camera angles is played from a DVD.
☞Press the ANGLE button on the remote control once or several times while the camera sym-
bol is displayed on the monitor to select the desired camera angle.
✎This function is only available if there are scenes with alternative camera angles on the
DVD currently loaded.
✎The number of camera angles depends on the DVD.
✎For information on activating “ANGLE MARK”, see “DVD setup”.
Zoom (magnification)
☞Press the ZOOM button on the remote control once or several times during playback to select
the desired zoom factor: Q1 –> Q2 –> Q3 –> Q4 –> OFF.
Operation
18

English
19
Multi-language discs
■Selecting the dialogue language
DVD:
☞Touch the AUDIO symbol on the touchscreen, or
☞press the AUDIO button once or several times during playback to select the desired dialogue
language.
✎The number of dialogue languages depends on the DVD.
✎Some DVDs only have one dialogue language.
VCD/CD:
☞Touch the AUDIO symbol on the touchscreen, or
☞press the AUDIO button once or several times during playback to select the desired audio
mode:
❑Stereo (L & R), Left only (L), Right only (R).
■Selecting the language for subtitles
☞Press the SUB-T button once or several times during playback to select the desired
language for subtitles.
✎The number of languages for subtitles depends on the DVD.
Displaying playback information
☞During playback, touch function area B (top centre) of the touchscreen to display infor-
mation about the current disc on the screen.
:The following information is displayed:
■DVD playback:
1. . . . . . . . . . Display of the current source.
Touch this area to call up the
main menu.
2. . . . . . . . . . Current title number and total
number of titles on the DVD
3. . . . . . . . . . Current chapter number and to-
tal number of chapters for the
current title
4. . . . . . . . . . Elapsed playing time for the
current title
5. . . . . . . . . . Display of the sound style setting
6. . . . . . . . . . Display of the current loudness setting
7. . . . . . . . . . Display of the current time
8. . . . . . . . . . Display of the selected rear zone operating mode
■VCD playback (differences):
2. . . . . . . . . . Current track number and total
number of tracks on the VCD
4. . . . . . . . . . Elapsed playing time for the
current track
Operation

CD audio playback
☞Press the MODE button on the TFT monitor repeatedly until “DVD” is displayed in the
upper section of the screen.
Or:
☞On the touchscreen, touch the DVD symbol in the main menu.
:The multimedia system switches to CD playback and the CD menu appears.
CD audio (CDDA)
The following information and functions appear in the CDDA menu:
1. . . . . . . . . . Display of the current source.
Touch this area to call up the
main menu.
2. . . . . . . . . . Display of the disc title (if there
is CD text available)
3. . . . . . . . . . Display of the current track
(if there is CD text available)
4. . . . . . . . . . Display of the current time
5. . . . . . . . . . Start/stop playback
6. . . . . . . . . . Stop playback
7. . . . . . . . . . Return to the previous page
8. . . . . . . . . . Go to the next page
9. . . . . . . . . . Fast rewind
10. . . . . . . . . Fast forward
11. . . . . . . . . Activation of the scan function (all tracks of the current CD)
12. . . . . . . . . Switch on REPEAT and select mode
13. . . . . . . . . Activate/deactivate random play
14. . . . . . . . . Display the number pad for entering the track number directly
15. . . . . . . . . Display of the current track number and the total number of tracks on the cur-
rent CD
16. . . . . . . . . Display of the elapsed playing time for the current track
17. . . . . . . . . Display of the selected sound style, the current loudness setting and the selected
rear zone operating mode
18. . . . . . . . . Display of the current volume setting
■Playing an audio CD:
When an audio CD is inserted, all tracks are played sequentially.
■Selecting a track
☞Touch the desired track in the track list (3), or
☞touch the keyboard symbol (14) and select a track using the number pad.
Operation
20
This manual suits for next models
1
Table of contents
Other VDO Car Video System manuals