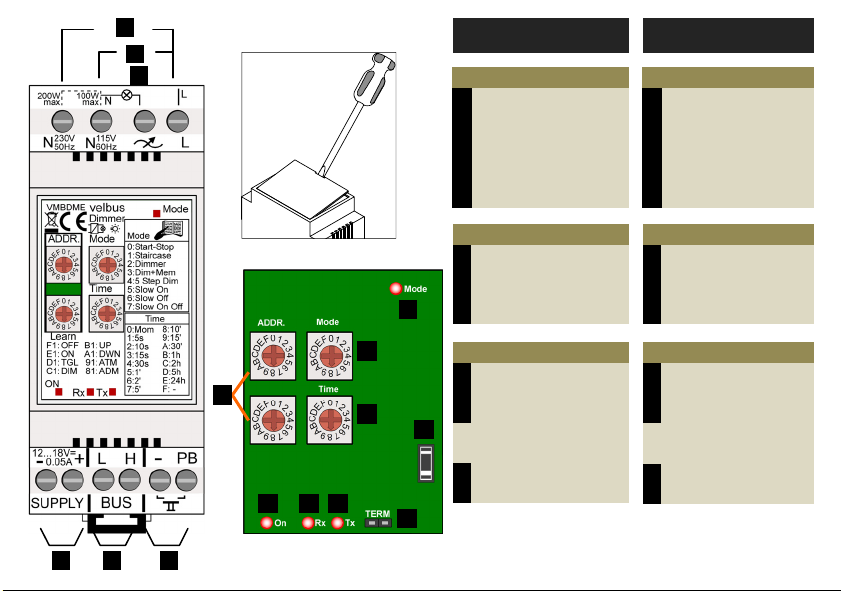
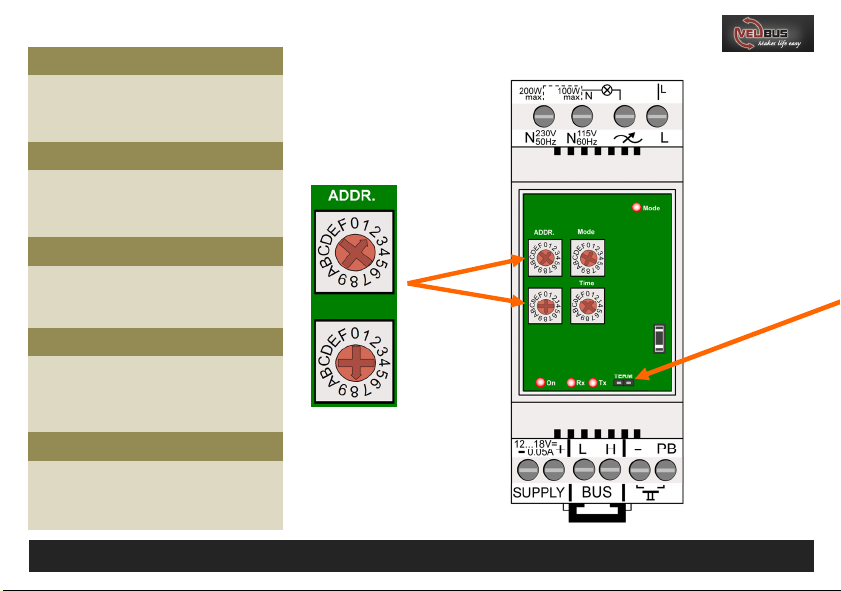
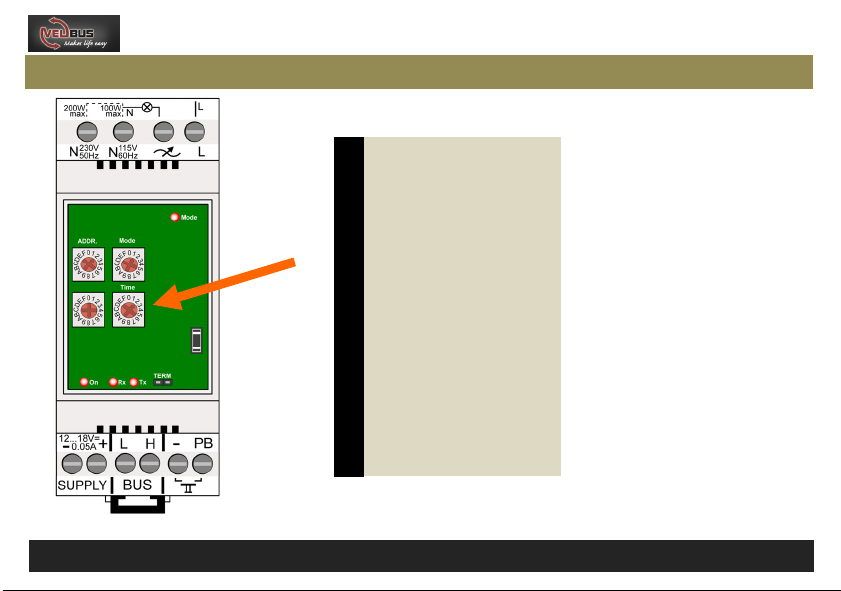
Velbus VMBDME User manual

DIMMER FOR ELECTRONIC/RESISTIVE LOAD
1-Channel 200W dimmer suitable for lamp(s)
connected using an electronic transformer.
Required AC power : 100-125V/60Hz or 220-
240V/50Hz.
Maximum load: 200W @ 230V or 100W @ 115V.
9 different operation modes.
16 possible time settings.
Required power supply: 12...18VDC.
Consumption: 40mA.
Velbus Home Automation
Choosing Velbus is choosing comfort, safety and energy saving with the guarantee that your home is
ready for the future. All this for a price barely higher than that of a traditional installation.
VMBDME

4
5
1 2 3
6
Connections
1 Velbus®power supply
2 Velbus®
3 Direct push button control
4 Load contact
5 115VAC connection
6 230VAC connection
LED indication
7Power supply
8 Receiving Velbus® data
9 Sending Velbus® data
10 Operating mode
ENGLISH
10
13
12
14
7 8 9 15
11
Settings
11 Manual control
12 Address
13 Mode
14 Time
15 Termination
0...7 : Resistive / capacitive load
8...F : Inductive load
Aansluitingen
1 Velbusvoeding
2 Velbus®
3 Directe drukknopbediening
4 Aansluitpunt voor belasting
5 115VAC netspanning
6 230VAC netspanning
Ledindicatie
7Voedingsspanning
8 Ontvangst van Velbusdata
9 Verzenden van Velbusdata
10 Werkingsmode
NEDERLANDS
Instellingen
11 Manuele bediening
12 Adres
13 Mode
0...7 : Resistieve / capacitieve
belasting
8...F : Inductieve load
14 Tijd
15 Afsluiting

Câblage
1 Alimentation Velbus®
2 Velbus®
3 Contrôle direct des boutons poussoirs
4 Point de connexion d’une charge
5 Connexion tension de réseau 115VCA
6 Connexion tension de réseau 230VCA
Indications LED
7Alimentation
8 Réception de données
9 Envoi de données
10 LED de mode d’opération
FRANCAIS
Configuration
11 Contrôle manuel
12 Adressage
13 Mode
0...7 : Charge résistive / capacitive
14 Temps
15 Terminaison
8...F : Charge inductive
Anschlüsse
1 Stromversorgung des Velbus-Systems
2 Velbus®
3 Direkte Drucktastenbedienung
4 Anschluss Belastung
5 115VAC-Anschluss
6 230VAC-Anschluss
LED-Anzeige
7Stromversorgung
8 Velbus-Daten empfangen
9 Velbus-Daten senden
10 Betriebsmodus
DEUTSCH
Einstellungen
11 manuelle Bedienung
12 Adresseneinstellung
13 Modus
0...7 : Ohmsche / kapazitiver Belastung
14 Zeit
15 Abschluss
8...F : Induktiver Belastung
Cableado
1 Alimentación Velbus®
2 Velbus®
3 Control directo de los pulsadores
4 Punto de conexión para una carga
5 Conexión tensión de red 115VCA
6 Conexión tensión de red 230VCA
Indicaciones LED
7Alimentación
8 Recepción de datos
9 Envío de datos
10 Modo de funcionamiento
ESPAÑOL
Configuración
11 Control manual
12 Ajuste de dirección
13 Modo
0...7 : Carga resistiva / capacitiva
14 Ajuste del tiempo
15 Terminación
8...F : Carga inductiva

- 4 -
Address setting
Enter a unique address (from ‘00’ to ‘FE’ except
for ‘81’, ‘91’, ‘A1’, ‘B1’, ‘C1’, ‘D1’, ‘E1’, ‘FE’ and
‘FF’) for each module through the ‘ADDR’
rotating switches
Adresinstelling
Stel een uniek adres in voor elke module via de
‘ADDR’ draaischakelaars van ‘00’ tot ‘FE’
uitgezonderd ‘81’, ‘91’, ‘A1’, ‘B1’, ‘C1’, ‘D1’, ‘E1’,
’F1’ en ‘FF’.
Réglage d’adresse
Attribuez une adresse unique (de ‘00’ à ‘FF’
excepté ‘81’, ‘91’, ‘A1’, ‘B1’, ‘C1’, ‘D1’, ‘E1’, 'F1'
et ‘FF’) pour chaque module
Adresseneinstellung
Stellen Sie eine einzigartige Adresse für jedes
Modul ein über die ’ADDR’ Drehschalter von
‘00’ bis ‘FE’ ausgenommen ‘81’, ‘91’, ‘A1’, ‘B1’,
‘C1’, ‘D1’, ‘E1’, ’F1’ und ‘FF’.
Ajuste de dirección
Introduzca una sola dirección para cada módulo
con los interruptores giratorios 'ADDR' de ‘00’ a
‘FE’ salvo ‘81’, ‘91’, ‘A1’, ‘B1’, ‘C1’, ‘D1’, ‘E1’,
’F1’ y ‘FF’.
example:
address = 28

- 5 -
Termination
If the module is connected at the start or end of a cable on the VELBUS, place the ‘TERM’ jumper
Remark: If different cable wiring topologies (tree, star, loop, ...) are used, place a jumper on the end module of the longest cable only, NOT on
each end point..
Afsluiting
Indien de module op het begin of het einde van de VELBUS-kabel aangesloten is, moet de ‘TERM’ jumper geplaatst worden. In alle andere gevallen
moet deze verwijderd worden.
Opmerking: Indien de bekabeling in ster- of boomstructuur uitgevoerd is, wordt er enkel een afsluiter geplaatst op de module die aan het beginpunt van
de kabel aangesloten is en op de module die op het uiteinde van de langste kabel aangesloten is.
Terminaison
Placez le cavalier TERM uniquement dans un module connecté au début ou en fin de connexion Velbus. Effacez le cavalier dans tous les autres modu-
les.
Remarque: Placez uniquement un cavalier sur le dernier module du câble le PLUS LONG et non sur tous les modules lorsque vous utilisez différents
modèles de câblage (arbre, étoile boucle…).
Abschluss
Montieren Sie die TERM-Steckbrücke bei einem Modul am Anfang oder am Ende des Velbus-Anschlusses.
Bemerkung: Verwenden Sie verschiedene Verdrahtungsausführungen (Baum, Stern, Schleife…), verbinden Sie dann nur eine Steckbrücke mit dem
letzten Modul des längsten Kabels und NICHT mit jedem Modul
Terminación
Ponga el jumper TERM sólo en un módulo conectada al principio o al extremo de conexión Velbus.
Nota : Ponga sólo un jumper en el último módulo del cable MÁS LARGO y no en todos los módulos si utiliza diferentes modelos de cableado (árbol,
estrella, bucle…)

- 6 -
USE WITH RESISTIVE LOAD
GEBRUIK MET RESISTIEVE BELASTING
UTILISATION AVEC CHARGE RÉSISTIVE
ANWENDUNG MIT OHMSCHE BELASTUNG
USO CON CARGA RESISTIVA
H
L VELBUS
+
- 12 ... 18Vdc
H
L
VELBUS
+
-
12 ... 18Vdc
N
L
230VAC

- 7 -
Warning: The electronic transformer must be short-
circuit proof, thermal protected and must be suited for
trailing edge dimmer
Opgelet: De elektronische transformator moet thermisch beveiligd,
kortsluitvast en geschikt zijn om met een faseafsnijdingsdimmer de
lichtsterkte te regelen.
Attention: Le transformateur électronique doit être thermiquement
protégé, protégé contre les courts-circuits et doit être adapté pour
contrôler l’intensité lumineuse avec un variateur à contrôle de
phase inversée.
Achtung: Der elektronische Transformator muss thermisch
geschützt, kurzschlussgeschützt sein und geeignet ist, um die
Lichtstärke über einen Phasenabschnittdimmer zu regeln.
Ojo!: Asegúrese de que el transformador electrónico tenga una
protección térmica y esté protegido contra cortocircuitos y esté apto
para controlar la intensidad luminosa con un dimmer con corte de
fase.
USE WITH CAPACITIVE LOAD
GEBRUIK MET CAPACITIVE BELASTING
UTILISATION AVEC CHARGE CAPACITIVE
ANWENDUNG MIT MIT KAPAZITIVER BELASTUNG
USO CON CARGA CAPACITIVA
H
L VELBUS
+
- 12 ... 18Vdc
H
L
+
-
N
L
230VAC
12VAC
PRIM
Dimmable electronic transformer

- 8 -
Warning: The transformer must be short-
circuit and thermal protected. Make sure to
always connect a lamp to the transformer (an
unloaded transformer could damage the dimmer).
Opgelet: De transformator moet thermisch beveiligd en
kortsluitvast zijn. Zorg ervoor dat er steeds een lamp
aangesloten is op de transformator (een onbelaste
transformator kan de dimmer beschadigen).
Attention: Le transformateur doit être thermiquement
protégé et protégé contre les courts-circuits. Connectez
toujours une lampe au transformateur (un transformateur
sans charge peut endommager le variateur).
Achtung: Der Transformator muss thermisch geschützt
und kurzschlussgeschützt sein. Sorgen Sie dafür, dass
schon eine Lampe an den Transformator angeschlossen
ist (ein unbelasteter Transformator kann den Dimmer beschädigen).
Ojo!: Asegúrese de que el transformador electrónico
tenga una protección térmica y esté protegido contra
cortocircuitos. Conecte siempre una bombilla al transfor-
mador (un transformador sin carga puede dañar el dimmer).
USE WITH INDUCTIVE LOAD
GEBRUIK MET INDUCTIEVE BELASTING
UTILISATION AVEC CHARGE INDUCTIVE
ANWENDUNG MIT INDUKTIVER BELASTUNG
USO CON CARGA INDUCTIVA
H
L VELBUS
+
- 12 ... 18Vdc
N
L 230VAC
Dimmable transformer
12VAC PRIM
H
L
VELBUS
+
-
12 ... 18Vdc

- 9 -
0
Momentary - Momentbediening -
Contrôle momentané -
Momentbedienung -
Control momentáneo
1 5s
2 10s
3 15s
4 30s
5 1'
6 2'
7 5'
8 10'
9 15'
A 30'
B 1h
C 2h
D 5h
E 1day - 1dag - 1jour - 1 Tag - 1día
F On/Off - Aan / Uit - Marche / arrêt -
Ein/Aus - Control arranque/parada
TIMESETTING - TIJDSINSTELLING - RÉGLAGE DE DÉLAI - ZEITEINSTELLUNG - AJUSTE DEL TIEMPO

- 10 -
The LED will not burn if the lamp does not light up.
The LED will burn if the lamp burns at a stable light intensity.
The LED blinks rapidly as long as the lamp’s light intensity is modifying.
The LED blinks slowly when the switch-off delay is running.
The LED blinks very rapidly if the dimmer module is set in learning mode.
De LED brandt niet indien de lamp niet oplicht.
De LED brandt indien de lamp op een stabiele lichtsterkte brandt.
De LED knippert snel zolang de lichtsterkte van de lamp wijzigt.
De LED knippert traag als de uitschakelvertraging loopt.
De LED knippert zeer snel indien de dimmermodule in de leermode staat.
La LED ne s’allume pas si l’ampoule ne s’allume pas.
La LED s’allume si l’ampoule brûle à une intensité lumineuse stable.
La LED clignote rapidement tant que l’intensité lumineuse de l’ampoule change.
La LED clignote lentement lors du délai de coupure.
La LED clignote très rapidement si le module variateur est en mode d’apprentissage.
Die LED leuchtet nicht wenn de Lampe nicht brennt.
Die LED leuchtet wenn die Lampe auf einer stabilen Lichtstärke brennt.
Die LED blinkt solange sich die Lichtstärke der Lampe ändert.
Die LED blinkt langsam wenn die Ausschaltverzögerung aktiv ist.
Die LED blinkt sehr schnell wenn das Dimmermodul im Lernmodus ist.
El LED no se ilumina si la lámpara no se ilumina.
El LED se ilumina si la lámpara está encendida a una intensidad luminosa estable.
El LED parpadea rápidamente mientras la intensidad luminosa de la lámpara cambie.
El LED parpadea lentamente durante el tiempo de corte.
el LED parpadea muy rápidamente si el módulo dimmer está en el modo de aprendizaje
MODE LED - LED DE MODE D’OPÉRATION - BETRIEBSMODUS-LED - LED DE MODO DE FUNCIONAMIENTO

- 11 -
OPERATION MODE - WERKINGSMODE - MODE D’OPÉRATION - BETRIEBSMODUS - MODO DE FUNCIONAMIENTO
0 / 8*
Start/Stop timer
Minuteur
marche/arrêt
Temporizador
start/stop
Operating the push
button will turn the lamp
on. After the set time
has elapsed, the lamp
will be turned off.
Operating the push
button while the lamp is
on will switch off the
lamp immediately.
Bedienen van de
drukknop doet de lamp
branden. Nadat de
ingestelde tijd verlopen is,
wordt de lamp gedoofd.
Bedienen van de
drukknop wanneer de
lamp brandt, zal de lamp
onmiddellijk uitschakelen.
L’actionnement du
bouton poussoir allumera
l’ampoule. L’ampoule
s’éteindra après l’écoule-
ment du délai introduit.
L’actionnement du
bouton poussoir lorsque
l’ampoule est allumée,
éteindra l’ampoule
instantanément
Eine Bedienung der
Drucktaste lässt die
Lampe brennen.
Nachdem die eingestellte
Zeit verstrichen ist, wird
die Lampe erlöschen. Eine
Bedienung der Drucktaste
wenn die Lampe brennt,
wird die Lampe sofort
ausgehen lassen.
1 / 9*
Staircase lighting
timer
Trappenhuisauto
maat
Temporisateur
de cage d’esca-
lier
Treppenhausauto
mat
Temporizador de
caja de escalera
Operating the push
button will turn the lamp
on. After the set time
has elapsed, the lamp
will gradually turn off
and will be completely
switched off after 30
seconds.
Operating the push
button while the lamp is
on will restart the timer.
Bedienen van de
drukknop doet de lamp
branden. Nadat de
ingestelde tijd verlopen is,
zal de lamp geleidelijk
uitdoven zodat deze na 30
seconden volledig uit is.
Bedienen van de
drukknop wanneer de
lamp brandt, herstart de
timer.
L’actionnement du
bouton poussoir allumera
la lampe. Après l’écoule-
ment du délai introduit,
l’ampoule s’éteindra
progressivement jusqu’à
une extinction complète
après 30 secondes.
L’actionnement du
bouton poussoir lorsque
l’ampoule est allumée,
redémarrera le minuteur.
Eine Bedienung der
Drucktaste wird die Lampe
brennen lassen. Nachdem
die eingestellte Zeit
verstrichen ist, wird die
Lampe allmählich
erlöschen bis sie nach 30
Sekunden ganz ausgeht.
Eine Bedienung der
Drucktaste wenn die
Lampe brennt, wird den
Timer neustarten.
Si se pulsa el pulsador,
la lámpara se encen-
derá. La lámpara se
apagará después de que
el tiempo introducido
haya transcurrido.
Si se pulsa el pulsador
mientras la lámpara está
encendida, esta se
apagará inmediatamen-
te.
Si se pulsa el pulsador,
la lámpara se encen-
derá. La lámpara se
apagará progresivamen-
te hasta que se apague
completamente después
de 30 segundos.
Si se pulsa el pulsador
mientras la lámpara está
encendida, el temporiza-
dor volverá a activarse.

- 12 -
2 / A*
Dimmer
Variateur
A short press will turn on
the lamp to full intensity.
A short press while the
lamp is on will switch off
the lamp.
A long press will dim the
lamp until the max. or
the min. is reached. A
next operation will
reverse the dimming
direction. After the set
time has elapsed, the
lamp will turn off.
Kort drukken zal de lamp
op volle sterkte doen
branden. Kort drukken
wanneer de lamp reeds
brandt, zal de lamp
uitschakelen.
Lang drukken zal de
lamp dimmen tot het
maximum of minimum
bereikt wordt. Bij een
volgende bediening zal
de dimrichting omkeren.
Nadat de ingestelde tijd
verlopen is, zal de lamp
uitdoven.
Une pression brève
allumera l’ampoule au
maximum. Une pression
brève lorsque l’ampoule
est allumée, éteindra
l’ampoule. Une pression
longue exercera une
variation sur l’ampoule
jusqu’au maximum ou le
minimum. Un prochain
actionnement renversera
la direction de variation.
L’ampoule s’éteindra
après l’écoulement du
délai introduit.
Ein kurzes Drücken wird
die Lampe auf voller
Lichtstärke brennen
lassen. Wenn die Lampe
schon brennt, wird sie
ausgehen. Langes
Drücken wird die Lampe
dimmen bis das Maximum
oder das Minimum erreicht
wird. Bei einer folgenden
Bedienung wird die
Dimmrichtung umkehren.
Nachdem die eingestellte
Zeit verstrichen ist, wird
die Lampe erlöschen
3 / B*
Dimmer with
memory function
Dimmer met
geheugenfunctie
Variateur avec
fonction de
mémoire
Dimmer mit
Speicherfunktion
Dimmer con
función de
memoria
A short press will turn on
the lamp at the intensity
which was last used.
A short press while the
lamp is on will switch off
the lamp.
A long press will dim the
lamp until the max. or
the min. is reached. A
next operation will
reverse the dimming
direction.
After the set time has
elapsed, the lamp will
turn off
Kort drukken zal de lamp
doen branden op de
laatst gebruikte
lichtsterkte.
Kort drukken wanneer de
lamp reeds brandt, zal de
lamp uitschakelen.
Lang drukken zal de
lamp dimmen tot het
maximum of minimum
bereikt wordt. Bij een
volgende bediening zal
de dimrichting omkeren.
Nadat de ingestelde tijd
verlopen is, zal de lamp
uitdoven.
Une pression brève
allumera l’ampoule à la
dernière intensité lumi-
neuse. Une pression
brève lorsque l’ampoule
est allumée, éteindra
l’ampoule.
Une pression longue
exercera une variation
sur l’ampoule jusqu’au
maximum ou le mini-
mum. Un prochain
actionnement renversera
la direction de variation.
L’ampoule s’éteindra
après l’écoulement du
délai introduit.
Ein kurzes Drücken wird
die Lampe auf der zuletzt
verwendeten Lichtstärke
brennen lassen.
Ein kurzes Drücken wenn
die Lampe schon brennt,
wird die Lampe
ausschalten. Ein langes
Drücken wird die Lampe
dimmen bis das Maximum
oder das Minimum erreicht
wird. Bei einer nächsten
Bedienung wird die
Dimmrichtung umkehren.
Nachdem die eingestellte
Zeit verstrichen ist, wird
die Lampe ausgehen.
Una breve presión activará
la lámpara a intensidad
máx. Una breve presión
mientras la lámpara está
encendida, la apagará. Con
una presión prolongada
puede aumentar la intensi-
dad luminosa hasta el
máximo y disminuirla hasta
el mínimo. La siguiente
presión invertirá la dirección
de la regulación. La lámpara
se apagará después de que
el tiempo introducido haya
transcurrido.
Una breve presión iluminará
la lámpara a la última
intensidad luminosa
seleccionada. Una breve
presión mientras la lámpara
está encendida, la apagará.
Con una presión prolongada
puede aumentar la intensi-
dad luminosa hasta el
máximo y disminuirla hasta
el mínimo. La siguiente
presión invertirá la dirección
de la regulación. La lámpara
se apagará después de que
el tiempo introducido haya
transcurrido

- 13 -
4 / C*
Multi-position
dimmer
Meerstanden
dimmer
Variateur multi
position
Multipositions-
dimmer
Dimmer
multiposición
Operating the push button
will turn on the lamp to full
intensity. Each time the
push button is pressed
within 5 seconds after the
previous operation the
light intensity will modify
with 25%. If the lamp is on
and the previous opera-
tion happened more than
5 seconds ago, the lamp
will turn off. After the set
time has elapsed, the
lamp will turn off.
Bedienen van de
drukknop zal de lamp op
volle sterkte doen
branden. Iedere keer dat
men binnen de 5
seconden na een vorige
bediening de drukknop
opnieuw bedient, zal de
lichtsterkte met 25%
wijzigen.
Indien de lamp reeds
brandt en een vorige
bediening langer dan 5
seconden geleden is, zal
de lamp doven.
Nadat de ingestelde tijd
verlopen is, zal de lamp
uitdoven.
L’actionnement du
bouton poussoir allumera
l’ampoule au maximum.
Chaque actionnement du
bouton poussoir dans un
délai de 5 secondes
après le précédent
actionnement modifiera
l’intensité lumineuse avec
25%. Si l’actionnement
du bouton poussoir est
hors du délai des 5
secondes lorsque l’am-
poule est allumée,
l’ampoule s’éteindra.
L’ampoule s’éteindra
après l’écoulement du
délai introduit.
Eine Bedienung der
Drucktaste wird die Lampe
auf voller Lichtstärke
brennen lassen.
Jedesmal, wenn man
innerhalb von 5 Sekunden
nach der vorigen Bedienung
die Drucktaste nochmals
bedient, wird die Lichtstärke
um 25% geändert werden.
Wenn die Lampe schon
brennt und die vorige
Bedienung vor 5 Sekunden
ausgeführt wurde, wird die
Lampe erlöschen.
Nachdem die eingestellte
Zeit verstrichen ist, wird die
Lampe erlöschen.
5 / D*
Slow-on
dimmer
Langzaam aan
dimmer
Variation à
allumage lent
"Langsam ein"-
Dimmer
Dimmer con
encendido lento
Operating the push button
will turn on the lamp
gradually. The time
needed for the lamp to
burn at full intensity
depends on the rotary
switch used to determine
the time setting. Operat-
ing the push button while
the lamp is on will switch
off the lamp immediatly.
Bedienen van de
drukknop zal de lamp
geleidelijk aan doen
branden. De tijdsduur
nodig om de lamp tot op
volle lichtsterkte te doen
branden, wordt bepaald
door de draaischakelaar
voor de tijdsinstelling.
Bedienen van de
drukknop wanneer de
lamp reeds brandt, zal de
lamp onmiddellijk
uitschakelen.
L’actionnement du
bouton poussoir allumera
progressivement l’am-
poule. L’interrupteur
rotatif du réglage de délai
détermine le délai néces-
saire pour allumer l’am-
poule au maximum.
L’actionnement du
bouton poussoir lorsque
l’ampoule est allumée,
éteindra l’ampoule
instantanément
Eine Bedienung der
Drucktaste wird die Lampe
allmählich brennen lassen.
Die erforderliche Dauer um
die Lampe auf voller
Lichtstärke brennen zu
lassen, wird vom
Drehschalter für die
Zeiteinstellung bestimmt.
Eine Bedienung der
Drucktaste wenn die Lampe
schon brennt, wird die
Lampe sofort ausschalten
Si se pulsa el pulsador, la
lámpara se encenderá a
intensidad máxima.
Cada presión dentro de
los 5 segundos después
de la presión anterior
modificará la intensidad
luminosa con un 25%. Si
se pulsa el pulsador fuera
del tiempo de 5 segundos
mientras la lámpara está
encendida, la apagará.
La lámpara se apagará
después de que el tiempo
introducido haya transcu-
rrido.
Si se pulsa el pulsador la
lámpara se iluminará
progresivamente. El
interruptor giratorio del
ajuste de tiempo determi-
na el tiempo necesario
para activar la lámpara a
intensidad luminosa.
La lámpara se apagará
inmediatamente si se
pulsa el pulsador mientras
la lámpara está encendi-
da.

- 14 -
6 / E*
Slow-off dimmer
Langzaam uit
dimmer
Variation à
extinction lente
"Langsam aus"-
Dimmer
Dimmer con
apagado lento
Operating the push button
will turn on the immediately
to full intensity. Operating
the push button while the
lamp is burning at full
intensity will turn off the
lamp gradually. The time
needed for the lamp to turn
off completely depends on
the rotary switch used to
determine the time setting.
Operating the push button
while the lamp turns off
gradually will immediately
turn on the lamp to full
intensity.
Bedienen van de drukknop
zal de lamp onmiddellijk op
volle lichtsterkte doen
branden. Bedienen van de
drukknop wanneer de lamp
reeds op volle lichtsterkte
brandt, zal de lamp
geleidelijk aan uitdoven. De
tijdsduur nodig om de lamp
volledig te laten uitgaan,
wordt bepaald door de
draaischakelaar voor de
tijdsinstelling. Bedienen van
de drukknop tijdens het
langzaam uitdoven van de
lamp zal de lamp
onmiddellijk op volle
lichtsterkte doen branden.
L’actionnement du bouton
poussoir allumera instanta-
nément l’ampoule au maxi-
mum. L’actionnement du
bouton poussoir lorsque
l’ampoule est allumée au
maximum éteindra l’ampoule
de manière progressive.
L’interrupteur rotatif du
réglage de délai détermine le
délai nécessaire pour
éteindre l’ampoule
complètement. L’actionne-
ment du bouton poussoir lors
de l’extinction progressif de
l’ampoule rallumera l’ampou-
le au maximum.
Eine Bedienung der
Drucktaste wird die Lampe
sofort auf voller Lichtstärke
brennen lassen.
Eine Bedienung wenn die
Lampe schon auf voller
Lichtstärke brennt, wird die
Lampe allmählich erlöschen
lassen. Die erforderliche
Dauer um die Lampe ganz
erlöschen zu lassen wird
vom Drehschalter für die
Zeiteinstellung bestimmt.
Eine Bedienung der
Drucktaste wenn die Lampe
langsam erlischt, wird die
Lampe sofort auf voller
Lichtstärke brennen lassen.
7 / F*
Slow on/off
dimmer
Langzaam
aan/uit dimmer
Variateur à
allumage/
extinction lent
"Langsam ein/
aus"-Dimmer
Dimmer con
encendido/
apagado lento
Operating the push button
will turn on the lamp
gradually.
Operating the push button
while the lamp is on will
turn off the lamp gradually.
The time needed for the
lamp to turn on or off
depends on the rotary
switch used to determine
the time setting.
Bedienen van de drukknop
zal de lamp geleidelijk aan
doen branden. Bedienen
van de drukknop wanneer
de lamp reeds brandt, zal de
lamp geleidelijk aan
uitdoven. De tijdsduur nodig
om de lamp volledig te laten
aan of uitgaan wordt
bepaald door de
draaischakelaar voor de
tijdsinstelling.
L’actionnement du bouton
poussoir allumera l’ampoule
de manière progressive.
L’actionnement du bouton
poussoir lorsque l’ampoule
est allumée, éteindra pro-
gressivement l’ampoule.
L’interrupteur rotatif du
réglage de délai détermine le
délai nécessaire pour allumer
ou éteindre l’ampoule
complètement.
Eine Bedienung der
Drucktaste wird die Lampe
allmählich brennen lassen.
Eine Bedienung der
Drucktaste wenn die Lampe
schon brennt, wird die
Lampe allmählich erlöschen
lassen.
Die erforderliche Dauer um
die Lampe ganz erlöschen
zu lassen wird vom
Drehschalter für die
Zeiteinstellung bestimmt.
Si se pulsa el pulsador la
lámpara se iluminará
inmediatamente a
intensidad máx.
Si se pulsa el pulsador
mientras la lámpara está
encendida a intensidad
máxima, la apagará de
manera progresiva. El
interruptor de ajuste de
tiempo determina el
tiempo necesario para
apagar la lámpara
completamente. Si se
pulsa el pulsador durante
el apagado progresivo la
lámpara vuelve a encen-
derse a intensidad máx.
Si se pulsa el pulsador la
lámpara se iluminará
progresivamente.
Si se pulsa el pulsador
mientras la lámpara está
encendida, la apagará de
manera progresiva.
El interruptor de ajuste de
tiempo determina el
tiempo necesario para
encender o apagar la
lámpara completamente.

- 15 -
Remark: The set mode is only applicable on push buttons connected to the direct push button input and to push buttons connected via the Vel-
bus®which were attributed the mode function in the learning mode (see learning mode). If the TIME rotary switch is set on 0, the dimmer module
will always operate in moment control, regardless of the set operating mode. In other words: the light bulb will burn as long as the push button is
being pressed. If the TIME rotary switch is set on F, the dimmer module will not automatically deactivate or the dimming speed will be at its peak
if the module is set in slow on, slow off or slow on/off mode.
Opmerkingen: De ingestelde mode is enkel van toepassing op drukknoppen aangesloten op de directe drukknopingang en op drukknoppen
aangesloten via de VELBUS die de mode-functie toegekend kregen in de leerstand (zie leermode). Indien de ‘TIME’ draaischakelaar op ‘0’ staat, zal
de dimmermodule steeds in momentbediening werken ongeacht de ingestelde werkingsmode. Dit wil zeggen: de lamp brandt zolang de drukknop
bediend wordt. Indien de ‘TIME’ draaischakelaar op ‘F’ staat, zal de dimmermodule niet automatisch uitschakelen of zal de dimsnelheid maximaal zijn
als de dimmermodule in de langzaam aan, langzaam uit of langzaam aan/uit mode ingesteld staat.
Remarque : Le mode sélectionné ne s’applique qu’aux boutons-poussoirs connectés à l’entrée directe du bouton-poussoir et aux boutons-poussoirs
connectés via le Velbus®ayant reçus la fonction en mode d’apprentissage (voyez le mode d’apprentissage). Le module variateur fonctionnera toujours
en mode de contrôle momentané lorsque l’interrupteur rotatif 'TIME' est positionné sur '0', et ceci malgré le mode de fonctionnement utilisé. Bref,
l’ampoule est allumée aussi longtemps que le bouton-poussoir est actionné. Lorsque l’interrupteur rotatif 'TIME' est positionné sur 'F', le module varia-
teur ne se déclenchera pas de manière automatique ou la vitesse de variation sera maximale lorsque le module est en mode d’allumage lent, extinction
lente ou allumage/extinction lent.
Bemerkungen: Der eingestellte Modus eignet sich nur für Drucktasten, die mit dem direkten Drucktasteneingang verbunden sind und für
Drucktasten, angeschlossen über das Velbus®-System und denen die Modusfunktion im Lernmodus zugeteilt wurde (siehe Lernmodus). Wenn
der TIME-Drehschalter auf ’0’ steht, wird das Dimmermodul immer in Momentbedienung funktionieren, ungeachtet des eingestellten
Betriebsmodus. Mit anderen Worten: Die Lampe brennt solange die Drucktaste gedrückt wird. Wenn der TIME-Drehschalter auf ’F’ steht, wird das
Dimmermodul nicht automatisch ausschalten oder wird die Dimmgeschwindigkeit maximal sein, wenn sich das Dimmermodul im ’langsam EIN’,
’langsam AUS’ oder ’langsam EIN/AUS’-Modus befindet.
Nota: El modo seleccionado sólo se aplica a los pulsadores conectados a la entrada directa del pulsador y a los pulsadores conectados por
Velbus®que han recibido la función en el modo de programación (véase el modo de programación). El módulo dimmer funcionará siempre en el
modo de control momentáneo si el interruptor giratorio "TIME" está en la posición "0", sin considerar el modo de funcionamiento utilizado. Es
decir, la lámpara queda iluminada mientras se pulse el pulsador. Si el interruptor giratorio "TIME" está en la posición "F", el módulo dimmer no se
desactivará de manera automática o la velocidad de ajuste de la intensidad de luz estará en la posición máx. si el módulo está en el modo de
encendido lento, apagado lento o encendido/apagado lento.

- 16 -
Only push buttons connected to the Velbus via a push button interface or a control panel are appropriate for the procedure below.
Each command can accept up to 14 different push buttons. Memorize he unique address of the module.
The lamp will be switched off and the operation mode LED will blink very rapidly to indicate the learning mode. The LEDs of the
learned push buttons will also blink very rapidly.
You can add a specific push button by maintaining it pressed until the lamp lights up. When releasing the push button the lamp
will switch off and the push button indication LED will blink very rapidly as a confirmation. If this does not work then the maximum
amount of push buttons has been reached.
To delete a learned push button, maintain it pressed. When releasing the push button the indication LED will be turned off. You
can delete all learned push buttons for a specific control group by maintaining the manual control on the dimmer module pressed
until the lamp lights up. When releasing the manual control push button the lamp and the indication LEDs of all corresponding push
buttons will turn off.
LEARNING MODE
Address Command Address Command
F1 OFF: Learning push buttons switching off the lamp B1 UP: Learning push buttons increasing the lamp’s
intensity
E1 ON: Learning push buttons turning on the lamp to full
intensity A1 DWN: Learning push buttons decreasing the lamp’s
intensity
D1 TGL: Learning push buttons turning on the lamp to
full intensity or turning the lamp off 91 ATM: Learning push buttons turning on the lamp to
a specific light intensity (atmosphere)
C1 DIM: Learning push buttons/sliders activating the set
mode on the module 81 ADM: Lamp’s light intensity for corresponding
atmosphere push buttons

- 17 -
Troubleshooting:
The dimmer module features a non-resettable fuse which will blow in case of a short-circuit or overload. In this case, return
the dimmer to the manufacturer for repair.
If the lamp does not go out due to an external cause (even after switching the power supply off and on), the control transistor
will probably be faulty. In this case, return the dimmer to the manufacturer for repair.
To learn a light atmosphere set the dimmer module on address ‘81’. The LEDs of the push buttons creating atmospheric light will
blink rapidly. To assign a specific light intensity to an atmosphere push button, operate the corresponding push button until the
desired light intensity has been reached.
To set all learned atmospheric setting to full intensity, maintain the manual control on the dimmer module pressed until the lamp
burns at full intensity. When releasing the manual control push button the lamp and the indication LEDs of all corresponding push
buttons will turn off.
To learn the sliders, set the learning address on C1. Operate the slider until the lamp turns on and the corresponding LED blinks
rapidly. Erase a learned slider by operating the slider until the indication LED turns off. Quit the learning mode by resetting the
dimmer module’s original address.
You will be able to delete all push buttons and sliders saved into the memory of the dimmer module at once. Set the address to one
of the learning addresses. Maintain the manual control on the dimmer module pressed for 10 seconds. The relay will activate and
deactivate again after 7 seconds to confirm the push buttons have been erased. Set the address back to its original value.

- 18 -
LEERMODE
Adres Bedieningsfunctie Adres Bedieningsfunctie
F1 OFF: Om drukknoppen aan te leren die de lamp
uitschakelen B1 UP: Om drukknoppen aan te leren die de lamp harder
doen branden
E1 ON: Om drukknoppen aan te leren die de lamp op volle
lichtsterkte doen branden A1 DWN: Om drukknoppen aan te leren die de lamp zachter
doen branden
D1 TGL: Om drukknoppen aan te leren die de lamp op
volle lichtsterkte doen branden of uitdoven 91 ATM: Om drukknoppen aan te leren die de lamp op een
bepaalde lichtsterkte (sfeer) doen branden
C1 DIM: Om drukknoppen/schuifknoppen aan te leren die
de ingestelde mode op de module activeren 81 ADM: Om de lichtsterkte van de lamp aan te leren voor
de bijhorende sfeerdrukknoppen
Enkel drukknoppen die via een drukknopinterface of bedieningspaneel op de VELBUS aangesloten zijn komen in aanmerking voor
onderstaande procedure. Er kunnen tot 14 verschillende drukknoppen aangeleerd worden per bedieningsfunctie. Onthoud het
unieke adres van de module.
De lamp wordt uitgeschakeld en de werkingsmode-led zal nu zeer snel knipperen ter indicatie van de leermode. De indicatie-leds
van de drukknoppen die reeds aangeleerd zijn zullen ook snel knipperen.
Men kan een bepaalde drukknop toevoegen door deze lang in te drukken totdat de lamp oplicht. Bij het loslaten van de drukknop
zal de lamp uitschakelen en de indicatie-led van de drukknop zeer snel knipperen ter bevestiging. Lukt dit niet, dan is het maximum
aantal aan te leren drukknoppen bereikt. Een aangeleerde drukknop verwijderen gebeurt door deze lang in te drukken. Bij het
loslaten van de drukknop zal de indicatie-led van de drukknop gedoofd zijn.
Men kan alle aangeleerde drukknoppen voor een bepaalde bedieningsfunctie verwijderen door de manuele bediening op de
dimmermodule lang in te drukken tot de lamp gaat branden. Bij het loslaten van de manuele bedieningsdrukknop zal de lamp en de
indicatie-leds van alle bijbehorende drukknoppen doven.

- 19 -
Probleemoplossing:
De dimmermodule is voorzien van een niet-zelfherstellende zekering. Door kortsluiting of overbelasting zal deze smelten. In
dit geval moet de dimmermodule terug naar de fabrikant gestuurd worden voor herstelling.
Als door een externe oorzaak de lamp niet meer uitgaat (ook na het uit- en terug inschakelen van de netspanning) zal de
regeltransistor waarschijnlijk defect zijn. Ook in dit geval moet de dimmermodule terug naar de fabrikant gestuurd worden
voor herstelling.
Voor het aanleren van lichtsferen moet de dimmermodule op adres ‘81’ geplaatst worden. De leds van de drukknoppen om
lichtsferen op te roepen zullen nu snel knipperen. Om een bepaalde lichtsterkte toe te kennen aan een sfeerdrukknop, bedient men
de betreffende drukknop tot de vereiste lichtsterkte bekomen wordt. Om alle aangeleerde sfeerinstellingen op volle lichtsterkte te
plaatsen, houdt men de manuele bediening op de dimmermodule lang ingedrukt tot de lamp op volle lichtsterkte gaat branden. Bij
het loslaten van de manuele bedieningsdrukknop zullen de lamp en de indicatie-leds van alle bijbehorende drukknoppen
doven.Voor het aanleren van schuifknoppen wordt het leeradres op ‘C1’ geplaatst. De schuifknop wordt bediend totdat de lamp
oplicht en de bijhorende indicatie-led snel knippert. Het verwijderen van een aangeleerde schuifknop gebeurt door de schuifknop
zolang te bedienen totdat de indicatie-led dooft. Verlaat de leermode door het adres van de dimmermodule terug op zijn
oorspronkelijke unieke waarde te plaatsen.
Alle drukknoppen en schuifknoppen die in het geheugen van de dimmermodule opgeslagen kunnen in één keer gewist worden.
Stel hiervoor het adres in op één van de leeradressen. Hou de manuele drukknop op de dimmermodule ongeveer 10 seconden
ingedrukt. Eerst zal de lamp op volle sterkte branden en na een 7-tal seconden terug doven ter bevestiging van de wisoperatie.
Plaats het adres terug op zijn oorspronkelijke waarde.

- 20 -
MODE D’APPRENTISSAGE
Adresse Apprentissage Adresse Apprentissage
F1 OFF : apprentissage de boutons-poussoirs éteignant
l’ampoule B1 UP : apprentissage de boutons-poussoirs augmentant
l’intensité lumineuse de l’ampoule
E1 ON : apprentissage de boutons-poussoirs allumant
l’ampoule au maximum A1 DWN : apprentissage de boutons-poussoirs diminuant
l’intensité lumineuse de l’ampoule
D1 TGL : apprentissage de boutons-poussoirs allumant
l’ampoule au maximum ou éteignant l’ampoule 91 ATM : apprentissage de boutons-poussoirs allumant
l’ampoule à une certaine intensité lumineuse (ambiance)
C1 DIM : apprentissage de boutons-poussoirs activant
le mode d’opération introduit 81 ADM : intensité lumineuse de l’ampoule pour les boutons-
poussoirs d’ambiance correspondants
La procédure décrite ci-dessous n’est applicable que pour les boutons-poussoirs connectés au Velbus®via une interface de bouton
-poussoir ou un panneau de commande. Chaque commande peut accepter jusqu’à 14 boutons-poussoirs différents.
Mémorisez l’adresse unique du module.
L’ampoule s’éteint et la LED du mode d’opération clignotera très rapidement pour indiquer le mode d’apprentissage. Les LED des
boutons-poussoirs qui sont appris clignoteront également très rapidement.
Il est possible d’ajouter un bouton-poussoir spécifique en le maintenant enfoncé jusqu’à ce que l’ampoule s’allume. En relâchant
le bouton-poussoir l’ampoule s’éteindra et le voyant LED du bouton-poussoir clignotera très rapidement en guise de confirmation.
S’il est impossible d’ajouter un bouton poussoir, le nombre maximum a été atteint.
Maintenez enfoncé un bouton poussoir appris pour l’effacer. En le relâchant, le voyant LED de celui-ci s’éteindra.
Effacez tous les boutons-poussoirs appris pour un groupe de contrôle spécifique en maintenant enfoncé le contrôle manuel sur
le module variateur jusqu’à ce que l’ampoule s’allume. En relâchant le bouton de contrôle manuel l’ampoule et les voyants LED de
tous les boutons poussoirs correspondants s’éteindront.
Table of contents