Velleman K8095 User manual

U
Us
se
er
rm
ma
an
nu
ua
al
l
f
fo
or
r
M
MP
P3
3
p
pl
la
ay
ye
er
r
K
K8
80
09
95
5.
.
V
Ve
er
rs
si
io
on
n
1
1.
.0
0

Pagina 2 van 12 (rev.1)
Table of contents:
OVERVIEWCONNECTIONOVERVIEW..............................................................................................................................3
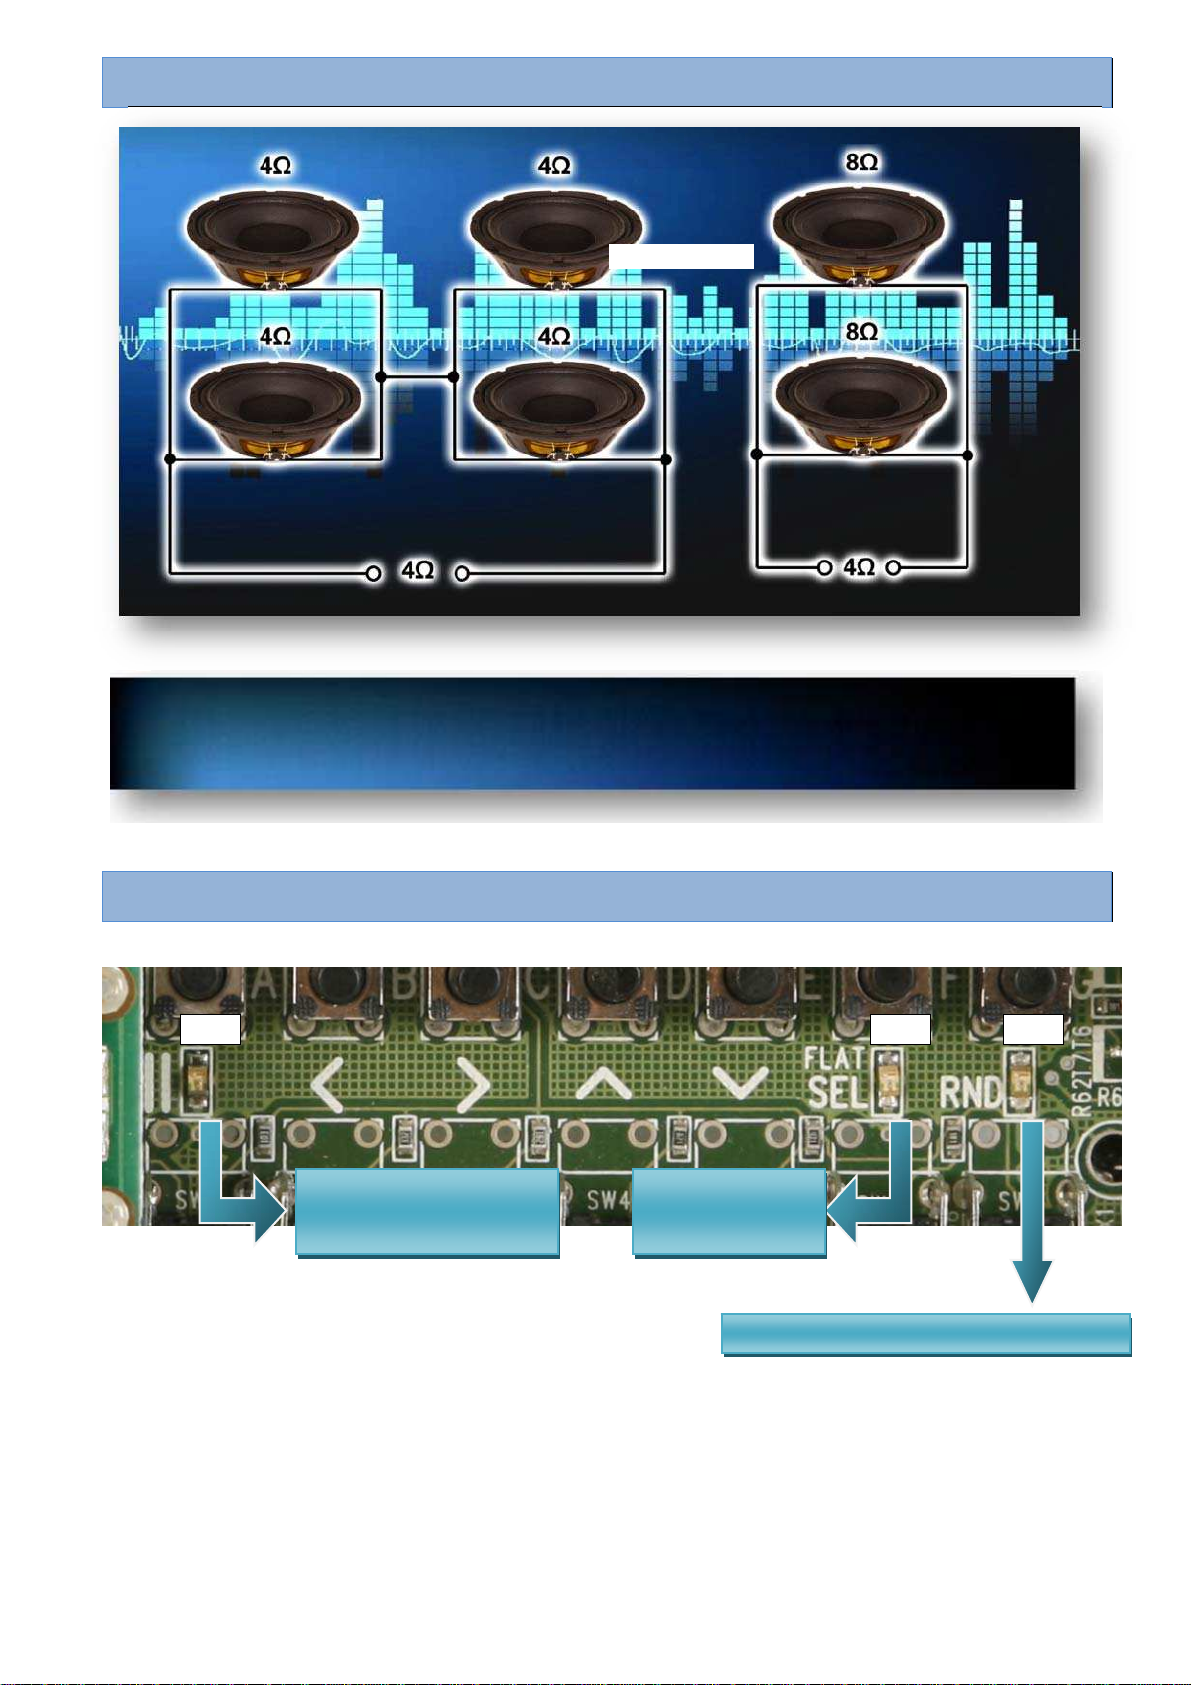
LOUDSPEAKERCONNECTIONSDIAGRAM........................................................................................................................4
LEDINDICATIONS............................................................................................................................................................4
OVERVIEWPUSHBUTTONCONTROL...............................................................................................................................5
STEREO/MONOUSE.......................................................................................................................................................5
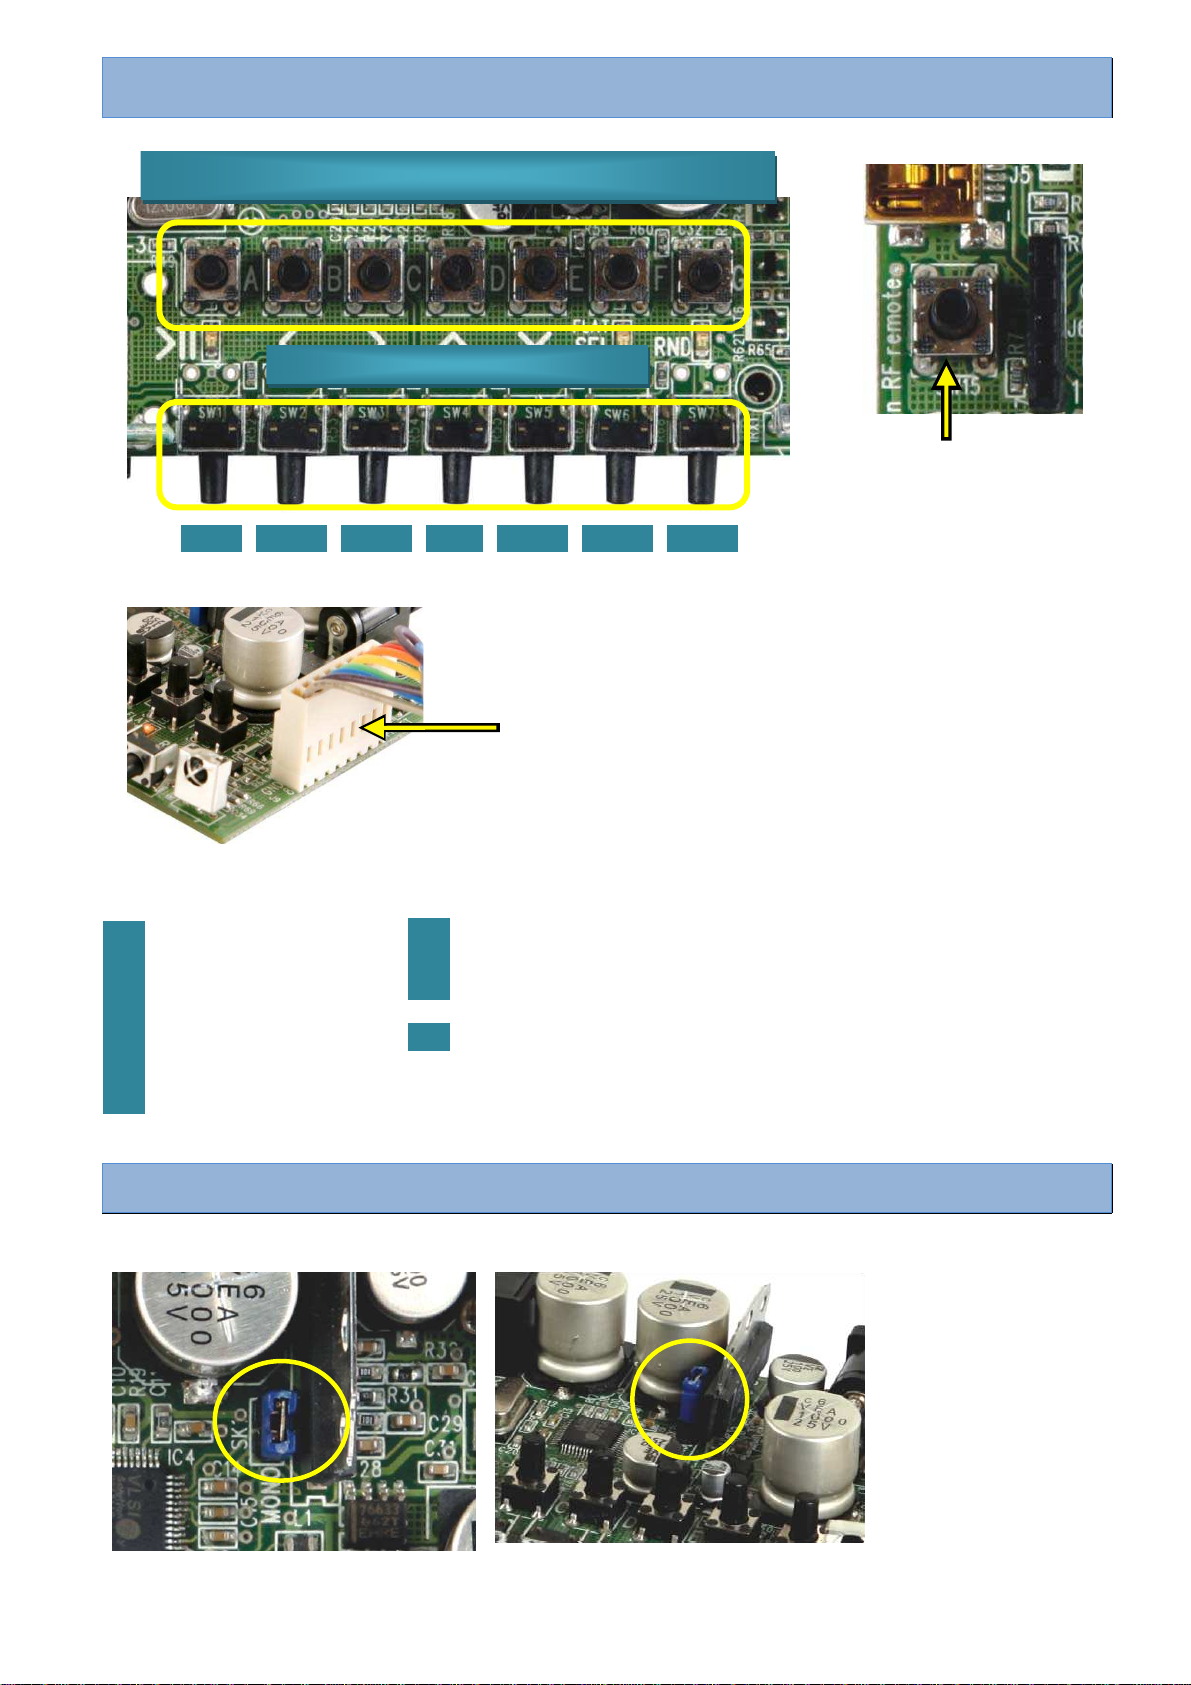
MODIFYINGTHE“PRESET”BUTTONSA...G....................................................................................................................6
LEARNINGAREMOTE......................................................................................................................................................7
1.LEARNINGARFREMOTE(VM118R/K8058/VM160DT/VM160T).........................................................................7
2.LEARNINGAIRREMOTE(K8049)..............................................................................................................................7
KEYBOARDLAYOUTFOROPTIONALREMOTES................................................................................................................8
SOUND&PLAYMODES...................................................................................................................................................9
1.SOUNDMODES:.....................................................................................................................................................9
2.PLAYMODE:..........................................................................................................................................................9
3.RANDOMMODE:....................................................................................................................................................9
Allefolders:......................................................................................................................................................................9
Selectedfolder:..............................................................................................................................................................10
PRESETPUSHBUTTONS“A”–“B”–“C”–“D”–“E”.......................................................................................................11

Pagina 3 van 12 (rev.1)
Overview Connection overview
1 Optional RF remote receiver module (part#: RX433N)
2 Line or phones output
3 Direct stereo speaker connection (see connection diagram on pag. 4)
4 Mono or Stereo output selection
5 On board power amplifier
6 Adaptor input 12Vdc regulated min. 1A
7 7 on-board preset buttons
8 Connect up to 7 external preset buttons (same action like on-board ones)
9 On-board infrared receiver
10 On-board control buttons
11 SD/SDHC card input
12 2 line 16 character LCD with backlight
13 Remote learn button
14 Mini USB PC connection
15 LCD contrast setting
Right Left GND

Pagina 4 van 12
(rev.1)
Loudspeaker connections diagram
Led indications
LD1
ON: random mode is activated
ON: Flat sound
mode
ON : play
Blinking : pause
OFF : sleep mode
LD2 LD3
Hint: If multiple speakers are used you can connect speakers in series + parallel
Rechts LinksGND

Pagina 5 van 12
(rev.1)
Overview push button control
1 2 3 4 5 6 7
Short press
1
Play / Pause
2
Back
3
Forward
4
Volume up
5
Volume down
6
Sound mode
7
Random
Long press:
1
Sleep mode
2
Fast backward
3
Fast forward
6
Folder select / play mode
Stereo / mono use
For mono output, mount a shunt on SK1.
8
Preset buttons : Play or learn a folder/music *
Connect up to 7 external preset buttons, these will have the
same action like on-board ones.
“On-board” Bedieningsknoppen
RF Remote
learn button
*
These preset buttons will be assigned to folders A to E by default if these folders are present onto the SD card.

Pagina 6 van 12 (rev.1)
Modifying the “preset” buttons A ... G
It is possible to assign different functions to the preset push buttons A ... G. These push buttons can also be
controlled by external buttons that you connect using the included cable (see the chapter “Connection
overview”).
1- Download the VM8095 Programmer software from the product page on our website: www.velleman.eu
2- Power up the VM8095.
3- Connect the VM8095 to the PC using the included USB cable (check for the correct USB hardware
installation).
4- Start the VM8095 Programmer software.
5- Click the “Connect” button in the programme, and check the VM8095 connection.
6- Select the required function for the buttons A to G.
7- Click the “Update Preset/Ext Button functions” button.
8- Check if the “Update complete” message appears.
9- When the message appears, the functions are programmed.
G F E D C B A

Pagina 7 van 12
(rev.1)
Learning a remote
1. Learning a RF remote
(VM118R / K8058 / VM160DT / VM160T)
Learning a RF remote is only possible when the RF-receiver is mounted.
(art. RX433N).
2. Learning a IR remote
(K8049)
Keep push button SW15 pressed while
transmitting with the remote. The LCD display will
blink twice to confirm that the remote is learnt
See section “mode selection” in the manual of K8049 for
setting the remote on “MODE 4”.
The remote is now ready to be used.
A
ttention: Learning a remote erase the
previous saved remote.
Data GND
+5V Antenna
20cm
Data GND+5V
“SW15”
Learn RF remote
SHIFT

Pagina 8 van 12
(rev.1)
Keyboard Layout for optional remotes
1 Play / Pause
2 Volume Up
3 Volume down
4 Random
5 Power off
6 Next
7 Previous
8 Browse presets
1
3
2
4
5
7
6
8
2
3
6
7
2
3
6
7
RF-remotes: K8058 / VM118R
IR-remote : K8049
RF-remote: VM160T
RF-remote: VM160DT
2
3
6
7
4-channel IR remote: VM191

Pagina 9 van 12 (rev.1)
Live - Hall -
Flat -
Loudness -
Heavy - Clear -
Soft and Disco
Play all - Play
folder - Repeat
folder - Repeat
all - Shuffle -
startup play on
- startu
p
p
la
y
Sound & play modes
The MP3 player features several possible play modes and preset sound modes. The “play mode” is only
available when a LCD-display is mounted!
1. Sound modes:
2. Play mode:
Play all: play all folders
Play folder: play only the selected folder
Repeat folder: repeat the selected folder after the last played song
Repeat all: repeat all folders after the last played folder
Shuffle: play in random mode all songs of all folders. In this mode a song
can be played several times.
Startup play on: When the MP3 unit is powered off it will start automatically
to play when powered on.
Startup play off: When the MP3 unit is powered off it doesn’t start
automatically to play when powered on.
To select a play mode keep push button SW6 long pressed so that you come into the setup mode, press
once shortly to go to the “play mode” folder. With the push buttons SW4 “volume up” en SW5 “volume
down” you can choose the mode and confirm with SW6.
If you want this mode for next times after switching off the power you must place the MP3 shortly in sleep
mode to save your settings.
3. Random mode:
All songs or the songs of the selected folder will randomly played once.
Alle folders:
press long SW6 “select” to open the setup menu.
Press short “SW6” for the play mode.
choose the mode “play all” with push buttons SW4 (up) / SW5 (down)
Confirm with a short press on SW6
Press push button SW7 for random play

Pagina 10 van 12
(rev.1)
Selected folder:
Select mode
o
press long SW6 “select” to open the setup menu.
o
Press short “SW6” for the play mode.
o
choose the mode “play folder” with push buttons
SW4 (up) / SW5 (down)
o
Confirm with a short press on SW6
Select folder
o
press long push button SW6 “select” to open the setup menu.
o
Select the folder with push buttons SW4 (up) / SW5 (down)
o
Confirm with a short press on SW6
Press push button SW7 for random play
SW4 SW5 SW6 SW7

Pagina 11 van 12 (rev.1)
Preset push buttons “A” – “B” – “C” – “D” – “E”
All preset push buttons will automatically be linked to a folder on the SD-card.
To do this it’s necessary that the folders on the SD-card have the folder name: A, B, C, D and E, each folder
have it’s own music files.
By pressing on a preset push buttons you’ll play the music files that are saved in the folder.
It’s possible to re-assigned other folders to these preset push buttons
Procedure to re-assign a preset push button
First select a folder
Press long push button SW6 “select” to open the setup menu.
Select the folder with push buttons SW4 (up) / SW5 (down)
Confirm with a short press on SW6
Assign now the folder
Play a song of the selected folder.
Press push button SW1 to pause the MP3 player
Press long on the preset button where you want to assigned the folder on it.
The name of the preset button and the song of that folder appears on the LCD-display
Led LD4 will blink fast to confirm if no LCD is mounted, if LCD display is mounted a message appear on the
screen (see. Fig.)

Pagina 12 van 12
(rev.1)
Velleman nv, Legen Heirweg 33, 9890 GAVERE
© 2011
V
elleman nv, Legen Heirweg 33, 9890 GAVERE
© 2012
Other manuals for K8095
2
Table of contents
Other Velleman MP3 Player manuals