VELOWAVE PRADO S User manual

1/ 16
Instructions to Set Up Your VELOWAVE PRADO S
Diagram

2/ 16
We know you are excited about getting going but please:
✓Reseat and charge the battery before the first ride
✓Make sure the pedals are tight
✓Make sure the front wheel is installed properly and tight
✓Inflate the tires properly
✓Check that all screws are properly torqued
✓Carry out a fine adjustment of the gears and brakes
✓Learn how to use the LCD display
✓Wear a helmet before riding
Please Note: Your bike may need further adjustments after assembly.
________________________________________________________
If you have any trouble with setup, please contact us online or through
our email address: support@velowavebikes.com
Please always include your order ID when reaching out to us.

3/ 16
Assembling Your E-Bike
1) Read all of the instructions carefully. Be familiar with the proper operation of all items.
2) This quick guide is intended to list the steps needed to assemble your bike with some mechanical
skills. It is not a complete manual or training. If you do not feel comfortable or lack some of the
skills to assemble it yourself, reach out to a cyclist friend, a local bike mechanic or one of our
support technicians for guidance.
3) Our QA mechanics have assembled and tested your bike beforehand.
4) To assemble your bike, work on a clean area with enough space to maneuver.
5) If installed, remove the battery from the bike to start the assembly。
6) Inspect the bike completely to be sure no damage occurred during shipping.
7) The kickstand is designed to support the bicycle only. Not the rider mounted。
8) You can adjust your saddle position and the tilt on your handlebar items for comfort.
9) Check all screws and parts are tight and properly fixed. We recommend a pre-trip inspection
before your first rides.

4/ 16
Installing Your Handlebars
1) Point the headset towards the front of the bike.
2) Place the handlebar in the handlebar mount being careful with the wires.
3) Face the mounting brackets on the front end of the mount with the round edges facing outward.
Adjust the handlebar angle to your comfortable riding posture.
4) Secure the mounting brackets with four screws.
5) Verify your front tire lines up with your headset.
6) Check all headset items are tight.

5/ 16
Installing Your Front Wheel
1) Insert the axle into the wheel hub as shown. Add the Slim Spacer on the LEFT side (Brake Disk)
and the Wide Spacer on the RIGHT side.
2) Insert the front wheel with the spacers in between the front fork on the bike. Be sure to align the
disk between the brake caliper as shown in Figure 2. Balance the length of the axel at the left
and right side of the fork to make room for the washers and nuts.
3) Now on the outside add the hooked washer first, facing the hook toward the fork and stuck it in
the gap of the fork end. Add the flat washer and nut on the end of the axel and hand turn until
snug.
4) Using your wrench, tighten each side alternatively until snug (you might need to secure the
opposite nut slightly so the whole axle doesn’t turn).
5) Now tighten each nut putting your weight into the wrench. Your front wheel is now installed.
6) The Adjustment Nut needs to be very tight, be sure to retighten after your first couple
rides.
Brake Caliper and Brake disk on left side of bike
Figure 1
Figure 2

6/ 16
Installing Your Front Fender and Headlight
1) Install the front fender first. Align the fender clamps on the left and right legs of the fork with
the fender stay to enable the fender in the line with the wheel. Fix the stay with the screws
provided on the clamp.
2) Put the headlight with its bracket in front of the fork gantry, put the lifting lug of the fender
behind it. Link and secure the three pieces with the screw provided on the headlight (you
might need to secure the opposite nut slightly so the screw doesn’t turn).
3) Connect the headlight cable with the wire coming from the downtube.

7/ 16
Installing Your Pedals
1) Warning: Incorrect installation will cause damage. Please read the instructions and watch our
videos if needed.
2) Identify the Left and Right markings on the pedals. They can only be installed in their respective
side.
a. L is for the Left Pedal and it goes on the Left Crank Arm.
b. R is for the Right pedal and it goes on the Right Crank Arm (Chain Side).
3) Sitting on your bike the pedals go on the Left and Right side respectively.
4) Keep the pedal Horizontal while hand screwing to get the thread started. Then Use your 15mm
wrench to tighten them.
5) Both pedals tighten towards the front of the bike. The left pedal is reverse threaded to allow this.
6) The pedals need to be very tight, be sure to retighten after your first couple rides.
Use your 15mm
wrench to properly
tighten the pedals
Right Pedal /
Chain Side
Left Pedal /
Key Side
Both pedals tighten
towards the front
Rear
Front

8/ 16
Installing and Removing the Battery
To Install the Battery
1) Release the seat post clamp; remove the seat to leave space for mounting the battery.
2) Ensure the battery is turned off before sliding it into the frame mount receptacle.
3) Do not force the battery onto the receptacle; locate the slots on the battery and the receptacle,
slowly align and push the battery down into the receptacle.
4) Push and rotate the key to the “LOCK” position. Remove the key after the battery is locked.
5) Ensure the battery has been properly secured to the bike before each use by carefully pulling
upwards on the battery with both hands to test the security of the attachment of the battery
to the mount.

9/ 16
To Remove the Battery
1) Turn off the LCD display; turn off the battery switch.
2) Use the key to unlock the battery.
3) Carefully slide the battery upwards and lift it off the frame.
Note: the battery weighs around 8 lbs and should be handled with care.
When the Battery is Removed
⚫Do not touch the “+” and “-” terminal contacts on the bottom of the battery when the battery
is removed from the bike.
⚫Be careful not to drop or damage the battery when loose from the bike.
⚫Avoid damaging the exposed connector terminals and keep them clear of debris.
Preparations Before Riding
1) Read all instructions carefully, be familiar with the proper operation of all items. Check for
detailed information and guidance on our product page.
2) Warning: Basic electric precautions should always be followed to avoid issues or malfunction.

10 / 16
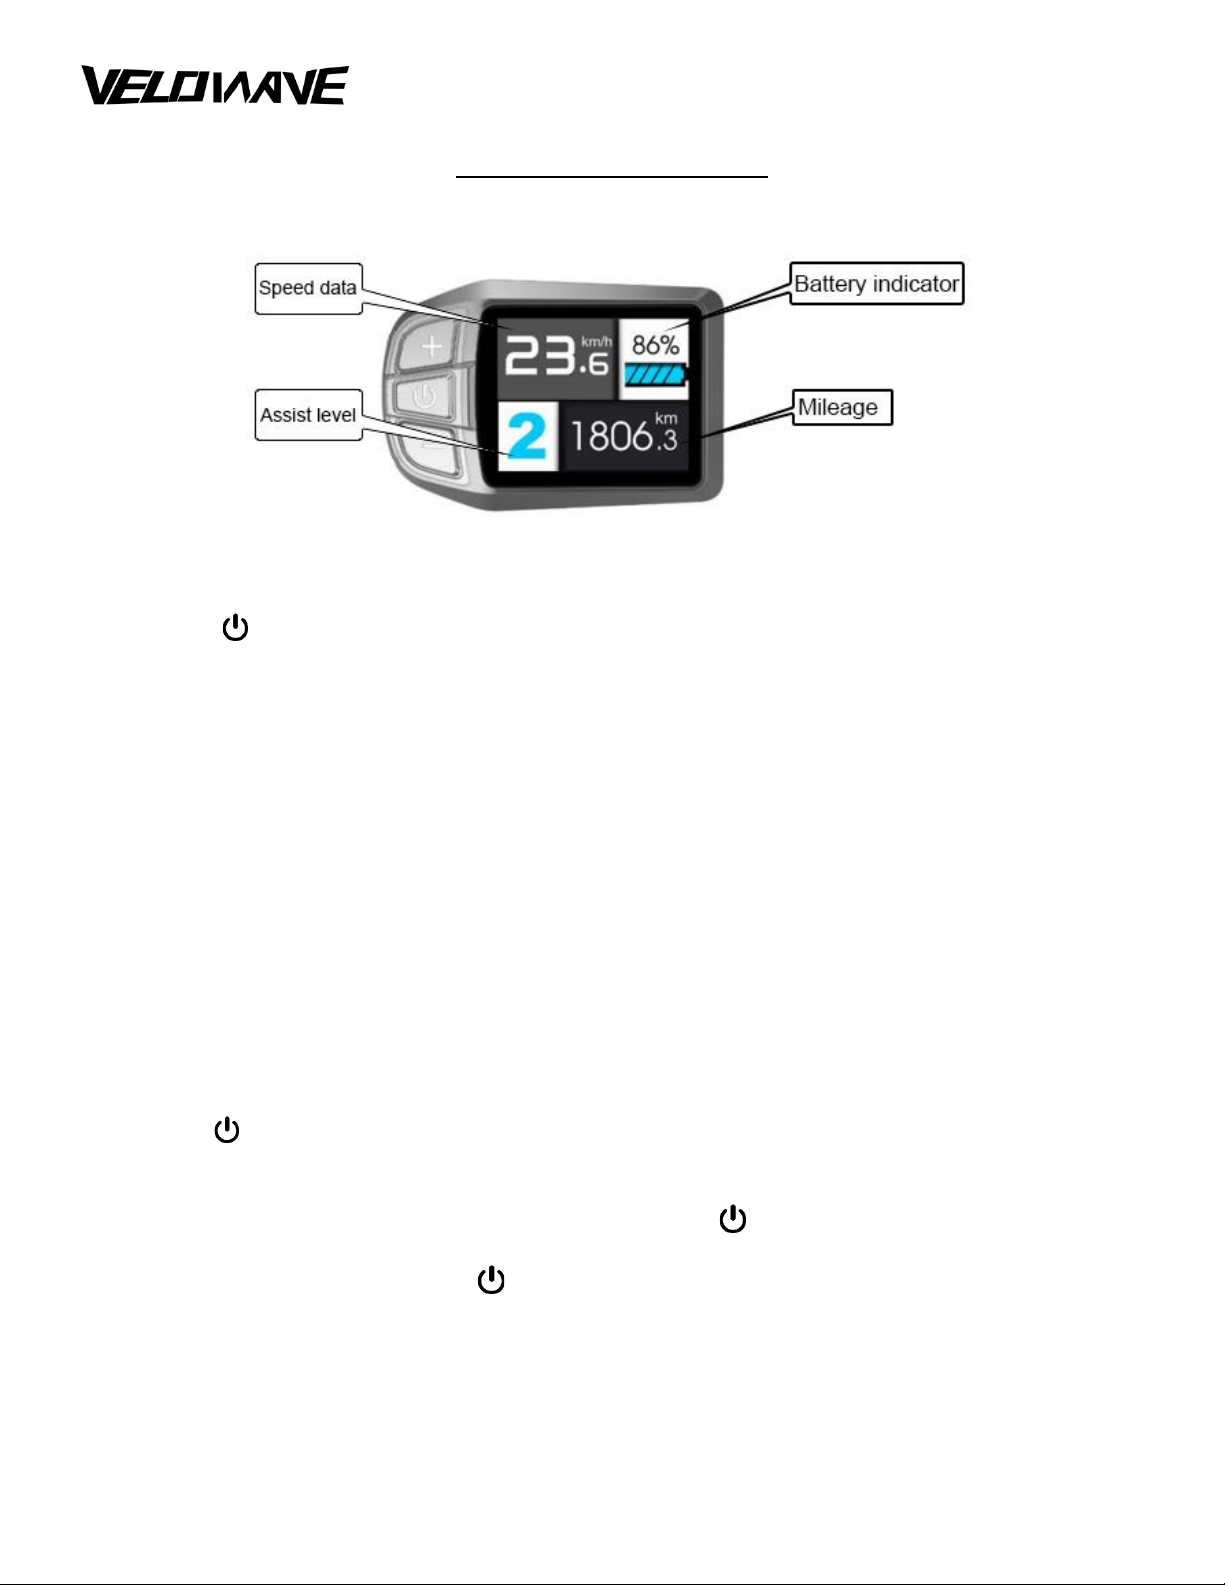
How to Use the Display
1) Power on/off
Press the button to turn on the display. Your bike will be ON. Press again to turn it off. The
display will automatically shut down when there is no operation or riding for 5 minutes.
2) Adjust the assist level
Short press “+” or “-” button to change the assist level from 0 to 5. 0 is without assist. 5 is the
max assist level.
3) Headlight
If your bike is installed with a headlight, press and hold “+” button for 1 second to switch on or
switch off the headlight.
4) Walking mode
Press and hold “-” button for 2 seconds to shift into walking mode, the display indicates P and
the bike will be propelled at walking pace. Release the button to exit the walking mode.
5) Information menu
Press the button for 1 second to shift into information menu, it will show TRIP, ODO and TIME.
6) Parameter setting menu
With the display powered on, if you quickly press the button twice, it will shift into the
parameter setting menu. Users are NOT supposed to change the factory default settings. You
may exit by quickly pressing the button twice again or leave it without operation for 30
seconds.

11 / 16
How to Charge Your Bike
The battery can be charged when locked on the bike or unlocked and removed from the bike.
1) Turn off the battery by switching the power button on the battery to OFF.
2) Remove the rubber cover on the charging port and insert the charger into the charging port.
3) Plug the charger into an appropriate power outlet. When the charger is plugged in, the red
light on the charger will illuminate to show that the battery is charging.
4) Charge the battery, making sure not to charge for longer than 12 hours at a time. When the
battery is fully charged, the LED will turn green and charging will be stopped.
Note: The charger is designed to automatically stop charging when the battery is full, but
unnecessary wear of the charging components could occur if the charger is left attached to the
battery and a power source for longer than 12 hours. Detach the charger as soon as possible
once the green light indicates a complete charge, to avoid unnecessary wear of charging
components.
5) Once the battery is charged, unplug the charger from the power outlet.
6) Unplug the charger from the battery. Store the charger in a safe place for future use.
Note: The battery capacity indicator located at the left side of the battery indicates the battery
capacity status. GREEN light indicates the voltage is higher than 48V, rest battery charge higher
than 60%; YELLOW light indicates the voltage is in between of 48V and 41.5V, rest battery
charge from 20% to 60%; RED light indicates the voltage is less than 41.5V, rest battery charge
less than 20%. It’s recommended to charge the battery in time when it’s under yellow light status.

12 / 16
Do not leave a charging battery unattended. Never charge a battery for more than
12 hours at a time. Failure to follow battery charging best practices could result in
unnecessary wear to the charging components, battery, and or charger, and could lead to
an under-performing or non-functional battery and replacement will not be covered under
warranty.
Notes of Charging and Storage:
1) Pay attention to check whether the surface temperature of the battery case rises too high
during charging. It is FORBIDDEN to cover the battery during charging.
2) Due to high temperature in summer time, it is NOT advisable to charge it immediately after
riding. In winter, it is FORBIDDEN to charge the battery in environment below 0
℃
. It is
recommended to charge the battery in room temperature.
3) If the battery will not be used for a long period, take it off from the bike and discharge its
capacity to 60%-80% for stock. Disconnect it from the charger and place it in a dry, ventilated
place without direct sunlight. In order to maintain a long lifecycle, it is recommended to charge
the battery every two months.

13 / 16
Error Code
Error
Code
Error
Notes
4
Open Throttle Fault
Throttle has not returned to the start position on start-up. Check to
see if the throttle can return to the start position or if there is
something blocking the throttle unit.
5
Throttle Fault
Throttle may be damaged. Check the throttle or throttle cable for
damage.
6
Low Voltage Protection
The battery voltage is too low to operate. Incorrect battery was
used on the bike. The battery is in sleep mode or not functioning
correctly.
7
Over Voltage Protection
The battery voltage is too high to operate. Incorrect battery was
used on the bike.
Check to be sure that the correct battery is being used on the bike
8
Motor Hall Signal Fault
At least one of the motor’s hall sensor wires have been
disconnected or damaged.
Disconnect and reconnect the motor cable.
9
Motor Phase Line Fault
At least one of the motor’s phase wires has been disconnected or
damaged.
10
High Temperature Fault
The controller has reached the highest allowable temperature.
Allow the controller to cool down before using the e-bike again.
12
Current Sensor Fault
The controller’s current sensor has become disconnected or
damaged. Contact technical support.
15
Temperature Sensor
Fault
The controller’s temperature sensor has become disconnected or
damaged. Contact technical support.
21
Speed Sensor Fault
The speed sensor has become disconnected or damaged. Contact
technical support.
30
Communication Fault
Poor connection between the controller and the display. Check all
cable connectors. Check for corrosion damage.

14 / 16
BASIC TROUBLESHOOTING
SYMPTOMS
CAUSES
SOLUTIONS
Throttle and pedal assist not
working
⚫Battery off
⚫Turn on battery
⚫Battery installation
⚫Reseat battery
⚫LCD display not on
⚫Turn on LCD display
⚫Discharged battery
⚫Charge battery
⚫Brake sensors engaged
⚫Inspect brake lever
Reduced speed
⚫Low battery power
⚫Charge battery
Reduced battery range
⚫Low battery power
⚫Charge battery
⚫Low tire pressure
⚫Inspect tire
⚫Heavy load on bike
⚫Adjust bike load
⚫Driving on rough terrain
⚫Adjust route
⚫Using throttle only
⚫Include pedal assist
Battery does not charge
⚫Charger not properly
connected
⚫Inspect connections
⚫Battery temperature
⚫Read the user manual for best
practices
⚫Damaged charger
⚫Replace charger
⚫Issue with battery
⚫Contact Support Team
E-bike making strange noises
⚫Loose hardware
⚫Tune-up and inspection needed
⚫Issue on drivetrain
⚫Maintenance needed
⚫Issue with motor
⚫Contact Support Team

15 / 16
Label of Your PRADO S

16 / 16
To find out more, please visit our website at
www.velowavebikes.com
Table of contents
Other VELOWAVE Bicycle manuals