ENGLISH | 1918 | ENGLISH
ENGLISH
ENGLISH
TROUBLESHOOTING
Juicer has no power
The drum lid will not close
Low juice yield
• Check if the power cord is properly
plugged in.
• Check if the drum lid and the juicing
bowl are properly assembled.
• Check if the top-set and the base are
properly assembled.
• During the very beginning of
extraction, the pulp can be more
moist.
• Depending on the ingredient’s
condition, the extracted pulp can
be affected; especially when the
ingredient is not fresh, the juice can
be extracted with the pulp.
• The juicing screw and the strainer
are set up to crush and squeeze the
ingredients. It is normal for the juic-
ing screw and the strainer to vibrate.
• If the ingredient contains strong
ber, the vibration from the top-set
may be stronger.
• When continuously juicing, and de-
pending on the ingredient, the juice
may contain a lot of ne pulp.
• To reduce the ne pulp, clean the
top-set frequently and extract the
pulp.
• Use a mesh strainer and put the juice
through it to collect the unwanted
pulp.
• If the strainer and the screw are
damaged and affecting the juicer’s
performance, it is recommended
the parts be replaced. *The lifetime
of each part may vary depending
on length and method of use and
ingredients extracted.
• If too many ingredients are inserted
at the same time, it may cause the
juicer to stop frequently. This can
lead to pulpy juice. Insert the ingre-
dients slowly and few at a time.
• Make sure the juicing screw is
pushed all the way in to the strainer
in order for the drum lid to close
properly.
• Different ingredients hold different
amounts of uid that will yield differ-
ent amounts of juice.
• If the ingredients are not fresh, they
may contain reduced amounts of
uid, which will yield less juice.
• Check if the compression silicone is
rmly inserted.
• If the ingredient itself has low water
content, it may help to soak it in
water before juicing.
• If juicing ingredients with small
seeds, after a few servings, it may re-
duce the juice yield. For best result,
disassemble and wash the top-set in
between juicing.
Juicer will not operate if parts are not
assembled properly.
If there is seed residue on the bottom
of the strainer, this can affect juicer per-
formance and the overall juice yield.
If the juicing screw is not properly in
position, the drum lid may not close.
Too much pulp in juice
The extracted pulp is very moist
During operation, the juicing bowl
shakes
?
?
?
?
?
?
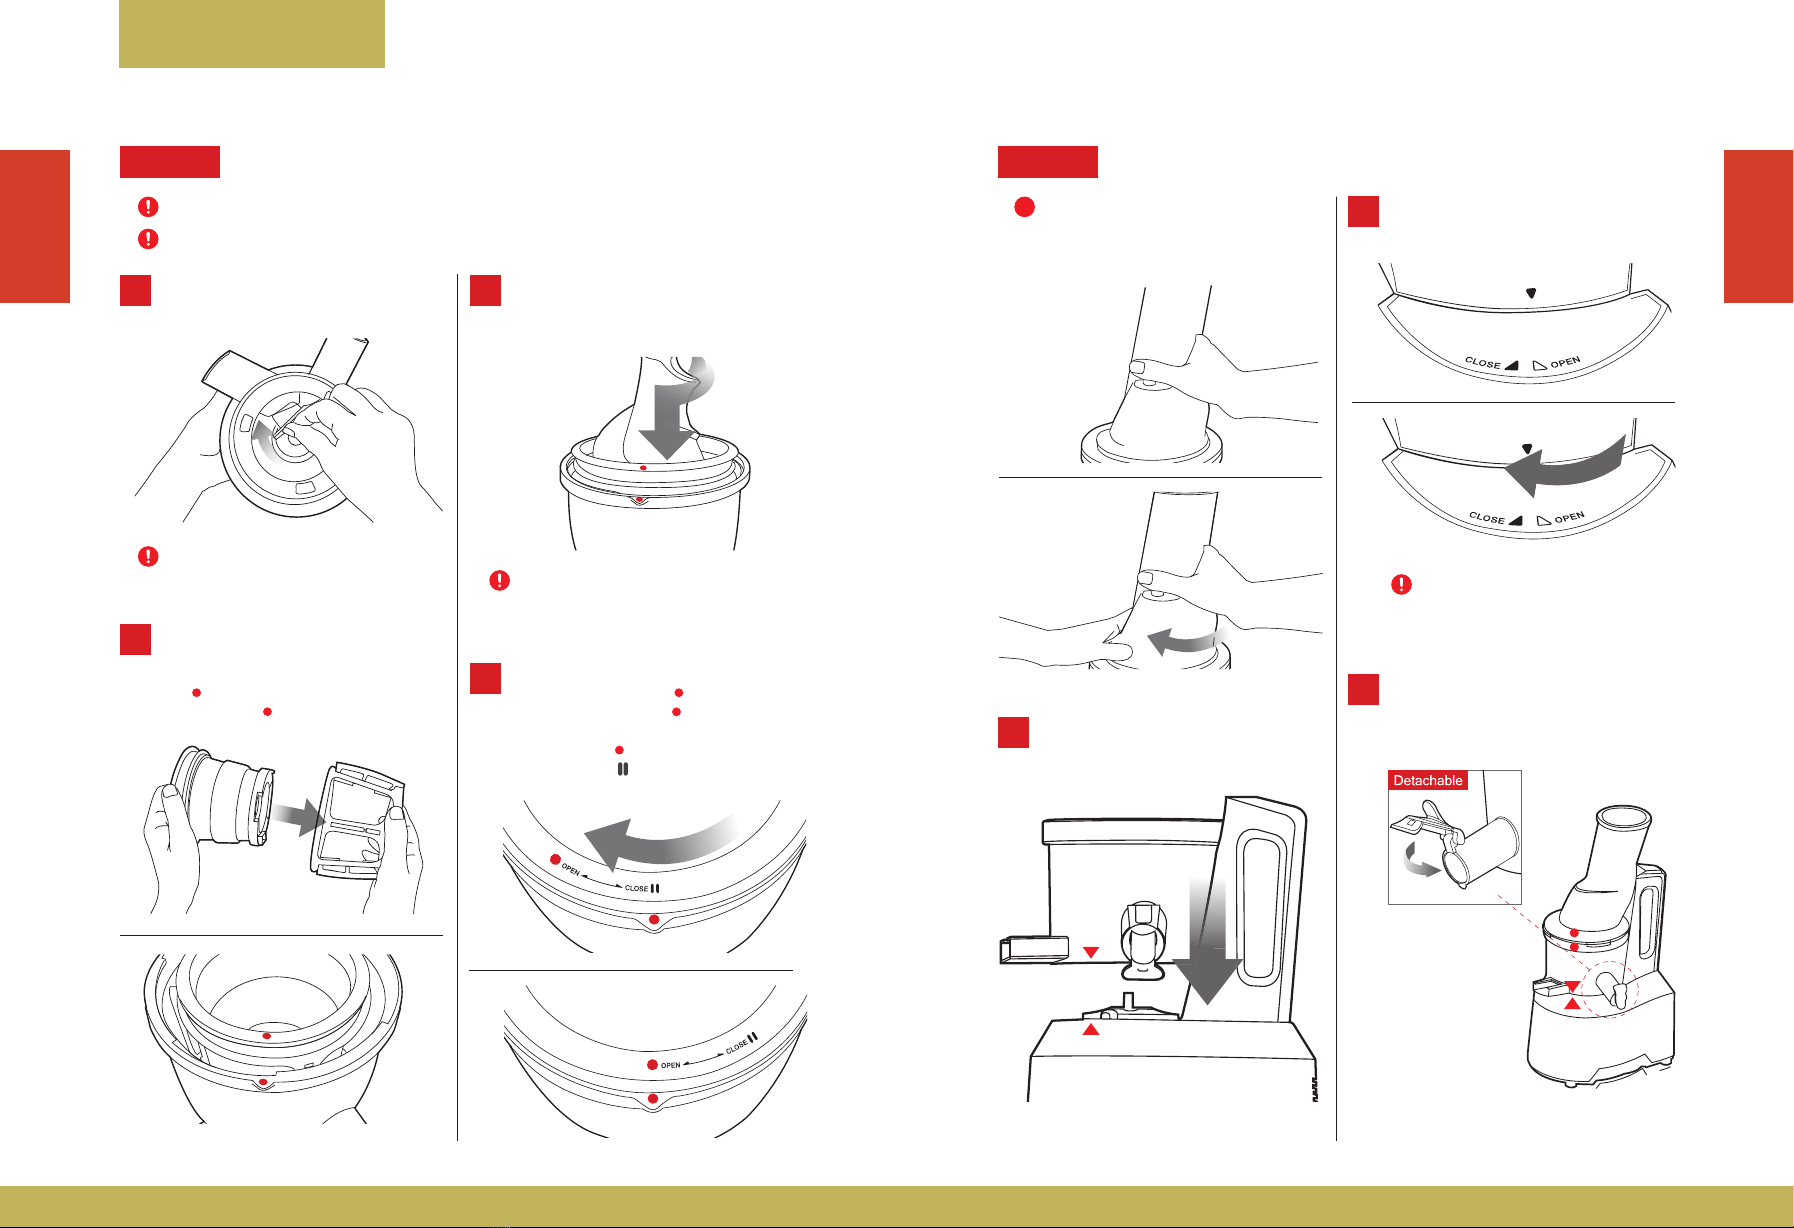
CARE AND CLEANING
1 4
5
2
Switch OFF and unplug the power
cord from the wall outlet.
Remove the juicing screw, strainer and
rotation wiper unit from the juicing
bowl. Clean with provided brush.
Place the juicing bowl under running
water and unplug the compression
silicone to clean the pulp spout.
Turn the drum lid counter clockwise to
open.
Extract all the remaining pulp in the
juicing bowl before stopping the juicer.
For easier clean up, operate the juicer
for an additional 30 seconds after the
juice is extracted.
If the drum lid is stuck, press the
REVERSE —OFF — FORWARD button
in this order, switching back and forth
2 to 3 times to dislodge. Then place
hands on top of the drum lid and rmly
press down simultaneously turning the
drum lid counter clockwise to open. Clean the juicer immediately after each
use. if remaining residue in the juicer
dries up, it can make disassembling and
clean-up difcult. The excess build up
can cause poor performance in future
uses.
For easier disassembly, place the
top-set in the sink and run the water
through from the top of the top-set.
Thoroughly dry the bottom of the
juicing screw where it connects to the
metal cylinder shaft on the base.
Soak the juicing bowl in a solution of
warm water with baking soda or little
bit of bleach to clean the excess build
up.
When moving the appliance, do not Iift
by grabbing the feeding tube. Always
lift the appliance by grabbing the base
or handle.
?
?
?
3Place the bowl on the base so that
its grey arrow lines up with the black
arrow on the base.