VETRON 5000 User manual

5000 / 5100 » INSTRUCTION MANUAL
07/2020


5000/5100 » INSTRUCTION BOOK
07/2020
STANDARD
»5000
»5010
»5020
»5030
»5040
LONGARM
»5100
»5110
»5120
»5130

© VETRON | TYPICAL GmbH
Clara-Immerwahr-Str. 6
67661 Kaiserslautern, Germany
Tel.: +49 6301 320 75 - 0
Fax: +49 6301 320 75 - 11
info@vetrontypical.com
www.vetrontypical.com
All rights reserved.
The instructions for use, service instructions, parts lists are protected by copyright. Any reuse of the
content outside the copyright is without the written consent of VETRON | Typical GmbH inadmissible
and punishable.
VETRON | Typical GmbH is only liable for damage caused by intent or gross negligence on the part of
the manufacturer. Otherwise, liability is excluded.
Reserve technical changes!
The contents were carefully prepared and checked by the publisher. Due to continuous development,
illustrations, functional steps and technical data may dier slightly.
Updating the documentation
If you have suggestions for improvement or have detected any irregularities, please contact us.
The documents for the machines can be accessed by logging on
https://www.vetrontypical.com/ downloaded for free.
CE marked after §7 Prod SG

03
07/2020
VETRON 5000/5100 - FLAT BED MACHINE - INSTRUCTION BOOK
INDEX
VETRON 5000/5100 - FLAT BED MACHINE
01. PREFACE
05 01. SAFETY INSTRUCTIONS
06 02. SYMBOLISM
07 03. DANGER NOTES
08 04. PRODUCT INTRODUCTION / INTENDED USE / CONFORMITY DECLARATION
09 05. TECHNICAL DATA
10 06. TRANSPORT - PACKAGING - DISPOSAL - STORAGE |
FIRST COMMISSIONING / DECOMMISSIONING
11 07. SAFETY DEVICES FOR TILTING (CYLINDER)
12 07.01. SAFETY DEVICES FOR TILTING (CHAIN)
13 07.02. SAFETY DEVICES FOR TILTING (SAFETY SPRING)
02. MACHINE DESCRIPTION
15 01. OVERVIEW
16 02. OPERATING PANEL
17 03. HOTKEYS
18 04. ELECTRONIC HANDWHEEL & REVERSE SEWING
19 05. CONTROL & MAIN SWITCH
20 06. PEDAL
21 07. LIGHT
22 08. MACHINE START
23 09. PROGRAM CHANGE
24 10. DIRECT ACCESS

04 07/2020
VETRON 5000/5100 - FLAT BED MACHINE - INSTRUCTION BOOK
03. OPERATION OF THE MACHINE
25 01. INSERTING THE NEEDLE (1- NEEDLE)
26 01.01. INSERTING THE NEEDLE (2- NEEDLE)
27 02. SEWING FEET EXCHANGE
28 03. THREADING THE MACHINE (1- / 2- NEEDLE)
29 04. EXCHANGING THE BOBBIN AND ADJUSTING THE BOBBIN THREAD TENSION
30 04.01. EXCHANGING THE BOBBIN AND ADJUSTING THE BOBBIN THREAD TENSION
(SHORT THREAD CUTTER)
31 05. WINDING THE BOBBIN THREAD
32 06. ENGAGING THE SAFETY CLUTCH
33 07. SAFETY SPRING
04. MAINTENANCE
34 01. MAINTENANCE INTERVALS
35 02. OIL LEVEL CHECK
36 03. CLEANING THE MACHINE
37 04. SEWING DRIVE
38 05. PNEUMATIC SYSTEM
05. PROGRAMMING
39 01. GENERAL
40 02. CREATE PROGRAMNAME AND STORING
41 03. CHANGE PROGRAM NAME
42 04. PROGRAM PARAMETER
56 05. CREATE PROGRAM CHAIN
60 06. PROGRAM ADMINISTRATION WITHOUT USB DONGLE
62 07. PROGRAM ADMINISTRATION WITH USB DONGLE
67 08. UPDATE THE OPERATING PROGRAM
06. WEAR PARTS
69 01. GENERAL INFORMATION
70 02. LISTING
07. WIRING DIAGRAM
73 01. VETRON 8340 CONTROL BOX
INDEX
VETRON 5000/5100 - FLAT BED MACHINE

05
07/2020
VETRON 5000/5100 - FLAT BED MACHINE - INSTRUCTION BOOK
01. PREFACE
01. SAFETY INSTRUCTIONS
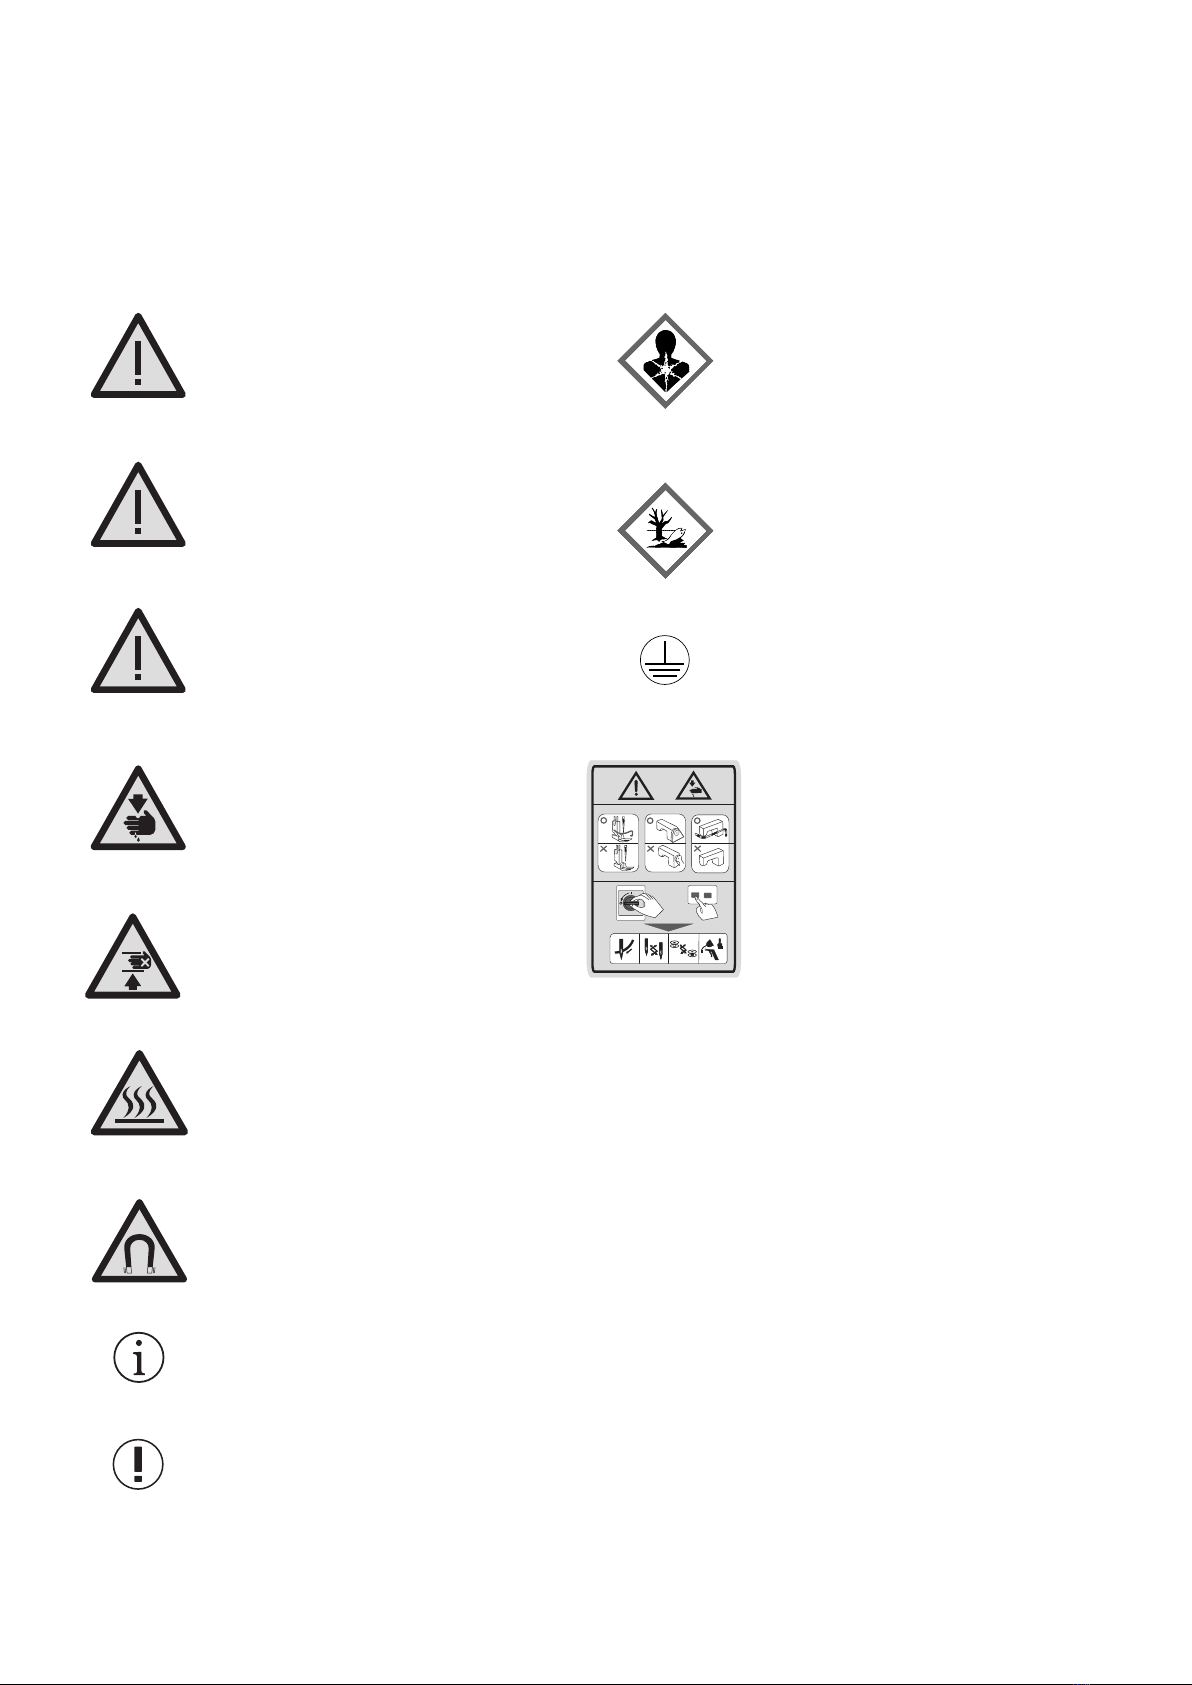
General Safety Instructions
This manual and the warning symbols on the machine should en-
sure the safe use of the machine, so that no accidents and injuries
may occur to you and others. Please read this instruction and also
the safety instructions of the motor manufacturer carefully.
» The machine must only be operated in accordance with its
intended purpose (for example, sewing medium to heavy
materials such as jeans, leather, etc. NO tin!) and with the
associated protective equipment. The relevant country-
specific safety regulations and technical data must also be
observed.
» The machine should only be used in accordance with its in-
tended purpose (eg sewing medium to heavy materials such
as jeans, leather, etc.) and with the associated protective
equipment. The relevant country-specific safety regulations
and the technical data must also be observed.
» The machine should only be set up and operated in dry and
well-kept rooms.
» Do not place the machines outdoors, next to radiators or
heat source. The ambient temperature should not be lower
or higher than between 0° C to 45° C.
» The machine must only be commissioned after the relevant
operating instructions have been taken into consideration
and by appropriately instructed operators.
»These instructions are to be stored at hand.
» The connection cable must be provided with a country-
specific approved mains plug. The mains plug must only be
connected to grounded sockets. Here a qualified specialist
is necessary.
» The machine must always have a grounding. Only over this is
a normal operation of the machine to ensure.
» The danger and safety instructions attached to the machine
must be followed.
» When replacing sewing tools such as needle, sewing
foot, stitch plate, feed dog or bobbin, when threading,
when leaving the workplace and during maintenance,
etc., the machine must be disconnected from the mains.
Press the main switch or pull out the mains plug.
» Machines with compressed air components must be dis-
connected from the compressed air supply and the residual
pressure released before repair or maintenance work. Ex-
ceptions to this are performance tests or specific settings.
» Repairs and all maintenance work should only be carried out
by qualified personnel or appropriately instructed persons.
» Work on electrical equipment must only be carried out by
qualified specialists.
If errors are detected, stop the machine immediately.
» Work on parts and equipment that are live is not permitted.
The machine must be disconnected from the mains.
» Modifications or modifications to the machine must be car-
ried out in compliance with all relevant safety regulations.
The manufacturer assumes no responsibility for damage
caused by changes or modifications.
» For repairs, only spare parts approved by VETRON may be
used. In case of infringement the guarantee expires.
»The machines are to be used only for the purpose intended.
» If oils, greases, etc., used for the machines and accessories,
get in your eyes or on your skin, or should you swallow any
of these fluids, wash them immediately and thoroughly, or
seek medical attention immediately.
» Commissioning of the machine is prohibited until it has been
determined that the entire sewing unit complies with the
provisions of the EC directive and the declaration of confor-
mity has been created.
Advice to the Owner
»
As part of the machine, this operating manual must be availa-
ble to operating personnel at all times. Before using the ma-
chine for the first time, the operator must read this operating
manual.
» The operator has to ensure that the machine is only opera-
ted in perfect condition.
» The operator must ensure that no safety devices are remo-
ved or disabled.
» The operator must ensure that only authorized or properly
instructed persons work on the machine.
»
The operator must therefore ensure that the workstations
according to ASR lux. 4 are adequately illuminated (min. 750
lux).
Operators and Technical Sta
» The operating personnel are responsible for setting up, ope-
rating and cleaning the machine and responsible for the eli-
mination of faults.
» Qualified personnel include people with specialist training
in electrical / electronics, pneumatics and mechanics.
Lubrication, maintenance, repair and adjustment are your
responsibilities.
» The operator must refrain from any operation that impaires
the safety on the machine.
1. Jewelry, chains and rings - must not be worn.
2. The clothes should be tight
3.
Only authorized persons may enter the danger area.
» If changes occur to the machine that aect safety, they must
be reported immediately to the operator.
» The specialist personnel - persons with training in electri-
cal / electronics and mechanics - are responsible for the
lubrication, maintenance, repair and adjustment of the ma-
chine.
» Before starting adjustment and repair work, the main switch
must be switched o and secured against reclosing.
» Work on parts that are under tension should be avoided. Ex-
ceptions are regulated by EN 50110. After maintenance and
repair work, the protective covers must be replaced.
»
Operating and specialist personnel are obliged to observe the
safety instructions given in the instructions for use during all
work.

06 07/2020
VETRON 5000/5100 - FLAT BED MACHINE - INSTRUCTION BOOK
01. PREFACE
02. SYMBOLISM
DANGER!
This symbol in combination with the
word DANGER, indicates an imminent
danger that may result in serious injury
or death.
WARNING!
This symbol in combination with the
word WARNING indicates a potentially
hazardous situation which, if not avoided,
could result in serious injury or death
ATTENTION!
This symbol in combination with the
word ATTENTION may indicate a
potentially hazardous situation that
could result in minor personal injury
.
DANGER OF CUTS!
This symbol indicates that there is an
increased risk of cuts here.
CRUSHING!
This symbol indicates that there is a
heightened risk of crushing
RISK OF BURNS!
This symbol indicates that there is an
increased risk of burning here.
MAGNET!
This symbol indicates that there is a
magnet field.
INFORMATION!
This symbol displays information.
ADVICE!
This symbol indicates important
information
.
HARMFUL TO HEALTH!
May damage certain organs. Can lead to
immediate and long-term massive
impairment of health, cause cancer,
damage genetic material, fertility or
development. May be fatal if infiltrated
into the respiratory tract.
HAZARD TO WATERS!
May cause acute or long-term damage
to aquatic organisms such as fish,
aquatic insects and aquatic plants in low
concentrations.
PROTECTIVE EARTHING!
Earthing one or more points of a
network, installation or equipment for
the purpose of electrical safety.
1
2
OFFON
DANGER LABEL
Do not work the machine without finger
guard and safety covers!
Before threading, changing the needle,
adjusting, changing the bobbin, cleaning,
maintenance, etc. switch o the main
switch on the control.

07
07/2020
VETRON 5000/5100 - FLAT BED MACHINE - INSTRUCTION BOOK
01. PREFACE
03. DANGER NOTES
1 THREAD TAKE UP LEVER
6 EYE GUARD
2 SEWING ZONE
7 FINGER GUARD
3 BOBBIN THREAD WINDER
5 SAFETY SPRING
4 ZONE BETWEEN MACHINE AND TABLE
CRUSHING
Crushing and bruising through the thread take up lever 1
Make sure thread take up lever guard is mounted.
Risk of injury due to movement of the lever.
CRUSHING
Crushing and bruising through the needle and sewing feet 2
Make sure finger guard is mounted.
Risk of injury through needle and feet movement.
DANGER OF CUTS
Cuts through rotation 3
Keep distance from bobbin winder while winding.
Risk of injury due to rotation.
CRUSHING
Crushing and bruising due to tilting the machine 4
Make sure safety spring 5 is mounted.
Risk of injury when machine is tilted back.
SAFETY PRECAUTIONS!
The eye protection 6 can be ordered optionally, but must not be removed after
installation without consultation with the operator.
The finger guard 7 must not be removed!

08 07/2020
VETRON 5000/5100 - FLAT BED MACHINE - INSTRUCTION BOOK
1-/ 2-NEEDLE LOCKSTITCH SEWING MACHINE WITH DIRECT DRIVE
AND TRIPLE FEED
The consistent use of state-of-the-art control technology has made it possible to program all ma-
chine parameters programmatically, making them directly accessible. This ensures that the process
parameters are free from operator influence and after each setup.
The innovative dynamic machine parameters based on the current speed and the permanent materi-
al thickness measurement open up new paths in terms of processing quality, process reliability and
reducing cycle times.
Typical applications:
Automotive Upholstery Suitcase Bag
INTENDED USE
Any use not approved by the manufacturer is considered improper!
Proper use also includes compliance with the prescribed operating, adjustment,
maintenance and repair measures. Damage due to non-intended use is not covered by
the manufacturer‘s liability!
The VETRON 5000/5100 and its subclasses are 1- and 2- needle lockstitch sewing machine with
direct drive and triple feed. Use the machines only according to their technical data and for medium
to heavy materials such as jeans, leather, etc.. No tin! The machine is only intended for processing
dry material and must not contain any hard objects. In this respect, the seam must be made with a
thread whose requirement profile corresponds to the application purpose.
The machine is designed for industrial use.
The operator is obliged to carry out a risk assessment in accordance with the Work Protection Act
(ArbSchG).
CE-CONFORMITY DECLARATION
All VETRON sewing machines comply with the applicable European regulations of relevant basic
health and safety requirements, which are specified in the declaration of conformity and manufac-
turer.
01. PREFACE
04. PRODUCT INTRODUCTION / INTENDED USE / CONFORMITY DECLARATION

09
07/2020
VETRON 5000/5100 - FLAT BED MACHINE - INSTRUCTION BOOK
Technical Data Vetron 5000/5010 - 5100/5120 (Standard - Longarm)
Stitch type 301 1- or 2-needle lockstitch with triple transport
Needle system 134-35
Needle size 110-140 for sewing middle heavy materials
Needle size 140-180 for sewing heavy materials
Thread size 10/3 (depending on version)
Max. Stitches/minutes Standard: 4000; XXL -Hook: 3400
Longarm: 3000
Max. Stitch length 12mm
Max. clearance under the sewing feet 20mm
Max. top-feed-stroke 9mm
Thread cutter for threads up to 10/3
Clearance space Standard: 350 x 130mm
Longarm: 680 x 130mm
Table plate size Standard: 640 x 200mm
Longarm: 990 x 200mm
Netto weight Standard: 55 kg
Longarm: 82 kg
Gross weight Standard: 70kg
Longarm: 110 kg
Operating voltage AC 220-240V / 50-60Hz
Rated power 1200W
Noise indication 80dB(A)
Versions and subclasses can be found under:
www.vetrontypical.com
01. PREFACE
05. TECHNICAL DATA

10 07/2020
VETRON 5000/5100 - FLAT BED MACHINE - INSTRUCTION BOOK
01. PREFACE
06. TRANSPORT - PACKAGING - DISPOSAL - STORAGE |
FIRST COMMISSIONING / DECOMMISSIONING
FIRST COMMISSIONING
01. Before operating the machine, clean the machine thoroughly.
02. Check whether the machine or electrical cables are damaged.
03. Have specialists confirm that you are allowed to operate the machine with the mains voltage
and that it is correctly connected.
04. MACHINES WITH PNEUMATIC CONNECTIONS:
Connect the machine to the compressed air system. The operating pressure at the filter valve
is 6 bar.
05. All covers must be mounted.
NOTE!
1.) Should deviations occur, do not operate the machine!
2.) Only connect the machine to a grounded power outlet!
DECOMMISSIONING
01. Switch o the machine at the control.
02. Pull out the mains plug.
03. Disconnect the machine from the compressed air supply, if available.
04. Clean the machine if necessary.
05. If possible, cover the machine to avoid soiling.
TRANSPORT - PACKAGING - DISPOSAL - STORAGE
01. Transport of the machine
All machines are delivered packed.
The product must be checked for shipping damage after delivery. For subsequent damage
within the customer‘s operation, the manufacturer assumes no liability.
Make sure that the products are transported safely and with the utmost care at your facility.
Moving machines with EHS (electrically height adjustable) with wheels:
» Turn o the machine
» Make sure that the sewing machine head is not tilted back
» Put the table in the lowest position
» Pull power and pneumatic connections
» Release wheel brakes
» Grab the table top and push the entire machine to the new location
» Reconnect the electricity and pneumatics and tighten roller brakes
02. Packaging
The packaging material must be disposed of in accordance with local environmental protection
regulations.
03. Disposal
The customer is responsible for the proper disposal. Disposal should comply with local
environmental regulations.
NOTE!
Parts contaminated with lubricants or oils must be disposed of separately.
04. Storage
When not in use for a long time, the machines must be protected against dirt, moisture and
corrosion (e.g.: by an oil film).

21
3
4
280mm
205mm
5mm
11
07/2020
VETRON 5000/5100 - FLAT BED MACHINE - INSTRUCTION BOOK
01. PREFACE
07. MOUNTING SAFETY DEVICES FOR TILTING (CYLINDER)
SAFETY CYLINDER 1:
»The safety cylinder 1 should be approx. 304mm to 310mm long.
NOTE:
If the cylinder is longer (max 310mm), the machine is moved further back.
That means the machine is safer and more stable in this position.
» If the machine is tilted back, the safety spring 3 must be locked securely. The distance bet-
ween the table top and the spring must be at least 5mm (Picture 2).
The distance can be adjusted on the cylinder by turning the fork head 2 in or out. If this is not
enough, the cylinder carrier 4 must be readjusted. (Picture 3)
HOW TO MOUNT THE SAFETY CYLINDER 1 :
» Screw the cylinder carrier 4 under the table.
The distance between the edge of the machine cutout and the cylinder carrier 4 is 205mm
(minimum 203mm).
»The distance between the cylinder carrier 4 and the edge of the machine cutout is 280mm.
NOTE:
The position of the safety cylinder is important for the stability of the machine. This must be
checked when the machine is received.
CRUSHING
Crushing and bruising due to tilting the machine
For dierent adjustments, the safety cylinder should be unhooked.
Caution is advised, when returning the sewing machine to its original position.
After work, reattach the safety cylinder
Picture 1 Picture 2 Picture 3
WARNING!
Work on safety devices must only be carried out by trained personnel!

195mm
3
4
21
5mm
12 07/2020
VETRON 5000/5100 - FLAT BED MACHINE - INSTRUCTION BOOK
01. PREFACE
07.01. SAFETY DEVICES FOR TILTING (CHAIN)
Picture 1 Picture 2 Picture 3
HOW TO MOUNT THE SAFETY CHAIN 2 ON THE POST BED MACHINE WITH
SLANTED PEDESTRAL 1 :
» The carrier of the safety chain 3 should have a distance of 195mm to the machine housing.
(Picture 2)
ATTENTION:
The chain must hold the machine securely when the machine is tilted backwards.
» If the machine is tilted back, the safety spring 4 must be locked securely. The distance bet-
ween the table top and safety spring must be at least 5mm. (Picture 3)

2
1
13
07/2020
VETRON 5000/5100 - FLAT BED MACHINE - INSTRUCTION BOOK
01. PREFACE
07.02. SAFETY DEVICES FOR TILTING (SAFETY SPRING)
HOW TO MOUNT THE SAFETY SPRING 1 :
»Mount the safety spring 1 with the screws 2 .
ATTENTION:
The safety spring 1 must engage securely when the machine is tilted backwards.
» If the machine is tilted back, the safety spring 1 should be locked securely. The distance bet-
ween the table top and the bracket must be at least 5mm.

14 07/2020
VETRON 5000/5100 - FLAT BED MACHINE - INSTRUCTION BOOK
01. PREFACE

ESC
P000 30%
TEST
15
07/2020
VETRON 5000/5100 - FLAT BED MACHINE - INSTRUCTION BOOK
02. MACHINE DESCRIPTION
01. OVERVIEW
OPERATING PANEL
HOTKEYS
CONTROL DONGLE PEDAL
ELECTRONICS AND
SEWING REVERSE

ESC
000
SE T
30%P
T
1 2 3 4
5 6 7 8 9
10
A B
16 07/2020
VETRON 5000/5100 - FLAT BED MACHINE - INSTRUCTION BOOK
02. MACHINE DESCRIPTION
02. OPERATING PANEL
The operating field indicates the current operating states.
Operation takes place via continuous dialog between control and operator.
Depending on the operating state, dierent texts are displayed.
The following functions are assigned to the BUTTONS ABOVE AND BELOW THE DISPLAY:
1 BACKTACK (from left to right):
A Start backtack
B End backtack
2 THREAD TRIMMING
3 NEEDLE UP/DOWN AFTER STOP
4 LIGHT ON/OFF
5 PARAMETERS
6 NEW PROGRAM
7 PROGRAMMED SEAM
8 SAVE
9 CANCEL
If a function is activated, this is indicated by illuminating the corresponding LED.
In order to CHANGE OR SET VALUES, use the JOG KEY ( 10 ):
Turning changes the values; pressing the JOG KEY enters the value.
In the following, the operating type is indicated by the following icons:
Input = Press the JOG KEY:
Change = Turn the JOG KEY:

1
2
4
3
17
07/2020
VETRON 5000/5100 - FLAT BED MACHINE - INSTRUCTION BOOK
02. MACHINE DESCRIPTION
03. HOTKEYS
1 SAFETY SWITCH
If the safety switch is triggered, all functions are locked. The LED lights up red.
The “BLOCKED MODE” is active.
With software version 1.338, the machine is automatically blocked when the gripper cover
is opened. To continue sewing, the safety button 1 must be pressed after closing the hook
cover.
ADVICE:
Before activating the machine by the X-button make sure to remove sewing material or
other items below the sewing feet if necessary and follow the instructions displayed in the
control panel.
2 SINGLE BACKTACK SUPRESSION
If the backtack function is activated, the following backtack is switched o once
by pushing the key.
3 2ND STITCH LENGTH
If the second stitch length is activated, the corresponding LED lights up.
4 CUSTOMIZABLE BUTTON
Default: Toggle foot stroke level

1
2
3
18 07/2020
VETRON 5000/5100 - FLAT BED MACHINE - INSTRUCTION BOOK
ADVICE!
The electronic handwheel is not active unless the machine has performed at least one
stitch.
For safety reasons it is necessary during “BLOCKED MODE” to push and hold
the programmable button (the lowest button) 3 to activate the electronic handwheel.
1 ELECTRONIC HANDWHEEL – FUNCTION
By turning the handwheel, you can move the needle bar up or down.
From here on, the operating type is indicated by the following icons:
Pressing the handwheel: stitch-for-stitch function / needle positioning
Turning the handwheel:
2 REVERSE SEWING
Pulling the button changes the sewing direction.
02. MACHINE DESCRIPTION
04. ELECTRONIC HANDWHEEL & REVERSE SEWING
Other manuals for 5000
5
This manual suits for next models
1
Table of contents
Other VETRON Sewing Machine manuals

VETRON
VETRON 4000 User manual

VETRON
VETRON Typical GC6890 User manual

VETRON
VETRON 5300 User manual

VETRON
VETRON 5000 User manual

VETRON
VETRON 5064 User manual

VETRON
VETRON 5000 Owner's manual

VETRON
VETRON 5000 User manual

VETRON
VETRON 5400 User manual

VETRON
VETRON 5374 User manual

VETRON
VETRON 5000 User manual