Vetter LD 50/30 User manual

Article No. 9987033904 | © Vetter GmbH I 01/19 I Changes and errors excepted.
Emergency Pneumatics.
Operating Instructions
VETTER Leak Sealers

Vetter Leak Sealers
Page 2/39
Contents
1. Introduction ......................................................4
1.1 Symbols used...............................................4
1.2 Correct handling and usage.................................5
2. Safety instructions ................................................5
2.1 General information ........................................5
2.2 Information concerning the dangers ........................6
2.3 Warning information........................................6
3. Operation of the Leak Sealers .....................................7
3.1 Operation with controllers, ination hose and compressed
air bottle ...................................................7
3.2 Operation of the controller, ination hose and other sources
of compressed air...........................................8
3.3 Operation with hand pump and foot air pump...............9
3.4 Operation with foot air pump having safety valve and
manometer.................................................9
4. Application of Leak Sealers ...................................... 10
4.1 Use of the acid protection covering ....................... 10
4.2 Preparing for operation ...................................10
4.3 Handling the tension ratchet..............................12
5. Maintenance and care ..........................................13
5.1 Maintenance intervals ....................................13
5.2 Safety valve blow-through ................................ 14
5.3 Visual test of the safety valve .............................. 14
6. Vetter High Pressure Leak Sealing System........................15
6.1 Description............................................... 15
6.2 Safety instructions ........................................ 15
6.3 Ground connection .......................................15
6.4 Operation instructions ....................................16
6.5 Technical data High Pressure Leak Sealing System .........17
7. Vetter Leak Sealing Bags ........................................18
7.1 Leak Sealing Bag LD 50/30 1.5 bar .........................18
7.2 Leak Sealing Bag LD 50/30 S 12 bar with belt guide slots ... 18

Page 3/39
7.3 Leak Sealing Bag LD 110/60 S XL 1.5 bar with belt guiding
slots...................................................... 19
7.4 Leak Draining Bag DLD 50/30 ............................. 19
7.5 Technical Data Leak Sealing Bags..........................20
8. Vetter Mini-Leak Sealing Bags ...................................21
8.1 Description............................................... 21
8.2 Technical data of the Mini-Leak Sealing Bags. . . . . . . . . . . . . . . 22
9. Vetter Flange Draining Bag ...................................... 23
9.1 Description............................................... 23
9.2 Technical data of the ange drainage bags ................ 24
10.Vetter Vacuum Leak Draining Bag ............................... 25
10.1 Vacuum Leak Draining Bag DLD 50 VAC....................25
10.2 Safety instructions ........................................ 25
10.3 Application instructions...................................25
10.4 After operation ...........................................27
10.5 Technical data of Vacuum Leak Draining Bag............... 28
11.Vetter Leak Sealing Lance .......................................28
11.1 Application instructions...................................29
11.2 Technical data of the Leak Sealing Lance. . . . . . . . . . . . . . . . . . . 30
12.Vetter Leak Sealing Bandages ...................................31
12.1 Technical data ............................................ 31
13.Vetter Pipe Sealing Sleeves .....................................32
13.1 Technical data Pipe Sealing Sleeves. . . . . . . . . . . . . . . . . . . . . . . . 32
14.Vetter Sealing Paste.............................................33
14.1 Description............................................... 33
15.Vetter Gully Sealing Bags........................................ 34
15.1 Vetter Universal Gully Sealing Bags ........................34
15.2 Compact Gully Sealing Bags...............................35
15.3 Technical data Gully Sealing Bags .........................36
16.List for temperature resistances and materials ...................37
16.1 Material list ...............................................37
16.2 Temperature resistance ................................... 37
16.3 Resistance chart .......................................... 38

Vetter Leak Sealers
Page 4/39
1. Introduction
The precondition for the safe use and the defect-free operation of
Vetter Leaking Seals is the knowledge and the observance of this
operating manual as well as the safety instructions.
DIN 7716 is to be adhered to in cases of
long-term storage.
In addition to this, the pertinent work protection regulations, work
safety regulations and accident prevention regulations are to be
observed the same as the generally recognized technology laws.
The operating instructions given here are to be regarded as part
of the product and are to be kept for the complete life duration of
the product. In case the product should be passed on to a succes-
sive user then the operating instructions must also be included.
1.1 Symbols used
This symbol means that there is imminent dan-
ger. If it is not avoided then death or serious in-
jury will result.
This symbol means that there is a possible dan-
gerous situation. If it is not avoided then death or
serious injury could result.
This symbol means that there is possibly a dan-
gerous situation. If it is not avoided then light in-
juries or slight injuries could result.
This symbol means that there is the possibility of
damage being caused. If it is not avoided then
the product or something else in its vicinity could
be damaged.

Page 5/39
1.2 Correct handling and usage
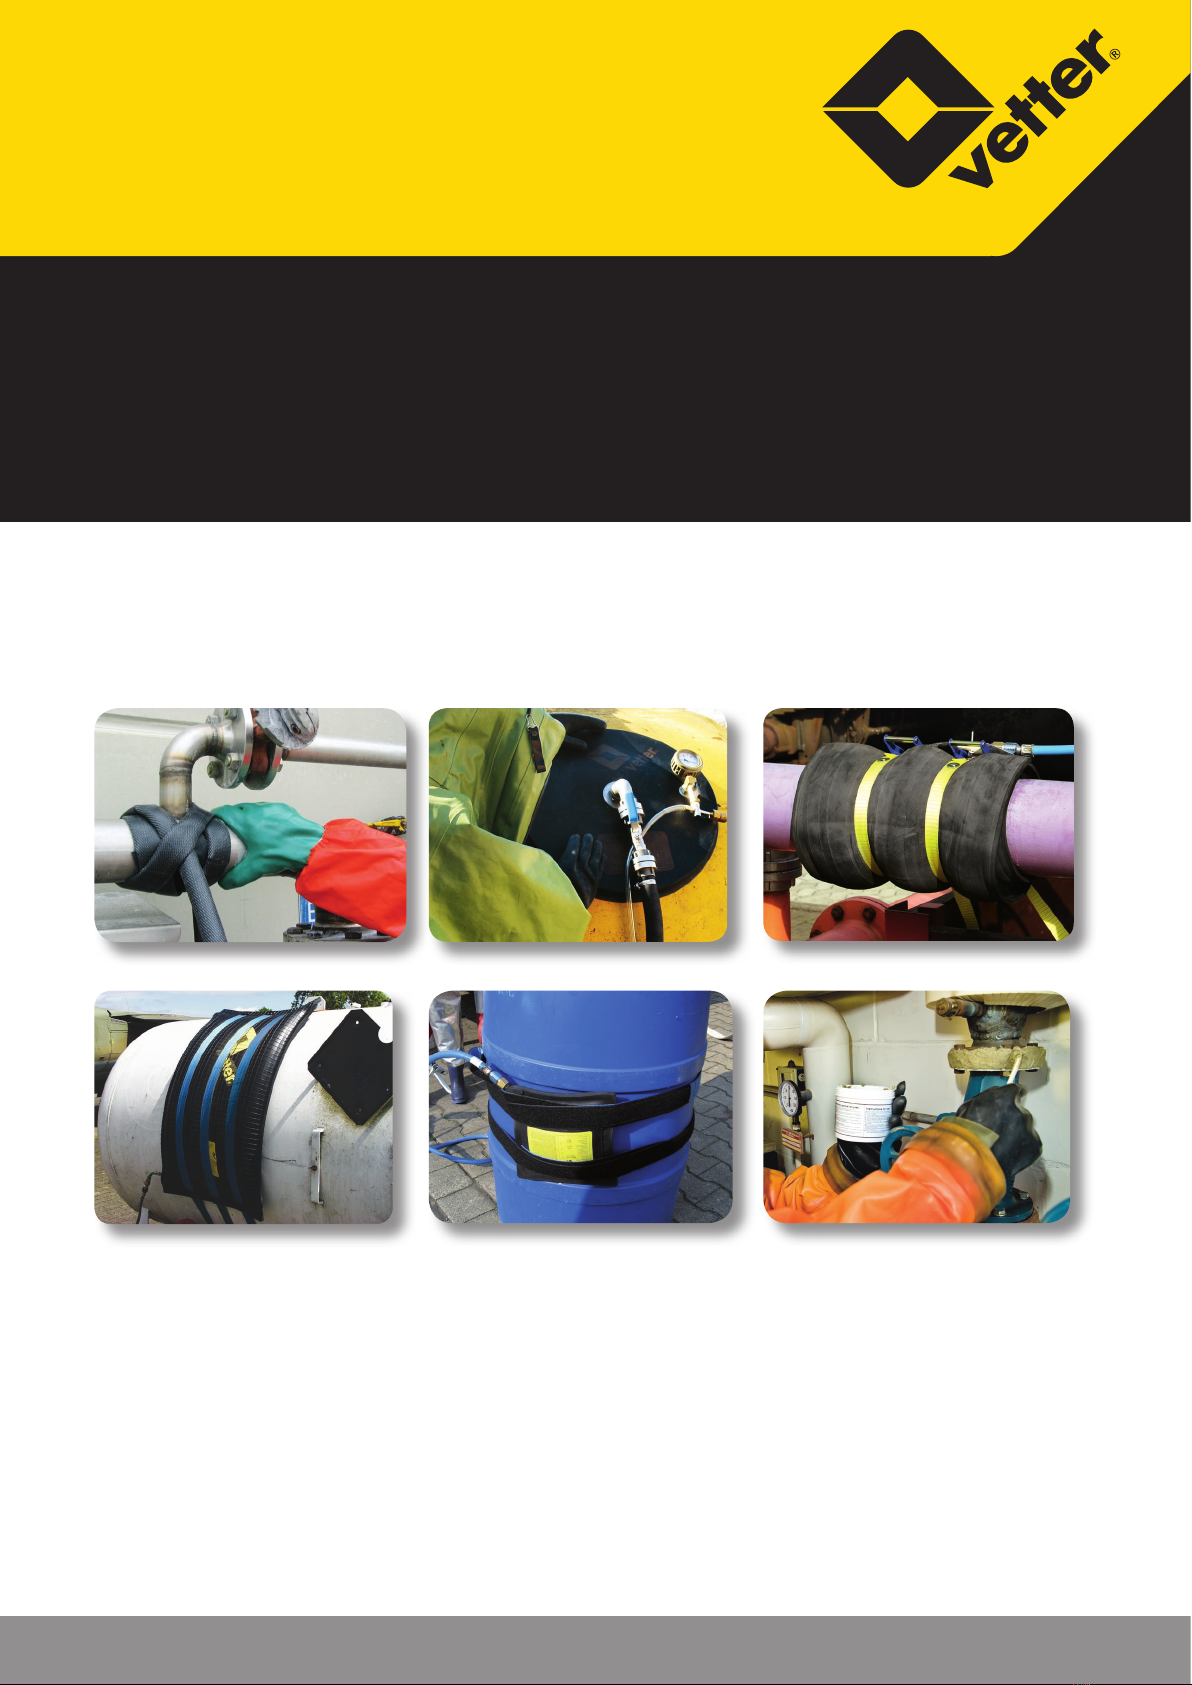
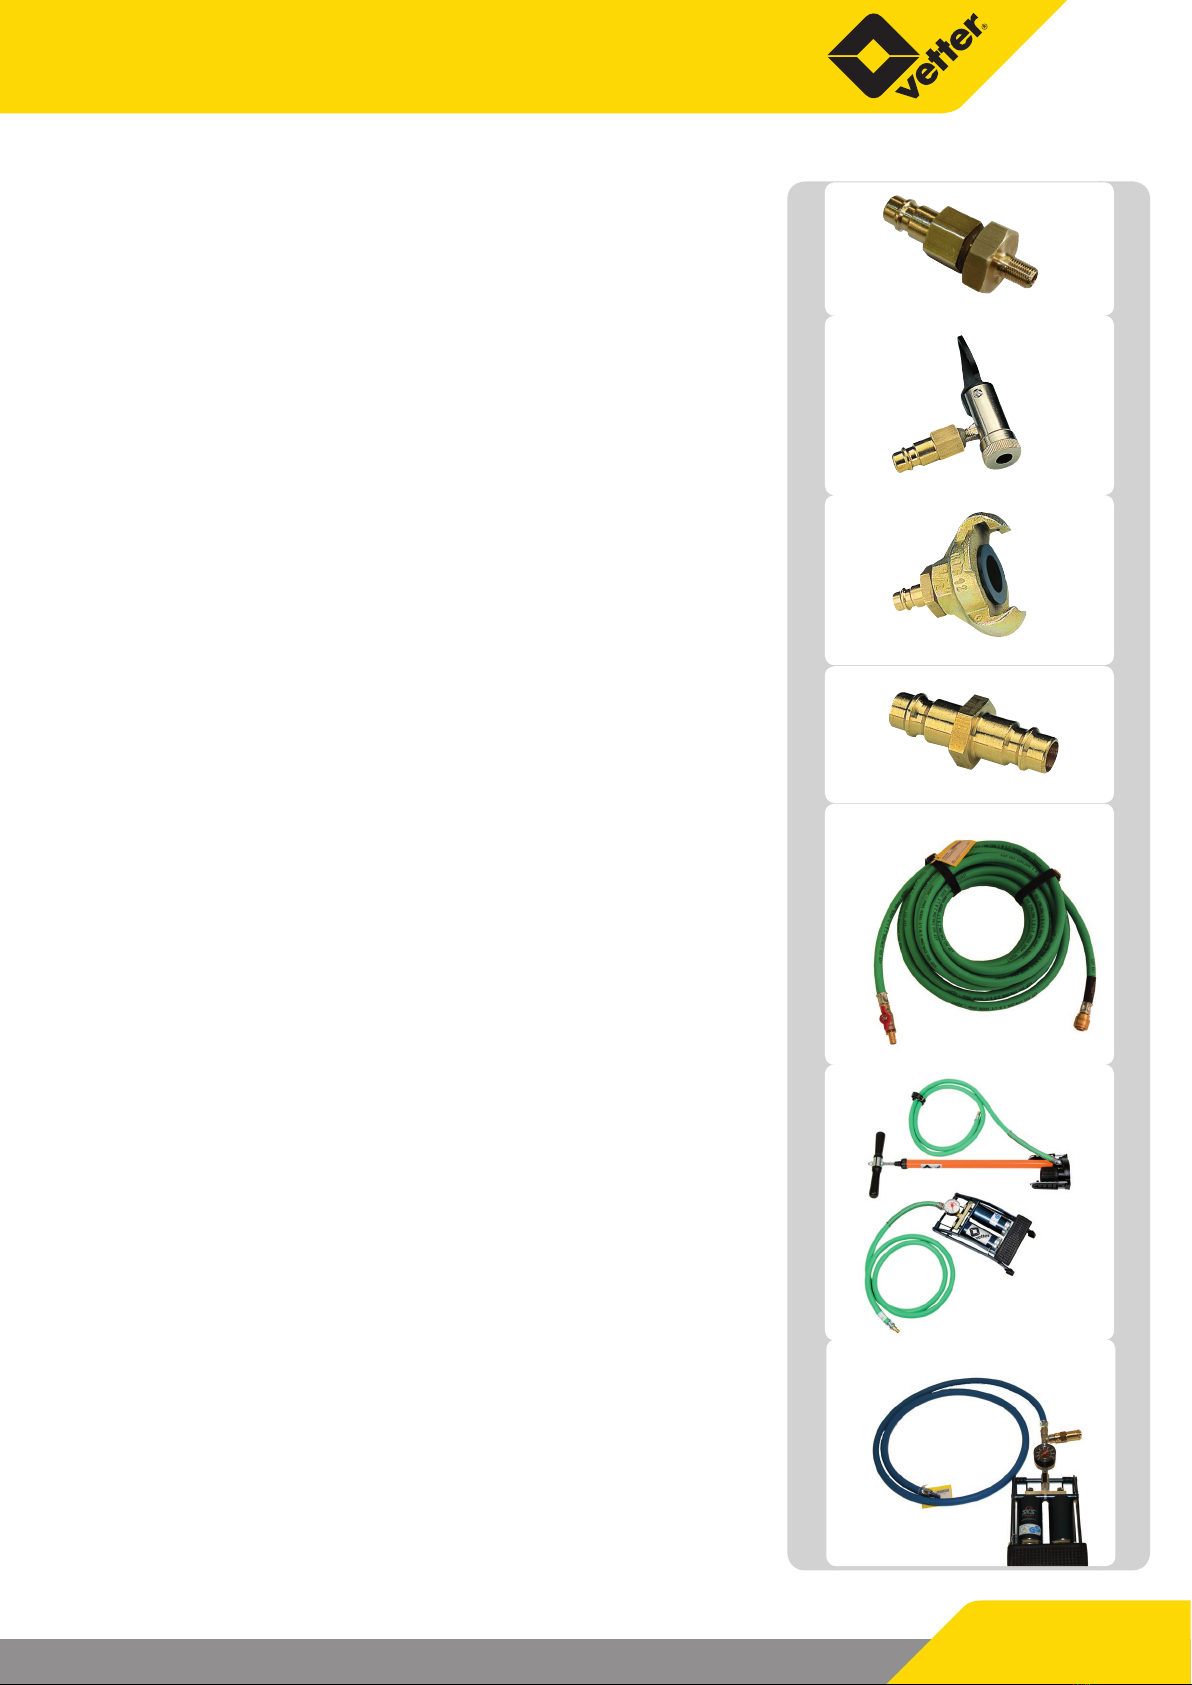
Depending on the application, Vetter leak sealers must only be
used with compressed air and only inated to the corresponding
pressure with original ination ttings.
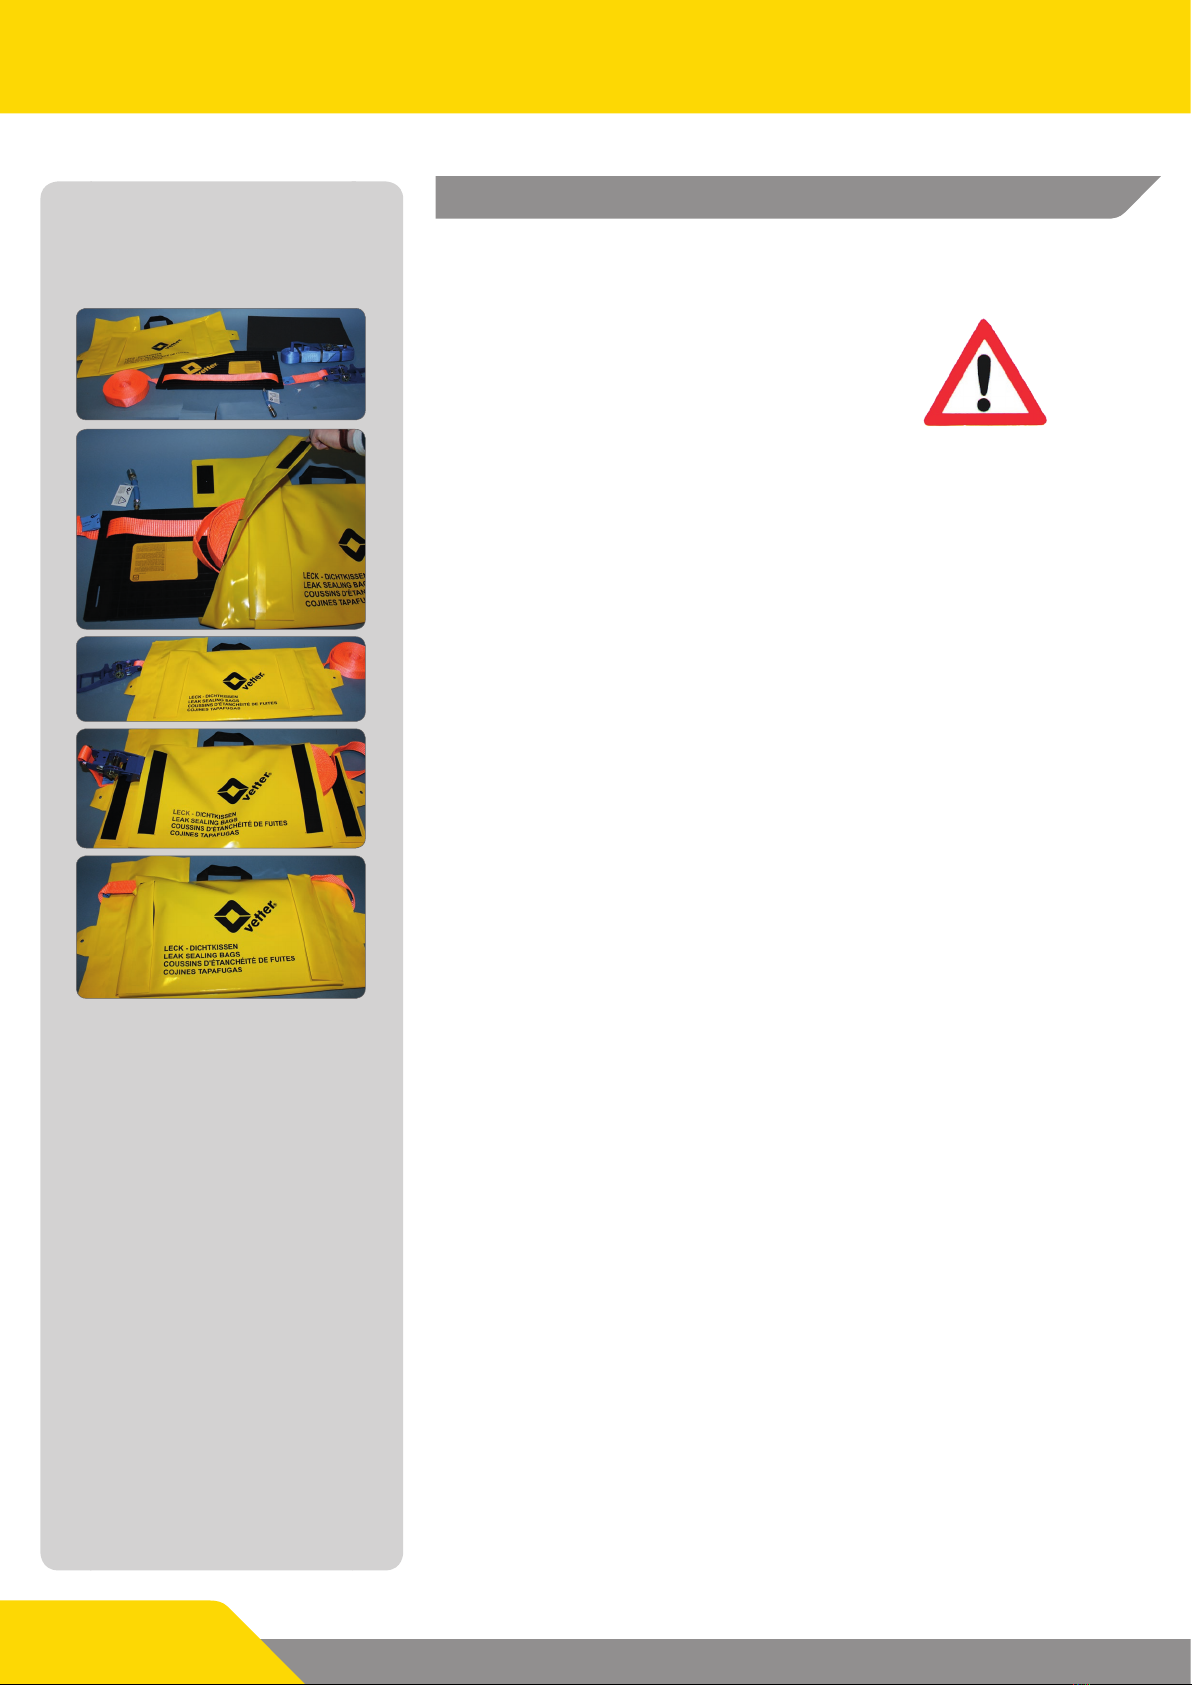
They are exclusively used for sealing leaks on containers and
pipes.
Incorrect application of Vetter leak sealers includes the following:
9Incorrect use, operation or maintenance of leak sealers.
9Use of the leak sealers with defective safety devices or inati-
on ttings which have been either incorrectly installed or are
non-functional.
9Non-observance of the instructions contained in the opera-
ting instructions with respect to storage, operation and main-
tenance of the leak sealers.
9Insucient monitoring of accessory parts which are subject
to wear.
9Incorrectly carried out maintenance work.
The following also belong to correct application:
9Observance of all information contained in these operating
instructions.
9Compliance to the periods for maintenance and care contai-
ned in the Chapter“Maintenance and Care”.
2. Safety instructions
The use of Vetter Leak Sealers is made under the precondition that
there is a knowledge of this application and that the operating
instructions are observed.
2.1 General information
The observance of all pertinent regulations with respect to work
protection, safety and accident prevention (e.g. DGUV) as well as
generally recognized technological regulations is a precondition.
Leak sealers must be tested before application to see whether
they are resistant against hazardous materials. For this, refer to the
resistance chart!
The PVC acid protection cover for the leak sealing bag oers incre-
ased protection against acid spray.
Observe the pertinent regulations concerning handling with dan-
gerous liquids.
Protection equipment, such as protection clothing, gloves, hel-
met, face and eye protection, breathing protection and inherent
protection, are to be used onsite depending on the degree of
danger and the situation.

Vetter Leak Sealers
Page 6/39
2.2 Information concerning the dangers
Danger of explosion! If there are inammable liquid or gas leaks it
is imperative that sparks be avoided by xtures and ttings.
Vetter Leak Sealers must only be lled when in the correctly ten-
sioned condition. Only ll the leak sealers until the leak is sealed
(max. operating pressure 1.5 bar and 12 bar). Any additional lling
of the leak sealer can damage the pipe or the tank by built up
pressures
A leak in a tank or container is a weak point. Therefore avoid any
additional damage by lling the leak sealer so that no more liquid
or gas escapes. This can be the case at a point lower than the ma-
ximum permissible operating pressure.
2.3 Warning information
The leak sealers and the accessories are to be inspected for per-
fect condition before and after use. Damaged seals or seals and
accessories which are functionally limited present a source of dan-
ger and must not be used!
All controllers are equipped with a safety valve that corresponds
to the maximum permitted operation pressure for leak sealers.
These safety valves will blow when the maximum operating pres-
sure is exceeded.
The tolerance for the opening and closing of the safety valves
must be a maximum of ± 10 %. The set pressure must not be chan-
ged. Should the seal on the upper part of the valve be removed
then safe operation can no longer be guaranteed. The safety valve
must be exchanged. The permitted input pressure at the control-
ler must not be exceeded (marked on the input coupling).
Before application of the leak sealer, cover sharp edges and/or
pointed positions in the area of the leak by using dimensioned
sealing plates. In doing this you avoid damage to the leak sealers
as well as the unintended escape of dangerous liquids and gases.

Page 7/39
3. Operation of the Leak Sealers
This chapter gives you information about which sources of com-
pressed air you are able to use with Vetter leak sealers.
When using leak sealers observe the
corresponding pressure stage.
3.1 Operation with controllers, ination hose and
compressed air bottle
As an example the following pictures present
the sequence of events for leak sealing
bags 1.5 bar. Corresponding leak sealers
and accessories must be used for other
pressures and other sources of air.
Before ination, the leak sealing bags
must be correctly and safely tensioned
with tension belts on the leak position.
To do this, refer to Chapter 4.3“Handling the tension rat-
chet”.
Leak sealing bag
9Step 1
Connect the leak sealing bag LD 50/30 S 1.5 bar with guide
slots to the ination hose.
Ination hose
9Step 2
Connect the ination hose to the controller.
Controller
9Step 3
Connect the connection hose of the pressure regulator to
the input coupling of the controller. It is imperative that the
permitted input pressure of the controller be observed when
doing this.
Pressure regulator
9Step 4
Screw the pressure regulator into the valve on the compressed
air bottle.

Vetter Leak Sealers
Page 8/39
Compressed air bottle
3.2 Operation of the controller, ination hose and
other sources of compressed air
Observe the maximum input pressures of the
controllers for the various pressures
(refer to the table below).
Applied pressure Maximum input pressure of
the controller
0.5 bar 2 bar
1.0 bar 2 bar
1.5 bar 2 bar
2.5 bar 4 bar
12.0 bar 14 bar
Adapters contained in the adapter kit
The adapter kit contains adapters for the following sources of
compressed air:
Truck compressed air connection with blind coupling
Close the control line to the blind coupling.
The tyre ination connection must be secured with a safety valve
as a standard.
The control line is to be connected with the blind coupling. The
truck must be secured by brake holding blocks so that it does not
roll away.
Local compressed air network
Connection to the outlet coupling of a compressed air network.
Series connected pressure regulator, max input pressure
of 16 bar
If the output pressure of the compressed air network exceeds the
permitted ination pressure of the controller then the adapter
must be exchanged for a series connected pressure regulator.
Truck compressed
air connection
Blind coupling

Page 9/39
Truck tyre valve
Used for inating with a normal hand pump or foot pump.
Truck tyre valve connection
For tapping o air from the spare tyre.
Adapter for construction site compressor
Adapter for portable compressor
Air supply hose, 10 m with blocking valve
The air supply hose with blocking valve can be used as an extensi-
on between air source and the controller.
3.3 Operation with hand pump and foot air pump
Hand pump or foot pump for connection to the input coupling of
a controller via a 2 m connection hose.
3.4 Operation with foot air pump having safety
valve and manometer
Foot air pump 1.5 bar with safety valve and manometer and 2 m
connection hose for ination of leak sealing bags.

Vetter Leak Sealers
Page 10/39
4. Application of Leak Sealers
This chapter gives you information about how Vetter leak sealers
are used.
When using leak sealers, observe the safety
instructions in Chapter 2 as well as the perti-
nent regulations for work protection and
safety, accident prevention regulations
(e.g. DGUV) and the general rules for technology.
4.1 Use of the acid protection covering
The special design of the acid protection covering permits storing
the ready-for-use leak sealing bag including the tension belts on
the emergency vehicle.
9Route both tension belts through the belt bushing slots or
the swivel eyes.
9The bag is stored in the acid protection covering, possibly
with an upholstery plate underneath, and secured with a Vel-
cro fastener. Please note that the valve connection should lie
in the ap!
9The tension belts are accommodated in the upper Velcro-fas-
tener pocket.
4.2 Preparing for operation
Wear the required protective gear and clothing suitable for the
task.
9Select and put on the personal protective equipment corres-
ponding to the degree of danger.
9Mark the work area.
9Ensure that only authorized persons are in the work area /
area of danger.
9Select the leak sealing bag/leak sealer according to the requi-
rements.
9In doing this observe the resistance chart and material resis-
tance chart.
9Check the leak sealing bag/the leak sealer and the accessories
to be used for completeness and for any forms of damage.
9Damaged leak sealing bags/leak sealers and accessories must
not be used!
9Ination hose and controller must already be connected to
the leak sealing bag/leak sealer.
9Place the tension belts around the tank/container.
9Loosely close the leak position with the sealing bag / leak sea-
ler.
The simplied illustrations show
only one tension belt!

Page 11/39
9Tension the leak sealer with the tension belts.
9Make certain that there is nobody within the area of danger.
9Inate the leak sealer from a safe position until the leak is
sealed.
Danger of explosion! If there are inammable liquid or gas leaks it
is imperative that sparks be avoided by xtures and ttings.
Vetter sealing must only be lled when in the correctly tensioned
condition. Only ll the leak sealing until the leak is sealed (max.
operating pressure 1.5 bar and 12 bar). Any additional lling of the
leak sealer can damage the pipe or the tank by built up pressures.
A leak in a container or pipe is a weak point. Therefore avoid any
additional damage by lling the leak sealer so that no more liquid
or gas escapes. This can be the case at a point lower than the ma-
ximum permissible operating pressure.
Before application of the leak sealer, cover sharp edges and/or
pointed positions in the area of the leak by using dimensioned
sealing plates. In doing this you avoid damage to the leak sealers
as well as unintended escape of dangerous liquids and gases.
The Vetter Leak Sealing Bags LD 50/30 come in two dierent versi-
ons each having dierent tensioning possibilities available.
Leak sealing bags with
guide slots
Leak sealing bags with
rotating lugs

Vetter Leak Sealers
Page 12/39
4.3 Handling the tension ratchet
Threading the belt
With the ratchet closed, quickly pull the locked function slide (1)
in order to move the ratchet lever (2). Thread the end of the belt
into an appropriate position in the slot shaft (3) and pull until the
belt is tensioned.
Tensioning the belt
By moving the ratchet lever, ratchet until the required, or maxi-
mum, belt tension is obtained. In doing this there must be at least
1.5 turns on the slot shaft.
Closing the ratchet
After this, pull the function slid and swing the ratchet lever into
the locking position until the slid is able to lock into the securing
groove.
Opening the ratchet
Before opening the ratchet it is imperative to ensure that the leak
sealing bag is not under pressure because when opening the rat-
chet, the belt is suddenly released.
When opening the ratchet, the function slid is to be pulled and
the ratchet lever is to be swung approximately 180° to the end
stop in order to let the slide lock into the last possible position.
The slot shaft is now no longer locked. The belt can now be un-
coiled and taken out.
The tie-down straps used in the Vetter systems do not have any
specications on the standard manual force (SHF) and standard
tension force (STF) because here they are only being used as strap-
ping lashes and not for lashing down the load (load restraints).
2
1
3

Page 13/39
5. Maintenance and care
This chapter gives information about care of Vetter leak sealers
and which maintenance intervals are to be observed.
5.1 Maintenance intervals
A function test of the safety valve must only be carried out wit-
hout the leak sealers. Over-pressure area! A function test of the
safety valve with leak sealers can cause leak sealers to burst.
When? What? What to do?
After each
operation
Leak sealers and ac-
cessories
Carry out a check for completeness,
perfect condition and function.
Carry out a visual check and function
check.
Clean the leak sealers with warm water,
neutral cleaning agent and, if necessa-
ry, with a cleaning brush.
Finally, dry at room temperature.
Acid protection
cover
Dispose and replace if necessary.
At least once
every year
Controller Carry out a visual check and function
check.
Test the function capability of the cou-
plings, nipple, manometer and safety
valve.
At least once
every year
Ination hose Carry out a visual check and function
check.
Test the function capability and the
sealing of the connection nipple and
the couplings
At least once
every year
Leak sealers Carry out a visual check and function
check.
Test the function capability of the con-
nection coupling.
Check for tears and/or cuts, abrasions,
changes to the surface caused by che-
mical eects.

Vetter Leak Sealers
Page 14/39
5.2 Safety valve blow-through
If a safety valve blows too early due to foreign body penetration,
open the blowing device (2) by turning counter-clockwise and
blow through.
If the foreign body is not removed by doing this, then the comple-
te upper part of the valve is to be unscrewed
9To do this, place the pipe pliers at the height (1).
9After unscrewing, carefully take out the valve ball and remove
the foreign body from the sealing plate.
9Screw on the upper part of the valve again and check for per-
fect operation.
9Changes to the set pressure must not be made.
9If the seal on the upper part of the valve is removed then per-
fect function can no longer be guaranteed. The safety valve is
then to be sent back to the manufacturer.
9With icing caused by high humidity and low temperatures, it
is possible to use a normal defrosting spray..
5.3 Visual test of the safety valve
Safety valves are sealed.
If the seal on the upper part of the valve is removed then
perfect function can no longer be guaranteed. The safe-
ty valve must be exchanged.
9Seal exists and is undamaged.
Old safety valves had customs seals
New safety valves have seal plates

Page 15/39
6. Vetter High Pressure Leak Sealing System
6.1 Description
The high pressure leak sealing system consists of one or three sealing
hoses, depending on the version. This is intended for sealing T-pieces,
pipe bends or problematic connection supports.
Additional sealing plates made of dierent materials (NBR, EPDM, glass
bre reinforced plastic) produce a higher resistance.
6.2 Safety instructions
Observe the pertinent regulations for work safety. Danger of
explosion! If there are inammable liquid or gas leaks it is im-
perative that sparks be avoided by xtures and ttings.
6.3 Ground connection
9The ination valve as well as couplings and joints on the sealing ho-
ses and on the ination hose are made of stainless steel.
9The sealing hoses are conductive and equipped with a grounding
device on both sides.
9Fix the ground cable onto the grounding device attached to the
sealing hose.
9Secure the ground cable hand-tight using the wing nut.
9Before use, check to see whether the high pressure leak sealing sys-
tem is resistant against hazardous materials.
9Wear specied protective clothing necessary for operation

2
1
3
45
3
2
1
3
4
5
Dierent ball valve!
Vetter Leak Sealers
Page 16/39
6.4 Operation instructions
9Select the sealing hose most suitable for the leak, respectively
lay a sealing plate (EODM, NBR, glass bre reinforced plastic)
underneath.
9Entwine the pipe to be sealed so that the rst point of the
sealing hose completely covers the leak position.
9Feed through, as shown below, one layer under the sealing
hose.
After this connect the ination device as follows:
9Connect the pressure regulator to the compressed air bottle.
9Close the outlet valve (1) by turning clockwise.
9Open the valve on the bottle (2) slowly.
9The pre-pressure manometer indicates the pressure in the
bottle (3).
9Adjust the backpressure on the regulator (4) to a maximum
of 14 bar.
9The reduced pressure is indicated on the backpressure mano-
meter (5).
9Connect the ventilation valve (1) to the connection hose (2) of
the pressure regulator.
9Connect the ventilation valve (1) to the red ination hose (3).
9Close the ventilation valve!
9Connect the red ination hose (3) to the closed ination valve
(4) and couple to the sealing hose (5).
9In order to inate the sealing hose, open the outlet valve on
the pressure regulator by turning counter-clockwise.
9Now carefully open the ination valve and inate the sealing
hose until the damaged point is just sealed.
9Close the ination valve.
9In order to remove the ination device, close the outlet valve
on the pressure regulator and open the ventilation valve. The
ination hose, which is now not under pressure, can be un-
coupled from the ination valve without any diculty.
9The connected high pressure leak sealing system is to be con-
tinually monitored.
9The damaged pipeline can now be switched o without dif-
culty and can be repaired after emptying.

Page 17/39
6.5 Technical data High Pressure Leak Sealing System
Sealing hose
1,500 mm
Sealing hose
2,500 mm
Sealing hose
3,500 mm
Art. No. 1500015901 1500016001 1500016101
Max. operating pressure
bar 14 14 14
psi 203 203 203
Air requirement at
14 bar
Liter 11.1 20.0 27.9
cu. ft. 0.4 0.7 1.0
Temperature
°C -30/+80 -30/+80 -30/+80
°F -22/+176 -22/+176 -22/+176
Approximate weight
kg 1.1 1.4 1.8
lbs 2.5 3 3.9
All rights reserved for technical changes within the scope of product improvement.

Vetter Leak Sealers
Page 18/39
7. Vetter Leak Sealing Bags
7.1 Leak Sealing Bag LD 50/30 1.5 bar
The Vetter Leak Sealing Bag LD 50/30 1.5 bar is available in two
versions each having dierent tensioning possibilities.
Leak sealing bags with
guide slots
Leak sealing bags with
rotating lugs
The Vetter leak sealing bags 1.5 bar can be used on containers and
tanks for sealing of leaks.
9Connect the ination hose to the connection coupling of the
selected leak sealing bag 1.5 bar and to the nipple of the foot
air pump 1.5 bar.
9Air supply can be made by a hand air pump or foot air pump,
pressure regulator and compressed air bottle or by local com-
pressed air lines, respectively by tapping o air from a truck
compressed air brake device.
9Place or move the leak sealing bag to the selected position
and inate until the leak is sealed and that no liquid or gas
escapes.
7.2 Leak Sealing Bag LD 50/30 S 12 bar
with belt guide slots
The Vetter Leak Sealing Bag LD 50/30 S 12 bar is used for sealing
thick-walled containers. The tension belts are designed for a ten-
sile strength of 5000 kg.
The leak sealing bag LD 50/30 S 12 bar must not be used on plastic
containers. Plastic containers can be pressed in and damaged.
The leak sealing bag LD 50/30 S 12 bar is only to be used on metal
containers which permit loading of 10 kg/m2.
9Connect the ination hose to the connection coupling of the
leak sealing bag 12 bar and to the output coupling of the con-
troller. Place the belts around the container and tension them.
9The air supply can be made by a pressure regulator and com-
pressed air bottle or by a local compressed air line or by tap-
ping o air from a truck compressed air brake device.
9Place or move the leak sealing bag to the selected position
and inate until the leak is sealed and that no liquid or gas
escapes.

Page 19/39
7.3 Leak Sealing Bag LD 110/60 S XL 1.5 bar
with belt guiding slots
The Vetter Leak Sealing Bag LD 110/60 S XL 1.5 bar is intended for
sealing large leaks. The tension belts are extremely tear resistant.
9Connect the ination hose to the connection coupling of the
leak sealing bag and to the output nipple of the controller.
9Place the belts around the container and tension them.
9The air supply can be made by a pressure regulator and com-
pressed air bottle or by a local compressed air line, respec-
tively by tapping air from the compressed air brake device on
a truck.
9Place or move the leak sealing bag to the selected position
and inate until the leak is sealed and that no liquid or gas
escapes.
9Further ination of the leak sealers can damage the pipe or
the container due to pressure build-up.
7.4 Leak Draining Bag DLD 50/30
With the leak draining bag, the leak is sealed and simultaneously
the liquid drained away by a drain chamber.
The sealed area around the drain chamber is blown up so that the
liquid can be reliably drained away.
9Position a collection container for the liquid to be drained.
Place the outlet hose into the collection container.
9Connect the outlet hose to the ball valve and then connect
this to the leak draining bag.
9Connect the ination hose to the connection coupling of the
leak sealing bag and to the foot air pump.
9Place the belts around the container and tension them.
9Position or move the leak draining bag to the selected point
and inate it.

Vetter Leak Sealers
Page 20/39
7.5 Technical Data Leak Sealing Bags
LD 50/30 S LD 50/30 W
Art. No. 1500005401 1500005102
Size (L x W x H) cm 61.5 x 30 x 2 61.5 x 30 x 2
inch 24 x 12 x 0.8 24 x 12 x 0.8
Sealing area cm 50 x 30 50 x 30
inch 20 x 12 20 x 12
Max. operating
pressure
bar 1.5 1.5
psi 21.75 21.75
Test pressure bar 1.95 1.95
psi 28.5 28.5
Sealing pressure m WS 14 14
psi 20.3 20.3
Air requirement at
1.5 bar
Liter 17.5 17.5
cu. ft. 0.6 0.6
Weight of indivi-
dual bag, approx.
kg 4.3 6.9
lbs 9.5 15.2
Weight of set,
approx.
kg 29 31.7
lbs 64 69.9
LD 50/30 S 12 bar LD 110/60 S XL DLD 50/30
Art. No. 1500011402 1500014500 1500006001
Size (L x W x H) cm 61.5 x 30 x 2 110 x 60 x 2 62 x 30 x 6
inch 24 x 12 x 0.8 43 x 24 x 2.7 24 x 12 x 2.4
Sealing area cm 50 x 30 86 x 57 50 x 30
inch 20 x 12 34 x 22 20 x 12
Drain space cm 40 x 20 x 3.5
inch 16 x 8 x 1.4
Max. operating
pressure
bar 12 1.5 1.5
psi 174 21.75 21.75
Test pressure bar 18 1.95 1.95
psi 261 28.5 28.5
Sealing pressure m WS 14 10
psi 20.3 14.5
Air requirement Liter 154 190 2.8
cu. ft. 5.4 6.7 0.1
Weight of
individual bag,
approx.
kg 4.6 16 8.2
lbs 10.1 35.3 18.1
Weight of set,
approx.
kg 21.9 39.5 31.9
lbs 48.3 87.1 70.3
All rights reserved for technical changes within the scope of product improvement.
This manual suits for next models
9
Table of contents