VEVOR HB641601 User manual

Technical Support and E-Warranty Certificate www.vevor.com/support
PEGBOARD
USER MANUAL
We continue to be committed to provide you tools with competitive price.
"Save Half", "Half Price" or any other similar expressions used by us only represents an
estimate of savings you might benefit from buying certain tools with us compared to the major
top brands and doses not necessarily mean to cover all categories of tools offered by us. You
are kindly reminded to verify carefully when you are placing an order with us if you are
actually saving half in comparison with the top major brands.

- 1 -
MODEL:HB641601,HB641602,HB9632
Have product questions? Need technical support? Please feel free to
contact us:
CustomerService@vevor.com
NEED HELP? CONTACT US!
This is the original instruction, please read all manual instructions
carefully before operating. VEVOR reserves a clear interpretation of our
user manual. The appearance of the product shall be subject to the
product you received. Please forgive us that we won't inform you again if
there are any technology or software updates on our product.
PEGBOARD

- 2 -
SAFETY INSTRUCTIONS
WARNING:
1.Read this material before using this product. Failure to do so can result in
serious injury.
2. Do not exceed working capacity for pallet fork.
3. After use, please dry before storage to avoid rusting of product.
4. Procedures not specifically explained in this manual must be performed
only by a qualified technician.
To prevent serious injury from tool failure,do not use when it is
damaged:
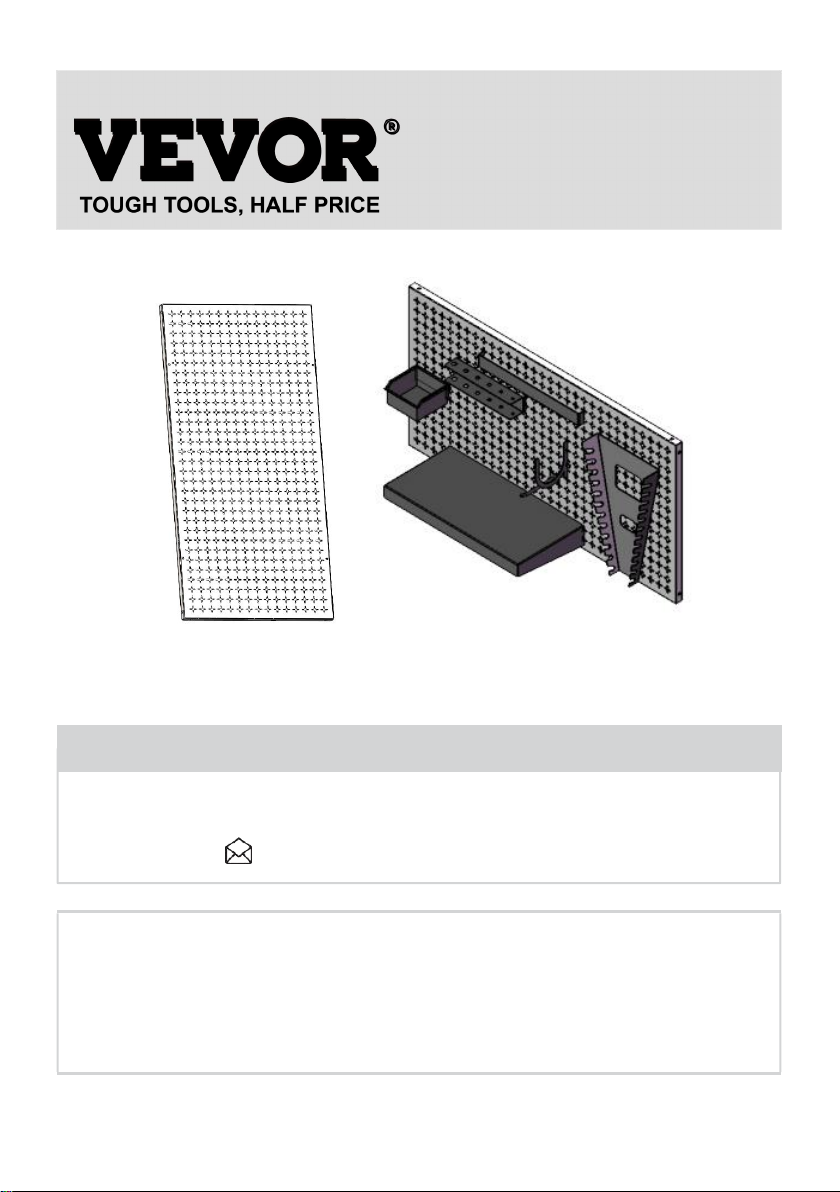
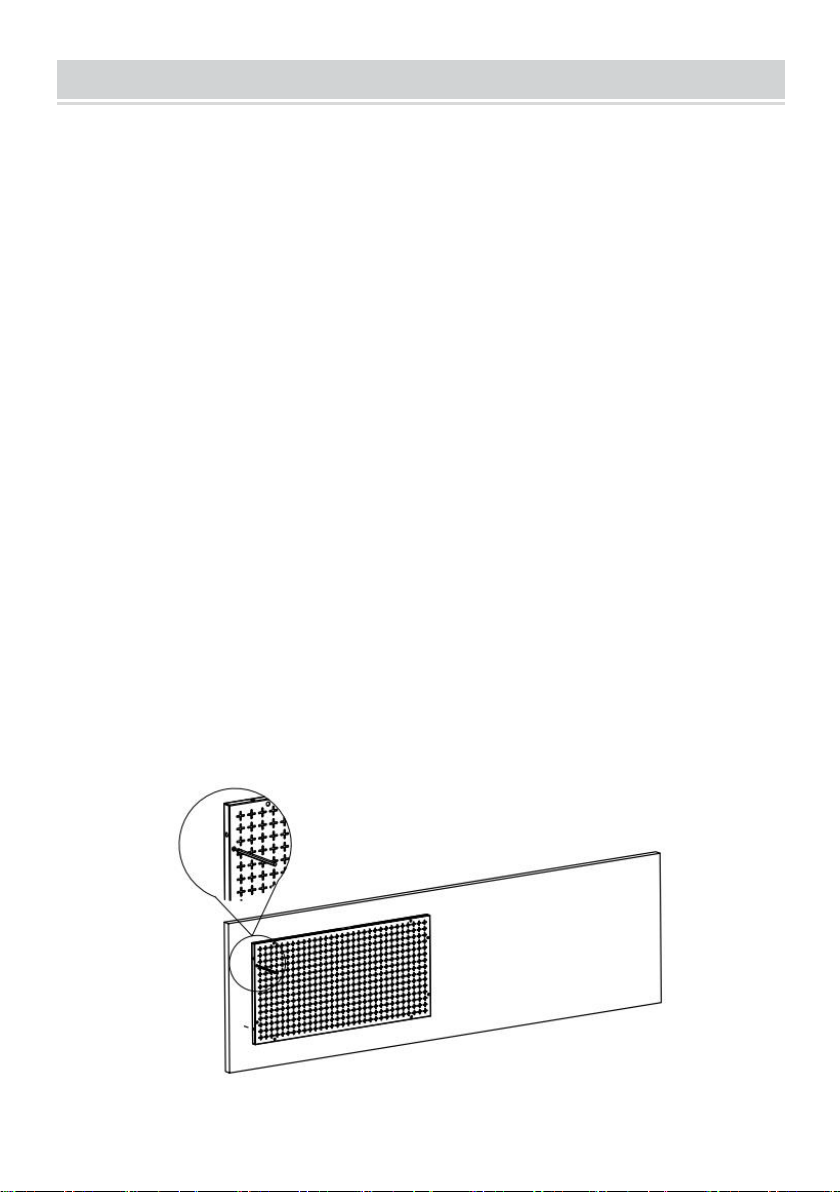
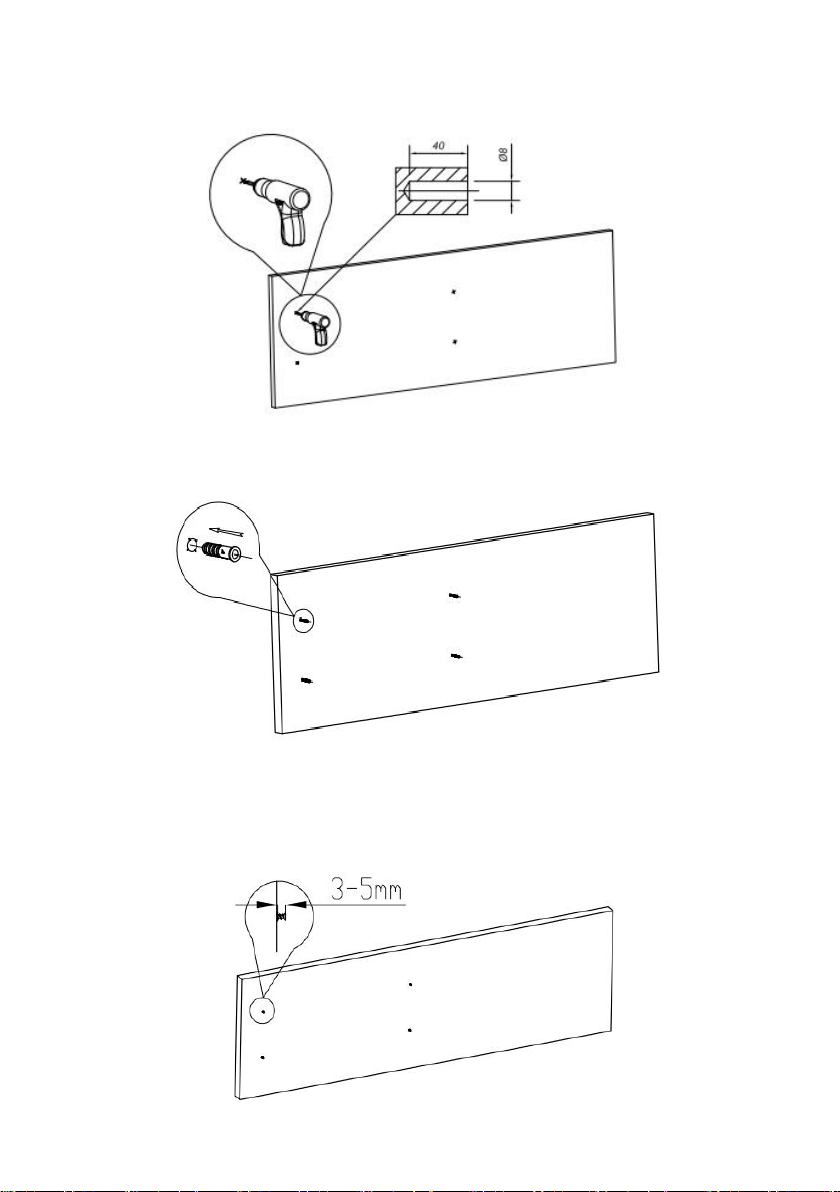
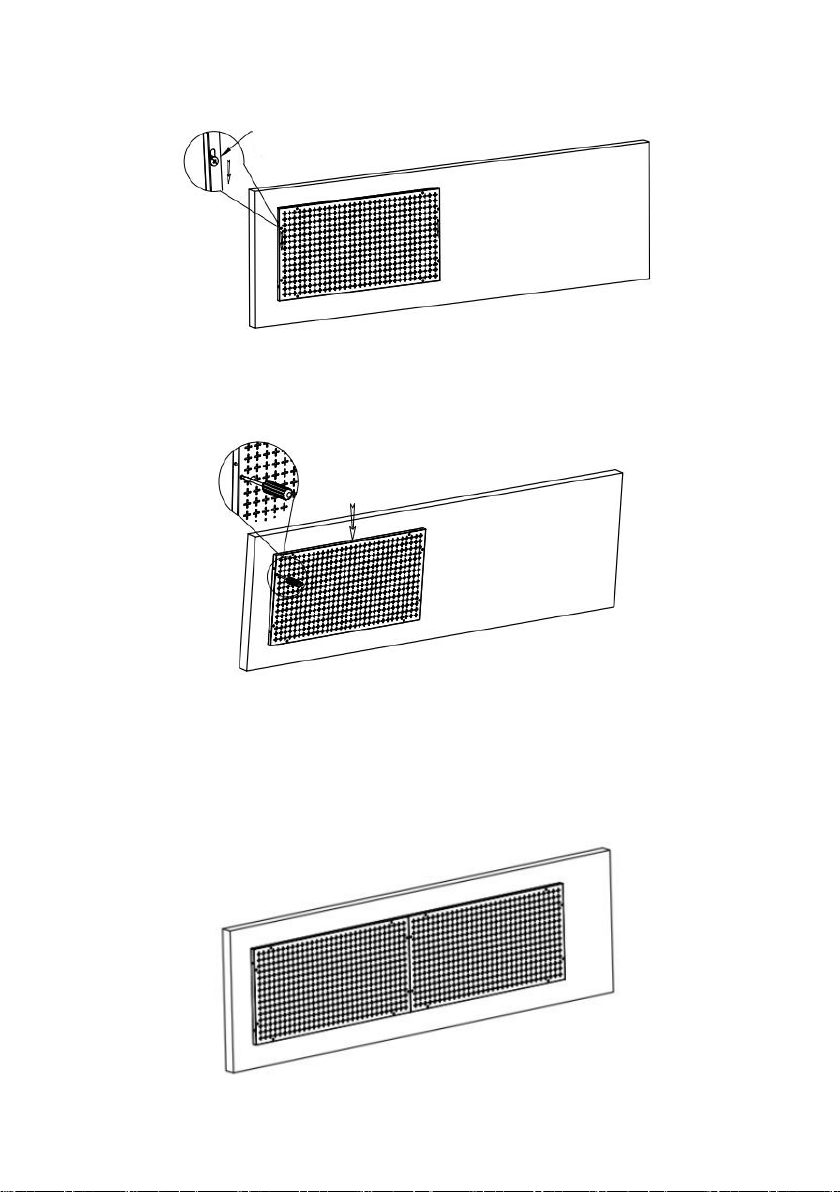
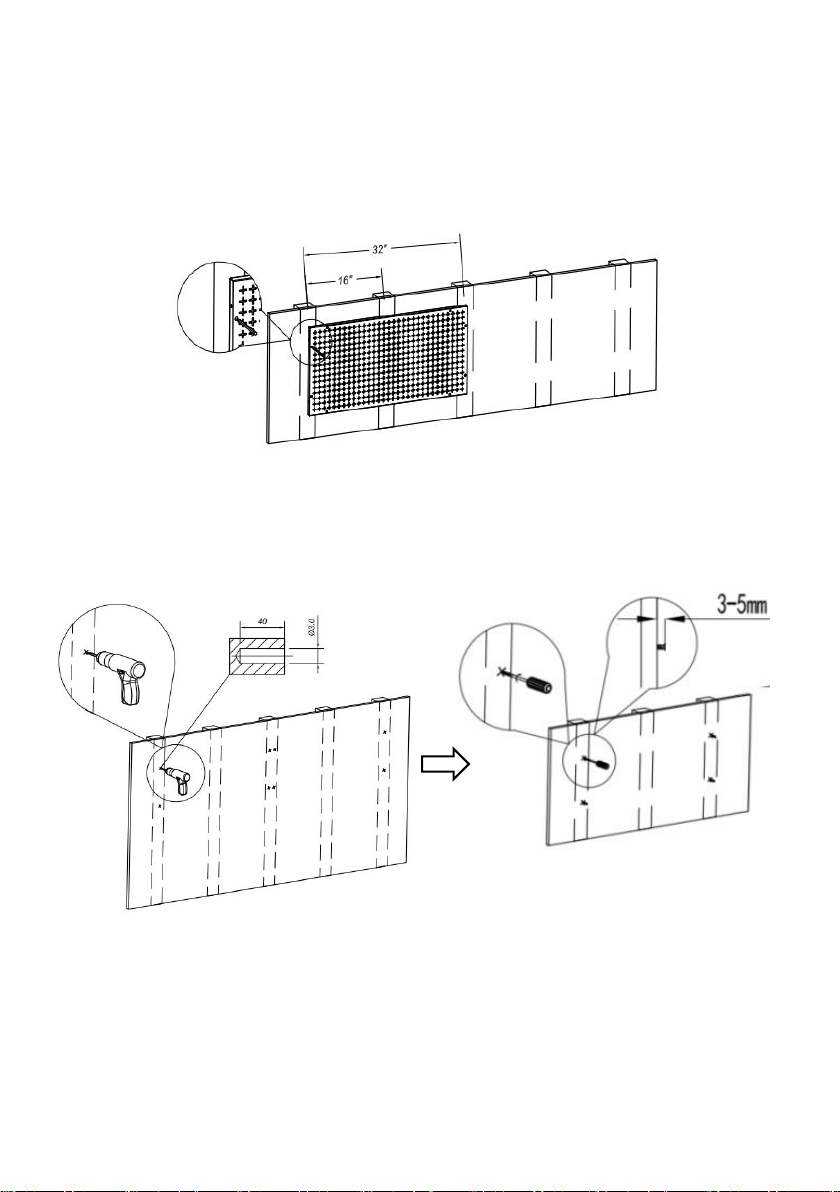
The pegboard must be mounted on a solid wall.
The pegboards shall not be installed on too thin wooden walls.
The pegboards shall not be installed on rotten or loose wooden walls.
The weight of the items to be hung shall not exceed the load of the
pegboard.
When replacing the hook, it must be selected to match the size of the
pegboard.
Avoid sharp points, blades, and other items to scratch the product
CAUTION:
Carefully read instructions and procedures for safe operations.
Save This Manual

- 3 -
MODEL AND PARAMETERS
HB641601
HB641602
HB9632
Material
Steel
Steel
Steel
Max.Weight
Capacity(single
pegboard)
165lbs
165lbs
165lbs
Pegboard
Size(L*W)
32”*16”
32”*16”
32”*16”
Hole Spec.
1/4”
1/4”
1/4”
Sheet Thickness
1.0mm
1.0mm
1.0mm
Surface Treatment
(pegboard)
Galvanization+Powder
Spraying
Galvanization+Powder
Spraying
Galvanization+Powder
Spraying
Color
white
white
white
Model
SPEC.

- 4 -
COMPONENTS
HB641601
HB641602
HB9632
Pegboard
×2
×2
×3
Hook
/
×15
×20
Storage Box
/
×5
×5
Storage Box Holder
/
×5
×5
Screwdriver Holder
/
×1
×1
Rack
/
×1
×1
Shelf
/
×1
×2
Mounting Block
/
×6
×8
U Hook
/
/
×4
Wrench Holder
/
/
×1
Limit Plug
/
×8
×12
Expansion Plug
×8
×12
×16
Self-tapping Screw
×8
×12
×16
Positioning Cardboard
/
×1
×1
User's Manual
×1
×1
×1
Model
Parts

- 5 -
INSTALLATION INSTRUCTION
Installation Preparation:
1. Two or more people to assemble the pegboard.
2. Please prepare a carpet or mat to protect your floor you need to spread
out all the accessories.
3. Please prepare gloves to avoid being scratched by sharp parts that may
occur during installation.
4. Please open all the boxes to check if the accessories are complete and
in good condition.
5. If you need to use power tools to install this product, please set the
speed to low speed in advance.
6. When installing, please align all the holes and do not tighten all the
screws first, otherwise, it may make the installation difficult.
For Concrete Wall Installation
STEP 1: Place the hanging board near the installed wall and mark the
holes with a fine nail or pencil.(Note:Two holes on the left, two holes on the
right)

- 6 -
STEP 2: Drill holes 8mm in diameter and 40mm in depth at the marked
places.(Note: Prepare your own drilling tools.)
STEP 3: Nail the four expansion plugs completely into the hole.
STEP 4: Screw the self-tapping screw into the expansion plug hole, leaving
3~5mm exposed.

- 7 -
STEP 5: Hang the pegboard on the self-tapping screws, as shown in the
picture.
STEP 6: Ensure that the four self-tapping screws are hung into the
mounting holes of the pegboard and tighten the self-tapping screws.
STEP 7: Follow the steps above to install other pegboards.
(Note:The pegboard is placed horizontally and vertically, and the
installation method is the same.)
back

- 8 -
For Wooden Wall Post Installation
STEP 1: Align edge of pegboard with center-line of post,and mark the
holes with a fine nail or pencil.(Note:Two holes on the left, two holes on the
right)
STEP 2: Drill holes 3mm in diameter and 40mm in depth at the marked
places,screw the self-tapping screw into the holes, leaving 3~5mm
exposed.(Note: Prepare your own tools.)
STEP 3: Hang the pegboard on the self-tapping screws, as shown in the

- 9 -
picture.
STEP 4: Ensure that the four self-tapping screws are hung into the
mounting holes of the pegboard and tighten the self-tapping screws.
STEP 5: Follow the steps above to install other pegboards.
(Note:The pegboard is placed horizontally and vertically, and the installation
method is the same.)
back

- 10 -
For Mounting Block + Concrete Wall Installation
STEP 1: Lay the positioning cardboard on the wall to be installed,drill the
marking holes according to the holes marked on the positioning cardboard.
Take away cardboard and drill holes 8mm in diameter and 40mm in depth
at the marking holes.(Note: Prepare your own drilling tools.)
Nail the expansion plugs completely into the hole.
Vertical:A=406mm

- 11 -
Horizontal:B=814mm
STEP 2: Fix the mounting block with self-tapping screws as
shown(Vertical).
Note:Horizontal and vertical installation method is the same.

- 12 -
STEP 3:Insert the hanging plate into the mounting block and plug the limit plug
as shown.
STEP 4: Follow the steps above to install other pegboards.
When the installation is complete, you can hang your items.

- 13 -
For Mounting Block + Wooden Wall Post Installation
STEP 1: Lay the positioning cardboard on the wall to be installed,and the
center of the hole on cardboard is located on the center-line of post.
Drill the marking holes according to the holes marked on the positioning
cardboard.
Take away cardboard and drill holes 3mm in diameter and 40mm in depth
at the marking holes.(Note: Prepare your own drilling tools.)
Vertical:A=406mm

- 14 -
Horizontal:B=814mm

- 15 -
STEP 2:Fix the mounting block with self-tapping screws as
shown(Vertical).
Note:Horizontal and vertical installation method is the same.
STEP 3:Insert the hanging plate into the mounting block and plug the
limit plug as shown.

- 16 -
STEP 4: Follow the steps above to install other pegboards.
When the installation is complete, you can hang your items.
Storage box assembly:

- 17 -
MAINTENANCE
Do not exceed the weight capacity.
After use, please clean and dry the product in a dry ventilated place.
Address:Baoshanqu Shuangchenglu 803long 11hao 1602A-1609shi
Shanghai
Imported to USA: VEVOR STORE INC, 9448 RINCHMOND PL #E
RANCHO CUCAMONGA, California, 91730 United States of America
REP
UK
Pooledas Group Ltd
Unit 5 Albert Edward House, The Pavilions
Preston, United Kingdom
REP
EC
SHUNSHUN GmbH
Römeräcker 9 Z2021, 76351
Linkenheim-Hochstetten, Germany
Made In China

This manual suits for next models
2
Table of contents