Viali V3FC60SS User manual

CANOPY
RANGEHOOD
12 MONTH WARRANTY
instruction manual
V3FC60SS
& V3FC90SS

1
Contents
Guide to the Appliance 2
Caring for the Environment 3
Safety Information and Warnings 4
Installation Instructions 6
Operation Instructions 8
Troubleshooting 9
Care and Maintenance 10
Specifications 11

2
1 2 3 4 5
7
6
Guide to the Appliance
1. Aluminium filters x 2
2. LED Lights
3. On / off button
4. 3 speed buttons - low, mid high
5. Light on /off button
6. Chimney
7. Hood
1 2 3
4
5
7
6
1. Aluminium filters x 3
2. LED Lights
3. On / off button
4. 3 speed buttons - low, mid high
5. Light on /off button
6. Chimney
7. Hood
V3FC60SS
V3FC90SS

3
Caring for the Environment
Responsible disposal of the packaging
The packaging of your appliance has been selected from environmentally friendly
materials and can usually be recycled. Please ensure these are disposed of correctly.
Plastic wrapping can be a suffocation hazard for babies and young children, please
ensure all packaging materials are out of reach and are safely disposed of. Please
ensure they are offered for recycling rather than throwing these materials away.
Responsible disposal of the appliance
At the end of its working life, do not throw this appliance out with your household
rubbish. An environmentally friendly method of disposal will ensure that valuable raw
materials can be recovered and used again.
Electrical and electronic appliances contain materials and substances which, if handled
or disposed of incorrectly, could be potentially hazardous on the environment and
human health.
Observe any local regulations regarding the disposal of electrical consumer goods and
dispose of it appropriately for recycling. Contact your local authorities for advice on
recycling facilities in your area.
The plug must be rendered useless and the cable cut off directly behind the appliance or
the machine to prevent misuse.

4
Safety Information and Warnings
General
• Please ensure this manual is read carefully before installation and use. Keep this
manual in a safe and accessible location should future reference be required.
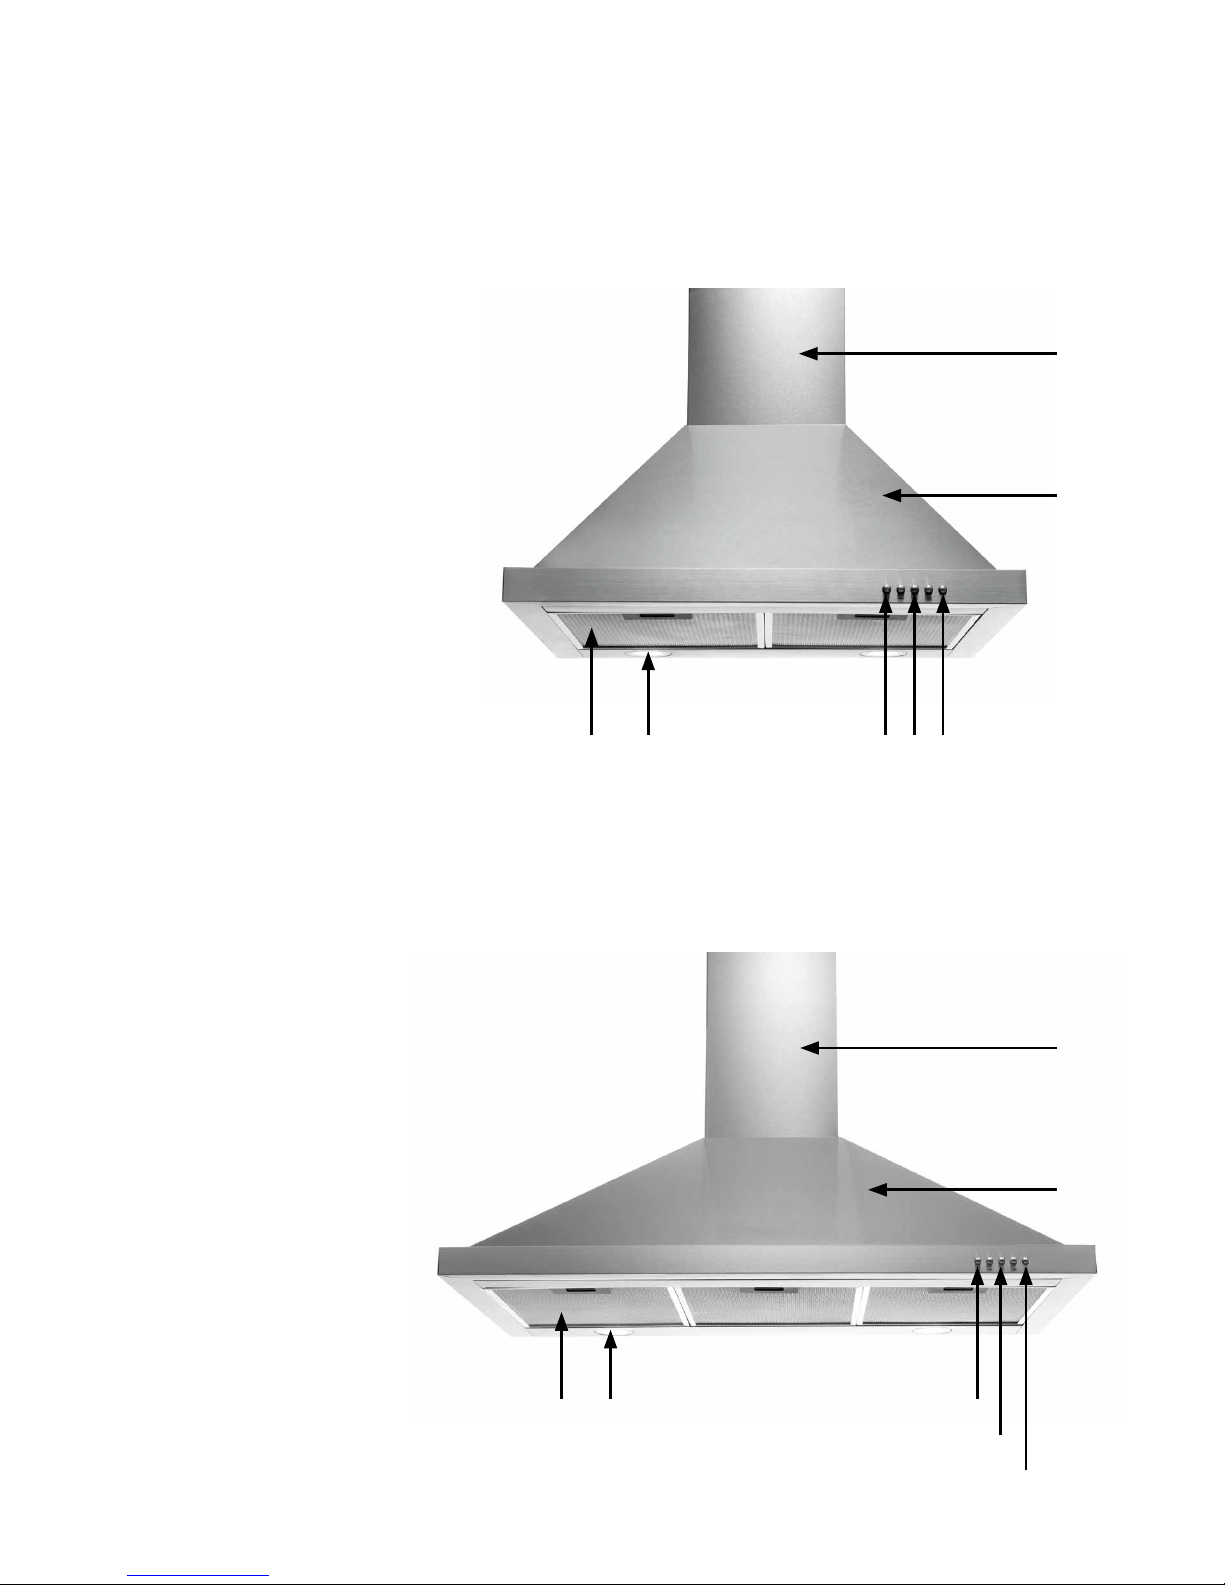
• The appliance has been designed as an exhausting version (external exhaust) or as
a filter version (inter air recycle) cooker hood.
Safety Precaution
• Take care when the cooker hood is operating simultaneously with an open fireplace
or burner that depends on the air from the environment and that are supplied by
other than electrical energy, as the cooker hood removes the air from the environment
which a burner or fireplace needs for combustion.
• There shall be adequate ventilation of the room when the range hood is used at the
same time as appliances burning gas or other fuels. (Not applicable to appliances
that only discharge the air back into the room)
• There is a risk of fire if cleaning is not carried out in accordance with the instructions.
• Do not flambé under the range hood.
CAUTION: Accessible parts may become hot when used with a cooking appliance.
• The appliance is not intended for use by persons (including children) with reduced
physical, sensory or mental capabilities, or lack of experience and knowledge, unless
they have been given supervised or instruction concerning use of the appliance by
a responsible person for their safely.
• If the supply cord is damaged, it must be replaced by the manufacturer or its service
agent or a similarly qualified person in order to avoid a hazard.
• The negative pressure in the environment must not exceed 4 Pa (4*10-5 bar).
• Provide adequate ventilation in the environment for a safe operation for the cooker
hood.
• Follow the local laws applicable for external air evacuation.
• Appliance shall only be used with rated voltage and frequency.
• There is a fire risk if cleaning is not carried out in accordance with the instruction.

5
Installation Safety Precautions
• The exhaust air must not be discharged into a flue which is used for exhausting fumes
from other appliances burning gas or other fuels. (Not applicable for appliances
which only discharge air back into the room)
• The minimum distance between the supporting surface for the cooking vessels on the
hob and the lowest part of the range hood is to be 65cm.
• When the range hood is located above a gas appliance, this distance may be
reduced to 60cm to align with the AGA code.
WARNING: Failure to install the screws or fixing device in accordance with the
instructions may result in electrical hazards.
WARNINGS
• In certain circumstances electrical appliances may be a danger hazard.
• Do not check the status of the filters while the cooker hood is operating.
• Do not touch the light bulbs after appliance use.
• Do not disconnect the appliance with wet hands and do not apply excessive force to
the supply cord.
• Naked Flame cooking (flambe) is prohibited underneath cooker hood (e.g. items
such as BBQ’s).
• The hood is only to be used in a domestic situation.
• Avoid free flame, as it is damaging for the filters and a fire hazard.
• Constantly check frying food to avoid it becoming overheated as the oil may become
a fire hazard.
• Disconnect the electrical plug prior to any maintenance.
• Young children should be supervised to ensure that they do not play with the
appliance.

6
Installation Instructions
NOTICE BEFORE INSTALLATION: Ducting, recirculating kits and carbon filters
are optional extras. Please check After Sales Support for product codes.
1. Before installation, please ensure the area is clean to avoid suction of any remaining
bits of broken wood and dust.
2. It cannot share the same air ventilation tube with other appliance such as gas tube,
warmer tube, and hot wind tube.
3. The bending of ducting should be ≥120°, parallel or above the start point and should
be connected to the external wall.
4. After installation, make sure that the extractor is level to avoid grease collection at
one end.
Installation of the hood:
1. The cooker hoods should be placed at a distance of 65—75cm from the cooking
surface for best effect. The minimum distance between the supporting surface for
the cooking vessels on the hob and the lowest part of the range hood is to be 65cm.
When the range hood is located above a gas appliance, this distance may be
reduced to 60cm to align with the AGA code. See Pic 1.
2. Install the hook on a suitable place once the installation height is fixed, and keep
it in line. The fixed position of the inside chimney bracket is the place of chimney.
See Pic 2.
3. Fix one-way valve on the hood and connect any ducting to the one-way valve.
See Pic 3.
4. Put the cooker hood on the hook. See Pic 4.
5. Use clamp to fix the T-piece valve on the ducting. See Pic 5.
6. Fix plate on the outer chimney, and be sure that the inside chimney can be adjusted
the height in it freely, See Pic 6.

7
7. Install the chimney and screw the T-piece metal outlet to the inside chimney,
See Pic 7 and 8.
8. Adjust the height of the inside chimney to the position of the inside chimney bracket
and fix on it by screw, after adjusting the position, fix the body with safety screw.
See Pic 9.
NOTE: The two safety vents are positioned on the back casing, with diameter of 6mm.
T-piece valve and ducting are optional extras.
WARNING: Failure to install the screws or fixing device in accordance with these
instructions may result in electrical hazards.
Ducting

8
Operation Instructions
1. Push stop button, and the motor will stop.
2. Push the Low button, the motor runs at low speed.
3. Push the Mid button, the motor runs at mid speed.
4. Push the High button, the motor runs at high speed.
5. Push the light button and the two lights will come on. Push it again and the lights
will turn off.
IMPORTANT
Should the lamps not work, make sure they are firmly tightened.
To replace the light, remove the filters, and push the light downwards, and unplug the
wiring connector.

9
Troubleshooting
Fault Cause Solution
Light on, but motor does
not work Blocked Fan Blades Remove item caught in
fan blades
Faulty capacitor Replace capacitor*
The motor jammed
bearing damaged Replace motor*
The internal with of motor
off or a bad smell from
the motor
Replace motor*
Light does not work,
motor does not work Light/s damaged Replace lights
Power cord loose Ensure pushed into
power points fully
Hood Vibrating Fan blades damaged
and causes vibration Replace fan blades
The motor is not tightly
fastened Lock the motor tightly
The body is not tightly
hanged Tighten the motor
Insufficient suction
The distance between the
hood and the cooktop is
incorrect (too far)
Readjust the distance
Too much air movement
from open doors or
windows
During use ensure
reasonable ventilation
provided although not
strong winds
The machine inclines
The fixing screw or
hanging screws are not
tight enough
Tighten the screw and
make it horizontal
* This work to be handled only by a qualified tradesperson

10
Care and Maintenance
NOTE: Please ensure this rangehood is turned off at the power point before any care
and maintenance is carried out.
• It is recommended to commence the operation of the appliance prior to cooking.
• It is recommended to leave the appliance in operation for 15 minutes after cooking
is terminated in order to completely eliminate cooking vapours and odours.
• When the appliance is not in use, please turn off.
• Do not use if the appliance is damaged — especially the supply cord and the case.
• If the supply cord is damaged, it must be replaced by the manufacturer, its service
agent or similarly qualified persons in order to avoid a hazard.
• Do not immerse the appliance in liquid.
• The exhaust air must not be discharged into a flue which is used for exhausting
fumes from an appliance burning gas or other fuels.
• Regulations concerning the discharge of air have to be fulfilled.
• The proper function of the cooker hood is conditioned by the regularity of the
maintenance operations, in particular, the active carbon filter.
• The filters are designed to capture the grease particles suspended in the air from
the cooking process, and must be maintained as per below to avoid clogging
(depending on the frequency of the use of the appliance).
- In order to prevent a fire hazard, it is recommended to clean the filter
at least every 2 months by carrying out the following:
- Remove the filters from the cooker hood and wash them in a solution of
water and neutral liquid detergent, leaving to soak.
- Rinse thoroughly with warm water and leave to dry.
- The filters may also be washed in the dishwasher.
• The aluminum panels may alter in color after several washes. This is normal under
correct use and is not cause for customer concern or replacement of panels.
• Clean the fan and other surface of the cooker hood regularly using cloth moistened
with denatured alcohol of non abrasive liquid detergent.
• Before any repair on the cooker hood, detach all plugs.
• Replace carbon filters approximately every 4 months.

11
Specifications
V3FC60SS
Features
Canopy rangehood 60cm
Stainless steel finish
3 speed push button control
LED lights – 2 x 2W
2 x aluminium grease filters
500m3/hr
Ducted (recirculating available)
50dB(A) maximum noise level
Optional Accessories
Carbon Filter (CF110)
Recirculating Kit: IA150BSRK
Extension Flue: IASXSE3
Technical Information
220-240V/50Hz
104W
1.5metre cable
150mm ducting spigot
Product Dimensions
700-1080 mm H x 600mm W x 500mm D
172mm
600mm
500mm
222mm
400 - 780mm
400mm
40mm
55mm
300mm
ɸ150mm

12
Specifications
V3FC90SS
172mm
900mm
500mm
222mm
400 - 780mm
400mm
40mm
55mm
300mm
ɸ150mm
Features
Canopy rangehood 90cm
Stainless steel finish
3 speed push button control
LED lights – 2 x 2W
3 x aluminium grease filters
500m3/hr
Ducted (recirculating available)
50dB(A) maximum noise level
Optional Accessories
Carbon Filter (CF110)
Recirculating Kit: IA150BSRK
Extension Flue: IASXSE3
Technical Information
220-240V/50Hz
104W
1.5metre cable
150mm ducting spigot
Product Dimensions
700-1080 mm H x 900mm W x 500mm D

13
Blank Page

14
Blank Page

15
Distributed by:
Home Appliances Pty. Ltd.
20 Carlotta Street, Artarmon NSW 2064
After sales support: 1800 444 357
Fax: 1300 133 279
Email: info@hapl.com.au
VIALIPRODUCTS.COM.AU
While every effort has been made in the preparation of this instruction manual, the publishers cannot be
held responsible for the accuracy of the information contained herein or any consequences arising from it.
This manual suits for next models
3
Table of contents
Other Viali Ventilation Hood manuals
Popular Ventilation Hood manuals by other brands

Bosch
Bosch DWK09M850 installation instructions

Klarstein
Klarstein CONTEMPO NEO 60 manual

Gaggenau
Gaggenau AI 540-720 Operating and assembly instructions

Foster
Foster FLY 2459930 Care and use manual

enervent
enervent Standard Plus white Installation and user instructions

Broan
Broan Elite EW54 Series installation instructions

AEG
AEG DK 4390 user manual

Kleenmaid
Kleenmaid ARTICA Instructions for use and warranty details

Whirlpool
Whirlpool UXT5230BD Installation Instructions and Use & Care Guide

Teka
Teka DGE 90-60 instruction manual

XtremeAIR
XtremeAIR Deluxe Series Installation guide & user manual

Schweigen
Schweigen UM1390-6BS installation guide