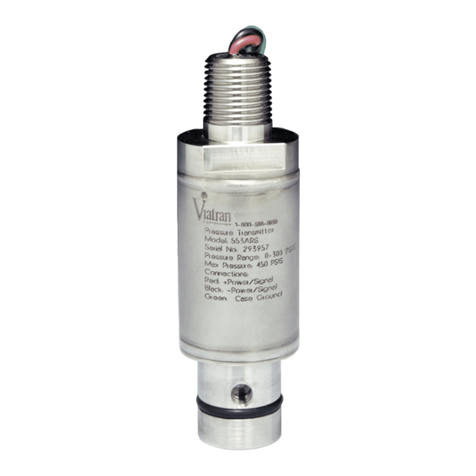
Viatran 359 User manual

1
98MANAL359 Rev. F3/21/17
MODEL 359
SANITARY PRESSURE TRANSMITTER
INSTALLATION MANUAL
199 Fire Tower Drive
Tonawanda, NY 14150
Toll Free: 1-800-688-0030
International: 716-629-3800
Fax: 716-693-9162
www.viatran.com
solutions@viatran.com

2
98MANAL359 Rev. F3/21/17
PRODUCT OVERVIEW
All information contained in this document is representative of a standard Model 359. If the product you ordered has special requirements or
modifications, refer to the Laser Marked information on the product and your purchase order for possible alteration to the product’s
configuration. Failure to verify product configuration before installation may cause permanent product damage and in most cases, void the
manufacturer’s product warranty. If you are unsure or have questions about your product, please contact our Application Engineers for
assistance.
Remove and retain all instruction manuals and performance certificates that are shipped with the product. These documents provide important
information on the product’s calibration, operation, safety precautions, recommended maintenance, re-calibration requirements, repair service
instructions and warranty information. These documents are updated from time to time as changes to the product occur and should be reviewed
at receipt so that proper and safe installation can occur.
Specifications:
Connection Diagrams:
Output: 4-20 mA
Single Transmitter
Multiple Transmitters
Sensor Construction: Oil-Filled Silicon
Wetted Parts: 316 LSS
Electrical Mating Connection: Acceptable 18AWG
wire termination connection - 1/2” NPT (M)
Electrical Connections:
Red: + Signal
Black: - Signal
Green Wire: Case Ground
Typical Adapter Installation
Typical Tank Installation
Type
‘L’
‘M’
Size Code
Short
Long
Standard
7.38
13.06
10.81
2.14
8.79
6.54
HD
HE

3
98MANAL359 Rev. F3/21/17
INSTALLATION REQUIREMENTS & CAUTIONS
1. The Model 359 is shipped from the factory with a protective cover over the sensing diaphragm. Care must be taken at all times to prevent
the diaphragm from becoming damaged or ruptured.
2. The Model 359 is shipped with a silicone (FDA Approved) O-Ring that provides a seal to the tank receiver or adapter. Care should be taken to
ensure the O-Ring is seated properly. If it is not, product will leak out of the breather passageway. A part number for a spare O-Ring is listed
in the accessories section of this Installation Manual.
3. The threaded tank shell-retaining nut, optionally available from Viatran, secures the transmitter into the tank receiver or adapter. It is
recommended that this nut be hand tightened to provide the required force to seat the O-Ring. An optional wrench is available for this nut if
solidified product prevents the nut from being loosened by hand. When the transmitter is removed from the receiver or adapter, the O-Ring
should be removed, inspected and cleaned or replaced if necessary.
4. It is important that breather passageways be kept clear of solidified product. If these holes become blocked, the transmitter output will be
erratic due to changes in barometric pressure. A probe, such as a pipe cleaner, may be used to clear the reference vent holes. If the
problem persists, soak the unit in Isopropyl Alcohol to dissolve any blockage.
5. If the transmitter must be removed for an extended period of time, a dummy plug is optionally available to seal the tank so tank or system
can be put back in service. Like the Model 359, the plug is secured into the tank receiver or adapter by the retaining nut and sealed by the O-
Ring. For the appropriate length plug, please contact one of our Application Engineers.
6. This product cannot be used in sterilization systems as described in the 3A Sanitary Standard 74 – XX (latest rev), Sections E1.9.
7. During product installation, the customer shall verify that all o-rings, gaskets, or seals meet or exceed the requirements of the 3A Sanitary
Standard 74 - XX (latest rev).
8. This product utilizes a sensing diaphragm that is “corrugated” or “grooved”, and shall be mounted at a minimum of 10 degrees to meet the
intent of 3A Sanitary Standard 74 – XX (latest rev), for self draining when installed in a process tank or piping by the customer.
9. The mounting for the Model 359 Tank Spud, shall have the “flats” of the shell aligned so as to allow for leak detection of the tank mounting.
10. This product utilizes a fill fluid, DC-200 (CAS# 63148-62-9), and has been determined to be non-toxic.
11. Adapters for Model 359, in general, are not 3A approved. Customer must ensure that the installation meets the requirements of 3A
Sanitary Standard 74 – XX (latest rev) for both leak detection and self draining when installed in a process tank or piping by the customer.
BASIC OPERATION & INTERNAL CALIBRATION CIRCUIT
Note:
The casting of the module has raised numbers at the adjustment screw positions. Those numbers reflect the following function of the
assigned screw.
Screw 1: Top Left, Coarse Zero Pot (CCW - Lower, CW - Raise)
Screw 2: Top Right, Fine Zero Pot (CCW - Lower, CW - Raise)
Screw 3: Lower Left, Internal Cal. Activation Pot (12 or 6 o’clock position – Disengage; 3 o’clock position - Engage)
Screw 4: Lower Right, Span Adjustment Pot (CCW - Lower, CW - Raise)
1. Outside of using the calibration circuit or the availability of a metrology lab for obtaining a pressure (Full Scale) reading, no object should be
used to physically move the sensor. The diaphragm can easily be ruptured by a fingernail.
2. Once proper connections and power are applied, the unit should begin to function.
3. Check the zero (4.00 mA) with the performance certificate to verify condition. If it is out of specification from the performance certificate,
use the coarse and fine zero adjustment screws to obtain the proper reading.
4. With no pressure applied, engage the calibration circuit by slowly rotating the calibration screw until the current output rises to about 8.80
mA’s (for a standard calibrated range). Check the reading with the performance certificate. If the reading is off, adjust the span screw to
raise or lower the reading – return the calibration circuit to the original position.
5. When making zero and/or span adjustments, there may be some interaction between the zero and span readings - repeat adjustments if
needed.
6. Always return the calibration screw to off or full CCW position before installing the transmitter into the application. Note: This is a common
reason for incorrect readings at start-up. The calibration circuit must be deactivated in order for the product to perform properly.
7. Once the product has been tested and functionality verified, the power and meter connections may be removed and the product reconnected
to the instrumentation loop.

4
98MANAL359 Rev. F3/21/17
NON-STANDARD RANGE (NSR) CALIBRATION
Definition
NSR: A non-standard range is a customer request to provide alternate scaled readings. Through the use of a single transmitter, numerous
pressure ranges can be monitored. Depending upon the model, the transmitter can be scaled down to any pressure range, from three times to
five times the original range. Only NSR requests for ranges less than the sensor rated range are recommended and in most cases possible.
The module type products have the ability to be re-ranged for different levels of measure. The NSR is possible due to the ability of the
adjustment screws to alter where the zero and span will fall. Refer to the below example for field NSR calibration.
NSR EXAMPLE
You have Viatran’s Model 359 with a standard range of 0 to 300” WCG. You would like to set an NSR of 0 to 150” WCG. Refer to the
Performance Certificate and obtain the following:
Zero = 0” WCG = 4.00 mA
Full Scale = 300” WCG = 20.00 mA
Cal Value = 90.04” WCG = 8.81 mA
In order to recalibrate the transmitter, you must determine the cal reading in mA’s at the NSR range. This is done by calculating what the cal
output should be at the NSR range. For the example listed, the standard calibration value is set to represent 90.04“ WCG. Once internally set,
the calibration (Cal) will always represent this pressure.
Use the formula: Cal mA’s = [(16 x Standard Cal Pressure) / desired range] + 4
Substitute Actual Numbers: Cal mA’s = [(16 x 90.04) / 150] + 4
Cal mA’s = (1440.64 / 150) + 4
Cal mA’s = 9.604 + 4
Cal mA’s = 13.604 mA’s
The zero would be set for 4.00 mA’s, and the calibration circuit will read (after adjusting span) 13.604 mA’s when activated. This would provide
a new NSR range for the unit of 4-20 mA’s over 0-150“ WCG.
ACCESSORIES - OPTIONAL EQUIPMENT
Please contact Viatran for these and other available accessories.
O-Rings
Retaining Nut (Required for all
adapters)
Retaining Nut Wrench
Polyhead Connection Box
Digital Indicators
Tank Adapters
Tank Shell (Receiver)
Tank Shell Bezel
Tank Plugs
PREVENTATIVE MAINTENANCE
Note: This checklist should be followed each time a transmitter requires preventative maintenance. Depending on product usage cycle, all
maintenance should be done on a schedule that is reflective of the application.
1. Cleaning in place is the recommended process that should be performed as the system or process permits.
2. The O-Ring seal and sensor surface should be visually checked whenever the unit is removed or every 6 months, usage dependent. Any
visible damage, especially deep gouges or cuts in the sensor, would require the unit to be returned for evaluation. A soft, lint-free, cloth
dampened with a process recommended cleaner may be used to clean the sensor to remove excessive media buildup. Never use
compounds or solvents that are not compatible with the wetted materials. The sensor area should never be scrubbed with a stiff or metal
brush.
3. The sensor surface and/or gasket seal should be visually checked whenever the unit is removed or every 6 months (usage dependent). Any
visible damage, especially deep gouges or cuts in the sensor, would require the unit to be returned to Viatran for evaluation.
4. Care should be used when handling the unit by the connection wires. Continued movement of these wires will weaken the seal. Seal failure
will result in internal contamination and non-warranty product failure. Visually inspect the connection area every 6 months (usage dependent).
5. The module door should always remain (closed) over the adjustment screws. Constant exposure of the adjustment screws to mists, dusts or
contaminants could cause them to become “frozen” in place, causing the module to become locked and non-usable. This would render
external adjustment difficult at best. Replacement magnets are available if this problem occurs. Hence a visual inspection of the calibration
pots should take place on a 2 to 4 week schedule, or when extreme environmental conditions require it.
6. NEVER - Strike a presumed failed transmitter. If the transmitter is in working order, the shock could (and usually does) cause additional
failure.

5
98MANAL359 Rev. F3/21/17
7. NEVER - Remove a transmitter from an instrumentation loop with the power on. Protection circuitry designed to absorb small power surges
could become shorted and cause transmitter failure due to “arcing”.
8. NEVER - Ground a transmitter to AC Return (White). Instant “fatal” failure occurs.
9. NEVER - Apply input power to the case ground (Green wire). Reduced life span of protection components will occur.
MAINTENANCE AND REPAIR
All Viatran transmitters have been designed to function free from routine or scheduled maintenance. Simple cleaning of the electrical
connection and pressure cavity on an as needed basis will provide many years of satisfactory performance. Protecting the product from
continued exposure to moisture or fluids at the electrical connection, breather area (model dependent) will eliminate premature internal failure
of the product. Generally any time the product is removed from service the connector and pressure port threads should be cleaned and the
pressure cavity flushed with a 316SS and/or O-Ring (material model dependent) compatible cleaner to prevent media buildup. During the
cleaning process only a soft, lint-free cloth is recommended. Never use a coarse or stiff bristle brush to clean media from the diaphragm surface.
It is suggested that the calibration be verified on a usage dependent schedule. If the product is in continuous service 7 days a week, then
calibration verification may be necessary every 6 to 8 months. If the product is in a lab test environment a more lenient verification schedule
would be appropriate. In all instances the performance of the product will depend on the individual application or process in which it is installed.
More continued usage would require a shorter period between calibration verification and product maintenance.
If a product is perceived to be exhibiting problems, it can be returned to Viatran for analysis and/or repair. It is suggested that only Viatran
personnel attempt repair of the product. Any damage resulting from customer disassembly would result in a loss of coverage under the warranty
policy. All Viatran products are able to be repaired at minimal cost if simple cleaning and precautions are taken in the handling and application
of the product. Older products returned for repair are updated to current specifications unless the repair cost would outweigh the cost of a new
replacement model. Products returned for repair should include information on the person to contact for repair quote approval, the individual to
contact if Viatran’s technical staff requires additional information during analysis, and a brief description of the problem associated with the
product’s failure.
WARRANTY
Viatran Corporation warrants that its products shall be free from defective workmanship and/or material for a period of twelve (12) months
from the date of shipment, provided that Viatran’s obligation hereunder shall be limited to correcting any defective workmanship and/or
replacing any defective material f.o.b. factory. No allowance will be made for any expense incurred for correcting any defective workmanship
and/or material without written consent by Viatran. This warranty is in lieu of all other warranties expressed or implied.
REPAIR INSTRUCTIONS
Viatran’s Transmitters are designed to be easily repaired and recalibrated if necessary. If a failure occurs, the transmitter should be returned to
the factory for inspection and testing. Please contact the Customer Support Department at 1-800-688-0030, for a return tracking number
and/or a repair cost estimate. A nominal inspection fee is charged on all units returned to the factory which are not subsequently repaired.
Viatran Corporation
199 Fire Tower Drive
Tonawanda, NY 14150
Phone: 716-629-3000
Toll-Free: 1-800-688-0030
Fax: 716-693-9162
Website: www.viatran.com
solutions@viatran.com
Table of contents
Other Viatran Transmitter manuals

Viatran
Viatran 118 Installation and user guide

Viatran
Viatran 509 Installation and user guide

Viatran
Viatran 517 Installation and user guide

Viatran
Viatran 246 Installation and user guide

Viatran
Viatran 574 Installation and user guide

Viatran
Viatran 350 User manual

Viatran
Viatran 553 Installation and user guide

Viatran
Viatran 510 Installation and user guide

Viatran
Viatran 379 Installation and user guide

Viatran
Viatran IDP10-A Use and care manual