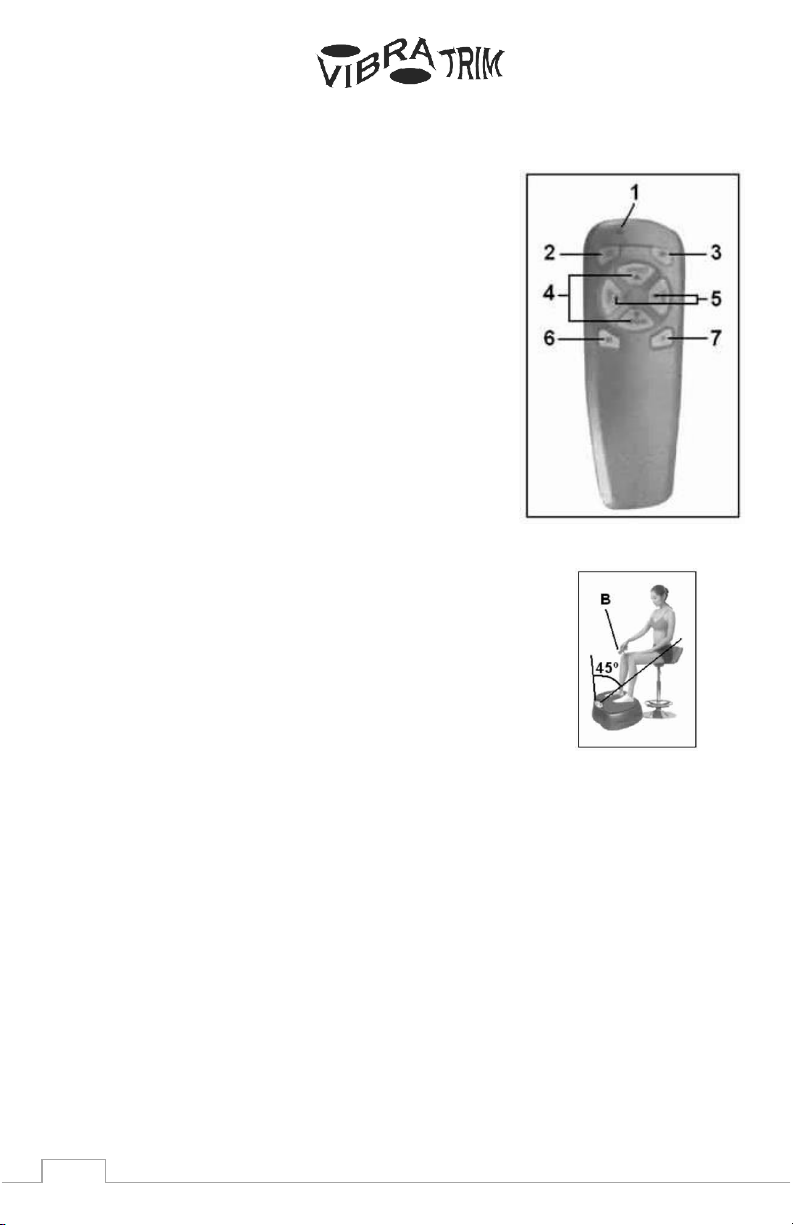
Vibratrim VT202+1 Manual

VT202+1
2 motors providing Oscillation &
Spiral Vibrations independently.
Owner’s Manual
Instructions & Warranty

2
Thank you for purchasing our
product. While we do our best to
ensure the quality in all our
products, occasional errors or
omissions may occur. If you notice
a defect or missing parts contact us
at the address and phone shown
on the back of this booklet.
GENERAL INSTRUCTIONS -
Before plugging the unit in, make
sure that the unit is not damaged
and that the unit is level.
1. Do not allow children or the
disabled to use the machine
without strict supervision from
a qualified person.
2. Never use accessories not
recommended by the
manufacturer.
3. Do not use the machine if the
power cable becomes damaged
or worn.
4. Keep the power cable away
from hot surfaces.
5. Do not use this machine
outdoors.
6. To unplug the machine, first
put the power switch to the --
O- position and then unplug it
from the wall socket.
7. This unit has been designed for
home use only.
8. The VT202 has been designed
for a maximum user weight of
265 pounds.
9. Keep your hands well away
from any moving parts.
10. Use suitable clothing and
footware, making sure that the
laces/cords are tied.
11. It is not advisable to keep your
unit in damp locations for long
periods as it will be prone to
rust.
SAFETY BREAKER -
This model is equipped with an
electronic circuit breaker to
protect both the electronic and
electrical circuits. This safety device
(fuse) will be automatically
triggered if the unit is subjected to
abnormal force or heat. If the
On/Off button does not light when
switched on, this will indicate the
fuse has blown. (Call for directions
on replacing this fuse if needed)
1. Set the switch (L) located on
the casing to the -O- (OFF)
position Fig B.
2. Change the fuse (c) (5 Amp).
3. Next set the switch (L) to the -
I- (ON) position and the unit
will be ready for use again.
Plug the unit into a wall socket
with a grounded outlet. Set the
switch to the on position.

3
ASSEMBLY INSTRUCTIONS –
Take the unit out of the box and place it on the floor as shown. Make
sure that all of the pieces are there (A) Platform, (B) Remote Control,
(C) Power Cable. The remote control is shipped in the top Styrofoam
piece. It is white in color and easy to miss.
START UP –
Plug the power cable © into the socket (M) on the unit.
The other end of the cable is plugged into the electric wall socket
(110Volt). Set the switch (L) to the (I) position.

4
VT202+1 Vibration Information
The VT202+1 uses two motors to produce two separate vibration
styles. They can only be run individually and not together.The
principal vibration style is the Oscillation type of vibration. In theory,
this type should offer the safest, most complete muscle development
simply because it allows the pelvis to move the way it naturally wants
to: rotating side to side, the same as when you walk. This not only
limits vibration of the head and neck but it also brings into play the
important small stabilizing muscles of the spine that you ordinarily
would not be able to consciously contract and exercise. Improved
posture is an under-rated benefit of exercising with a Pivotal vibration
machine.
The other vibration is a spiral vibration that moves the platform in a
horizontal spiral pattern. This is an excellent vibration style for
massages, stretches and rehabilitation from an injury or surgery.
DISPLAY PANEL ELEMENTS -
1. Power Button
2. Built-in Program Selection Button
3. Vibration Type Selection (left side) Oscillation Speed,
L (right side) Spiral Speed
4. Remote Indicator Light
5. Start Button

5
6. Stop Button
7. Time Adjust Buttons
8. Speed Adjust Buttons
9. Time/Mode/Program Displays (Left)
Time/Speed/Program Displays (Right)
MANUAL FUNCTION -
1. Step on to the platform and place your feet at the desired
position. This is discussed further on page 10.
2. Press the "Power Button”(1)
3. Press the “Time Button” (7) if you want to select a different
time than the default of 10 minutes.
4. Press the Vibration Type” Button to select the type of vibration
to be active. H is Oscillation and L is Spiral.
5. Press the “Start” Button (5) to start the platform vibrating.
6. Press the “Speed”Adjust Buttons (8) to select the
desired speed. The speed can be adjusted while the machine
is running in the manual mode.
7. Press the “Stop” Button to Stop the plate vibrating.The unit will
stop immediately if you press the STOP key.
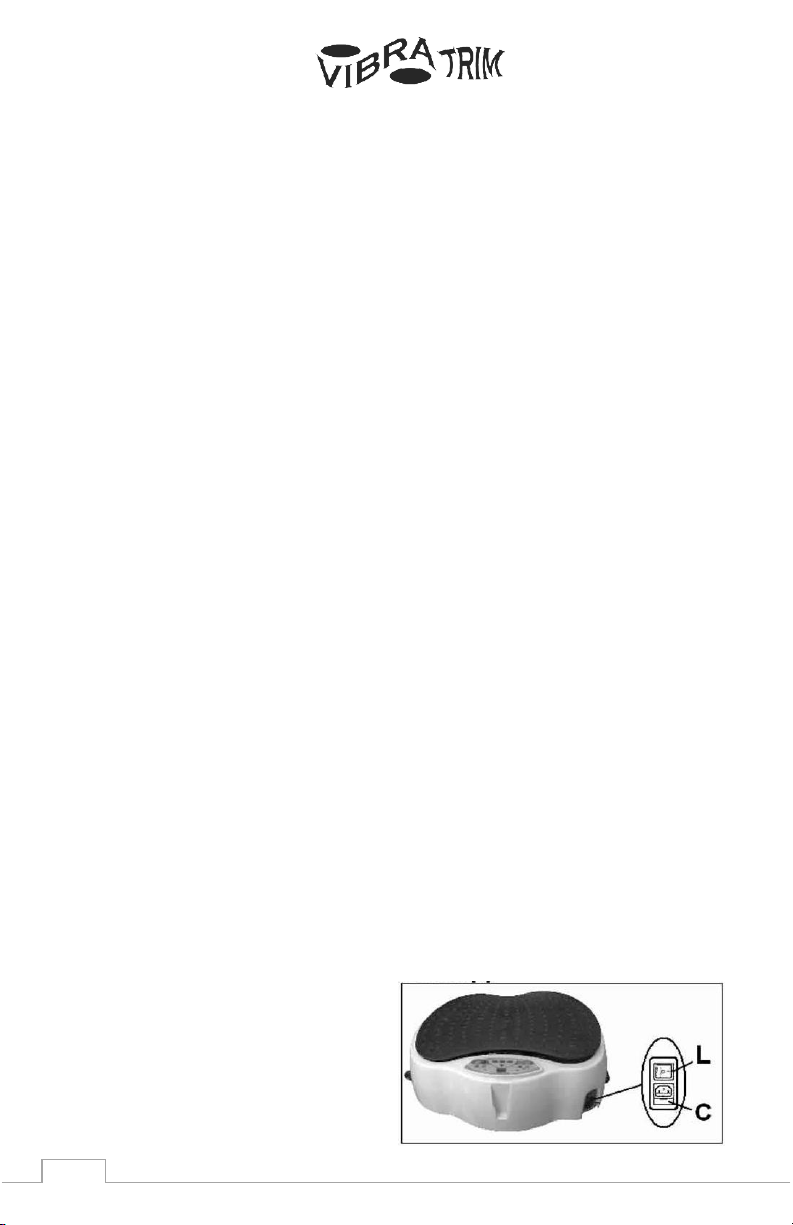
When you have finished exercising, press the ON/OFF key (1) and
the On/Off power switch (L), Fig. B. next to the Power Cord in back of
the machine.
BUILT-IN PROGRAM FUNCTION
This platform has 5 built-in preset programs that allow you to exercise
without making any changes on the display panel.
1. Step on to the platform and place your feet at the desired
position. This is discussed further on page 10.
2. Press the "Power Button”(1)

6
3. Press the “Program Button” (2) repeatedly until the program
you want is displayed. P1, P2, P3, P4 or P5. Each program has a
duration of 5 minutes.
4. Press the Vibration Type” Button (3) to select the type of
vibration to be active. H is Oscillation and L is Spiral.
5. Press the “Start” Button (5) to start the platform vibrating.
6. The speed and time buttons are not functional when a built-in
program has been selected.
7. Press the “Stop” Button to Stop the plate vibrating before the 5
minutes have elapsed otherwise it will stop automatically when
the program is completed.
Program 1 (P1) The speeds are the same whether the Oscillation or
Spiral Vibration is selected.
Time
Speed
Minute 5
4
7
9
11
13
12
Minute 4
10
8
6
4
9
12
Minute 3
13
9
6
4
7
9
Minute 2
11
13
12
10
8
8
Minute 1
4
9
12
13
9
6
Program 1 (P2) The speeds are the same whether the Oscillation or
Spiral Vibration is selected.
Time
Speed
Minute 5
7
11
15
18
20
18
Minute 4
16
12
14
16
18
20
Minute 3
16
14
10
7
11
15
Minute 2
18
20
18
16
12
14
Minute 1
16
18
20
16
14
10
Program 3 (P3) The speeds are the same whether the Oscillation or
Spiral Vibration is selected.
Time
Speed
Minute 5
5
15
18
1
18
20
Minute 4
20
1
19
20
1
20
Minute 3
20
15
5
15
18
1

7
Minute 2
1
18
20
1
1
1
Minute 1
19
20
1
20
15
5
Program 4 (P4) is a mixture of both vibrations in one program. White
background is Oscillation the Grey background is Spiral.
Time
Speed
Program 4
Minute 5
5
10
15
10
2
2
Oscillation or Spiral
Minute 4
10
15
10
2
2
10
Oscillation or Spiral
Minute 3
15
10
2
2
10
15
Oscillation or Spiral
Minute 2
10
2
2
10
15
10
Oscillation or Spiral
Minute 1
2
2
10
5
10
2
Oscillation or Spiral
Program 5 (P5) is a mixture of both vibrations in one program. White
background is Oscillation the Grey background is Spiral.
Time
Speed
Program 5
Minute 5
5
10
18
10
2
2
Oscillation or Spiral
Minute 4
10
18
10
2
2
16
Oscillation or Spiral
Minute 3
19
11
2
2
16
19
Oscillation or Spiral
Minute 2
11
2
2
16
19
11
Oscillation or Spiral
Minute 1
2
2
16
19
11
2
Oscillation or Spiral
REMOTE CONTROL -
INSTALLING THE BATTERIES
This remote uses two 1.5 volt ALKALINE
BATTERIES. To fit the batteries, take the cover
off the back of the remote control (B) and
carefully insert the two “AAA” type batteries
into the battery compartment (A), Fig.1, making
sure that the batteries polarity is correct
(matching the battery “+” terminal with the “A”
sign inside the battery compartment, and the “-“sign). Replace the
battery compartment cover (B).

8
OPERATION -
For greater ease of use, when exercising, this
platform has a remote control unit to select the
different operation modes. The control buttons
perform the same as the buttons on the display
panel and the instructions on pages 4-6 are the
same.
Remote control key list:
1. Remote control unit ON LED
2. Remote control ON/OFF button
3. START/STOP key
4. Increase or decrease speed keys
5. Increase or decrease time keys
6. Vibration Type Selection H is
Osciallation and L is Spiral
7. Program selection key.
NOTE: To ensure a good signal between the remote control unit
and the monitor, point the remote control at an angle of
approximately 45 degrees, as shown in the diagram.
MOVEMENT & STORAGE.
The unit is equipped with wheels (Y) and extendable handles to make
it easier to move around your house. Make sure that the power
cable is unplugged from the wall socket. Pull out the handle (D) in the
direction of the arrow <, as shown below. Lift the platform in the
direction of the arrow , so that the wheels (Y) rest on the floor.

9
To prevent accidents, DO NOT MOVE THE PLATFORM ACROSS
UNEVEN FLOORS.
INSPECTION & MAINTENANCE –
Switch the unit off and unplug the power cord. Use a damp cloth or
towel to clean any dust off the surfaces of the platform and the
remote control unit. DO NOT USE SOLVENTS.
ATTENTION:
Periodically check that all of the fastening elements are duly
tightened and connected correctly. Check and tighten all the parts on
your unit every three months.
When in doubt, about any parts on the machine, do not hesitate to
get in touch with the Technical Assistance Service by phoning
customer service (see the back page of this manual).
USE OF THE PLATFORM:
Consult your doctor before using the balancing platform, especially if
suffering from pain or any illness. A workout on the Vibra-Trim
provides significant benefits and reactions for your body. These are
the same responses observed with traditional training methods, but
with greater intensity.

10
WHO SHOULD NOT USE THIS MACHINE
Use is NOT ADVISABLE for people suffering from the following
conditions:
Pregnancy
Active Cancer
Recent Fracture
Acute Inflammation
Current Blood Clots
Recent Surgery
The following are precautions not eleminations *
Acute Thrombosis
Severe diabetes
Epilepsy
Pacemaker
Tumors and metastatic processes.
Known neurological conditions
Acute hernia, discopathy, spondylolysis
Known retinal conditions
*That means a person should take them into consideration, see a
health professional prior to starting an exercise program, and be
a bit more careful not to overdo it. Many a health professional
may advocate that a person with these conditions use whole
body vibration.

11
BENEFITS -
WELL BEING
Boosts levels of Testosterone and natural HGH
Reducing the effects of stress and treatment of stress
incontinence
Positive results on neurological conditions such as Parkinson's
General improvement of skin quality
Revitalization
Creating a balance of body and mind
HEALTH
Gentle training - no physical strain of the joints
Improves circulation and increases blood oxygenation
Decreased diastolic blood pressure
Strengthening of muscles - particularly the back/spine
Reduces back pain and stiffness
Improves cellulite reduction
Improved collagen production
Stimulation of the metabolism and lymph drainage
Decreases level of Cortisol (hormone released when we’re under
stress)
Highly effective body fat combustion
Strengthening of bone tissues
Combats osteoporosis
Rehabilitate injuries and ailments
Rapid recovery after exercising
FITNESS
Increases muscle strength, flexibility, mobility and coordination
Strengthens and enhances posture
Increases bone strength and density
Increases tendon strength
Improves muscle strength and tone, enhancing athletic
performance
Enhances balance, coordination and post ACL repair

12
TRAINING -
The exercise uses 3 training variables:
Time: Measuring the duration of the exercise. Sessions are
measured in minutes (VT202).
Frequency: (Intensity) Representing the number of cycles per
second.
Amplitude: Oscillation height.
The oscillation vibration system lets you changed the height by
merely changing the position of your feet on the platform so that the
further away you are from the platform’s center line, the greater the
amplitude. See diagram below.
There are various positions you can use to exercise specific parts of
the body (these will be described further on).
It is essential that you begin using the Vibra-Trim platform model
VT202 in a gradual fashion to accustom your body to the vibration
treatment. It is advisable to begin with short application times.
Respecting the recovery times is essential, not only for energy-
metabolic recovery, as noted by “tiredness”, but also to rest the
Central and Peripheral nervous systems that are actively involved.
On this VT202, you can choose to select one of the 3 preset programs,
or use the manual program.
You can use the basic stance or adopt other postures that will allow
you to exercise specific areas.
The recommended training method is to focus on one muscle group
per session. Perform training sessions of 1 to 3 sets on each one,
depending on your individual fitness level.

13
It is advisable not to use the platform more than three times per
weeks, avoiding use on consecutive days. It can only be used on
consecutive days but at minimum settings for stretching exercises or
massage. We recommend the manual training mode on alternate
days during the first week using the tables below.
Week 1
Set
Time
Speed
1
3 minutes with 1 minute rest between
1-3
2
3 minutes with 1 minute rest between
1-6
3
3 minutes with 1 minute rest between
1-3
Week 2-5
Set
Time
Speed
1
4 minutes with 1 minute rest between
1-6
2
4 minutes with 1 minute rest between
1-12
3
4 minutes with 1 minute rest between
1-6
Week 6-10
Set
Time
Speed
1
4 minutes with 1 minute rest between
1-6
2
4 minutes with 1 minute rest between
1-15
3
4 minutes with 1 minute rest between
1-6
The basic rule, when choosing the duration, frequency and amplitude
is to respect your own personal reactions and create a training
program that builds up gradually. Thus allowing you to adapt to the
time settings and speeds best suited to your body.
Level 16 and above must only be used by people who are very fir or
who weigh more than 200 kg.
EXERCISE TABLE:
Select a session of 2 exercises from the table of different positions,
exercise for the duration stated in the tables above.
Gradually increase the number of sessions over time to reach a
maximum total daily exercise time of 30 minutes.
NOTE:
Do not use this unit for longer than 20 minutes during any one
continuous session. You will stimulate so much lymphatic drainage

14
that you will quickly feel the effects of those toxins being released
and may start to feel a little goofy. You also should drink a good deal
of water to help eliminate these toxins from your body.
THE MANUFACTURERE RETAINS THE RIGHT TO MODIFY THE
PRODUCT SPECIFICATIONS WITH ANY PRIOR NOTIFICATION
VibraTrim VT202+1 SPECIFICATIONS -
VIBRATION TYPE: Oscillating & Spiral
POWER: 2 - 200W motor (DC Motors)
INTENSITY: 20 levels of speed
VIBRATION AMPLITUDE: - Minimum; 0mm. - Maximum 10mm.
PROGRAMMING: 1-10 min.
PROGRAMS: 5 with remote control.
MAXIMUM USER WEIGHT: 120Kg / 265 lbs.
MEASURES: 72cm / 28.34” x 56cm / 22” x 26cm / 10.25”
PLATE DIMENSIONS: 40cm / 15.34”. x 55cm / 21.6”.
WEIGHT: Gross 23Kg / 51 lbs. Net 21Kg/ 46lbs.
MATERIAL: Fiberglass reinforced ABS
ELECTRICAL PROTECTION: fuse (5 A)
EXERCISES -

15

16

17
It is recommended that you use only the
Spiral Vibration for Stretches & Massages

18

19
It is recommended that you use only the
Spiral Vibration for Stretches & Massages

20
Table of contents
Other Vibratrim Fitness Equipment manuals
Popular Fitness Equipment manuals by other brands

Movement
Movement ADDUCTOR owner's manual

MAYHEM STRENGTH
MAYHEM STRENGTH HAVOC Series Assembly instructions

Weider
Weider CROSS BAR MAX user manual

Kayakpro
Kayakpro SpeedStroke Gym - Kayak instructions

Schwinn
Schwinn Active series 20 series Assembly guide

Body Solid
Body Solid POWERLINE PSS-60X owner's manual