manuals.online logo
Brands
  1. Home
  2. •
  3. Brands
  4. •
  5. Viessmann
  6. •
  7. Work Light
  8. •
  9. Viessmann 5043 User manual

Viessmann 5043 User manual

Bedienungsanleitung
Operation Manual
Viessmann
Modellspielwaren GmbH
Am Bahnhof 1
D - 35116 Hatzfeld-Reddighausen
www.viessmann-modell.de
Modellbauartikel, kein Spielzeug! Nicht geeignet für
Kinder unter 14 Jahren! Anleitung aufbewahren!
Model building item, not a toy! Not suitable for children
under the age of 14 years! Keep these instructions!
Ceci n’est pas un jouet. Ne convient pas aux enfants
de moins de 14 ans ! C’est un produit décor! Conser-
vez cette notice d’instructions!
Modelbouwartikel, geen speelgoed! Niet geschikt voor
kinderen onder 14 jaar! Gebruiksaanwijzing bewaren!
Articolo di modellismo, non è un giocattolo! Non
adatto a bambini al di sotto dei 14 anni! Conservare
instruzioni per l’uso!
Artículo para modelismo. No es un juguete! No
recomendado para menores de 14 años! Conserva las
instrucciones de servicio!
Não é um brinquedo! Não aconselhável para menores
de 14 anos. Conservar a embalagem.
DE
EN
FR
NL
IT
ES
Lichterkette mit LEDs
Fairy lights with LEDs
5043 12 LEDs gelb / yellow
5044 6 LEDs gelb / yellow
PT
1. Wichtige Hinweise
Bitte lesen Sie vor der ersten Anwendung des Produktes bzw.
dessen Einbau diese Bedienungsanleitung aufmerksam durch.
Bewahren Sie diese auf, sie ist Teil des Produktes.
1.1 Sicherheitshinweise
Vorsicht:
Verletzungsgefahr!
Aufgrund der detaillierten Abbildung des Originals bzw.
der vorgesehenen Verwendung kann das Produkt Spitzen,
Kanten und abbruchgefährdete Teile aufweisen.
Für die Montage sind Werkzeuge nötig.
Stromschlaggefahr!
Die Anschlussdrähte niemals in eine Steckdose einführen!
Verwendetes Versorgungsgerät (Transformator, Netzteil)
regelmäßig auf Schäden überprüfen. Bei Schäden am
Versorgungsgerät dieses keinesfalls benutzen!
Alle Anschluss- und Montagearbeiten nur bei abgeschal-
teter Betriebsspannung durchführen!
Ausschließlich nach VDE / EN-gefertigte Modellbahntrans-
formatoren verwenden!
Stromquellen unbedingt so absichern, dass es bei einem
Kurzschluss nicht zum Kabelbrand kommen kann.
DE
1
6
Die aktuelle Version der Anleitung nden Sie auf
der Viessmann-Homepage unter der Artikelnummer.
The latest version of the manual can be looked up at the
Viessmann homepage entering the item-No.
98266
Stand 02/sw
03/2016
Ch/Me
Viessmann fairy lights are intended for connection with a
model railroad transformer with an alternating output voltage
of 16 V (e. g. Viessmann item-No. 5200).
Connect the cables of the fairy lights to each pole of the
transformer as shown in g. 3.
Several fairy lights can be connected in parallel.
To switch the fairy lights on and off use the universal on-off
switch item-No. 5550 from Viessmann.
Sekundär
0-10-16 V~
16 V
Primär
230 V~
Gefertigt nach
VDE 0570
EN 61558
Lichttransformator
5200
Nur für trockene Räume
Primär 230 V 50 - 60 Hz
Sekundär max. 3,25 A52 VA
ta 25°CIP 40
10 V
0 V
viessmann
Powermodul 5215
T
E
ge bn
Braune Massebuchsen
nicht koppeln !
max. 24 V~
rt bn
zu den Decodern
Modellbahntransformator
Model railroad transformer
5215
gelb
yellow
braun
brown
Zum Verteiler L
(siehe Abb. 3)
To distributor L
(see g. 3)
Zu Art.-Nr. 5550
(siehe Abb. 3)
To item-No. 5550
(see g. 3)
Artikel-Nr. /
Item-No. 5043 5044
LEDs gelb /
yellow 12 6
Maße /
Dimensions
in mm
75 x 2 x 1 37 x 2 x 1
Strom-
aufnahme /
Current
consumption
32 mA 16 mA
4. Technische Daten / Technical Data
Betriebsspannung / Operating voltage:
10 – 16 V AC ~ (mit und ohne 5215 Powermodul)
(with and without 5215 power module)
14 – 24 V DC =
13 – 24 V (Digitalsignal / Digital signal)
Abb. 4 Fig. 4
5200
Die Viessmann-Lichterketten sind zum Anschluss an einen
Modellbahntransformator (z. B. Viessmann Art.-Nr. 5200) mit
einer Ausgangswechselspannung von 16 V ~ vorgesehen.
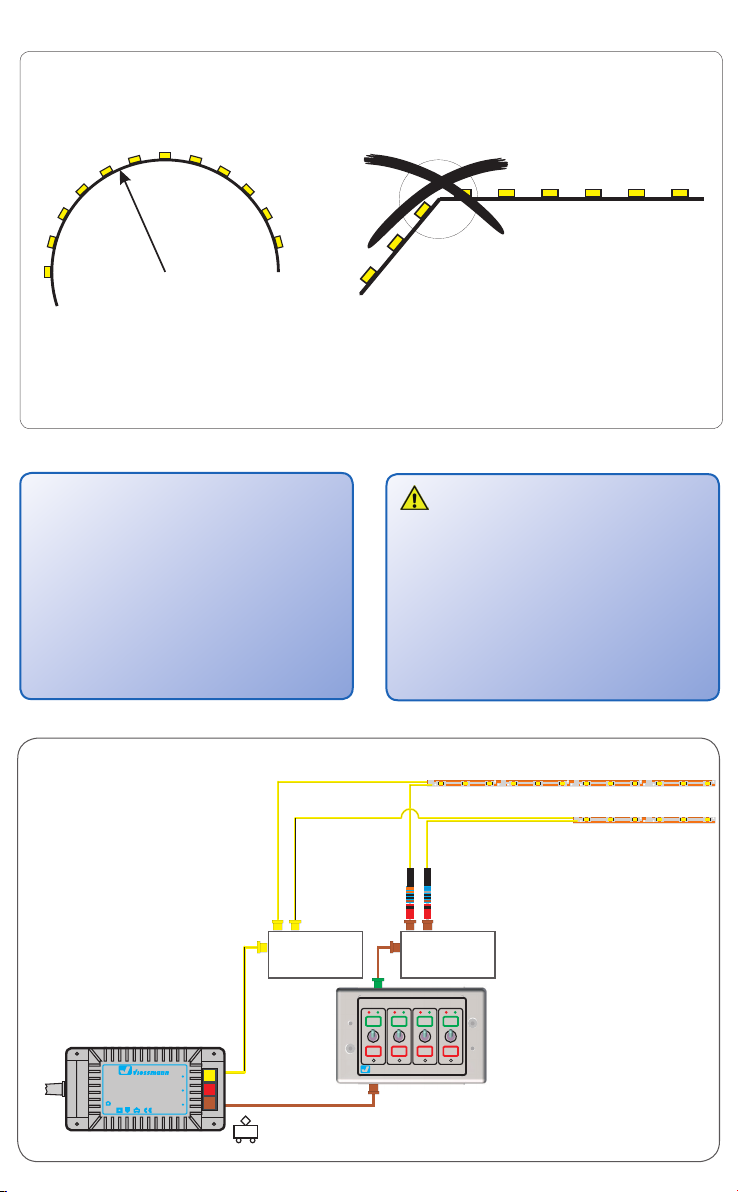
Schließen Sie die beiden Anschlusskabel der Lichterkette an
je einem Pol des Transformators an. Mehrere Lichterketten
werden parallel geschaltet. In der Abbildung 3 ist der
Anschluss dargestellt. Bei Bedarf können Sie mit Hilfe des
Universal-Ein-Aus-Umschalters Art.-Nr. 5550 von Viessmann
die Lichterketten ein- und ausschalten.
1.2 Das Produkt richtig verwenden
Dieses Produkt ist bestimmt:
– Zum Anbau an ein Modell-Haus, Kirmesmodell o. ä. oder
als freihängende Lichterkette, jeweils innerhalb einer
Modellbahnanlage oder eines Dioramas.
– Zum Anschluss an einen zugelassenen Modellbahntrans-
formator (z. B. Viessmann Art.-Nr. 5200) bzw. an einer
Modellbahnsteuerung mit zugelassener Betriebsspannung.
– Zum Betrieb in trockenen Räumen.
Jeder darüber hinausgehende Gebrauch gilt als nicht
bestimmungsgemäß.
Für daraus resultierende Schäden haftet der Hersteller nicht.
1.3 Packungsinhalt überprüfen
Kontrollieren Sie den Verpackungsinhalt auf Vollständigkeit:
– Lichterkette mit LEDs
– Anleitung
2. Einleitung
Aufgrund ihrer ungewöhnlich hohen Flexibilität können die
Viessmann-Lichterketten den individuellen Gegebenheiten
entsprechend geformt werden. Durch Kombination der 12-
und 6-fachen Lichterketten können Sie die von Ihnen benötig-
ten Längen problemlos realisieren.
3. Einbau
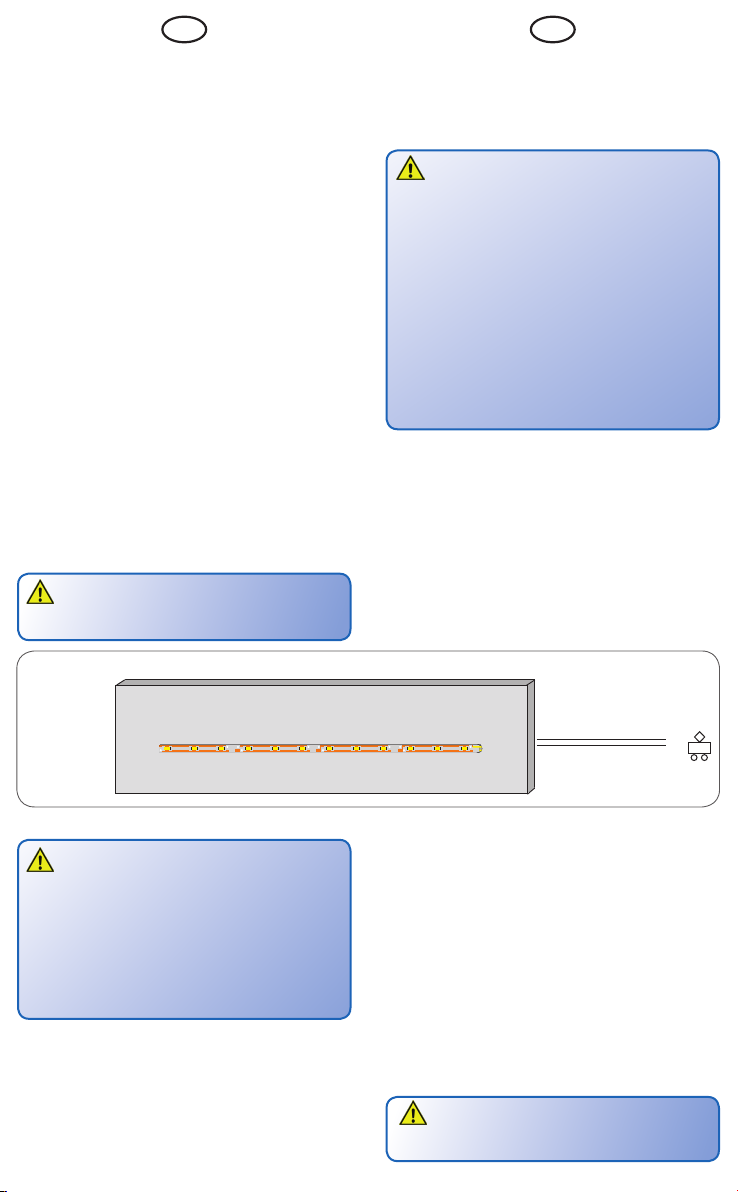
Zur Montage an einer Wand bohren Sie in diese bitte am
Ausgangspunkt der Lichterkette ein Loch mit einem Durchmes-
ser von 2 mm und entgraten dieses. Ziehen Sie dort vorsichtig
die Anschlusskabel hindurch und kleben die Lichterkette mit
ein wenig Sekundenkleber (möglichst Gel, z. B. Loctite 454,
dünn auftragen!) an der Wand des Modells an (Abb.1).
Vorsicht:
– Lichterkette nicht auf metallischen Oberächen anbringen!
Rückseite ist nicht isoliert! Kurzschlussgefahr!
DE
3.1 Anschluss
Vorsicht:
– Der Widerstand und die Diode an dem einen Anschlusskabel
dürfen nicht entfernt werden.
– Der Widerstand und die Diode dürfen nicht mit
Isolationsmaterial (z. B. Klebeband) umhüllt werden.
Eine gute Wärmeabfuhr muss gewährleistet sein, da der
Widerstand mitunter sehr heiß werden kann.
– Den Widerstand während des Betriebes nicht berühren
(Erwärmung)! Lichterkette nicht zu stark biegen und knicken
(Biegeradius maximal 1 cm, siehe Abb. 2). Bruchgefahr!
EN
1. Important information
Please read this manual completely and attentively before
using the product for the rst time.
Keep this manual. It is part of the product.
1.1 Safety instruction
Caution:
Risk of injury!
Due to the detailed reproduction of the original and the
intended use, this product can have peaks, edges and
breakable parts. For installation tools are required.
Electrical hazard!
Never put the connecting cables into a power socket!
Regularly examine the transformer for damage.
In case of any damage, do not use the transformer!
Make sure that the power supply is switched off when you
mount the device and connect the cables!
Only use VDE / EN tested special model train transformers
for the power supply!
The power sources must be protected to prevent the risk of
burning cables.
1.2 Using the product for its correct purpose
This product is intended:
– To be mounted on a model house, a funfair model etc. or as
free-hanging chain of lights within a model railroad layout or
diorama.
– For connection to an authorized model railroad
transformer (e. g. Viessmann item-No. 5200).
– For use in dry rooms only.
Using the product for any other purpose is not approved and
is considered incorrect. The manufacturer is not responsible
for any damage resulting from the improper use of this
product.
1.3 Checking the package contents
Check the contents of the package for completeness:
1. Fairy lights with LEDs
2. Operation manual
2. Introduction
Due to their unusual high exibility, Viessmann fairy lights can
be formed individually to t individual circumstances.
By combining the 12- and 6-fold fairy lights, you can easily
achieve the required lengths.
3. Mounting
For mounting on a wall, drill a hole of 2 mm diameter at the
starting point of the fairy lights and remove any ridges in the hole.
Pull the connection cables carefully through the hole and x the
fairy lights at the wall of the model (g.1) using a little bit of quick-
drying glue (preferably a gel such as Loctite 454, applied thinly!).
32
Abb. 1 Fig. 1
←
Anschlusskabel /Connection cablesWand / Wall
zur Stromversorgung
to power supply unit
Lichterkette / Fairy lights
←
←
Caution:
– Do not x the fairy lights to metallic surfaces because the
rear side is not insulated. Danger of short circuit!
5
4
Tipp:
Für flackerfreies Leuchten schalten Sie ein Viessmann
Powermodul, Art.-Nr. 5215, zwischen Trafo und Lich-
terketten.
Das durch Wechselspannung (50 Hz) verursachte
Flackern wird dadurch vermieden (Abb. 4).
Tip:
For flickering free lighting connect a Viessmann power
module, item-No. 5215, between transformer and fairy
lights.
This avoids the flickering caused by the alternating
voltage (50 Hz) (fig.4).
r=1 cm
min
Minimalen Biegeradius rmin
von 1 cm nicht unterschreiten!
Do not fall below bending radius of 1 cm!
Lichterkette nicht zu stark knicken!
Bruchgefahr!
Prevent bending the fairy lights too tight!
Risk of breakage!
Abb. 2 Fig. 2
3.1 Connection
Caution:
– The resistor and the diode at the connection cable may not
be removed.
– The resistor and the diode may not be surrounded with
insulating material (such as adhesive tape).
Good heat removal must be ensured because the resistor
can become very hot.
– Do not touch the resistor during operation (it could be hot)!
– Do not bend the fairy lights too tight and cause a kink
(bending radius min. 1 cm, see g. 2). Risk of breakage!
Universal Ein-Aus-Umschalter
5550
Viessmann
Ei n
Aus
Abb. 3 Fig. 3
5043
5044
Verteiler L
distributor L
Verteiler 0
distributor 0
Modellbahntransformator
(z. B. Viessmann Art.-Nr. 5200)
Model railroad transformer
(e. g. Viessmann item-No. 5200)
5550
braun
brown
gelb
yellow
Sekundär
0-10-16 V~
16 V
Primär
230 V~
Gefertigt nach
VDE 0570
EN 61558
Lichttransformator
5200
Nur für trockene Räume
Primär 230 V 50 - 60 Hz
Sekundär max. 3,25 A52 VA
ta 25°CIP40
10 V
0 V

This manual suits for next models

1

Other Viessmann Work Light manuals

Viessmann H0 6727 User manual

Viessmann

Viessmann H0 6727 User manual

Viessmann 4017 User manual

Viessmann

Viessmann 4017 User manual

Viessmann 6620 User manual

Viessmann

Viessmann 6620 User manual

Popular Work Light manuals by other brands

Parkside PLLA 12 B2 Original instructions

Parkside

Parkside PLLA 12 B2 Original instructions

TE-Group Dymond Warm White LED strip user manual

TE-Group

TE-Group Dymond Warm White LED strip user manual

Husky K40068 Use and care guide

Husky

Husky K40068 Use and care guide

ELEKTRA LD 8101 AF2 quick start guide

ELEKTRA

ELEKTRA LD 8101 AF2 quick start guide

Belifal Rechargeable Solar Tube Light user manual

Belifal

Belifal Rechargeable Solar Tube Light user manual

Clarke UBL1600R User instructions

Clarke

Clarke UBL1600R User instructions

Daewoo DALL18-1 user manual

Daewoo

Daewoo DALL18-1 user manual

brennenstuhl professionalLINE LA 4010 operating instructions

brennenstuhl

brennenstuhl professionalLINE LA 4010 operating instructions

Makita ML005G instruction manual

Makita

Makita ML005G instruction manual

Utilitech PQS2504IN1UT installation manual

Utilitech

Utilitech PQS2504IN1UT installation manual

HUBBELL LIGHTING LCC6LED Series instruction sheet

HUBBELL LIGHTING

HUBBELL LIGHTING LCC6LED Series instruction sheet

Ryobi CAL180G Owner's operating manual

Ryobi

Ryobi CAL180G Owner's operating manual

Panlux NGARD LED OO-LED instructions

Panlux

Panlux NGARD LED OO-LED instructions

U.S. General U.S. GENERAL 95181 Assembly and operating instructions

U.S. General

U.S. General U.S. GENERAL 95181 Assembly and operating instructions

superbrightleds NFLSK-x300X3-UC instruction sheet

superbrightleds

superbrightleds NFLSK-x300X3-UC instruction sheet

PowerSmith PWLS070H Operator's manual

PowerSmith

PowerSmith PWLS070H Operator's manual

Smartpond 52532 manual

Smartpond

Smartpond 52532 manual

CO/Tech 36-6706 instruction manual

CO/Tech

CO/Tech 36-6706 instruction manual

manuals.online logo
manuals.online logoBrands
  • About & Mission
  • Contact us
  • Privacy Policy
  • Terms and Conditions

Copyright 2025 Manuals.Online. All Rights Reserved.