VIETA VH-MS170BK User manual

VH-MS170BK
Le rogamos que lea el manual de usuario antes de utilizar el producto y que lo guarde para futuras consultas.
La operación de este equipo está sujeta a las siguientes dos condiciones: (1) es posible que este equipo o
dispositivo no cause interferencia perjudicial y (2) este equipo o dispositivo debe aceptar cualquier interferencia,
incluyendo la que pueda causar su operación no deseada.
Please read the user manual first before using the product, keep well for future referring.
Por favor, leia o manual de utilizador antes de utilizar o produto, e mantenha-o para futura referência.
Veuillez lire le manuel utilisateur avant d’utiliser le produit et de le ranger pour des consultations ultérieures.
Bitte lesen Sie das Gerätehandbuch bevor Sie das Produkt benutzen.
Manual de usuario
Micro Cadena CD
User Manual
CD Microsystem
Manuel utilisateur
Microchaine CD
Gerätehandbuch
Mikroanlage CD

CASOS EXENTOS DE DICHA GARANTÍA
1. El periodo de la garantía exceda del tiempo estipulado.
2. Siempre que el producto presente manipulaciones hechas por centros o personas no autorizadas por VIETA AUDIO S.A.
3. Siempre que el producto presente daños causados por manipulaciones incorrectas, utilización del mismo con fines
inadecuados para los que no ha sido diseñado y que no estén contemplados en el manual de usuario, así como roturas de
piezas, ralladuras, fisuras, desgaste de piezas por el uso, daños producidos por restos de pintura, arena, agua, o restos de
comida dentro de la unidad.
4. Esta garantía no cubre los gastos ni los daños derivados del transporte.
5. Pérdidas, robo o accidentes producidos por incendio, líquidos, productos químicos, calor excesivo, ventilación inadecuada,
vandalismo, inundaciones, tormentas eléctricas, tensión o suministro de voltaje excesivo o incorrecto, rayos, terremotos,
impactos, otras fuerzas externas, radiaciones.
6. Cualquier coste adicional derivado de la instalación o desinstalación del producto.
7. Productos comprados fuera del territorio español o en distribuidores no autorizados.
8. Los datos contenidos en nuestros productos, (archivos de fotos, música, soportes digitales, etc..) no están en ningún caso
cubiertos por la garantía, es responsabilidad del cliente realizar copias de seguridad antes de entregar el producto. Así mismo
la incorrecta configuración o instalación del software o incompatibilidades con el hardware de otros equipos incluyendo drivers
y controladores.
9. Mantenimiento reparación o sustitución de piezas derivado del uso y desgaste.
10. Baterías recargables y/o desechables (el tiempo de vida depende de la frecuencia de uso).
11. Fallos menores o variaciones en la calidad del producto que no afecten a su valor o el propósito para el cual fue creado.
12. Negligencia.
13. Accesorios:
Estuches y piezas de los enchufes.
Cables de conexión.
Diademas.
Kits de los extremos de los auriculares, almohadillas para las orejas.
Acabados decorativos.
14. Cualquier incidencia detectada al recibir la mercancía ha de ser notificada al servicio de atención al cliente 902.367.607
o al correo sat@vieta.es. De acuerdo con el artículo 366 del código de comercio, VIETA AUDIO S.A. no admitirá reclamaciones
sobre roturas, golpes o falta de bultos pasadas 24 horas después de haber recibido la entrega de la mercancía.
ATENCIÓN AL CLIENTE / Tel. 902 367 607 / Fax. 93 574 26 83 / www.vieta.es
CONDICIONES DE GARANTÍA
VIETA AUDIO S.A. garantiza sus productos por un periodo de 24 meses. El periodo de garantía comienza en la fecha de compra
de productos totalmente nuevos y sin usar por parte del primer usuario final.
Esta garantía cubre los posibles fallos de fabricación para todos los productos Vieta vendidos en el territorio español por
distribuidores autorizados. Los productos Vieta adquiridos en otros países estarán cubiertos por la garantía que ofrezca el
distribuidor local.
Esta garantía tendrá validez solamente cuando se presente la factura de compra en la cual aparece el nombre del cliente, el
centro distribuidor y la fecha en la que se realiza la compra del producto. VIETA AUDIO S.A. acepta repara durante el periodo de
garantía, todos aquellos productos que presenten anomalías durante su utilización normal tal y como se detalla en el manual
de usuario y siempre que se utilice para el fin de fue diseñado.
Siempre que se realice un cambio de componentes o una sustitución del producto no se prorroga el periodo de la garantía.

ESPAÑOL
Índice
Instrucciones de seguridad importantes .................................................................................. 4
Colocación y mantenimiento de la unidad................................................................................. 4
Funcionamiento y mantenimiento de los CDs ......................................................................... 5
Características principales.......................................................................................................... 5
Contenido del embalaje .............................................................................................................. 5
Interfaz de funcionamiento .................................................................................................... 6 - 7
Mando a distancia ....................................................................................................................... 8
Diagrama del mando a distancia ................................................................................................ 8
Instrucciones del mando a distancia ......................................................................................... 9
Funcionamiento básico ............................................................................................................ 10
Especicaciones técnicas ........................................................................................................ 10
Consejos útiles .......................................................................................................................... 10
Resolución de problemas ......................................................................................................... 11

Micro Cadena CD
4
Instrucciones de seguridad
importantes Colocación y mantenimiento
de la unidad
ADVERTENCIA
RIESGO DE DESCARGA
ELÉCTRICA. NO ABRIR
2. Para evitar que el láser quede expuesto, no retire la
carcasa. Consulte con el personal cualificado.
Lea detenidamente este manual de usuario antes
de utilizar este producto. Consérvelo para futuras
consultas.
Para evitar incendios o descargas eléctricas, no
exponga la unidad a la lluvia o a la humedad.
Precaución: Para evitar incendios o descargas
eléctricas, no abra la unidad. Las reparaciones
correspondientes serán efectuadas por personal
cualificado.
Este símbolo advierte al usuario de que
existe alta tensión. Téngalo en cuenta
para evitar posibles descargas eléctricas.
Este símbolo advierte al usuario de que
existen instrucciones importantes para el
funcionamiento y mantenimiento incluidas
en la unidad.
Protección del cable de alimentación
1. Sujete bien el enchufe al enchufar o desenchufar el
cable de alimentación.
2. No coloque el cable de alimentación CA cerca de
una fuente de calor.
3. No coloque objetos pesados sobre el cable de
alimentación CA.
4. No realice reparaciones en el cable de alimentación
CA.
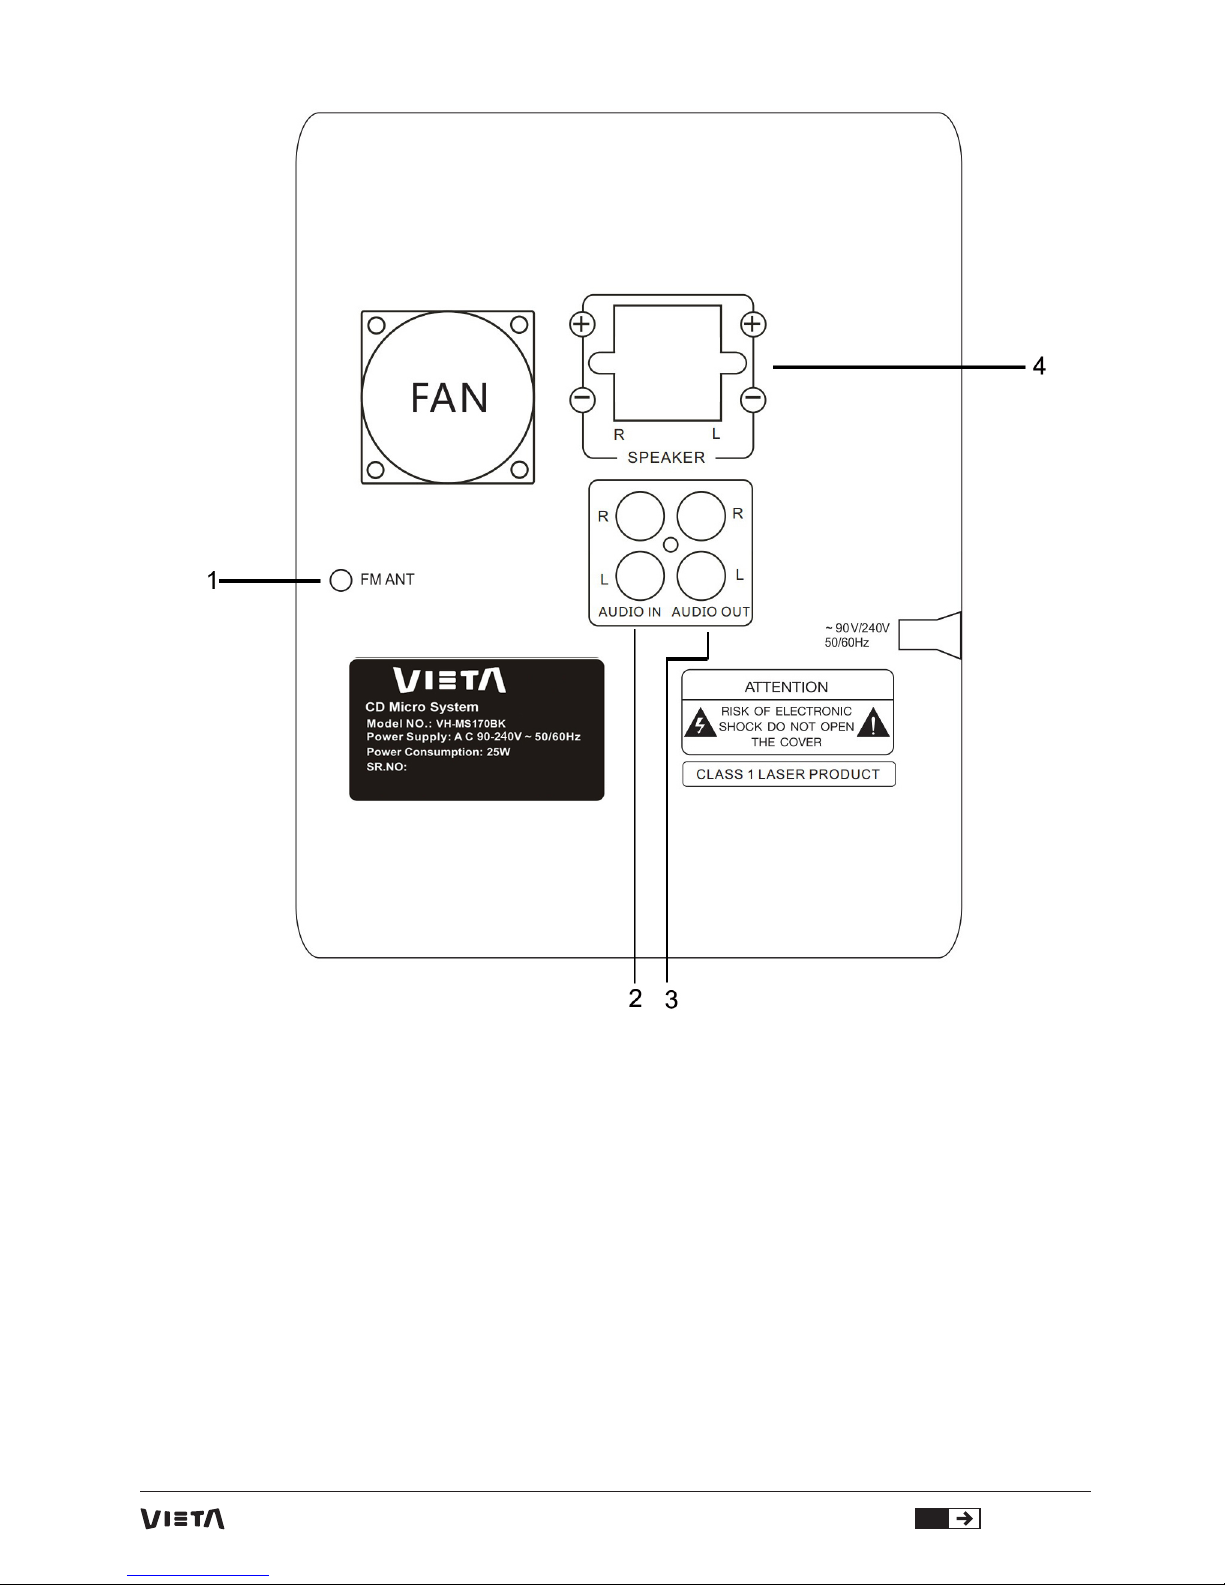
5. La unidad pertenece a los productos láser de
CLASE 1.
6. Existe un símbolo de producto de CLASE 1 en el
panel trasero.
7. Este producto contiene un dispositivo láser de baja
potencia. Por motivos de seguridad y para no dejar
expuestas las partes internas, no abra la unidad.
Si hay algún problema que necesite ser reparado,
contacte con un profesional para que lo arregle.
1. Para evitar que la unidad sufra daños por un
aumento brusco de la temperatura interior, no coloque
la unidad en un lugar cerrado ni la cubra.
2. No exponga la unidad a la luz solar directa ni la
coloque cerca de una fuente de calor.
3. No coloque ningún recipiente con agua o líquido
inflamable. Si hay algún líquido dentro, desconecte el
cable de alimentación y póngase en contacto con el
técnico.
4. No abra la unidad para manipular los componentes
internos. De lo contrario, podría producirse una
descarga eléctrica o daños en la unidad. En caso de
que sea necesario realizar una reparación o ajuste,
lleve la unidad a un técnico profesional.
5. Coloque la unidad en una superficie horizontal. No
coloque objetos pesados sobre la unidad.
6. Cuando la unidad esté en pausa, póngala en estado
de espera. Si no desea utilizar la unidad durante un
largo periodo de tiempo, desconecte el cable de
alimentación de la toma de alimentación CA y extraiga
la batería de litio de la unidad.
7. No ponga sus dedos u otros objetos en la unidad.
8. En los siguientes casos, se producirá rocío de
condensación en la lente:
1). Al activarse la fuente de calor.
2). En una habitación muy húmeda o con vapor.
3). Cuando la unidad se haya movido de un lugar
más frío a otro más caliente.
9. Desconecte el enchufe de la toma de corriente antes
de limpiar la unidad. Utilice un paño húmedo para
limpiar. No utilice detergentes ni aerosoles, ya que el
líquido entrará en el interior de la unidad y provocará
daños en la unidad, riesgo de incendio o descarga
eléctrica. Este tipo de líquidos también pueden dañar
la superficie de la unidad.
10. No realice reparaciones en la unidad.
11. Si hay suciedad o fricción en la lente, el sonido se
verá alterado, o incluso puede que no haya ningún
sonido al reproducir el disco.
1. Este aparato es un
producto láser de CLASE 1 y
utiliza un láser en el interior
de la carcasa.

5ESPAÑOL
Compatible con CD/MP3/WMA/CD-R/CD-R/W etc.
Potencia de salida del amplificador de canal 2.0
integrado: 30W*2.
Con ranura para USB.
Con AUX.
Con FM digital.
Con función Bluetooth.
Mando a distancia IR con todas las funciones.
Contenido del embalaje
Compruebe que se incluyen los siguientes accesorios.
Si considera que falta algo, póngase en contacto con el
distribuidor inmediatamente.
Mando a distancia: 1pza.
Manual de usuario: 1pza.
Saque el disco cogiéndolo por
el borde tal como se muestra a
continuación e intente no tocar
el lado brillante del disco (Lado
para el almacenamiento de
datos).
No pegue ninguna etiqueta
en el lado del disco. No raye la
superficie del disco.
Al reproducir el disco, la velocidad de rotación será
muy alta. No utilice ningún disco dañado, rayado,
agrietado o doblado para evitar posibles daños en la
unidad.
Las huellas dactilares o la suciedad de un disco
afectarán a la luz reflectante del disco y a la calidad
de la señal directamente. Cuanto más pobre es la
calidad de la señal más pobre será la reproducción.
Utilice un paño suave para limpiar el disco desde el
centro del disco hacia fuera.
Características principalesFuncionamiento y
mantenimiento de los CDs
Si el disco está muy sucio,
utilice un paño húmedo suave
para limpiarlo y después
utilice el paño suave y seco
para limpiarlo de nuevo.
No utilice detergentes, benceno, líquido antiestático,
diluyentes u otros disolventes. De lo contrario, la
superficie del disco sufrirá daños.
Coloque los discos en sus cajas originales para
que no se doblen. No coloque los discos en lugares
con temperatura elevada, altos niveles de humedad o
con luz solar directa, ya que los discos pueden sufrir
daños.
Lea detenidamente la etiqueta con instrucciones de
los discos.

Micro Cadena CD
6
Interfaz de funcionamiento
Panel frontal
1. POWER:
Pulse este botón para encender o apagar la unidad.
2. PLAY/PAUSE:
Utilice este botón para iniciar o pausar la reproducción
de un CD. Al pulsar este botón durante la
reproducción, la unidad entrará en modo de Pausa.
3. PREV:
Pulse este botón para seleccionar la última canción o
archivo.
4. VOLUME:
Gire este botón para subir o bajar el volumen.
5. OPEN/CLOSE:
Pulse este botón abrir o cerrar la bandeja del disco.
6. NEXT:
Pulse este botón para seleccionar la próxima canción
o archivo.
7. USB:
Conecte un USB aquí.
8. FUNCTION:
1. Apretar esta tecla para encender la unidad y
reproducir un CD.
2. Apretar esta tecla para pasar del modo CD Disk al
modo FM radio/ AUX/Bluetooth.
9. Enchufe auriculares
10. FM auto
11. CD/USB:
Cambio de CD a USB, o cambio de USB a CD.
Observaciones:
El botón Power sirve solo para encender la unidad.
Para reproducir un CD, un soporte USB, FM,
Bluetooth, utilizar el botón Function.

7ESPAÑOL
Panel trasero
1. FM Antenna:
Necesitará utilizarla al seleccionar el estado FM y
buscar los canales FM.
2. Left Audio in y Right Audio in:
Estos terminales sirven para conectar altavoces.
3. Left Audio Output y Right Audio Output:
Estos terminales sirven para conectar la salida
de audio de dispositivos externos, tales como la
televisión.
4. L/R Speaker output:
Estos terminales sirven para conectar los altavoces.

Micro Cadena CD
8
Mando a distancia
Instalación de las baterías del mando a distancia.
1. Retire la pequeña tapa situada en el lado trasero
del mando a distancia;
2. Introduzca dos baterías 7# AAA correctamente;
3. Vuelva a colocar la tapa.
Nota:
1. No utilice baterías recargables.
2. No mezcle baterías de distinta marca o tipo en
el mando a distancia. No utilice simultáneamente
baterías nuevas y usadas.
3. Cuando el funcionamiento del mando a distancia
no sea muy intenso o el rango de control sea más
pequeño, cambie las 2 baterías 7# AAA a la vez.
4. Si la unidad no se utiliza durante un largo periodo
de tiempo, saque las baterías del mando a distancia
para que no se produzcan fugas de líquido en la
batería, corrosión o se dañe la unidad.
5. No coloque el mando a distancia en lugares con
alta temperatura o humedad.
6. No desmonte el mando a distancia.
7. No deje que la luz del mando a distancia o del
cabezal de recepción infrarrojo del panel refleje. De
lo contrario, interferirá con las señales del mando a
distancia.
El efecto será excelente cuando el mando a distancia
funcione a una distancia de 5m y en un ángulo de
300.
Diagrama del mando a distancia
1. STANDBY
2. MUTE
3. NUMBER KEYS
4. TIME
5. CD/USB
6. VOL-
7. PLAY/PAUSE
8. STOP
9. OPEN/CLOSE
10. FUNCTION
11. BASS/TREBLE
12. PROG
13. MEMORY
14. REPEAT
15. NEXT
16. PREV
17. REV
18. VOL+
19. FWD
20. EQ
21. FM AUTO
22. AUDIO

9ESPAÑOL
Instrucciones del mando a distancia
1. STANDBY:
Pulse este botón para elegir entre el estado
ENCENDIDO o EN ESPERA.
2. MUTE:
Púlselo para silenciar el sonido; púlselo de nuevo
para que el sonido vuelva.
3. NUMBER KEYS:
Incluye los botones numéricos 0-10 y los botones
10+/10-. Puede pulsarlos para seleccionar el archivo
que desee directamente.
4. TIME:
Para ajustar la hora.
5. CD/USB
Para pasar del modo CD al modo USB, o del modo
USB al modo CD.
6. VOL -:
Pulse este botón para bajar el volumen.
7. PLAY/PAUSE :
Pulse este botón para reproducir o pausar la música.
8. STOP:
Pulse este botón para detener la reproducción.
9. OPEN/ CLOSE:
Abre o cierra el compartimento del disco.
10. FUNCTION:
Para encender la unidad y reproducir un CD.
Pasar del modo CD al modo FM radio/ AUX/
Bluetooth.
11. BASS/TREBLE:
Pulse este botón y el botón Vol+/- para ajustar el
volumen BASS/TREBLE según se desee.
12. PROG:
Durante la reproducción de CDs, pulse stop y luego
PROG, y aparecerán los números en la pantalla LED.
13. MEMORY
Para sintonizar una estación de radio FM.
14. REPE AT:
Pulse este botón para repetir la reproducción de
archivos.
15. NE XT:
Pulse este botón para seleccionar el siguiente
archivo o canal.
16. PREV:
Pulse este botón para seleccionar el último archivo o
canal.
17. REV:
Pulse este botón para entrar en estado de
reproducción rápida hacia atrás, púlselo
repetidamente y aparecerá:
2X: El programa se reproducirá al doble de la
velocidad de reproducción hacia atrás.
4X: El programa se reproducirá a cuatro veces la
velocidad de reproducción hacia atrás.
8X: El programa se reproducirá a ocho veces la
velocidad de reproducción hacia atrás.
16X: El programa se reproducirá a 16 veces la
velocidad de reproducción hacia atrás.
32X: El programa se reproducirá a 32 veces la
velocidad de reproducción hacia atrás.
18. VOL+
Pulse este botón para subir el volumen.
19. FWD:
Pulse este botón para entrar en estado de
reproducción rápida hacia delante, púlselo
repetidamente y aparecerá:
2X: El programa se reproducirá al doble de la
velocidad de reproducción hacia delante.
4X: El programa se reproducirá a cuatro veces la
velocidad de reproducción hacia delante.
8X: El programa se reproducirá a ocho veces la
velocidad de reproducción hacia delante.
16X: El programa se reproducirá a 16 veces la
velocidad de reproducción hacia delante.
32X: El programa se reproducirá a 32 veces la
velocidad de reproducción hacia delante.
20. EQ
Para seleccionar su modo de musica favorito.
21. FM AUTO
Búsqueda automatica de estaciones de radio.
22. AUDIO
Para activar el canal R/L del sónido.

Micro Cadena CD
10
Funcionamiento básico
I. SELECCIÓN DE FUNCIONES
Pulse el botón “function” en el mando a distancia y
podrá elegir entre reproducción CD, MP3, USB, AUX,
BLUETOOTH o radio FM según lo desee.
II. REPRODUCCIÓN USB
Inserte la unidad USB y luego pulse el botón
“function” para seleccionar el estado USB; a
continuación pulse el botón PLAY y comenzará a
reproducir el archivo de la unidad USB.
III. RADIO FM
Para activar la búsqueda automatica de estaciones
de radio y registrar las estaciones.
Apretar “FWD /NEXT” o “REV /PREV” para
seleccionar la estación FM anterior o siguiente-
Apretar “NEXT y PREV” más de 3 segundos para
activar la búsqueda de la estación siguiente.
Registrar las estaciones con el botón “Memory”.
IV. ENTRADA AUX
Pulse el botón “function” para seleccionar AUX, y
aparecerá INPUT en la pantalla LED. Y después, a
través de los terminales de entrada de audio en la
parte trasera de la máquina, se reproducirá la señal
de audio externa en esta unidad. Contacte la señal
de audio externa con los terminales de entrada de
audio en la parte trasera de la unidad y, al mismo
tiempo, la señal de música ampliada saldrá de esta
unidad.
V. BLUETOOTH
Pulse el botón “function” para entrar en estado
Bluetooth. A continuación haga lo siguiente:
1. Active la función Bluetooth en su teléfono móvil u
otro dispositivo Bluetooth y comenzará a buscar el
dispositivo Bluetooth.
2. El nombre del Bluetooth de esta unidad es “VIETA”.
Selecciónelo y conéctelo; después su teléfono u otro
dispositivo Bluetooth sincronizará con esta unidad.
3. Tras la conexión, podrá disfrutar de la música
desde esta unidad.
Especicaciones técnicas
Tipo de producto:
MICRO SYSTEMA CD
Compatible con:
discos CD, WMA, MP3, CD-R/RW etc
Nivel de salida de audio:
1.0-2.2V
Relación señal/ruido de audio:
≥70dB (ponderado en A)
Voltaje:
90-240V 50-60HZ
Estas instrucciones únicamente sirven como
referencia; la empresa se reserva el derecho de
modificar las especificaciones de este documento
sin previo aviso.
Consejos útiles
Para aumentar la vida útil de la máquina, el tiempo
de cambio entre el encendido y apagado de la
máquina debe ser de más de 30 segundos.
Apague la unidad después de su uso.
El voltaje debe corresponder con los valores
de voltaje indicados, de lo contrario, no habrá
reproducción alguna.
Para algunos discos, algunas de las características
de esta máquina no estarán disponibles.
Si la unidad se detiene repentinamente, reiníciela.

11 ESPAÑOL
Antes de ponerse en contacto con el personal de reparación, compruebe la razón de problema siguiendo las
instrucciones que se muestran a continuación.
Problema Razones Medidas a tomar
No hay sonido
1. La entrada de audio no está
conectada correctamente.
2. El disco está deformado o sucio.
3. La máquina está en estado
silenciado.
1. Conecte correctamente la entrada de
audio.
2. Limpie y ajuste el disco.
3. Pulse el botón de silenciar nuevamente
para cancelar esta función.
Resolución de problemas
El disco no
se lee
1. El disco estaba mal producido,
deformado o sucio.
2. El disco no estaba bien colocado.
3. El cabezal óptico está empañado.
1. Limpie y revise el disco.
2. Coloque el disco de nuevo con la etiqueta
hacia arriba.
3. Abra el compartimento del disco, sáquelo
y manténgalo abierto durante 1 hora.
El mando a
distancia falla
1. El mando a distancia no apunta a
la ventana de recepción.
2. La distancia del mando a
distancia es demasiado grande.
3. El nivel de las baterías del mando
a distancia es demasiado bajo.
1. Utilice el mando a distancia
correctamente.
2. Reemplace las baterías.
Error de
función
1. El disco es de mala calidad.
2. Mal funcionamiento de otros
botones.
3. Fuga externa de electrostática de
la máquina.
1. Espere de 5 a 10 segundos para volver
automáticamente al estado normal.
2. Inténtelo otra vez.
3. Apáguelo de 1 a 2 minutos y enciéndalo
de nuevo.

INCIDENTS THAT ARE EXEMPT FROM GUARANTEE:
1. The guarantee period exceeds the stipulated time.
2. When the product has been handled by centres or personnel that are not authorised by VIETA AUDIO S.A.
3. When the product has been damaged by incorrect handling or use for purposes other than those it is intended
for and that are not contemplated in the user’s manual, or when it has broken pieces, scratches, cracks, wear and
tear, damage produced by particles of paint, sand, water or food within the unit..
4. This guarantee does not cover expenses or damages caused by transport.
5. Loss, robbery or accidents produced by fire, liquid, chemical substances, excessive heat, inadequate
ventilation, vandalism, electrical storms, incorrect or excessive power supply, lightening, impact, other external
forces, radiation.
6. Any additional cost related to installing or uninstalling the product.
7. Products purchased outside Spanish territory or from distributors that are not authorised.
8. The data contained on our products (photo files, music, digital support, etc.) are not covered by the guarantee
under any circumstance; it is the client’s responsibility to make back-up files before giving us the product.
Likewise, any incorrect configuration or installation of software or incompatibility issues with hardware
belonging to other equipment, including drivers and controllers.
9. Maintenance, repairs or parts replacement due to use and wear and tear.
10. Rechargeable and/or disposable batteries (life cycle depends on usage frequency).
11. Small faults or variations in the quality of the product that do not aect its value or the purpose for which it
was created.
12. Negligence.
13. Accessories:
Plugs and cases.
Connector cables.
Headband.
Eartip and sleeve kits.
Decorative finishes.
14. Any issue detected on receipt of the goods must be notified to customer care 902.367.607 or sat@vieta.es.
In accordance with article 366 of trade law, VIETA AUDIO S.A. will not accept any claims regarding broken goods,
impacts or missing packages 24 hours after the goods have been delivered.
CUSTOMER CARE / Tel. 34 902 367 607 / Fax. 34 93 574 26 83 / www.vieta.es
TERMS OF GUARANTEE
VIETA AUDIO S.A. guarantees its products for a period of 24 months. The guarantee period starts on the date of
purchase of brand new products that have never been used by the first end user.
This guarantee covers any possible manufacturing flaws for any Vieta products sold on Spanish territory by
authorised distributors. Vieta products acquired in other countries will be covered by the guarantee supplied by
the local distributor.
This guarantee will only be valid when accompanied by an invoice for the product that includes the client’s
name, the distributor and the date of purchase. VIETA AUDIO S.A. agrees to repair any product with a problem
occurring during normal use as detailed in the user’s manual and when being used for the purpose for which it
was designed.
The guarantee will not be extended because a component is changed or the product is replaced.

ENGLISH
Contents
Important safety instruction ..................................................................................................... 14
Placement and maintain for the unit ........................................................................................ 14
Operation and Maintenance of CD Discs ............................................................................... 15
Main Characteristics .................................................................................................................. 15
Packing Content ........................................................................................................................ 15
Operation Interface ............................................................................................................. 16 - 17
Remote Control .......................................................................................................................... 18
Remote Control Diagram .......................................................................................................... 18
Function Instruction For Remote Control ............................................................................... 19
Basic Operation ......................................................................................................................... 20
Technical Specications ........................................................................................................... 20
Useful Tips ................................................................................................................................. 20
Troubleshooting ........................................................................................................................ 21

CD Microsystem
14
Important safety instruction Placement and maintain for the unit
WARNING
RISK OF ELECTRIC SHOCK
DO NOT OPEN
2. To prevent the laser from being exposed, do not
remove the cover. Refer servicing to qualified person.
Please read this user manual carefully before
you use this product. Please reserve it properly for
reference in the future.
Please do not expose the unit in the raining or moist
environment to avoid fire hazard or electric shock.
Caution: Please do not open the unit to avoid fire
hazard or electric shock. The corresponding repairs
should be done by professional person,
This mark warns the user that there is
High Voltage, Please prevent from electric
shock.
This mark warns the user that there are
some important instructions for Operation
and Maintaining attached to the unit.
Protection of Power Cord
1. Hold the plug well when you plug the power cord in
or out.
2. Please do not put the AC power cord near any heat
source equipment.
3. Please do not place any heavy objects on the AC
power cord.
4. Please do not overhaul the AC power cord.
5. This unit belongs to CLASS 1 laser product.
6. There is CLASS 1 product mark on the rear panel.
7. This product contains a low power laser device.
In order to keep safety, please do not open the unit
to expose the inside parts. If there is some problem
need to be repaired, please let the professional people
check and repair it.
1. Please do not put the unit in a sealed place or cover
something onto the unit, to avoid the unit damaged by
its inside temperature’s abrupt rising.
2. Please do not expose the unit under the sunshine
directly or place it near the heat source equipments.
3. Please do not place any container with water or
fire liquid. If there is any liquid in, please plug out the
power cord and contact with the professional repairer.
4. Please do not open the unit to contact the inside
components. Otherwise it may cause electric shock or
unit damage. If need any repairs or adjustment, please
provide this unit to the professional person.
5. Please put the unit on the horizontal surface. Please
do not put any heavy object on the unit.
6. When the unit pauses, please set it to the standby
state. If you do not want to use the unit for a long time,
please take off the power cord from the AC power
socket, and take out the Li-battery from the unit.
7. Do not put your fingers or other objects into the unit.
8. Under the following circumstances, there will be
condensed dew on the Lens:
1). When the heat source equipment was just
activated.
2). In a very damp room or a room with vapor.
3). When the unit is just moved from a colder place
to a hotter place.
9. Pull the plug out of the socket before cleaning the
unit. Use a piece of wet cloth for cleaning. Please do
not use detergents or sprays, which will cause the
liquid enter into the inside unit and cause unit damage,
fire hazard or electric shock. This kind of liquid will also
damage the surface of the unit.
10. Please do no repair the unit by yourself.
11. If there is Dirt or Friction on the Lens, It will impair
sound, or even make it no sound when disc playing.
1. This unit is a CLASS 1
Laser product and employs a
laser inside the cabinet.

15 ENGLISH
Compatible with CD/MP3/WMA/CD-R/CD-R/W ect.
Built-in 2.0 channel amplifier output power: 30W*2.
With USB slot.
With AUX.
With digital FM.
With Bluetooth Function.
Full function IR remote control.
Packing Content
Please refer to the following accessories. If you found
there is any shortage for the contents, please contact
the dealer immediately.
Remote Control: 1pc.
User Manual: 1pc.
Please take out the disc by
holding the brim of the discs as
below, please try to not touch
the shinning side of the disc
(Data Storage Side).
Please don’t attach any labels
on the side of the disc. Do not
scratch the surface of the disc.
When the disc is being played, the rotate speed
will be very high. Please do not use any damaged,
scratched, cracked or bent discs to avoid causing
unit damaged.
Fingerprints or Dirt on a disc will impair the
reflective light of the disc and will affect the signal’s
quality directly. The poorer the signal’s quality is, the
poorer the playing effect is. Please use the soft cloth
to wipe the disc from the disc center towards the
outside direction.
Main CharacteristicsOperation and Maintenance
of CD Discs
If the disc is very dirty, please
use a wet soft cloth to wipe
it firstly, and then use the dry
soft cloth to wipe it again.
Please do not use detergents, benzene, thinner,
antistatic liquid or other solvents. Otherwise it will
damage the surface of the disc.
Please put the discs into the original boxes where
they are so as not to bend them. Do not put the discs
at the place of high temperature, high humidity or
direct sunshine, because the bad environment will
also make the discs damaged.
Please read the instruction label for the discs.

CD Microsystem
16
1. POWER:
Press this key to turn on or turn off the power for the
unit.
2. PLAY/PAUSE:
Use this key to start or pause CD playback. When you
press this button during playback, the unit enters into
Pause mode.
3. PREV: Press this key to choose last song or file.
4. VOLUME:
Rotate this button to decrease or increase the volume.
5. OPEN/CLOSE: Press this key to open or close the
disc tray.
6. NEXT: Press this key to choose next song or file.
7. USB: Connect a USB Driver here.
8. FUNCTION:
1. Turn on the unit, press this key to begin to play the
CD disk.
2. Press this key, change the mode from CD Disk to
FM radio/ AUX/Bluetooth.
9. Headphone jack
10. FM auto
11.CD/USB: CD change to USB, or USB change to CD
Remark:
The Power key is only turn on the unit,
Play the disc, USB, FM, Bluetooth, need press the
Function key.
Operation Interface
Front panel

17 ENGLISH
1. FM Antenna:
When you choose FM status and search for the FM
channels, you need to use it.
2. Left Audio in and Right Audio in:
These terminals are for connecting speakers.
3. Left Audio Output and Right Audio Output:
These terminals are for connecting audio output of
external devices, such as TV.
4. L/R Speaker output:
These terminals are for connecting speakers.
Rear panel

CD Microsystem
18
Remote Control
Method for installing the batteries of the remote
control.
Note:
1. Please do not use the rechargeable battery.
2. Do not mix use the battery with different brand and
type for the remote control. Please do not use the
new and old batteries together.
3. When the remote control’s function is not so strong
or the control range becomes smaller, please change
the 2pcs 7# AAA batteries together.
4. If the unit will not be used for a long time, please
take out the batteries from the remote control so as
not lead to battery liquid leak, corrosion and unit
damaged.
5. Do not put the remote control on the high
temperature high humidity place.
6. Please do not disassemble the remote control.
7. Please do not let the remote control or the infrared
reception head of the panel glared by the strong
light. Otherwise it will interfere the remote control’s
signals.
The effect will be excellent when the remote control
is operated within 5m distance and within the angle
of 300.
Remote Control Diagram
1. STANDBY
2. MUTE
3. NUMBER KEYS
4. TIME
5. CD/USB
6. VOL-
7. PLAY/PAUSE
8. STOP
9. OPEN/ CLOSE
10. FUNCTION
11. BASS/TREBLE
12. PROG
13. MEMORY
14. REPEAT
15. NEXT
16. PREV
17. REV
18. VOL+
19. FWD
20. EQ
21. FM AUTO
22. AUDIO

19 ENGLISH
Function Instruction For Remote Control
1. STANDBY:
Press this key to choose the unit POWER ON or
STANDBY status.
2. MUTE:
Press it will make sound off; press it again will make
sound on.
3. NUMBER KEYS:
It includes 0-10 number keys and 10+/10- keys. You
can press them to select the file which you want
directly.
4. TIME:
Press this key to design the time.
5. CD/USB
Press this key, can change the CD mode to USB
mode, or change the USB mode to CD mode.
6. VOL -:
Press this key to decrease the volume.
7. PLAY/PAUSE :
Press this key to make the music play or pause.
8. STOP:
Press it to stop the file playing.
9. OPEN/ CLOSE:
Open or Close the disc tray.
10. FUNCTION:
Turn on the unit, press this key to begin to play the
CD disk.
Press this key, change the mode from CD Disk to FM
radio/ AUX/Bluetooth
11. BASS/TREBLE:
Press this key and Vol+/- key, you can adjust the
BASS/TREBLE volume as you like.
12. PROG:
During CD playback, press stop, and then press
PROG, it will show the numbers on the LED display.
13. MOMORY:
Press this key, to make the FM station no.
14. REPE AT:
Press this key, it will repeat the file playing.
15. NE XT:
Press this key to select the next file or channel.
16. PREV:
Press this key to select the last file or channel.
17. REV:
Press this key to enter into the fast backward status,
press it repeatedly, it will show.
2X: The program will be played at 2 times speed
of backward.
4X: The program will be played at 4 times speed
of backward.
8X: The program will be played at 8 times speed
of backward.
16X: The program will be played at 16 times speed
of backward.
32X: The program will be played at 32 times
speed of backward.
18. VOL+
Press this key, it will increase the volume.
19. FWD:
Press this key to enter into the fast forward status,
press it repeatedly, it will show:
2X: The program will be played at 2 times speed
of forward.
4X: The program will be played at 4 times speed
of forward.
8X: The program will be played at 8 times speed
of forward.
16X: The program will be played at 16 times
speed of forward.
32X: The program will be played at 32 times
speed of forward.
20. EQ:
Press this key, can choose the music mode you like.
21. FM AUTO:
Press this key, can search the radio station auto.
22. AUDIO:
This key is R/L Channel for sound.

CD Microsystem
20
Basic Operation
I. FUNCTION CHOOSE
Press the “function” key on the remote control,
you can choose to play CD, MP3, USB, AUX,
BLUETOOTH or FM radio as you like.
II. USB PLAYING
Insert USB flash driver, and then press the “function”
key to choose USB status, and then press PLAY key,
it will begin to playing the file from USB flash driver.
III. FM RADIO
Using the FM antenna, if it is the first time for you to
use this unit, please choose FM auto to search the
radio station, save the stations automatically.
Press “FWD /NEXT” or “REV /PREV”, you can
choose the next or last FM station. You can also
revise tThe keys “NEXT and PREV” , when you press
it more than 3 seconds,
Have the function to search the next station which is
with signal.
he stored FM channel’s position by using “Memory”
key.
IV. AUX IN
Press the “function” key to choose AUX, it will
show INPUT on the LED display. And then through
the audio input terminals on the back side of the
machine, it will play the external audio signal on this
unit. Contact the external audio signal with the audio
input terminals on the back side of the unit, and then
the enlarged music signal will come out from this unit
at the same time.
V. BLUETOOTH
Press the “function” key to enter into the Bluetooth
status. And then please do as follows:
1. Open the Bluetooth function on your mobile phone
or other Bluetooth device, it will begin to search for
the Bluetooth device.
2. This unit’s Bluetooth name is “VIETA”. Please
choose and connect it, finally your phone or other
Bluetooth device will pair with this unit successfully.
3. After connecting, you can begin to enjoy the music
from this unit.
Technical Specications
Product type:
CD MICRO SYSTEM
Compatible disc type:
CD, WMA, MP3, CD-R/RW discs etc.
Audio output level:
1.0-2.2V
Audio signal to noise ratio:
≥70dB ( A weighted )
Power voltage:
90-240V 50-60HZ
The instructions are only for reference, the company
will reserve the right to modify specifications in this
document without any prior notification.
Useful Tips
In order to extend the local machine life, the switch
time between machines turn on and off must be more
than 30 seconds.
Turn off the power after using.
The use of power should correspond with the mark
voltage values, otherwise it will not play.
For some of the discs, using some of the features of
this machine, it can not be achieved.
If appear contingent dead halt, please restart the
machine.
Table of contents
Languages:
Other VIETA Stereo System manuals