manuals.online logo
Brands
  1. Home
  2. •
  3. Brands
  4. •
  5. Viking
  6. •
  7. Network Hardware
  8. •
  9. Viking TR-1 Installation and operating instructions

Viking TR-1 Installation and operating instructions

APPLICATION
APPLICATION
N
No
ot
te
e
T
TE
EL
LE
EC
CO
OM
MS
SO
OL
LU
UT
TI
IO
ON
NS
SF
FO
OR
RT
TH
HE
E2
21
1S
ST
TC
CE
EN
NT
TU
UR
RY
Y
TR-1
TR-1
Jumper
Programming
April 18, 2000
User Programming the TR-1 Jumpers
P
Ph
ho
on
ne
e.
..
..
.7
71
15
5.
.3
38
86
6.
.8
88
86
61
1
M
Ma
ad
de
ei
in
nt
th
he
eU
U.
.S
S.
.A
A.
.
i
in
nf
fo
o@
@v
vi
ik
ki
in
ng
ge
el
le
ec
ct
tr
ro
on
ni
ic
cs
s.
.c
co
om
m
h
ht
tt
tp
p:
:/
//
/w
ww
ww
w.
.v
vi
ik
ki
in
ng
ge
el
le
ec
ct
tr
ro
on
ni
ic
cs
s.
.c
co
om
m
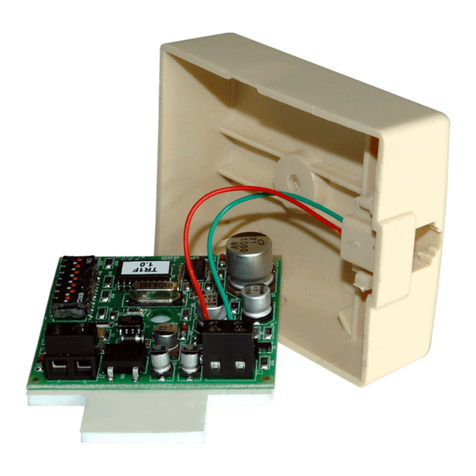
Concealed in a standard wall mount RJ11C jack, the TR-
1is designed to allow or restrict local and/or specified long
distance numbers.
The TR-1 contains programmable internal jumpers for
added versatility. Each internal jumper may be user-pro-
grammed with up to eight 8-digit numbers. This feature is
useful when using the TR-1 in countries outside of the
U.S., allowing the user to program numbers specific to
each individual country.
Important: This Application Note is to be used in conjunction with the TR-1 Technical
Practice, Fax Back Document 705.
A. Pre-Programmed Jumper Selections
Important: The TR-1 components are sensitive to static electricity. Personnel and the
work area should be grounded before handling.
The TR-1 has six removable jumpers (see the diagram to the right). Removing the
specified jumper will allow the following factory default dialing strings.
Note: Each jumper can be user programmed with up to eight, eight-digit phone num-
bers per jumper (see User Programming Jumpers 1-5 below).
Jumper Number
Jumper 1
Jumper 2
Jumper 3
Jumper 4
Jumper 5
Jumper 6
Removing Jumper will allow the following factory default numbers...
976, 1-976, 1-XXX-976
1+ six digits (long distance), 10
0+
1-900
555, 1-555, 1-XXX-555, 411, 1-411
For Centrex or PABX’s: Remove this jumper to ignore the first 9 in 9+
dialing (programmable)
Internal View of the TR-1
JP
1
Jumpers
1-6
JP
2JP
3JP
4JP
5JP
6
B. User Programming Jumpers 1-5
Jumpers 1-5 can be user programmed. This is useful when installing the TR-1 outside of the U.S.A. You can user pro-
gram the jumpers to the specific country’s toll numbers. Each jumper can be programmed with up to (8) eight-digit num-
bers. With numbers programmed into jumpers 1-5, removing a specific jumper will set that group of numbers to allow.
Likewise, installing a specific jumper will set that group of numbers to restrict.
1. Access the programming mode as explained in section D.
2. Enter your 1-8 digit restricted number + ## + jumper number 1-5 + position 1-8.
3. Repeat step 3 for each restricted number programmed (up to 8 positions per jumper).
C. Programming Jumper 6 to Ignore Specific Outside Line Access Numbers
Jumper 6 is factory programmed to ignore the first 9 in 9+ dialing. This feature is enabled by removing jumper 6. Jumper
6 can be user programmed with up to eight 8-digit numbers. This feature is useful if you have an outside line access
number other than “9” or multiple outside line access numbers. With this feature enabled (jumper 6 removed), if the
phone number dialed does not start with your programmed outside line access number (number programmed in jumper
6), it is allowed. This is useful for allowing extension dialing on phone systems. If the number dialed does start with the
programmed line access number, all the digits following the access number will be allowed or restricted according to
the selected programming.
1. Access the programming mode as explained in D.
2. Enter your 1-8 digit line access number + ## + 6+ the position 1-8.
3. Repeat step 3 for each line access number programmed (up to 8 positions).
4. Remove jumper 6to enable the ignore line access number programming.
Due to the dynamic nature of the product design, the information contained in this document is subject to change without notice. Viking Electronics, and its affiliates and/or
subsidiaries assume no responsibility for errors and omissions contained in this information. Revisions of this document or new editions of it may be issued to incorporate
such changes.
Fax Back Doc 817
Rev 2
Printed in the U.S.A.
P
Pr
ro
od
du
uc
ct
tS
Su
up
pp
po
or
rt
tL
Li
in
ne
e.
..
..
.7
71
15
5.
.3
38
86
6.
.8
86
66
66
6F
Fa
ax
xB
Ba
ac
ck
kL
Li
in
ne
e.
..
..
.7
71
15
5.
.3
38
86
6.
.4
43
34
45
5
E. Programming Features Quick Reference
Features
Programmable jumpers 1-6 ...................................................................
Set all jumpers to factory default ............................................................
Clear all numbers programmed in jumper 1 ...........................................
Clear all numbers programmed in jumper 2 ...........................................
Clear all numbers programmed in jumper 3 ...........................................
Clear all numbers programmed in jumper 4 ...........................................
Clear all numbers programmed in jumper 5 ...........................................
Clear all numbers programmed in jumper 6 ...........................................
Digits
1-8 digits + ## + jumper number 1-6 + position 1-8
#45
✱01
✱02
✱03
✱04
✱05
✱06
Note: Jumpers 1-6 have priorities set to them. This is due to the structure of the factory default jumper numbers. The
jumpers are in the following priorities: JP6, JP1, JP3, JP4, JP5, JP2.
For your records and ease in programming, write down the numbers and check off the appropriate boxes (jumper on
or removed) in the spaces below before programming.
F. Record Programming Features
Jumper 1
___ Restrict (Jumper ON)
___ Allow (Jumper removed)
Position: (1-8 digits)
1. _________________
2. _________________
3. _________________
4. _________________
5. _________________
6. _________________
7. _________________
8. _________________
Jumper 2
___ Restrict (Jumper ON)
___ Allow (Jumper removed)
Position: (1-8 digits)
1. _________________
2. _________________
3. _________________
4. _________________
5. _________________
6. _________________
7. _________________
8. _________________
Jumper 3
___ Restrict (Jumper ON)
___ Allow (Jumper removed)
Position: (1-8 digits)
1. _________________
2. _________________
3. _________________
4. _________________
5. _________________
6. _________________
7. _________________
8. _________________
Jumper 4
___ Restrict (Jumper ON)
___ Allow (Jumper removed)
Position: (1-8 digits)
1. _________________
2. _________________
3. _________________
4. _________________
5. _________________
6. _________________
7. _________________
8. _________________
Jumper 5
___ Restrict (Jumper ON)
___ Allow (Jumper removed)
Position: (1-8 digits)
1. _________________
2. _________________
3. _________________
4. _________________
5. _________________
6. _________________
7. _________________
8. _________________
Jumper 6
___ Disabled (Jumper ON)
___ Ignore (Jumper removed)
Position: (1-8 digits)
1. _________________
2. _________________
3. _________________
4. _________________
5. _________________
6. _________________
7. _________________
8. _________________
D. Accessing the Programming Mode
1. From a Touch Tone phone, call the phone connected to the TR-1 on a C.O. line or analog PABX/KSU station.
2. Answer the phone connected to the TR-1.
3. Enter ✱+current six-digit security code (factory set to 845464). A double beep should be heard indicating the
programming mode has been accessed.
Note: If a
✱
entered as the first digit from off-hook conflicts with your C.O. or phone system features, a single (allowed)
digit 1-9 may be entered prior to the
✱
and six digit security code to enter programming. Example: 5
✱
845464).


Other Viking Network Hardware manuals

Viking DNA-510 Instructions for use

Viking

Viking DNA-510 Instructions for use

Viking ONYX Series Installation instructions

Viking

Viking ONYX Series Installation instructions

Viking DVA-500 Instructions for use

Viking

Viking DVA-500 Instructions for use

Viking DNA-510 Instructions for use

Viking

Viking DNA-510 Instructions for use

Viking DVA-500A Instructions for use

Viking

Viking DVA-500A Instructions for use

Viking DVA-1003B User manual

Viking

Viking DVA-1003B User manual

Viking E-1600A series Installation and operating instructions

Viking

Viking E-1600A series Installation and operating instructions

Viking DVA-2WA Installation and operating instructions

Viking

Viking DVA-2WA Installation and operating instructions

Viking DVA-2WA Instructions for use

Viking

Viking DVA-2WA Instructions for use

Viking TR-1 Instructions for use

Viking

Viking TR-1 Instructions for use

Viking DVA-1002 Instructions for use

Viking

Viking DVA-1002 Instructions for use

Viking DVA-3003 Instructions for use

Viking

Viking DVA-3003 Instructions for use

Viking DVA-1003B Installation and operating instructions

Viking

Viking DVA-1003B Installation and operating instructions

Viking DVA-1003B Installation and operating instructions

Viking

Viking DVA-1003B Installation and operating instructions

Viking CPA-7B Installation and operating instructions

Viking

Viking CPA-7B Installation and operating instructions

Viking DVA-1003B Instructions for use

Viking

Viking DVA-1003B Instructions for use

Viking CPC-4 Instructions for use

Viking

Viking CPC-4 Instructions for use

Viking W-1000 Installation and operating instructions

Viking

Viking W-1000 Installation and operating instructions

Viking DVA-1003A Instructions for use

Viking

Viking DVA-1003A Instructions for use

Viking TDR-1 Instructions for use

Viking

Viking TDR-1 Instructions for use

Viking CTG-2 Instructions for use

Viking

Viking CTG-2 Instructions for use

Viking CPA-7B Installation and operating instructions

Viking

Viking CPA-7B Installation and operating instructions

Viking CPC-1 Instructions for use

Viking

Viking CPC-1 Instructions for use

Popular Network Hardware manuals by other brands

UNIVIEW NVR201 quick guide

UNIVIEW

UNIVIEW NVR201 quick guide

evertz 7700 Series manual

evertz

evertz 7700 Series manual

Solid Alliance eROU user manual

Solid

Solid Alliance eROU user manual

Eiki LC-X71 owner's manual

Eiki

Eiki LC-X71 owner's manual

TRENDnet TEG-S4M1FGL supplementary guide

TRENDnet

TRENDnet TEG-S4M1FGL supplementary guide

Motorola DIMETRA MTS 2 Installation, Configuration and Basic Service Manual

Motorola

Motorola DIMETRA MTS 2 Installation, Configuration and Basic Service Manual

Fluke NetDAQ 2640A Service manual

Fluke

Fluke NetDAQ 2640A Service manual

Silex technology SX-500 Series instructions

Silex technology

Silex technology SX-500 Series instructions

Draytek Vigor VigorAccess quick start guide

Draytek

Draytek Vigor VigorAccess quick start guide

Cisco 220 Series Smart Plus reference guide

Cisco

Cisco 220 Series Smart Plus reference guide

Agrowtek GrowNET instruction manual

Agrowtek

Agrowtek GrowNET instruction manual

Quartz Q1601 System manual

Quartz

Quartz Q1601 System manual

Integral Technologies DVXi TS4 user manual

Integral Technologies

Integral Technologies DVXi TS4 user manual

JVA Wi-Fi Anywhere PTE2704 quick start guide

JVA

JVA Wi-Fi Anywhere PTE2704 quick start guide

D-Link ShareCenter DNS-323 Quick installation guide

D-Link

D-Link ShareCenter DNS-323 Quick installation guide

SkyPilot SkyConnector Outdoor installation guide

SkyPilot

SkyPilot SkyConnector Outdoor installation guide

Idis DR-3104P Operation manual

Idis

Idis DR-3104P Operation manual

Iomega StorCenter px4-300d Product guide

Iomega

Iomega StorCenter px4-300d Product guide

manuals.online logo
manuals.online logoBrands
  • About & Mission
  • Contact us
  • Privacy Policy
  • Terms and Conditions

Copyright 2025 Manuals.Online. All Rights Reserved.