Viper CAR275 User manual

ev.2014(03-06)
VA83608-010
75L DRY & WET CARPET CLEANER / NETTOYANT MOQUETTE EAU ET POUSSIERE
75L/NETTOYANT MOQUETTE EAU ET POUSSIERE 75L/ 75L ΜΗΧΑΝΗΜΑ ΣΤΕΓΝ Υ
& ΥΓΡ Υ ΚΑΘΑΡΙΣΜ Υ ΧΑΛΙΩΝ/Μ ΚΕΤΩΝ /75L SZÁRAZ ÉS NEDVES
SZŐNYEGTISZTÍTÓ/BATTITAPPETO A SECCO & UMIDO DA 75L/75L URZĄDZENIE DO
CZYSZCZENIA DYWANÓW NA MOKRO I NA SUCHO/75L LIMPADOR DE CARPETE
SECO E MOLHADO / ASPIRATOR PENTRU CURĂŢARE UMEDĂ & USCATĂ 75L / 75L
СУХОЙ & ВЛАЖНЫЙ ОЧИСТИТЕЛЬ КОВРОВ/75L ASPIRADORA PARA LIMPIADO EN
SECO Y MOJADO/75L KURU& ISLAK HALI TEMİZLEYİCİ /75L ПРАХОСМУКАЧКА ЗА
СУХО И МОКРО ПОЧИСТВАНЕ/75L VYSAVAČ NA MOKRO-SUCHÉ ČIŠTĚNÍ
KOBERCŮ/75-L-TROCKEN- UND NASS-TEPPICHREINIGER/75L DROOG & NAT
CARPET REINIGER/75L ČISTILEC ZA SUHO IN MOKRO ČIŠČENJE
(CAR275 OWNER’S MANUAL)

3-6. 11-14
2
ENGLISH
Operation Guidelines.................................
3-6. 7-10
TÜRKÇE
Kullanım Talimatları...................................

3
F1
F1F1
F1

4
F2
F2F2
F2

5
F4

6
F4
F4F4
F4
F5
M
M
VACUUM
VACUUM NO.1 SWITCH
PUMP SWITCH VACUUM
220V~240V
50/60Hz
EMI
EMI
BLUE
BROWN
RED
BLACK
BLUE
BROWN
YELLOW/GREEN
YELLOW/GREEN
YELLOW/GREEN
24V
POWER
SUPPLY
0.47uF
0.47uF
CAR275 CIRCUIT DIAGRAM

DRY & WET CARPET CLEANER ENGLISH
7
I troductio :
This man al is to be sed for an nderstanding of Viper and a mastery of the operation and se of CAR275.
This man al sho ld be read thoro ghly before se.
This device is a commercial carpet cleaner.
Descriptio of the co structio of the device
For parts diagrams of the co structio of CAR275, refer to “F1”Diagram o Page 3 a d “F2” Diagram o
Page 4.
1. Headpiece handle hook 2. Power cord 3. Headpiece water p mp inlet fast female connector 4. Water tank
fastener 5. Drain water tank hind fastener hook 6. Tank handle 7. Stainless steel drain water tank 8. On/off
switch panel 9. Headpiece water p mp o tlet fast female connector 10. Headpiece assembly 11. Stainless
steel foam protection mesh 12. D st filter 13. S ction hose base b tton 14. S ction hose base 15. Draining
hose 16. clean water tank lid 17. Spare tank 18. 10-inch hind wheel 19. Water tank fastener 20. Clean
water tank hose fast male connector component 21. 25-liter clear water tank base 22. 3.5”directional wheel
23. Water drainage lid 24. Male connector component for the base of the s ction hose 25. Connector for the
corr gated hose at the base of the s ction hose 26. Corr gated hose 27. Connector for the corr gated hose of
the metal elbow end 28. Fast male connector of the metal elbow end 29. Threaded fast female connector of the
on/off switch panel 30. Control valve 31. Metal elbow end component 32. PU water hose 33. PU water
hose retaining clips 34. 110° nozzle 35. 10” transparent triang lar rake component 36. Unscrewing sliding
b tton
I structio s
1. Fill the clean water tank with an appropriate q antity of clean water or sol ble low foaming sol tion with
cleaning agents (Attention: No dirt and sand grains sho ld be present). The sol ble sol tion to be sed to fill
the clean water tank m st be kept at 5 cm below the water inlet of the clean water tank, in order to avoid
spilling when the machine is in operation. T rn the lid of the clean water tank tight.
2. Fix the headpiece onto the 75-liter drain water tank, and fasten well (Attention: for ease of se, the operation
control panel of the headpiece sho ld face the direction of the s ction set of the drain water tank).
3. Referring to the F2 diagram, connect well the metal elbow component, fix the triang lar assembly, and adj st
to the appropriate direction of operation. Fix well the PU water hose retaining clips, and fix the on/off control
to the handle end of the metal elbow hose. Fix well the hexagon n ts. Insert the fast male connector of the
metal elbow hose end to the threaded fast female connector of the on/off switch panel.
4. Insert the flexible hose of the s ction hose end to the s ction hose end, and insert the water hose male
connector component to the fast female connector of the o tlet of the headpiece water p mp.
5. Insert the male connector component of the o tlet hose of the clean water tank into the fast female connector
of the water inlet of the headpiece water p mp.
(The way to insert and p ll o t the fast male and female connectors: P sh forward the threaded sliding b tton,
insert the male connector, then release the sliding b tton, and it is locked a tomatically. When disconnection
is req ired, p sh the threaded sliding b tton of the female connector and p ll o t the male connector.)

ENGLISH
DRY & WET CARPET CLEANER
8
6. On completing the connections as shown in F3 Diagram, pl g in the power, t rn on the red s ction motor
switch, and se this device to vac m any debris before cleaning:
Attention: When no water is req ired for carpet cleaning or when the clean water tank is empty, do not t rn
on the green water p mp switch. Otherwise the f nction of the water p mp will be wasted.
7. Pl g in the power, t rn on the red s ction motor switch and the green water p mp control switch, and se the
hand to hold the control valve. The carpet is now ready for cleaning and for extracting water and moist re.
(This device has a high vac m capacity and the dehydration rate is aro nd 90%). After cleaning, the carpet
may be air dried.
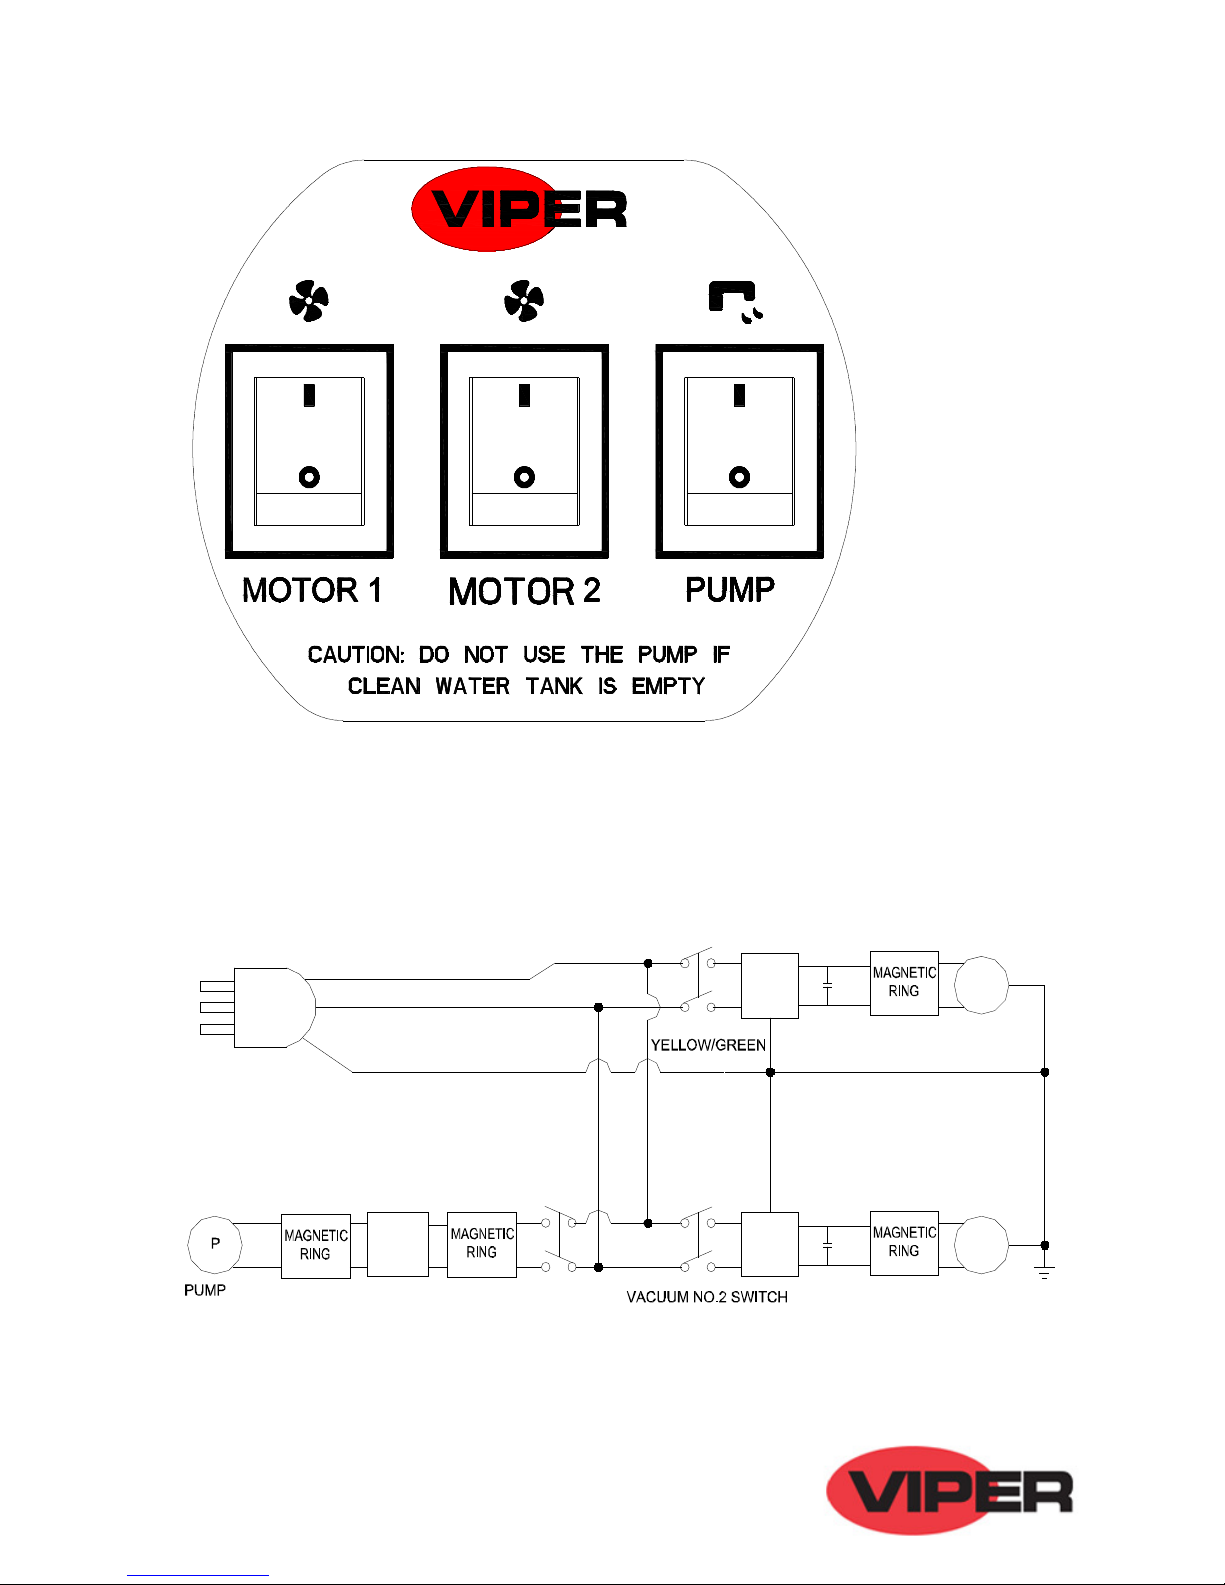
The two red on/off “MOTOR 1” and “MOTOR 2”switches of the Headpiece panel in F5 Diagram are the on/off
vac m s ction motor control switches for the creation of vac m s ction. The green on/off “PUMP” switch is
the control switch of the water p mp.
This device may clean carpets of any q ality, s ch as p re wool, synthetics, nylon, plant fiber, woven woolen
blankets, and long and short woolen blankets. It can soften the fibers of carpets, recover the bo nciness of
carpets, and lengthen the life of r bbed and cleansed carpets.
The device ses stainless steel foam-protected mesh so that no foam enters the headpiece d ring operation. When
foam has become excessive, the addition of a foam-dissolving agent or a low foaming chemical is recommended.
Atte tio : Do ot use water at high temperatures whe clea i g carpets. The result would be better if
lukewarm water is used, especially i relatively cold regio s. Never use water with a temperature higher
tha 40
o
C
.
When it is f lly filled with water, the float will rise to block the air-intake of the headpiece. At s ch a time, the
device may not s ck in water in the normal manner, and the water ejected from the nozzle may not be s cked in
thro gh the transparent triang lar rake. The noise may s ddenly become lo der. In s ch a case, t rn off the
power, take the device to a drainage area, and open the drain water hose to empty the tank of the fo l water inside.
When completed, make s re the dirty water in the drain water tank is f lly drained. The remaining n sed water
in the clean water tank sho ld be drained thro gh the o tlet at the base. Use a dry towel to clean the body of the
device, and replace the power cord on the handle hook of the headpiece.
Terms a d Co ditio s of Warra ty
When any Viper prod ct is sed within half a year (from the date of the p rchase invoice) and if fo nd defective
thro gh non-h man ca ses and when determined to be tr e by o r company, the device will be repaired free of
charge or parts will be replaced (except v lnerable parts). The following conditions, however, are not covered by
the warranty:
1. Prod ct damage ca sed by improper operation;
2. Self-dissembling or changes made to the device and man-made damages;
3. Man-made damages and/or distortions done to the appearance of the device.
For enq iry on the q ality or operation of the prod ct, please contact the service department of o r distrib tion and
sales centers in time.

DRY & WET CARPET CLEANER ENGLISH
9
Care a d Mai te a ce
Atte tio : Whe care a d mai te a ce is do e, make sure the power cord plug is pulled out from
the socket.
1. Make s re the power cord is intact.
2. Clean the device after se. Make s re the drain water tank is free of fo l water, dirt or d st. Drain off
completely any n sed water in the clean water tank.
3. After vac ming, the d st filter m st be beaten forcibly.
4. To ens re the water press re in the p mp is good, it is needed to reg larly take o t the filter at the
import point for removing the blockage and take o t the filter at the nozzle part for removing the
blockage.
5. The stainless steel foam-protection mesh sho ld be reg larly cleansed of woolen fl ffs to avoid nfavorable
effect on s ction.
6. After cleaning the d st bag and the d st filter, they m st be completely dry when re- sed.
7. The motor carbon br sh m st be replaced when damaged thro gh over- se.
8. Make s re the voltage in se is compatible with that marked on the label of the device.
9. If the power cord is damaged, the after-sales service department m st be contacted for replacement in order to
avoid danger.
War i g
Safety m st be considered at all times when an electrical device is sed. In order to ens re safe operation of the
device, it is necessary to give it reg lar care and maintenance.
O r company will not be held responsible for any safety accidents ca sed by a lack of care and maintenance or by
ntimely replacement of defective parts.
The following s bstances m st not be sed in this device:
Harmf l powder, searing s bstances (for example: b rning cigarette, hot ash, inflammable liq ids (petrol, solvents,
acid and alkali corrosive liq ids), inflammable powder (for example: magnesi m and al min m powder)
Power Cord
If the external socket does not match the pl g of the power cord of this device, c t off the pl g of this
device and fix an appropriate pl g in its stead. The wires inside the power cord are labeled in accordance
with the following reg lations:
Bl e wire ----------------------- ne tral wire (Zero wire)
Brown wire ---------------------live wire
Yellow-green wire -------------earth wire
The bl e wire connects with the terminal marked with “N”; the brown wire and the terminal “L” connect with the

ENGLISH
DRY & WET CARPET CLEANER
10
device; and the earth wire is marked with “E”.
Parts and accessories are changed witho t notice.
Circuit Co ectio Diagram
For circ it connection diagram, refer to “Fig re 1” on Page 6.
Product Specificatio Parameter
For specification parameter, refer to “Form 1”.
CAR275 Specificatio Parameter(
((
(Form1)
))
)
Voltage(V) 220~240
Freq ency(Hz) 50/60
Power(W) 2000
Vac m(mmH
2
O) 2005
Air Flow(ltr/min) 3115
Noise(dBA) 78
Drain Water Tank Capacity(L) 75
Clean Water Tank Capacity(L) 25
Operation Diameter(m) 14m
Power Cord Length(m) 10m

17
Viper Cleaning Equipment Co., Ltd
EC Declaration of Conformity
The undersigned, representing the following:
Manufacturer and
the authorised representative established within the
European Economic Area:
Company name:
Viper Cleaning Equipment Co., Ltd
Address:
Liang Bian village, Liao Bu town, Dongguan City,
Guangdong Province, China
Viper EUROPE
Nilfisk-Advance A/S
Business name: Viper Cleaning Equipment Co., Ltd
Name and address of person/Company authorised to compile the technical file established in the EU
Community:Viper EUROPE/Nilfisk-Advance A/S Sognevej 25 DK-2605 Br
Ø
ndby,Denmark
herewith declare that the following machinery:
De cription of machinery
Generic denomination: Carpet Cleaner
Function: The machine is used for carpet cleaning in commercial area.
Model/s:CAR275-EU/CAR275-UK/CAR275-TR/CAR275
Fulfill the relevant provisions of European Directive 2006/42/EC (MD) and 2006/95/EC (LVD). The
harmonized standards used in order to obtain compliance to 2006/42/EC (MD) and 2006/95/EC (LVD) are
the following:
EN 60335-1 Safety of household and similar electrical appliances
EN 60335-2-67 Particular requirements for floor treatment and floor cleaning machines, for industrial and
commercial use
Place: Dongguan,China
Date: 2013-06-13
Identity and Signature:

18
Carried Standard: QB1562-1992
VIPER INDUSTRIAL PRODUCTS VIPER CLEANING EQUIPMENT CO.,LTD
P.O.BOX 104 HAMILTON, MI 49419 LIANG BIAN, LIAO BU, DONG GUAN,
(866) 418-4737 GUANG DONG, CHINA
(866) 41-VIPER TEL
:
(0769) 83283988
FAX
:
(0769) 83280104
Other manuals for CAR275
3
Table of contents
Other Viper Vacuum Cleaner manuals

Viper
Viper ECO15 User manual

Viper
Viper GV35 User manual

Viper
Viper GTR1500-EU User manual

Viper
Viper DSU8 User manual

Viper
Viper FANG 20-EU User manual

Viper
Viper GV25 User manual

Viper
Viper MB39CV Mamba Series User manual

Viper
Viper LSU135 User manual

Viper
Viper GV25 User manual

Viper
Viper BARRACUDA CUDA26 User manual

Viper
Viper SL1610SE User manual

Viper
Viper MAMBA Series User manual

Viper
Viper LSU135 User manual

Viper
Viper Rocket TS13 II HEPA User manual

Viper
Viper Shovelnose User manual

Viper
Viper SD 18 User manual

Viper
Viper LSU135 User manual

Viper
Viper AS4325B User manual

Viper
Viper MAMBA MB53CV User manual

Viper
Viper CAR275 User manual