VITACLAY VM7900-8 Installation guide
0
OPERATING AND CARE INSTRUCTIONS
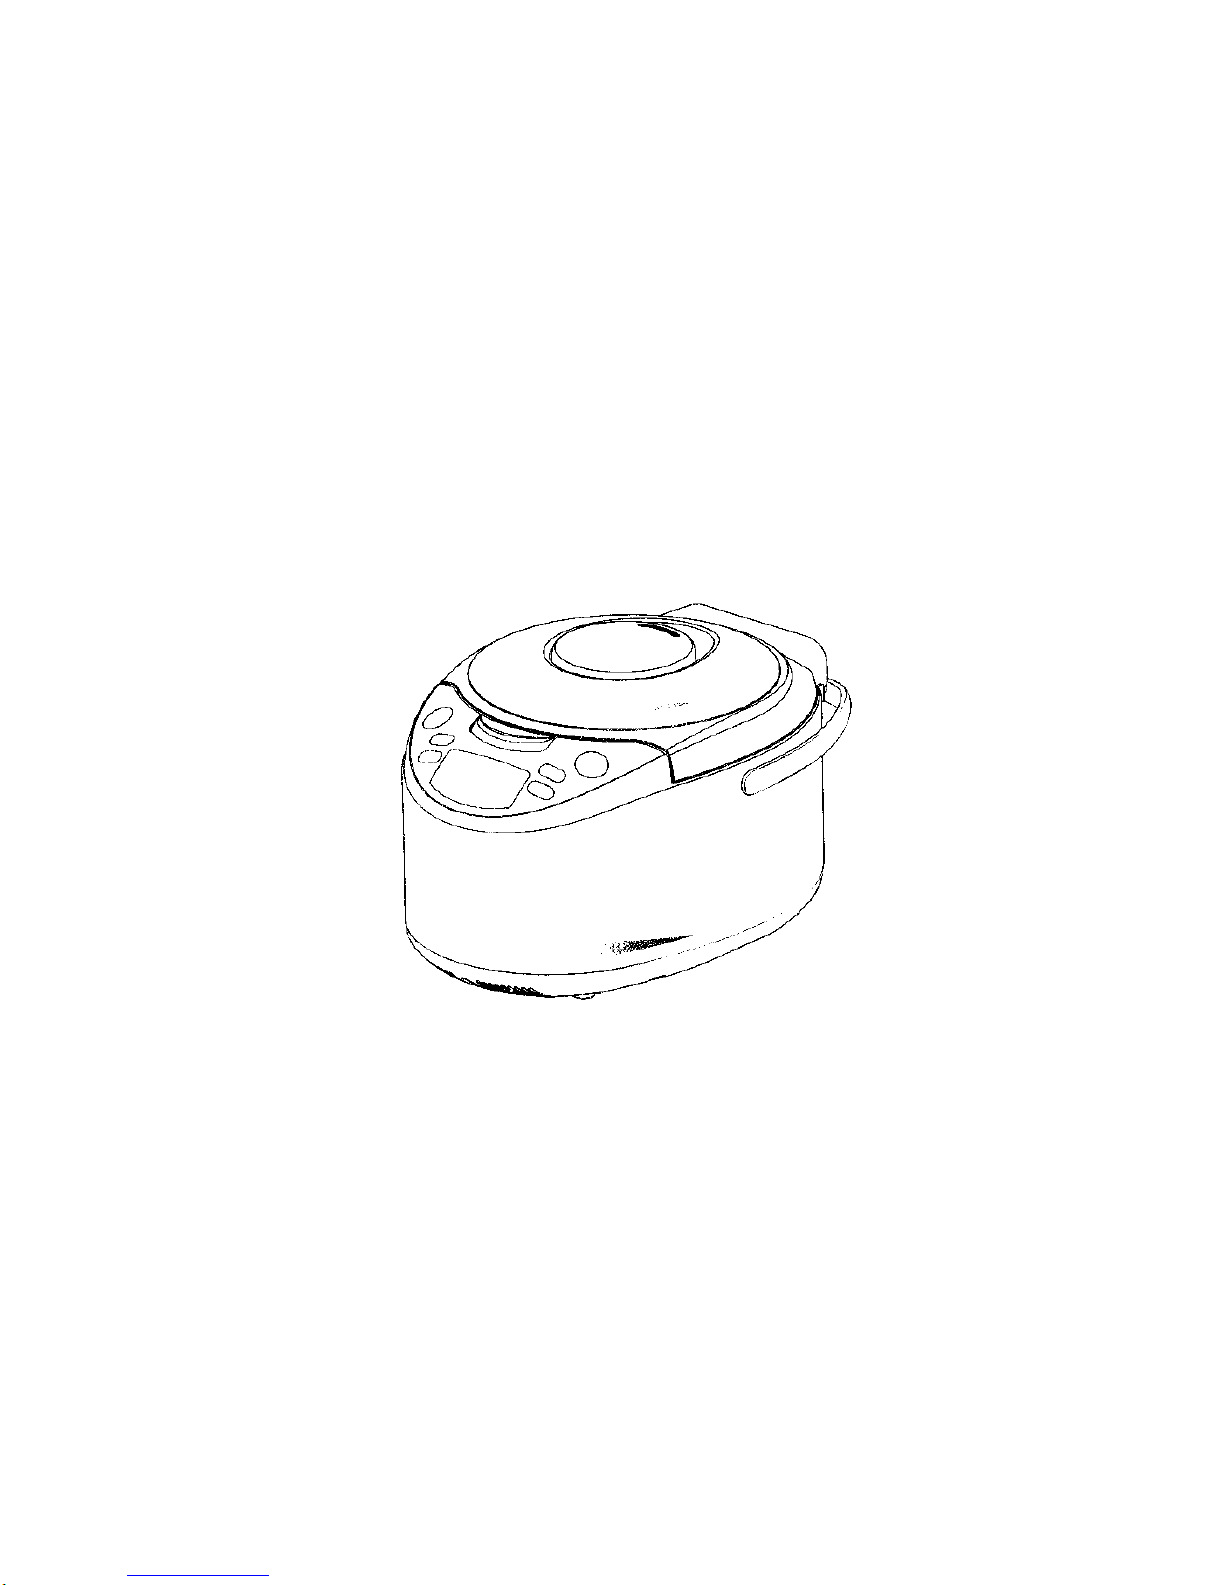
VitaClay® Smart Organic Multi-Cooker
VM7900-8
VM7900-6Y
READ ALL INSTRUCTIONS BEFORE INITIAL USE
HOUSEHOLD USE ONLY
© 2012 Essenergy, Inc. All rights reserved

1
IMPORTANT SAFETY INFORMATION
When using electrical appliances, basic electrical precautions should always
be followed to reduce the risk of fire, electric shock and injury, including the
following:
1. Read all instructions before using the appliance.
2. Do not operate any appliances that have damaged plugs or cords,
malfunctioned or been damaged in any way. Return the appliance to the
manufacturer or qualified service technician for repair or adjustment.
3. Do not immerse the heating unit of the appliance in water or any other
liquid. To prevent electrical shock, do not place the cord, plug or
cooking unit near water or other liquids.
4. Always unplug the cooker when not in use or before cleaning. Allow
cooker to cool before cleaning or removing parts.
5. Do not touch hot surfaces; Use the handles or knobs provided.
6. Avoid sudden temperature changes. Clay is sensitive to changes in
temperature, so allow it to cool and heat gradually. Placing a cold pot
onto a hot surface or a hot pot in cold environment (such as a very cold
countertop, the refrigerator or freezer) can cause the pot to crack. Also be
sure that the outside of the pot is dry before placing inside the housing to
cook.
7. Do not put cold liquids or food into heated pot. Thaw frozen foods before
placing in heated pot unless warm liquid is already in pot. Do not
immerse heated pot into cold water.
8. Do not place cooker on or near a hot gas or electric stove burner. Do not
place cooker inside a hot oven or broiler.
9. Do not use outdoors.
10. Do not let cord hang over the edge of a table or countertop and do not let
it touch heated surfaces.
11. Use extreme care when moving the cooker if it is filled with hot liquid.
12. Ensure cooker is always placed on a flat, level surface before use.
13. Closely supervise whenever cooker is being used by or near children.
14. Do not use this cooker for anything other than its intended use.
15. The use of accessory attachments not supplied or recommended by
Essenergy may cause injury, fire or electrical shock and may also damage
the cooker.
16. To disconnect, turn unit off and remove the plug from wall outlet by
holding the plug. Do not pull the cord.
17. The clay pot is fragile. Be careful when carrying or storing.
18. Do not cook food directly in metal housing.
19. Do not start cooking function while the clay pot is empty.

2
20. Dry heat can cause the clay pot to crack or break. Always have some
liquid present in the clay pot when the cooking cycle begins.
21. When using this appliance, provide adequate air space above and on all
sides for air circulation. On surfaces where heat may cause a problem, an
insulated heat pad is recommended.
22. When opening heated cooker, carefully lift and tilt cover away from you
to avoid scalding and to allow condensed water to drip into pot. Steam
and condensation will be very hot; be very careful not to burn.
23. CAUTION: To reduce the risk of electric shock, cook only in removable
container.
24. To ensure continued protection against risk of electric shock, connect to
properly grounded outlet only.
25. SAVE THESE INSTRUCTIONS.
This appliance is intended for HOUSEHOLD USE ONLY. There are no User
Serviceable Parts inside. The heating unit needs no lubrication or other service.
Do not attempt to service this appliance.
GROUNDING INSTRUCTIONS:
This appliance must be grounded. It is equipped with a 3-wire detachable cord
with grounded plug. The plug must be plugged into an outlet that is properly
installed and grounded.
WARNING: Improper use of the grounded wire can result in a risk of electric
shock. Consult a qualified electrician if necessary. Do not attempt to defeat this
safety feature by modifying the plug.
The short power cord is provided to reduce the hazards resulting from
entanglement or tripping over a long cord. An extension cord may be used with
care.
If it is necessary to use an extension cord, it should be positioned so that it does
not drape over the counter or tabletop where it can be pulled on by children or
tripped over and:
a) Use only 3-wire extension cord with 3-blade grounding plug.
b) The marked rating of extension cord must be equal to or greater than the
rating of this appliance. Electrical rating of this appliance. Electrical rating is
listed on the bottom of this unit.
CLEAN UNIT THOROUGHLY BEFORE FIRST USE
•Ensure the packing paper on the heating surface is removed.
•Wash the clay pot and lid with warm water and a small amount of
detergent.
•Rinse and dry clay pot thoroughly before placing in the housing.

3
•Plug the power cord into the unit first and then plug into the wall outlet.
When the cooker is ready for operation you will hear a long “beep”.
•Ensure the clock is set to the current time before using the Delay Timer
key features (see Function Keys).
Caution:
1. A slight odor and/or smoke smell may be noticed during the initial use of this
appliance. This is normal with many heating appliances and will disappear
after the first few uses.
2. The cooker should be used for its intended purpose only and not for other
cooking purposes such as stir frying, deep oil frying or rendering fat.
3. If liquids have been soaking in the clay pot for a long time, a leak could
occur. Use a dry towel to dry the outside surface of the inner clay pot.
4. During the cooking process, the steam cap should always be in place for
safety and performance.
5. Do not touch the steam cap during cooking process as it becomes very hot.
6. The clay pot and lid become very hot during the cooking process and/or when
cooking is finished. Use a dry cloth to pick up the clay pot and use the
enclosed lid lifter for the lid. Do not use bare hands.

4
CLAY POT CARING
Unglazed natural clay promotes nourishing traditions, preserving all
essential nutrients and vitamins in your foods. It creates excellent
texture and intensifies foods’flavors. However,
•Like any ceramic material, clay pots should not be exposed to
sudden temperature changes.
•The clay pot is considered a consumable part. For optimum
cooking results, keep the clay pot in ‘wet’ cooking conditions to
allow slow simmer and intensify flavors. Frequent dry heating
clay pot causes stress that may lead to crack. To promote
longevity of your cooker and clay pot, keep the pot in ‘wet’
cooking conditions—meaning water-based liquid should always
be present in the clay pot during cooking.
•If the clay pot is preheated or is hot to the touch, do not add cold
or frozen foods. Do not preheat or dry heat the clay pot. The
clay pot should be at room temperature when adding hot or very
cold ingredients.
•Do not add cold water if the pot is still hot.
•Thoroughly wash or sanitize the clay pot and let it dry
completely before store your VitaClay® in a dry and clean
environment.
5
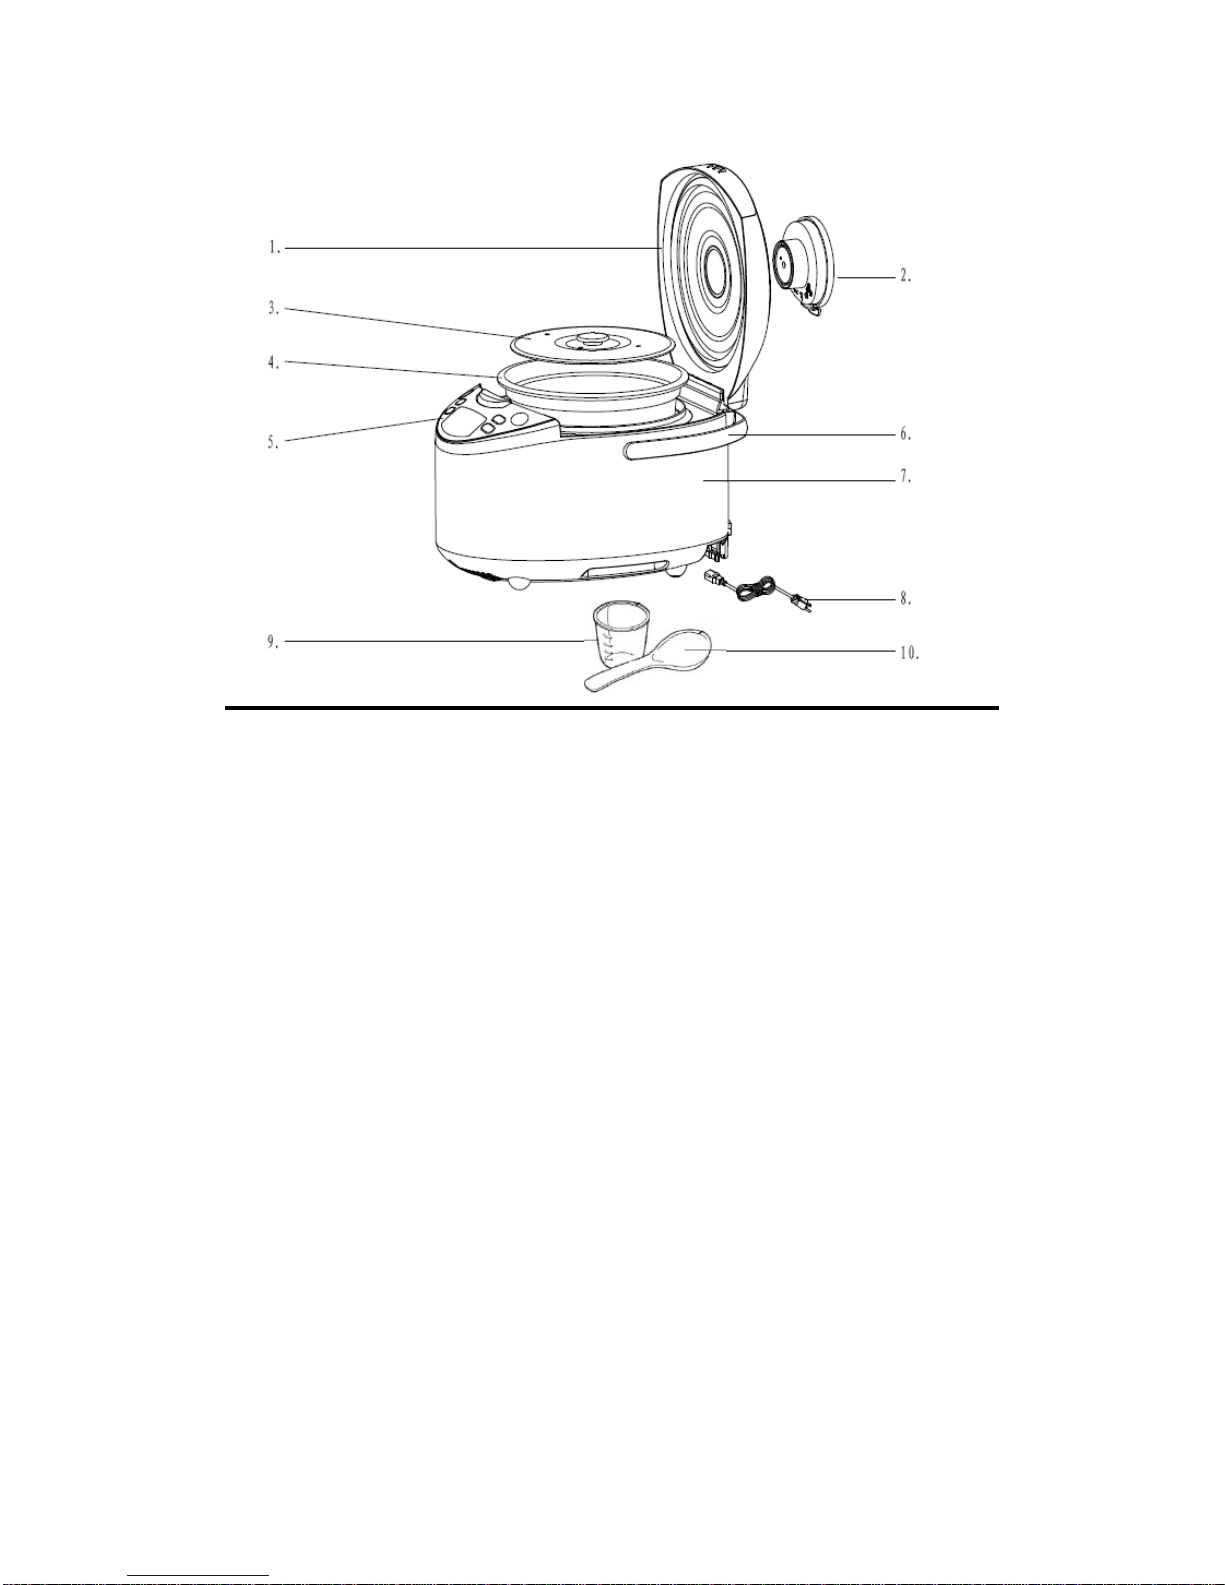
PARTS ASSEMBLY ILLUSTRATION:
(1) Cooker Cover
(2) Steam Cap
(3) Clay Lid
(4) Clay Pot
(5) Control Panel
(6) Handle
(7) Main Housing
(8) Power Cord
(9) Measuring Cup
(10)Rice Spoon
6
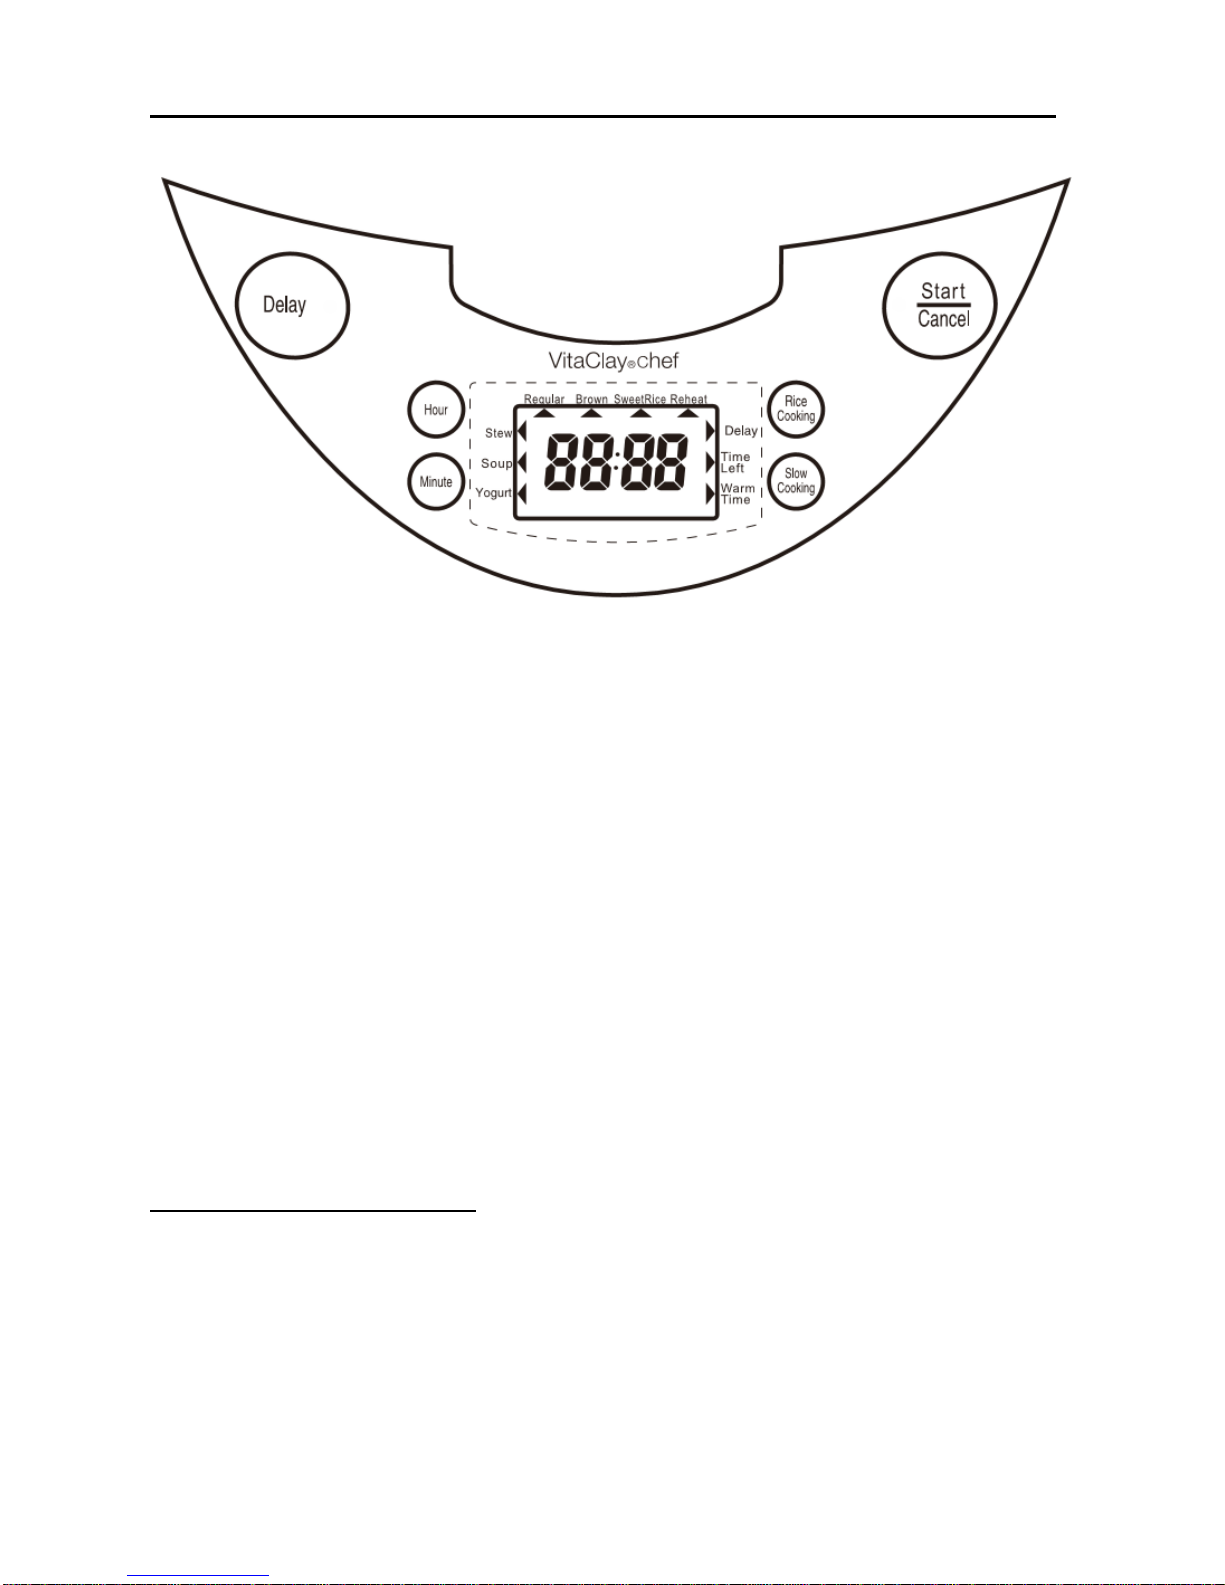
CONTROL PANEL DISPLAY AND FUNCTION KEYS
(1) Delay Timer key
(2) Hour &Minute keys: clock setting and/or slow cooking time
duration setting
(3) LCD rice cooking mode indicators (regular rice/brown
rice/sweet rice/reheat)
(4) Start/Cancel function key and indicator light
(5) Rice Cooking selection key
(6) Slow cooking selection key
(7) remaining cook time indicator
(8) Warm Time indicator
(9) LCD Slow cooking mode indicators (Stew / Braise / porridge
& Soup & Yogurt)
Function Keys
Cooking with Delay Timer:
(a) Press the desired cooking key (“rice cooking” or “slow cooking”). If it
is for “slow cooking”, press “Hour” or “Minute” key for desired
cooking time; If it is for “rice cooking”, you do not need to set for
cooking time as it is programmed to cook automatically.
(b) Within a few seconds (while it is blinking), press “Delay” Timer key
(1)
(c) Using the “hour” and “minute” keys, set the screen the desired time
ahead to begin cooking (If you want to start cooking one hour from

7
now, set to 1:00. To cook 3 hours and 30 minutes from now, set to
3:30)
(d) Or Press START key, the LCD will automatically display the Delay
time and will begin cooking at the desired time.
Rice Cooking Mode Indicators (3)
Regular rice, Brown rice, Sweet rice, or Reheat rice
Start / Cancel Key (4)
(a) Press the key once, it starts cooking cycle after
function key(s) is (are) selected.
(b) Press the key again, it cancels the cooking cycle.
Rice Cooking Selection Key (5)
Press for Rice Cooking selection to choose any of. White (rice or quinoa),
Brown (rice), Sweet (rice) or Reheat (rice).
Slow Cooking Selection Key (6)
Press for Slow Cooking Selection key, for any of following cooking
functions: Stew/Braise/porridge or Soup or Yogurt
Clock and Time Left Indicator (7)
(a) Remaining cook time indicator (count down)
(b) Time cooker has been on warm mode (count up)
Warm Time Indicator (8)
Duration of warm time indicator.
LCD Warm Indicator (9)
(a) Indicator displays cooking cycle is at Warm.
(b) The clay pot maintains a temperature between 70 C to 75 C (158 F and
167 F).
(c) It automatically stays in WARM for 12 hours

8
USING THE RICE COOKER
Rinsing Rice:
To make great rice we recommend rinsing your plain, raw rice before cooking.
If the rice is flavored or enriched, or the package clearly states not to rinse,
however, doing so will wash away infused flavors. Try rinsing your plain rice
in a strainer or bowl for best results.
The Rice Cooking Function Key (5) cycles between regular rice, brown rice,
sweet rice and reheat rice options. Each option has a different micro
computerized cooking mode which enables the cooker to determine the cook
time automatically based on the rice option you choose. Cooking time setting
is not required.
Assumed after rinsed the rice, we recommend water to rice ratios are:
(a) For white rice (sushi rice, jasmine rice, etc.), place slightly over 1 part of
water per part of rice, adjust the ratio as needed;
(b) For sweet rice, place slightly less than 1 part of water per part of rice,
adjust the ratio as needed;
(c) For Brown rice, 1.5 part of water per part of brown rice, adjust the ratio as
needed;
(d) Ratio of water to quinoa is 2 part of water per part of quinoa. Choose on
Regular (white) rice setting.
Note:
1. If you decide not to rinse the rice, another quarter cup of water per cup of
rice may need to be added.
2. To achieve the best cooking results, after the sound of the ‘beep’, let the
rice stay on “Warm” mode for at least an additional 15 to 20 minutes.
And then serve.
3. If you plan to keep the rice on WARM much longer than 30 minutes, we
recommend adding a little more water to avoid the rice drying out on the
bottom.
To start rice cooking immediately:
(a) Rinse rice thoroughly and place in the clay pot with the desired amount of
water. Cover with clay lid.
(b) Place the clay pot on the cooker’s heating element. Ensure the heating
surface is clean: any particle interference could prevent the cooker from
cooking evenly, can cause a burning smell and can even cause the pot to

9
crack. If there is food residue on the heating element, wipe with a damp
cloth or magic eraser sponge until it is clean. Do not fill with or immerse
in water.
(c) Close the cooker cover. You will hear a “click” when it is snapped in.
Plug cord into a 120V AC 60Hz only outlet.
(d) Press rice cooking function key (5) to select type of rice.
(e) Press “Start/cancel” key or within 7 seconds, the light indicator will turn
on to indicate cooking cycle has started;
(e) A few minutes before cooking cycle completes, a “beep” will sound to
indicate that the cooker will automatically switched to the “Keep Warm”
state and then rice is ready to serve.
4. (d) For the best results, once rice is cooked, allow to remain on “warm”
setting for 10-20 minutes before serving. It is then recommended to push
the red “cancel” key to turn off the heat. If you plan to keep the rice in
WARM mode much longer than 30 minutes, we recommend adding a
little more water to avoid the rice drying out on the bottom.
Rice or other food can be left in a closed cooker for several hours with no
power and will stay warm, due to clay’s natural thermal retention.
To program rice cooking at the desired time clock:
(a) Repeat steps (a) to (c) above.
(b) Press Delay Timer Function Key (1).
(c) Make sure the clock is set at present time.
(d) Press “Hour /Minute” function keys (2) until reached at desired cooking
time.
(e) Press Start / Cancel key, or within a few seconds, the LCD will display
the pre-programmed time. The cooker will begin cooking at the desired
time clock. A “beep” will sound to indicate cooking cycle has started and
the cooking indicator light will turn on.
(f) A few minutes before cooking is done, a “beep” will sound to indicate
that the cooker has automatically switched to “Warm” mode and the
Warm/Cancel light will turn on. Once the cooker enters the Warm mode,
the rice is ready to serve.
Brown Rice and Quick Serving Tips
A whole grain of rice has several layers, but only the
outermost layer (the hull) is removed to produce what
we call brown rice. This process is the least damaging

10
to the nutritional value of the rice and avoids the unnecessary loss of nutrients that
occurs with further processing.
- Rinse brown rice at least three times in cold water.
- Stir with hands in a circular motion
- Drain and place into clay pot
- Follow instructions for “Using the Rice Cooker”
Cook the brown rice in mushroom or vegetable stock, leftover vegetable-steaming
water or with your favorite herbs. Other variations are to add cashews,
cranberries, raisins, apple chunks, mango cubes, mushrooms, garlic and onions.
Sauté these ingredients in olive oil and mix into the prepared rice. Cooking the
rice in mushroom stock and then mixing it with mushrooms makes a flavorful
dish.
You can turn any rice dish bright yellow by adding a few dashes of turmeric. This
doesn’t change the flavor, just the color.
Reheating Cold Rice
Previously cooked rice can be reheated in the cooker. If the clay pot has been in
the refrigerator, be sure to allow it to return to room temperature. Use a spoon or
spatula to scoop the rice away from the bottom of the pot. Then place the pot
inside the housing with the previously cooked rice, add a few tablespoons of
water, cover, and select the “reheat rice” option. Break up the cold rice in the clay
pot and add hot water as desired to speed up reheating process.
Quick Serving Ideas
(1) Heat cooked rice with milk. Add in cinnamon, nutmeg, raisins and honey for
a delicious rice pudding.
(2) Make homemade vegetable sushi rolls by wrapping brown rice and your
favorite vegetables in sheets of well moistened nori.
(3) Use rice leftovers for cold rice salads: great for on-the-go lunches. Be creative
and add in chicken or tofu with your favorite vegetables, nuts, herbs and
spices.
(4) Serve beans and rice accompanied by the vegetables of your choice for a
simple yet delicious lunch or dinner entrée.
(5) Rice as a side dish need not be served plain - spruce it up with the toppings of
your choice. Some favorites include nuts, sesame seeds, sautéed mushrooms
and scallions.
(6) Place rice and chopped vegetables in pita bread, top with your favorite
dressing and enjoy a quick and easy lunch.
USING THE SLOW COOKER

11
The VitaClay® preserves nutrients allowing food to cook in its natural juices. It
brings food to a boil 2-4 times faster than conventional slow cookers then reduces
the heat to a slow simmer for gourmet perfection. The Automatic Warming Cycle
holds food perfectly cooked for up to 12 hours. It reduces the cooking time by 30-
50%. It also reduces the cooking liquid by 7 - 8% of the original amount per
cooking hour in addition to adequate liquid requirements by each specific type of
food. Suggestion for initial use: test frequently to see if the contents are covered
with the cooking liquid during cooking, then come to your own decision on the
duration of cooking and amount of liquid desired.
To convert cooking time from conventional slow cooker recipes into VitaClay®
slow cooking: the rule of thumb is if the conventional slow cooking time is set on
‘high’ for 4 hours, or on ‘low’ for 8 hours, the VitaClay® will only take 2 hours.
Most dishes will require no longer than 2 hours to fully cook.
To start the slow cooker immediately:
(a) Place recipe contents in the clay pot and cover with the lid.
(b) Place the clay pot on the cooker’s heating base. Ensure there is no
particle interference to prevent the cooker from cooking evenly.
(c) Close the cooker cover. You will hear a “click” when it is snapped in.
Plug cord into a 120V AC 60Hz only outlet.
(d) Press the slow cooker function key (6) to select desired function cycle.
When the "default” cooking time indicator flashes, enter the desired
cooking time by pressing “Minute” or “Hour” key while it is flashing.
(e) Press “Start/cancel” key or within 7 seconds, the slow cooker will “beep,”
start to heat up and the indicator light will illuminate. When the Slow
Cooker reaches the desired cooking time, the system will indicate
cooking is complete and will automatically switch to “Warm.” The LCD
will display the warm time duration.
Note: 1. To steam veggies or fish, place 2 to 4 cups of water in
VitaClay, then place veggies inside a steam tray or bowl;
press “Slow cooking” key, followed by pressing “minute” key
for 30 minutes, continue pressing “Hour” key until “0” hour,
press “Start/Cancel” key to start steam.
Caution:
1. To prevent overflow: do not fill the cooker more than ¾ full of water.
2. Ensure all ingredients are fully cooked before serving. If not, re-program
to cook longer.

12
3. If the Stew/Soup cycle is too thick and causes the cooker to overheat, the
cooker will give a warning “beep” and switch to the Warm cycle. You
can cancel the operation by pressing the Warm/Cancel function key (4).
4. Do not add any liquid to a hot clay pot, as it can crack the clay pot or lid.
5. Do not place clay pot or lid on cold surface.
To program slow cooker to cook at the desired time clock:
(a) Make sure the clock is set at present time.
(b) Repeat steps (a) to (d) above.
(c) Press Delay timer function key (1).
(d) Select “Hour”/“Minute” function keys (2) to the desired time to cook.
(g) Press “Start/Cancel” key, or within 7 seconds, the LCD will display the
pre-programmed time. The cooker will begin cooking at the desired time
clock. A “beep” will sound to indicate cooking cycle has started and the
cooking indicator light will turn on.
Recommendations: When making porridges/oatmeal, (1) set minimum
cooking time to prevent from burning or sticking to the bottom (normally
around 20 minutes); (2) let cooker cover open during cooking to prevent
overflow; (3) Do not add any cold or hot liquid during cooking that may
cause clay pot crack. Approximate 2-3 cups water per cup oatmeal.
CARE AND CLEANING
•Like any ceramic material, clay pots should not be exposed to sudden
temperature changes.
•The clay pot is considered a consumable part. For optimum cooking
results, keep the clay pot in ‘wet’ cooking conditions to allow slow
simmer and intensify flavors. Frequent dry heating of the clay pot causes
stress that may lead to a crack. To promote longevity of your cooker and
clay pot, keep the pot in ‘wet’ cooking condition—meaning to always
have some water-based liquid present in the pot when cooking.
•If the clay pot is preheated or is hot to the touch, do not add cold or
frozen foods. Do not preheat or dry heat the clay pot. The clay pot should
be at room temperature when adding hot or cold ingredients.
•Do not use cold water if the pot is still hot.
•Thoroughly wash or sanitize the clay pot and let it dry completely before
storing your VitaClay® in a dry and clean environment.

13
•For general washing, wait until the clay pot cools. Then wash it in warm
water with a very small amount of natural dishwashing liquid and rinse
thoroughly.
•Do not use abrasive scouring powders or steel wool. Plastic brush or
nylon scrub pads can be used as needed.
•For hard to remove residue or burns, or to do a thorough cleaning, boil
water with several spoonfuls of baking soda in the clay pot for 1-2 hours
(make sure the water doesn’t boil away completely).
•After washing, dry thoroughly and store. Always clean and dry
thoroughly before storing.
•If the cooker should become moldy (because it was not thoroughly
cleaned or food residue was left inside), make a paste of baking soda and
water, cover the cooker with the paste and allow it to dry. When the
paste is dry, rinse with water and dry well.
•If clay pot pores become clogged, boil the pot to remove debris. Use a
roaster with a rack and add tepid water. Place the pot bottom on the rack
and bring water to a boil. Boil for 30 minutes to remove the
debris. Repeat doing the top if necessary.
•Some cooking residue may fill into the venting holes of the clay lid itself,
or around the clay lid. To clean, use a warm water to wash the clay lid,
and use damp cloth to wipe silicon vent gasket and the large silicone ring
(being careful not to remove it).
Caution: When washing the clay pot, it is recommended that a soft cloth or pad
be placed between the pot and sink to protect the pot from hitting the sink.
A remedy to remove burnt food from the bottom of the pot-
Put 1 cup water, 1/4 vinegar, 1 TP of baking soda and turned the cooker on the Slow
cooking –Stew setting and let it on for 20 minutes. If you need to boil it for 40
minutes, you need to double the ingredients, specially water to prevent from dry
heating that causes stress on clay pot.
CLEANING OUTSIDE OF COOKER UNIT
The outside of the cooker may be wiped clean with a soft cloth and warm soapy
water. Wipe dry. Do not use abrasive cleaners. Grease may be removed with
diluted ammonia. Do not let the Control Panel or any electrical mechanisms
within the unit get wet.
CLEANING INSIDE OF COOKER UNIT
If an object becomes stuck to the heat element lightly rub it off using a fine
sandpaper #600 or steel wool. Then wipe with a damp cloth.

14
How to Operate the New VitaClay® Yogurt Maker Option
Ever wanted to make your own yogurt but thought it would be too hard? It
couldn’t be easier with the new yogurt maker built right into your new VitaClay®
multicooker!
1. Place 32 oz to 48 oz of fresh, pasteurized milk into a high-sided sauce
pan (1 cup of milk makes about a cup of yogurt).
2. Heat the milk until it just starts frothing (but before it boils) or measure it:
use a cooking thermometer and watch until it is heated to 180ºF (82ºC).
Remove the saucepan from heat and allow the milk to cool to lukewarm.
To accelerate the cooling down, place the saucepan in cold water.
3. When the temperature reaches 110ºF (43ºC), you may add your yogurt
culture. Culture may either be bought freeze-dried or you can use plain
yogurt from the store or a previous homemade batch. If not using a
thermometer, wait until the pot is just cool enough to touch with your
bare hands (still very warm). Pour the milk into a small clean cup and add
2-3 Tablespoons of plain yogurt then stir culture in to distribute it evenly.
Mix the room temperature milk well with the smooth mixture and pour
into VitaClay pot.
4. Place the clay pot into the VitaClay cooker and push the “Yogurt” button.
Set it for 6 to 8 hours. Wait for the beep and it will begin the incubation.
Place the clay lid on the pot and close up the cooker.
5. Once the yogurt is done, dispense the yogurt into your own containers or
leave in the clay pot to refrigerate for 4 hours before using. Store in the
refrigerator and use within 4-5 days.
6. Greek yogurt: The yogurt will thicken further in refrigerator. After more
whey separates from the yogurt, it will become creamy Greek yogurt or
yogurt cheese. You might use a strainer or cheese cloth to separate more
of the whey from the yogurt. This will help thicken more.
7. Feel free to flavor with fruit, honey or vanilla beans and enjoy!
8. Don't forget to save a small amount to make the next batch!
Note:
1. 6 to 8 hours is best. The longer the yogurt coagulates beyond that time,
the sourer the taste becomes.
2. Water may condense on the lid of the cooker. When you remove the lid,
take care not to drip any accumulated water into the finished yogurt.
3. Mark the date you made the yogurt or with the date the yogurt will expire
(10 days). Chill them in the refrigerator for a minimum of three hours
before eating.

15
4. THE YOGURT MAKER SHOULD REMAIN PERFECTLY STILL DURING THE
MATURING PROCESS. DO NOT REMOVE THE APPLIACNE AS THIS WILL
AFFECT THE FIRMNESS OF THE YOGURT.
CHOOSING THE MILK
The following types of milk may be used: Pasteurized milk of any fat content
(full, 2%, 1% or fat-free), Powdered milk, Long-life UHT sterilized milk, Soy
milk. Be sure to use UHT soy milk which contains one of the following
ingredients: fructose, honey or malt. These ingredients are necessary for
fermentation and you will not succeed if none are available in the milk.
Fresh milk must be boiled and, if necessary, filtered before the use. The taste and
texture of the yogurt varies according to the milk and yogurt starter selected.
UNFLAVORED YOGURT
The taste and texture of the yogurt varies according to the milk and yogurt starter
selected. You should experiment with milk of various fat contents to determine
which one you prefer.
YOGURT FLAVORED AFTER COOKING
You may choose to make flavored yogurt and add sugar, honey, flavorings, fruit
or other ingredients to taste just prior to eating.
YOGURT FLAVORED WITH JAM AND JELLY, (OR HONEY, OR
SYRUP)
Ingredients:
•4-5 tablespoons of jam and jelly, (or honey or syrup)
•5 tablespoon of unflavored yogurt or 1 tablespoon of culture
•32 oz of milk
Heat the milk until it boils (82°C-180°F), for 1-2 minutes and starts to climb the
sides of the saucepan. Remove the saucepan from heat and allow the milk to cool
lukewarm (43°C-110°F). To accelerate the cooling down, place the saucepan in
cold water. Warm the jam and jelly (or honey or syrup) over low heat. Add half of
the milk and stir until smooth; let cool again to (43°C-110°F), stir together the
culture, jam or jelly and remaining milk until smooth. Add the jam or jelly (or or
honey or syrup) while stirring. Add the mixture in VitaClay cooker. Cover the
cooker. Set “Yogurt” for 6 hours.
YOGURT FLAVORED WITH FRESH FRUIT

16
Ingredients:
•½ cup chopped fresh fruit
•4 tablespoons of sugars or to taste
•1-3 cup water
•5 tablespoons of unflavored yogurt or 1 tablespoon of culture
•32 oz of milk
Heat the milk until it boils (82°C-180°F), for 1-2 minutes and starts to climb the
sides of the saucepan. Remove the saucepan from heat and allow the milk to cool
lukewarm (43°C-110°F). To accelerate the cooling down, place the saucepan in
cold water. Cook the fruit in the sugar and water over low heat for 10-15 minutes
or until thickened .Let cool again to (43°C-110°F). Stir together the culture and
milk until smooth. Stir in the chopped fruit. Add the mixture in VitaClay cooker.
Cover the cooker. Set “Yogurt” for 6 hours.

17

18
LIMITED ONE-YEAR WARRANTY
On-Line warranty registration
www.vitaclaychef.com
Essenergy, Inc. (“Essenergy”) warrants this Product against defects in material or
workmanship for a period of one (1) year from the date of original purchase, when
utilized for normal household use. Essenergy will repair or replace the Product, at
its option, at no charge except for shipping and handling.
This warranty does not cover: (1) The clay pot or lid; (2) damage due to incorrect
customer instruction, installation or set up; (3) cosmetic damage or other damage
due to an act of God, accident, misuse, abuse, or negligence; (4) commercial use of
the Product; (5) modification of any partof the Product; (6) damage due to improper
operation, improper maintenance, or connection to an improper voltage supply; (7)
damage due to attempted repair of the Product by anyone not authorized by
Essenergy to service the Product; (8) normal wear of parts; (9) Damage or defects
caused by shipping, faulty packaging or mishandling in transit; (10) any non-
electric/mechanical attachments and accessories and disposable parts including
measuring cup, spoon, inner pot, outside case, cord and plug.
KEEP YOUR SALES RECEIPT. Warranty service will require presentation of
proof of purchase in the form of a bill of sale or receipt which shows the date of
purchase and establishes that the Product is within the warranty period.
PLEASE REGISTER YOUR PRODUCT WITHIN 10 DAYS OF PURCHASE.
Product must be registered in order to claim warranty service. Please visit
www.VitaClayChef.com to register your product. If you need a registration form,
please contact service@essenergy.com or call us toll-free at 1-877-877-9121.
This warranty is invalid if the factory applied serial number or production date has
been altered or removed from the Product.
To obtain warranty service, first contact customer service to receive an RMA
number. You will receive instructions for the return of your unit once it has been
authorized. You will need to send the complete electronic housing (without the
clay pot or lid) insured, freight prepaid, plus proof of purchase (as described above).
Be sure to package in the original packaging and ensure the machine is secure inside
of the box, with no rattling or movement once the box is sealed. If the unit arrives
with damage from shipment, the warranty will be invalidated.
Please attach your name, address, telephone number, and a description of the
problem along with return postage. A warranty form should be completed and

19
included with the package. The product must be sent carefully packed and properly
cushioned to prevent damage in transit. Your failure to abide by these provisions
may cause your request for warranty service to be denied, and the repaired unit will
be returned at your expense. This warranty is extended only to the original
purchaser of this product and does not extend to any commercial use or
unreasonable use. This warranty is valid only in the United States.
NOTE: REPAIR OR REPLACEMENT AS PROVIDED UNDER THIS
WARRANTY IS THE EXCLUSIVE REMEDY OF THE CONSUMER.
ESSENERGY SHALL NOT BE LIABLE FOR ANY INCIDENTAL OR
CONSEQUENTIAL DAMAGES FOR BREACH OF ANY EXPRESS OR
IMPLIED WARRANTY ON THIS PRODUCT EXCEPT TO THE EXTENT
PROHIBITED BY APPLICABLE LAW. ANY IMPLIED WARRANTY OF
MERCHANTABILITY OR FITNESS FOR A PARTICULAR PURPOSE ON
THIS PRODUCT IS LIMITED IN DURATION TO THE DURATION OF THIS
WARRANTY.
Some states do not allow the exclusion or limitation of incidental or consequential
damages, or allow limitations on how long an implied warranty lasts, so the above
limitations or exclusions may not apply to you. This warranty gives you specific
legal rights, and you may have other rights which vary from state to state.
This manual suits for next models
1
Table of contents
Other VITACLAY Kitchen Appliance manuals


