Vitea Care Junior Plus 2 User manual

USER’S MANUAL
Junior Plus 2 & 3
CHILDREN’S
REHABILITATIVE
STROLLER
(DRVG0J)
EDITION 06.2020ML
page - 1
INSTRUKCJA UŻYTKOWNIKA
Junior Plus 2 i 3
WÓZEK INWALIDZKI
SPECJALNY,
DZIECIĘCY
(DRVG0J)
WYDANIE 06.2020ML
strona - 23

1
USER’S MANUAL (GB/EN)
Table of content
1. Introduction.....................................................................................................................2
2. Product description.........................................................................................................2
3. Application.......................................................................................................................4
4. Contradictions .................................................................................................................4
5. Usage...............................................................................................................................5
6. Safety of use....................................................................................................................8
7. Everyday use and maintenance ......................................................................................10
8. Technical parameters......................................................................................................20
9. Symbols ...........................................................................................................................21
10. Contact details...............................................................................................................22
ATTENTION
Always follow the basic precautions according to the information included
below and regarding safety measures when using the device. Read the entire
instructions carefully before use. Keep this user’s manual for future reference.
Junior Plus children’s rehabilitative stroller is available in two sizes,
further known as Junior Plus 2, Junior Plus 3. For detailed information please
refer to the Technical Parameters section.
2
1. Introduction
Thank you for choosing our product. We are deeply convinced that it will meet your
expectations. Please read this document before first use. This manual was made in order to
provide the necessary information on the safe use of the device. The correct application of
the recommendations will contribute significantly to extended durability and visual design of
the product. We would like to highlight that to date we are constantly improving the quality
of our products, which may result in minor changes that are not included in this manual.
2. Product description
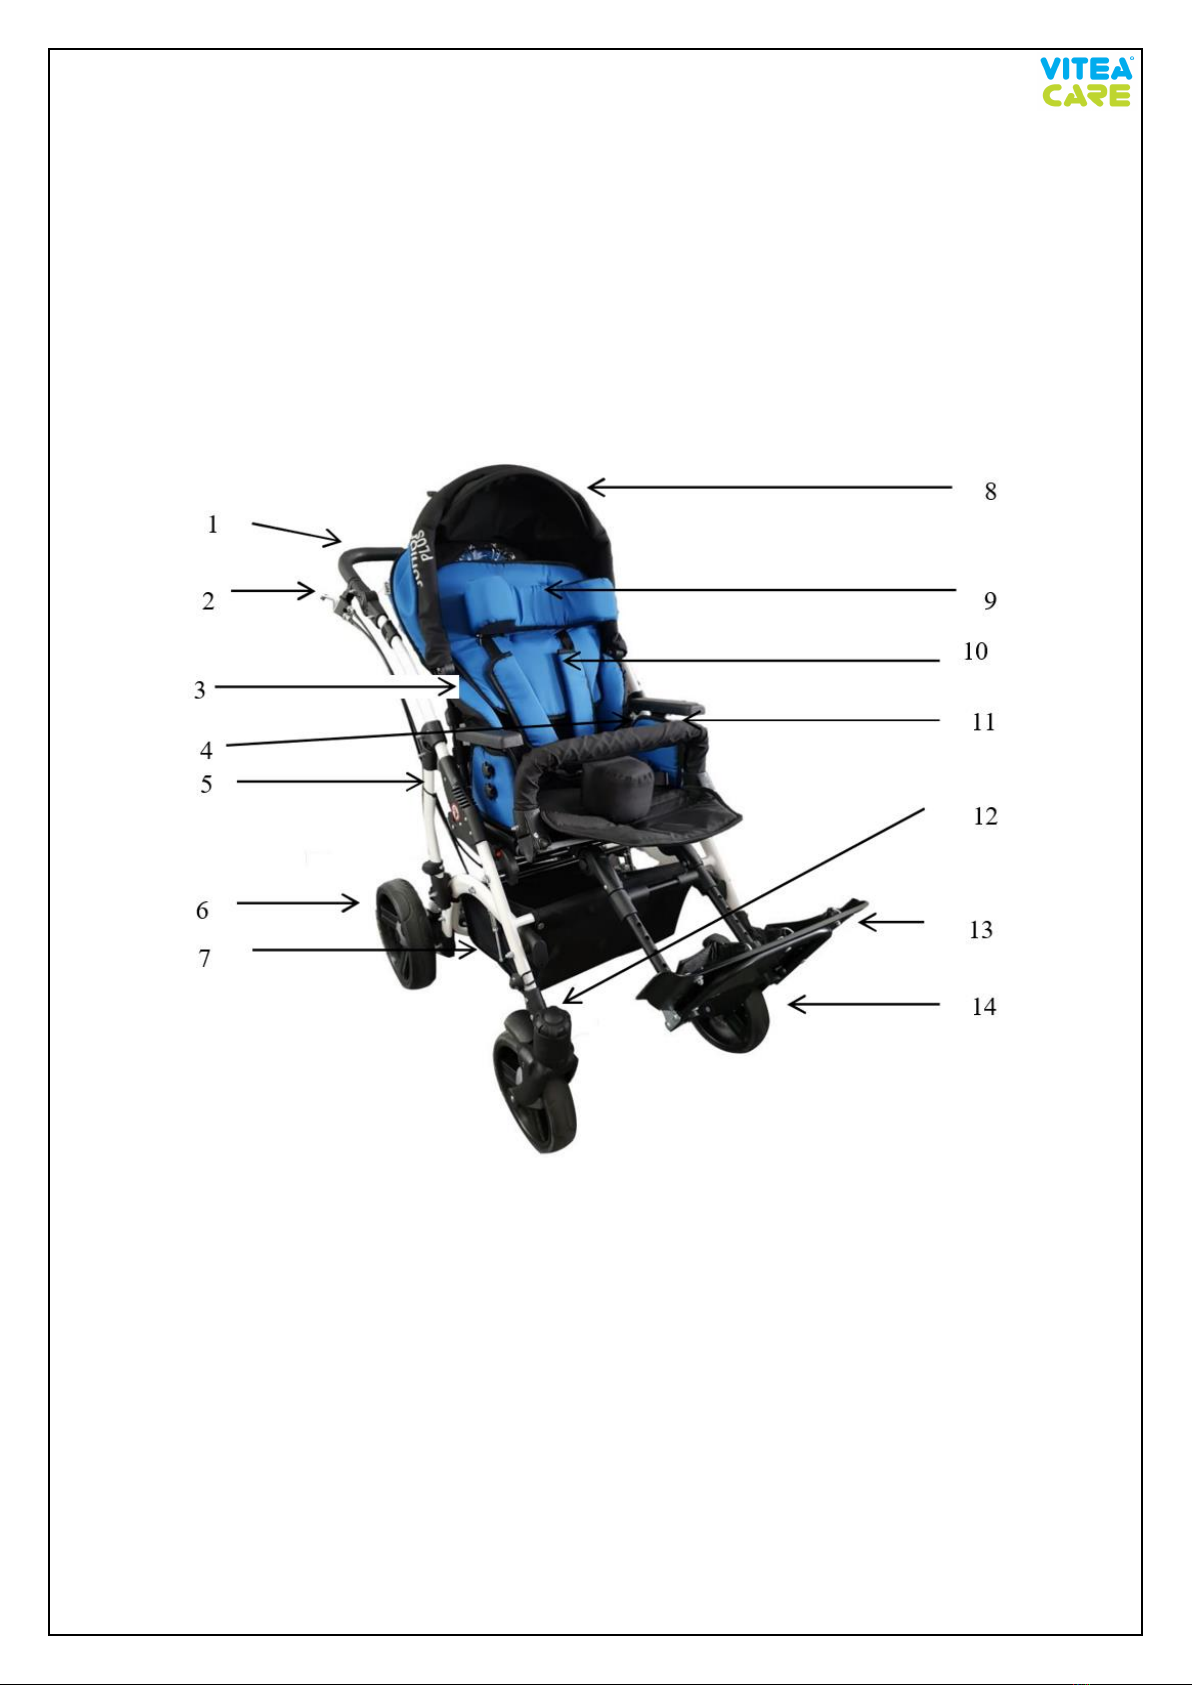
Fig. 1. Construction scheme of Junior Plus children’s rehabilitative stroller.
1. Handle, 2. Lever for changing the seat angle and backrest, 3. Trunk stabilizer,
4. Side stabilizer, 5. Side frame, 6. Rear wheel, 7. Basket for small items,
8. Canopy, 9. Head stabilizer, 10. Safety belts, 11. Front guard, 12. Front wheel
handle, 13. Footrest, 14. Front wheel.
3
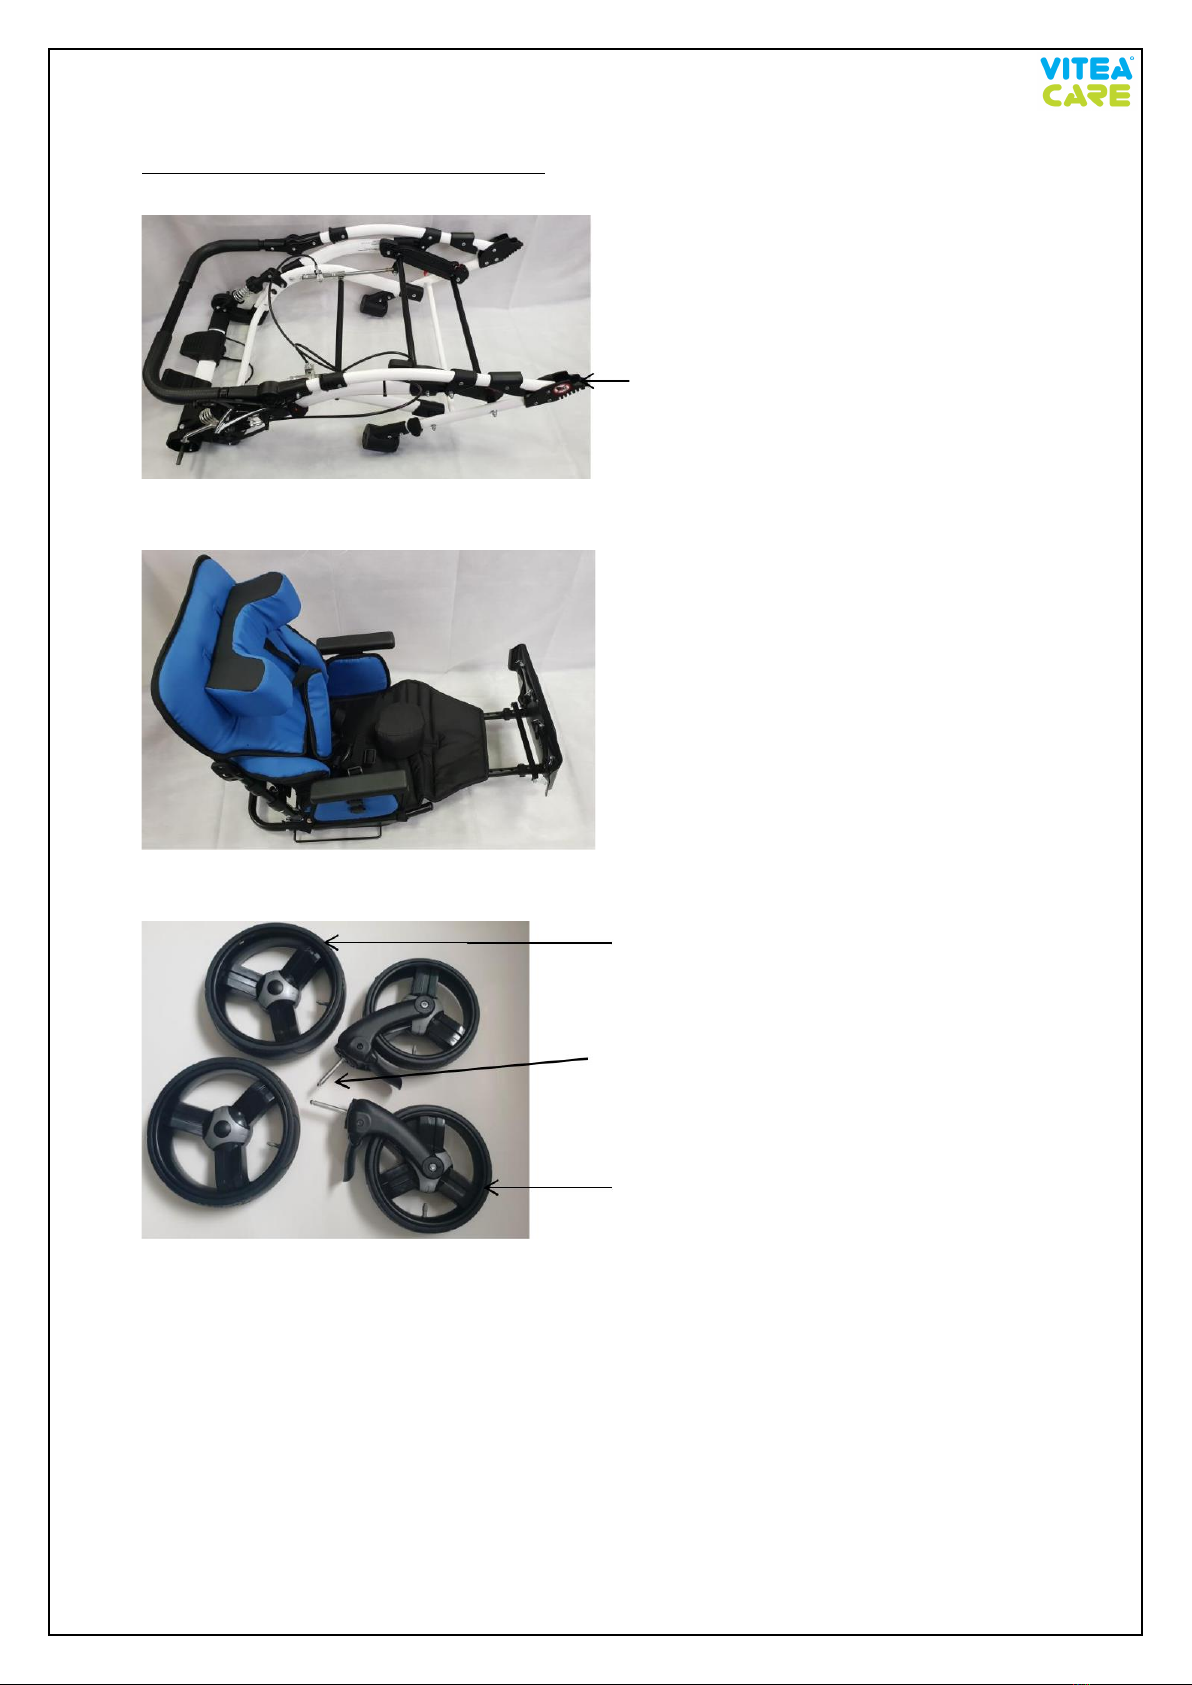
Equipment of the stroller’s package
Fig 2. Stroller corpus
Fig. 3. Seat
Fig. 4. Wheels
Side frame connector
Rear wheel
Front wheel stem
Front of the wheel

4
Fig. 5. Front guard Fig. 6. Canopy
Fig. 7. Basket for small items, umbrella, table and try holder, lumbar support, attachable cup
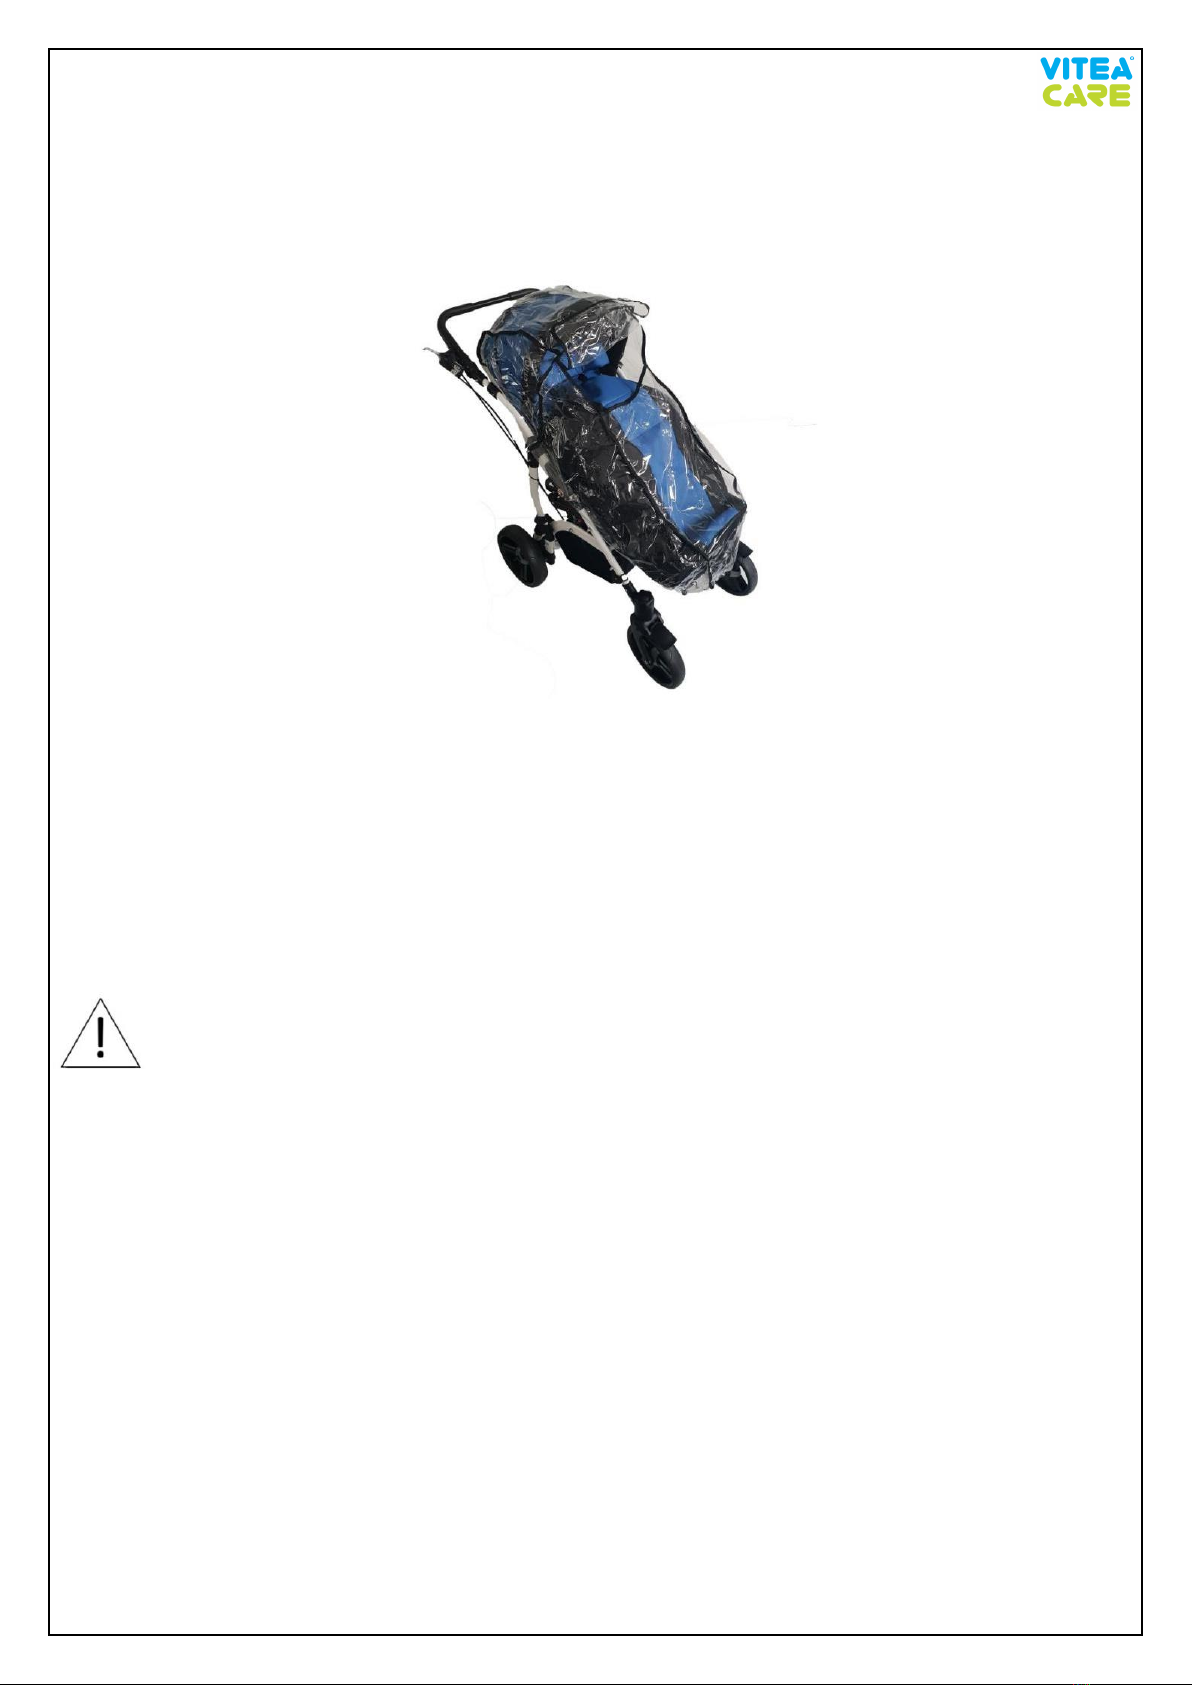
Fig. 8. Sleeping bag Fig. 9. Raincover
3. Application
The stroller is designed for children with disabilities and / or dysfunctions movement activities
as a result of damage of the CNS Central Nervous System. It can be used in children with CP
Cerebral Palsy, myelomeningocele, muscle disorders, dysfunctions of the lower limbs.
The maximum weights are 40 kg (Junior Plus 2) & 75 kg (Junior Plus 3).
4. Contraindications
Contradictions against sitting position.

5
Caregiver handle
5. Usage
• After unpacking the package, check if it contains all parts in accordance with the list of
elements set out above.
• Ensure that all components have no visible damage. If any doubts, please contact the
manufacturer.
• Do not use the stroller until all parts are properly connected.
a) Unfolding the stroller
Fig. 10.Folded stroller Fig. 11. Unfolded stroller
•Unfolding the stroller should begin with the setting of the corpus on a flat surface,
preferably on the floor. Handle to drive should be facing up (Fig. 10).
•Stroller corpus should be lifted up using the handle until (Fig. 11.) you will hear
a click.
•To fold a stroller corpus, at the same time pull upwards the two levers folding. At this
moment lock is released and side frame connector is separated.
•Then direct down the driving handle till the stroller corpus get figure like on Fig. 10.
•Make sure that the actuators are unlocked when folding and unfolding the stroller.
To do this, press the seat and backrest
WARNING! When folding the stroller, the rear wheels must be unlocked!
Lever for changing angle
of seat and backrest
Levers
for
corpus
folding
Front
wheel
handle

6
Fig. 12. Folded stroller Fig. 13. Seat lock closeup
•Into unfolded stroller corpus, attach wheels.
•Front wheel stem slip in the wheel grip in the direction from the bottom to the top, to the
point hearable click.
•To remove the front wheels, press button located at the top of wheel handle and pull it in
from top to bottom (Fig. 12.).
•Rear wheels slide on the pin located in the back of the stroller corpus. Press in this same
time the button located in the central part of the wheel to hearable click.
•To remove the rear wheels, press the button in the middle of the wheel and then pull the
wheel out of the stroller corpus (Fig. 13.).
•Basket for small items should be mounted on the front of the stroller to a thin rod in the
lower part of the side frames using latch, while at the rear of the horizontal rod using
Velcro (Fig 13.).
Fig. 14. Seat with rod Fig. 15. Seat sockets
Seat lock
Rod
Seat socket

7
Fig. 17. Canopy attachment Fig. 18. Canopy folded Fig. 19. Canopy unfolded, sleeping bag
•Seat is equipped with four pins, two on each side.
•While installing the seat, pins should be positioned in the seat socket (Fig. 15.).
•The seat should be held with both hands, one hand front edge of the seat and second hand
the upper edge of the backrest.
•After placing the seat in the stroller corpus, it will lock automatically.
•To remove the seat from the corpus, the safety devices must be unlocked at the same
time. The safety catch (1) needs to be moved down, and the second safety catch (2)
towards the first safety catch (Fig. 16.). There will be a characteristic click. Do this on both
sides. Carefully pull out the seat.
Fig. 16. Safety catches
•To install the canopy push canopy handles on the stroller support frame (Fig. 17, 18.).
•Sleeping bag mount if only the child is properly fasted with the seatbelt (Fig. 19).
•To mount the sleeping bag, start from the bottom by hooking it on the footrest.
•Front guard must be attached to the seat frame with clips, make sure that the barrier is properly
fastened (Fig. 18.).
2
1
Canopy
lock
8
•Raincover should be placed from top to bottom. Cover canopy and then stretch down to
a footrest (Fig. 20.).
•When the raincover is no longer needed, dry it, out of the reach of children.
Fig. 20. Raincover properly attached to the stroller
b) Folding the stroller
•To fold the stroller, remove the canopy and front guard.
•Open seat lock, remove seat.
•Unlock the rear wheels (you can also remove the front and rear wheels).
•Pull levers folding corpus.
•Fold corpus.
WARNING! Failure to follow these guidelines can result in damage to the wheelchair.
6. Safety of use
a) Before using the stroller, refer to this manual and keep it for future reference.
b) Your child's safety may be compromised case of non-compliance of rules contained in this
manual.
c) Never leave a child unattended. Always watch the child when he/she is in the stroller.
Caretakers are responsible for the safety of the child.
d) The seat is not suitable for children under 6 months.
e) Always use the seat belts to avoid serious injuries caused by the child falling out or slipping
out of the stroller.
f) It is important to fasten seat belt properly and its adjustment to the user.
g) The seat and belts do not replace proper supervision of caretaker.
h) While adjusting the parameters of the stroller, the child should not be in a stroller.

9
i) All repairs must be carried out by qualified personnel. And during the warranty period only
by the manufacturer's service.
j) The stroller is not suitable for running or ice-skating and roller skating.
k) The stroller is designed for transporting only one child.
l) It is unacceptable to use the stroller, if you found visible or palpable damage, or worn out
parts and stroller parts indicates a potential risk of an accident (e.g. Consumption wheels,
upholstery, cracks, etc.).
m) Always check before use if the stroller is properly unfolded. Ensure that all locks blocked
before use.
n) To avoid injury to make sure that the child is far away when the product is being folded
and unfolded.
o) When moving the stroller through doors and other passages, make sure that on both sides
there is enough space to avoid injury of hands or damage the stroller.
p) Do not allow your child to play with this product.
q) Do not allow your child to stand on the stroller or footrest. The stroller might fall over
and hurt the child.
r) When in motion, always hold the handle of the stroller.
s) Be especially careful while using the wheelchair near to steps and stairs.
t) The stroller is not intended for use on stairs and escalators.
u) Do not to move the stroller if a child is sitting in it.
v) Do not to move the stroller by holding the front guard. If there is a need to move your
stroller, you should hold the fixed elements of the frame.
w) In order to avoid accidental rolling off the stroller, always put on the brakes and turn on
the lock of driving direction when the stroller is stopped, when patient get in, get off,
changing the position.
x) Do not let the child stand on the footrest. Never leave the stroller unattended on sloping
ground, even if the brakes are on.
y) The stroller is designed for children up to 40 kg (Junior Plus 2) and 75 kg (Junior Plus 3).
z) Stroller should always be easy to fold out. In case of problems with unfolding. You should
re-read the user's manual or contact the manufacturer.
aa) Keep extreme caution while passing an obstacle. Extreme use of the stroller could cause
damage or destroy it.
bb)Never use the stroller as a seat for the transportation of people in cars, buses, or any motor
vehicles.
cc)During transport (e.g. In the trunk), do not burden stroller, it may weaken or damage its
structure.
dd)Do not leave the stroller with the user close to open sources of fire
ee) Be aware that the surface temperature of the upholstery and the frame parts may be
increased after exposure to the sun or other heat source. Furthermore, with low
temperatures there is a danger of overcooling metal parts of stroller. It may cause burns

10
Fig. 21. Motion mechanism
or frostbite parts of the body.
ff) Keep caution while moving on sloping surfaces. The maximum allowable slope angle up
and down is 5%.
gg) With the stroller you can only use on surfaces where all four wheels touching the ground
are to use all of four wheels.
hh)Stroller is designed for use indoors and outdoors only on paved and even surfaces.
ii) Use of the product i.e. The icy, wet, greasy, strongly gritty surfaces is unacceptable - it
creates a risk of falling.
jj) It is extremely important to keep all strollers’ components clean in order to maintain the
product parameters.
kk) Do not add additional loads (bags, etc.) on the stroller handles.
ll) Storing the stroller in areas with very high humidity (baths, laundry, etc.) or in the open
air, also the lack of hygiene causes rapid loss of operating parameters and aesthetic of the
product.
mm)Do not leave the child in the stroller for longer, because persons with neurological
affections who stay in unchanged positions may experience problems with skin
nourishment and develop bedsores.
nn)When the footrests will not be removed before folding the stroller, it can cause damage.
oo)During use, handing of the product and during its assembly, regulating mechanisms, it
might happen trapping and / or squeeze user's or caretaker's body part in holes / gaps
between the elements.
pp)Perform these steps with extreme caution. After adjustment, stabilize the position by
carefully tightening the nuts / bolts.
7. Everyday use and maintenance
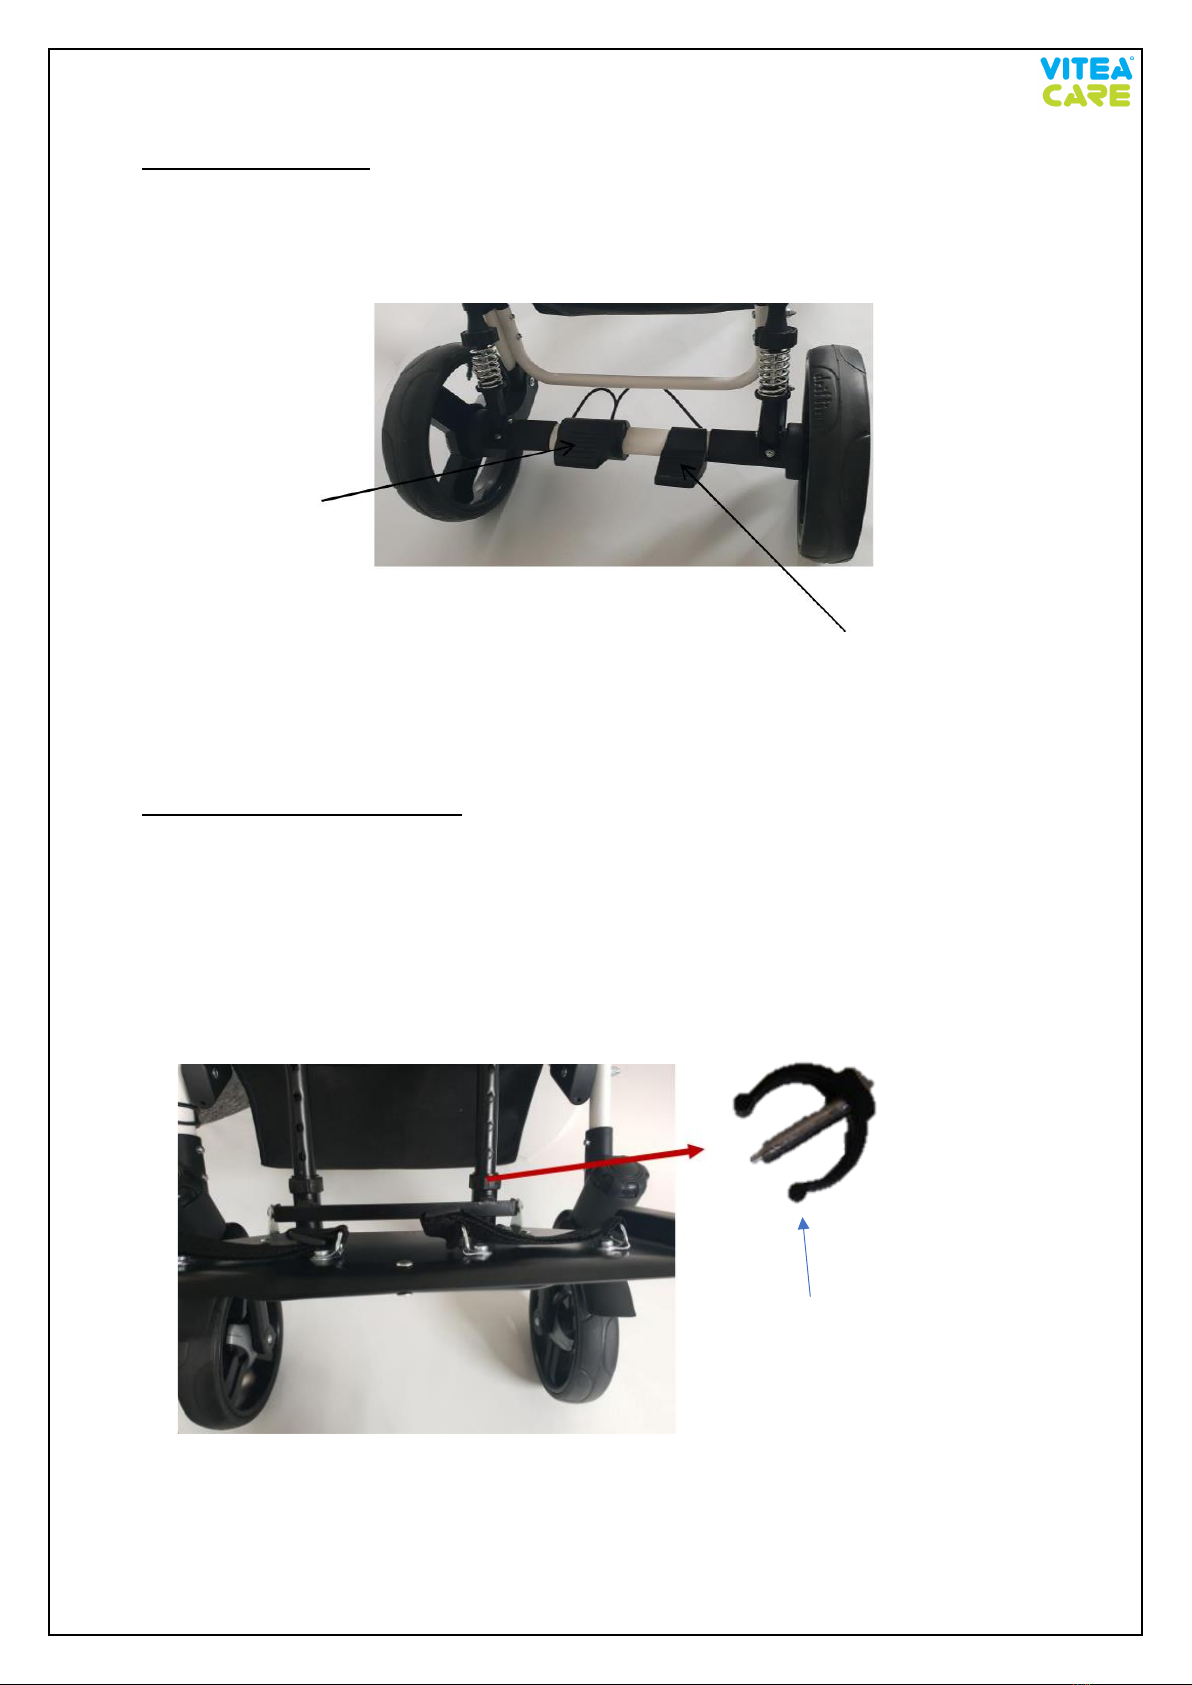
TWISTING MOTION LOCK–DRIVING ONLY IN STRAIGHT
•The front wheels are equipped with twisting motion lock (Fig. 21.).
•To turn it on, turn the lock to the right on both front wheels.
•Then set the wheels in the straight-ahead, it will block the twisting motion.
•Make sure that the lock is working properly.
•To turn off the twisting motion lock, spin the lock on both wheels to the left.
Twisting motion lock –turn on
Twisting motion lock –turn off
11
SWITCHING THE BRAKE
•The rear wheels are equipped with brake system.
•To prevent unplanned movement of the stroller, switch on brakes on two rear wheels
(Fig. 22.).
•To prevent movement, press the foot brake lever.
•It is necessary to make sure that the brake lever has been launched on both wheels.
•To unlock the brake, lift the brake lever.
FOOTREST LENGTH REGULATION
•The footrest has a five-stage (or seven stage) length adjustment.
•To change the length of the footrest, remove two footrest locks on both sides of the
footrest (Fig. 23.)
•Select required length on the footrest, by using the holes in footrest frame.
•Next insert the footrest locks into the holes.
•It is important that each side footrest locks were placed in holes at the same height.
Fig. 23. Footrest regulation scheme
Footer
Brake
lever
Fig. 22. Brake mechanism
Footrest locks closeup
12
•Select required length on the footrest, by using the holes in footrest frame.
•Next insert the footrest locks into the holes.
•It is important that each side footrest locks were placed in holes at the same height.
FOOTREST POSITION ADJUSTMENT
•By pressing by both sides of the footrest adjustment button, you can change its position
up or down (Fig. 24.).
•It is important that the regulation buttons are pressed by thumbs, while the rest of the
hand, grasps the footrest frame.
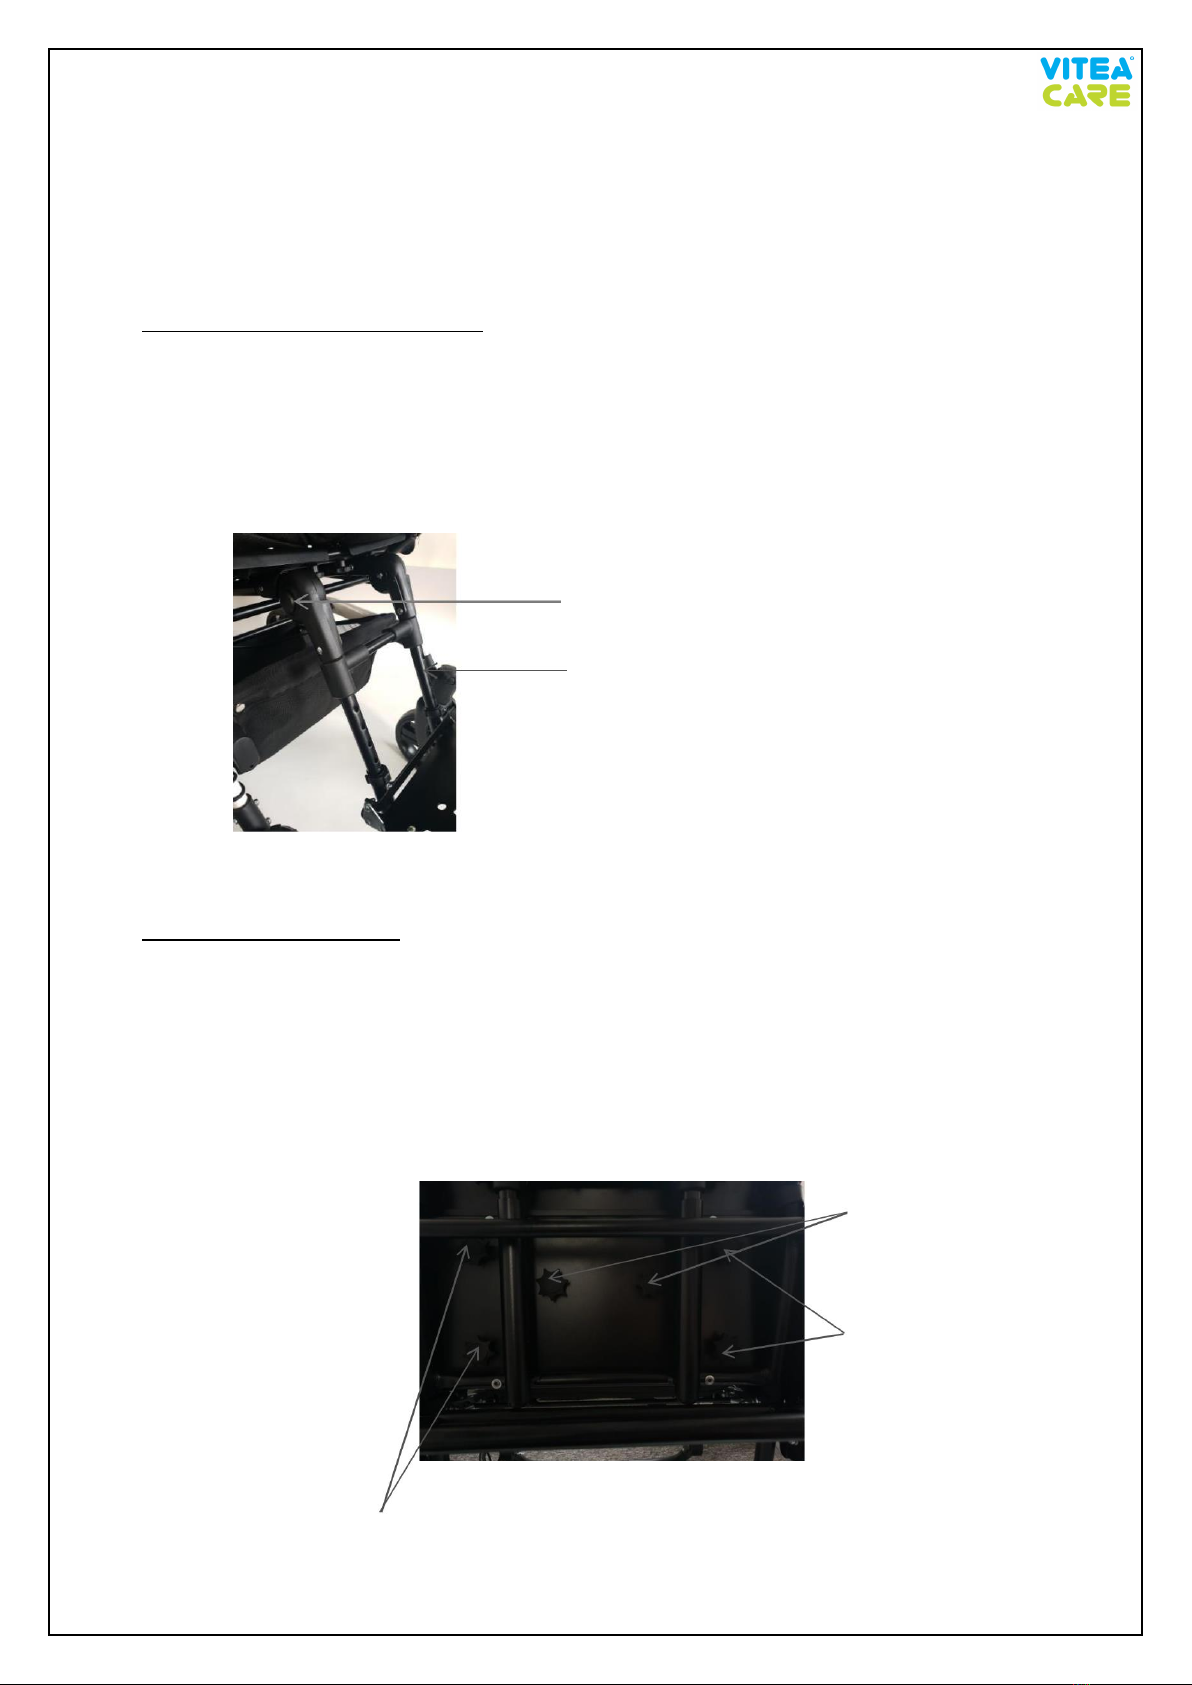
SEAT DEPTH ADJUSTMENT
•Six knobs are located under the seat.
•Their use has been shown on figure 25.
•To adjust the seat depth, loosen the two knobs the seat depth adjustable.
•Grab the seat edge by hand, push or pull to set the desired depth.
•Then tighten the two knobs to adjust the seat depth to prevent automatic changes the
depth of the seat.
Regulation button
Footrest frame
Fig. 24. Footrest regulation scheme
Side stabilizers with adjustable knobs
Side stabilizers
with adjustable
knobs
Seat depth
adjustable knob
Fig. 25. Seat depth adjustment

13
SIDE STABILIZERS POSITION ADJUSTMENT
•After unzipping in the rear of the backrest is visible eight knobs. Their use has been shown
in figure 26.
•To change the position of the side stabilizers, should loosen the right pair and left pair of
side stabilizers adjustable knob.
•Grasp side stabilizer on the left and then on the right, by using hand, set the desired
position of the stabilizers.
•Tighten both knobs which were loose before.
TRUNK STABILIZERS POSITION ADJUSTMENT
•After unzipping in the rear of the backrest is visible eight knobs. Their use has been shown
on figure 26.
•To change the position of the trunk stabilizers, should loosen the right pair and left pair of
trunk stabilizers adjustable knob.
•Grasp trunk stabilizer on left and then on right by using hand, set the desired position of
the stabilizers.
•Tighten both knobs which were loose before
BACKREST HEIGHT ADJUSTMENT
•To change the backrest height, should loosen pair of backrest high adjustable knob
(Fig. 26.).
•Grasp upper edge of the backrest by using hand, set the desired position.
•Tighten a pair of knobs which were loose before.
Fig. 26. Backrest and Trunk stabilizers
Backrest high adjustable lever
Head stabilizers adjustable knob
Backrest high adjustable knob
Trunk high adjustable knob

14
HEIGHT ARMREST ADJUSTMENT
•To change the height of the armrest, unscrew both knobs located under the armrest, then
select the height and tighten the knobs (Fig 27.).
ADJUSTING THE BACKREST ANGLE
•To change the angle of the backrest, push by thumb on the upper edge of the backrest.
Grab lever adjusting the angle of the backrest from the bottom. Pull the lever and set
convenient location in one of four positions.
SAFETY BELT SYSTEM
Fig. 27. Armrest adjustment
Armrest height adjustable knob
Fig. 28. 5-point safety belts
Shoulder belts
5-point central lock
Central belt
Belt
regulations
elements
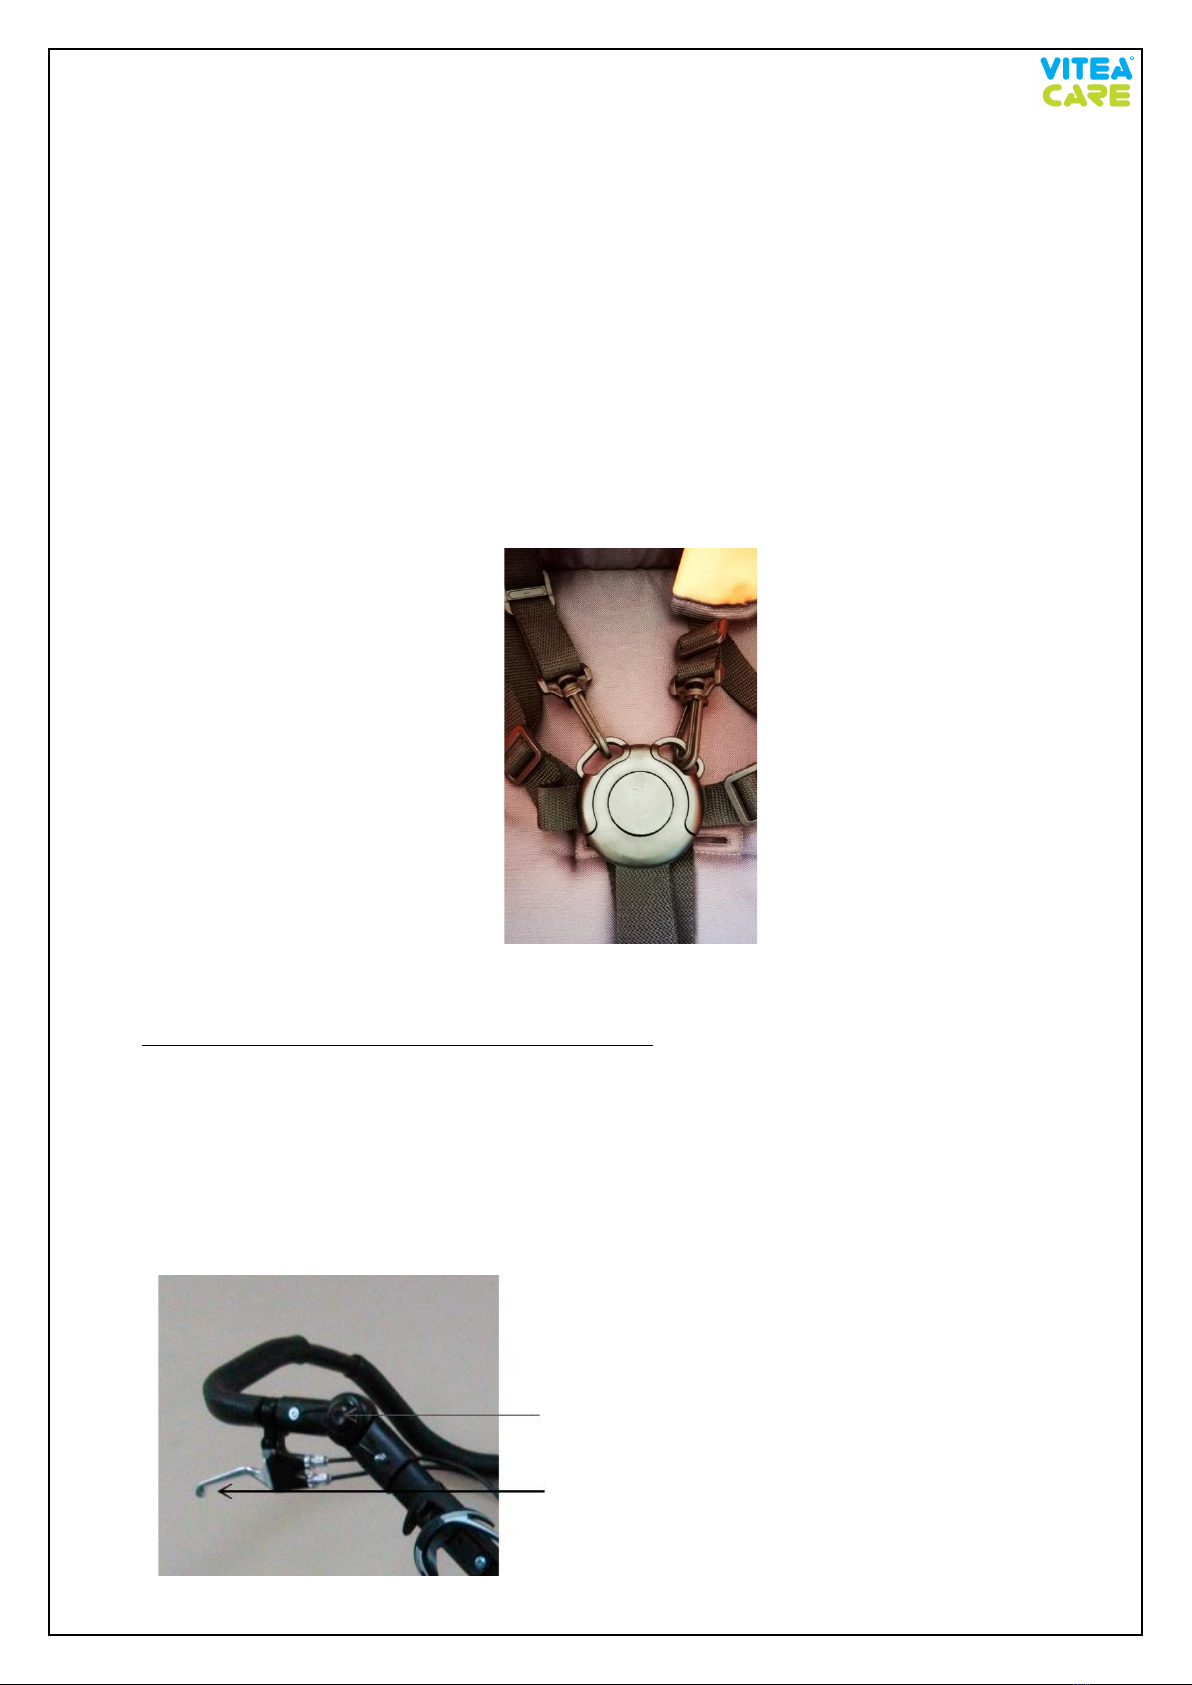
15
•The stroller is equipped with a stabilizing belt which length can be adjusted.
•Settings of all stabilizing elements should be discussed with your doctor or physiotherapist.
•To ensure safety, after placing the child in the stroller, caretaker should immediately
buckle them into stabilizing belts.
•Security system include three-point seat belts with central buckle and lap belt with buckle.
•All elements of the buckle should be placed in the central fastener. To do this, press the
button on the buckle and place the elements (Fig 28, 29.).
•While placing elements of buckle into central buckle there must be a click. Only if click is
heard, 5-point belts are properly fastened.
•To properly protect your child, adjust the length of the belt using the adjustment belt
elements.
•To unfasten the seat belt, press the button on the central fastener.
ADJUSTING ANGLE OF THE SEAT AND THE BACKREST
•The stroller is equipped with a lever to change the angle of the seat and backrest
(Fig 29A.).
•To change the angle of the seat and backrest, push by left hand the lever change the angle
of the seat and backrest into the stroller driving handle.
•By right hand grab the upper part of the backrest and move up or down to set the desired
setting.
Fig. 28. 5-point safety belts
Height adjustment button handle
Lever for changing angle of the seat and backrest
in Junior Plus 2 & 3
Fig. 29A. Angle adjustment

16
•Junior Plus 3 is equipped with the additional mechanism that allows to adjust angle of the
backrest (Fig 29B.).
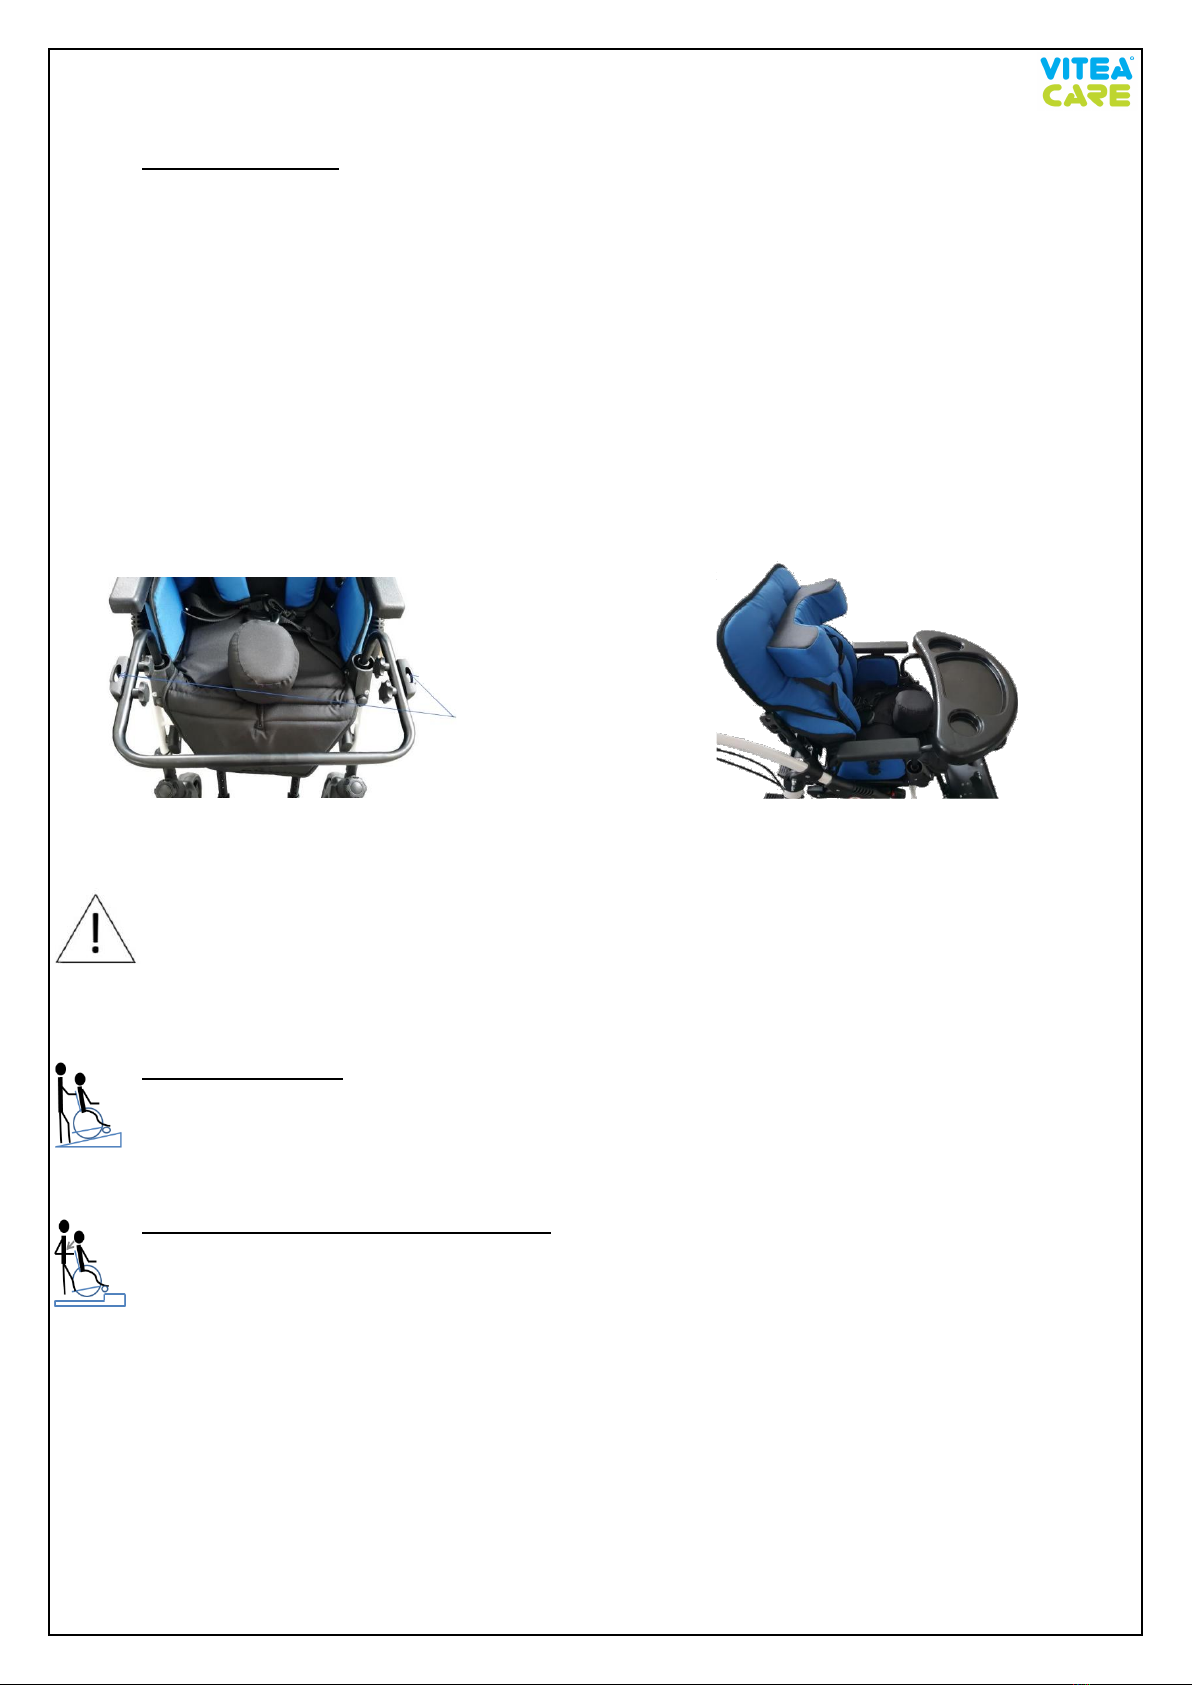
DIRECTION OF TRAVEL ADJUSTMENTS
•Stroller offers the ability to change settings for the seat relative to the direction of travel.
•To make changes, open the seat lock on both sides of the stroller.
•Remove the seat from the body corpus. Turn the seat by 180 ° relative to the corpus.
•Place the seat on the corpus in such a way that the "rods" are placed in the seat sockets
(Fig 30). To make changes, open the seat lock on both sides of the stroller.
•Remove the seat from the body corpus.
•Turn the seat by 180 ° relative to the corpus.
•Place the seat on the corpus in such a way that the "rods" are placed in the seat sockets
(Fig 31.).
Fig. 30.Rods installation Fig. 31.Rods installation
Fig. 29B. Angle adjustment
17
TRAY INSTALLATION
•To assemble the tray, remove the front guard and then mount the table holder in the
same place.
•Insert the tray into the holes in the handle.
•When dismantling the tray, press the side part of the tray in the hole from the side. Do
this on both sides of the handle.
•Remove the handle.
•The tray distance can be adjusted using two screws located on the inside of the handle.
Unscrew both knobs, pull out the screws, then move the part with the hole to the tray to
the desired depth, insert the screws and tighten the knobs (Fig 32, 33.).
•Do this on both sides. The depth must be the same.
WARNING! When changing the angle of the seat and backrest, be careful of
items on the tray. Too big angle change can cause objects to fall. The option
with a table is not possible when you change the seat settings relative to the
direction of travel.
MOVING ON SLOPES
•While moving on slopes, use caution and reduce your speed.
•Do not move on too high slopes. The maximum allowable slope angle up and down is 5%.
ENTRANCE TO THE THRESHOLD OF CURBS
•To enter stroller to the threshold or curb, it must be set so that the front wheels were set
on straight ahead threshold or curb, and near to it.
•Then place a foot on the lock back of stroller, press lightly and push the handle down .
•The front wheels of stroller will lift slightly upwards, what allows to overcome the
obstacles. Once the front wheels are on the obstacle, raise the rear wheels by tilting the
stroller frontward.
Holes for the
tray
Fig. 32. Holes for the table Fig. 33. Properly attached try

18
PUMPING TYRES
(It applies to stroller fitted with wheels pumped)
Fig. 34. Valves with cover Fig. 35. Valves w/o cover
•Before pumping the tires, identify the type of valve which is located on the tire. This may
be one of the two valves shown in Illustration 34. and 35.
•Presta valve also has an additional small top, which must be loosened before pumping.
•After identifying the valve, prepare the pump designed to valve type
•Most of the new pumps are equipped to service both Presta valve and Schrader. Many of
them let to reverse the tip. Smaller hole is Presta valve, Schrader valve greater. If the pump
does not support Presta, you will need to buy for yourself the "adapter Presta", which is
available at any bike store.
•At this point, if the wheel is provided with a valve Presta, it will be necessary to unscrew
the top located on the vent. It is a small top, which can be unscrewed with fingers. When
doing this, the top should move upwards. Then valve is considered open.
•Then remove the plastic top from the valve and set it aside in a safe place. It is important
to not lose it, because the valves will get dirt, leading to difficulties in pumping and rapid
air loss.
•Place the nozzle of the pump to the valve and check if it stick properly. If it is needed, push
the pump to the valve to make sure that the air does not escape to the sides.
•If the pump has a lever with clamp at the nozzle, tighten it. If the nozzle of the pump and
valve have a threaded tip, screw them together. As a result, air will be streamed directly
to the inner tube and the nozzle cannot detach from the valve.
•At the beginning of pumping the pressure in tyres should be checked at some points. Check
tire pressure with your thumbs at the end of the tread. If it is possible, make only a
millimetre indentation. It means that the tire has enough air. If necessary, continue
pumping.
•After pumping, remove or unscrew the nozzle from the valve outlet while compressing it
is ends by thumb. It is recommended to do this quick enough in order to not lose too much
air. For Presta valve, tighten previously loosened additional small top. Screw the plastic
top on the valve.
Schrader valve
Presta valve

19
MAINTENANCE AND CONSERVATION
•Clean the plastic parts and the frame with damp cloth without the addition of detergents
or other similar ones.
•Systematically remove the dirt from the movable elements of the stroller (screws,
resistance mechanisms). Regularly remove dirt from the upholstery with a damp cloth.
•Keep clean all strollers’ elements for to save functional parameters of the product.
•Storing in rooms of very high humidity (baths, laundries etc.) or in the open air, in the
combination with the lack of hygiene will cause the fast loss of functional and aesthetic
parameters. Do not expose the wheelchair on to extreme weather conditions (rain, snow
very strong sun), because certain parts can change color.
•The stroller has coverage (coverage is part of the upholstery having the closest contact
with the child, does not have stiffeners), which can be washed by hand at a 30˚.
You must not use:
•solvents,
•toilet detergents,
•sharp brushes and hard objects,
•detergents that contain chlorine,
•corrosive detergents,
•clean the stroller with pressure or steam aggregates.
Frequency
Object of control
Comments
Before first installation
Checking the technical condition
and all the elements within the
packaging.
Check if any elements have any visible
mechanical damage.
Before each use
Control of wheels, brakes, the lock
of driving direction
The brakes can wear out, check the
condition of the brakes and the lock of
driving direction before each use
You should also check the condition of
wheels and clean them from dust and
sand.
Every two weeks
Screw and nut control regarding
their correct fixing.
Make sure if all the screws and top are
fixed tightly.
Every two months
Cleanliness and general condition.
In case of mechanical damage contact the
producer immediately.
Once a month
wheel axles
Wheel axles must be conserved, oil
between the axle and the hub a few drops
of lubricant.
This manual suits for next models
1
Table of contents
Languages:
Other Vitea Care Stroller manuals

Vitea Care
Vitea Care MDH Junior User manual

Vitea Care
Vitea Care PREMIUM PROMYK SPECIAL PLUS User manual

Vitea Care
Vitea Care UMBRELLA User manual

Vitea Care
Vitea Care PROMYK PLUS User manual

Vitea Care
Vitea Care DRVG0C User manual

Vitea Care
Vitea Care Junior Plus User manual

Vitea Care
Vitea Care PROMYK User manual

Vitea Care
Vitea Care Premium PROMYK User manual

Vitea Care
Vitea Care UMBRELLA User manual


