VITO VL User manual

Page 1
Contents
1. Product 2
1.1 Product descripon 2
1.2 Scope of delivery 2
1.3 Technical data 2
2. Legal informaon 3
3. Preface 3
4. Safety instrucons 3
4.1 Explanaon of symbols 3
4.2 Safety instrucons 3
4.3 Intended use 4
5. Safety funcons 4
5.1 Tilt and vibraon protecon 4
5.2 Acousc signal 4
5.3 Overtemperature 4
6. Geng started 4
6.1 Filtraon me 4
6.2 Checking the factory sengs 4
6.3 Oine programming 4
6.3.1 Adjusng the ltraon me 4
6.3.2 Turning the acousc signal on/o 4
6.4 Online programming 5
6.4.1 Adjusng the ltraon me 5
6.4.2 Turning the acousc signal on/o 5
6.5 Internet connecon 5
7. Filtraon process 6
7.1 Preparing for ltraon 6
7.2 Starng the ltraon 6
7.3 Stopping ltraon prematurely 6
8. Storage / cooling me 6
9. Changing the lter paper 6
10. Cleaning 7
10.1 Notes 7
10.2 Preparing for cleaning 7
10.3 Manual Cleaning 7
10.4 Cleaning with the dishwasher 7
10.5 Boil out 7
11. Trouble shoong 8
12. Waste disposal 9
12.1 Packaging disposal 9
12.2 Filter disposal 9
12.3 Device disposal 9
12.4 WEEE (Waste Electrical and Electronic Equipment) Direcve 9
13. Declaraon of conformity 10

53
42 1
11
8
16
15
13
6
7
9
12
10
14
1. Product
1.1 Product descripon 1.2 Scope of delivery
1. Power indicator (red LED) • VITO oil lter system
2. Filter indicator (green LED) • User manual
3. WiFi indicator (pink LED) • Short instrucon
4. BT indicator (blue LED) • Parcle lter (11 pcs.)
5. Start / Stop buon • Drip pan
6. Drip pan
7. Star handles (2 pcs.)
8. Control unit
9. Handle
10. Power cord
11. Pump-lter unit
12. Venlaon slots
13. Cable protecon
14. Cable holder
15. Control panel foil
16. Type label
Type label (16) Control panel foil (15)
1.3 Technical data
Nominal voltage
country-specic
(see type label)
220 - 240 V ~ ±10%
100 - 120V ~ ±10%
50 - 60 Hz
Nominal power
consumpon
approx. 2.0 A at 230 V
approx. 4.0A at 115V
Max. power 500 W
Noise level <85db
User control Start / Stop buon (5)
Operang temperature control unit (8) max. 75°C
pump-lter unit (11) max. 200°C
(recom. frying temperature max. 175°C)
Storage temperature +10°C to +30°C / 50°F to +86°F
Weight 10.5 kg / 23.2 lbs (with drip pan)
8.8 kg / 19.4 lbs (without drip pan)
Acousc signal yes
Network connecon WiFi 2.4GHz
Parcle uptake approx. 2.5 kg / 5.5 lbs* (3 l)
Parcle lter cellulose FDA-CFR 21
Operaon intermient operaon
*Regular bread crumbs
VITO VL
565mm/22.2 in
502mm/19.8 in
210mm/8.3 in
116mm/4.6 in
324mm/12.8 in
187mm/7.4 in

Page 3
2. Legal informaon
VITO AG
Eltastrasse 6
78532 Tulingen (Germany)
Phone: +49 (0) 7461 / 96289-0
Fax: +49 (0) 7461 / 96289-12
www.vito.ag
CEO:
Andreas Schmidt (MBA, Dipl.-Wirt.Ing)
Headquarters: Tulingen, Germany
Reg. court: Stugart HRB-750227
In cooperaon with:
University Albstadt-Sigmaringen (Germany)
- Industrial engineering with business studies -
Jakobstrasse 1
72458 Albstadt (Germany)
Copyright © VITO AG
All rights reserved
This document is subject to the copyright of VITO AG.
Without previous wrien permission of the company VITO AG the
document or parts of it may neither be duplicated, nor used in
contradicon to their legimate interests.
Changes in the sense of the technical progress are reserved.
3. Preface
Dear VITO customer,
Thank you for choosing this product by VITO AG.
Please read the manual carefully to familiarize yourself with the handling of your VITO oil lter system to ensure proper use.
Your local dealer and our customer service are available to answer your quesons and provide support.
We are thankful for comments and suggesons concerning the VITO oil lter system and / or user manual. (Please nd contact
informaon in chapter 2 Legal informaon.)
We hope that you enjoy your VITO oil lter system for a long me and increase the eciency in your establishment.
With VITO you own a high-quality oil lter system from which you can expect a long life and ecient support on the fryer.
4. Safety instrucons
4.1 Explanaon of symbols
Incorrect operaon of the VITO can lead to danger and injury. The following should be observed.
Possible dangers are marked with these symbols:
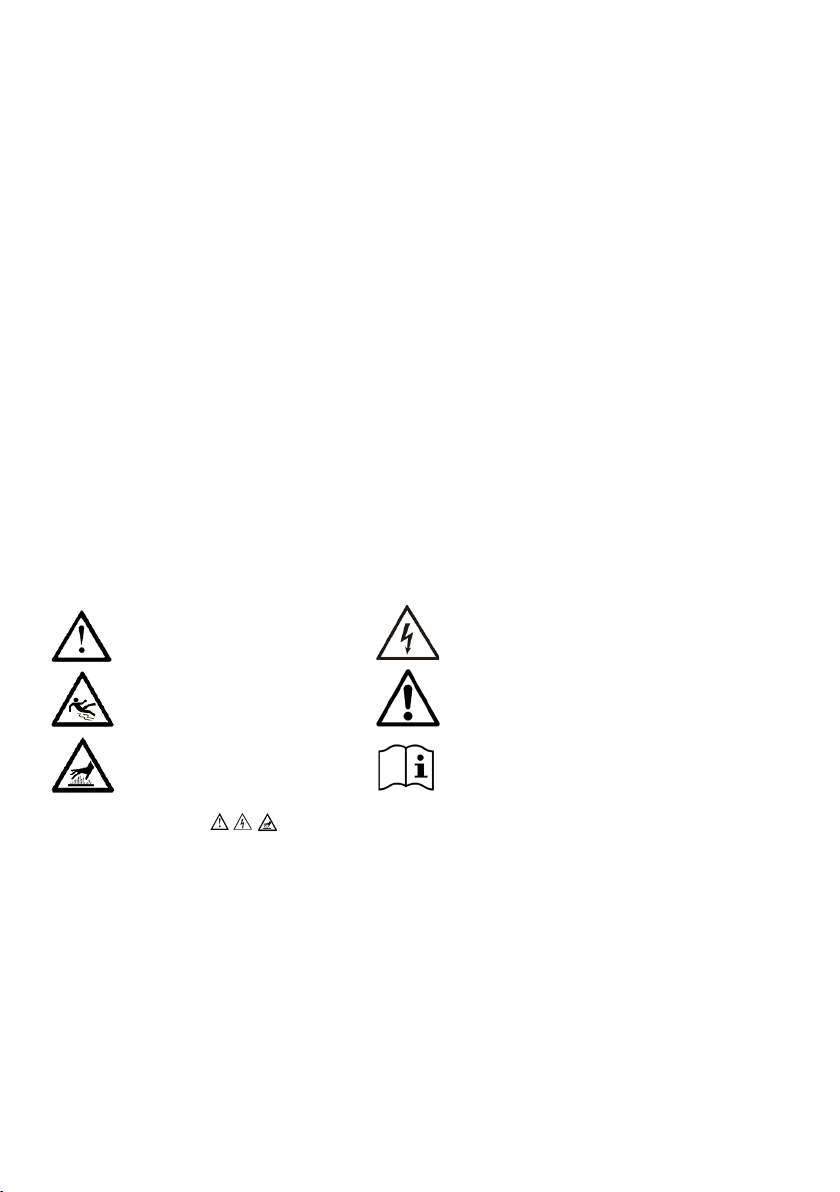
Warning
Risk of injury if not observed
Risk of electric shock
due to incorrect handling or
opening of the housing
Risk of slipping
Contaminaon on the oor possible
Cauon
Important safety instrucon
Danger of burnings
due to incorrect operaon of VITO
Operaon instrucons
Informaon on the operaon of VITO
4.2 Safety instrucons
• VITO is NOT approved for ltraon of liquids other than frying oil.
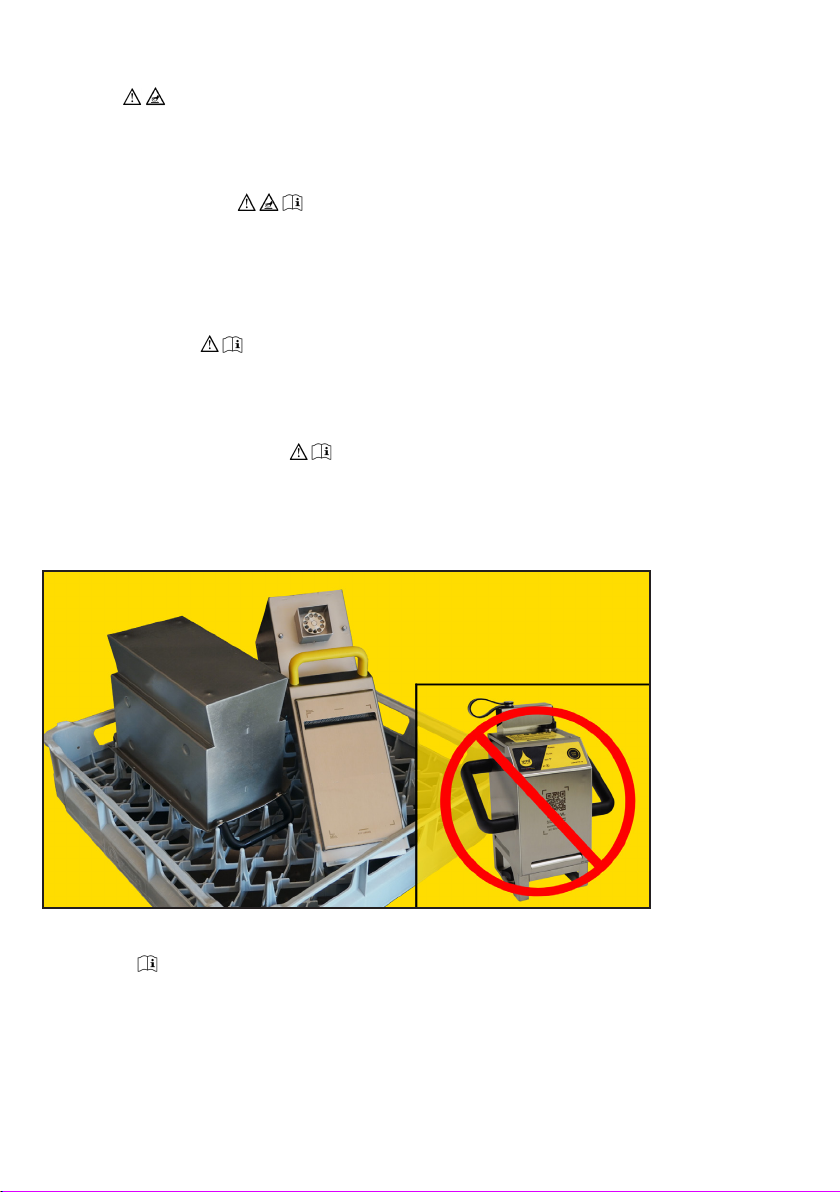
• DO NOT use or store VITO outdoors! Damage due to rain or moisture.
• VITO is NOT designed for connuous operaon! (Risk of overheang/re).
• Children are strictly prohibited from using VITO!
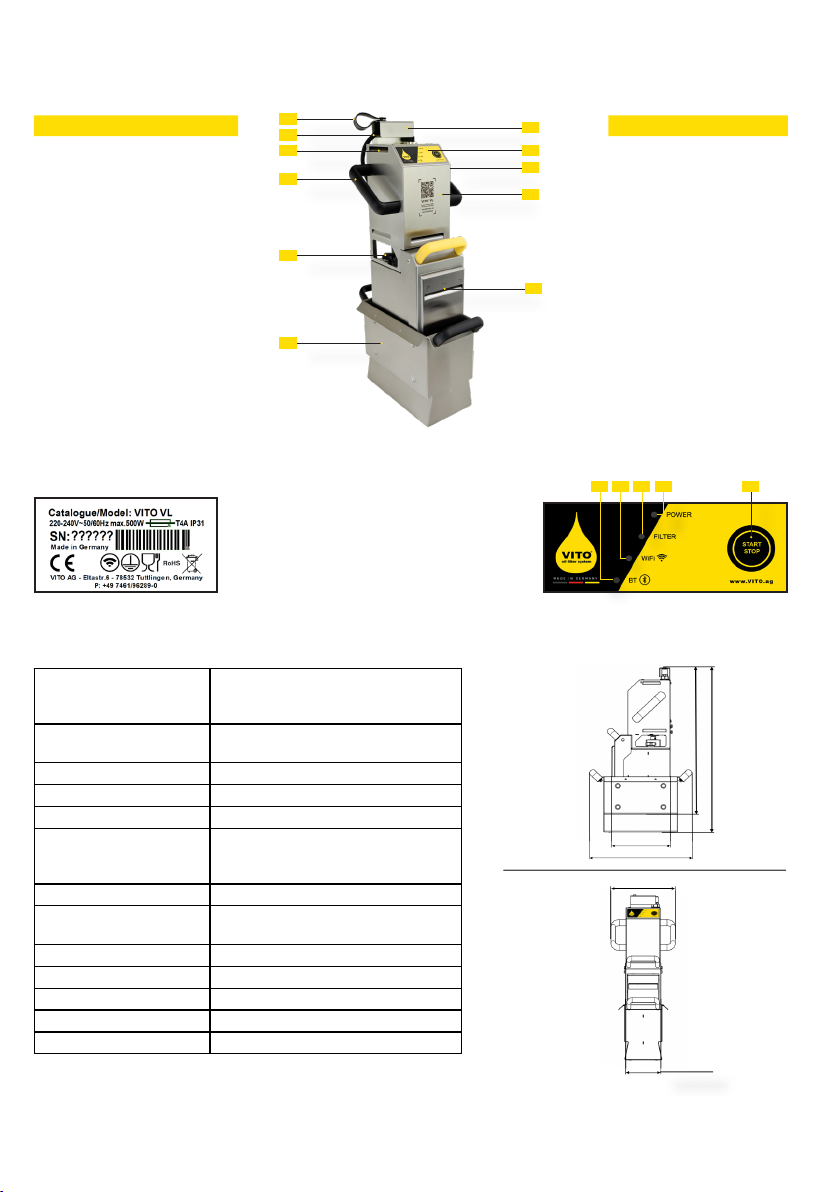
• DO not cover the venlaon slots (12)!
• DO NOT touch the power cord (10) and control unit (8) with wet hands!
• DO NOT pinch or bend the power cord (10)!
• Avoid the power cord (10) to come into contact with hot oil or other hot objects.
• Operate VITO only on protecon class I connecons (with protecve earth contact).
• Clean VITO before inial use (see chapter 10 Cleaning).
• The local voltage must match the voltage on the type plate (16).
• The maximum operang temperature is 200°C / 392°F (recommended frying temperature 175°C / 347°F).
• DO NOT run the pump-lter unit (11) while dry!
• Pay aenon to heang elements, grids or thermal sensors of the deep fryer!
• Carry VITO only using the black handles (9)!
• DO NOT operate the VITO in an inclined posion!
• DO NOT move VITO during ltraon!

4.3 Intended use
• VITO is designed for commercial use in the hospitality industry.
• Observe the safety instrucons. Filtraon is only possible when the oil is liquid.
• VITO should only be used by appropriately trained personnel.
• VITO is only designed for intermient operaon.
No liability will be accepted for improper use!
5. Safety funcons
5.1 Tilt and vibraon protecon
If VITO is placed inclined more than 17°, lts or vibrates too much due to a defect or incorrect placement, VITO will immediately
stops o the ltraon. The power indicator (1) and the lter indicator (2) ash and a repeang acousc signal sounds.
5.2 Acousc signal
Aer the boot-up, a short acousc signal sounds. VITO is then ready for operaon. At the end of each ltraon cycle, an acousc
signal sounds for 5 seconds. The acousc signal can be deacvated (see chapter 6 Geng started).
5.3 Overtemperature
In case of overheang (control unit >75°C / 167°F), VITO stops the ltraon process.
The power indicator (1) ashes and VITO emits an acousc signal.
Remove VITO from the fryer and store it (see chapter 8 Storage / cooling me).
6. Geng started
6.1 Filtraon me
The factory seng of the ltraon me is 4 min. 30 sec. Up to 16 ltraon cycles are possible directly one aer the other.
6.2 Checking the factory sengs
1. Press and hold the Start / Stop buon (5).
2. Plug in the power cord (10). Meanwhile, hold the Start / Stop buon (5).
3. Hold the Start / Stop buon (5) for 5 seconds. VITO emits an acousc signal and lter indicator (2) lights up briey.
4. Release the Start /Stop buon (5).
5. The programmed ltraon cycle me is indicated by the ashing of the LEDs.
6. The power indicator (1) shows 1 minute per ash
7. The lter indicator (2) shows 30 seconds per ash
e.g.: 4x red = 4 min.
1x green = 30 sec.
= ltraon me: 4 min. 30 sec.
6.3 Oine programming
6.3.1 Adjusng the ltraon me
To set the ltraon me, follow the steps in chapter 6.2 Checking the factory sengs, then:
1. Press Start / Stop buon (5) immediately aer the ltraon me is displayed.
2. Press Start / Stop buon (5) to extend the ltraon me by 30 seconds (starts at 0 sec.).
(e.g. press 3x for 1 min 30 sec. etc.)
3. When the desired ltraon cycle me has been set, wait unl the lter indicator (2) lights up briey and an acousc signal
sounds.
4. Unplug the power cord (10).
6.3.2 Turning the acousc signal on/o
To adjust the volume of the signal, follow the instrucons in chapter 6.2 Checking the factory sengs, then:
1. Wait unl the lter indicator (2) lights up briey and a short acousc signal sounds
2. Press Start / Stop buon (5) to adjust the signal.
3. The LEDs show the status:
Power indicator (1) = Sound o
Power indicator (1) + lter indicator (2) = Sound on
4. When the desired seng has been made, wait unl the lter indicator (2) lights up briey and a acousc signal is audible.
5. Unplug the power cord (10).

Page 5
Successfully connected.
6.4 Online programming
VITO oers the opon to set the ltraon me, the acousc signal and the network connecon online, using a smartphone,
tablet or PC.
1. Plug in the VITO.
2. Open the WiFi sengs of your device (tablet, smartphone or PC).
3. Search for the network “VITO Cong + Serial number”. The serial number (SN) of the VITO can be found on the type label (16).
4. Connect to the network.
5. Enter password: 12345789. WiFi indicator (3) ashes.
6. Open the web browser.
7. Enter IP address 10.10.10.10.
8. Tap on VITO drop.
9. Log in with:
User name: user
Password: Vito2k18
10. If necessary, change language by clicking on EN, DE, etc.
6.4.1 Adjusng the ltraon me
To adjust the ltraon me, follow the instrucons of chapter 6.4 Online programming, then:
1. Select the desired ltraon duraon.
2. Click on “Save”. Filter indicator (2) lights up briey and an acousc signal sounds.
6.4.2 Turning the acousc signal on/o
To set the volume of the signal, follow the instrucons in Chapter 6.4 Online programming, then:
1. Select under the menu “Buzzer”, whether the acousc signal should be acvated or deacvated. Filter indicator (2) lights up
briey and an acousc signal sounds.
6.5 Internet connecon
To use VITOconnect to the full extent, VITO requires an internet connecon. You need a suciently strong 2.4GHz WiFi.
To connect VITO to your network, follow the instrucons in chapter 6.4 Online programming, then:
1. Click on “WiFi conguraon“
2. Select network.
3. Enter the network password. (If you do not have a network password, leave this eld blank).
4. Check network password by clicking on “Show password”.
5. Click on “Save”. VITO will now check the network and internet connecon.
VITO only collects and sends machine usage data. No personal data is collected or sent.
On hps://connect.vito.ag you get an online overview of your machine usage data, services and updates.
Not connected.
Check network and password.

7. Filtraon process
7.1 Preparing for ltraon
1. Li VITO out of the drip pan (6).
2. Insert the lter paper into the pump-lter unit (11) (see chapter 9 Changing the lter paper).
3. Close the lter cover. Snap the lter cover into the boom of the pump-lter unit (11).
4. Place the control unit (8) on the pump-lter unit (11).
5. Tighten the star handles (7).
7.2 Starng the ltraon
1. Place the VITO in the deep fryer.
2. Ensure that VITO stands rmly.
3. Check the frying oil level (take care of MIN and MAX levels (11)).
4. Plug in the power cord (10).
Power indicator (1) lights up.
5. Press Start / Stop buon (5).
The lter indicator (2) lights up during ltraon.
7.3 Stopping ltraon prematurely
1. Press the Start / Stop buon (5).
The lter indicator (2) shuts o.
2. Li VITO and let residual oil ow into the fryer.
3. Store VITO in the drip pan (6) (see chapter 8 Storage / cooling me).
8. Storage / cooling me
• Place VITO in the drip pan (6) aer use or for transport.
• Permissible storage temperature +10°C to +30°C / +50°F to +86°F.
Cooling phases:
• Up to 2.5 hours when power cord (10) is unplugged.
• Approx. 15min. when power cord (10) is plugged in.
9. Changing the lter paper
Change the lter paper as needed. The change depend on the use of VITO and the degree of contaminaon of the frying oil.
Pay aenon to the cleaning performance and how much oil comes out at the front of the pump-lter unit (11).
Normal ow Low ow Do not leave gaps between the lter and
the edges of the pump-lter unit (11).
Overlap the last fold of the lter paper on
both sides of the pump-lter unit (11).

Page 7
10. Cleaning
10.1 Notes
• Clean the pump-lter unit (11) every me the lter paper is changed.
• Clean VITO only when it is cooled down.
• DO NOT use abrasive cleaners.
• DO NOT use a wire brush or similar.
10.2 Preparing for cleaning
1. Make sure that VITO has cooled down.
2. Loosen the star handles (7) (on both sides).
3. Detach the control unit (8) from the pump-lter unit (11).
4. Open the pump-lter unit (11).
5. Remove and dispose of the lter paper (see chapter 12.2 Filter disposal).
6. Manual cleaning or cleaning with the dishwasher
10.3 Manual Cleaning
1. Clean the control unit (8) with a damp cloth!
DO NOT use running water! This will damage the control unit!
2. Wash the pump-lter unit (11) and the drip tray (6).
3. Dry VITO.
10.4 Cleaning with the dishwasher
1. Clean the control unit (8) only with a damp cloth!
NEVER put the control unit (8) in the dishwasher! This will damage the unit.
2. Put the pump-lter unit (11) and the drip tray (6) into the dishwasher.
3. Start the cleaning program.
10.5 Boil out
If the pump-lter unit (11) is heavily soiled, deep clean it with water and soap or deep fryer cleaner.
Regular boil outs are recommended for opmal cleaning and maintenance results.

11. Trouble shoong
Malfuncon Possible cause Remedial acon
Power indicator (red LED) (1)
remains inacve
• Power cord (10) not plugged in
• Power cord (10) defecve
• Device defecve
• Plug in VITO
• Please contact service
VITO is very noisy during operaon • Star handles (7) are loose
• Rotor defecve
• Rotor scratches on the fryer
• Tighten star handles (7)
• Please contact service
• Change the posion of VITO
in the deep fryer
Power indicator (red LED) (1)
ashes and acousc signal sounds
• Overtemperature • Let VITO cool down
• Place VITO in a cool place
Power indicator (red LED) (1) and
lter indicator (green LED) (2) ash
and an acousc signal sounds
• VITO is at an angle of more
than 17°
• Strong vibraons
• Check posion of the VITO in
the fryer
• Please contact service
• Damaged rotang parts
• Filter cover not closed properly
VITO doesn’t start • Control unit (8) defecve • Please contact service
Line fuse / Ground fault circuit fuse
(GFCI) blow-out
• Power cord (10) or other elec-
trical components defecve
• Rotor defecve / blocked
• Circuit overloaded
• Please contact service
• Change socket/circuit
Low ltraon performance • Parcle lter is full
• Pump-lter unit (11)
clogged
• Motor defecve
• Change parcle lter
• Empty pump-lter unit (11)
• Boil out to remove heavy
contaminaon
• Insert lter as described
• Please contact service
Oil splashed sideways and / or at
the back of the pump-lter unit (11)
• Parcle lter full
• Too much space between lter
cover and pump-lter unit (11)
• Filter paper not inserted over-
lapping
• Change parcle lter
• Please contact service
• Insert parcle lter as
described
Power and lter indicator (1 & 2)
ash 10 sec. aer plugging VITO in
and an acousc signal sounds
• Start / Stop buon (5)
defecve
• Control unit (8) wet inside
• Please contact service
• Please let it dry
Internet connecon cannot be
established
• Wrong network chosen
• Wrong password entered
• WiFi signal too weak
• Select correct network
• Enter correct password
• Strengthen the WiFi signal
• Move router closer to VITO
“10.10.10.10”-website is not
displayed correctly
• Outdated website in cache
• Device is not connected to
VITO
• Delete Cache
• Delete browser data
• Connect to VITO (see chapter
6.4)
If you nd any faults not listed here, please contact the VITO customer service or your dealer!
Contact details can be found in chapter 2. Legal informaon.

Page 9
12. Waste disposal
12.1 Packaging disposal
• The packaging should be recycled
or
• keep the packaging carefully.
12.2 Filter disposal
• Used parcle lter must be disposed according to your local regulaons.
12.3 Device disposal
If VITO reaches the end of life it must be disposed accordingly.
This disposal is handled by VITO AG as dened by law.
Send VITO to:
VITO AG
Eltastrasse 6
78532 Tulingen (Germany)
For further quesons please contact your local dealer or the VITO AG customer support
12.4 WEEE (Waste Electrical and Electronic Equipment) Direcve
Do not throw power devices in the household waste! According to the European Direcve 2002/96/EG on Waste electrical and
electronic equipment and its implementaon in naonal law, not usable power tools are collected separately and recycled in an
environmentally friendly manner.
Manufacturers of these devices are obliged to take back products that are no longer usable. VITO AG will comply with the product
take back requirements at the end of life of VITO-branded products that are sold into the EU. You can return these products to local
collecon points.

13. Declaraon of conformity
Issued by VITO AG | Eltastrasse 6 78532 Tulingen (Germany) | Phone : +49 (0) 7461 / 96289-0
Fax : +49 (0) 7461 / 96289-12 | Email: [email protected]
For the product VITO VL:EU Patent No. 1326692 / U.S. Patent No. US7.052.605.B2
The professional oil and fat ltraon equipment is manufactured and tested according the following standards:
For the purposed of the EU direcves :
- 2006/42/EG Machinery Direcve
- 2014/30/EU Electromagnec Compability
- 2014/35/EU Low Voltage Direcve
- 2011/65/EU RoHS - Direcve (Restricon of certain Hazardous Substances)
- 2003/10/EC Minimum requirements to protect the safety and health of workers
-2012/19/EU WEEE Direcve
- 2014/53/EU Radio Equipment Direcve
- EN 61000-6-1: 2019 Immunity
- EN 61000-6-2: 2019 Immunity
- EN 61000-6-3: 2011-09 Emission
- EN 61000-6-4: 2020-09 Emission
- DIN 18876:2018-06: Commercial kitchen equipment - Portable non-integrated oil / fat ltraon equipment - Requirements and tesng
with German, European and Internaon (Non- European) standards
German standard DIN EN European standard EN Internaon standard IEC (IEC/CISPR)
DIN EN 61000-6-1:2019-11 based on EN 61000-6-1:2019 based on IEC 61000-6-1:2016
DIN EN 61000-6-2:2019-11 based on EN 61000-6-2:2019 based on IEC 61000-6-2:2016
DIN EN 61000-6-3:2011-09 based on EN 61000-6-3:2011-09 based on IEC 61000-6-3:2006 + A1:2010
DIN EN 61000-6-4:2020-09 based on EN 61000-6-4:2019 based on IEC 61000-6-4:2018
DIN EN 61000-3-2:2019-12 based on EN 61000-3-2:2019 based on IEC 61000-3-2:2018
DIN EN 61000-3-3:2020-07 based on EN 61000-3-3:2013 + A1:2019 based on IEC 61000-3-3:2013-05
DIN EN 60335-1:2020-08 based on EN 60335-1:2014-11 based on IEC 60335-1:2010, modied
DIN EN 12100:2011-03 based on EN 12100:2011-03 based on ISO 12100:2011-03
DIN EN 60204-1:2019-06 based on EN 60204-1:2019-06 based on IEC 60204-1:2016, modied
DIN EN 55014-1:2018-08 based on EN 55014-1:2018-08 based on CISPR 14-1:2016 + COR1:2016
DIN EN 55014-2:2016-01 based on EN 55014-2:2016-01 based on CISPR 14-2:2015
- - VO (EG) Nr. 2023/2006 - IEC 60884-2-1
- VO (EG) Nr. 1935/2004 - -
2002/72/EG
DIN EN 10088-1:2014-12 - -- -
DIN 18876 A1:2018-06 - -- -
DIN 18876 A2:2018-06 - -- -
DIN 18876 A3:2018-06 - -- -
DIN EN 50396:2006-07 - -- -
DIN EN 61003-2:2017-06 - -- -
DIN EN 10095:2018-12 - -- -
DIN EN 10269:2014-02 - -- -
DIN EN 10302:2008-06 - --
89/109/EWG - -- -
EGV 1935/2004 - -- -
80/590/EWG - -- -
DIN EN 82079-1:2013-06 - -- -
ProdSG based on 2001/95/EG - -
LFGB - -- -
DGUV-rule 110-002 - -
Tulingen, 2021
Andreas Schmidt
CEO
VITO AG
Other manuals for VL
1
Table of contents
Other VITO Water Filtration System manuals
Popular Water Filtration System manuals by other brands

Franklin Water Treatment
Franklin Water Treatment PKLX Series Installation instructions and owner's manual

Selecto
Selecto SP20-1 use and care manual

Weller
Weller WFE 20D operating instructions

Royal Prestige
Royal Prestige FP6000CT Use & care manual

Heylo
Heylo HWA 600 manual

Parker Hiross
Parker Hiross Hyperfilter user manual

Deltec
Deltec FR 509 Operating instructions and spare parts lists

Speedaire
Speedaire 4ZL16 Operating instructions & parts manual

Barco
Barco F40 installation manual

Petsafe
Petsafe DRINKWELL hy-drate PFD17-12901 quick start guide

CALEFFI
CALEFFI 546 Series manual

KineticoPRO
KineticoPRO NSC-120 owner's manual