Vivaldi KEYROUND16AF User manual
vivaldigroup.it 1
User Manual
Manuale d’utilizzo
KEYSOL line
FRAMELESS SPEAKERS
WI-FI & BLUETOOTH
Coppia di altoparlanti a 2 vie wifi
2-way paired wifi speakers
KEYROUND16AF
vivaldigroup.it
2
SAFETY INSTRUCTIONS
1) Please read the instructions carefully before installation and use. Keep the manual for future reference.
2) Before installing the speakers into any ceiling/wall check the structure for weight bearing ability and
avoid contact with any wiring or plumbing that might be behind the surface area. lnstalling on soft
materials or in areas incapable of supporting the speakers weight may cause personal injury or damage to the speaker.
3) Make sure the speaker is properly secured to the ceiling/wall. Please use the proper screws, bolts, or anchors. Otherwise,
the speaker can be unsecured and cause potential damages/injuries.
4) Damage to the woofer and tweeter may occur if the speaker is dropped or hit-resulting in no sound or distorted sound.
5) Never overdrive your speakers to the point of distortion and always reduce volume before switching input sources.
6) Use only approved and certied wiring in your installation. Do not stretch or place the wire in contact with sharp objects.
7) Before removing cables make sure the power-supply to your amplier and other components is turned o.
PREPARATION
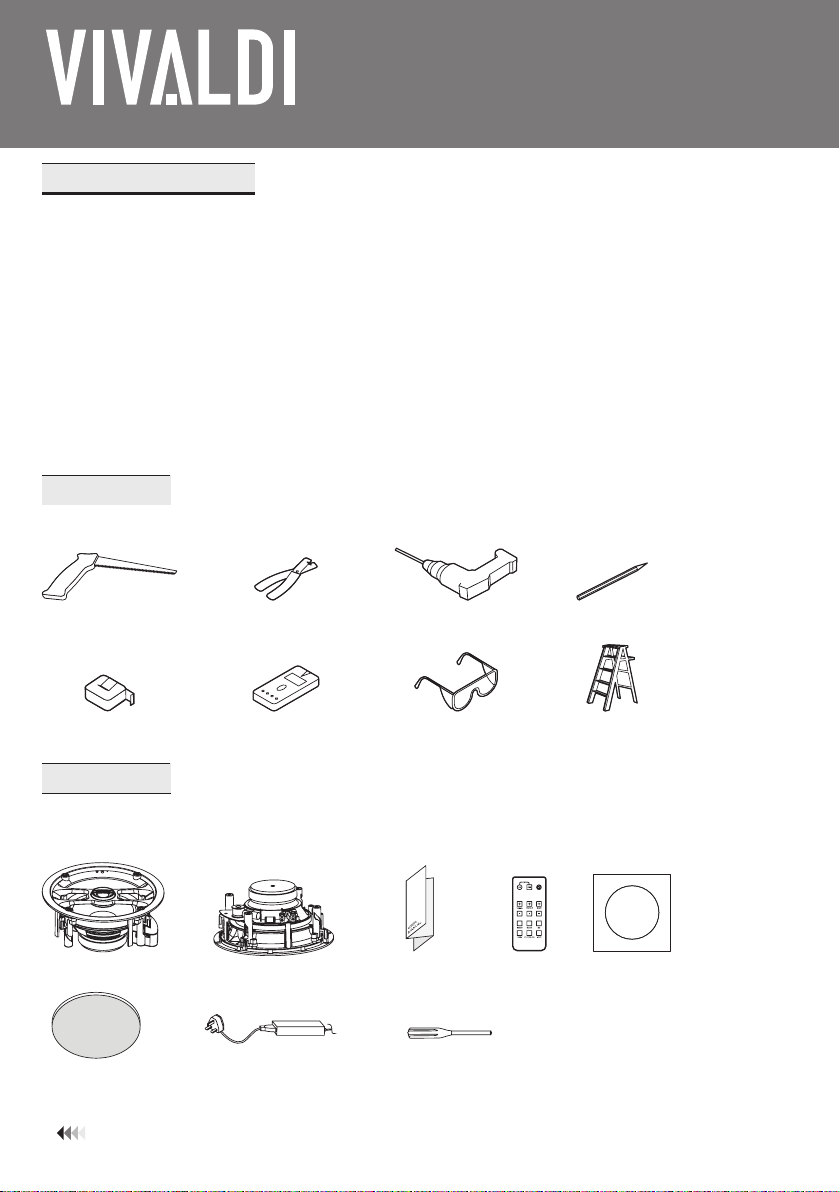
The hardware equipment listed below is needed to install the speaker
PACKING LIST
Make sure that you have received all parts according to the component checklist before to installation. lf any parts are
missing or defective, please contact your supplier.
english
Cutting Saw Wire Stripper Over Drill Pencil
Tape Measure Stud Finder Safety Glasses Ladder
Active Speaker Passive Speaker User Manual Remote
Control
Cutout
Template
Grill (x2) Power Supply Installation Tool
vivaldigroup.it 3
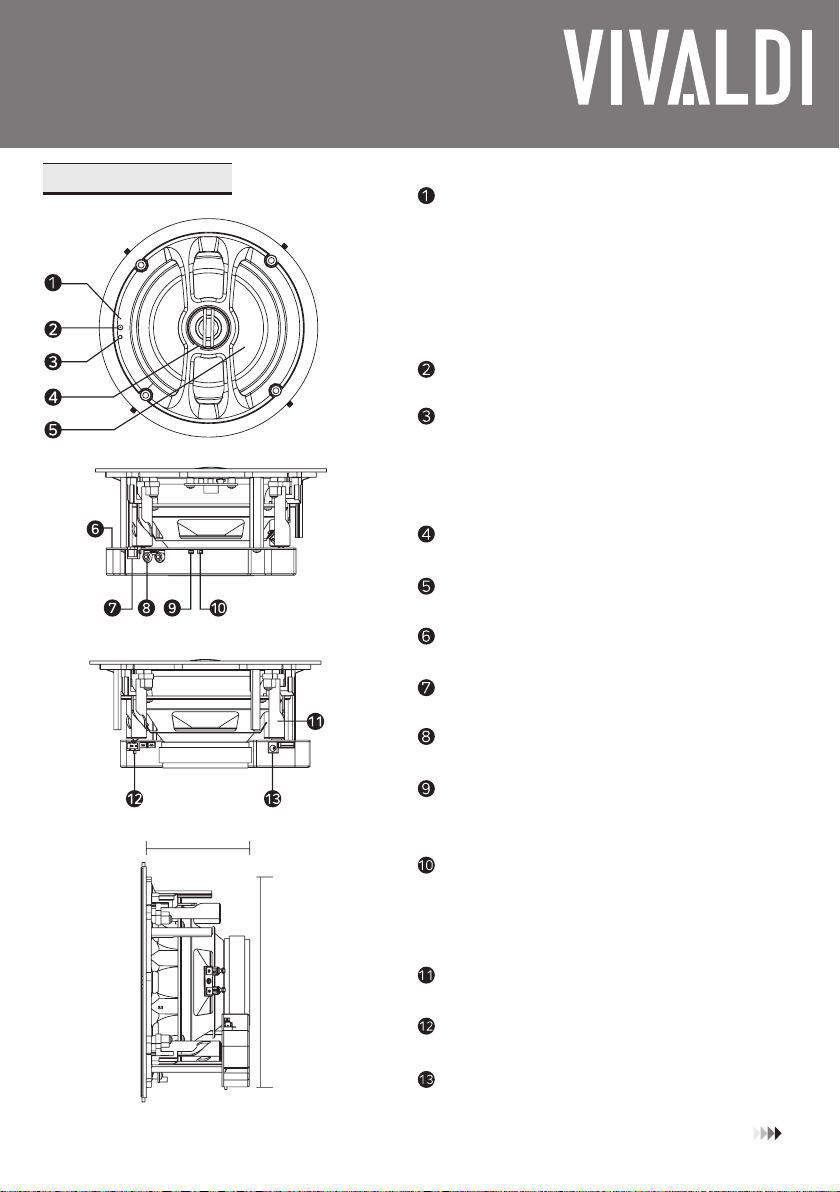
SPEAKER OVERVIEW
LED Indicator
Slowly ashing red: power on or reset.
Steady red: the Internet module is ready to connect.
Slowly ashing green: Wi-Fi is connecting.
Steady green: Wi-Fi is connected.
Fast ashing blue: Bluetooth is connecting.
Steady blue: Bluetooth is connected.
Steady cyan: Current audio source is RCA.
Flashing red. green and blue: The system is updating
or resetting
IR Receiver
Reset Button(WPS)
1. Press it to switch play mode.
2. Press it far 3 seconds to show the access point named:
vivaldi_keyround_xxxx (the “x” is the nal part of the MAC
ADDRESS)
3. Press it far more than 10 seconds to start
resetting with ashing red, green and blue light.
Pivoting Tweeter
Woofer
Built-in-Amplifer & Bluetooth Driver
RJ45 Ethernet Port
RCA Jack
Stereo/Mono Switch
Switch to the “stereo” position when a passive speaker
is attached. lf not, keep in “mono” position.
Volume Limiter
Limiter Enabled(50%): The volume will be limited
to the max. output 15W@8Ω
Limiter Disable(100%): The volume can be adjusted
to the max. output 30W@8Ω.
Quick-Install Spring lock Fixing
Speaker Output
Power In Jack (DC 24V/2.5A)
209mm
hole
cutout
(template
required)
100mm ceiling depth required
english

vivaldigroup.it
4
english
INSTALLATION
Power adapter
RCA
Connections
1.Cut the Speaker Hole
Place the cutout template where you are installing
the speaker. Draw the template to mark out the
speaker location with a pencil. Drill a pilot hole and cut
all of the way around the circular outline with a cutting
saw.
2.Wire the Speaker
Connect the adapter and RCA cables
(if needed) to the corresponding ports.
3.lnstall the Speaker
Adjust the spring lock with the installation
tool as shown and insert the speaker
into the hole.
4.Lock the Speaker
Lock the speaker by pressing the buttons
located on the front face of the speaker and
the dog leg will engage automatically.
5.Finish installation
Check if the LED is power on and
start the connection procedure.
vivaldigroup.it 5
english
CONNECTION
1)Wi-Fi Connecting
lnstalling Controller App
Please search “Vivaldi” to download controller app from Google Play (Android) or Apple App Store (iOS).
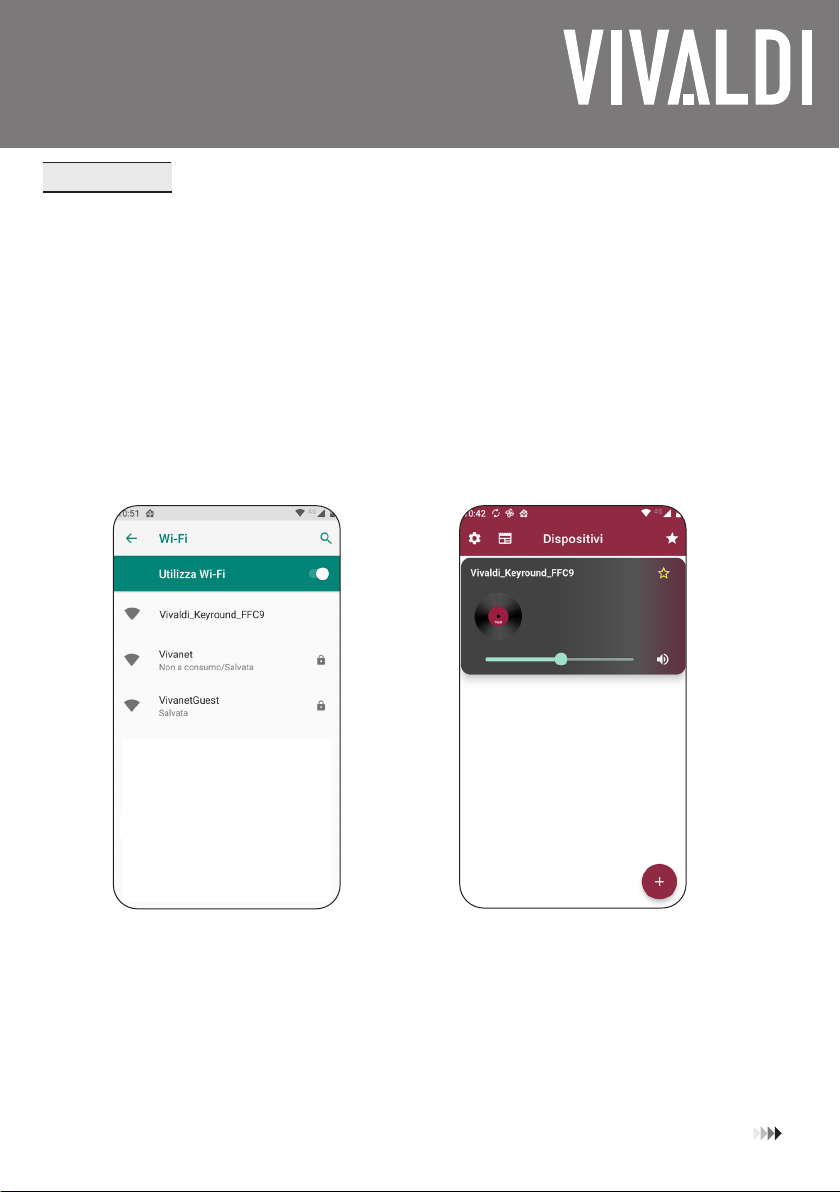
Connecting the Wi-Fi Speaker
Ensure the speaker is connected to the power supply. Press the WPS button to start the speaker, then you
will hear an instruction “Enter the setup mode, follow the instructions in the app to nish the setup”, and the
power indicator ash as green indicating that the speaker is ready to connect. Any wireless device
(such as phones, tablets...) is available for connecting. The Access Point name is: vivaldi_keyround_xxxx (the “x” is the nal
part of the MAC ADDRESS) for the rst 5 minutes there isn’t password(after, the access point is disable). Once connected
successfully, the power indicator will become steady green.
1. Turn on the Wi-Fi function and
connect your phone to “vivaldi_
keyround_xxxx” Wi-Fi network.
In Android OS wait the pop-up message
asking to stay connected and conrm.
2. Start the controller App Vivaldi and
wait the device appears.
vivaldigroup.it
6
english
3. Enter the Setup menu. 4. Enter Wi connection and choose
the favorite Wi network.
5. Insert the password for the se-
lected Wi network.
6. Click OK and close the APP.
Connect the Smartphone to the
WIFI network where the Keyround is
connected.
vivaldigroup.it 7
english
6. When nished, the device is suc-
cefully into the desidered network.
• When using an Ethernet cable to connect the speaker to the Router, you don’t need to do the WI-FI
setup, but only download the APP and you can nd the device.
• The router must have an active DHCP server and the UPNP functionality must be available..
• When the device starts up the access point will be activated without a password for 5 minutes, after
which the access point will be disabled..
• Between player source and RCA source, web source has priority.
• Wireless connection between Keyround and local access point may not work if you exceed
30mt in the open air, or if there are obstacles.
Note:

vivaldigroup.it
8
english
2) Airplay function
The Airplay feature is available for all compatible Apple devices.
In the device drop-down menu, click in the Airplay section and select the Keyround device from
the list. (In the example below, iOS13 system is used for your reference)

vivaldigroup.it 9
3) Bluetooth Pairing
Make sure the device is on by checking the status LED. Select the Bluetooth source in the APP or press the “MODE” button in
the remote control until the status LED turns blue. Now select from your source device (e.g. Smartphone,
tablet, laptop, etc. ) vivaldi_keyround_xxxx and perform pairing, when prompted to pin enter “2022”. Once
that the pairing is successful, you will be able to use the functionality.
Notes:
• Bluetooth functionality can only be used from 1 device at a time.
• If a pin is required for the queue enter “2022”.
• If the queue fails the rst time, restart the device and follow the instructions again. If the problem persists, press the reset
button and reset the device.
• If you are unable to connect to the previously used device, remove “Keyround” from the device list
and make the queue again.
• Bluetooth functionality does not exceed 10mt of unobstructed distance
4) RCA Connecting
1. Connect to the speaker using a dual RCA left/right cable.
2. Use the mode button on the remote or Vivaldi APP to choose RCA mode.
(PLAYER or Bluetooth Input has the priority when 3 audio inputs are connected simultaneously.)
3. The RCA mode will be activated when the indicator light shows cyan.
5) Create Stereo Pair
1. Connect the passive speaker to the 2 way connector output.
2. Slide the mono-stereo switch to the stereo position
6) Switch 3 Audio Sources
• PLAYER Mode
After connecting with the network, use Vivaldi App to play audio and the speaker will automatically work in PLAYER mode.
Or press “MODE” button of the remote for several times until the LED light turns green to switch audio source to “PLAYER”.
The Webradio, Airplay, Spotify and other function will be active automatically in this mode.
• Bluetooth Mode
Press the “MODE” button of the remote several times until the LED light turns blue or use Vivaldi App to switch
the audio source to “Bluetooth”.
• RCA Mode
Connect the speaker with an audio device like a phone or a computer by RCA cable, and press the “MODE” button on
the remote several times until the LED light turns cyan, or use Vivaldi App to switch the audio source to
“AUX in” to switch to RCA mode.
english

vivaldigroup.it
10
english
7) Remote Control
Note: CR2025 lithium coin cell battery not included.
Power On/O
Press to turn on/o the speaker.
Mute
Press to turn o the sound temporary, and press again to turn the sound back.
Volume+/-
Press to increase or decrease the sound leveI. You will hear a beep when the
volume reaches the highest or lowest level.
Treble +/-
Press to increase or decrease the high frequency response. You will hear a
beep when the treble reaches the maximum or minimum value.
Bass +/-
Press to increase or decrease the low frequency response. You will hear a
beep when the bass reaches the maximum or minimum value.
Reset
Press and hold to resume the speaker to default setting. All parameters will be reset to default values:
volume is 26; sound eect is at; treble and bass is 0.
MODE
Press to switch the audio source. Press it several times until the LED light turns green (Player mode),
blue (Bluetooth mode), or cyan (RCA mode).
EQ
Press to switch sound eects in order as Flat, Classical, Pop, Rock, Jazz, Vocal Enhanced.
Previous
Press far previous track.
Next
Press far next track.
Play/Pause
Note:
Only if the Bluetooth or Wi-Fi input is activated, the PREV, NEXT and RESET keys can work.
Tips:
The infrared remote control has eective scope of operating range which is less than 3mt and at 60 degrees angle left
for right away from the system.

vivaldigroup.it 11
english
CARE AND MAINTENANCE
• Turn o the power to the speaker when unused for long periods of time.
• Ensure all equipment is turned o before to cleaning. Surfaces only need occasional dusting/cleaning.
Never use chemicals or solvents as they may damage the surface. Always clean using a dry cloth.
• Never touch the speaker drivers.
SPECIFICATONS
Vivaldi Keyround16 Wi-Fi & Bluetooth Ceiling Speaker Pair (Active+Passive)
Speaker
Woofer
Tweeter
Frequency Response
Sensitivity( 1 M/1W)
Nominal lmpedance
RMS Power
Amplier Power
Wireless Connection System
Wireless Transmission Distance
Bluetooth Version
Bluetooth Distance
Power Supply
Dimensions
Cutout Size
Active Speaker(Master)
6.5” Polypropylene Cone
0.75” Silk Dome
70Hz-20kHz
87dB
8Ω
/
2x30W/8Ω
Wi-Fi 802.11 b/g/n
80mt
V5.O
10mt
DC 24V/2.5A
Ø 233x105mm
Ø 209mm
Passive Speaker(Slave)
6.5” Polypropylene Cone
O. 75” Silk Dome
70Hz-20kHz
87dB
8Ω
30W
/
/
/
/
/
/
Ø 233x105mm
Ø 209mm

vivaldigroup.it
12
italiano
1) Si prega di leggere attentamente il manuale d’istruzioni prima dell’installazione. Tenete il manuale per future operazioni.
2) Prima dell’installazione controllare il supporto, in modo che possa tenere il peso del dispositivo. Controllare che non
siano presenti cablaggi elettrici o tubature vicino al dispositivo. L’installazione su materiali troppo morbidi o che non
riescono a sostenere il peso del dispositivo, possono creare danni o ferire le persone.
3) Controllare che il dispositivo sia ben ssato al supporto(parete o sotto). Si prega di usare le viti/gangi in dotazione.
4) Il danneggiamento del Woofer o del tweeter può causare suono distorto o eventualmente non essre presente suono.
5) Si prega di evitare di superare il punto di distorsione del dispositivo, ed eventualmente ridurre il suono in ingresso per
evitare danni.
6) Si prega di usare solo cavi in dotazione e/o certicati per l’utilizzo assegnato, e di evitare di tagliare o tirare i cablaggi.
7) Prima di rimuovere cablaggi o connesisoni, assicurarsi che il dispositivo e i dispositivi connessi siano spenti.
La lista di attrezzi seguente è necessaria per l’installazione del dispositivo:
Si prega di controllare se il contenuto della confezione corrisponde a quello descritto qui. Se alcune parti dovessero
mancare, contattare il fornitore.
Seghetto Spelali Trapano/avvitatore Matita
Metro Rilevatore metalli Occhiali di sicurezza Scala
Altoparlante attivo Altoparlante passivo Manuale Teleco-
mando
Dima
Griglie (x2) Alimentatore Strumento per
installazione
ISTRUZIONI DI SICUREZZA
PREPARAZIONE
CONTENUTO CONFEZIONE
vivaldigroup.it 13
italiano
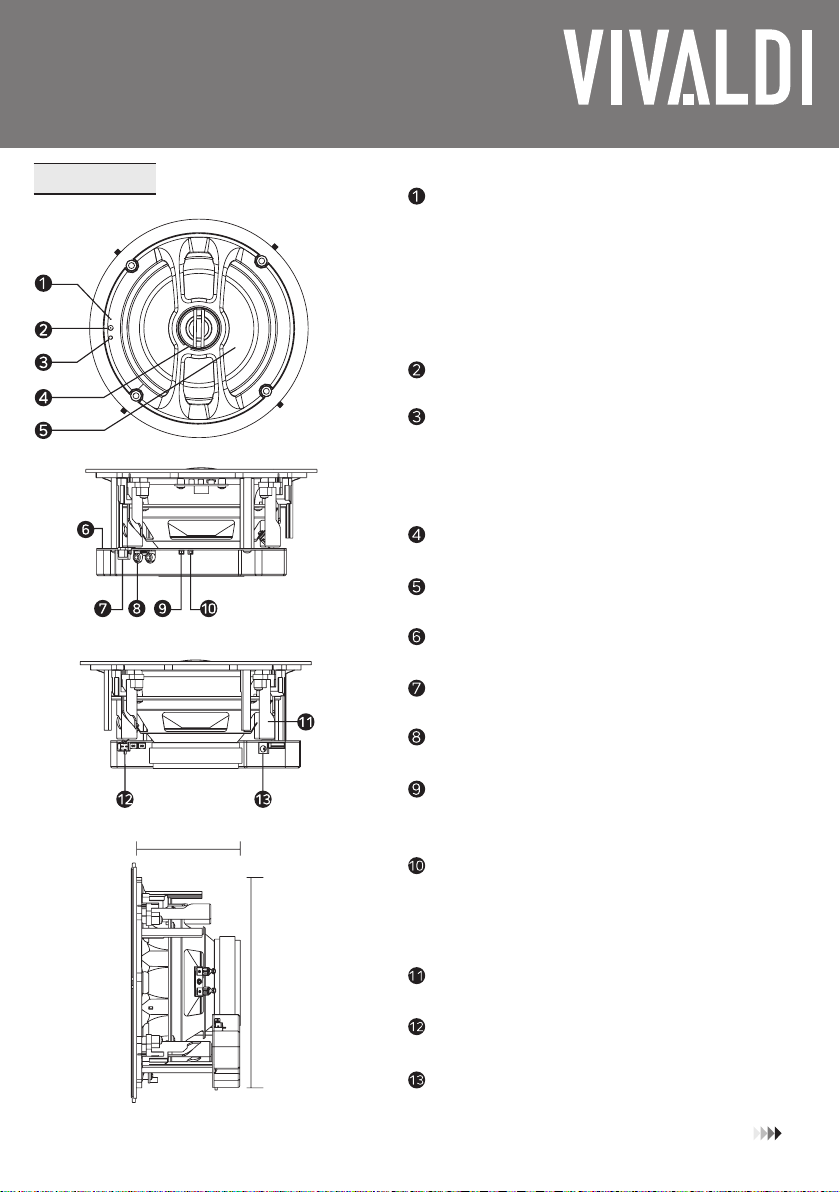
LED Di Stato
Lampeggio lento rosso: accensione.
Rosso sso: dispositivo pronto per la connessione.
Lampeggio lento verde: collegamento in corso.
Verde sso: connesso alla rete.
lampeggio veloce blu: Bluetooth in collegamento.
blu sso: Bluetooth connesso.
Ciano sso: AUX attivo.
Lampeggio rosso, verde e blu: sistema in aggiornamento o
reset di fabbrica
Ricevitore IR
Pulsante di reset(WPS)
1. Premere per cambiare sorgente.
2. Mantenere premuto per 3 secondi per avviare la moda-
lità WPS ed attivare l’acces point interno, SSID: vivaldi_
keyround_xxxx (la “x” è la parte nale del MAC ADDRESS)
3. Mantenere premuto per più di 10 secondi per avvirare il
ripristino di fabbrica, il led lampeggierà rosso, verde e blu.
Tweeter pivotante
Woofer
Amplicatore ed Ricevitore Bluetooth
RJ45 Ethernet
RCA Jack, ingresso aux
Stereo/Mono
Se connesso un altoparlante esterno, impostare su stereo,
in alternativa mantenere su mono.
Limite Volume
Se attivo, il volume massimo è del 50%.
L’uscita sarà 15W@8Ω
Se disattivato, il volume massimo sarà 100%.
L’uscita sarà 30W@8Ω.
Installazione rapida con i ganci a molla
Uscita altoparlante passivo, canale destro
Jack di alimentazione (DC 24V/2.5A)
209mm
diametro
fondo
(dima neces-
saria)
100mm profondità
DESCRIZIONE

vivaldigroup.it
14
italiano
Power adapter
RCA
Connections
1.Ritagliare il foro
Posizionare la dima nella posizione d’installazione del
dispositivo. Segnare con la matita il cerchio della dima.
Togliere la dima e tagliare il foro d’ingombro del
diusore, prestare attenzione ad eventuali tubazioni.
2.Collegamento elettrico
Collegare l’alimentatore in dotazione,
al jack 24Vdc, se necessario collegare
l’ingresso analogico RCA.
3.Installazione
Premere i 4 ganci a molla con l’apposito
utensile in dotazione, in modo da bloccarli
in posizione. Una volta bloccati, inserire nel
foro il dispositivo.
4.Fissaggio altoparlante
Tenendo l’altoparlante con una mano, verso
la struttura, premere i 4 bottoni in rilievo
corrispondenti ai ganci a molla. Una volta
premuto si sentirà un click e il gancio sarà
bloccato. Per evitare lo scatto violento, è
possibile utilizzare l’utensile per accompa-
gnare la molla mentre si preme il bottone.
5.Fine installazione
Fornita l’alimentazione, il LED di stato comin-
cerà a lampeggiare rosso e il dispositivo si
avvierà.
INSTALLAZIONE

vivaldigroup.it 15
italiano
1)Connessione tramite WI-FI
Installazione APP di controllo
Ricercare l’applicazione “VIVALDI” nel Google Play Store(Android) o Apple App Store (iOS) ed installarla.
Collegamento alla rete Wi-FI
Assicurarsi che il dispositivo sia acceso, vericando il LED di stato. Premere il pulsante di reset 1 volta(WPS), ci sarà la ripro-
duzione audio “Enter the setup mode, follow the instructions in the app to nish the setup” che dice di seguire le istruzioni
dell’applicazione, ed il LED di stato lampeggerà di verde. Verrà attivato l’access point denominato: vivaldi_keyround_xxxx
(la “x” è la parte nale del MAC ADDRESS). L’access point resterà senza password per i primi 5 minuti(dopo di che, l’access
point verrà disabilitato). Si prega di collegare il dispositivo dove si è scaricata l’APP a questa rete WI-FI e seguire le seguenti
istruzioni.
1. Aprire nello Smartphone il menu
relativo alla connessione WI-FI e
connettersi alla rete denominata “vival-
di_keyround_xxxx”.
Con Android vericare se un pop-up
chiede di restare connessi e confermare.
2. Aprire l’APP Vivaldi precedentemente
scaricata.
CONNESSIONE

vivaldigroup.it
16
italiano
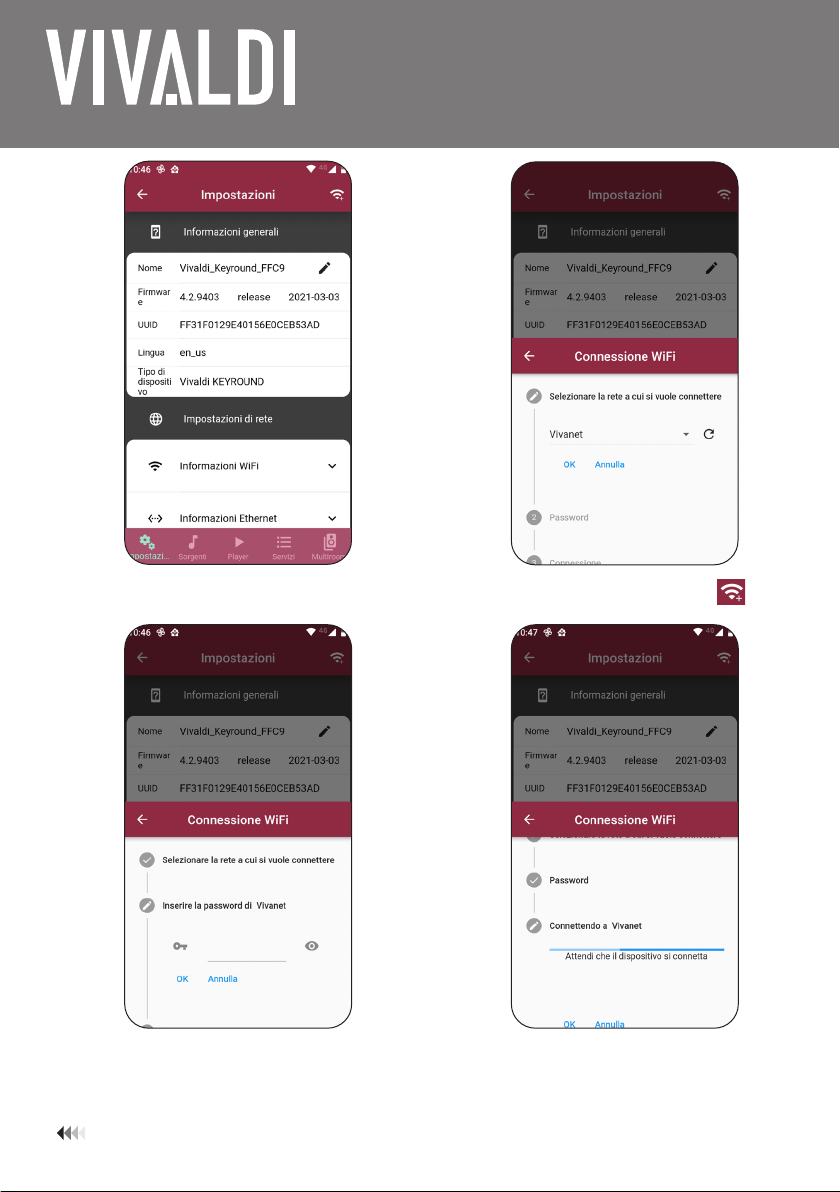
3. Entrare nel dispositivo che viene
visualizzato ed entrare nel menu
impostazioni.
4. Cliccare nel menu per la
connessione WI-FI.
5. Una volta selezionata la rete desi-
derata, inserire la password relativa.
6. Cliccare OK e chiudere l’applica-
zione. Entrare nel menu WI-FI dello
Smartphone e connettersi alla rete
dove è stata connessa Keyround.

vivaldigroup.it 17
italiano
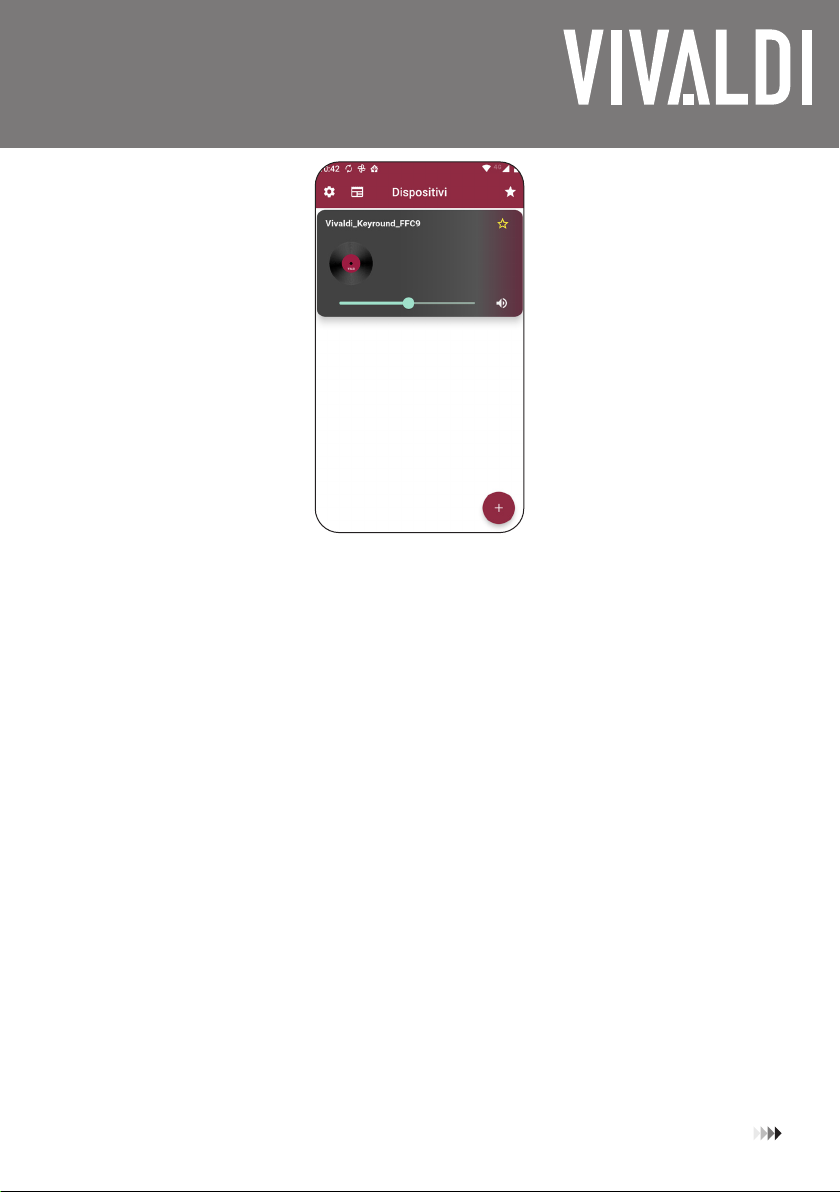
6. Una volta nito e connessi alla
propria rete, aprendo l’applicazione
Vivaldi si troverà il dispositivo
automaticamente.
• Quando si usa la connessione via cavo non è necessario seguire la procedura WI-FI, ma
semplicemente scaricare l’applicazione ed utilizzare il dispositivo.
• Il router deve avere un server DHCP attivo e la funzionalità UPNP deve essere disponibile.
• All’avvio del dispositivo verrà attivato l’access point senza password per 5 minuti, dopo di che l’access
point verrà disabilitato.
• Tra la sorgente player e la sorgente RCA, la sorgente player ha la priorità.
• La connessione wireless tra Keyround e l’access point locale potrebbe non funzionare se si superano i
80mt in aria libera, o se ci sono ostacoli.
Note:
vivaldigroup.it
18
italiano
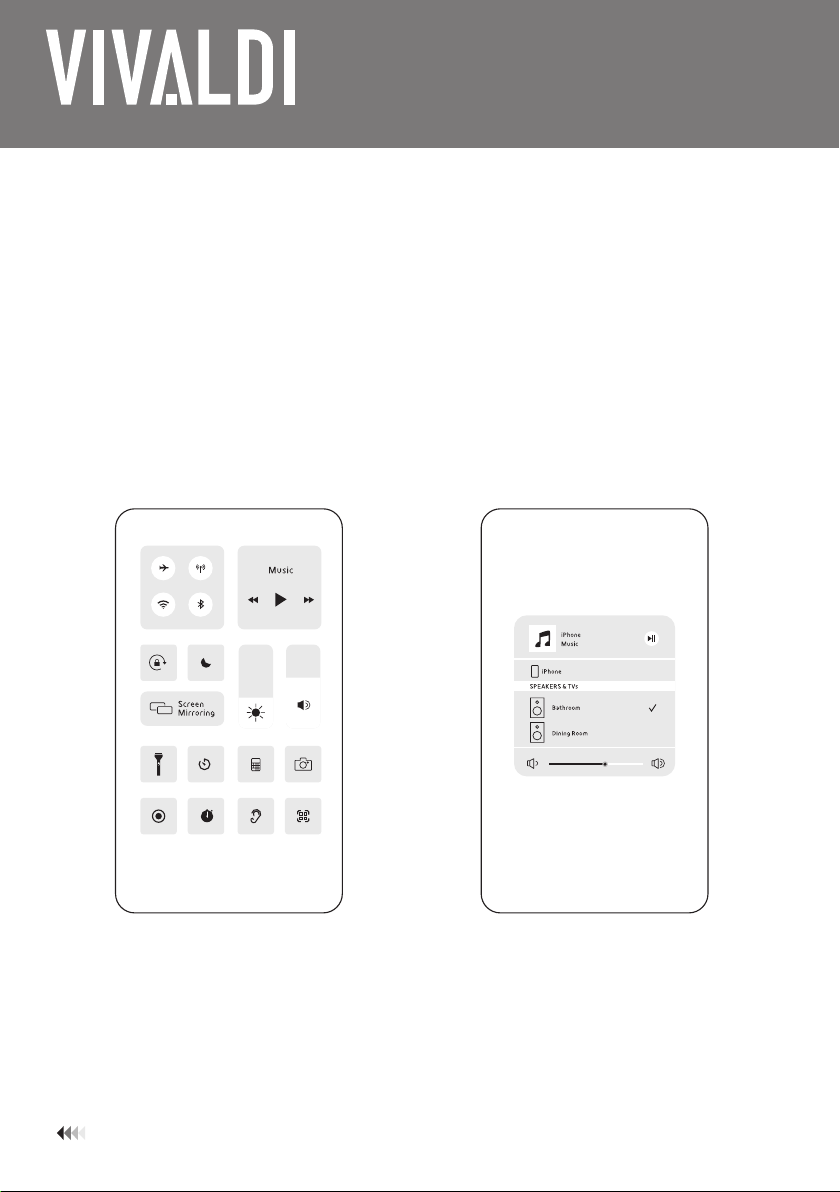
2) Funzione Airplay
La funzionalità Airplay è disponibile per tutti i dispositivi Apple compatibili.
Nel menu a tendina del dispositivo, cliccare nella sezione Airplay e selezionare dalla lista il dispo-
sitivo Keyround. (Nell’esempio sottostante, si sta utilizzando un dispositivo con iOS13)

vivaldigroup.it 19
italiano
3) Accopiamento Bluetooth
Assicurarsi che il dispositivo sia acceso, controllando il LED di stato. Seleziona nell’APP la sorgente Bluetooth o premi nel tele-
comando il tasto “MODE” nchè il LED di stato diventa blu. Ora seleziona dal tuo dispositivo sorgente (es. Smartphone,
tablet, laptop ecc.) vivaldi_keyround_xxxx ed esegui l’accoppiamento, quando viene richiesto il pin inserire “2022”. Una volta
che l’accoppiamento ha successo, sarà possibile utilizzare la funzionalità.
Note:
• La funzionalità Bluetooth può essere usata solo da 1 dispositivo alla volta.
• Se viene richiesto un pin per l’accopiamento inserire “2022”.
• Se l’accopiamento fallisce la prima volta, riavviare il dispositivo e seguire le istruzioni di nuovo. Se il problema persiste,
premere il pulsante di reset e ripristinare il dispositivo.
• Se non si riesce a connettersi al dispositivo già utilizzato in precedenza, rimuovere “Keyround” dalla lista dei dispositivi
ed eettuare l’accopiamento un’altra volta.
• La funzionalità Bluetooth non supera i 10mt di distanza senza ostacoli.
4) AUX-IN RCA
1. Connettersi alla keyround utilizzando un cavo stereo RCA.
2. Utilizzare l’applicazione e selezionare l’ingresso tra le sorgenti o utilizzare il telecomando premendo il tasto “MODE” nchè
il LED di stato diventa di colore Ciano.
(Sorgente PLAYER o Bluetooth hanno priorità sull’ingresso AUX-IN)
3. Se il LED di stato è di colore Ciano, la sorgente AUX-IN è attiva.
5) Utilizzo con altoparlante passivo
1. Collegare l’altoparlante passivo al connettore denominato
“Slave speaker”.
2. Cambiare l’interruttore mono-stereo su stereo.
6) Selezione della sorgente
• Modalità Player
Una volta connesso alla rete, dall’applicazione VIVALDI è possibile selezionare il PLAYER quando si ascoltano Webradio, Airplay,
Spotify, musica locale.
O premendo il tatsto “MODE” sul telecomando nchè il LED diventa verde.
• Modalità Bluetooth
Una volta connesso alla rete, all’applicazione VIVALDI è possibile selezionare la sorgente Bluetooth.
O premendo il tatsto “MODE” sul telecomando nchè il LED diventa blu.
• Modalità AUX-IN
Una volta connesso alla rete, all’applicazione VIVALDI è possibile selezionare la sorgente AUX.
O premendo il tatsto “MODE” sul telecomando nchè il LED diventa Ciano

vivaldigroup.it
20
italiano
7) Telecomando infrarossi
Note: La batteria CR2025 al litio non è inclusa.
Power On/O
Premere ON per accendere, premere OFF per spegnere l’altoparlante.
Mute
Premere per disattivare l’audio e premere nuovamente per attivarlo.
Volume+/-
Premere per aumentare e diminuire il volume. Quando si raggiunge il massimo o il
minimo viene segnalato con un beep.
Treble +/-
Premere per aumentare e diminuire la banda delle alte frequenze. Quando si
raggiunge il massimo o il minimo viene segnalato con un beep.
Bass +/-
Premere per aumentare e diminuire la banda delle basse frequenze. Quando si
raggiunge il massimo o il minimo viene segnalato con un beep.
Reset
Premere e mantenere premuto per ripristinare il dispositivo. Tutti i parametri torneranno di default:
volume a 26; equalizzatore at; alti and bassi a 0.
MODE
Premere per cambiare sorgente. Premere nchè il LED diventa verde (modalità PLAYER),
blu (modalità Bluetooth), o ciano (modalità AUX).
EQ
Premere per variare l’equalizzatore tra Flat, Classical, Pop, Rock, Jazz, Vocal Enhanced.
Prev
Premere per tornare alla traccia precedente.
Next
Premere per andare alla traccia successiva.
Play/Pause
Premere per cambiare tra riproduzione attiva e riproduzione in pausa.
Note:
Se in Bluetooth e in Player, i tasti PREV, NEXT e RESET sono attivi.
Tips:
Il telecomando infrarossi ha un campo d’azione di 3mt e un angolo di 60°.
Other manuals for KEYROUND16AF
1
Table of contents
Languages:
Other Vivaldi Speakers manuals

Vivaldi
Vivaldi PH50M User manual

Vivaldi
Vivaldi GIADA213HPA User manual

Vivaldi
Vivaldi KEOPE.S40 User manual

Vivaldi
Vivaldi KEYROUND16AF User manual

Vivaldi
Vivaldi KEOPE.HP60 User manual

Vivaldi
Vivaldi FREEMK3 Operating manual

Vivaldi
Vivaldi ZEN315 User manual

Vivaldi
Vivaldi GIADA10 User manual

Vivaldi
Vivaldi FLORA10TW User manual

Vivaldi
Vivaldi FLORA16T User manual


