Vivaldi FLORA10TW User manual

FLORA10TW
FLORA10TB
OUTDOOR
AND INDOOR
WALL SPEAKER
4
Model FLORA10T
Woofer
Tweeter
Frequency Response
Sensitivity
Transformer
Dimensions
IP Level
10,5 cm
2,5 cm
75-20000 Hz - 10dB
88dB
8Ω - 100V selectable
170x243x180 mm
IP65
SPECIFICATIONS
5
8Ω Power
100V Power
30W RMS, 60W musical
5/10/20W. 40W peak, max 105dB
FOREIGN WARRANTY
12 month warranty terms. The term and warranty may
vary by country and may not be the same for all
products. Warranty terms and conditions for a specific
product can be determined first by locating the
appropriate country where the product was purchased,
then identifying the type of product.
VIVALDI SRL by VIVALDI UNITED GROUP
Headquarter
Via Enrico Fermi, 8
30020 Noventa di Piave (VE) - IT
Warehouse
Via Edison, 4. 30020 Noventa di Piave (VE) ñ IT
Phone +39 0421.307825 - Fax +39 0421.307845
E-mail
Web
www.vivaldigroup.it
© 2020 Vivaldi Srl
Vivaldi srl ongoing effort to improve its products,
reserves the right to make technical and aesthetic
changes effectively without obligation to notice.
Amplifier
LEFT RIGHT
8Ω8Ω
CARE AND MAINTENANCE
·Turn off the power to the speaker when unused for long periods of time.
·Ensure all equipment is turned off prior to cleaning. Surfaces and cabinet
need only occasional dusting/cleaning. Never use chemicals or solvents
as they may damage the surface. Always clean using a dry cloth.
·Never touch the speaker drivers.
1 2 3
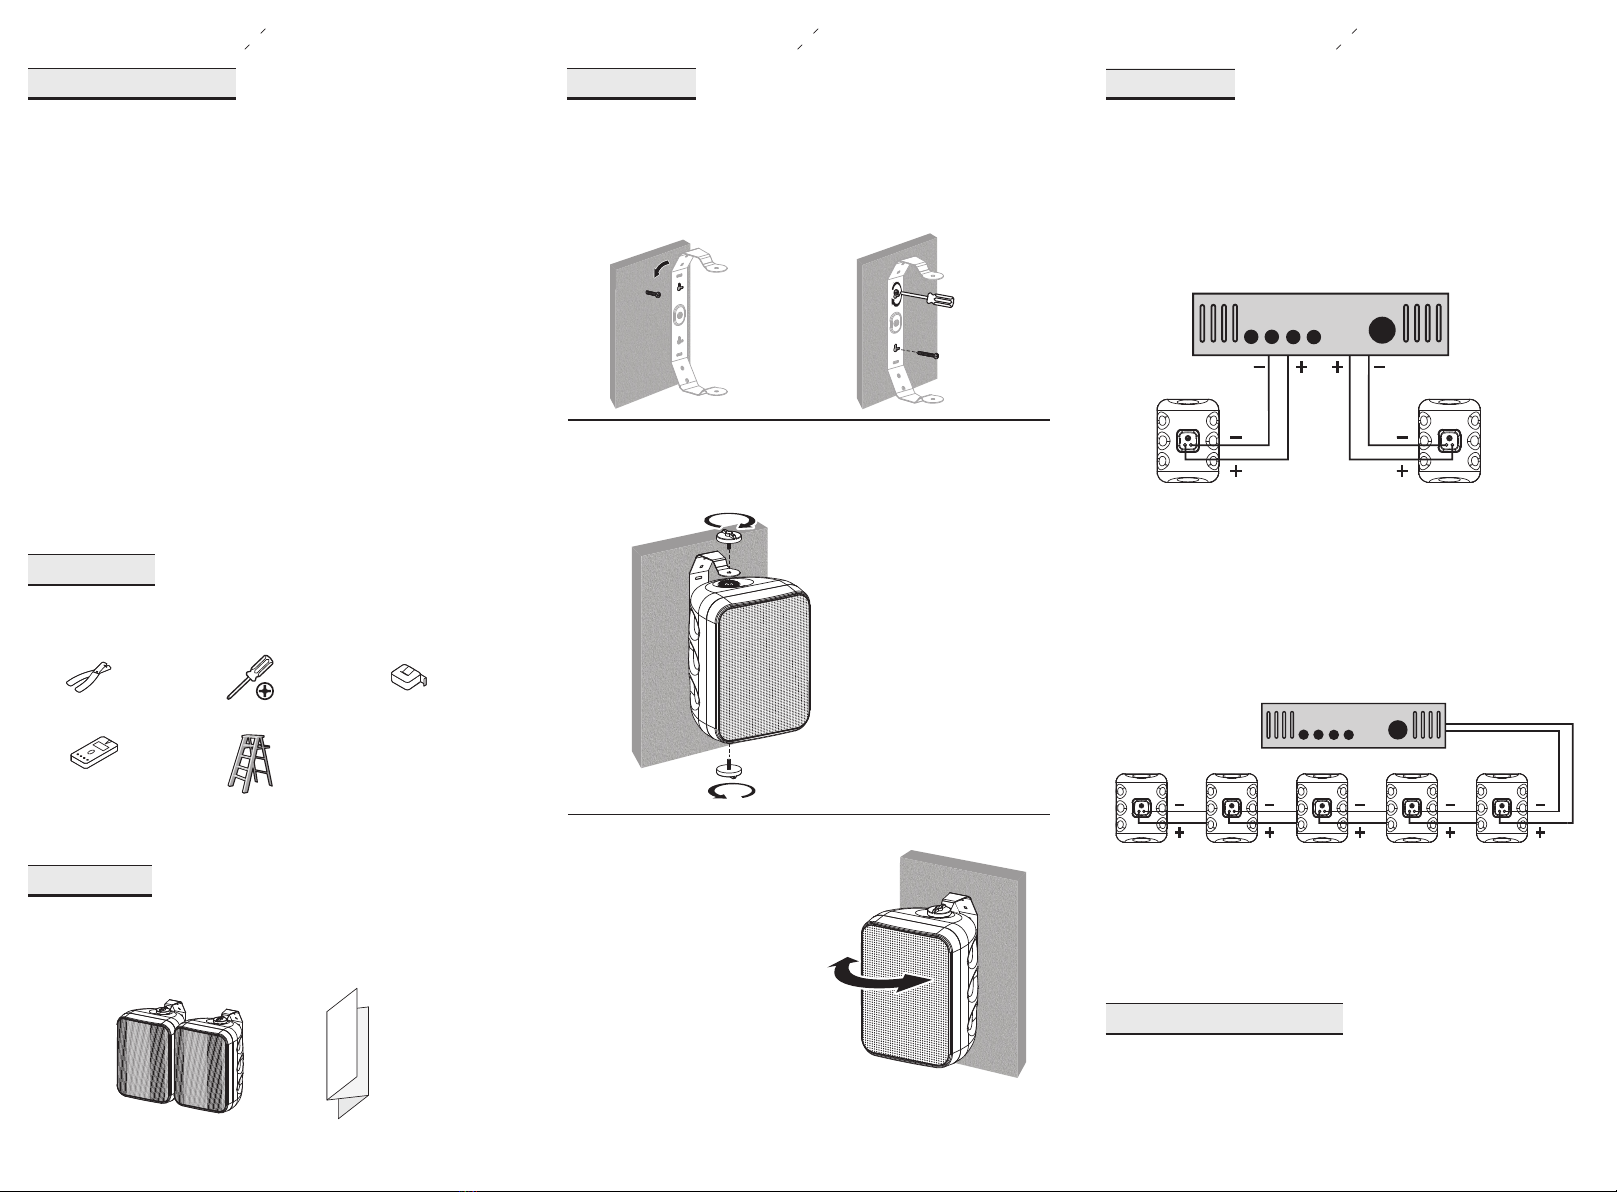
INSTALLATION
1. Attach the Mounting Bracket
SAFETY INSTRUCTIONS
·Please read the instructions carefully before installation and use.
Keep the manual safe for future reference.
·Prior to installing the speakers into any wall, check the structure for
weight bearing ability and avoid contact with any wiring or plumbing
that might be behind the surface area. Installing on soft materials or
in areas incapable of supporting the speakers’ weight may cause
personal injury or damage to the speaker.
·Make sure the speaker is properly secured to the wall. Please use the
proper screws, bolts, or anchors. Failure to do so may cause the
speaker to become unsecured and cause potential damages/injuries.
·When installing the speakers outside, choose areas such as the
underside of eaves to avoid strong direct sunlight that may affect the
color and life of the speaker enclosure.
·Use only approved and certified wiring in your installation, do not
stretch or place the wire in contact with sharp objects.
·Prior to removing cables, ensure all power to your amplifier and other
components is turned off.
·Damage to the woofer and tweeter may occur if the speaker is dropped
or hit-resulting in no sound or distorted sound.
·Never overdrive your speakers to the point of distortion and always
reduce volume prior to switching input sources.
The hardware equipment listed below is needed to install the speaker.
PREPARATION
Speakers
PACKING LIST
USER
MANUAL
User Manual
Supplied with wall fixing bracket.
Hang the bracket on the screw as shown.
Then tighten the screws to fix the bracket to the wall.
3 positions: -30° / 0° / + 30°.
Tilting: 180° horizontal / 180° vertical.
·Parallel Connection of Multiple Speakers (for OWME-4T/5T/6T only)
For distributed line application, built-in100V multi-tap transformer offers
the ability to daisy chain multiple number of speakers in parallel. The total
number of speakers multiplied by the tap value cannot exceed the output
power of the amplifier. For example, if you want to daisy chain 5 speakers
in total using the 20W taps, you will need an amplifier with at least
5x20W = 100W. A good rule of thumb is to select an amplifier with 20%
greater power; in this case, an amplifier that delivers about 150W.
Note:
Anytime you note distortion, reduce the volume to a lower setting.
Never allow your amplifier to be driven into “clipping”. Otherwise the
speakers may be damaged. Damage caused by operating the speakers at
distorted volume levels is not covered by the warranty.
Tape Measure
Stud Finder
(For Wood Stud Wall)
Phillips Screwdriver
Ladder
Wire Stripper
Ensure that you have received all parts according to the component
checklist prior to installation. If any parts are missing or faulty, contact
your place of purchase for a replacement.
2. Attach the Speaker to the Mounting Bracket
Secure the speaker to the bracket with plastic knobs supplied.
3. Adjust the Speaker
Loosen the screws on the slider to tilt the speaker
up or down and then tighten the screws again to
fix the position.
CONNECTION
Ensure that the speaker is unplugged from the mains before making
any connections.
·Stereo Connection of L/R Pair Speaker
Connect two speakers as shown. Always check to ensure polarity is
correct: L(left) to L, R(right) to R, “+” to “+”, and “-” to “-”.
100V
C
Amplifier
This manual suits for next models
1
Other Vivaldi Speakers manuals

Vivaldi
Vivaldi KEYROUND16AF User manual

Vivaldi
Vivaldi GIADA 16HPA User manual

Vivaldi
Vivaldi KEYROUND16AF User manual

Vivaldi
Vivaldi ROCK16T User manual

Vivaldi
Vivaldi PH50M User manual

Vivaldi
Vivaldi ZEN315 User manual

Vivaldi
Vivaldi GIADA10 User manual

Vivaldi
Vivaldi KEOPE.HP60 User manual

Vivaldi
Vivaldi KEOPE.M250 User manual

Vivaldi
Vivaldi KEOPE.S40 User manual


Popular Speakers manuals by other brands

 user manual")


Phase Technologies
Phase Technologies Speaker user manual

Cambridge Sound Works
Cambridge Sound Works NEWTON s100 Multipole user manual

Air 2U
Air 2U E10 quick start guide

MB QUART
MB QUART PSC 316 installation instructions

Eton
Eton CSR 16 instruction manual

MB QUART
MB QUART REFERENCE Series RCE 268 RCE268 RCE268 installation manual


