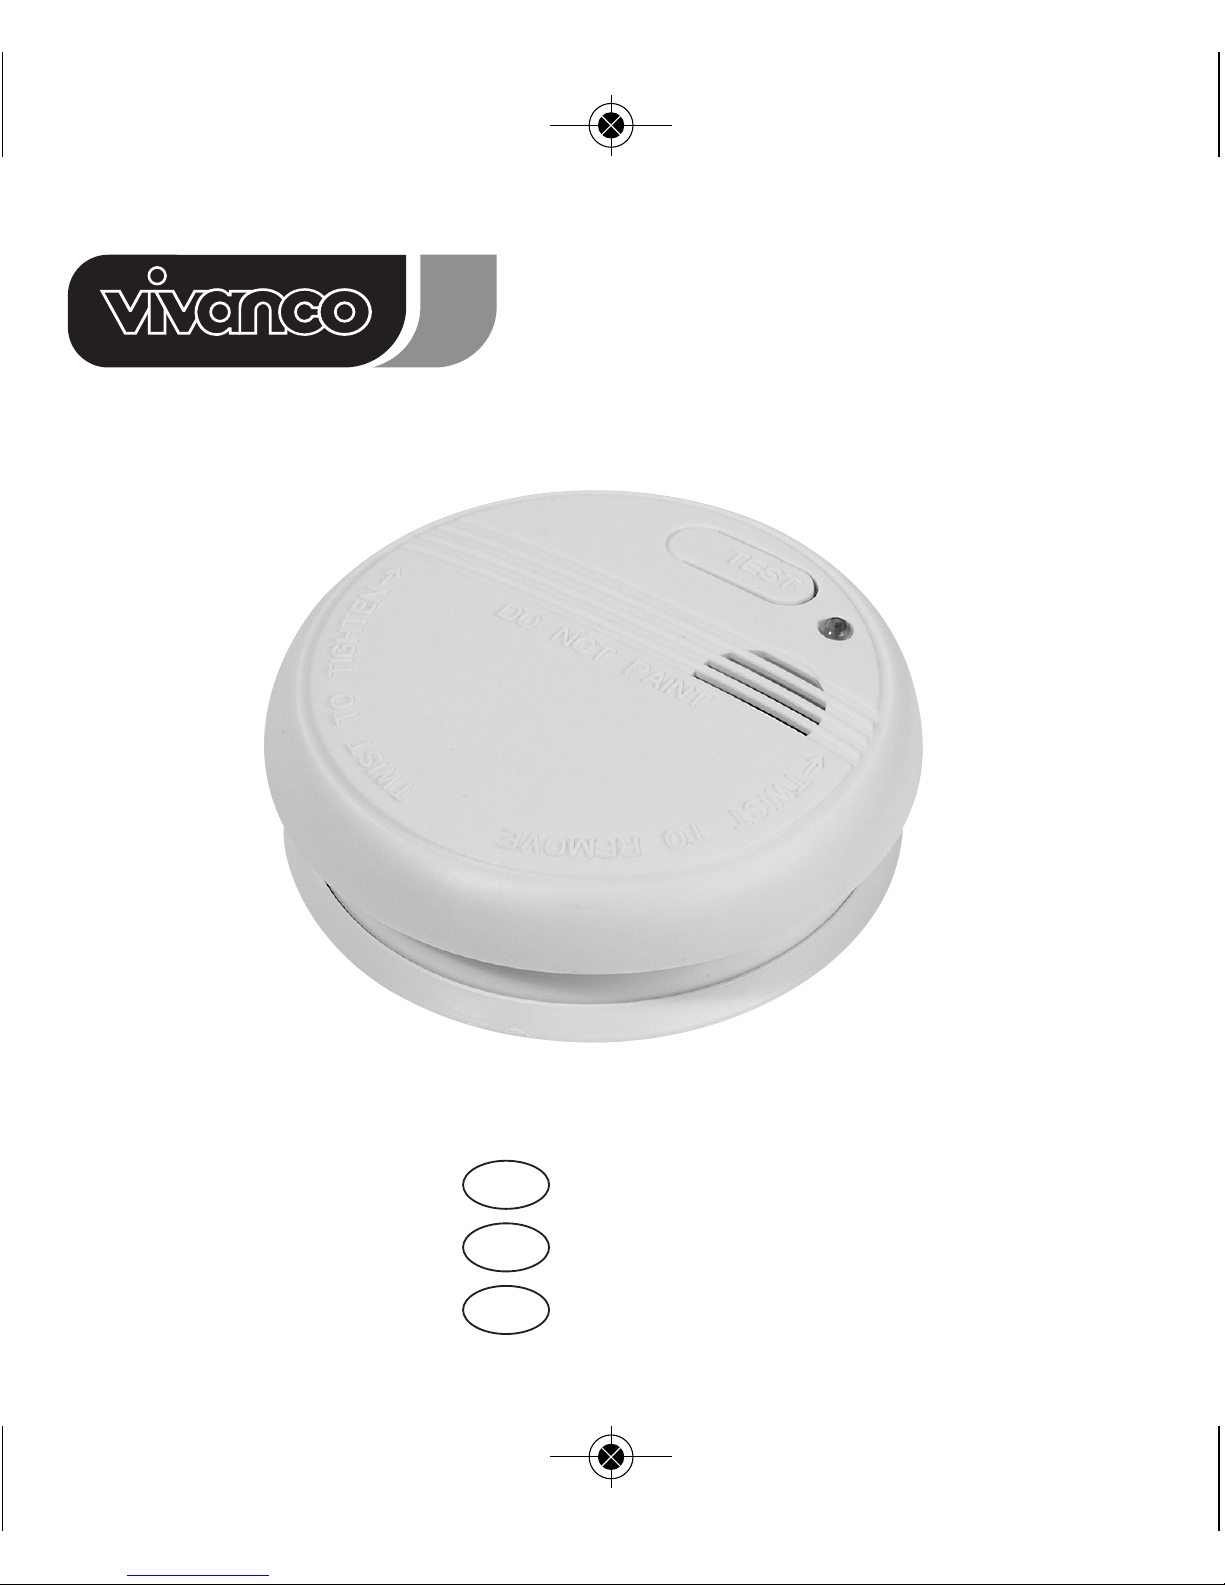
Vivanco SD 3-N User manual
Pag /S it
D B di nungsanl itung 2 –9
GB Op rating instructions 10 – 17
F Mod d’ mploi 18 – 25
SD 3-N
Man al 33510-2014-Rev7-RZ.qxp_Layo t 1 30.09.15 15:02 Seite 1

D G brauchsanl itung
Bevor Sie das Gerät benutzen, lesen Sie bitte die Sicherheitshinweise und die
Bedienungsanleitung aufmerksam durch. Bewahren Sie diese Gebrauchs-
anleitung gut auf und geben Sie sie an mögliche Nachbesitzer weiter .
T chnisch Dat n
Stromversorgung: 9-Volt-Blockbatterie, CaBn oder Alkali,
Empfohlene Typen: Gold Peak GP1604S, GP1604P, G6F22, Pairdeer 6F22
Duracell MN1604
Batteriealarm: akustisches Signal (85dBA) bei fast leerer Batterie
Schutzart: IP20
Umgebungstemperatur: 0°C – 40°C, nicht kondensierend
Funktions-LED
Gewicht (ohne Batterie): 90g
Abmessungen: 106mm ø, Höhe 32mm
B stimmungsg mäß r G brauch
Der Rauchwarnmelder ist ausschließlich für die Rauchmeldung (bei Feuer) in privaten
Haushalten gemäß dieser Anleitung bestimmt. Er darf nicht für gewerbliche
Zwecke
verwendet werden. Jede andere Verwendung gilt
als nicht bestimmungsgemäß und kann
zu Sach- oder
Personenschäden führen, für die der Hersteller nicht haftet.
Sich rh itshinw is
WARNUNG!
Erstickungs- bzw. V rbr nnungsg fahr durch Rauchgas bzw. F u r
2
Man al 33510-2014-Rev7-RZ.qxp_Layo t 1 30.09.15 15:02 Seite 2
3
L b nsg fahr und/od r schw r Sachb schädigung n durch f hl rhaft
Montag an nicht zulässig n Ort n und/od r f hl nd r g lmäßig
Üb rwachung
- Montieren Sie bitte Rauchwarnmelder NUR an dafür empfohlenen trockenen Orten in
Ihrem Privathaus.
- Bitte MALEN oder TAPEZIEREN Sie den Rauchwarnmelder NICHT über.
- Bitte führen Sie regelmäßig den SELBSTTEST (Testtaste drücken) und die REINIGUNG
gemäß dieser Anleitung durch.
- Bitte WECHSELN Sie die BATTERIE SOFORT, wenn der Selbsttest erfolglos bleibt oder
der Batteriealarm ertönt.
- Bitte TAUSCHEN Sie den Rauchwarnmelder SOFORT aus, wenn auch nach Reinigung
und/oder Batteriewechsel der Selbsttest erfolglos bleibt. Dann bietet das Gerät
keinerlei Schutz.
WARNUNG!
Stromschlag-, Explosions-, Brand-, Üb rschw mmungsg fahr
V rl tzungs- und Erstickungsg fahr n, Sachb schädigung n durch
Stromschlag, Gas- od r Wass rausström n b im Anbohr n von
V rsorgungsl itung n.
VORSICHT! Brandg fahr und/od r V rätzungsg fahr durch Batt ri
Brand-, und V rätzungsg fahr, Sachb schädigung n durch Kurzschluss und
od r auslauf nd Batt ri .
- Bitte schließen Sie Batteriekontakte nicht kurz, z.B. durch gemeinsame Lagerung mit
metallischen Gegenständen.
- Bitte setzen Sie Batterien nie längerer, direkter Sonneneinstrahlung oder Hitze aus.
Man al 33510-2014-Rev7-RZ.qxp_Layo t 1 30.09.15 15:02 Seite 3
4
- Bitte werfen Sie Batterien nicht ins Feuer; und öffnen Sie Sie niemals.
- Bitte ersetzen Sie die Batterie nur gegen eine gleichen oder eines empfohlenen
vergleichbarem Typs.
- Batterien bitte niemals aufladen.
Montag
Bevor Sie den Rauchwarnmelder installieren, wählen Sie einen geeigneten Montageort
aus. Diese sind in der für Deutschland gültigen Anwendungsnorm DIN EN 14676
verbindlich geregelt. Die nachfolgend genannten "Empfohlenden Aufstellungsorte"
stellen hierbei nur einen Auszug aus der Norm dar.
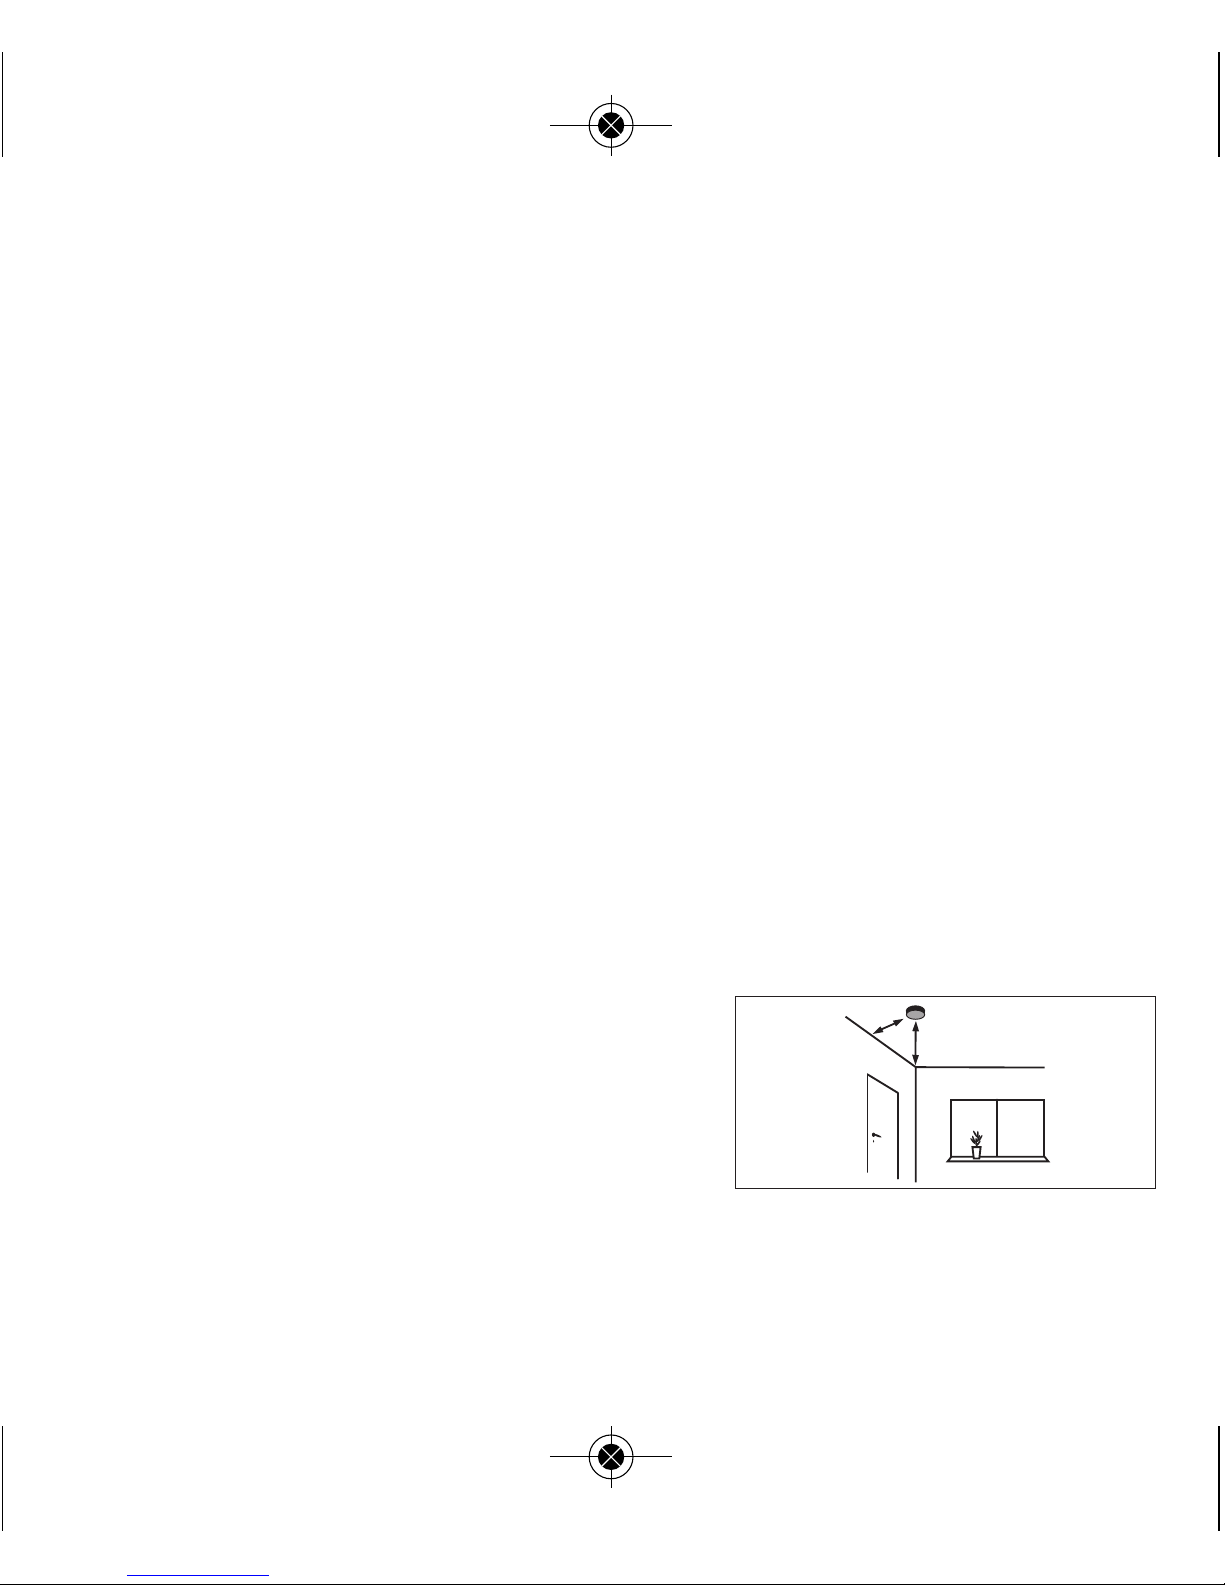
B sond rs mpfohl n Montag ort
sind: Schlaf- und Kinderzimmern und Treppenhäusern.
Lassen Sie sich wie folgt leiten, um Rauchwarnmelder möglichst wirksam einzusetzen:
- Bringen Sie mindestens einen Rauchwarnmelder in jeder Etage an.
- Platzieren Sie einen Rauchwarnmelder in Räumen, in denen sich elektrische Geräte
befinden.
- Bringen Sie Rauchwarnmelder an der Decke in Zimmermitte an, da Rauch steigen nach
oben an die Decke steigt und sich dort horizontal ausbreitet.
- Vermeiden Sie Montageorte, die weniger als
50cm von einer Seitenwand und weniger als 60cm
von einer Ecke entfernt sind.
Hinw is
Auch an geeigneten Montageorten kann die
Funktion von Rauchwarmmeldern stark beeinträchtigt sein, z.B.
- Beim Rauchen im Bett.
- Beim Säubern mit entzündlichen Flüssigkeiten (z. B. Benzin).
mind. 50 cm mind. 60 cm
Man al 33510-2014-Rev7-RZ.qxp_Layo t 1 30.09.15 15:02 Seite 4
5
Ung ign t Montag ort
sind: u.a. Küchen, Badezimmer, Garagen,
Werkräume, Heizungskellern und andere
Räume mit stark verunreinigter oder abgashal-
tiger Luft, hoher Luftfeuchtigkeit, zu hohen
(höher 40°C) oder zu niedrigen (niedriger 0°C)
Temperaturen, da z.B. Staub- und Wasser-
dampfpartikel sofort oder langfristig ein
Fehlalarme auslösen können. Auch der höchste
Punkt unter spitzförmigen Dächern ist nicht
geeignet.
Installation und B f stigung
HINWEIS: Beiliegendes Befestigungsmaterial
ist nur für Beton- oder Holzdecken geeignet.
Für die Befestigung an anderen Untergründen
besorgen Sie sich bitte im Fachhandel geeig-
netes Befestigungsmaterial.
1.Öffnen Sie den Rauchwarnmelder, indem Sie
den Gehäuseboden leicht gegen den
Uhrzeigersinn drehen.
2.Benutzen Sie nun den Gehäuseboden mit
seinen beiden Bohrlöchern als Schablone für
die Deckenmontage. Markieren Sie die
Positionen der beiden Bohrlöcher mit einem
Bleistift.
3.Überprüfen Sie mittels Leitungsprüfer die
Bohrlochpositionen, ob diese frei von Strom-,
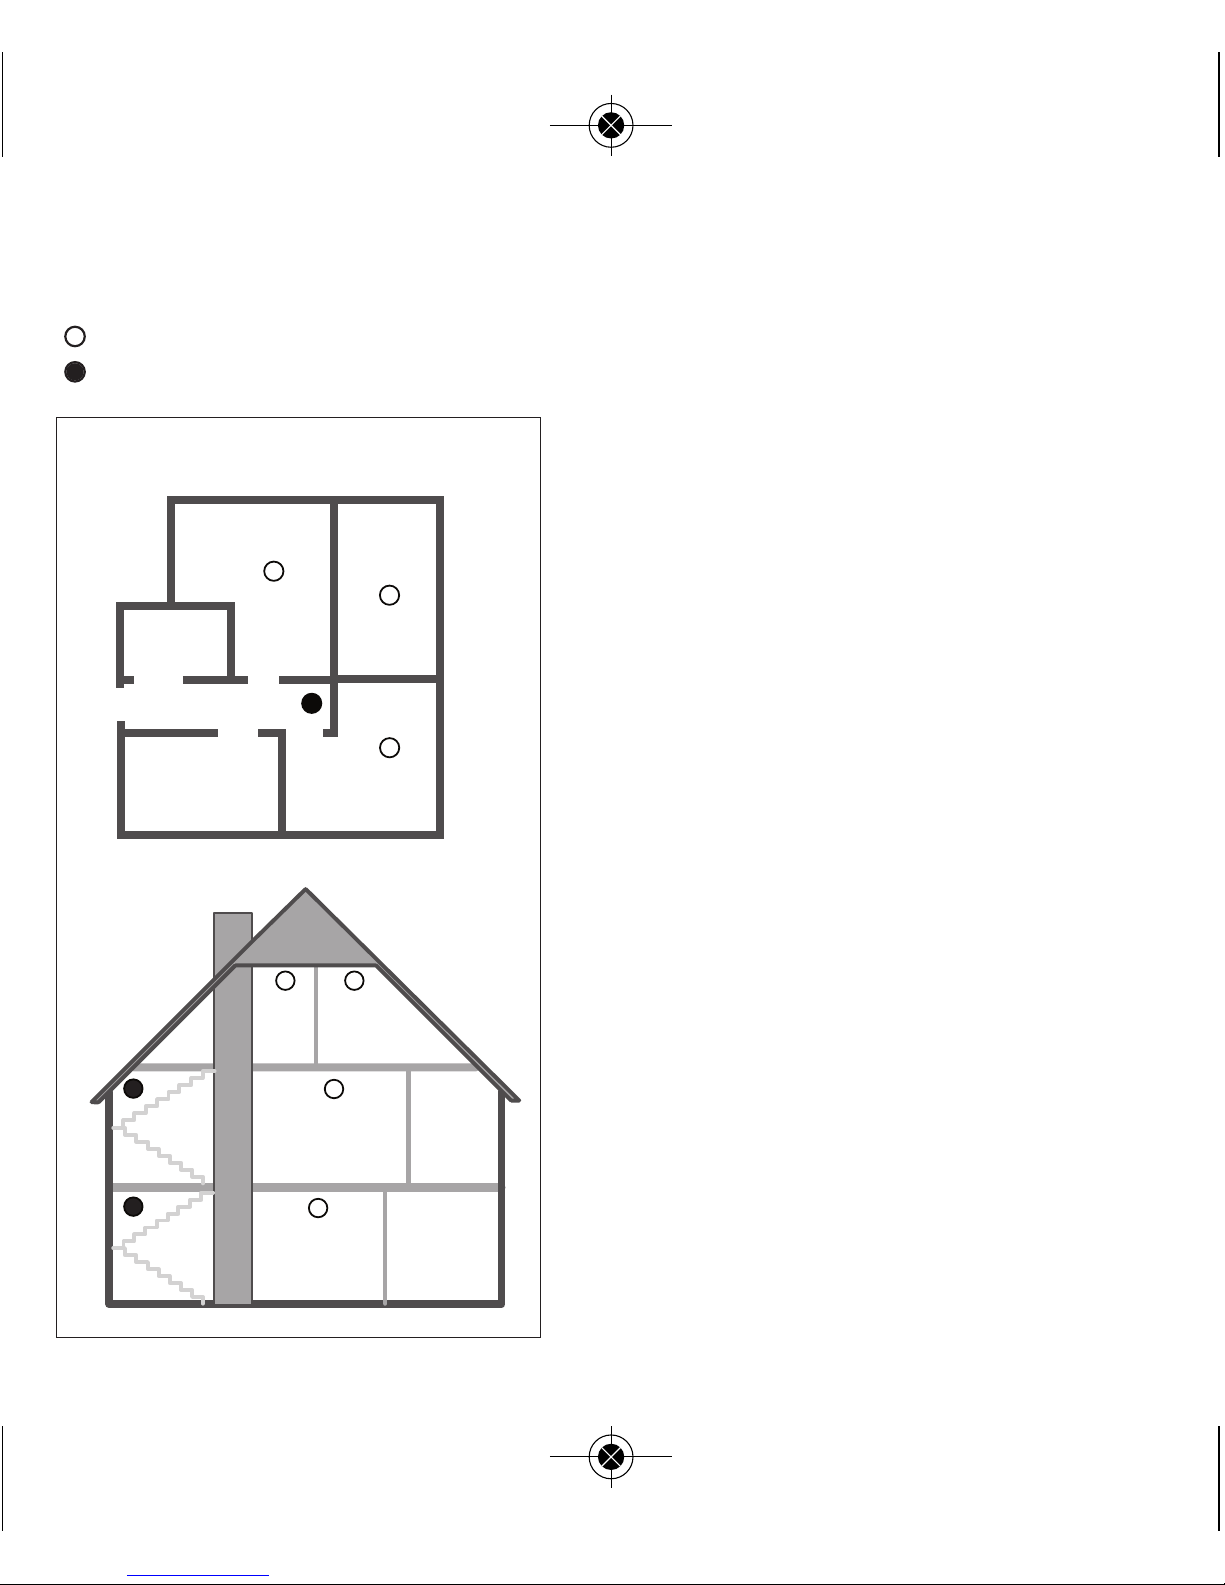
Etagenwohnung
Minimal r und optimal r Rauchschutz
für Wohnung n und in Häus rn
= Rauchmelder für zusätzlichen Schutz
= Rauchmelder für minimalen Schutz
Schlafzimmer Schlaf-
zimmer
Bad
Diele
Küche Wohn-
zimmer
Wohnhaus
Schlafzimmer
Treppen-
haus
Schlafzimmer
Schlafzimmer
Küche
Bad
Wohnzimmer
Man al 33510-2014-Rev7-RZ.qxp_Layo t 1 30.09.15 15:02 Seite 5

Gas- und anderen Leitungen usw. sind. Falls Leitungen angezeigt werden, markieren
Sie eine andere Position.
4.Zum Bohren in Beton oder Mauerwerk benutzen Sie bitte einen 5,5mm ø Bohrer.
Bohren Sie ca. 25 – 30mm tief. Stellen Sie sicher, dass die Dübel in den Bohrlöchern
halten, falls nicht, suchen Sie eine andere Position für den Rauchwarnmelder oder
verwenden Sie stärkeres Befestigungsmaterial, das Sie im Fachhandel erwerben
können. An Holzverkleidungen oder Balken bohren Sie bitte mit einem mit 2,5mm ø
Bohrer ca. 20mm tief vor.
5.Schrauben Sie den Gehäuseboden mit den beiliegenden Schrauben fest.
6.Klemmen Sie die beigelegte 9-Volt-Blockbatterie an den Batterieclip fest und legen Sie
die Batterie in das Batteriefach ein.
7.Verbinden Sie das Gerät wieder mit seinem Gehäuseboden, indem Sie die Halte-
klemmen des Gehäusebodens in die dafür vorgesehenen Öffnungen des Gerätes
stecken und es im Uhrzeigersinn drehen.
Achtung!
Der Rauchwarnmelder ist mit einer Sicherheitsausstattung versehen, die ein verriegeln
des Gehäuses verhindert, falls keine oder eine Batterie eingelegt falsch eingelegt ist.
Bitte ggf. den richtigen Sitz der Batterie überprüfen.
B di nung
Bitte überprüfen Sie die Funktion des Rauchwarnmelders, indem Sie den Funktionst st
wöchentlich und bei Funktionszweifeln durchführen, und reinigen Sie das Gerät einmal
jährlich oder bei Bedarf mit einem feuchten Tuch.
Funktionst st
Drücken Sie die Prüftaste (Push to Test) an der Unterseite des Geräts bis der Alarmton
ertönt. Dieser verstummt nach dem Loslassen der Prüftaste.
Ertönt KEIN Alarmton, dann kann das Gerät NICHT alarmieren, und es sollte zunächst die
6
Man al 33510-2014-Rev7-RZ.qxp_Layo t 1 30.09.15 15:02 Seite 6

Batterie ausgetauscht werden (s. Batteriewechsel unten).
Batt ri warnsyst m
Sobald die Batterie schwächer wird, ertönt jede Minute ein Piepton. Kurz bevor die
Batterie erschöpft ist, ertönt jede Minute ein langer Piepton. Bitte erneuern Sie die
Batterie sofort, sobald ein Piepton ertönt s. Batteriewechsel unten)
.
Batt ri w chs l
1.Öffnen Sie das Gehäuse, indem Sie den Deckel entgegen den Uhrzeigersinn drehen.
2.Heben Sie die alte Batterie aus dem Batteriefach und ziehen sie den Batterieclip von den
Batteriekontakten vorsichtig ab.
3.Klemmen Sie eine neue 9V- Blockbatterie an den Batterieclip fest und legen Sie die
Batterie in das Batteriefach ein.
4.Verbinden Sie das Gerät wieder mit seinem Gehäuseboden, indem Sie die Halteklemmen
des Gehäusebodens in die dafür vorgesehenen Öffnungen des Gerätes stecken und es im
Uhrzeigersinn drehen.
5.Führen Sie einen Funktionstest durch, Prüftaste drücken und auf Alarmton hören, um die
Funktionsfähigkeit des Gerätes sicherzustellen.
Fluchtplan rst ll n
Bitte arbeiten Sie gemeinsam mit allen Hausbewohnern einen Fluchtplan mit
Fluchtwegen aus. Überlegen sie gut, ob im Falle eines Brandes potenzielle Fluchtwege
durch Hindernisse versperrt sein könnten. Außerdem sollen es die schnellsten und
sichersten Wege ins Freie sein.
Sofortmaßnahm n b im Ertön n d s Alarms
Verlassen Sie sofort das Haus oder Ihre Wohnung nach dem von Ihnen erstellten
Fluchtplan. Jede Sekunde zählt, also verschwenden Sie keine Zeit durch Ankleiden
7
Man al 33510-2014-Rev7-RZ.qxp_Layo t 1 30.09.15 15:02 Seite 7

oder Mitnehmen von Wertgegenständen.
Beim Verlassen eines Zimmers öffnen Sie keine Tür, ohne vorher die Oberfläche zu
berühren. Wenn diese heiß ist oder wenn Sie Rauch unter der Tür hereinströmen
sehen, öffnen Sie die Tür nicht! Stattdessen benutzen Sie den alternativen Fluchtweg.
Sollte die Oberfläche der Tür kühl sein, pressen Sie Ihre Schulter dagegen, öffnen Sie
die Tür leicht und halten Sie sich bereit, sie zuzuschlagen, falls Hitze und Rauch
eindringen sollten.
Instanthaltung
Um die Funktionssicherheit des Rauchwarnmelders gewährleisten zu können, ist
entsprechend der DIN EN 14676 mindestens einmal jährlich eine Wartung durchzuführen.
Gehen Sie hierbei folgendermaßen vor:
- Entstauben Sie den Rauchwarnmelder mit einem weichen Tuch.
- Entfernen Sie bei Bedarf Verschmutzungen mit einem feuchten Lappen. Verwenden Sie
keine Reinigungsmittel.
- Führen Sie den Funktionstest durch (siehe Funktionstest).
- Bekommen Sie keine Rückmeldung, muss der Rauchwarnmelder getauscht werden.
Garanti
Wir haften gegenüber unserem jeweiligen Vertragspartner für Mängel nach den
gesetzlichen Vorschriften. Ein Anspruch auf Garantie besteht bei Material- und
Verarbeitungsfehlern und nur dann, wenn das Produkt nicht eigenmächtig geöffnet wurde
und der Kaufbeleg beigefügt ist. Ausgenommen von der Garantie sind Batterien und
Verschleißteile.
8
Man al 33510-2014-Rev7-RZ.qxp_Layo t 1 30.09.15 15:02 Seite 8

Entsorgung d s G rät s
Das Gerät darf nicht in den Hausmüll. Bitte geben Sie es bei einer Sammel-
stelle für Elektrogeräte Ihrer Gemeinde zum umweltgerechten Recycling ab.
Batt ri ntsorgung
Batterien dürfen nicht in den Hausmüll. Bitte geben Sie Alt-Batterien im
entladenen Zustand bei einer Batteriesammelstelle Ihrer Gemeinde oder Ihrem
Händler ab.
Entsorgung d r V rpackung
Die Verpackung ist einer Wiederverwendung zuzuführen. Bitte werfen Sie sie
nicht in den Hausmüll und handeln Sie entsprechend der lokalen
Entsorgungsvorschriften.
Konformitäts rklärung
In Übereinstimmung mit folgenden Europäischen Richtlinien wurde das
CE-Zeichen angebracht: EU 305/2011 + 2004/108/EG.
Die Konformitäts- und Leistungserklärung finden Sie unter:
www.vivanco.de direkt beim Artikel 33510 zum Download.
9
Pb/Cd/Hg
Man al 33510-2014-Rev7-RZ.qxp_Layo t 1 30.09.15 15:02 Seite 9

GB Us instructions
Before using this product, please read the safety and operating instructions
carefully. Keep these instructions safely and give it to any subsequent owner.
Sp cifications
Power supply: 9V block battery, CaBn or alkali
Recommended types: Gold Peak GP1604S, GP1604P, G6F22, Pairdeer 6F22
Duracell MN1604
Battery alarm: beep (85dBA) for low battery
Type of protection: IP20
Ambient temperature: 0°C – 40°C, non-condensing
LED function
Weight (without battery): 90g
Dimensions: 106mm ø, height 32mm
Int nd d us
The smoke alarm is intended solely for the detection of smoke (fire) in households
according to these instructions. It must not be used for commercial purposes.Any other
use is deemed to be misuse and can lead to personal injury or property damage for
which the manufacturer is not liable
.
Saf ty instructions
WARNING!
Risk of suffocation or burns from flu gas s or fir
10
Man al 33510-2014-Rev7-RZ.qxp_Layo t 1 30.09.15 15:02 Seite 10
Risk of d ath and/or s rious damag to prop rty r sulting from incorr ct instal-
lation not in p rmitt d positions and/or lack of r gular monitoring
- Please operate the smoke alarm ONLY with a properly installed and charged battery of
the recommended battery type.
- Please ONLY install the smoke alarms recommended dry places in your home.
- Please do NOT PAINT or PAPER over the smoke alarm.
- Please regularly perform the SELFTEST (Press test key) and CLEANING according to
these instructions.
- Please REPLACE THE BATTERY IMMEDIATELY if the self test is unsuccessful or the bat-
tery alarm sounds.
- Please REPLACE the smoke alarm IMMEDIATELY if the self-test is unsuccessful even
after cleaning and/or changing the batteries. In such circumstances, the device provi-
des no protection.
WARNING!
El ctric shock, xplosion, fir and flood risk
Risk of injury or suffocation and prop rty damag du to l ctric shock, gas or
wat r l aks from drilling into utility lin s.
CAUTION! Risk of fir and/or ch mical burn from th batt ry
Fir and burn risks, possibl prop rty damag from short-circuit and or l aking
batt ry.
- Please do not short-circuit the external battery contacts, e.g. through storage together
with metal objects.
- Please do not expose batteries for lengthy periods to direct sunlight or heat;
- Please do not throw batteries into a fire; and never open them.
11
Man al 33510-2014-Rev7-RZ.qxp_Layo t 1 30.09.15 15:02 Seite 11

- Please replace the battery only with the same or a recommended comparable type.
- Never remove the charge from batteries.
Mounting
Before you install the smoke alarm, select a suitable location for mounting. These are set
out on a mandatory basis in the applicable regulation for Germany DIN EN 14676. The
following "recommended sites" represent only a sample from the standard.
Esp cially r comm nd d mounting locations
are: Bedrooms and children's rooms andstaircases.
Follow the instructions below to deploy smoke alarms as effectively as possible:
- Install at least one smoke alarm on each floor.
- Place a smoke alarm in rooms containing electrical equipment.
- Install smoke alarms on the ceiling in the middle of the room, as smoke rises upward
to the ceiling and there spreads horizontally.
- Avoid mounting locations that are less than 50cm from a side wall and less than 60cm
from a corner.
Not
Even in recommended mounting places the function
of smoke alarms may be severely affected,
e.g.- By smoking in bed.- By cleaning with flammable
liquids (e.g. gasoline).
Unsuitabl mounting plac s
are:in particular kitchens, bathrooms, garages, work rooms, boiler rooms and other rooms
with high pollution or air containing waste gas, high humidity, too high (in excess of
12
min. 50 cm min. 60 cm
Man al 33510-2014-Rev7-RZ.qxp_Layo t 1 30.09.15 15:02 Seite 12

40°C) or too low (below 0°C) temperatures,
because, for example, dust and water vapour
particles can trigger a false alarm sooner or
later.The highest point under pitched roofs is
also not suitable.
Installation and attachm nt
NOTE: The enclosed attachment material is
only suitable for concrete or wooden ceilings.
For attachment to other substrates please
purchase commercially suitable attachment
material.
1.Open the smoke alarm by gently turning the
housing base anticlockwise.
2.Now use the housing base with itstwo holes
as a template for ceiling mounting. Mark the
positions of the two holes with a pencil.
3.Check the borehole positions with the pipe
and cable tester to see whether they etc free
of electricity, gas and other pipes. If pipes or
cables are detected, select a different
location.
4.For drilling in concrete or masonry please
use a 5.5mm diameter drill. Drill ca. 25 –
30mm deep. Make sure that the dowels stay
in the drill holes, if not, find another position
for the smoke alarm or use a stronger
fastening material which you can buy in
13
Apartments
Minimum and optimum prot ction
of apartm nt and hous s from smok
= optimum protection
= minimum protection
Sleeping room Sleeping
room
Bath room
Stair case
Kitchen Living room
Residential building
Sleeping room
Stair case
Sleeping room
Sleeping room
Kitchen
Bath
room
Living room
Man al 33510-2014-Rev7-RZ.qxp_Layo t 1 30.09.15 15:02 Seite 13

specialist stores. On wood panels or beams please drill ca. 20mm deep with a 2.5mm
diameter drill.
5.Screw in the housing base with the enclosed screws.
6.Clip the enclosed 9-volt block battery firmly to the battery clip and insert the battery
into the battery compartment.
7.Reconnect the device with its housing base, by plugging the holding clips of the
housing base into the appropriate slots on the device and turning it clockwise.
Attention!
The smoke alarm is provided with a safety feature that prevents locking of the housing if
there is no battery inserted or a battery is inserted incorrectly.Please, if necessary, check
the correct location of the battery.
Op ration
Please check the function of the smoke alarm, by performing the function t st weekly
and whenever in doubt about it, and clean the device once a year or as often as needed
with a damp cloth.
Function t st
Press the test button (push-to-test) on the bottom of the unit until the beep sounds. It
stops when you release the test button. If NO there is no beep, the device can NOT alert,
and the first step is to replace the battery (see Changing the battery below).
Batt ry warning syst m
Once the battery loses charge, it beeps every minute. Just before the battery runs out,
there is a long beep every minute. Please replace the battery as soon as you hear a beep
(see Changing the battery below).
14
Man al 33510-2014-Rev7-RZ.qxp_Layo t 1 30.09.15 15:02 Seite 14

Changing th batt ry
1.Open the case by turning the lid anticlockwise.
2.Lift the old battery from the battery compartment and carefully pull out the battery clip of
the battery contacts.
3.Clip a new 9V battery firmly to the battery clip and insert the battery into the battery
compartment.
4.Reconnect the device with its housing base by plugging the holding clips of the housing
base into the appropriate slots on the device and turning it clockwise.
5.Perform a functional test, press the test button and listen for the beep to ensure the
functioning of the device.
Producing an scap plan
Please work with all occupants of the property to produce an escape plan with escape
routes. Be sure to consider whether, in the event of a fire, potential escape routes could
be obstructed by obstacles. In addition, the escape routes should be the fastest and
safest way into the open air.
Em rg ncy m asur s wh n th alarm sounds
Leave the house or apartment immediately followingthe escape plan you have produced.
Every secondcounts, so do not waste time by getting dressedor collecting valuables.
When leaving a room, do not open any doorwithout first touching the surface. If itis hot
or if you see smoke flow in under the door,do not open the door! Insteaduse the
alternative escape route. If thesurface of the door is cool, press yourshoulder against it,
open the door slightly and beready to slam it shut if heat andsmoke start coming in.
15
Man al 33510-2014-Rev7-RZ.qxp_Layo t 1 30.09.15 15:02 Seite 15

Spot maint nanc
To ensure the functional safety of the smoke alarm maintenance must be carried out at
least once a year in accordance with DIN EN 14676. To do this, follow these steps:
- Remove dust from the the smoke alarm with a soft cloth.
- If necessary, remove dirt with a damp cloth. Do not use any cleaning agents.
- Perform the function test (see Function test).
- If you do not get any feedback, thesmoke alarm must be replaced.
Warranty
We are liable to our contractual partner for faults as defined by law. A claim for warranty
for defects in material and workmanship is only possible if the product has not been
opened without supervision and the receipt is attached. The warranty does not cover
batteries and wear parts.
16
Man al 33510-2014-Rev7-RZ.qxp_Layo t 1 30.09.15 15:02 Seite 16

Disposal of th d vic
The device may not be disposed of in the household waste. Please take it for
recycling to a collection point for electrical appliances in your community.
Batt ry disposal
Batteries may not be disposed of in the household waste.
Please take old batteries in a discharged state to a battery collection point in
your community or your dealer.
Disposal of packaging
The packaging must be made available for reuse.Please do not throw it in the
household waste and treatit according to local disposal regulations.
D claration of Conformity
In accordance with the following EuropeanGuidelines, the CE marking has
been granted: EU 305/2011 + 2004/108/EC.
For the declaration of conformity and performance, see
www.vivanco.de specifically to download Article 33510. DOWNLOAD
17
Pb/Cd/Hg
Man al 33510-2014-Rev7-RZ.qxp_Layo t 1 30.09.15 15:02 Seite 17

F Mod d' mploi
Veuillez lire attentivement les instructions de sécurité et le mode d'emploi
avant d'utiliser l'appareil. Conservez soigneusement le présent mode d'emploi
et transmettez-le tout propriétaire ultérieur.
Spécifications t chniqu s
Alimentation électrique : piles bloc 9 volts, carbone ou alcaline,
Types recommandés : Gold Peak GP1604S, GP1604P, G6F22, Pairdeer 6F22
Duracell MN1604
Alarme de pile : Signal acoustique (85dBA) en cas de pile presque vide
Classe de protection : IP20
Température ambiante : 0°C – 40°C, sans condensation
LED de fonctionnement
Poids (sans pile) : 90g
Dimensions : 106mm ø, hauteur 32mm
Utilisation conform
Le détecteur de fumée convient uniquement la détection de fumée (en cas de feu)
auprès de logements privés conformément au présent mode d'emploi. Il ne peut être
utilisé des fins commerciales. Toute autre utilisation n'est pas conforme et peut
entraîner des dommages personnels ou corporels pour lesquels le fabricant ne peut être
tenu responsable.
18
Man al 33510-2014-Rev7-RZ.qxp_Layo t 1 30.09.15 15:02 Seite 18
Instructions d sécurité
ATTENTION !
Risqu d'étouff m nt ou d brûlur suit à d s gaz d fumé ou f u
Dang r d mort t/ou dommag s corpor ls dang r ux suit à un montag
déf ctu ux à d s mplac m nts non autorisés t/ou n l'abs nc d' ntr ti n
réguli r
- Utiliser le détecteur de fumée UNIQUEMENT avec une pile chargée du type recomman-
dé et correctement montée.
- Placer le détecteur de fumée dans votre maison UNIQUEMENT aux emplacements
recommandés et au sec.
- Ne pas REPEINDRE ni TAPISSER le détecteur de fumée.
- Procéder régulièrement un TEST AUTOMATIQUE (appuyer sur la touche Test) et un
NETTOYAGE conformément au présent mode d'emploi.
- REMPLACER les PILES IMMÉDIATEMENT en cas d'échec du test automatique ou en
cas d'émission de l'alarme qui annonce que la pile est vide.
- REMPLACER IMMÉDIATEMENT le détecteur de fumée en cas d'échec du test
automatique même après un nettoyage et/ou un changement de pile car l'appareil
n'assume plus son rôle de protection.
ATTENTION !
Risqu d décharg él ctriqu , d' xplosion, d'inc ndi t d'inondation
Risqu s d bl ssur , d'étouff m nt, d dommag s corpor ls suit à un
décharg él ctriqu , à d s dégâts par gaz ou d s aux suit à la p rforation d
conduit s d'alim ntation.
19
Man al 33510-2014-Rev7-RZ.qxp_Layo t 1 30.09.15 15:02 Seite 19

ATTENTION !
Risqu d'inc ndi t/ou d brûlur par acid av c l s pil s
Risqu d'inc ndi , d brûlur par acid , d dommag s corpor ls suit à un
court-circuit ou à un fuit d la pil .
- Veuillez ne pas court-circuiter les contacts de la pile, par exemple lors d'un stockage
commun avec des objets métalliques.
- Ne pas exposer les piles directement ou sur une longue durée au soleil ou la chaleur.
- Ne pas jeter les piles dans le feu et ne jamais les ouvrir.
- Remplacer la pile uniquement par une pile identique ou similaire au type recommandé.
- Ne jamais recharger les piles.
Montag
Avant l'installation du détecteur de fumée, sélectionnez un emplacement de montage
adéquat. En Allemagne, les emplacements de montage sont réglementés par la norme
d'application DIN EN 14676. « Les emplacements recommandés » ci-après ne
représentent par conséquent qu'un extrait de la norme.
Emplac m nts d montag particulièr m nt r commandés
sont : chambres et cages d'escalier.
Procédez comme suit pour une utilisation efficace du détecteur de fumée :
- Placez au moins un détecteur de fumée chaque étage.
- Placez un détecteur de fumée dans les pièces comportant des appareils électriques.
- Placez le détecteur de fumée au milieu du plafond de la pièce, car la fumée s'élève
vers le plafond et se dissipe l'horizontale.
20
Man al 33510-2014-Rev7-RZ.qxp_Layo t 1 30.09.15 15:02 Seite 20
Table of contents
Languages:
Other Vivanco Smoke Alarm manuals


Popular Smoke Alarm manuals by other brands


Matelec
Matelec Residential FPC-30028 Owner's operation manual

brennenstuhl
brennenstuhl BR 102-F owner's manual

System Sensor
System Sensor TEMPORAL TONE SOUNDER BASE B501BHT Installation and maintenance instructions

Velocity
Velocity VDOT-ASD-100 user manual

Siemens
Siemens Cerberus DOT1151A-Ex Technical description

thefirebeam
thefirebeam Xtra user guide