VKI Technologies 145-3 Service manual

Revision -March 1997
THERMAL SERVER SYSTEM
T.S.S.
Operating and
Service Manual
MODELS
145-3180-3350-3
145-4180-4350-4
145-8180-8350-8

Page 29703 T.S.S. MANUAL
TABLE OF CONTENTS
INTRODUCTION..........................................................................................................3
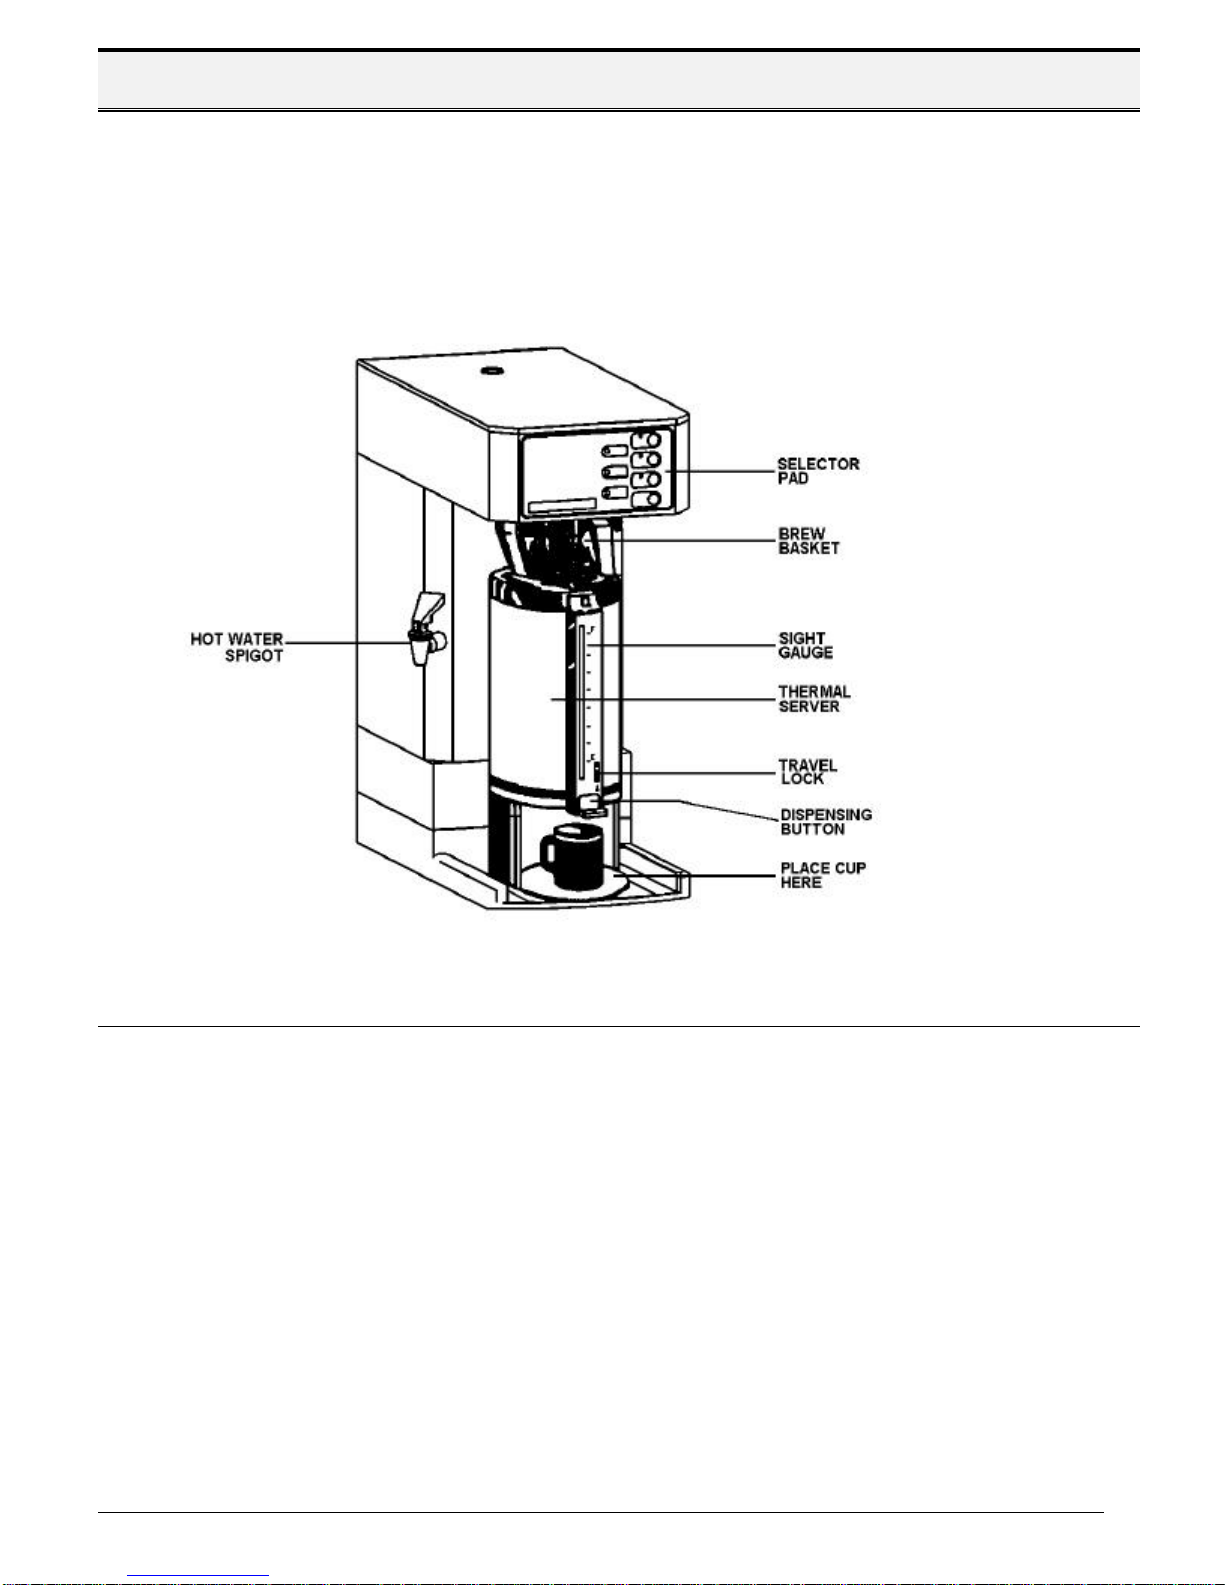
OPERATING DESCRIPTION.....................................................................................4-5
Function Indicator Lights ...........................................................................................................4
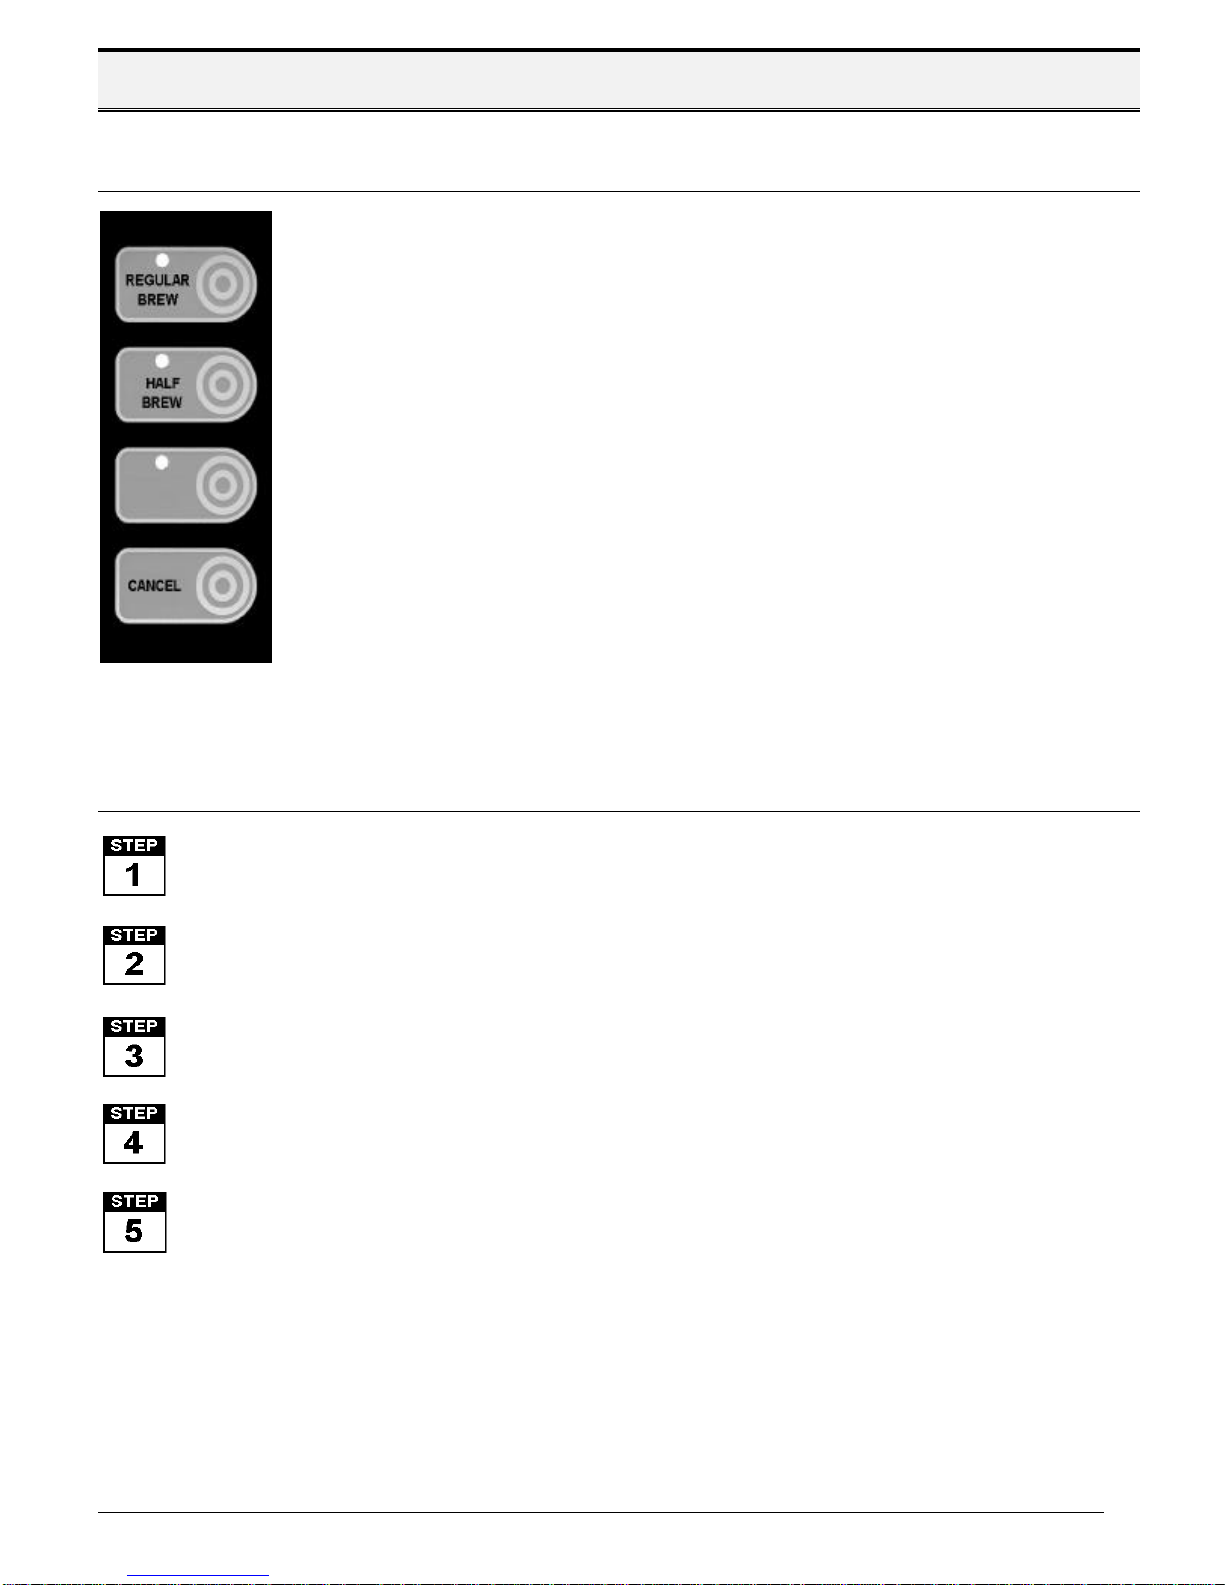
Brewing Function Pads..............................................................................................................5
Procedure for Making Coffee.....................................................................................................5
INSTALLATION INSTRUCTIONS ..............................................................................6-9
Plumber's Installation Instructions..............................................................................................6
Water Temperature and Adjustments .........................................................................................7
Adjusting Brew Level.................................................................................................................8
Adjusting Post Brew Buzzer.......................................................................................................9
Important Notes and Helpful Hints..............................................................................................9
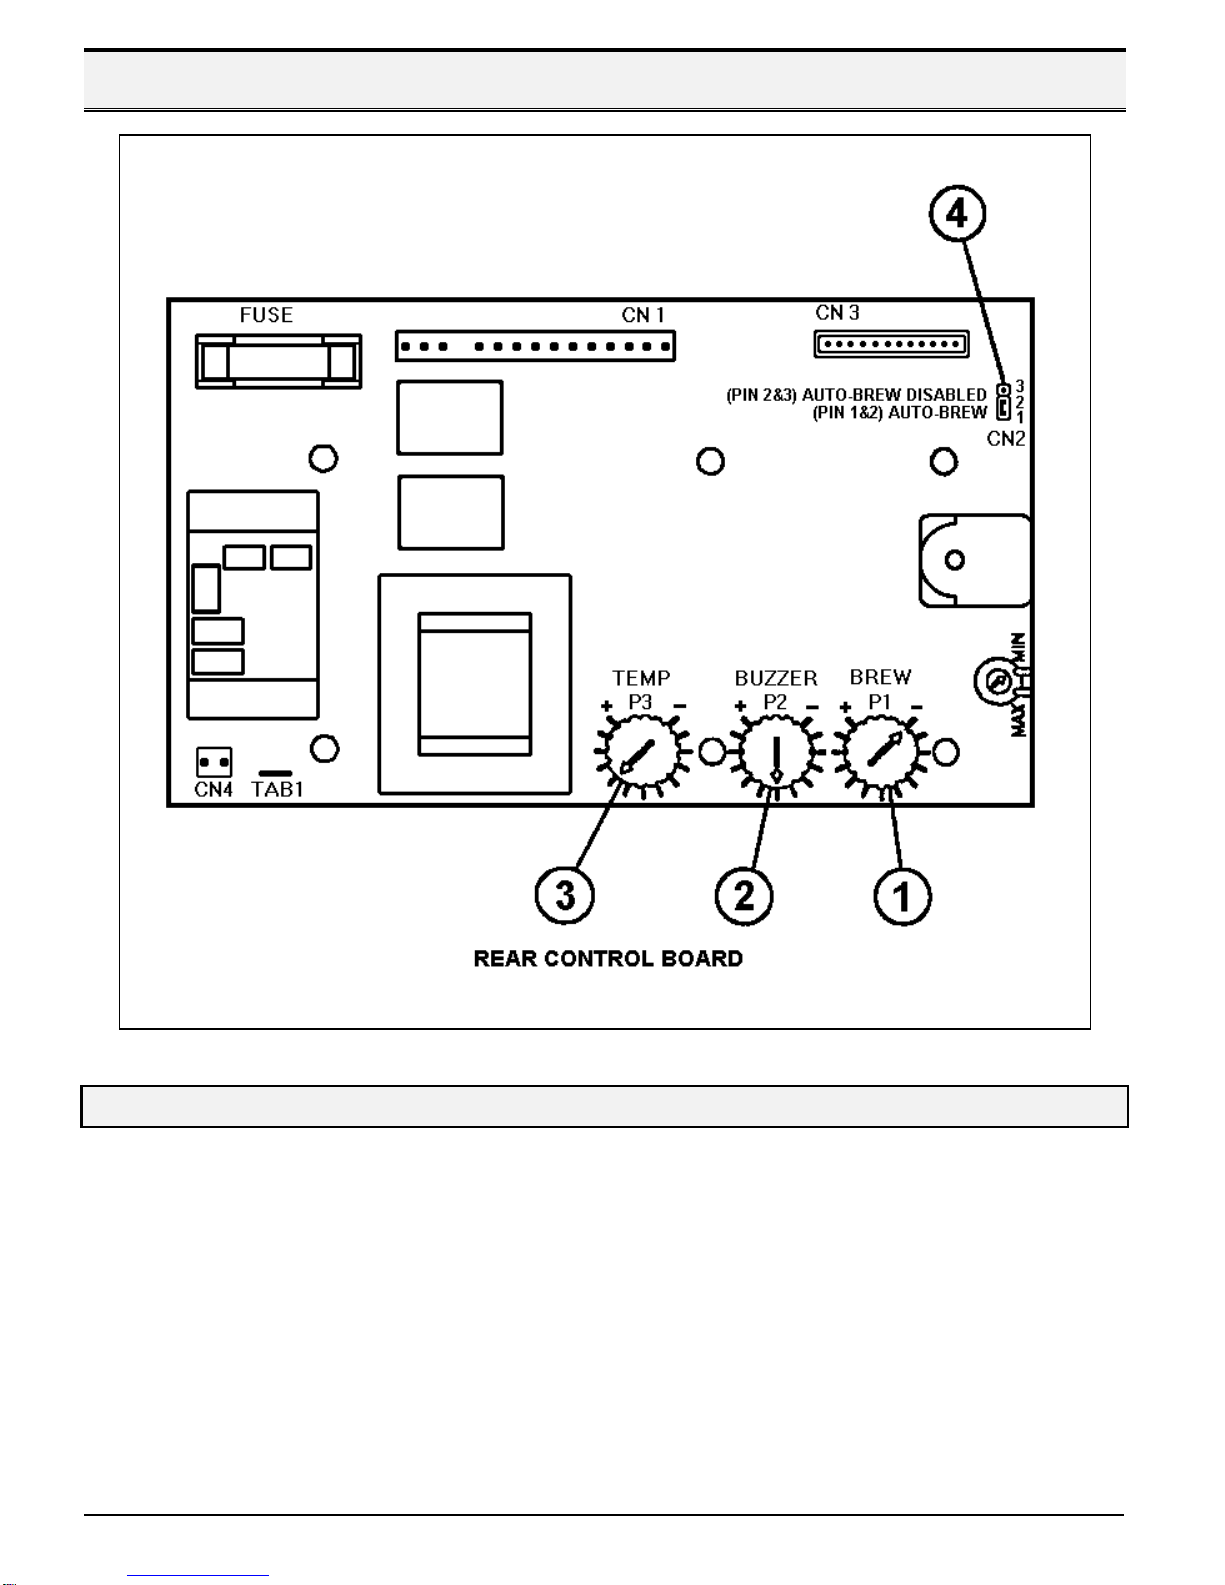
FUNCTIONS CONTROL AND PROCEDURE ..............................................................10
Factory Settings Rear Control Board........................................................................................10
SAFETY FEATURES..................................................................................................11
Overflow Safety Protection ......................................................................................................11
TEMPERATURE SETTINGS.......................................................................................12
CLEANING THE THERMAL SERVER.........................................................................12
DELIMING THE WATER TANK ..................................................................................13
Water Filtration Systems..........................................................................................................13
TROUBLESHOOTING GUIDE ...............................................................................14-19
Power ....................................................................................................................................14
Heat.......................................................................................................................................15
Brewing..................................................................................................................................16
Plumbing................................................................................................................................17
Warning / Auto........................................................................................................................18
Miscellaneous -Problem / Solution...........................................................................................19
WIRING DIAGRAM ...............................................................................................20-21
120 Volt..................................................................................................................................20
240 Volt..................................................................................................................................21
SPECIFICATIONS......................................................................................................22
PARTS .................................................................................................................23-27
Decals and Accessories ..........................................................................................................23
Complete System Assembly ................................................................................................24,25
Water Tank Assembly .............................................................................................................26
Inlet Valve Assembly...............................................................................................................27

T.S.S. MANUAL 9703 Page 3
INTRODUCTION
The VKI “Thermal Server System” (T.S.S.) series of brewers incorporates the latest advancements in materials and
electronics to provide optimum performance, quality and long service. Brewing begins the instant the cycle is
initiated and remains consistent regardless of water pressure variations and hot water faucet operation during the
brew cycle. The brewer's state of the art electronic control board controls heater tank water level, water temperature,
the amount of water dispensed, monitors draining of the grounds and provides an audible indication when the brew
cycle is complete.
T.S.S. FEATURES
þUser-friendly front selection panel.
þCompletely portable thermal server with a sight gauge and travel lock. Great feature for meetings, groups, etc.
þDripless dispensing button.
þOverflow access panel at rear of unit.
þIt provides consistently good tasting coffee that remains hot, flavorful and aromatic throughout the day. There is
virtually no waste because of excellent extraction.
þSpigot that provides a constant supply of hot water for a variety of beverages, such as tea, soup or hot chocolate.

Page 49703 T.S.S. MANUAL
OPERATING DESCRIPTION
FUNCTION INDICATOR LIGHTS
Green LED ON: Brewer is ready to brew coffee.
OFF: Brewer is heating water in tank to proper brewing temperature.
Amber LED
ON: Brewer is brewing.
Red LED Flashing: Brewer is in AUTO BREW mode and will automatically start the
brew cycle as soon as water in the tank reaches proper
brewing temperature; at the same time the green READY LED
comes on.
NOTE: Erratically flashing red light indicates that brewer is
in boiling condition and you must lower the temperature
(see page 7).
ON: Brewer is in WARNING mode and needs to be serviced. The
solid red light indicates that the backup probe in the water tank
has taken over because the primary probe is not working due
to lime build up or disconnection.

T.S.S. MANUAL 9703 Page 5
OPERATING DESCRIPTION
BREWING FUNCTION PADS
Multi-brew selection mode lets you select brew volume (REGULAR or HALF) by simply
pressing desired brew selector pad.
The green LED will light on the selector pad you have pressed. The amber BREWING LED
will also light indicating the brew cycle has been initiated. The green LED on selected brew
cycle pad will remain on during the brew cycle. At the end of the brew cycle an audible
signal will sound and the green and amber LED’s will turn off.
If the wrong selector pad has been pushed accidentally, the user may stop the brew cycle
by pressing the CANCEL selector pad.
PROCEDURE FOR MAKING COFFEE
Remove the brew basket from the T.S.S. by pulling it out towards you. Place coffee filter into the brew
basket, then add one package off coffee into the filter.
Insert the brew basket back into the T.S.S., then position the thermal server underneath. Check the
server’s sight gauge beforehand to make certain the server is empty, otherwise an overflow may
occur. Do not remove the flow-thru lid.
Press the desired selection on the front selector pad. If an error was made and the wrong product was
selected, simply press the CANCEL pad to stop the cycle.
When you hear the signal beep, it indicates that the cycle is complete and that the coffee is ready.
Remove the brew basket and discard the used grounds and coffee filter.

Page 69703 T.S.S. MANUAL
INSTALLATION INSTRUCTIONS
WARNING: Read and follow installation instructions carefully
before plugging in machine to electrical outlet.
1. Remove machine from shipping carton. It is strongly recommended to perform a visual inspection of the
machine inside out checking for loose connections on either control board or for damage to outlet valve that
might have been caused by mishandling during shipping. Please keep carton and packing in case the brewer
needs to be re-shipped.
2. Plumb in brewer.
PLUMBING INSTALLATION INSTRUCTIONS
CAUTION:Power to the brewer must be switched off before proceeding with installation.
a) Flush the water lines thoroughly before installing brewer. Brewer should be connected to a cold water line
for best operation. Check incoming water for adequate pressure. Water pressure should be at least 20
psi.
b) For less than a 25 ft. run, use 1/4" O.D. (outside diameter) copper tubing and connect to a 1/2” or larger
water line. For more than a 25 ft. run, use 3/8” O.D. copper tubing from a 1/2” or larger water line, and
provide an adapter fitting for the connection to the brewer.
c) If water pressure is more than 50 psi, we strongly recommend that you install a water pressure regulator
and set the water pressure below 50 psi. This will prevent erratic water levels in the server.
d) Connect the incoming water line to the incoming main fitting on the back of the brewer.
e) Provide an individual water line to each machine when there are multiple units installed at the same
location.
NOTE:A shut off valve should be installed on the incoming water line in a convenient
location. This will allow the user to shut the water supply, if needed.
3. Place an empty server under brew basket. Use the sight gauge to make certain it is empty.
4. Plug the brewer into proper voltage circuit and switch the power ON.
5. Water will automatically begin to fill the tank. After water tank has filled, remove the top cover of the T.S.S. by
removing the one screw in front securing it in place.
6. Switch the power OFF.
7. Reconnect heater terminal wires with red tape.

T.S.S. MANUAL 9703 Page 7
INSTALLATION INSTRUCTIONS
8. Put top cover back and turn power switch to ON.
9. Measure water temperature inside tank and adjust it to the recommended brewing temperature for your area
(according to elevation).
NOTE: Recommended water temperature in tank at sea level is 205° to 206° F. For every 500 ft. above sea
level, you should set water temperature inside tank 1° less than 206° F.
WATER TEMPERATURE INSIDE TANK
ÜMEASURING WATER TEMPERATURE
To measure temperature in the tank, please use the following procedure:
a) Remove black plastic plug at the rear top of the brewer.
b) Insert DIGITAL THERMOMETER DT 10K through the opening and inside the tank through the
collapsible plug.
c) Take temperature reading about 30 seconds after green READY LED has come on and heater has
turned off. To get the true water temperature in the, tank it is important to follow this step accurately.
ÜADJUSTING WATER TEMPERATURE
The temperature dial on the control board (see page 10) is set at the 9 mark position and will heat the
water in the tank to about 201 -205° F.
To change temperature, please use the following procedure:
a) To decrease the temperature, turn the dial marked “TEMP” on the control board counterclockwise 2
markings. Draw about 1 liter of water through the spigot. This will cool down the water in the tank a
few degrees. Allow water to heat to the new setting. Repeat above step until desired temperature is
reached.
b) To increase the temperature, turn the dial marked “TEMP” on the control board clockwise slowly to
increase the temperature until you hear the click sound and the green READY LED has turned off
(this will increase temperature by about 3° F in the tank). If you desire higher temperature, please
repeat the above step.

Page 89703 T.S.S. MANUAL
INSTALLATION INSTRUCTIONS
10. Press REGULAR BREW selector pad and monitor amount of water dispensed. The brew level will reach about
10 cups.
ADJUSTING BREW LEVEL
IMPORTANT: The water temperature must be at brew READY before brew level can be
adjusted. Turning the AUTO BREW feature off by setting the jumper from pin 1&2 to pin 2&3
(manual operation) allows the service technician to set brew level without waiting for machine to
reach brew temperature.
When setting the brew valve, keep in mind that the yield should not exceed 14 -5oz. cups to prevent
overflowing of the server.
Factory setting will produce approximately 10 cups of water (REGULAR BREW). To change brew level,
please use the following procedure:
a) To increase the brew level, rotate BREW dial on the control board counterclockwise and align arrow to
desired mark (each mark will yield approximately 5 to 6 fl.oz. less).
b) To decrease the brew level, rotate BREW dial on rear control board clockwise and align arrow to
desired mark (each mark will yield approximately 5 to 6 fl.oz. more).
NOTE:Monitor the amount of water dispensed three times to make sure that the adjusted
level is constant.
NOTE:Due to the fact that decaf coffee does not hold as much water as regular coffee, the
yield of brewed decaf coffee in the server will be slightly higher (approximately 3%).
Make certain to take this into account when setting the brew level.
11. Empty the water from the thermal server. Place coffee filter (large-4 1/2” Dia. X 2 1/2” tall -CF12 made by
ALTRA FILTERS is recommended), and add proper amount of coffee into the brew basket. Then slide the
brew basket into holder.
12. Press REGULAR BREW selector pad to start brew cycle. At the end of the brew cycle, the post brew buzzer
timer will activate.
NOTE: The next brew cycle can only be initiated when the buzzer has sounded, signalling the end of the
current brew cycle.

T.S.S. MANUAL 9703 Page 9
INSTALLATION INSTRUCTIONS
13. Adjust post brew buzzer.
ADJUSTING POST BREW BUZZER
The post brew buzzer function is factory set at 60 seconds. This means that it takes approximately 60
seconds for the buzzer to be activated after the brew function has been completed. Ideally, the buzzer
should sound when the last drop of coffee has dripped out from the brew basket. Depending on the gram
weight, grind size and type of coffee used (water will flow through decaf coffee at a slower rate), this pre-set
time has to be decreased or increased to achieve the sounding of the buzzer when brew basket has stopped
draining.
To decrease the time for the buzzer to sound, rotate the BUZZER dial on control board counterclockwise,
and align the arrow to the desired mark (each mark will decrease time by about 3 seconds).
To increase the time for the buzzer to sound, rotate the BUZZER dial on control board clockwise, and align
the arrow to the desired mark (each mark will increase the time by about 3 seconds).
14. To cancel the brew cycle, simply press CANCEL pad.
IMPORTANT NOTES AND HELPFUL HINTS
•If the machine indicates a red WARNING LED and green LED on the HALF BREW selector on the front panel,
drain some water through hot water spigot. (This is due to the expansion of cold water during initial set-up.)
•Do not transport the coffee brewer with water inside the tank.
•The brewer can be emptied through the drain provided at the back. Simply release the clip until all the water
drains out and then relock the clip.
•Should you ever remove the tank cover, please be cautious when you put it back -the temperature probe
should rest in the centre of the heater coil and not at an angle. This could cause the temperature probe to read
the wrong temperature, or the temperature sensor could short out and fail.
•Do not draw a cup of coffee from the thermal server while the system is still brewing coffee. This will weaken the
remaining coffee in the server.
•If you need to switch the heater off, turn the power switch to the OFF position. Please note that once the system
switches ON again, it may require up to 30 minutes to reach the proper brewing temperature.

Page 10 9703 T.S.S. MANUAL
FUNCTION CONTROLS AND PROCEDURES
FACTORY SETTINGS FOR REAR CONTROL BOARD FUNCTIONS
•• BREW: Set at (-) mark to yield 10 cups (48 fl. oz./1.42 liter) in 2 minutes, 25 seconds ± 10
seconds. Adjustment information is available on page 8.
‚‚ BUZZER: Set at 7 mark, which is approximately 60 seconds. Adjustment information is
available on page 9.
ƒƒ TEMPERATURE: Set at 9 mark to get 201-205°F. Adjustment information is available on page 7.
„„ AUTO BREW: Jumper is set to pins 1 & 2 to enable the AUTO BREW.
To disable AUTO BREW, set jumper to pins 2 & 3.

T.S.S. MANUAL 9703 Page 11
SAFETY FEATURES
All T.S.S. series brewers are equipped with several safety features to ensure that the unit does not operate should a
problem arise. These safety features are described below.
•A secondary water level probe prevents that water tank from overfilling should lime and calcium build-up
accumulate on the primary water level probe.
•The control board is designed so that the water heater switches off if a short circuit or open circuit is detected on
the temperature probe.
•All T.S.S. models are capable of heating the water to a temperature close to the boiling point (210°F). In the
event of a calibration change, low atmospheric pressure or a fault in the control board, the unit is equipped with
an overflow cup for additional safety. Should this cup fill, power will be switched off to all the valves and the
heater, preventing water leaking from the machine. This overflow prevention system is described in detail below.
OVERFLOW SAFETY PROTECTION
In the event of the water temperature exceeding the boiling
point, or the water tank overflowing due to a control board
failure, any excess water will safely drip into the overflow safety
cup. This cup is located at the back of the water tank, as
illustrated in the drawing (left). The magnetic float inside the
overflow cup will deactivate the switch and shut off the power to
the control board. This will in turn switch off the power to the
inlet valve, the outlet valve and the water heater.
NOTE: Should the overflow cup be full, no lights will be
illuminated on the front selection panel. The only light that
will be on is the light in the main power switch.
If an overflow does occur, follow these simple steps to correct
it:
1. Loosen the screw that secures the overflow cup
access panel at the rear of the machine.
2. Lift and remove the overflow cup access panel out of its retaining bracket, empty the water, and re-install
it.
3. Rotate the temperature dial (marked TEMP) on the control board back three marks to lower the
temperature.
4. Drain one or two liters of hot water through the hot water spigot. This will drop the temperature of the
water currently inside the tank.
5. Allow tank to re-hear, and check the temperature with a thermometer. Adjust the dial until the desired
temperature is obtained.
If the symptoms persist, check the control board and/or the water temperature probe.

Page 12 9703 T.S.S. MANUAL
TEMPERATURE SETTINGS
The Thermal Server System’s advanced electronic design produces the correct, recommended brewing
temperatures resulting in proper extraction and full bodied, flavorful coffee in every cup. The drawing below shows
the temperatures at various brewing stages, and other useful information. Please note that this information applies
for equipment with the original factory settings.
CLEANING THERMAL SERVER
Place a clean filter in the brew basket, and add 1 tablespoon of Sanitizer 510 (available from Cafe 98
Industries), then install the brew basket.
Place the thermal server under the brew basket and initiate the brew cycle by pressing the REGULAR
BREW pad on the front selection panel.
The sanitizing solution will pour into the thermal server cleaning the server and the sight gauge.
After the brew cycle is complete, allow the sanitizing solution to sit for a minute. Draw some cups of
cleaner through the dispenser of the server.
Rinse brew basket and thermal server with fresh water and draw some fresh water through the
dispenser of the server.

T.S.S. MANUAL 9703 Page 13
DELIMING THE WATER TANK
To maintain the system at peak performance, it is necessary to periodically clean the lime and calcium build-up in the
water tank. We recommend the following procedure:
1. Remove the brewer's top cover by removing front cover screw.
2. Remove the tank top cover by removing four screws.
3. Put 5 tablespoons of citric acid inside the water tank, or use “Scale Kleen” from EVERPURE*according to
their instructions.
4. Place tank cover back.
5. Let the brewer heat to brewing temperature and wait for five minutes. (This will remove all the lime from the
tank and the lime will dissolve in the hot water.)
6. Run a brew cycle (this will help clean all the tubing) and also draw about two pots of hot water through the hot
water spigot.
7. Unplug the electrical power cord and disconnect the water line.
8. Drain the tank through the drain hose.
9. Rinse the tank with clean, cold water twice and drain.
10. Reconnect brewer to cold water line. Replace the tank cover and secure it with four screws.
11. Replace the top cover and secure it with a screw.
12. Plug the brewer into electrical outlet.
13. Run one brew cycle without coffee to clean tubing and draw some water out of hot water spigot.
14. The system is now ready to brew.
NOTE: In a heavy lime area, double the amount of citric acid and the waiting time as per steps 3 and 5.
WATER FILTRATION SYSTEM
Now you can enjoy the very best coffee without any chlorine taste or other impurities. Your T.S.S. brewer is
equipped to readily adapt the EVERPURE* filter bracket for a QL3-3BH water filter system. Everpure's Quick
Change Cartridge makes it easy for anyone to change the cartridge in 15 seconds without any tools and without
breaking the water line or creating any mess.
BENEFITS:
•removes chlorine and other off-tastes and odours
•filters particles as small as 1/2 micron
•increases energy efficiency
•increases holding time
•reduces scale build-up and corrosion
•filter out giardia, cryptosporidium and other cysts and asbestos fibres
CAPACITY: approximately 1500 gallons
For more information call EVERPURE directly toll-free at 1-800-268-5967 (CANADA & U.S.A.)

Page 14 9703 T.S.S. MANUAL
TROUBLESHOOTING -POWER

T.S.S. MANUAL 9703 Page 15
TROUBLESHOOTING -HEAT

Page 16 9703 T.S.S. MANUAL
TROUBLESHOOTING -BREWING

T.S.S. MANUAL 9703 Page 17
TROUBLESHOOTING -PLUMBING

Page 18 9703 T.S.S. MANUAL
TROUBLESHOOTING -WARNING/AUTO BREW

T.S.S. MANUAL 9703 Page 19
TROUBLESHOOTING -MISCELLANEOUS
PROBLEM SOLUTION
Water fills overflow safety cup and keeps shutting
the machine off. •Tank is boiling due to too high of a temperature setting.
Decrease temperature setting by turning TEMP dial on
control board counterclockwise.
•Machine was moved.
•Ground wires loose or not connected
•Wires not properly connected to the water level probes.
Empty overflow cup and make sure all ground connections,
and water level probe connections are tight.
Water level reaches secondary water level probes.
The red WARNING AUTO BREW LED and the
green HALF BREW LED will come on.
•Primary water level probe is coated with lime and needs
to be cleaned.
•Water level probes are not pointing straight down and
need to be adjusted.
•The machine was moved. Draw a few cups of hot water
from the spigot to lower the level.
•Cold water expanded after heating. Draw a few cups of
hot water from the spigot to lower the level.
There are no LED’s lit on the front selection panel,
but the main power light (in the switch) is ON. Tank has overflowed into overflow safety cup. Empty cup
and replace.
Machine is cycling continuously. Harness is not properly connected to the rear board or front
board. Check the connections.
Green LED is on and machine works, but tank is
not heating. Thermistor may be open. Replace thermistor on tank
assembly.
Machine letting water in continuously until tank
overfills and overflows into the safety cup. Empty overflow safety cup and replace thermistor.

Page 20 9703 T.S.S. MANUAL
WIRING DIAGRAM -120 VOLT
This manual suits for next models
8
Table of contents
Other VKI Technologies Coffee Maker manuals

VKI Technologies
VKI Technologies Eccellenza Express User manual

VKI Technologies
VKI Technologies Eccellenza Momentum User manual

VKI Technologies
VKI Technologies Eccellenza Express User manual

VKI Technologies
VKI Technologies Eccellenza touch User manual

VKI Technologies
VKI Technologies Eccellenza touch User manual

VKI Technologies
VKI Technologies Eccellenza Pod User manual

VKI Technologies
VKI Technologies Eccellenza Pod User manual

VKI Technologies
VKI Technologies 2001 Operation manual

VKI Technologies
VKI Technologies Eccellenza Cafe User manual

VKI Technologies
VKI Technologies KEURIG Eccellenza touch User manual