Volvo 28239670 User manual

VOLVO AUDIO SYSTEM
Operating Instructions
Radio AM/FM/CD MP3/USB/iPod
Delphi part number 28239670
Radio AM/FM/CD MP3/USB/iPod/Bluetooth
Delphi part numbers 28239672, 28239674

2
Table of Contents
Table of Contents.......................................................................................................................................................... 2
Introduction ................................................................................................................................................................. 3
Safe Operation of the Radio................................................................................................................................................. 3
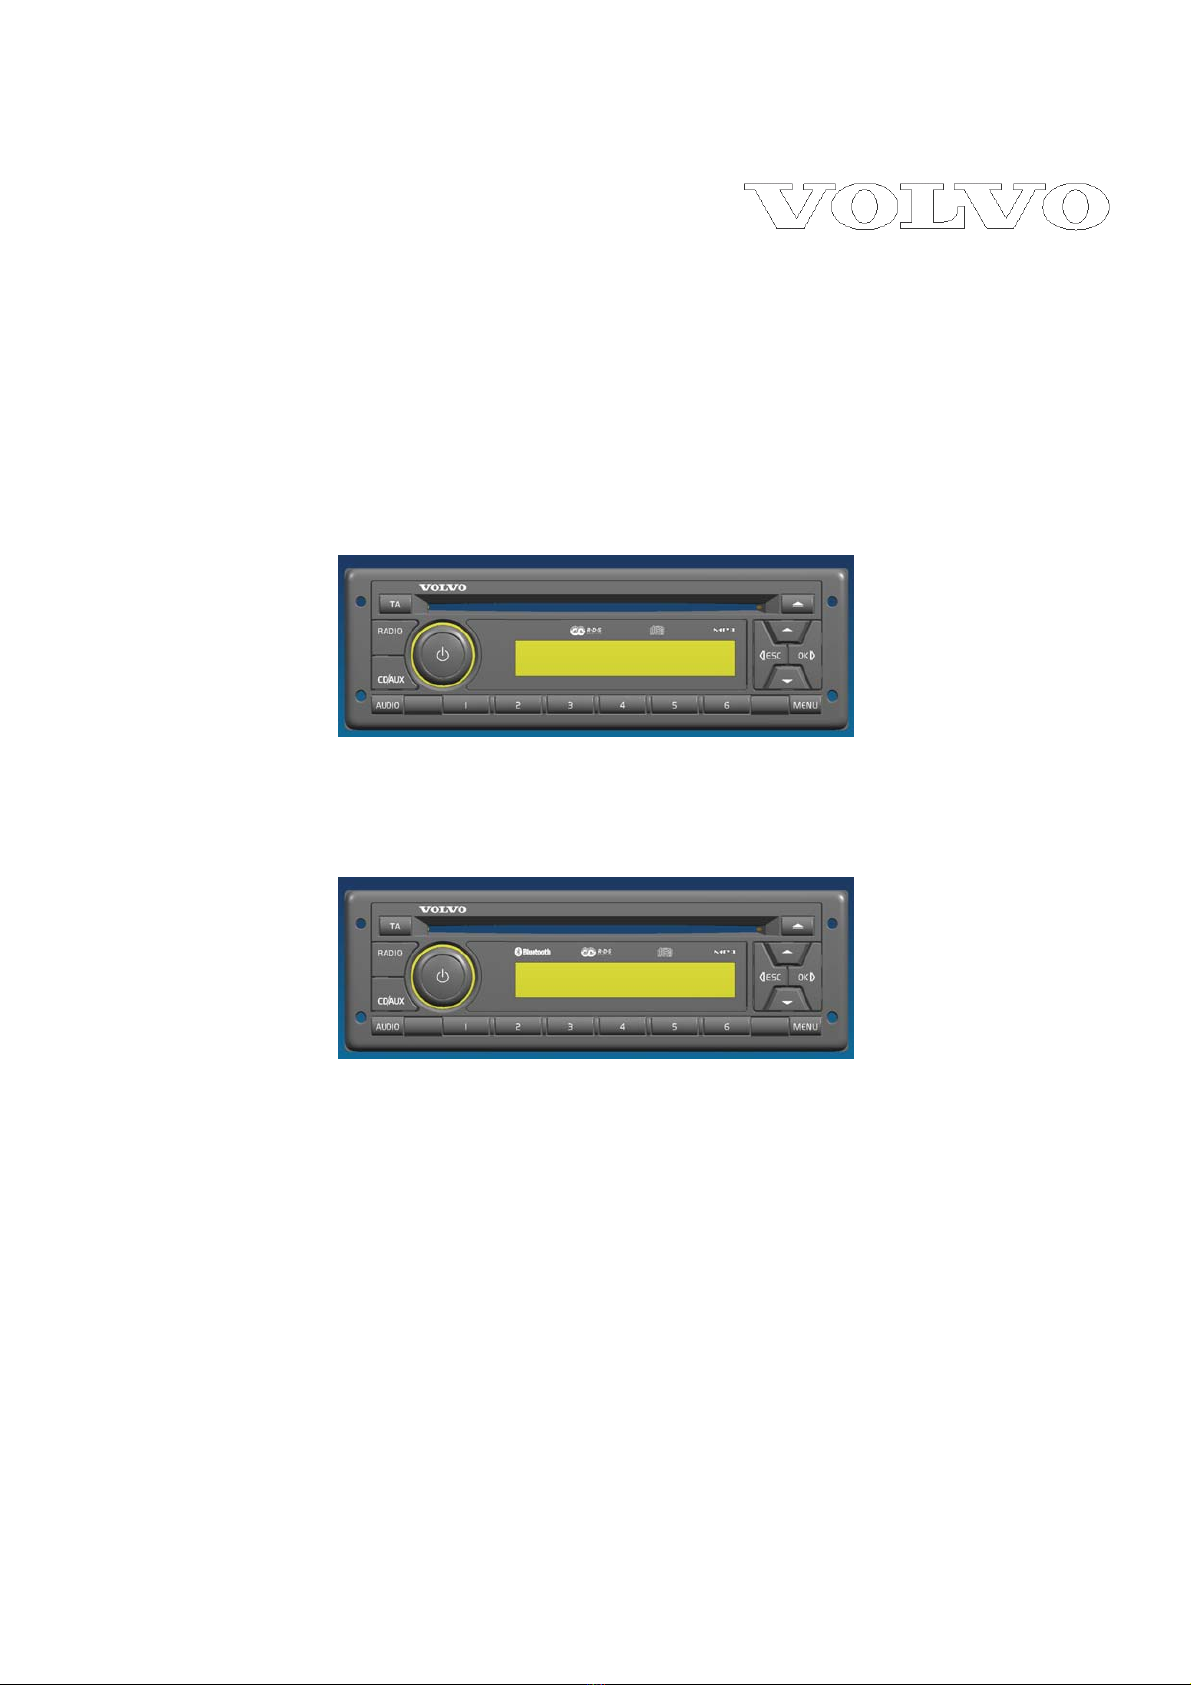
General Overview ......................................................................................................................................................... 4
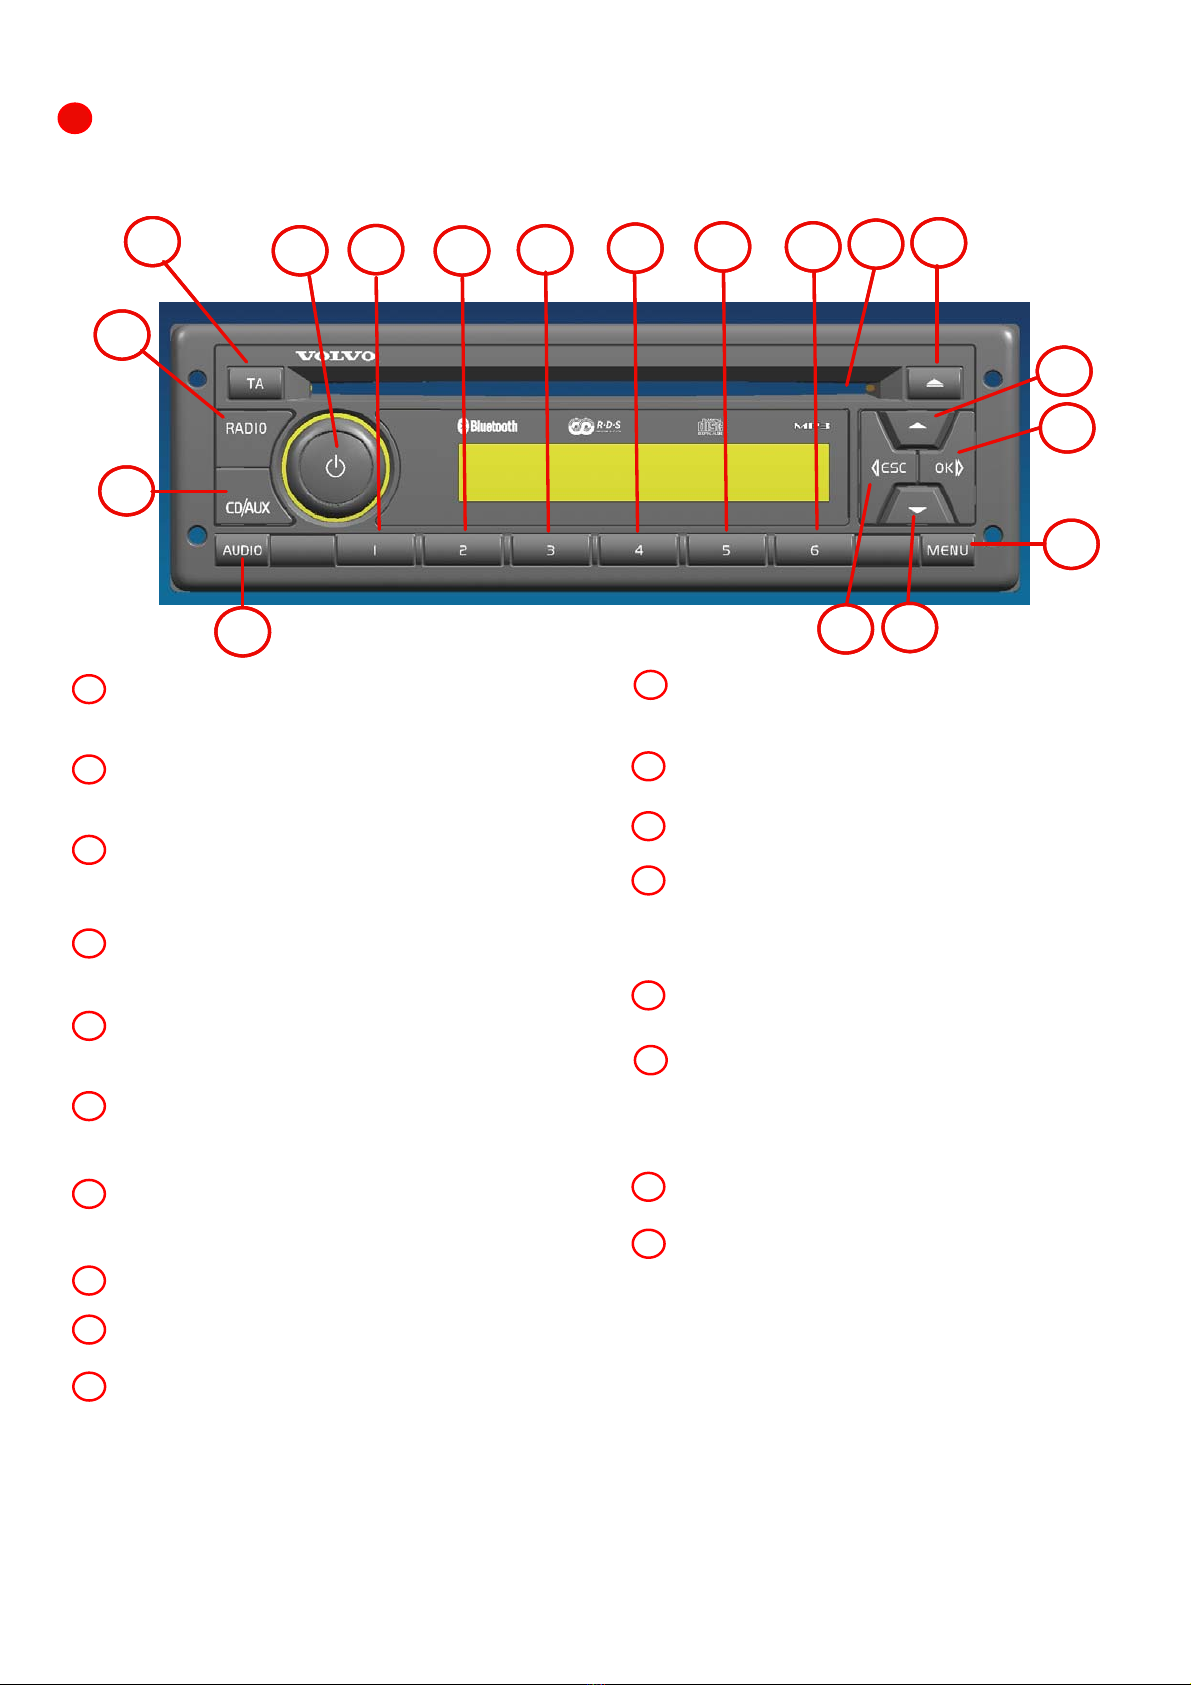
Radio / CD Controls Quick Reference Guide .......................................................................................................................... 4
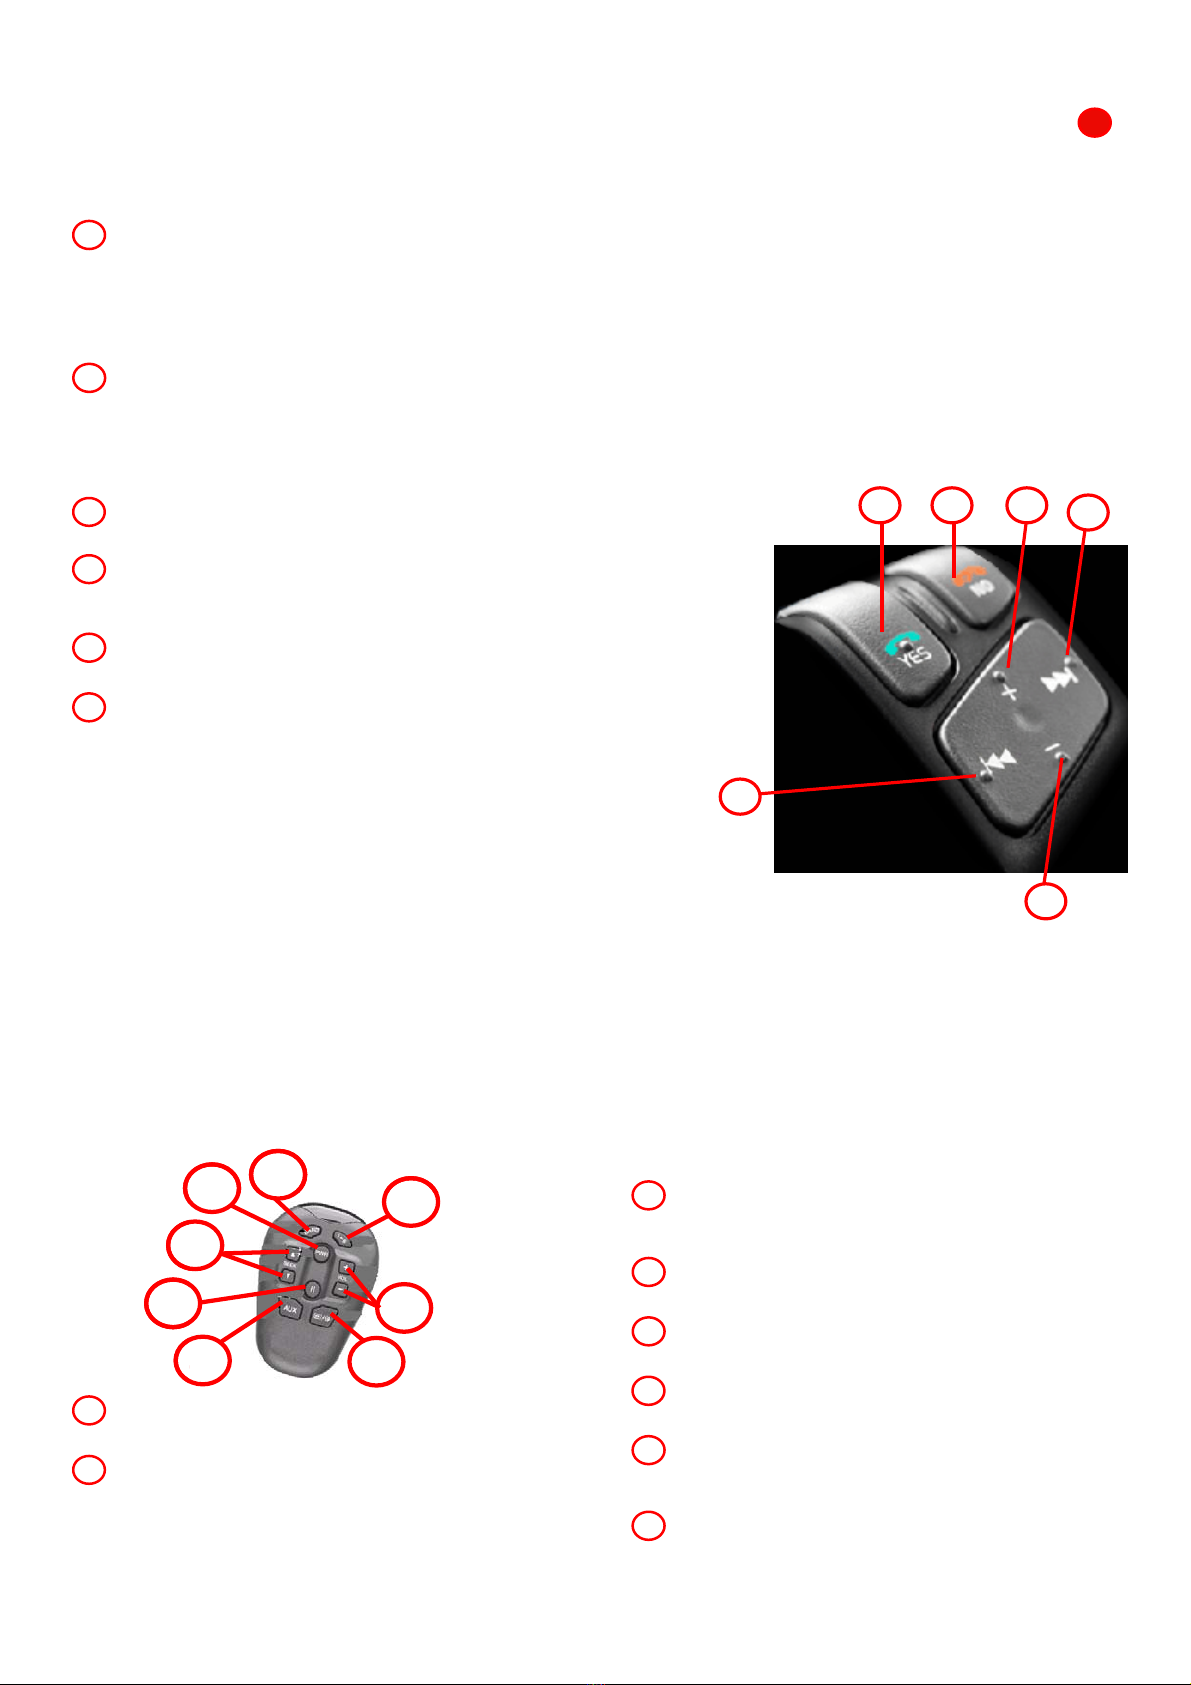
Steering Wheel Controls Quick Reference Guide.................................................................................................................... 5
Remote Control Quick Reference Guide ................................................................................................................................ 5
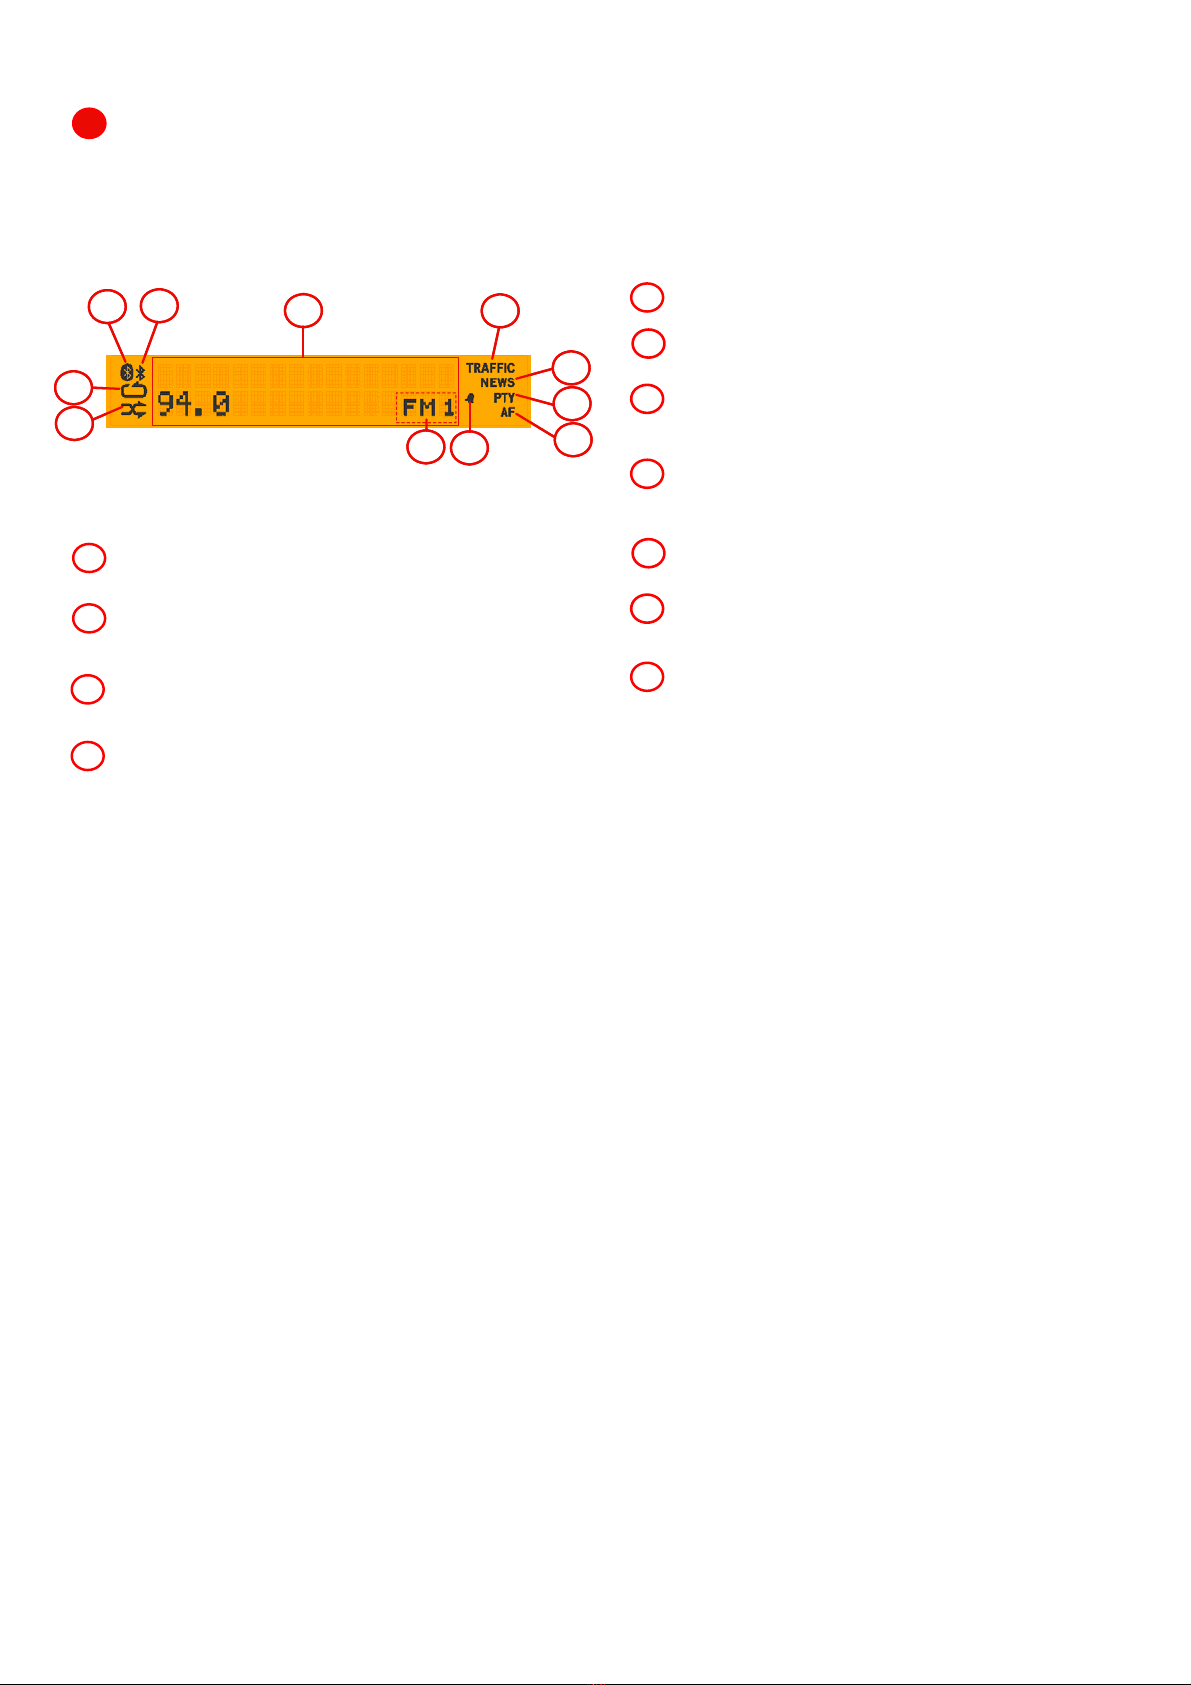
Display Quick Reference Guide............................................................................................................................................. 6
Radio LCD Display..............................................................................................................................................................................................6
Radio Data System (RDS).................................................................................................................................................... 7
Program Identification (PI Code).........................................................................................................................................................................7
Program Service Name (PS Code)........................................................................................................................................................................7
Alternative Frequency (AF Code).........................................................................................................................................................................7
Traffic Announcement and News.........................................................................................................................................................................7
Traffic / News Announcements Rejection.............................................................................................................................................................8
Enhanced Information Concerning Other Networks (EON).....................................................................................................................................8
Emergency Announcement .................................................................................................................................................................................8
Program Type (PTY)...........................................................................................................................................................................................8
Clock.................................................................................................................................................................................. 9
Displaying the Time............................................................................................................................................................................................9
12- or 12-Hour Format .......................................................................................................................................................................................9
Setting the Clock................................................................................................................................................................................................9
Turning ON/OFF the Alarm .................................................................................................................................................................................9
Setting the Alarm...............................................................................................................................................................................................9
Anti Theft Code..................................................................................................................................................................10
Main Functions ........................................................................................................................................................... 11
Power................................................................................................................................................................................11
Switching On & Off, Mute and Pause of the Audio System...................................................................................................................................11
Radio Mode .......................................................................................................................................................................11
Band Selection (FM and AM Mode)....................................................................................................................................................................11
Seek in radio mode..........................................................................................................................................................................................11
Manually tuning...............................................................................................................................................................................................11
Presets............................................................................................................................................................................................................11
Scan in radio mode..........................................................................................................................................................................................12
Adjusting Volume Up and Down........................................................................................................................................................................12
Adjusting Bass Up and Down ............................................................................................................................................................................12
Adjusting Treble Up and Down..........................................................................................................................................................................12
Adjusting Balance Left and Right.......................................................................................................................................................................12
Adjusting Fader Front and Back.........................................................................................................................................................................12
Speakers Selection...........................................................................................................................................................................................13
Activate / Deactivate Speed Dependant Volume .................................................................................................................................................13
CD Mode ...........................................................................................................................................................................13
Switch to CD Mode (From any other mode e.g. Radio Mode)...............................................................................................................................13
Eject a CD.......................................................................................................................................................................................................13
Change a Track on a CD...................................................................................................................................................................................13
Fast Forward or Fast Reverse on a CD...............................................................................................................................................................13
Play Tracks on a CD or music file in Random Order.............................................................................................................................................14
Repeat Tracks on a CD or music file..................................................................................................................................................................14
Change to next another folder on a CD..............................................................................................................................................................14
Scan a CD .......................................................................................................................................................................................................14
USB Mode..........................................................................................................................................................................15
Switch to USB Mode (From any other mode e.g. Radio Mode) .............................................................................................................................15
Disconect a USB..............................................................................................................................................................................................15
Change a Track on a USB.................................................................................................................................................................................15
Fast Forward or Fast Reverse on a USB .............................................................................................................................................................15
Play Tracks on a USB or music file in Random Order...........................................................................................................................................15
Repeat Tracks on a USB...................................................................................................................................................................................16
Change to another Folder on a USB...................................................................................................................................................................16
Scan a USB......................................................................................................................................................................................................16
iPod Mode .........................................................................................................................................................................16
Switch to iPod Mode (From any other mode e.g. Radio Mode).............................................................................................................................16
Disconect an iPod ............................................................................................................................................................................................16
Change a Track on an iPod...............................................................................................................................................................................17
Fast Forward or Fast Reverse on an iPod...........................................................................................................................................................17
Play Tracks on an iPod in Random Order ...........................................................................................................................................................17
Repeat Tracks on an iPod.................................................................................................................................................................................17
Scan an iPod....................................................................................................................................................................................................17
AUX Mode .......................................................................................................................................................................................................18
Bluetooth Handsfree Phone Mode ......................................................................................................................................18
Bluetooth Activation.........................................................................................................................................................................................18
Add a Phone....................................................................................................................................................................................................18
Activate Another Phone....................................................................................................................................................................................19
Delete a Phone................................................................................................................................................................................................19
Delete all Phones.............................................................................................................................................................................................19
Tips and Tricks ................................................................................................................................................................................................19

3
Safe Operation of the Radio
The driving conditions today require that the driver pays full attention to the road at all times. It is advised that when using this radio
while driving the driver maintain full concentration on the road. Therefore it is strongly advised to do the following:
Never Change a CD or read CD labels while driving.
Always Ensure the Volume of the Audio System is set so that outside acoustics can also be heard.
Introduction
The following instructions explain the general functions and operations of Volvo Radio Models.
Radio information is displayed through the LCD display on the radio.
The radio is commanded in three ways:
By the Faceplate shown in Fig 1.
By the Steering Wheel Controls in Fig 2 (optional feature).
By the Remote Control in Fig 3 (optional feature).
The main functions of the audio unit are:
Radio Mode.
CD (supporting mp3 and WMA).
USB (supporting mp3 and WMA).
iPod.
Auxiliary audio input.
Hands free (Bluetooth Phone Operation).

10
9
1
2
3
4
5
6
7
8
12
13
14
15
17
18
11
4
General Overview
Radio / CD Controls Quick Reference Guide
Fig 1.
“Preset #1” Button
Radio: Push and release: Recall Preset Station
Radio: Push and hold: Store Preset Station
“Preset #2” Button
Radio: Push and release: Recall Preset Station
Radio: Push and hold: Store Preset Station
“Preset #3” Button
Radio: Push and release: Recall Preset Station
Radio: Push and hold: Store Preset Station
“Preset #4” Button
Radio: Push and release: Recall Preset Station
Radio: Push and hold: Store Preset Station
“Preset #5” Button
Radio: Push and release: Recall Preset Station
Radio: Push and hold: Store Preset Station
“Preset #6” Button
Radio: Push and release: Recall Preset Station
Radio: Push and hold: Store Preset Station
“Rotary Knob/PWR” Button
Push: Power On and Off
Turn: Volume Adjust & Audio Value Update
CD Slot
CD: Insert / Remove CD
“Eject CD” Button
CD: Eject CD
Radio Select Mode
Radio: Choose from FM1, FM2 & AM Bands
Information (Traffic / News)
Radio: Switch Traffic on or off
Radio: Cancel ongoing Traffic or News message
CD/Aux Mode Select
CD/USB: Switch between sources other than radio
Up Button
Radio: Manual tuning up
(Fast) Forward >> Button
Radio: Seek
CD/USB: Push and release: Select Next Track
CD/USB: Push and hold: Fast Forward
Bluetooth Phone: Accept incoming call
Menu Button
Radio: Push and release: Menu Access
(Fast) Reverse << Button
Radio: Seek
CD/USB: Push and release: Select previous Track
CD/USB: Push and hold: Fast Reverse
Bluetooth Phone: Reject incoming call or hang up
iPod: Push and hold: Enter iPod menu
Down Button
Radio: Manual tuning down
Audio Button
General: Audio Settings
16
2345 6 8
15
13
9
16 17
14
1
10
12
11
18
72345 6 8
15
13
9
16 17
14
1
10
12
11
18
7

30
31
32
33
34 35
36
37
30
31
32
33
34 35
36
37
23
24
25
30
31
32
33
34
35
36
37
21
22
20
5
Steering Wheel Controls Quick Reference Guide
“Next” Button
Radio: Push and release: Seek
Radio: Push and hold: Manual tune up
CD/USB: Push and release: Select next track
CD/USB: Push and hold: Fast forward
“Previous” Button
Radio: Push and release: Seek
Radio: Push and hold: Manual tune down
CD/USB: Push and release: Select previous track
CD/USB: Push and hold: Fast reverse
“YES”Button
Not used for radio functions
“NO”Button
Not used for radio functions
“Vol +” Button
General: Increase Sound Volume
“Vol –”Button
General: Decrease Sound Volume
Fig 2 Volvo Steering Wheel
Controls
Remote Control Quick Reference Guide
Fig 3
“
Band” Button
Radio: Select between FM1, FM2 & AM Bands
“PWR” Button
General: Turns the Radio On and Off
“Seek” Buttons
Radio: Seek
CD/USB: Next or previous track
“Mute / Pause” Button
General: Mute or Pause the source of audio
“Aux” Button
Source: Select between USB, iPod or AUX
“CD Select” Button
CD: Select CD
“Vol + / Vol –” Button
Adjust the volume up and down
Preset 1 to 6
Radio: Select a Preset Station
20
21
22 2423
25

6
Display Quick Reference Guide
Radio LCD Display
Fig 4
Text display
Radio Displays radio band (FM/AM) and frequency
CD/USB Displays track, time and music when available
Source display (Part of (41))
Radio Displays radio band (FM1, FM2 or AM)
CD/USB Displays other source than radio
Phone connected
General Indicates that the phone is connected
Bluetooth on
Traffic Info
General Indicates that the Traffic function is on
News Info
General Indicates that the News function is on
AF
General Indicates that the AF (Alternative frequency)
function is on
PTY
General Indicates that the PTY (Program type) function
is on
Repeat
CD/USB Display when Repeat is on
Random
CD/USB Displayed when Random is on
Alarm
General Indicates that the Alarm clock function is on
General Indicates that the Bluetooth function is on
41
42
47
44
45
46
46
50
47
48
53
41
45
44
52
51
42
46
50
47
48
53
41
45
44
52
51
42
48
50
51
52
53

7
Radio Data System (RDS)
RDS is used by many radio stations throughout Europe. The system provides features such as Automatic frequency changing (AF)
and trigger signals for Traffic announcements (TA) and News.
Program Identification (PI Code)
The radio identifies the station currently being received by decoding the PI Code.
Program Service Name (PS Code)
The name of the radio station that appears on the display is contained in the PS Code.
Alternative Frequency (AF)
The range for FM stations is quite limited. For this reason many stations transmit on alternative frequencies in different areas. By
using the AF function, the driver can listen to such a station continuously without retuning the radio manually between the areas.
Some stations transmit different programs in different areas during some part of the day. To avoid tuning away from a locally sent
program, the AF function can be set to stay with that program by using AF LOC (local).
When traveling long distances the reception of a locally sent program may be lost. In such case, using the AF REG (regional) will
allow the radio to tune to other transmitters within that station.
When a radio search is performed the first time after activating AF, the radio creates an internal list of available stations. An
additional search will be done due to that list, which makes the search faster. The list is sorted with respect to the stations’ RDS
codes and the stations may not be tuned in frequency order in an AF search.
AF Activation
To activate or deactivate AF, perform the following:
1) Push the MENU button .
2) Push button
13
or until “AF” is displayed.
3) Select the AF status by pushing button .
When AF is active, the display shows the AF icon.
Traffic Announcement (TA) and News
This feature allows the radio to play traffic or news announcements even if the radio is in CD mode. To ensure that the message is
heard, the volume will be automatically adjusted to the highest of the three following volume levels.
Volume level 10 .
The present normal volume level.
A retained TA/News volume level.
The TA/News volume is set by adjusting the volume during a TA/News announcement. The radio will retain this TA/News volume
setting.
Traffic Activation
There are two ways to activate the Traffic function:
1) Push and release the information TA button .
OR
1) Press the MENU button on the radio.
2) Push button
13
or until “TRAFFIC” is displayed.
3) Activate “TRAFFIC” by pressing button .
When Traffic is active, the display shows the Traffic icon.
Note: If Traffic is active, then the AF function will be active.
14
17
15
11
14
17
15

News Activation
To activate the News function, perform the following:
1) Press the MENU button on the radio.
2) Push button
13
or until “TRAFFIC” is displayed.
3) Activate “NEWS” by pressing button .
When News is active, the display shows the News icon.
Note: If News is active, then the AF function will be active.
Traffic / News Announcement Rejection
To reject a current Traffic or News announcement, Push and release the information TA button.
Enhanced Information Concerning Other Networks (EON)
A network of stations may transmit News or Traffic announcements on just one of its stations. The RDS feature EON ensures that
this information is received by doing an automatic frequency change.
After the announcement the radio will return to the previous station.
Note: The Traffic and/or News functions need to be active for this feature to work.
Emergency Announcement - Alarm
In the event of a major disaster, an emergency announcement may be transmitted on the radio. When such is received, “ALARM” is
displayed and the Volume is adjusted as for TA/News announcements.
Program Type (PTY)
Some stations transmit common program types, e.g. Sports, Drama and Finance, along with an identifying signal. This allows the
user to search for such programs.
PTY Activation / Deactivation
To activate the News function, perform the following:
1) Press the MENU button on the radio.
2) Push button
13
or until “PTY” sub menu and activate/deactivate by pushing the button
14
.
3) Change the program type by pushing the
13
button on the radio as many times necessary.
When PTY is active, the display shows the PTY icon.
When a search is performed, this is indicated by displaying the chosen Program type.
17
15
11
14
17
15
8

Clock
Displaying the Time
By default, the time of day is displayed only when the ignition is ON and the radio is OFF. The Clock can be set to show the time also
when radio is ON, by doing the following:
1) Push MENU
15
button.
2) Push button
13
or until “CLOCK” is displayed.
3) Push button
14
to enter Clock sub menu.
4) Push button
13
or until “VISIBLE” is displayed.
5) Push button
14
to change between ON/OFF status.
12- or 24-Hour Format
The clock can be set to 12-hour or 24-hour mode. The 12-hour mode distinguishes between AM and PM.
To change the time format, do the following:
1) Push MENU
15
button.
2) Push button
13
or until “CLOCK” is displayed.
3) Push button
14
to enter Clock sub menu.
4) Push button
13
or until “12/24 HR” is displayed.
5) Push button
14
to change between 12H or 24H options.
Setting the Clock
Normally the time is set automatically by the trucks system. The option to manually set the time will then not be available.
To set the clock manually, do the following:
1) Push MENU
15
button.
2) Push button
13
or until “CLOCK” is displayed.
3) Push button
14
to enter Clock sub menu.
4) Push button
13
or until “SET TIME” is displayed.
5) Push button
14
to enter the Set time sub menu.
6) Push button
13
or to adjust the hours up or down respectively.
7) Push button
14
to set the hour and toggle to the minute adjustment.
8) Push button
13
or to adjust the minutes up or down respectively.
9) Push button
14
to save the time and finish the process.
Turning the alarm ON or OFF
To set turn On or Off the Alarm time, do the following:
1) Push MENU
15
button.
2) Push button
13
or until reaching “Wake Up Alarm” is displayed.
3) Push button
14
to enter the Wake up alarm sub menu.
4) Push button
13
or until “On/Off” is displayed.
5) Push
14
button to change the alarm status.
17
17
17
17
17
17
17
17
17
17
9

Setting the Alarm
To set the Alarm time, do the following:
1) Push MENU
15
button.
2) Push button
13
or until “Wake up alarm” is displayed.
3) Push button
14
to enter the Wake up alarm sub menu.
4) Push button
13
or until “Set time” is displayed.
5) Push button
14
to enter the Set time sub menu.
6) Push button
13
or to adjust the hours up or down respectively.
7) Push button
14
to set the hour and toggle to the minute adjustment.
8) Push button
13
or to adjust the minutes up or down respectively.
9) Push button
14
to save the time and finish the process.
Anti Theft Code (Guard)
The radio unit is set to function with only one vehicle. The Guard feature prohibits operation of the radio anywhere else.
The Guard is automatic and no manual handling is normally needed.
In case of malfunction
If, by some reason, the radio fails in detecting the required vehicle, the user will be prompted to enter the Anti Theft Code (sticker
found in Drivers Handbook). The display will then show “CODE 0000”.
Please note that this is a malfunction and should be checked at an authorized workshop.
To enter the code, do the following:
1) For the current (blinking) digit, turn the volume knob until the right number is shown.
2) Press the power button to enter the digit. The next digit will start to blink.
3) Repeat step 1 and 2 until all four digits has been entered.
The user has three tries to enter the code. If these are unsuccessful the radio will be locked for 60 minutes until three new tries are
allowed.
Deactivating Guard
It is possible to deactivate Guard, but (is) not recommended.
To deactivate the Guard function, do the following:
1) Push MENU
15
button.
2) Push button
13
or until “ADVANCE” is displayed.
3) Push button
14
to enter Advance sub menu.
4) Push button
13
or until “GUARD” is displayed.
5) Push button
14
to enter.
6) Push button
14
to set Guard ON or OFF.
The user will be requested for the Anti Theft Code to deactivate or activate Guard. The display will then show “CODE 0000” with the
first digit blinking.
To enter the code, do the following:
1) For the current (blinking) digit, turn the volume knob until the right number is shown.
2) Press the power button to enter the digit. The next digit will start to blink.
3) Repeat step 1 and 2 until all four digits has been entered.
The user has three tries to enter the code. If these are unsuccessful the radio will be locked for 60 minutes until three new tries are
allowed.
7
17
17
7
17
17
17
17
10

Main Functions
Many functions are controlled or adjusted through the radio Menu. If the Menu screen is open and the radio experiences no activity
for a 10 second period, the radio will cancel any incomplete actions, close the Menu screen and return to normal operation. The
radio will save all completed changes.
Power
Switching On & Off, Mute and Pause of the Audio System
The audio system is switched on or off by pressing the button.
If the driver wants to quickly mute the audio system sound, press the button.
Radio Mode
Band Selection (FM and AM)
To select the radio as the play mode, turn the radio on and press the RADIO button
10
.
The radio will then be active on the last used radio band (AM, FM etc).
To switch between the bands (AM/FM1/FM2/FM3) use the RADIO button
10
.
Seek in radio mode
There are two ways to seek for a radio station:
1) Use the Seek buttons
16
or
14
to seek up or down respectively on the radio. Once a station is found the seek
function will stop.
OR
2) Use the Seek buttons of the Steering Wheel Control or to seek up or down respectively on the radio. Once a
station is found the seek function will stop.
Manually Tuning
Manual Tuning can be performed in two ways:
1) Push the
13
or button to tune up or down respectively.
OR
2) Push and hold button or on the steering wheel, to tune up or down respectively.
Presets (Storing Radio Stations)
Up to 18 FM and 6 AM radio stations can be stored for fast access. There are tree sets of FM radio preset bands, which are FM1,
FM2, FM3, and one AM radio preset band. Each preset band can store 6 stations on buttons 1 thru 6.
To store a specific station into a preset button, do the following:
1) Push RADIO
10
button until the required frequency band is active (AM, FM1, FM2, FM3).
2) Tune the radio to the desire station.
3) Push and hold the desire preset button
1
2
3
4
5
6
.
4) There will be a short as the station is stored. When audio returns the process is completed.
Presets (Selecting a Stored Radio Station)
To select one of the preset stations, perform the following:
1) Push the RADIO
10
button to select the required band (AM, FM1, FM2, FM3).
2) Push and release the required preset button
1
2
3
4
5
6
to activate the desire station.
2021
17
2021
7
7
11

Scan in radio mode
The scan feature allows the user to perform a radio station search without having to toggle manually thru the stations. When in scan
mode, each station found will play for 10 seconds to give the user a chance to sample the station program or music. The scan will
then continue on to the next available station unless the user chooses to stop the scan and stay at the present station.
To enter scan mode, perform the following:
1) Press MENU button
15
on the radio.
2) Select “SCAN” by pressing
14
.
To exit scan mode and stay at the present station perform:
1) Press the RADIO
10
button.
Adjusting Volume Up and Down
The audio systems volume can be adjusted up by turning the knob in a clockwise direction and adjusted down by turning the
knob in a counter-clockwise direction.
It can also be adjusted up and down by using the +and –on the steering wheel controls respectively.
Adjusting Bass Up and Down
The audio systems bass can be adjusted by pressing the AUDIO button until BASS shows on the display.
The bass is then adjusted up by turning the knob in a clockwise direction and adjusted down by turning the knob in a
counter-clockwise direction.
It can also be adjusted up and down by using
16
or
14
on the radio respectively.
Adjusting Treble Up and Down
The audio systems treble can be adjusted by pressing the AUDIO button until TREBLE shows on the display.
The treble is then adjusted up by turning the knob in a clockwise direction and adjusted down by turning the knob in a
counter-clockwise direction.
It can also be adjusted up and down by using
16
or on the radio respectively.
Adjusting Balance Left and Right
The audio systems balance can be adjusted by pressing the AUDIO button until BALANCE shows on the display.
The balance is then adjusted right by turning the knob in a clockwise direction and adjusted left by turning the knob in a
counter-clockwise direction.
It can also be adjusted left and right by using
16
or
14
on the radio respectively.
Adjusting Fader Front and Back
The audio systems fader can be adjusted by pressing the AUDIO button until BALANCE shows on the display.
The balance is then adjusted right by turning the knob in a clockwise direction and adjusted left by turning the knob in a
counter-clockwise direction.
It can also be adjusted left and right by using
16
or
14
on the radio respectively.
Adjusting Mid (Medium Frequency Range) Up and Down
The audio systems mid can be adjusted by pressing the AUDIO button until MID shows on the display.
The mid is then adjusted up by turning the knob in a clockwise direction and adjusted down by turning the knob in a
counter-clockwise direction.
It can also be adjusted up and down by using
16
and
14
on the radio respectively.
77
18
77
18
77
18
77
18
77
18
2524
7
7
12

Speakers Selection
The audio system can be adjusted to 4 or 2 speaker mode by performing the following:
1) Press the MENU button
15
.
2) Push button
13
or until “ADVANCE” is displayed.
3) Press the
14
button to enter the “ADVANCE” submenu.
4) Push button
13
or until “SPEAKERS” is displayed.
5) Change between 2CH and 4CH by pressing the
14
button.
Activate Speed Dependant Volume (ASC)
The audio systems volume can be set to increase with the speed of the vehicle. This is sometimes preferred to compensate for road
and engine sounds. The feature can be set to three levels of sensitivity, LOW, MID and HIGH.
To activate ASC, perform the following:
1) Press the MENU button
15
.
2) Push button
13
or until “ADVANCE” is displayed.
3) Press button
14
to enter the Advance sub menu.
4) Push button
13
or until “ASC” is displayed.
5) Press button
14
14 to enter the ASC sub menu.
6) Push button
13
or to choose between LOW, MID and HIGH.
7) Press button
14
to enter the desired ASC setting.
CD Mode
The radio is designed to work with standard CD format and MP3 and WMA files.
The CD player will accept CD-R as well as CD-RW discs.
Switch to CD Mode (From any other mode e.g. Radio Mode)
There are two ways to switch to the CD mode:
1) Push the CD/AUX button
12
until CD shows on display.
OR
2) Insert a CD into the CD slot
8
.
Eject a CD
To eject a CD press the eject
9
button. When CD is ejected the radio will play the previous audio source.
If the CD is not removed from the CD slot, it will automatically reload after 15 seconds.
Change a Track on a CD
There are two ways to change a track on a CD:
1) Push and release the
16
or
14
button on the radio to move to the next or previous track respectively.
OR
2) Using the steering wheel controls: Push and release the or button to move to the previous or next track
respectively.
Fast Forward or Fast Reverse on a CD
Fast forwarding or reversing a CD can be performed in one of two ways:
1) Push and hold the
16
or
14
button on the radio to fast forward or fast reverse respectively.
OR
2) Using the steering wheel controls: Push and release the or button to move to fast reverse or fast forward
respectively.
2021
2021
17
17
17
17
17
13

Play Tracks on a CD or in Random Order
There are two possible Random settings for a CD: Random All and Random Folder (If the content of the CD is stored in folders).
To play tracks in random order, do the following:
1) Press the MENU button
15
.
2) Push button
13
or until “RANDOM” is displayed.
3) Enter Random Sub menu by pressing button
14
.
4) Push button
13
or to choose between All and Folder.
5) Push button
14
to activate the desired Random mode.
Repeat Tracks on a CD
There are three possible Repeat settings for a CD: Repeat All, Repeat track and Repeat Folder (If the content of the CD is stored in
folders). By default, Repeat All is active.
To change the repeat setting, do the following:
1) Press the MENU button
15
.
2) Push button
13
or until “REPEAT” is displayed.
3) Enter Random Sub menu by pressing button
14
.
4) Push button
13
or to choose between All, Track and Folder.
5) Push button
14
to activate the desired Repeat mode.
Change to next another Folder on a CD
If the content of the CD is stored in folders, it is possible to change folders directly. To do this, push either the button
13
or
button to move to the next or previous album/folder respectively.
Scan a CD
When CD is scanned, the first 10 seconds of each track is played.
To activate Scan, do the following:
1) Press the MENU button
15
.
2) Select “SCAN” by pressing button
14
.
Scanning will stop if:
1) The face plate buttons
16
or
14
.
OR
2) All tracks are browsed through.
17
17
17
17
17
14

External audio input
There are three possible external audio input modes, USB, iPod and Aux. A USB and an AUX device can be connected and accessible
at the same time. However, if an iPod is connected the USB and the AUX devices will be disabled as an available source.
USB Mode
The radio is designed to work with USB devices formatted with the USB Mass Storage Device Class standard. Other USB devices may
still work with the radio though.
If a USB device doesn’t work properly, try reconnecting the device which may solve the problem in some cases.
A USB device must be connected prior to operating in this mode.
Switch to USB Mode
There are two ways to switch to USB mode.
1) Push the CD/AUX button
12
until USB shows on the display.
OR
2) Connect a USB device.
Disconnecting the USB device
No special preparations are needed to disconnect the USB device. When USB device is removed the radio will play the previous audio
source.
Change a Track on USB Device
There are two ways to change a track on a USB:
1) Push and release the
16
or
14
button on the radio to move to the next or previous track respectively.
OR
2) Using the steering wheel controls: Push and release the or button to move to the previous or next track
respectively.
Fast Reverse or Fast Forward on USB Device
Fast forwarding or reversing can be performed in one of two ways:
1) Push and hold the
16
or
14
button on the radio to fast forward or fast reverse respectively.
OR
2) Using the steering wheel controls: Push and release the or button to move to fast reverse or fast forward
respectively.
Play Tracks on a USB Device in Random Order
There are two possible Random settings for a USB device: Random All and Random Folder (If the content of the USB device is stored
in folders).
To play tracks in random order, do the following:
1) Press the MENU button
15
.
2) Push button
13
or until “RANDOM” is displayed.
3) Enter Random Sub menu by pressing button
14
.
4) Push button
13
or to choose between All and Folder.
5) Push button
14
to activate the desired Random mode.
17
17
2021
2021
15

Repeat Tracks on a USB Device
There are three possible Repeat settings for a USB device: Repeat All, Repeat track and Repeat Folder (If the content of the USB
device is stored in folders). By default, Repeat All is active.
To change the repeat setting, do the following:
1) Press the MENU button
15
.
2) Push button
13
or until “REPEAT” is displayed.
3) Enter Random Sub menu by pressing button
14
.
4) Push button
13
or to choose between All, Track and Folder.
5) Push button
14
to activate the desired Repeat mode.
Change to another Folder on USB
If the content of the CD is stored in folders, it is possible to change folders directly. To do this, push either the button
13
or
button to move to the next or previous album/folder respectively.
Scan a USB
When USB is scanned, the first 10 seconds of each track is played.
To activate Scan, do the following:
1) Press the MENU button
15
.
2) Select “SCAN” by pressing button
14
.
Scanning will stop if
1) The face plate buttons
16
or
14
.
OR
2) All tracks are browsed through.
iPod Mode
The radio supports iPod Classic, iPod Video, and iPod nano.
The iPod settings, e.g. Shuffle or Repeat, used prior to connecting the iPod to the radio will be used by the radio.
An iPod device must be connected prior to operating in this mode.
Connecting the iPod
Connecting the iPod can be done with two different cable sets.
A split cable from the iPod 30-pin connector to a USB connector and a 3.5 mm audio connector.
A separate iPod/USB cable plus a 3.5 mm male/male stereo audio cable connected to the iPod earphone output. The iPod volume
should in this case be set to maximum prior to connecting to the radio.
When the iPod is connected to the radio, the iPod’s controls will lock. All control of the iPod is done by the radio buttons. When in
this state, the iPod will display a Volvo logotype.
Switch to iPod Mode
There are two ways to switch to iPod mode:
1) Push the CD/AUX button
12
until iPod shows on the display.
Or
2) Connect an iPod device.
Disconnecting the iPod device
No special preparations are needed to disconnect the iPod device. When the iPod device is removed the radio will play the previous
audio source.
iPod Menu
When iPod is connected and source, the user can Push and hold the
16
button to enter the iPod Menu. This Menu contains
some of the most common functions used in the iPod. E.g. the user can search for Artists and Albums, as well as starting a Playlist.
Push and hold the
16
button for 1 second to enter the iPod Menu at last used level.
Push and hold the
16
button for 2 seconds to enter the iPod Menu at top level.
17
17
17
16

Change a Track on iPod
There are two ways to change a track:
1) Push and release the
16
or
14
button on the radio to move to the next or previous track respectively.
OR
2) Using the steering wheel controls: Push and release the or button to move to the previous or next track
respectively.
Fast Reverse or Fast Forward on iPod
Fast forwarding or reversing a CD can be performed in one of two ways:
1) Push and hold the
14
button to fast forward.
OR
2) Using the steering wheel controls: Push and release the or button to move to fast reverse or fast forward
respectively.
Please note that Push and hold the
16
button will enter the iPod menu.
Play Tracks on iPod in Random Order
There are two possible Random settings for iPod: Random Album and Random All.
To play songs in random order, do the following:
1) Press the MENU button
15
.
2) Push button
13
or until “RANDOM” is displayed.
3) Enter Random Sub menu by pressing button
14
.
4) Push button
13
or to choose between All and Folder.
5) Push button
14
to activate the desired Random mode.
Repeat a Track on iPod
There are two possible Repeat settings for iPod: Repeat One, and Repeat All.
To change the repeat setting, do the following:
1) Press the MENU button
15
.
2) Push button
13
or until “REPEAT” is displayed.
3) Enter Random Sub menu by pressing button
14
.
4) Push button
13
or to choose between All, Track and Folder.
5) Push button
14
to activate the desired Repeat mode.
Scan iPod
When iPod is scanned, the first 10 seconds of each track is played.
To activate Scan, do the following:
1) Press the MENU button
15
.
2) Select “SCAN” by pressing button
14
.
Scanning will stop if
1) The face plate buttons
16
or
14
.
OR
2) All tracks are browsed through.
17
17
17
17
2021
2021
17

AUX Mode
To select an auxiliary audio input:
Push the CD/AUX button
12
until Aux shows on the display.
An auxiliary audio input may be selected except when in iPod mode.
The output volume of the Aux device should be set to maximum.
Please note that for an Aux device, changing tracks, fast forwarding etcetera must be done directly on the Aux device.
Bluetooth Hands free Phone Mode
The radio is designed to work with mobile phones that support the Bluetooth Hands Free Profile 1.5. Other Bluetooth capable mobile
phones may still work with the radio though.
To connect a mobile phone to the radio through Bluetooth, the following steps must be completed on the radio.
1) Activate the Bluetooth function.
2) Add the Phone.
Please note that corresponding steps have to be taken on the mobile phone.
An added phone will be stored in a list for quick access when connecting at another time.
Bluetooth Activation
The purpose of this process is to make a Bluetooth connection possible.
1) Push the MENU button
15
.
2) Push button
13
or until “Hands Free” is displayed.
3) Push button
14
to enter the Hands Free sub menu.
4) Push button
14
to activate Bluetooth.
When Bluetooth is active, the display shows the icon.
Add a Phone
The purpose of this process is to make a connection between the radio and a phone as well as to add a phone to the radio phone
list.
1) Push the MENU button
15
.
2) Push button
13
or until “Hands Free” is displayed.
3) Push button
14
to enter the Hands Free sub menu.
4) Push button
13
or until “Add phone” is displayed.
5) Push button
14
to initiate the phone connection.
The radio will now do a search for a blue tooth phone. This is indicated by the icon blinking. Note that the phone must be in a
corresponding connecting state during this process.
When a connection is established, the user will be prompted to enter a code on the phone. Enter code 0000 to verify connection.
Activate another Phone
The purpose of this process is to disconnect a present bluetooth phone and establish a connection to another phone in the phone
list.
1) Push the MENU button
15
.
2) Push button
13
or until “Hands Free” is displayed.
3) Push button
14
to enter the Hands Free sub menu.
4) Push button
13
or until the display shows “ChangePhName” (where “PhName” will be the name of the
presently connected phone).
5) Push button
14
to enter the Change phone sub menu.
6) Push button
13
or until the phone name that is to be connected is displayed.
17
17
17
45
17
17
45
17
18

7) Push button
14
to connect to the other phone.
Delete a Phone
The purpose of this process is to delete a specific phone from the phone list in the radio.
1) Push the MENU button
15
.
2) Push button
13
or until “Hands Free” is displayed.
3) Push button
14
to enter the Hands Free sub menu.
4) Push button
13
or until “Edit Phone” is displayed.
5) Push button
14
to enter the Edit Phone sub menu.
6) Push button
13
or until the phone name that is to be deleted is displayed.
7) Push button
14
to delete the phone.
8) The display will show “Delete?” Push button
14
to verify.
Delete all Phones
The purpose of this process is to delete all phones from the phone list in the radio.
1) Push the MENU button
15
.
2) Push button
13
or until “Hands Free” is displayed.
3) Push button
14
to enter the Hands Free sub menu.
4) Push button
13
or until “Edit Phone” is displayed.
5) Push button
14
to enter the Edit Phone sub menu.
6) Push button
13
or until “Delete All” is displayed.
7) Push button
14
to delete the all phones.
8) The display will show “Are U sure?”. Push button
14
to verify.
Tips and Tricks
USB and MP3
WMA and MP3 are the only formats readable by the device.
Playlist must be in .PLS or .M3U format.
Playlist must contain the song in the USB device or CD.
Bluetooth
Compatible with standard 1.5.
More information at www.bluetooth.org.
iPod
For better quality and connectivity use iPod adapter “Pocket Dock with line out and USB”. www.sendstation.com.
iPod firmware must be recently updated www.apple.com.
CD MP3
Might take long time to read a CD MP3 if other files are within (non WMA, MP3, PLS or M3U).
17
17
17
17
17
17
19

VOLVO
www.volvo.com
DELPHI
www.delphi.com
20
This manual suits for next models
2
Table of contents
Other Volvo Car Receiver manuals

Volvo
Volvo VR100 User manual

Volvo
Volvo XC70 2013 D5 AWD User manual

Volvo
Volvo RSE User manual

Volvo
Volvo 30732863 User manual

Volvo
Volvo VR100 User manual

Volvo
Volvo 13 84 580 User manual

Volvo
Volvo 31659996 User manual

Volvo
Volvo 31296261 User manual

Volvo
Volvo SENSUS User manual

Volvo
Volvo SENSUS User manual