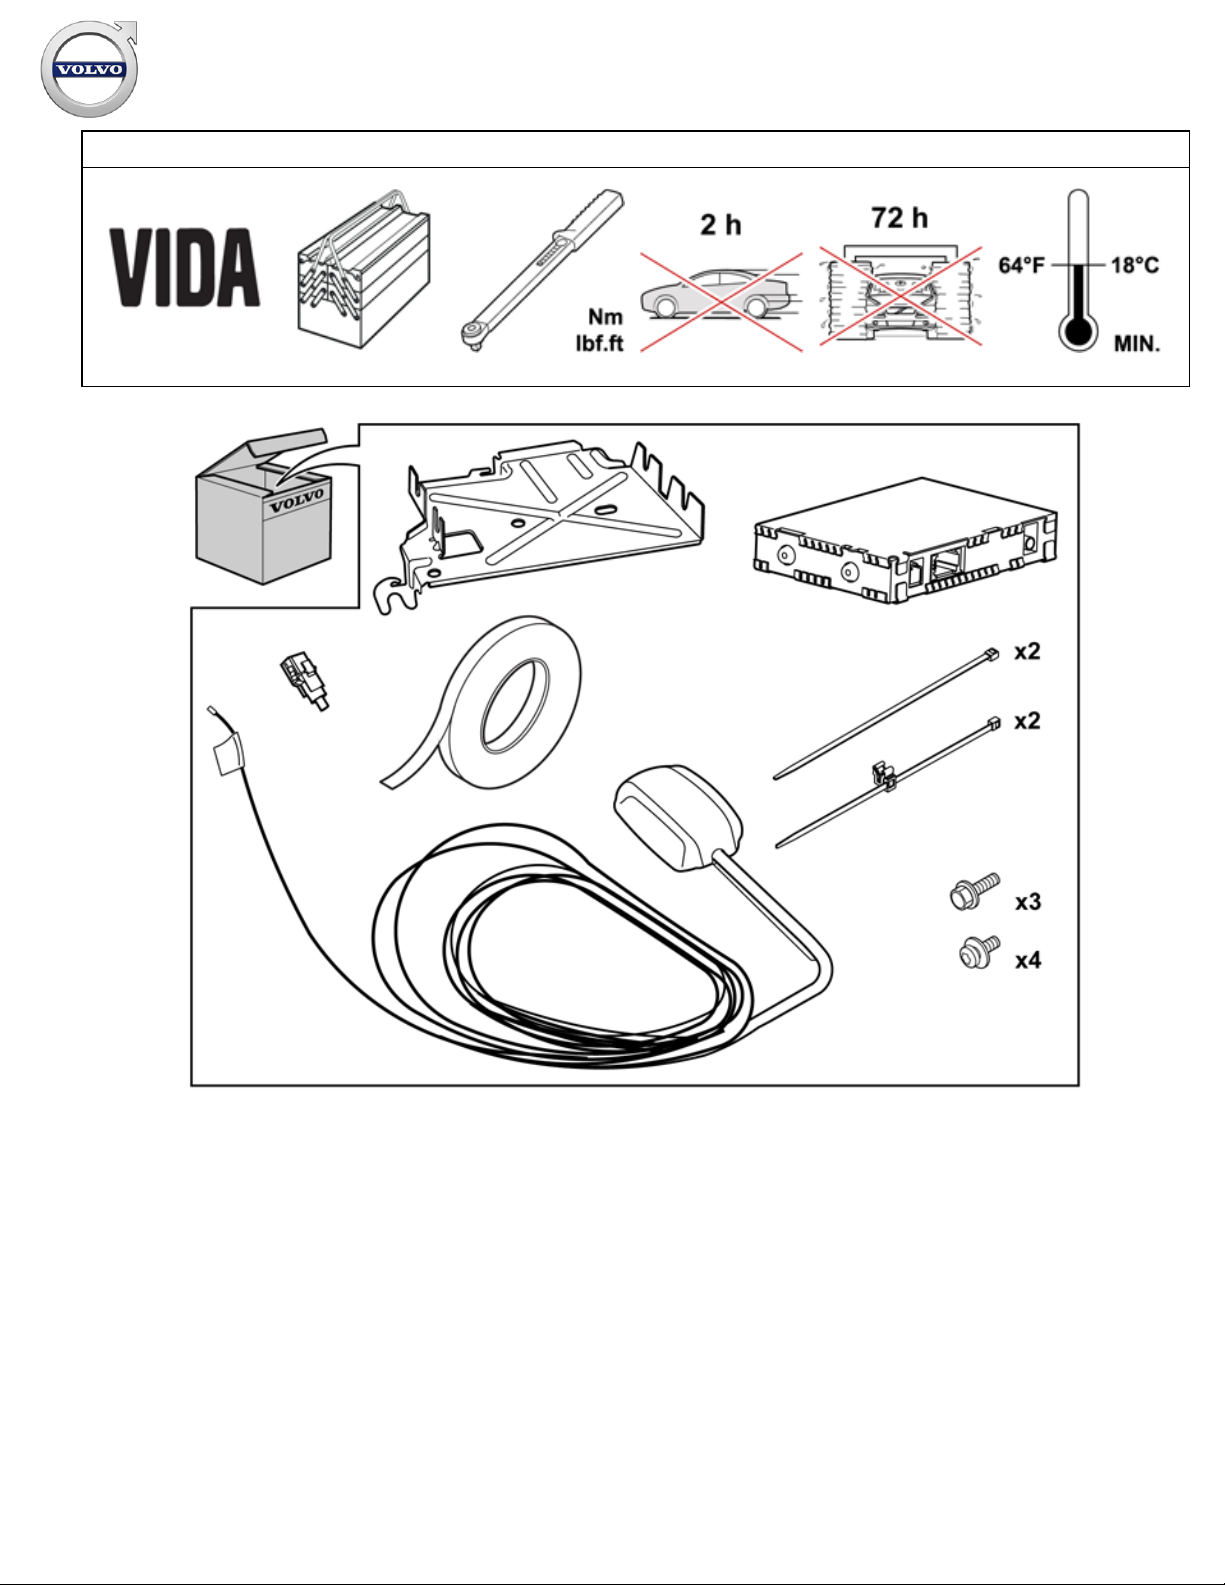
Volvo 31296261 User manual

Instruction No Version Part. No.
31201184 1.3 31296261, 31359449
Satellite radio, Sirius
IMG-246543
Instruction No Version Part. No.
31201184 1.3 31296261, 31359449
Satellite radio, Sirius
IMG-246543
Installation instructions, accessories Volvo Car Corporation Gothenburg, Sweden
© Volvo Car Corporation Satellite radio, Sirius- 31201184 - V1.3
Page 1 / 21

Equipment
IMG-242205 A0000162 IMG-239664 IMG-333288 IMG-336909 IMG-342961
IMG-342962
Installation instructions, accessories Volvo Car Corporation Gothenburg, Sweden
© Volvo Car Corporation Satellite radio, Sirius- 31201184 - V1.3
Page 2 / 21

INTRODUCTION
Read through all of the instructions before starting installation.
Notifications and warning texts are for your safety and to
minimise the risk of something breaking during installation.
Ensure that all tools stated in the instructions are available
before starting installation.
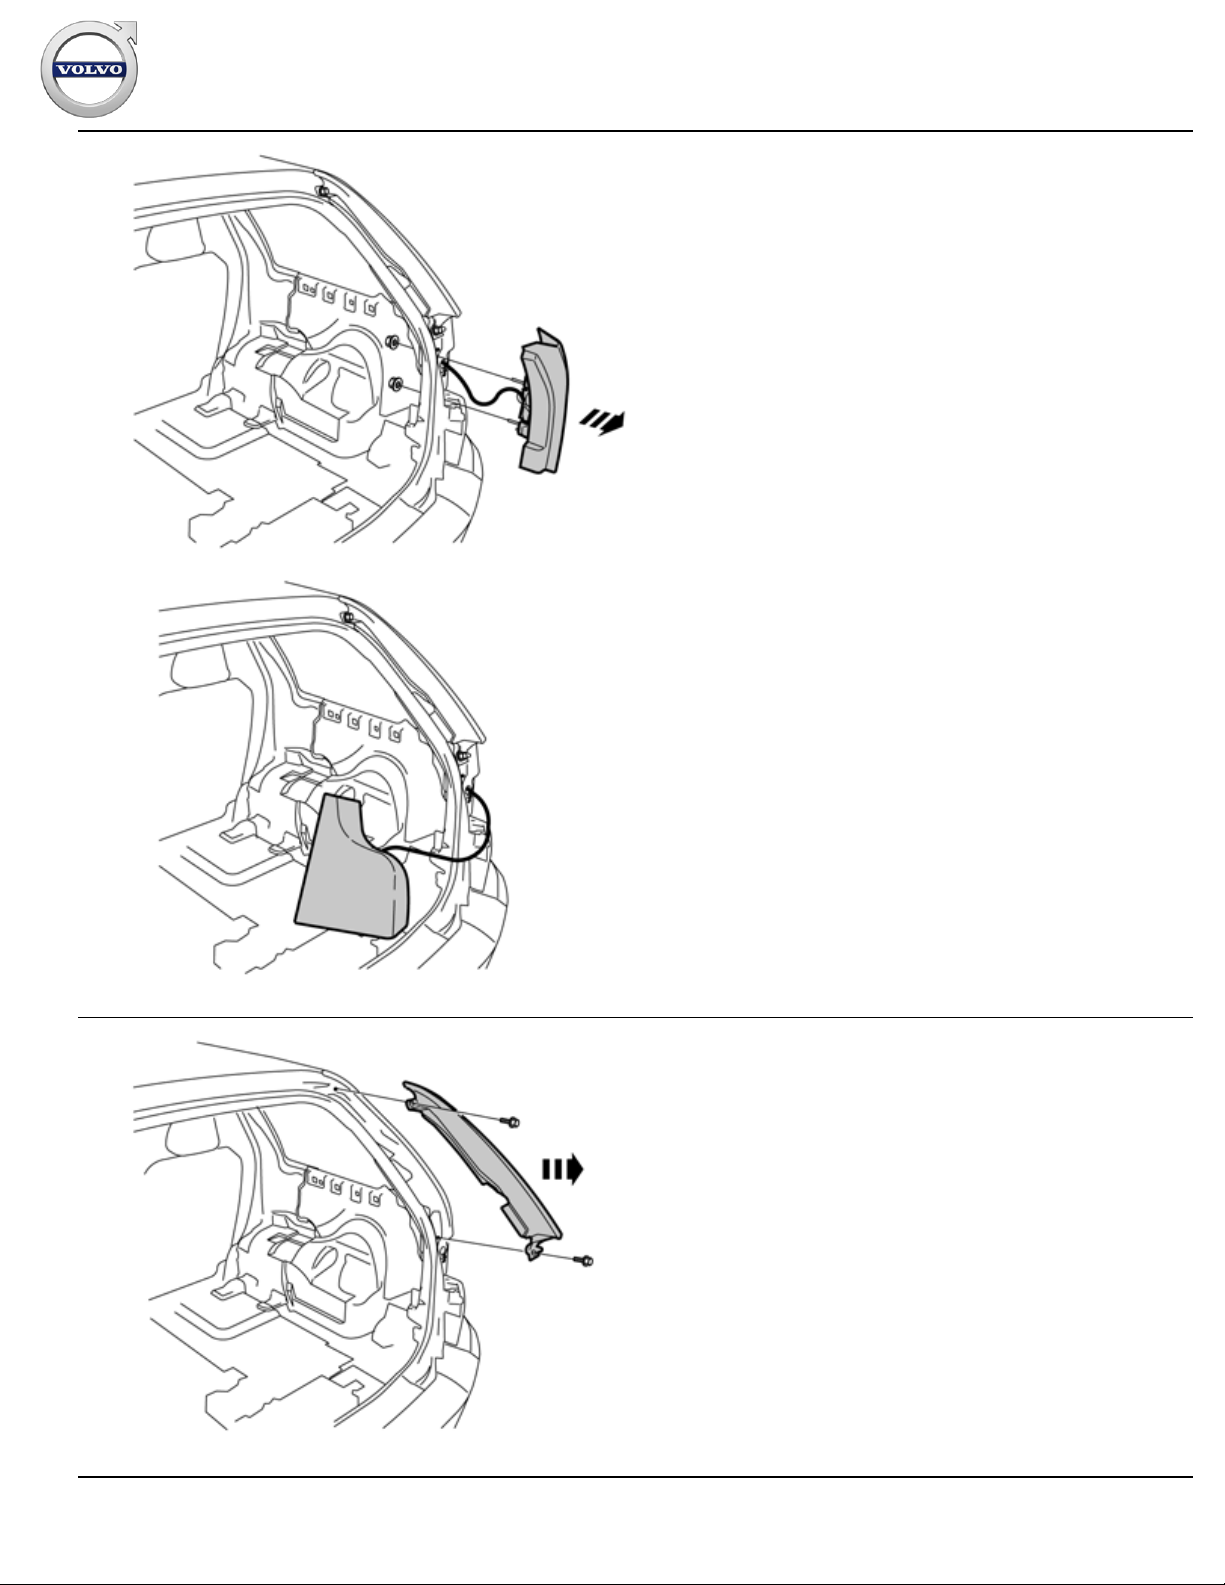
Certain steps in the instructions are only presented in the form
of images. Explanatory text is also given for more complicated
steps.
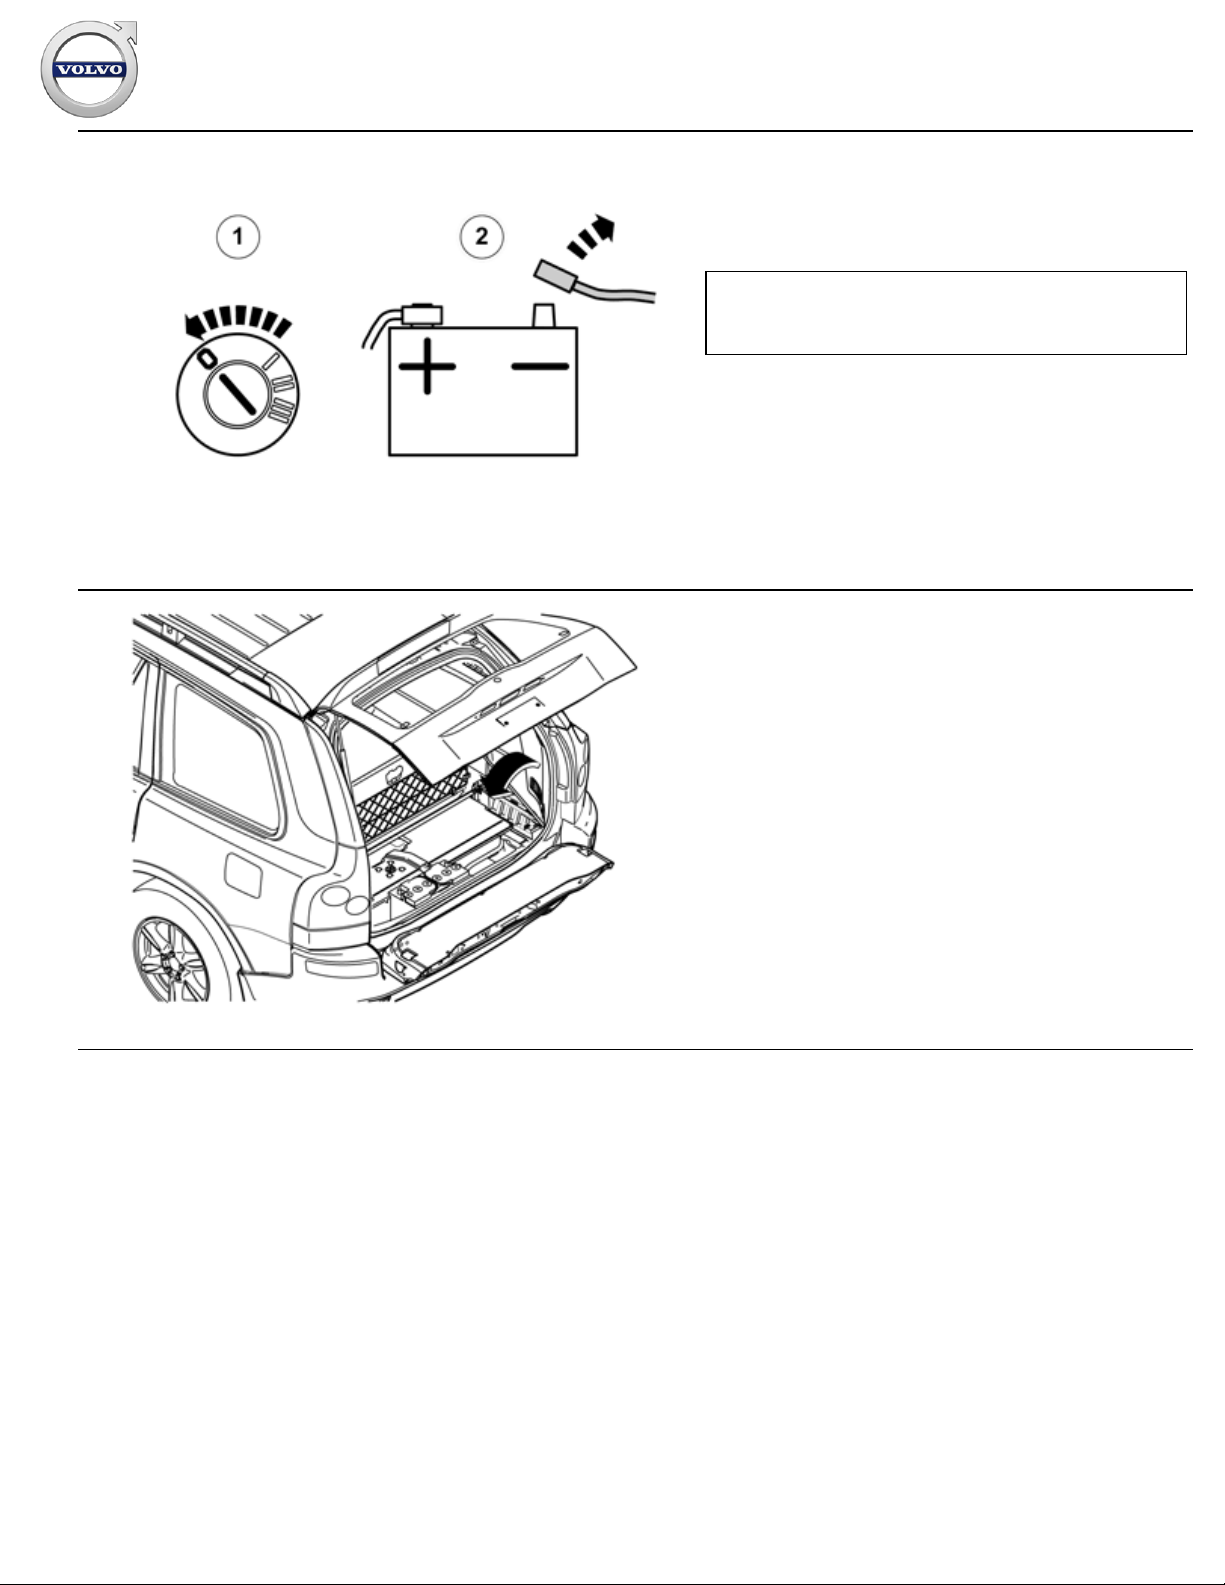
In the event of any problems with the instructions or the
accessory, contact your local Volvo dealer.
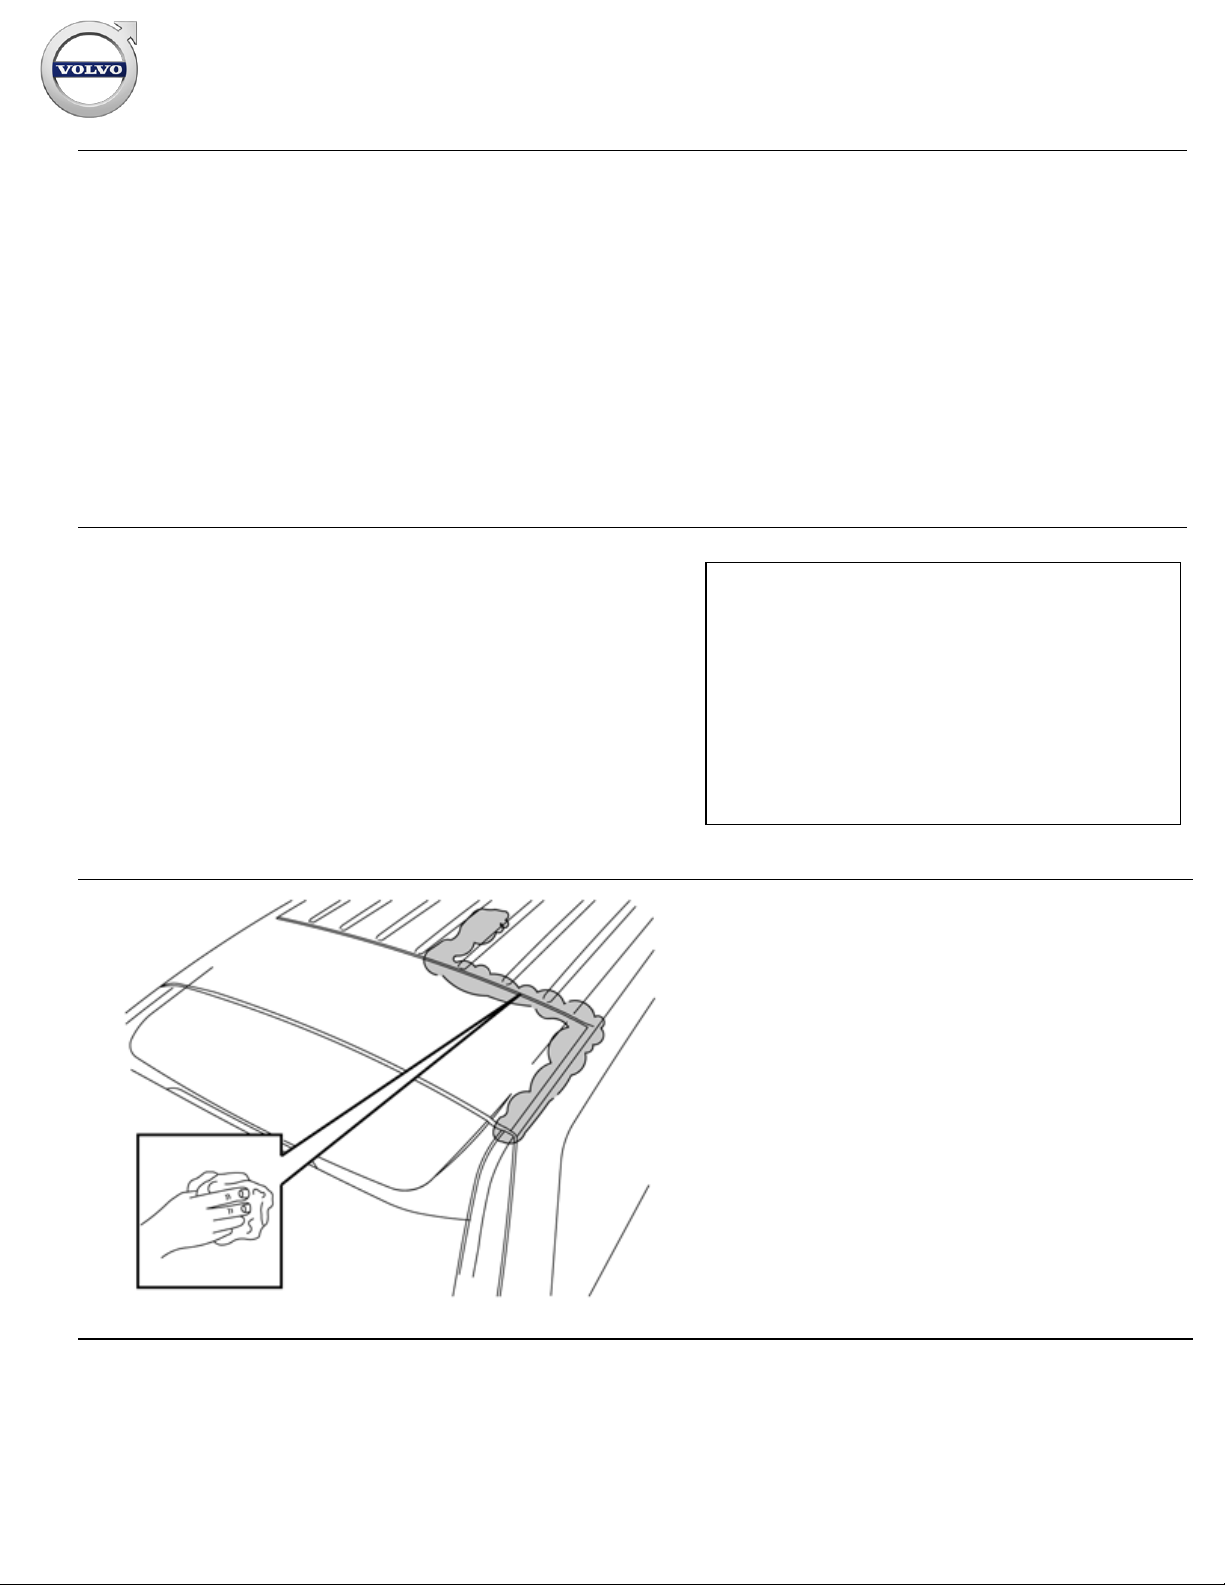
Note!
During installation, the surface and ambient temperature
should be between +18-35°C (64-95°F).
Do not wash the car within 72 hours after installation is
completed.
Leave the car indoors for at least two hours after after
finishing installation if the outdoor temperature falls below
+18°C (64°F) and/or if weather conditions are not dry.
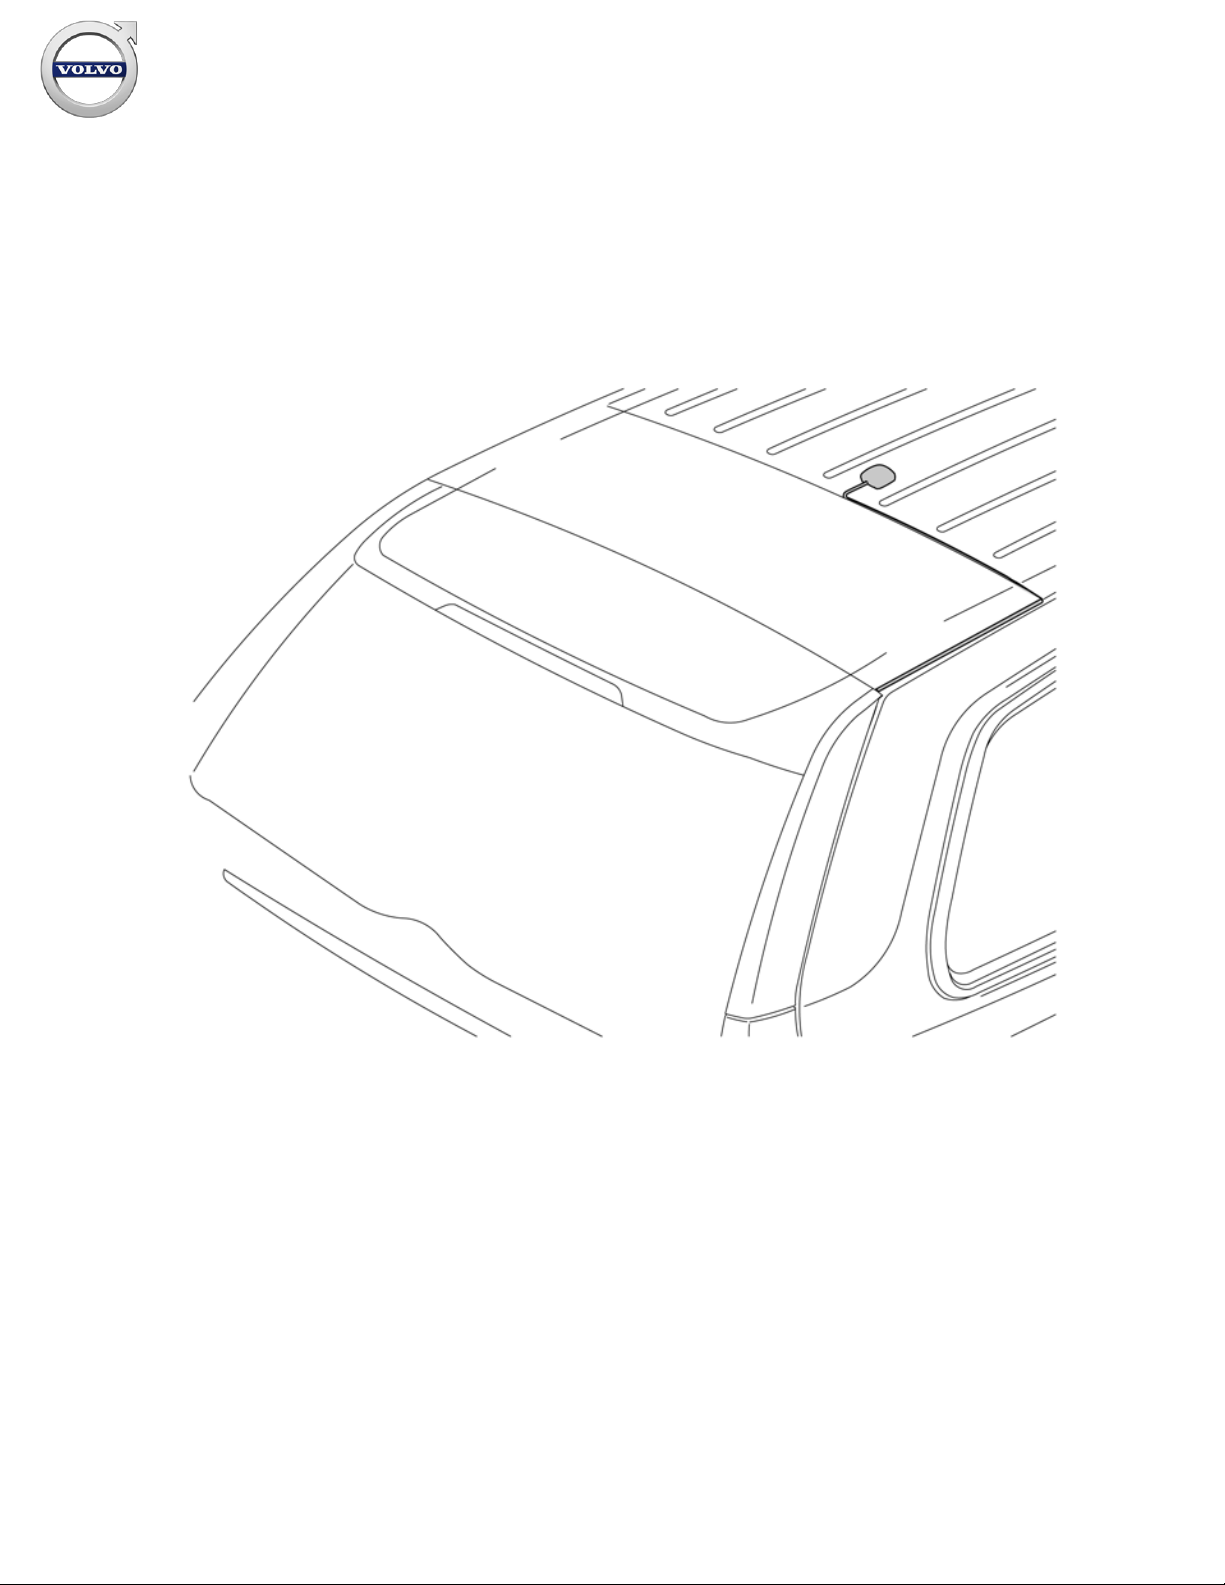
Make sure to have good lighting when fastening the antenna
with cable to the body.
1
IMG-246544
Clean the car from dirt and grease using a blend of washer fluid
and water as marked. Wipe dry.
Be particularly sure that the "ditches" around the antenna
module panel are free of dirt and other contaminants.
Installation instructions, accessories Volvo Car Corporation Gothenburg, Sweden
© Volvo Car Corporation Satellite radio, Sirius- 31201184 - V1.3
Page 3 / 21

2
R8902382
Applies to cars with two rows of seats
Fold up the centre rear floor hatch (1). If the underside of the
floor hatch is equipped with a grocery bag holder, the holder is
secured with a strap on both ends of the storage compartment.
Detach the straps.
Remove the storage compartment under the floor hatch.
Remove the floor hatch by folding it almost completely closed
then pulling it backwards from its mountings until it releases.
Applies to cars with three rows of seats and integrated
carrier bag holder on the underside of the centre floor hatch
Fold up the centre rear floor hatch (1).
Detach the two straps on the underlying panel. Lift up the rear
edge of the panel, fold the floor hatch back towards the panel
and lift out the floor hatch with the panel.
Applies to cars with three rows of seats without an
integrated carrier bag holder
Fold up the centre rear floor hatch (1) at the rear edge and lift it
out.
Applies to all models
Remove the two side floor hatches (2).
3
R3100130
Remove the three screws on the battery holder and lift it out.
Remove the battery cover.
Installation instructions, accessories Volvo Car Corporation Gothenburg, Sweden
© Volvo Car Corporation Satellite radio, Sirius- 31201184 - V1.3
Page 4 / 21

4
IMG-332179
Set the ignition key to position 0.
Disconnect the battery negative lead.
Note!
Wait at least one minute before unplugging the connectors or
removing other electrical equipment.
5
IMG-246826
Remove the folding side panel from the right-hand side of the
cargo compartment.
Installation instructions, accessories Volvo Car Corporation Gothenburg, Sweden
© Volvo Car Corporation Satellite radio, Sirius- 31201184 - V1.3
Page 5 / 21

6
IMG-246827
Pull off the rubber strip at the rear edge of the door opening for
the right-hand rear door opposite the right C-post panel.
Carefully pry off the C-post panel sides at the top. Use a plastic
weatherstrip tool. Then pull until the three clips on the inside
release. Do not damage the headlining or the panel.
If a headphone socket is mounted, disconnect the connector to
such.
Remove the panel by pulling upwards slightly and unhooking it
from the side panel.
7
R8504201
Remove the rear roof panel covers and the screws beneath
them.
Carefully pry off the panel at the rear edge. Use a plastic
weatherstrip tool.
Pull the rear edge of the panel downwards until the four clips on
the top release.
If the car is equipped with lighting in the panel, unplug the
connector from the panel.
Pull the panel backwards to release it.
Installation instructions, accessories Volvo Car Corporation Gothenburg, Sweden
© Volvo Car Corporation Satellite radio, Sirius- 31201184 - V1.3
Page 6 / 21

8
IMG-246828
Carefully pull off the D-post panel. Start at the top edge then pull
down until the three clips on the inside release. Do not damage
the panel.
Disconnect the connector on the D-post panel (if the car has a
speaker in the D-post, the connector is in the speaker)
Remove the panel by pulling upwards slightly and unhooking it
from the side panel.
Installation instructions, accessories Volvo Car Corporation Gothenburg, Sweden
© Volvo Car Corporation Satellite radio, Sirius- 31201184 - V1.3
Page 7 / 21

9A
IMG-246829
9B
IMG-246830
9C
IMG-260591
Illustration A shows the removal of the cover for the load
securing eyelets
Fold out the load securing eyelet.
Insert a scriber with an angled tip into the hole in the top of the
cover.
Turn the scriber so that the angled tip engages in the reverse of
the cover (1). Pull the cover off.
Illustration B applies to cars with two rows of seats
If the car is equipped with a 12 V socket, remove its connector.
Illustration C applies to cars with three rows of seats
Fold up the seats in the third row (applies to cars with three rows
of seats).
Remove the screws (2) for the load securing eyelets in the right-
hand side panel.
Remove the covers (3) over the front mountings for the right-
hand side panel. Pry the covers off. Use a plastic weatherstrip
tool or a small screwdriver.
Remove the screws (4).
Remove the panel by pulling out the upper edge slightly so that
the clips on the inside release. Pull the panel straight up.
If the car is equipped with a 12 V socket, remove its connector.
Installation instructions, accessories Volvo Car Corporation Gothenburg, Sweden
© Volvo Car Corporation Satellite radio, Sirius- 31201184 - V1.3
Page 8 / 21

10A
IMG-246832
10B
IMG-246833
Illustrations A and B
Remove the two nuts holding the right taillight in place.
Pull out the taillamp and place it at the right-hand side of the
tailgate opening (Illustration B).
11
IMG-246834
Remove the two screws and remove the upper part of the right-
hand taillight.
Installation instructions, accessories Volvo Car Corporation Gothenburg, Sweden
© Volvo Car Corporation Satellite radio, Sirius- 31201184 - V1.3
Page 9 / 21

12
IMG-246835
Remove the rubber grommet (with cables) of the right-hand
taillight from the body.
Pre-drill a Ø 5 mm (3/16 ") on the right-hand side of the rubber
grommet.
Drill out the hole using a Ø 8 mm (5/16 ") drill bit.
Note!
Do not damage the adjacent cables.
13
IMG-246836
Clean the marked surface from dirt and grease using a blend of
washer fluid and water as marked. Wipe dry.
Now clean the same area with isopropanol wipes and wipe dry.
Installation instructions, accessories Volvo Car Corporation Gothenburg, Sweden
© Volvo Car Corporation Satellite radio, Sirius- 31201184 - V1.3
Page 10 / 21

14
IMG-246837
The antenna will be positioned in the space between the
roof's center embossing and the embossing to the right of
such on the right-hand side of the roof.
Clean the marked surfaces on the roof and in the "ditch" around
the antenna module panel. Use Cleaner-H part no. 1161436.
Wipe dry.
15
IMG-246838
Position the antenna and the first part of the cable in the center
of the space between two of the roof plate's embossings. Make
sure that the hooked part of the antenna cable ends up at the
hooking of the roof plate.
Use pieces of tape to mark out the positions of the antenna and
cable.
Installation instructions, accessories Volvo Car Corporation Gothenburg, Sweden
© Volvo Car Corporation Satellite radio, Sirius- 31201184 - V1.3
Page 11 / 21

16
IMG-246840
Remove the protective backing from the attachment tape of the
antenna and antenna cable.
17
IMG-246841
First position the antenna cable's bent part and then continue to
secure the cable and antenna along the tape markings.
Press securely and hold for 30 seconds so that the tape adheres
properly.
Installation instructions, accessories Volvo Car Corporation Gothenburg, Sweden
© Volvo Car Corporation Satellite radio, Sirius- 31201184 - V1.3
Page 12 / 21

18
IMG-246842
Remove some of the protective backing from the antenna
cable's second part.
19
IMG-246843
Now guide the casing of the second antenna part towards the
first and under its tab (1).
Press the casing so that it fastens in the bottom of the "ditch"
using the part of the tape with the backing removed.
Installation instructions, accessories Volvo Car Corporation Gothenburg, Sweden
© Volvo Car Corporation Satellite radio, Sirius- 31201184 - V1.3
Page 13 / 21

20
IMG-246844
Continue removing the protective backing from the second part
of the antenna cable and press it into the bottom of the "ditch"
while doing so.
Continue until the antenna cable with casing has been affixed in
the "ditch" around the antenna module panel. Use a weatherstrip
tool to press the antenna into place in the "ditch" around the
antenna module. Make sure that the antenna fastens properly
around the corner of the antenna module.
21
IMG-246845
Press the antenna cable into place against the vertical part of
the roof edge at the last 150 mm (5 15/16 ") of the "ditch" but as
far down to the bottom of the "ditch" as possible.
Note!
The last part of the "ditch" is narrower and may vary from car
to car.
Installation instructions, accessories Volvo Car Corporation Gothenburg, Sweden
© Volvo Car Corporation Satellite radio, Sirius- 31201184 - V1.3
Page 14 / 21

22
IMG-246846
Now go over the entire antenna cable routing again and press it
into place more.
23
IMG-246847
Route the antenna cable inside the taillight as illustrated.
Guide the cable through the rubber grommet and reinstall the
rubber grommet in the body.
Note!
Do not damage the antenna cable connector.
Installation instructions, accessories Volvo Car Corporation Gothenburg, Sweden
© Volvo Car Corporation Satellite radio, Sirius- 31201184 - V1.3
Page 15 / 21

24
IMG-246848
Use tape pieces from the kit to fasten the antenna cable, pulling
it taut as you affix each piece of tape.
Note!
Be sure not to tape the cable in a way that causes it to be in
the way of the taillight's guides/guide pins or mounting holes.
Make sure that the cable makes a loop under the hole in the
body, comes from underneath and goes into the rubber grommet
to prevent water penetration at the rubber grommet.
25
IMG-246849
Use a piece of tape to fasten the cable loop beneath the rubber
grommet. Pull all excess length of cable into the cargo
compartment.
Installation instructions, accessories Volvo Car Corporation Gothenburg, Sweden
© Volvo Car Corporation Satellite radio, Sirius- 31201184 - V1.3
Page 16 / 21

26
IMG-246850
Use butyl tape to seal around the antenna cable in the rubber
grommet on both sides.
27
IMG-246851
Take the connector from the kit and press the antenna cable into
it.
Press the connector's catch into place.
Note!
Ensure that the antenna cable is secure in the connector to
prevent contact breaks.
Installation instructions, accessories Volvo Car Corporation Gothenburg, Sweden
© Volvo Car Corporation Satellite radio, Sirius- 31201184 - V1.3
Page 17 / 21

28
IMG-246854
Pull the cable into the cargo compartment. Make sure that the
cable loop beneath the rubber grommet does not disappear.
Move the bottom edge of the insulating panel aside and fit two
band clamps with edge clips along the edge of the wheel
housing approximately in the positions illustrated.
29
IMG-246855
Pull the antenna cable down along the existing cable harnesses
toward the first clip in the plate flange of the wheel housing.
Use two clamps to clamp the cable around the wheel housing
edge and two band clamps to clamp it at existing cable
harnesses.
Installation instructions, accessories Volvo Car Corporation Gothenburg, Sweden
© Volvo Car Corporation Satellite radio, Sirius- 31201184 - V1.3
Page 18 / 21

30A
IMG-246856
30B
IMG-246857
There are two variants of isolating panels.
Illustration A
Tear away the perforated section of the insulating panel
completely so that the third mounting hole for the Sirius receive
bracket is accessible.
Illustration B
Tear away the perforated part of the insulating panel.
Pull apart the perforation for the front and rear hole.
31
IMG-246858
Position the receiver in the bracket and fasten with the four
screws.
Installation instructions, accessories Volvo Car Corporation Gothenburg, Sweden
© Volvo Car Corporation Satellite radio, Sirius- 31201184 - V1.3
Page 19 / 21

32
IMG-246859
Fasten the Sirius receiver with bracket using the three screws in
the exposed holes. Tighten to 10 Nm (7.5 lbf.ft.).
33
IMG-246864
Connect the pre-routed cables and the routed antenna cable to
the connectors in the bottom edge of the Sirius receiver.
Installation instructions, accessories Volvo Car Corporation Gothenburg, Sweden
© Volvo Car Corporation Satellite radio, Sirius- 31201184 - V1.3
Page 20 / 21
This manual suits for next models
1
Other Volvo Car Receiver manuals

Volvo
Volvo 30732863 User manual

Volvo
Volvo D3902464 User manual

Volvo
Volvo A0801178 User manual

Volvo
Volvo VR100 User manual

Volvo
Volvo XC70 2013 D5 AWD User manual

Volvo
Volvo VR100 User manual

Volvo
Volvo SENSUS User manual

Volvo
Volvo 13 84 580 User manual

Volvo
Volvo SENSUS User manual

Volvo
Volvo Sirius Service manual