Vortex Razor HD 4000 GB User manual

RAZOR®HD 4000 GB
PRODUCT MANUAL

2 3
RAZOR®HD 4000 GB
SPECIFICATIONS ���������������������������������� 5
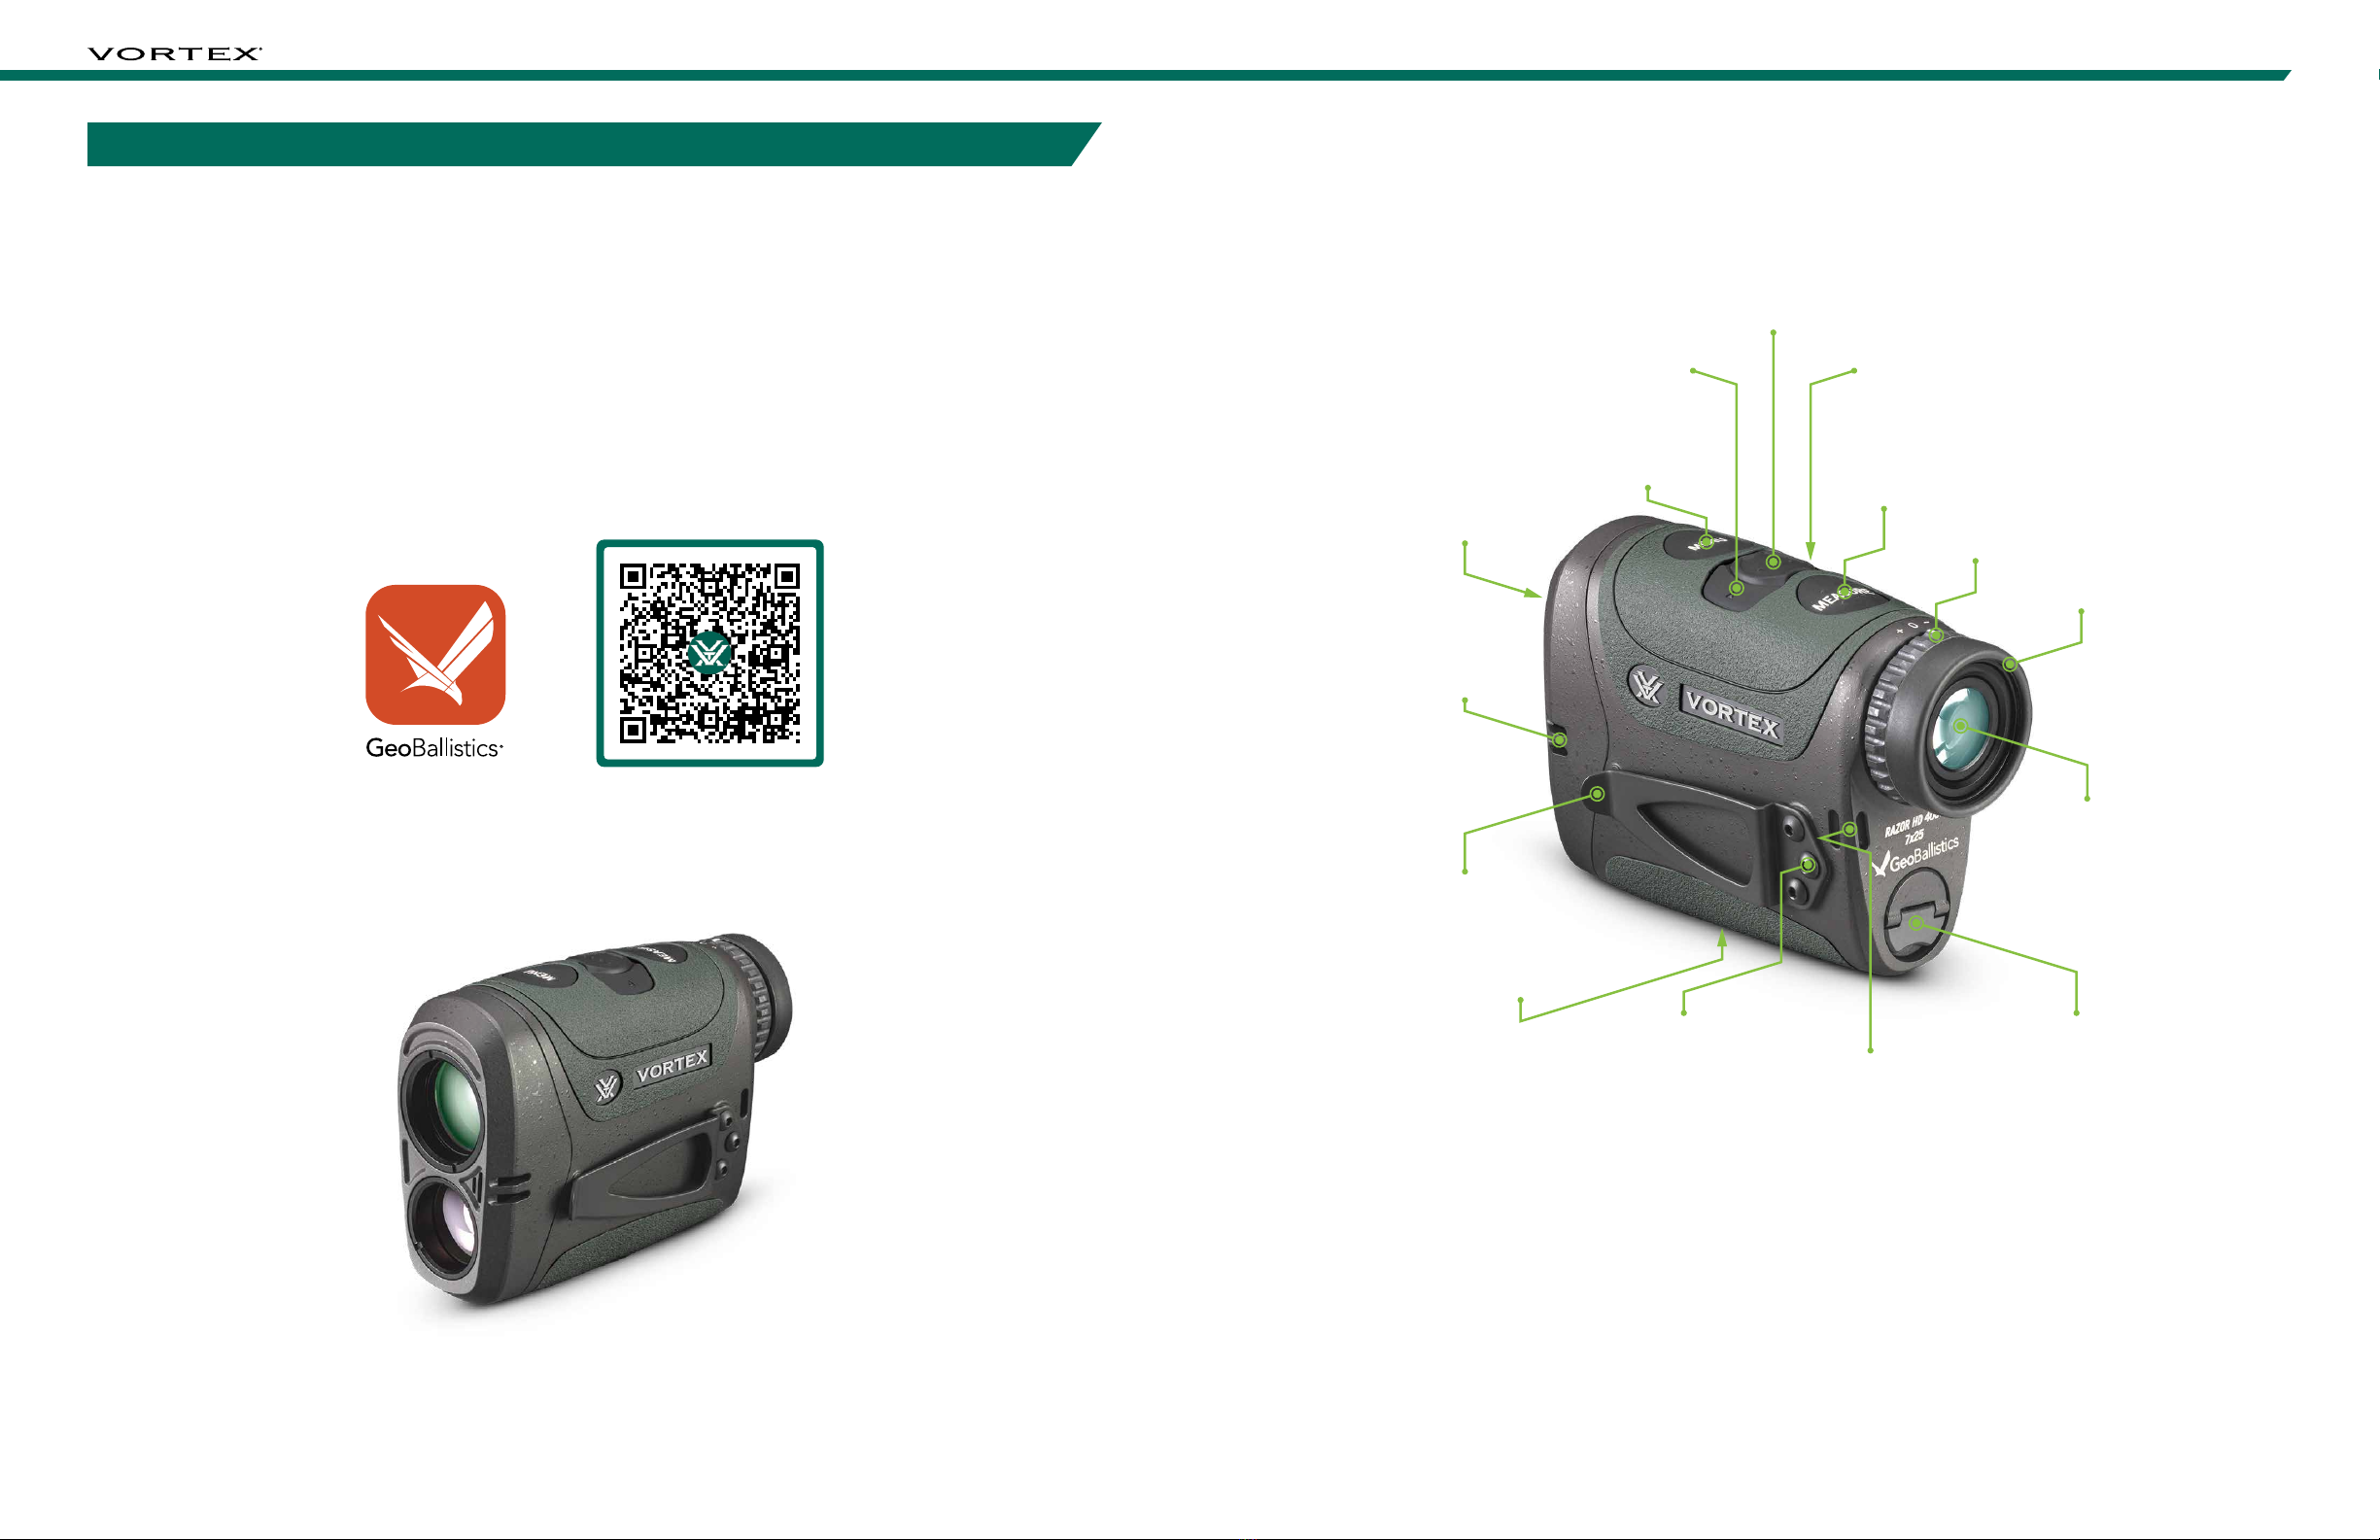
PRODUCT WALKAROUND ���������������������������� 7
BASIC OPERATION ��������������������������������� 8
Battery Installation and Replacement ����������������� 8
Power Up ��������������������������������������� 8
Low Battery Icon ��������������������������������� 8
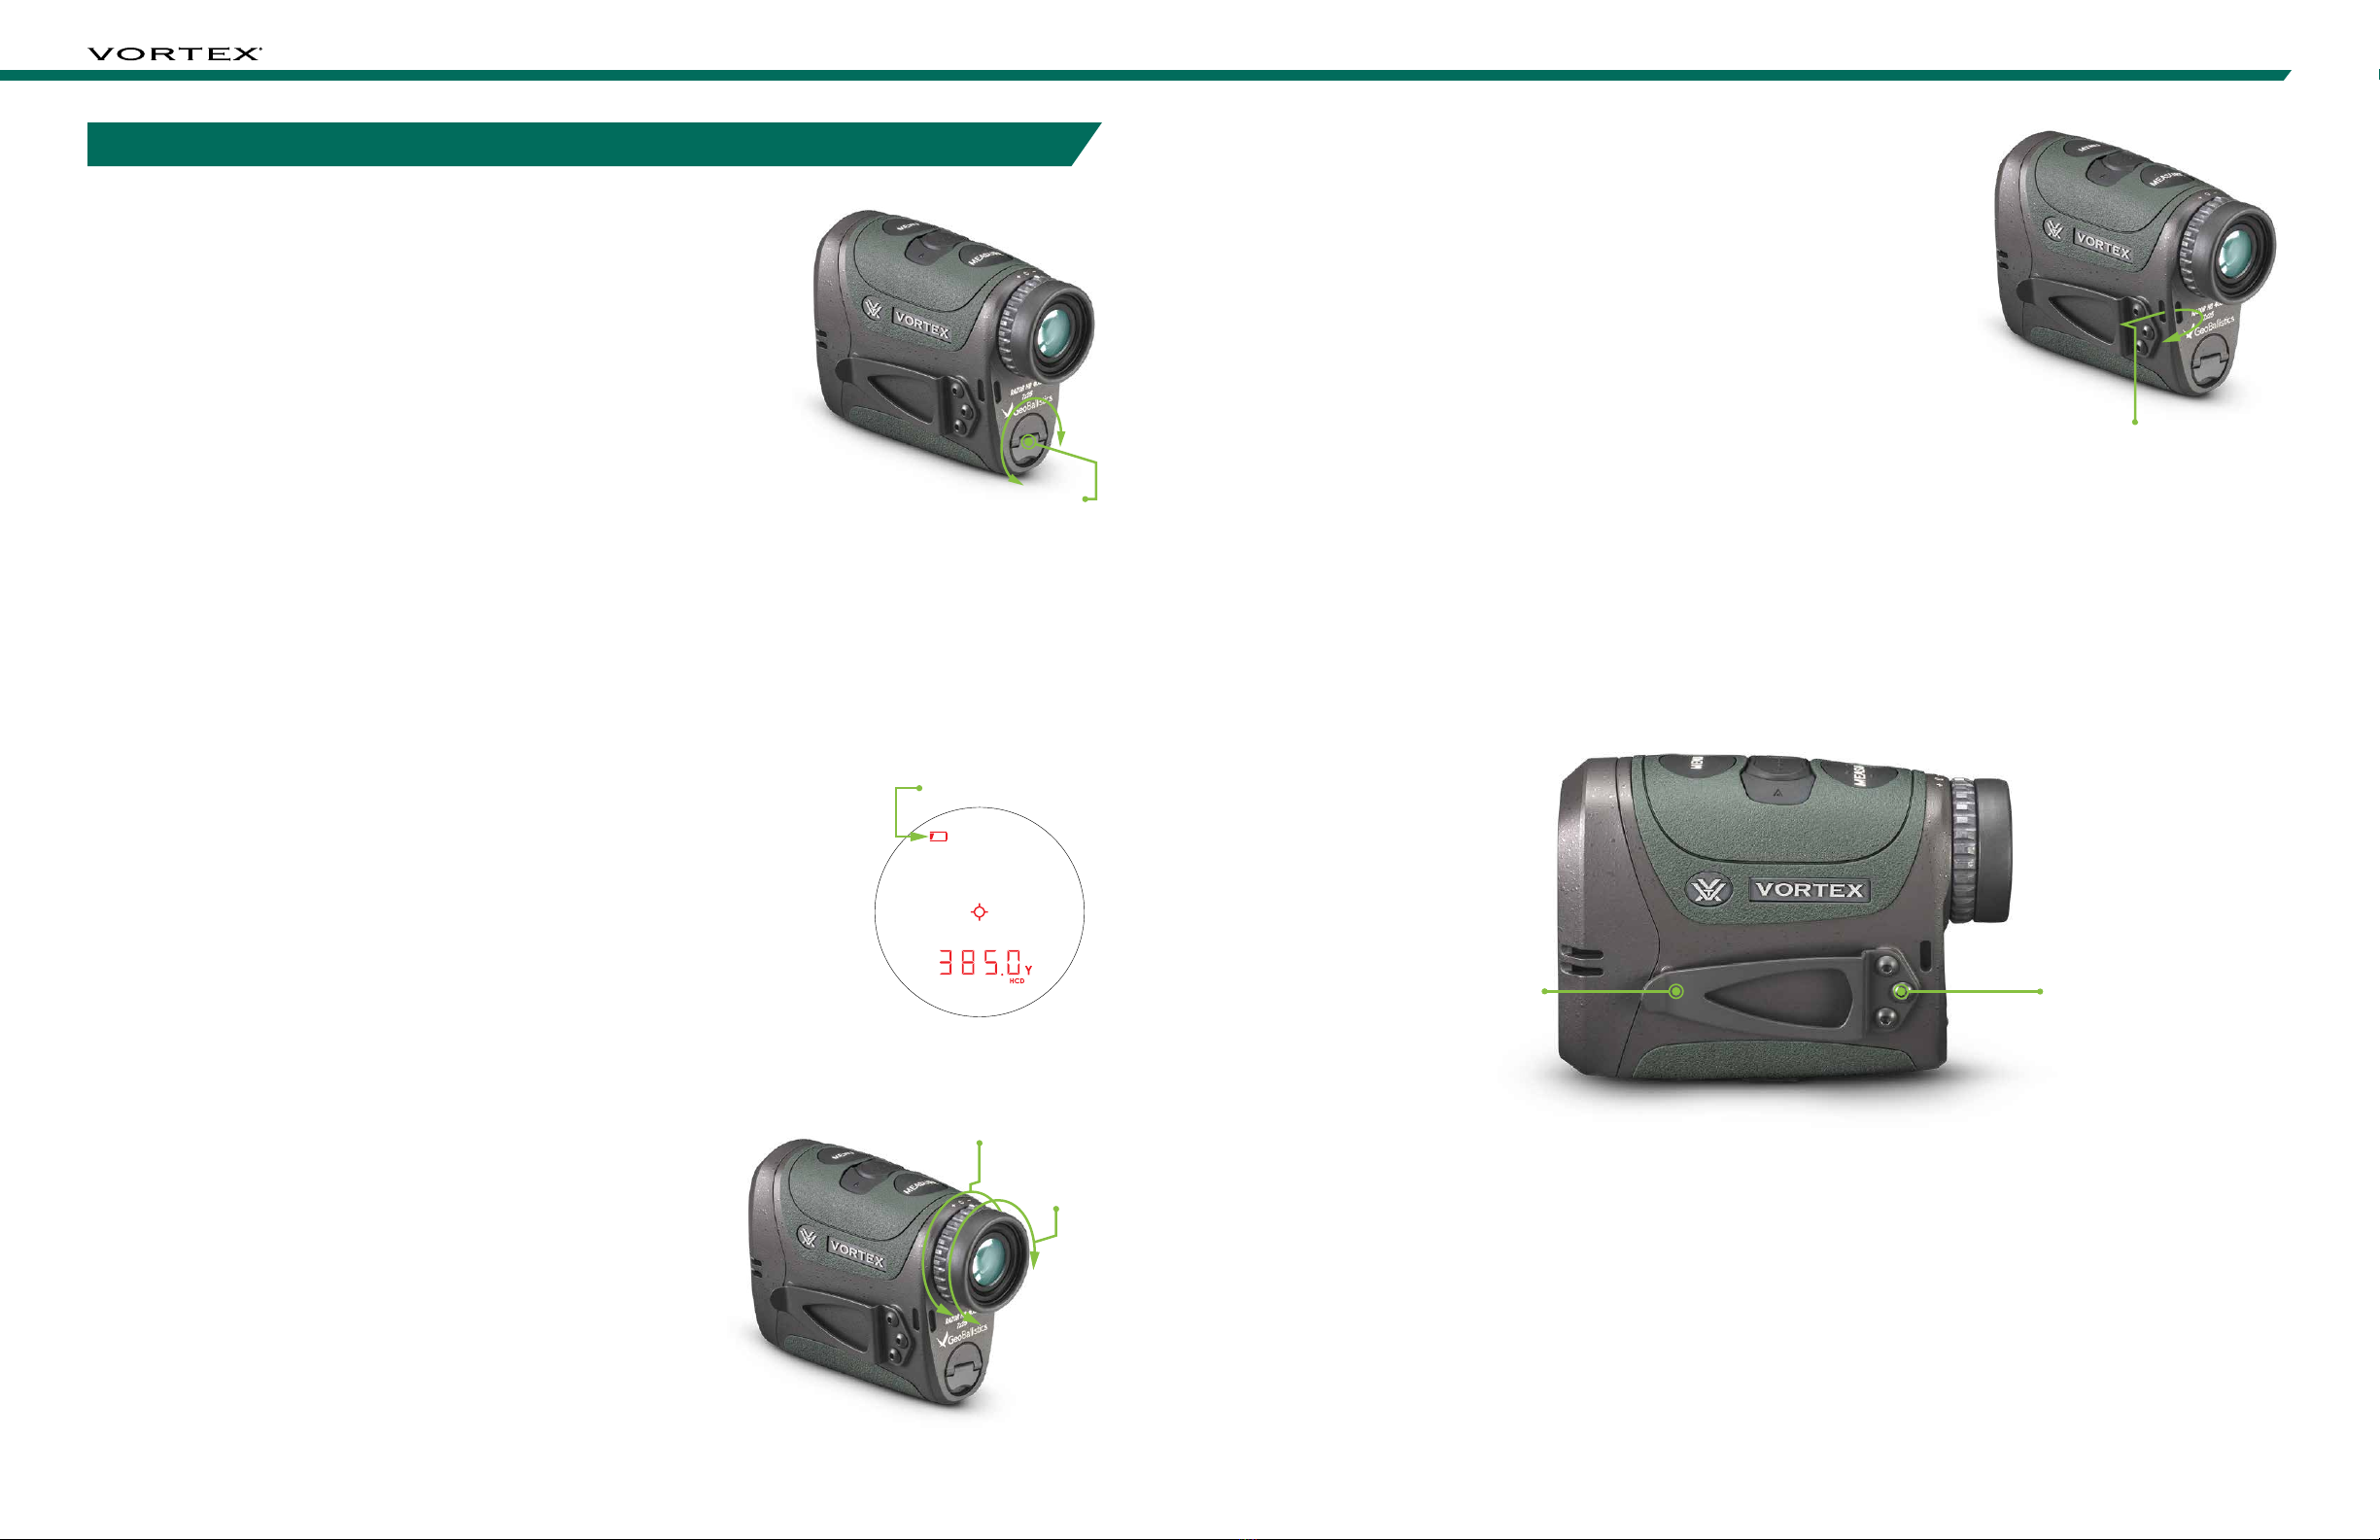
Adjust the Eyecup �������������������������������� 8
Focus ������������������������������������������ 8
Attaching the Lanyard ����������������������������� 9
Utility Clip �������������������������������������� 9
MODE SELECTION �������������������������������� 10
Changing Modes on the Razor®HD 4000 GB ����������� 10
To Change Modes ������������������������������� 10
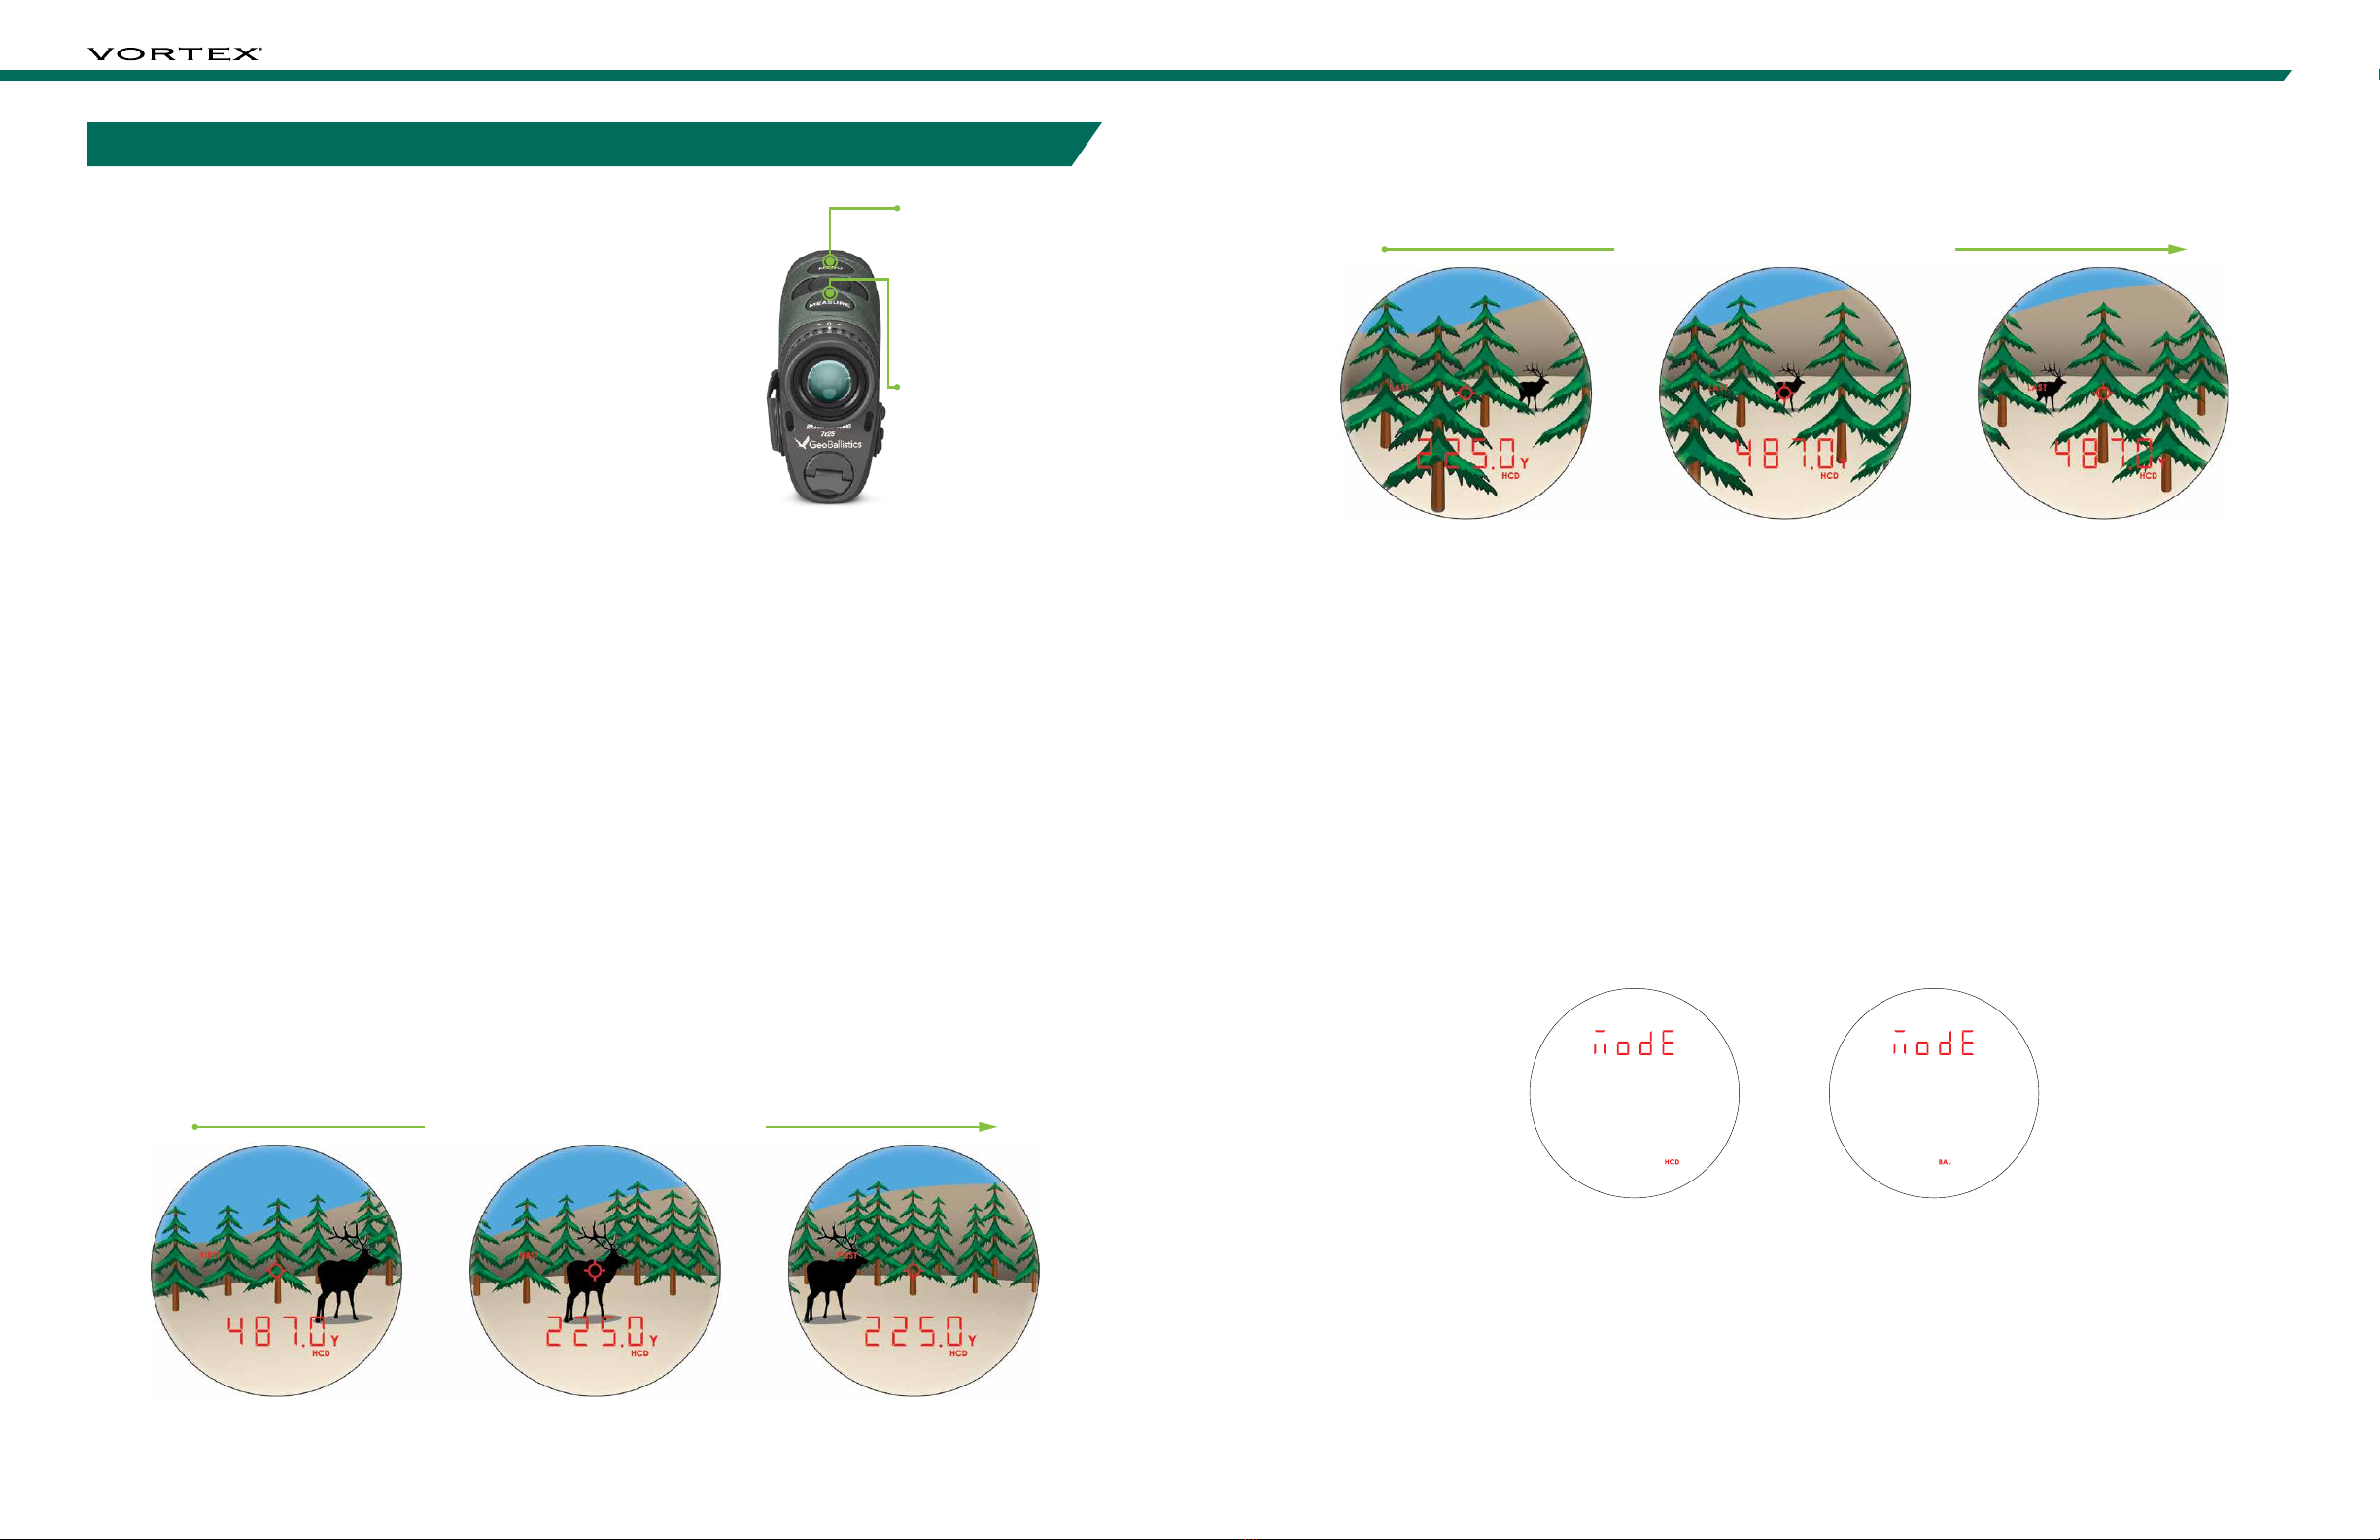
Target Mode Selection ���������������������������� 10
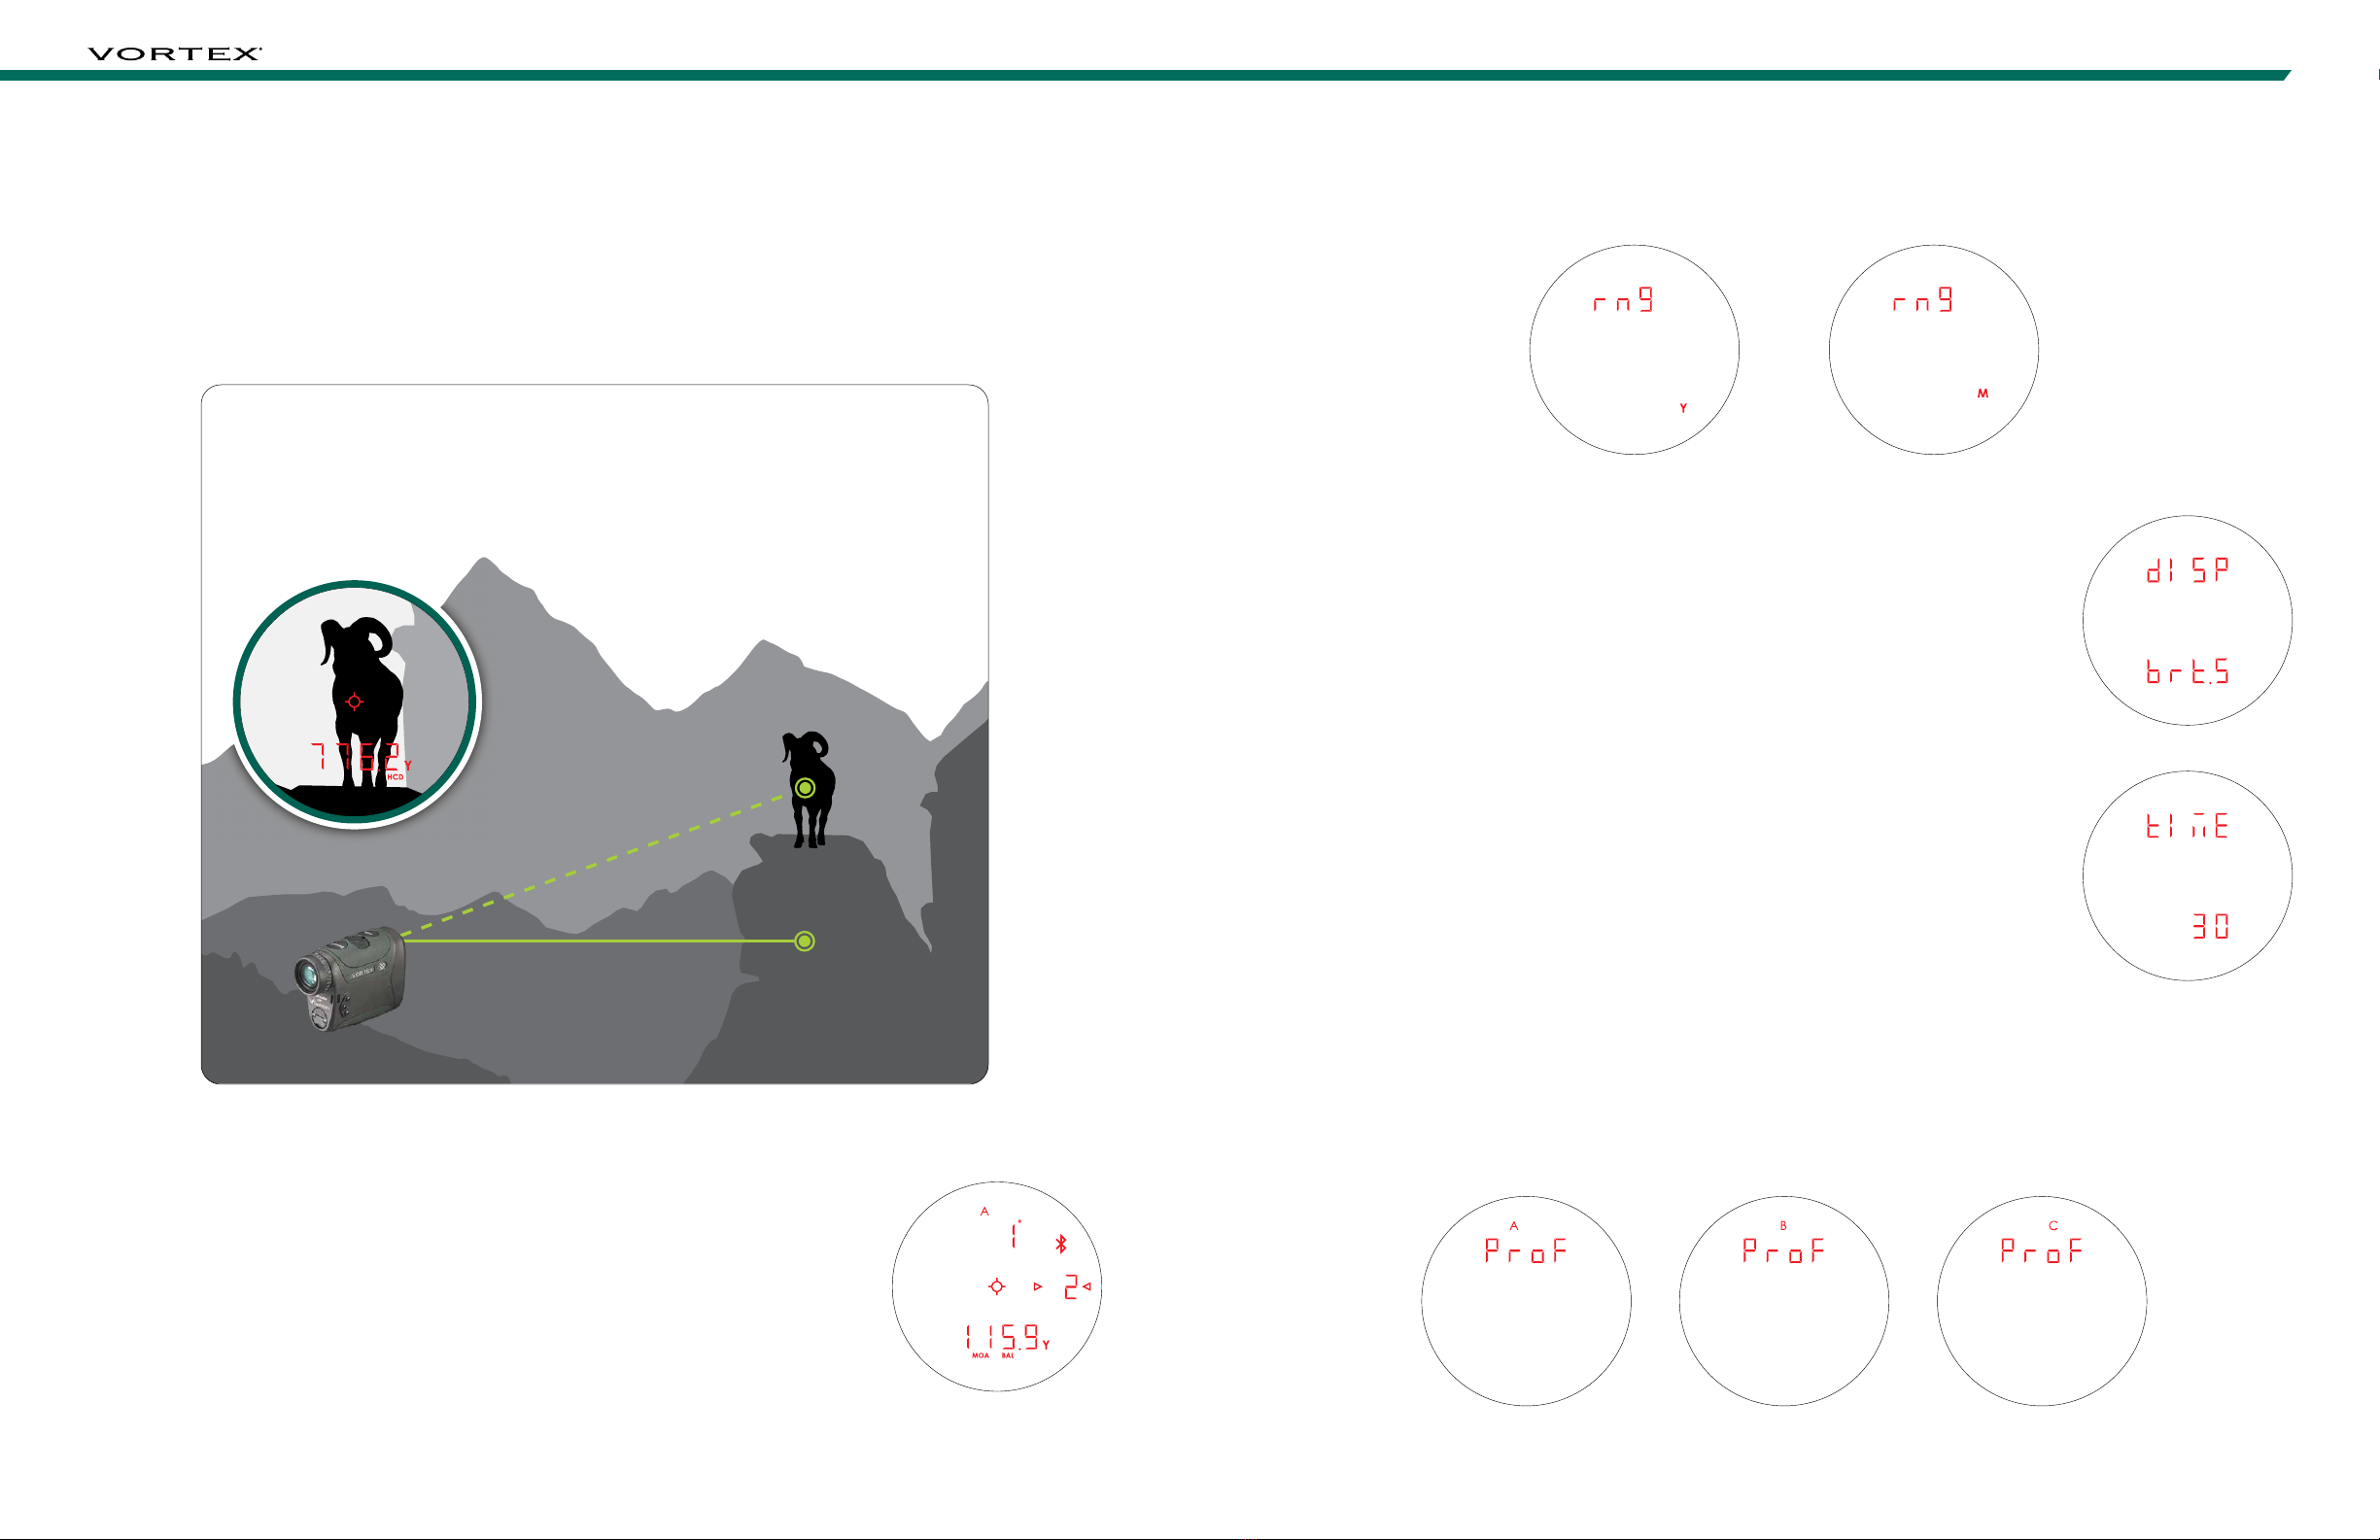
Ranging Mode Selection �������������������������� 11
Range Unit Selection ����������������������������� 13
Brightness Selection ����������������������������� 13
Auto-Shutoff ����������������������������������� 13
Ballistic Profile Selection ������������������������� 13
Bluetooth®Selection ����������������������������� 14
Temperature Selection ��������������������������� 14
Pressure Selection ������������������������������ 14
Wind Speed Selection ���������������������������� 15
RANGING ��������������������������������������� 15
SCAN FEATURE ����������������������������������� 16
VIEW DATA SCREENS ������������������������������ 17
Range Ready Data Screen ������������������������� 17
Temperature Data Screen ������������������������� 17
Pressure Data Screen ���������������������������� 18
Target Data Screen ������������������������������ 18
Wind Data Screen ������������������������������� 18
GENERAL INFORMATION FOR GEOBALLISTICS®APP ���� 19
NAVIGATING THE GEOBALLISTICS®APP ��������������� 20
HUD Tab ��������������������������������������� 20
Chart Tab �������������������������������������� 21
Map Tab ��������������������������������������� 22
Comp Tab �������������������������������������� 23
BALLISTICS SECTION ������������������������������ 24
Connection Scenarios ���������������������������� 24
Set Up ���������������������������������������� 24
Pairing the Razor®HD 4000 GB to the GeoBallistics®App � 25
RAZOR®HD 4000 GB SETTINGS MENU ���������������� 28
Data Received From the Razor®HD 4000 GB ����������� 28
Calibrating the Compass and Inclinometer ������������ 29
App Settings Menu ������������������������������� 33
App Preferences �������������������������������� 34
Ballistic Preferences ����������������������������� 34
Mobile Sensors ��������������������������������� 35
Chart Increments ������������������������������� 35
Distance Units ���������������������������������� 36
Rifle Profile Units �������������������������������� 36
Weather Units ���������������������������������� 37
Rifle & Ammunition Profiles ������������������������ 38
Rifle Information �������������������������������� 42
Optic Information ������������������������������� 44
GeoBallistics®Overlays (Optional) ������������������� 45
Copying a Profile �������������������������������� 46
Editing a Profile ��������������������������������� 47
Setting Up & Switching Profiles in the GeoBallistics®App � 48
Switching Between Profiles in the Razor®HD 4000 GB ���� 49
Deleting a Profile in the GeoBallistics®App ������������ 49
WEATHER ��������������������������������������� 50
Wind Modes ������������������������������������ 50
Manually Entering Weather in GeoBallistics®App ������� 53
Connect Weather Meter �������������������������� 53
Online Weather ��������������������������������� 53
CONNECTING/USING/DISCONNECTING A KESTREL®����� 54
Razor®HD 4000 GB + Kestrel®Via the GeoBallistics®App � 54
Connecting a Kestrel®to the GeoBallistics®App �������� 57
Using a Kestrel®With the Razor®HD 4000 GB and the
GeoBallistics®App ������������������������������ 59
Disconnecting ���������������������������������� 60
RANGEFINDING TIPS ������������������������������ 61
MAINTENANCE ����������������������������������� 61
TROUBLESHOOTING GUIDE ������������������������� 62
INDEX ������������������������������������������ 64
TABLE OF CONTENTS

4 5
RAZOR®HD 4000 GB
SPECIFICATIONS
MAGNIFICATION 7x
OBJECTIVE LENS 25mm
MAX REFLECTIVE RANGE TREE RANGE DEER RANGE
NORMAL MODE Up to 2400 yds. (2195m) Up to 1800 yds. (1646m) Up to 1600 yds. (1463m)
NORMAL MODE (SCAN) Up to 2400 yds. (2195m) Up to 2200 yds. (2012m) Up to 2000 yds. (1829m)
ELR MODE Up to 4000 yds. (3658m) Up to 2500 yds. (2286m) Up to 2200 yds. (2012m)
MINIMUM RANGE 5 yds. (4.5m)
ACCURACY
± 0.5 yds. @ < 200 yds.
± 1 yd. @ ≥ 200 yds. & ≤ 1000 yds.
± 2 yds. @ > 1000 yds.
MAXIMUM ANGLE READING ± 89°
FIELD OF VIEW Linear @ 1000 yds. 341'
Angular 6.5°
EYE RELIEF 19mm
BATTERY TYPE CR2
LENGTH 4.4" (111.8mm)
HEIGHT 3.2” (81.3mm)
WIDTH 1.9” (48.3mm)
WEIGHT W/ BATTERY 10.1 oz. (286.3g)

6 7
RAZOR®HD 4000 GB
RAZOR®HD 4000 GB BALLISTIC LASER RANGEFINDER
The Razor®HD 4000 GB is an essential companion for the extreme hunter and shooter. The angle
compensated ballistic laser rangefinder features four targeting modes (Normal, First, Last, and ELR)
and two ranging modes, Horizontal Component Distance Mode (HCD) and Ballistics Mode (BAL), for any
ranging environment. Using an array of built-in environmental sensors in conjunction with the state-of-
the-art GeoBallistics®solver and patented Vortex®Wind Bearing Capture Mode, the Razor®HD 4000 GB
will raise your level of long-range precision shooting ability to a new height.
The Razor®HD 4000 GB pairs, via Bluetooth®, with your mobile device and the GeoBallistics®App. Scan
the QR code below to download the GeoBallistics®App with your Apple or Android device.
The QR code below will also give access to instructional videos.
Scan QR code to get started.
PRODUCT WALKAROUND
Right-Hand Wind
Direction Button
Lanyard Attachment
Socket
Tripod Adapter
Socket
Environmental
Sensors
Measure
Button
Diopter
Focus
Adjustable
Eyecup
Battery
Compartment
Utility
Clip Plate
Left-Hand Wind
Direction Button
Wind Bearing Capture Button
Menu Button
Ocular Lens
Utility Clip
Objective Lens
Images are for representation only. Product may vary slightly from what is shown.

8 9
RAZOR®HD 4000 GB
BASIC OPERATION
Battery Installation and Replacement
To insert a new battery, flip up the finger tab on the Battery Cap and
unscrew, counterclockwise, to remove. Insert a CR2 battery with
the positive side (+) facing outwards. Reinstall the Battery Cap and
ensure it is tightly closed.
Power Up
Once the battery is installed, the Razor®HD 4000 GB is in ready condition – the normal power-off condition
when not ranging. To power up the Razor®HD 4000 GB from ready condition, press and release the
“Measure” button. The HCD or BAL ranging screen will display. The Auto-Shutoff feature can be adjusted
to 30, 45, 60, or 180 seconds. See the Auto-Shutoff section on page 13.
Note: While in the menu, the Razor®HD 4000 GB will auto-shutoff after 30 seconds if no buttons are pressed.
Low Battery Icon
The Low Battery Icon displays once the battery reaches 25% life and stays on
until there is no power or the battery is replaced.
Adjust the Eyecup
The Adjustable Eyecup on the Razor®HD 4000 GB twists
in and out so any viewer can see the full field and enjoy
comfortable viewing and ranging – with or without eyeglasses.
When not using eyeglasses or sunglasses, keep the Eyecup
fully extended. For best viewing when wearing eyeglasses,
twist the Eyecup in to allow closer contact to your glasses.
Focus
Adjust the Diopter until the image is sharp. Make note of this
Diopter setting in case you need to set it again.
Battery Cap
Low Battery
Diopter Focus
Adjustable
Eyecup
Attaching the Lanyard
The Lanyard provides a secure way to carry your rangefinder.
Loop the Lanyard through one of the Attachment Sockets.
Utility Clip
The Razor®HD 4000 GB comes with a Utility Clip on the unit’s left-hand side. You can switch the Utility
Clip’s side by unscrewing the 2mm hex screws on the left-hand side, and the 2mm hex screws on the unit’s
right-hand side. Reinstall the Utility Clip on the unit’s right-hand side and the Utility Clip Plate on the unit’s
opposite side with the 2mm hex screws.
2mm Hex ScrewsUtility Clip
Loop Lanyard through one of the
Attachment Sockets

10 11
RAZOR®HD 4000 GB
MODE SELECTION
Changing Modes on the Razor®HD 4000 GB
The Razor®HD 4000 GB is factory set to the angle compensating
HCD Range Mode, Normal Target Mode, Brightness Level 4, Auto-
Shutoff at 30 seconds, and displayed in Yards.
To Change Modes
Press and release the “Measure” button to power on the unit, and
then press and hold the “Menu” button for at least four seconds.
Once the Mode Selection screen displays, release the button.
As you progress through Mode Selection, you may exit at any
time and save your settings by pressing and holding the “Menu”
button for at least four seconds – the unit will then return to the
power-up condition.
Target Mode Selection
The Razor®HD 4000 GB provides four target modes:
Normal Mode, First Mode, Last Mode, and Extended Laser Range (ELR) Mode.
After activating the Mode Selection, press the “Measure” button to toggle between Normal Mode, First
Mode, Last Mode, and Extended Laser Range (ELR) Mode. Press the “Menu” button to save your desired
choice and continue through to the Ranging Mode Selection screen.
Normal Mode
The Razor®HD 4000 GB comes preset to Normal Mode. This is the standard mode providing the target’s range
with the strongest range result. Normal Mode is the recommended target mode for most situations.
First Mode
This mode displays the closest distance when panning and scanning. It is ideal for ranging a smaller
target in front of other larger or more reflective objects.
Use the “Menu”
button to activate
the Mode/Display
Selection displays.
Use the “Measure”
button to toggle
through each Mode
Selection option.
Scanning and Panning From Left to Right
Initial range captured on trees. Range captured on closer elk. Scanned to further trees. Range
remains locked on closer elk.
Last Mode
This mode displays the farthest distance when panning and scanning. It is ideal for ranging a specific target
behind a group of objects, such as rocks, trees, brush, etc.
Scanning and Panning From Left to Right
Initial range captured on trees. Range captured on farther elk. Scanned to closer trees. Range
remains locked on farther elk.
Extended Laser Range (ELR) Mode
This mode allows for ranging smaller, less reflective targets at extended distances. It is ideal for ranging
when Normal Mode is unable to obtain a desired range. A longer response time may be required to receive
the desired range. For best results, use a tripod.
Ranging Mode Selection
Choose Between the HCD and BAL Modes
Press the “Measure” button to toggle between the HCD and BAL displays. Press the “Menu” button to
save your desired choice and continue through to the Range Unit Selection screen.
BAL ModeHCD Mode

12 13
RAZOR®HD 4000 GB
HCD Mode
The Horizontal Component Distance (HCD) Mode will be your primary mode when not using the on-board
ballistic solver. The yardage number displayed is the critical horizontal component distance. The displayed
HCD yardage number is corrected for shot angle and needs no extra user input; shooters simply use the
appropriate level ground bullet drop for the range displayed and shoot. Archers use the appropriate level
ground sight pin for the range displayed.
Note: To correctly account for wind, you need to know the line of sight distance to the target as it is based on how far
the arrow or bullet travels to the target. This can be achieved using the BAL Mode.
Ballistics Mode (BAL)
800.0 Yards
Horizontal Component Distance (HCD):
776.2 Yards
BAL Mode
When in Ballistics (BAL) Mode, an additional number is displayed above the range
number. This number is shot angle shown in degrees.
This number is automatically calculated into the wind/drop solution provided in the
display and in the GeoBallistics®App. If you are not using the on-board solver, enter
the shot angle number into ballistic programs or field cards to help calculate precise
bullet drop in mountainous terrain. To use the Razor®HD 4000 GB on-board
ballistic solver, you need to be in BAL Mode.
Range Unit Selection
Press the “Measure” button to toggle between the Yards and Meters display. Press the “Menu” button to
save your desired choice and move to the Brightness Selection screen.
MetersYards
Brightness Selection
Choose Between Five Brightness Settings
The Razor®HD 4000 GB features five Brightness Settings. Press the “Measure”
button to toggle through the five Brightness Settings. Press the “Menu” button to
save your desired setting and move to the Auto-Shutoff Selection screen.
Auto-Shutoff
The Razor®HD 4000 GB offers four Auto-Shutoff program options: 30 seconds,
45 seconds, 60 seconds, and 180 seconds. Press the “Measure” button to
select the Auto-Shutoff time. If you are in HCD Mode, this will be the last Mode
Selection. Press and hold the “Menu” button for four seconds to save and exit
Mode Selection. Press the “Menu” button to save your desired choice and return
to Target Mode Selection or continue through to the Ballistic Profile Selection
screen (BAL Mode only).
Ballistic Profile Selection (Only Available in BAL Mode)
Select the Ballistic Profile for the wind/drop solution to be displayed when in BAL Mode. You can choose
between three different profiles, “A,” “B,” or “C.” See the Ballistics Section on page 24 for more information
and how to set up and select a Ballistic Profile. Press the “Menu” button to save your desired choice and
continue through to the Bluetooth®Selection screen (BAL Mode only).
Profile B Profile CProfile A

14 15
RAZOR®HD 4000 GB
Bluetooth®Selection (Only Available in BAL Mode)
The Razor®HD 4000 GB is equipped with a Bluetooth®chip to allow the unit to wirelessly pair with Kestrel®
wind meters and the GeoBallistics®App. Navigate to the Bluetooth®display in the menu and press the
“Measure” button to turn Bluetooth®on/off. Press the “Menu” button to save your desired choice and continue
through to the Temperature Selection screen (BAL Mode only).
Note: The Bluetooth®icon (
) will blink when looking for a connection and remain on when connected to a compatible
peripheral device once you exit the menu.
Bluetooth
®
Off Bluetooth
®
On ExampleBluetooth
®
On
Temperature Selection (Only Available in BAL Mode)
Temperature can be displayed in Celsius (˚C) or Fahrenheit (˚F). Navigate to the Temperature display in
the menu and press the “Measure” button to select “C” or “F.” Press the “Menu” button to save your
desired choice and continue through to the Pressure Selection screen (BAL Mode only).
CelsiusFahrenheit
Pressure Selection (Only Available in BAL Mode)
Pressure can be displayed in inches of mercury (inHg) or millibars (Mbar). Navigate to the Pressure display in
the menu and press the “Measure” button to select “inHg” or “Mbar.” Press the “Menu” button to save your
desired choice and continue through to the Wind Speed Selection screen (BAL Mode only).
Millibars (MBar)Inches of Mercury (inHg)
Wind Speed Selection (Only Available in BAL Mode)
Wind Speed can be displayed in miles per hour (MPH) or meters per second (MPS). Navigate to the Wind
display in the menu and press the “Measure” button to select “MPH” or “MPS.” Press the “Menu” button
to save your desired choice and return to Target Mode Selection. Press and hold the “Menu” button for
four seconds to save and exit Mode Selections.
MPSMPH
RANGING
With the Razor®HD 4000 GB powered up, position the reticle on the target object you wish to range, then
press and release the “Measure” button to get the distance measurement. If the laser is not able to range
due to the reflectivity of the target object, or being too close, you will see a display similar to that shown
here. To range a new target, simply re-aim and press the “Measure” button again.
No Range Returned
(BAL Mode)
No Range Returned
(HCD Mode)

16 17
RAZOR®HD 4000 GB
SCAN FEATURE
Activate the Scan Feature by pressing and holding the “Measure” button. Keeping
the button depressed will continuously measure for ten seconds before displaying
the last measurement as you pan back and forth across the target objects. The
word “SCAN” will blink on the left hand side of the display as you pan. Both HCD
and BAL Modes will offer a Scan Feature.
Note: For best results, use a tripod while attempting to range targets past 1,000 yards.
Scan back and forth, watching for yardage number to display or change.
VIEW DATA SCREENS
When your Razor®HD 4000 GB is in BAL Mode, you will have access to five data screens: Range Ready,
Temperature, Pressure, Target, and Wind.
Range Ready Data Screen
When your Razor®HD 4000 GB first powers on, the screen you see is called the Range Ready Data
screen. This will display:
• Ranged distance (yards or meters)
• Shot angle (degrees)
• Wind speed (miles per hour or meters per sec), see the Manually Entering Weather in GeoBallistics®App
section on page 51 for more information on how to set your wind speed and direction
• Ballistic solution (elevation correction on top of screen and windage correction on the bottom of the screen)
• Rifle profile selection, see page 41 for more information on how to set your rifle profile selection
• MRAD or MOA as the units based on your selection
Every two seconds, the screen will change its display to show either ranged distance and shot angle or
your ballistic solution.
Press the “Menu” button to continue to the Temperature Data screen.
Ballistic SolutionRanged Distance
& Shot Angle
Temperature Data Screen
This will display the ambient temperature (°F or °C) measured from the on-board
Environmental Sensors in your Razor®HD 4000 GB. Press the “Menu” button to
continue to the Pressure Data screen.
Note: The Environmental Sensors in your Razor®HD 4000 GB take time to acclimate to your
current environment. This acclimation time can vary depending on your current conditions.

18 19
RAZOR®HD 4000 GB
Pressure Data Screen
This will display the atmospheric pressure (inHg or Mbar) measured from the
on-board Environmental Sensors in your Razor®HD 4000 GB. Press the “Menu”
button to continue to the Target Data Screen.
Note: The Environmental Sensors in your Razor®HD 4000 GB take time to acclimate to your
current environment. This acclimation time can vary depending on your current conditions.
Target Data Screen
This will display the direction of the target you ranged in relation to north in
degrees. Press the “Menu” button to continue to the Wind Data screen.
Wind Data Screen
If the bottom of the screen displays “Wind,” the data screen will display wind direction and speed based
on your inputs using the Full Crosswind Mode or the Wind Bearing Capture. See the Weather section for
more information. If the bottom of the screen displays “other,” the data screen will display wind direction
and speed based on data measured from your connected Kestrel®device. See the Using a Kestrel®with
the Razor®HD 4000 GB and the Geoballistics®App section for more information. Press “Menu” again to
return to the Range Ready screen.
From Connected Kestrel®.
From Full Crosswind
Mode or Wind Bearing
Capture Mode inputs.
GENERAL INFORMATION FOR GEOBALLISTICS®APP
Go to your device’s app store and download the GeoBallistics®App.
From the main screen of the GeoBallistics®App, you will see these main icons:
ICON NAME FUNCTION
Account On the Account page you may log into your account to access your rifle
profiles and range cards.
App Settings On the App Settings page you may customize your app experience
by selecting preferences, units, and more.
Rifles On the Rifles page you may create, edit, delete, and sort rifle profiles to be
used for your ballistic solutions.
Atmospherics On the Atmospherics page you may view and input weather data, connect
to a Kestrel®device, or select a nearby airport to pull weather data from.
Range Cards On the Range Cards page you may save your range card data created in the
GeoBallistics®App.
Manage Devices On the Manage Devices page you may connect compatible devices to the
GeoBallistics®App and edit your preferences with each device.
Scan QR code for tutorial videos.

20 21
RAZOR®HD 4000 GB
NAVIGATING THE GEOBALLISTICS®APP
Across the top of the main screen of the GeoBallistics®App, there are four tabs: HUD, Chart, Map, and
Comp. See the App Settings Menu section for more information regarding how to select which tab is your
default when first opening the GeoBallistics®App.
HUD Tab
From the HUD tab, you will see your ballistic
solution displayed in either MOA or MRAD based
on your preferences.
You will also see wind and shot information based on data
collected from either the Razor®HD 4000 GB, GeoBallistics®
App, or a compatible Kestrel®device. Here you may also click
any buttons below each data point to capture measurements
from your mobile device. Wind speed can be changed
manually. If your Razor®HD 4000 GB is connected to the
GeoBallistics®App, you will see a (
) appear next to the word
MEASURE on the screen. Press the “Measure” button on the
screen to range a distance with the Razor®HD 4000 GB via
the app. Clicking either left or right arrow next to MEASURE
will manually change the ranged distance value.
For Target, you may select the speed and direction of a
moving target to add this data to your ballistic solution.
On the bottom of the screen is Ballistic Data. This is based
on information from your selected rifle profile. See page 38
for more information about rifle profiles.
Chart Tab
From the Chart tab, you will see data for shot angle, shot
direction, and range. Here you may also manually input this
data to change your ballistic solution.
Angle°
This displays your shot angle in degrees from the horizon
(ex: level = 0°, straight up = 90°).
Direction°
This displays shot direction in degrees from due north
(ex: north = 0°, east = 90°, south = 180°, west = 270°).
Range (yd)
This displays the ranged distance in either yards or meters.
You will also see a chart containing ballistic information
based on your selections. You can modify the range
increments and units on the App Settings page. The gray,
red, and yellow highlighted rows are GeoBallistics®Overlays.
See the GeoBallistics®Overlays section on page 45 for
more information.
You may export the chart data using the button.

22 23
RAZOR®HD 4000 GB
Map Tab
From the Map tab, you may locate your current position by
clicking . For best results, make sure the GeoBallistics®
App and Razor®HD 4000 GB are calibrated correctly. See
page 29 for instructions on how to calibrate your Razor®HD
4000 GB.
While on this tab, you can use the shooter icon to drop
a pin to denote your location and the target icon to drop
pins for your target’s locations. You may also use the Razor®
HD 4000 GB to range a target, which will then drop a pin on
the map representing that target’s position.
Use your finger to move the cursor around the map screen.
If you have dropped the “shooter position pin,” you will be
shown the distance and direction of that point from your
position. If you have dropped multiple target pins, you may
click on each one to see the calculated ballistic solution on
the bottom of the screen.
If your target position is far enough to show your
GeoBallistics®Overlays, they will appear using a black
dashed line (Max Vital Range), red dashed line (Energy
Threshold), and yellow dashed line (Velocity Threshold).
You can save the pin positions to your range card folders
by clicking floppy disk icon or export them to your Comp
tab by clicking export icon . You can also change the
map view to either topographical, road view, hybrid view, or
satellite view by pressing the map icon .
Comp Tab
From the Comp tab, you may manually enter shot Angle,
Direction, and Range. This information can also be
populated with data from the Razor®HD 4000 GB.
On this screen, you can begin building out your range card.
Make sure you have the desired rifle profile selected from the
Rifles page. The selected profile is shown next to the (A), (B),
or (C) designation depending on how your profiles are sorted.
Once the desired values for shot angle, shot direction, and
range are populated, press the +TARGET button to save the
ballistic solution for that target. You will see the ballistic
solution appear at the bottom of the screen.
Repeat this process for additional targets if desired. By
clicking the “Edit” button, you can modify the input
parameters for an individual target entry by clicking the box
next to the entry, or all entries at once by clicking the box
next to “Select All Targets.” You may also re-order the target
entries by either pressing the up and down arrows or by
typing the order number in the space provided. Click “Save”
to save your changes. You can also click “Clear” to delete all
target entry data.
Once you have at least one target entry saved, you may modify
the Holdover Setting by clicking or . This setting can be
used to set the elevation value on your reticle that you plan to
use as a holdover. For example, if you add a suppressor to a
gun that is already zeroed and it changes your point of impact
by .5 MRAD in the downward direction, but you do not want
to re-zero your optic, you can change your Holdover Setting to
- .5 to update your drop chart to reflect the change in zero.
Once you’ve created your range card, you can save the data to
your Range Card folders by clicking save or export the data
to several options by clicking .

24 25
RAZOR®HD 4000 GB
BALLISTICS SECTION
Connection Scenarios
=Ballistic Solution using environmental data from the Razor®HD 4000 GB (must first
sync Rifle Profiles with GeoBallistics®App) displayed in Razor®HD 4000 GB.
+ =
Ballistic Solution using environmental data from the Razor®HD 4000
GB and GeoBallistics®App displayed in both Razor®HD 4000 GB
and GeoBallistics®App.
+ + =
Ballistic Solution using environmental data from
the Razor®HD 4000 GB or a compatible Kestrel®
device displayed in both Razor®HD 4000 GB and
GeoBallistics®App.
+ = Ballistic Solution using environmental data from a compatible Kestrel®
device displayed in the GeoBallistics®App.
Set Up
Be sure you have reviewed the Razor®HD 4000 GB Basic Operation before reading the Ballistics Section.
Go to your device’s app store and download the GeoBallistics®App.
Scan QR code to get started.
Pairing the Razor®HD 4000 GB to the GeoBallistics®App
To pair your Razor®HD 4000 GB with your mobile device, ensure the Bluetooth®on your mobile device is
turned on and the GeoBallistics®App has been allowed access to your mobile device’s location services.
1. Press the “Measure” button to turn on the Razor®HD 4000 GB.
2. Ensure the Razor®HD 4000 GB is in BAL Mode (see page 11).
3. Go to the Razor®HD 4000 GB menu (press and hold the “Menu” button for
four seconds). Press the “Menu” button to cycle through the options. When you
see the “bt” symbol, press the “Measure” button to toggle on the Bluetooth®.
Make sure your device also has its Bluetooth®functionality turned on to pair
wirelessly with the Razor®HD 4000 GB.
4. Press and hold the “Menu” button for four seconds to leave the menu and save your selection.
5. The Bluetooth®symbol will blink until it is connected to the GeoBallistics®App or a compatible
peripheral device.
6. Open the GeoBallistics®App and select the Bluetooth®
symbol in the lower right-hand corner of the screen.

26 27
RAZOR®HD 4000 GB
7. Select the Razor®HD 4000 GB by pressing the ellipsis .
8. Press the icon.
9. Tap on your Razor®HD 4000 GB referencing the last four digits
of the serial number on the bottom of your Razor®HD 4000 GB.
This will connect the unit to the GeoBallistics®App.
Attention: If you are unable to see your Razor®HD 4000 GB
in the GeoBallistics®App, make sure it’s BAL Mode and
Bluetooth®is turned on.
The GeoBallistics®App and the Razor®HD 4000 GB are
now connected.

28 29
RAZOR®HD 4000 GB
RAZOR®HD 4000 GB SETTINGS MENU
Data Received From the Razor®HD 4000 GB
Angle
Toggle on/off whether the Inclination Angle from the Razor®HD
4000 GB is used by the GeoBallistics®App’s on-board solver. If
toggled off, the solver will use the Inclination Angle received from
the mobile device.
Direction
Toggle on/off whether the Target Direction from the Razor®HD 4000
GB is used by the GeoBallistics®App’s on-board solver. If toggled
off, the solver will use the Target Direction received from the mobile
device or manually entered by the user.
Range
Toggle on/off whether the Target Range from the Razor®HD 4000
GB is used by the GeoBallistics®App’s on-board solver. If toggled
off, the solver will use the Target Range manually entered by the
user in the GeoBallistics®App.
Wind
Toggle on/off whether the Wind Direction and Speed from the Razor®
HD 4000 GB is used by the GeoBallistics®App’s on-board solver. If
toggled off, the solver will use the Wind Direction and Speed either
manually entered by the user, imported from a local weather station
via the GeoBallistics®App, or from a compatible Kestrel®device.
Weather
Toggle on/off whether the Atmospheric Data (Temperature, Pressure, and Humidity) from the Razor®
HD 4000 GB is used by the GeoBallistics®App’s on-board solver. If toggled off, the solver will use the
Atmospheric Data either manually entered by the user, imported from a local weather station via the
GeoBallistics®App, or from a compatible Kestrel®device.
Note: The Razor®HD 4000 GB’s on-board Environmental Sensors will need to acclimate to your current environment for
accurate readings. The time required for acclimation can vary depending on the current conditions. As an alternative,
you may manually enter weather data to use in the calculation of your ballistic solution until the Razor®HD 4000 GB
has had time to acclimate.
Auto-Shutoff
Allows for the Razor®HD 4000 GB’s Auto-Shutoff to be set via the GeoBallistics®App. The Auto-Shutoff
can be set to either 30, 45, 60, or 180 seconds.
Calibrating the Compass and Inclinometer
The Razor®HD 4000 GB needs to be calibrated during initial setup and should be re-calibrated every time
you significantly change location, typically 30 miles or more. Calibration is important for the accuracy of
Wind Bearing Capture Mode and the on-board compass. It may take 2-3 cycles of turning the Razor®HD
4000 GB in each direction before it calibrates. Read steps 1-5 before starting the calibration process.
Note: Calibrate your Razor®HD 4000 GB outside and away from large metal structures or objects.
Note: There is a video example in the app to demonstrate proper speed and turning of the Razor®HD 4000 GB for
calibration. You can also see product videos for the Razor®HD 4000 GB at vortexoptics.com.
Important: Do not press any buttons on the Razor®HD 4000 GB during this process unless specifically
instructed to do so in the following steps.
1. After pairing the device, navigate to the bottom of the Razor®
HD 4000 GB Settings Screen and select the “Calibrate” button
under Razor®HD 4000 GB Compass. The date and location of
the last calibration is also shown for your reference.

30 31
RAZOR®HD 4000 GB
2. To begin the calibration process, select the “START” button. Ensure you see “cAL” in the Razor®HD
4000 GB display before proceeding to step 3.
Note: The calibration animation will begin immediately after pressing the “START” button.
3. Orient the device so that it is facing away from you and the
Measure button is closest to you, and turn the device end
over end three times.
4. Then keeping the same orientation of the device so that it
is facing away from you and the Measure button is closest
to you, rotate it around in a full circle three times.
5. Then orient the device so that it is on its side with the
Measure button to the right and the eyepiece facing you,
and turn the device over three times.

32 33
RAZOR®HD 4000 GB
6. Repeat steps 3 through 5 until the GeoBallistics®App indicates the
calibration is complete. Select “OK” and the date and location will
update on the Razor®HD 4000 GB Settings page.
7. Select the back arrow in
the upper left-hand corner
of the app to go back to the
main menu.
Note: If at any time you would
like to cancel the compass
calibration, simply press
and release the “Measure”
button. There is a 60 second
time limit to complete the
calibration process after
pressing the “START” button.
If the unit fails to calibrate
within this timeframe, please
repeat steps 1-7.
App Settings Menu
To navigate to the App Settings Menu, select the settings icon
in the upper right-hand corner of the screen. While in the App
Settings Menu, you will be able to change App Preferences, Ballistic
Preferences, Mobile Sensors, Chart Increments, Distance Units,
Rifle Profile Units, and Weather Units.
At the top of the App Settings Screen, you’ll see HUD, Chart, Map,
and Comp. By selecting one of these options, that page will be the
default screen when opening the app.

34 35
RAZOR®HD 4000 GB
App Preferences
Auto-Locate
Auto-Locate will use your mobile device’s latitude for
ballistic calculations.
Latitude
Latitude allows for manual entry of latitude. This is disabled if
Auto-Locate is on.
Solution Rounding
Solution Rounding allows you to set as many decimal places as you
would like the app solution to display.
Ballistic Preferences
For the most accurate ballistic solution, have Spin Drift, Coriolis
Effect, and Crosswind Jump enabled.
Spin Drift
Spin Drift is a bullet’s drift left or right due to the spin imparted by
the bullet length in conjunction with your rifle’s barrel twist rate,
and the interaction of gyroscopic and aerodynamic forces.
The Razor®HD 4000 GB can account for the effect of Spin Drift on
the bullet when solving for your ballistic solution. To turn Spin Drift
on/off, tap the toggle icon.
Coriolis Effect
Coriolis Effect is the effect that Earth’s rotation will have on long-
range shot precision, moving the target slightly away from the bullet’s
intended point of impact during the time of flight.
The Razor®HD 4000 GB can account for the Coriolis Effect on
the bullet when solving for your ballistic solution. To turn Coriolis
Effect on/off, tap the toggle icon.
Crosswind Jump
Crosswind Jump refers to the small but measurable +/- vertical
influence on a bullet’s flightpath by a crosswind. The higher the
wind velocity, the greater the influence.
The Razor®HD 4000 GB can account for the effect of Crosswind
Jump on the bullet when solving for your ballistic solution. To turn
Crosswind Jump on/off, tap the toggle icon.
Mobile Sensors
Mobile Sensors are for use when not using the Razor®HD 4000 GB.
This allows for use of your mobile device’s compass and inclinometer
in the GeoBallistics®App.
Angle
Angle turns on/off mobile inclination angle sensor to determine the
target’s angle. Tap the icon to toggle on/off.
Compass
Compass turns on/off mobile Compass Sensor to determine the
target’s direction. Tap the icon to toggle on/off.
Chart Increments
Tap on the distance increments you wish the chart to be laid out in.
(5, 10, 25, 50, 100 yards or meters)

36 37
RAZOR®HD 4000 GB
Distance Units
The distance to the target can be displayed in yards or meters. Select
the desired distance option in the menu. If the Razor®HD 4000 GB
is connected to the GeoBallistics®App, the distance option selected
will be displayed in both the app and in the rangefinder.
Rifle Profile Units
Length
The measured Sight Height, Elevation Offset, Windage Offset, and
Vital Size can be displayed in either inches (in) or centimeters
(cm). Select the desired option in the menu.
Velocity
The measured Muzzle Velocity and Velocity Threshold can be
displayed in either feet per second (ft/s) or meters per second
(m/s). Select the desired option in the menu.
Weather Units
Pressure
Pressure corresponds to the ambient atmospheric pressure
surrounding you and your equipment. Atmospheric Pressure can be
displayed in inches of mercury (in Hg) or millibars (mb). Select the
desired option in the menu. It will display in both the app and the
rangefinder.
Temperature
Temperature corresponds to the ambient temperature surrounding
you and your equipment. Temperature can be displayed in Celsius
(°C) or Fahrenheit (°F). Select the desired option in the menu. It will
display in both the app and the rangefinder.
Density Altitude
Density Altitude is a value derived from a combination of
Temperature, Pressure, and Relative Humidity and can be used as a
quick reference for atmospheric conditions. The Density Altitude can
be displayed in feet (ft) or meters (m). Select the desired option in
the menu. It will display in the app only.
Wind Speed
Wind Speed corresponds to the wind speed at your measurement
device. Wind Speed can be displayed in miles per hour (mph) or
meters per second (m/s). Select the desired option in the menu. It
will display in both the app and the rangefinder.

38 39
RAZOR®HD 4000 GB
Rifle & Ammunition Profiles
You can load and store up to three profiles in the Razor®HD 4000 GB. These
profiles are represented by the letters A, B, or C in the upper portion of the Razor®
HD 4000 GB display and are set in the GeoBallistics®App.
Default Profiles
The Razor®HD 4000 GB laser rangefinder and the GeoBallistics®App come preloaded with three default
ballistic profiles for some of the most common calibers - .308 Win, 6.5 Creedmoor, and .223/5.56. These
will populate the first time the Razor®HD 4000 GB is connected to the GeoBallistics®App in the Razor®
HD 4000 GB Rifles folder. The default profiles can be deleted as long as there are at least three complete
profiles. Copying and editing profiles is covered in more detail beginning on pg 44. See the Index starting on
page 62 for details on the default profiles.
The GeoBallistics®App also comes preloaded with the My Rifles folder. This folder can be used to store
unlimited rifle profiles.
Syncing Profiles to the Rangefinder
After connecting the Razor®HD 4000 GB to your device, the profiles
will automatically sync between the Razor®HD 4000 GB and your
device. The app and the laser rangefinder will automatically be synced
anytime changes are made to the ballistic profiles and are saved. To
view the profiles currently synced between your device and the Razor®
HD 4000 GB, navigate to the Rifles page by selecting the icon on
the lower left corner of the main screen and expand the Razor®HD
4000 GB Rifles folder. The currently synced profiles will be annotated
with (A), (B), and (C) before their names.
Creating Custom Ballistic Profiles
Custom ballistic profiles can be created in the GeoBallistics®App.
To create a custom ballistic profile:
1. Select from the home screen, then select on the
Rifles screen.
2. Select the folder that you wish to add the profile to. “Razor®HD
4000 GB Rifles” is the only folder that syncs profiles with the
Razor®HD 4000 GB.
Note: You can change folders after the profile is created.
Other manuals for Razor HD 4000 GB
1
This manual suits for next models
1
Table of contents
Other Vortex Measuring Instrument manuals

Vortex
Vortex RANGER 1300 User manual

Vortex
Vortex Viper HD 3000 User manual

Vortex
Vortex Diamondback HD 2000 User manual

Vortex
Vortex BLUEONE BWO 155ZM User manual

Vortex
Vortex RWG Series User manual

Vortex
Vortex Impact 850 User manual

Vortex
Vortex Impact 850 User manual

Vortex
Vortex Crossfire HD 1400 User manual

Vortex
Vortex Ranger 1000 User manual

Vortex
Vortex Razor HD 4000 User manual