VWR VWRI611-3663 User manual

MAN_VWR_M5_EN_th_RL_1.00_Rev1 04.01.18
Touch Screen Balance
European Catalogue Numbers:
VWRI611-3663
VWRI611-3664
VWRI611-3665
VWRI611-3666
VWRI611-3667
VWRI611-3668
VWRI611-3669
VWRI611-3670
VWRI611-3671
VWRI611-3672
VWRI611-3673
VWRI611-3674
VWRI611-3675
VWRI611-3676
VWRI611-3677
VWRI611-3678
VWRI611-3679
VWRI611-3680
VWRI611-3681
VWRI611-3682
VWRI611-3683
VWRI611-3684
VWRI611-3685
VWRI611-3686
VWRI611-3687
VWRI611-3688
VWRI611-3689
VWRI611-3690
VWRI611-3691
VWRI611-3692
VWRI611-3693
VWRI611-3694
VWRI611-3695
VWRI611-3696
VWRI611-3697
VWRI611-3698
VWRI611-3699
VWRI611-3700
VWRI611-3701
VWRI611-3702
VWRI611-3703
VWRI611-3704
VWRI611-3705
VWRI611-3706
User Manual
Version 1 Issued 21/04/17

1
Legal Address of Manufacturer
Europa
VWR International bvba
Researchpark Haasrode 2020
Geldenaaksebaan 464
B-3001 Leuven
+ 32 16 385011
http://be.vwr.com
Country of origin
Italy
Intended use
Moisture balances can be used for quality check in laboratory, food and beverages industry,
material industry, etc.

2
INDEX
1
SAFETY INSTRUCTIONS AND WARNINGS............................................................................4
2
STORAGE CONDITIONS...............................................................................................................4
3
PREPARING TO START UP THE DEVICE...............................................................................5
3.1
U
NPACKING
/
PACKING
.................................................................................................................5
3.2
O
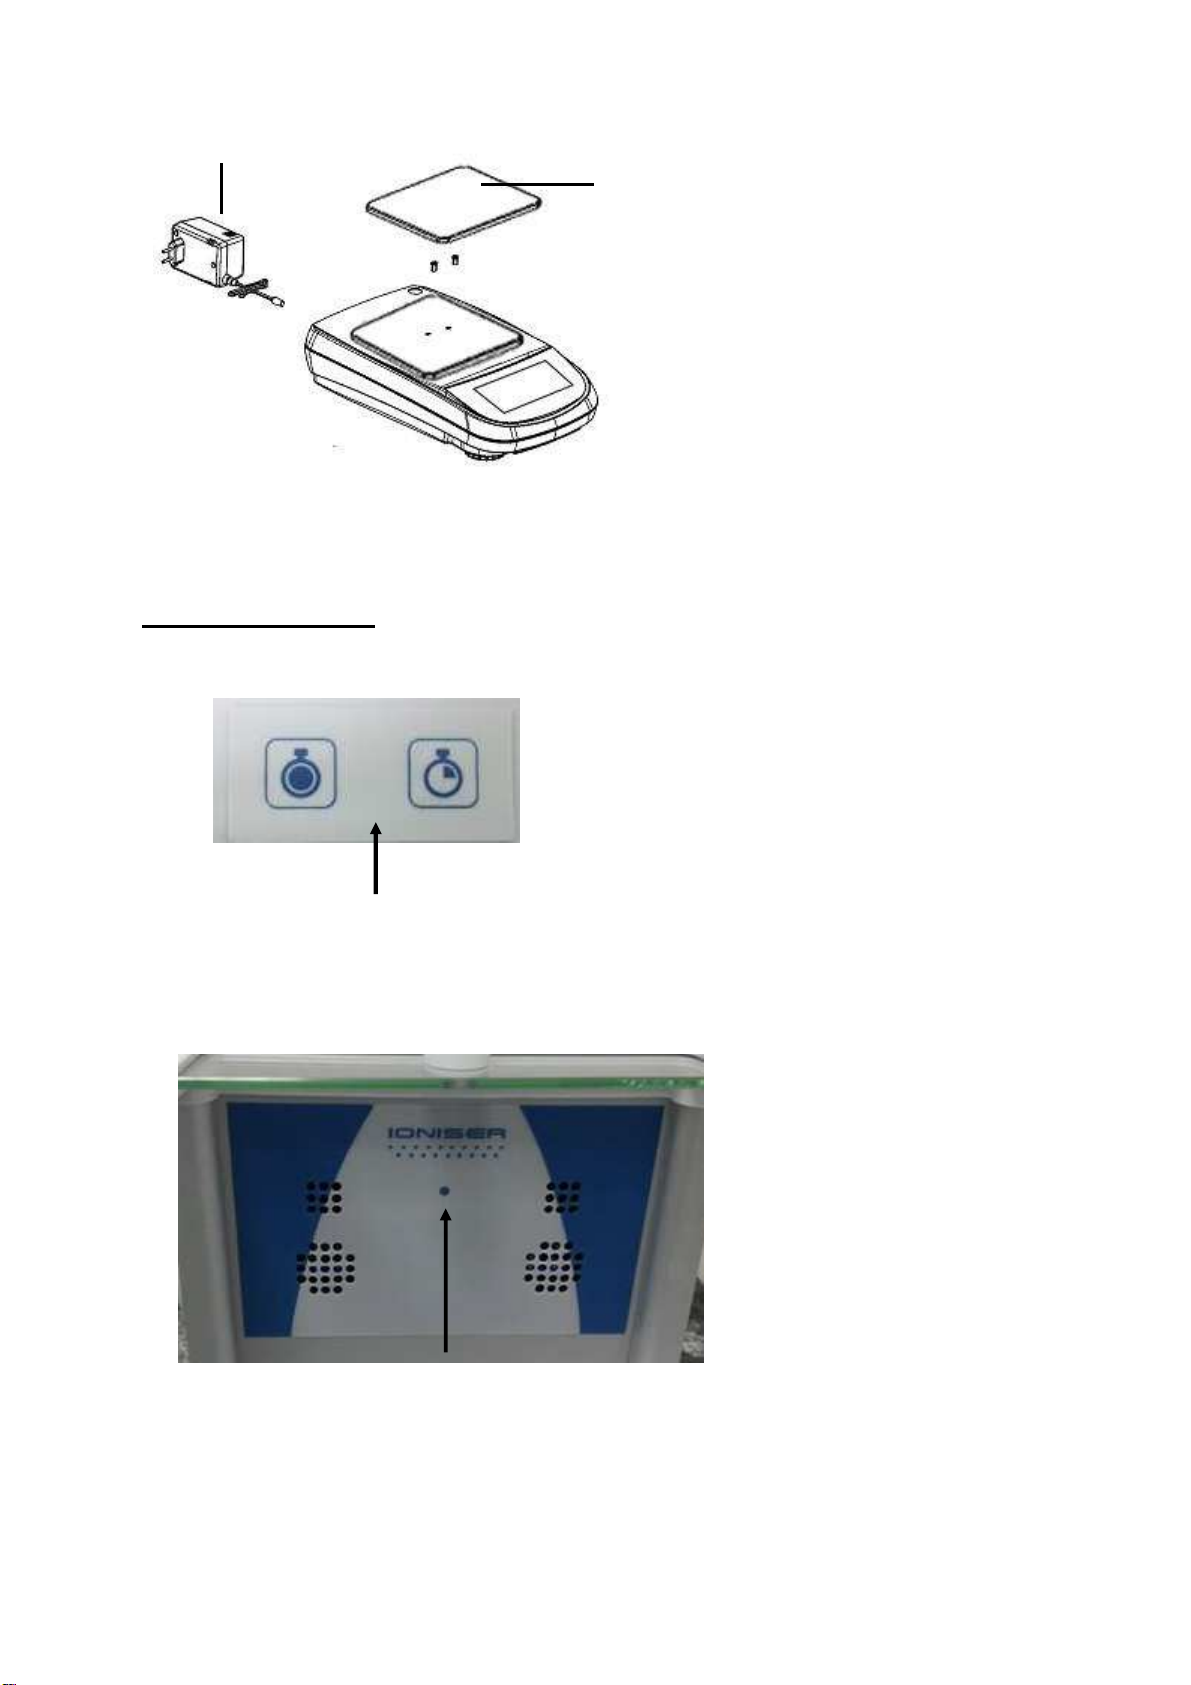
VERVIEW AND ACCESSORIES INSTALLATION
..............................................................................7
3.3
I
ONISER
(
ONLY FOR MODELS
-ION).............................................................................................8
3.4
I
NSTALLATION PLACE
.................................................................................................................10
3.5
S
TART
-
UP
....................................................................................................................................10
4
SIDE KEYBOARD OPERATION................................................................................................12
4.1
D
ESCRIPTION
...............................................................................................................................12
5
SERIAL INTERFACE CONNECTIONS ....................................................................................12
5.1
D
ISPLAY AREA OPERATION
.........................................................................................................13
5.1.1
Operating instructions of the numeric and alphanumeric keypads for entering data.........15
6
STANDBY, LOGOUT, SWITCHING OFF FUNCTIONS........................................................17
7
SIMPLE WEIGHING.....................................................................................................................18
8
CUSTOMIZED SETTINGS...........................................................................................................20
8.1
S
ELECTING THE LANGUAGE
........................................................................................................21
8.2
S
ETTING DATE AND TIME
............................................................................................................22
8.3
C
REATING
,
CHANGING AND SELECTING THE USER PROFILE
........................................................23
8.3.1
Recovering and removing passwords....................................................................................28
8.4
P
REFERENCES
:
LANGUAGE
,
DISPLAY APPEARANCE
,
BRIGHTNESS
,
BEEPER
,
FUNCTIONS
............29
8.5
S
ETTING THE WEIGHING PARAMETERS
........................................................................................31
8.6
S
ELECTING THE UNIT OF MEASUREMENT
....................................................................................32
8.7
S
ELECTING THE CUSTOM MEASUREMENT UNITS
.........................................................................33
8.8
C
ALIBRATING AND SETTING THE CALIBRATION MODE
...............................................................34
8.9
S
ETTING THE PERIPHERALS
.........................................................................................................37
8.10
I
NFO ABOUT THE SOFTWARE
.......................................................................................................43
8.11
S
ERVICE
......................................................................................................................................43
8.11.1
System data backup and restore........................................................................................43
8.11.2
Factory reset......................................................................................................................45
8.11.3
Software update.................................................................................................................46
8.11.4
Balance technical service..................................................................................................46
9
FUNCTIONS MENU.......................................................................................................................47
9.1
U
SING THE DATABASE
................................................................................................................48
9.2
F
UNCTION FOR COUNTING THE PIECES
........................................................................................49
9.2.1
Pieces count screen with “Statistics” function.....................................................................51
9.2.2
Pieces count screen with “Check weight” function. ............................................................52
9.3
“C
HECK WEIGHT
”
FUNCTION
......................................................................................................53
9.3.1
“Check weight” screen function ...........................................................................................54
9.4
“W
EIGHT
%”
FUNCTION
..............................................................................................................55
9.4.1
Screen of Weight % with “Statistics” function.....................................................................57
9.4.2
Screen of Weight % with “Check weight” function..............................................................58

3
9.5
F
UNCTION TO
“F
IX THE DENSITY
” ..............................................................................................59
9.5.1
Screen with the “Density of a solid” calculation function...................................................61
9.5.2
Screen with the “Density of a liquid” calculation function.................................................61
9.5.3
Screen with the “Density index” calculation function.........................................................62
9.6
“S
TATISTICS
”
FUNCTION
.............................................................................................................63
9.6.1
Screen with “Simple statistics” function...............................................................................64
9.6.2
Screen with “Database statistics” function..........................................................................65
9.7
“T
EXTILE
”
FUNCTION
..................................................................................................................67
9.7.1
Screen of the “Textile” function............................................................................................68
9.7.2
Screen of the database textile function with statistics enabled ............................................69
9.8
“A
NIMAL WEIGHTING
”
FUNCTION
..............................................................................................71
9.8.1
Screen of the “Animal weighting” function..........................................................................72
9.9
“M
AXIMUM LOAD
”
FUNCTION
....................................................................................................73
9.10
“R
ECIPE
”
FUNCTION
....................................................................................................................74
9.10.1
Screen of the “Simple recipe” function............................................................................77
9.10.2
Screen of the “Database recipe” function........................................................................78
9.11
S
ETTING THE
GLP
DATA
.............................................................................................................80
10
TECHNICAL FEATURES.............................................................................................................82
11
OPTIONAL ACCESSORIES.........................................................................................................83
12
TECHNICAL SERVICE ................................................................................................................83
13
WARRANTY....................................................................................................................................83
14
COMPLIANCE WITH LOCAL LAWS AND REGULATIONS.............................................84
15
EQUIPMENT DISPOSAL..............................................................................................................84

4
1 Safety instructions and warnings
CAUTION!
Please read these instructions for installation and operation carefully before
starting your work with the new balance. Using a device other than the one in this
manual does not guarantee the safety of the product. Carefully store the
instruction manual.
The balance complies with the directives and standards for electrical equipment,
electromagnetic compatibility and date safety requirements.
If the installation is not performed in accordance with the instructions given or is improperly
used, all warranty rights will lapse.
Do not use the device in areas at risk of explosion.
Before starting the device for the first time, check if the power supply unit or
the power cord is damaged and check if the power voltage corresponds to
the mains voltage.
disconnect the device from mains power, unplug the power cord.
2 Storage conditions
Storage temperature: +5 °C…+40°C
Storage humidity: 45% - 75%.
Keep the balance packing in the event of return for support; disconnect all cables and
any accessories to prevent unnecessary damage.
Do not expose the balance to extremes of temperature and humidity, and avoid violent
shocks.

5
3 Preparing to start up the device
Below are all the operations to be performed to prepare the device for its first power on.
3.1 Unpacking / packing
- After opening the box from the top, you can find the accessory box containing: User's
Manual, Plate, Under-plate; Anti-ventilation ring, Power supply unit, Power supply box.
Help with a stable plan to remove the protective cases.
N.B. Store all parts of the packaging for possible balance return.
User
Manual
1
2
3
4

6
Always use the original packaging for any device shipment to the
Service Center to prevent damage to the device. Below are the
procedures.
- Before any new packing, remove all the moving objects and put them in the accessory
box.
- Following this order, pack again the balance in its box:
User
Manual
1
2
3
4

7
3.2 Overview and accessories installation
1 - Plate
2 – Weighing plate
3 – Power supply unit
1 - Plate
2 – Weighing plate
3 – Power supply unit
4 – Anti-ventilation glass
5 – Glass cover
1 - Plate
2 – Weighing plate
3 – Power supply unit
2
1
3
3
5
4
2
1
1
2
3

8
1 – Weighing plate
2 –Power supply unit
3.3 Ioniser ( only for models -ION)
Using the ioniser:
Keys descriptions.
1 Activation button ioniser in continuous mode. (Auto power off after 8 hours of operation)
2 Activation button ioniser in timed mode. (Operation for 2 minutes)
N.B. to switch from one function or to turn off the device, press either one of the two keys.
LED green: powered ioniser.
Solid red LED: ioniser activated in continuous mode.
Flashing red LED: ioniser activated in time.
1
2
1 2

9
The ionizer is mounted in place of the rear glass as in the photo.
Technical data Ioniser
Distance “sample ion source” c. 5 - 40 cm
Ozone concentration 0 ~ 0.05 ppm (2cm from ion source)
Ambient conditions 0 – 50°C, 20 ~ 80% air humidity (non-condensing)
AC adapter (primary) AC 100-240V, 50/60Hz
Rated electric power supply DC 12V, 500mA
Pollution degree 2
Overvoltage category Category II
Altitude Up to 2000m
Installation site Device may only be used indoors

10
3.4 Installation place
Remove the balance and its calibration weight, in the models where it is included, from
the packaging and check for visible damage to the device.
Do not install the balance in any room where there are any air currents, strong heat
shifts, and vibrations.
Do not use the balance in explosive atmospheres.
The ambient humidity to use the balance should be between 45% and 75%.
3.5 Start-up
CAUTION!
In internal calibration models, manually remove the screw at the bottom
of the left-hand balance
Level the balance by adjusting the legs on the front of the balance.
Wait 30 minutes after switching on and calibrate the device after leveling it. For calibration
procedures, please refer to the "Device calibration chapter". Perform the device calibration
whenever it is moved to another place.

11
It is recommended not to drop excess weight objects on the balance weighing plate to
prevent damaging it.
Service must be performed by specialized personnel and the spare parts used must be
genuine. To do so, contact the dealer at whom the device was purchased.
Insert the supplied power supply unit jack into the connector on the back
of the device.
Then connect the power adapter to the power outlet near the device. Do
not use cables/extensions that do not comply with applicable regulations.
N.B. Check that the power shown on the device plate label corresponds to the one in
use in the country where you are installing the item.

12
4 Side keyboard operation
The balance is equipped with a keyboard located on the left side to perform the power on and
off.
4.1 Description
The keyboard has a power off and on button (1), an operation indicator LED (2), and a USB
port.
After connecting the power supply unit to the mains, the device will start automatically without
having to press the power button.
Use the power button to turn off the device and restart the system when the power cord is
already plugged in.
N.B. The turn-on and shut-down time of the device takes about 20 seconds, during this
time the display will be turned off.
When powering on, wait for the initial screen to appear before performing any other
operations.
While switching off, wait for the green LED to turn off before removing the power
supply socket, if necessary.
5 Serial interface connections
The device is equipped with an RS 232C interface for connection to a serial printer.
To ensure communication between the device and a printer, the following conditions must
be met:
Connect the printer using a suitable cable matching the position of the printer signals with
the device ones.
Set the transmission speed and type of printer correctly according to the parameters of the
printer. See Chapter 7.7
N.B. It is recommended that you use one of the printers listed in chapter 7.7 (Mod. dpp250 or
TLP50) to ensure proper print operation. (If you are using different printers, you will not be
able to print the chart).
12
1110

13
5.1 Display area operation
The balance comes with a color touch screen display that lets you touch the screen in active
areas to quickly access the various menus and features of the device.
1
Indication area for weighing values
g Measuring unit indication, by tapping the symbol, you can access the
measurement unit menu and select the desired unit.
Stability indicator.
T Man Indication of weight displayed.Net net value, Ldr gross value
T = Tare value indicator.
Analog indicator bar of magnitude being measured.
Indication of the technical data of the device
2
3
1

14
2
Bar displaying the date, time, for user selection, access to weighing functions, weighing
and device shutdown parameters setting.
Tap this area to access the available function menu.
Tap this area to access the menus for weighing settings, display
preferences, peripheral units setup, and users customization.
Tap this area to access the switching on or off menu for the device
standby mode.
Tap this area to access the users menu to quickly select the one desired.
3
Function key display bar.
Touching the keys displayed in this area, you will run the corresponding function. Below
are all the keys available in the simple weighing screen. The function key display bar
varies according to the selected applications.
Key bars available in simple weighing
screens.
Print: Data printing activation key.
-
0-: Reset activation key.
-T-: Tare operation activation key.
Gro/Net: Net or gross weight display mode
key.
T Man: Key for entering a tare value
manually.

15
5.1.1 Operating instructions of the numeric and alphanumeric keypads for entering
data
The operation of the alphanumeric keyboard described below is valid for all data entry
operations in the various operating modes of the device.
Mod 1
Mode 2
Mod 3
Alphanumeric keypad.
Selection key for entering uppercase or
lower case letters
Delete key of the last entered character
Delete key for all entered characters
Back and forward cursor movement key on
the inserted string
Key to confirm and store the entry
Keyboard character selection key. Tap this
key to rotate the various characters
available for entry:
Mod 1, Mod 2, Mod 3
Input operation cancellation key.

16
Numeric keypad.
Delete key of the last entered character
Key to confirm and store the entry
Delete key for all entered characters
Input operation cancellation key.
Key for selecting the unit of measurement.

17
6 Standby, logout, switching off functions
After inserting the power cord into the mains socket, the device will automatically turn on
showing the basic weighing screen.
Tap the area with the symbol
to access the switching off menu.
There are 3 switching off modes:
Display off.
Logout.
Switching off.
Display off
By selecting the display off mode, the
device will enter in the standby mode, the
display will be off and it will remain ON only
the lower-right command to turn on the
system again.
Touch the symbol to return to the basic
weighing screen.
Logout
Select the logout mode to enable the user
used.
Touch the key “Start” to enable again the
user and, if the user is password-protected,
you will be required to enter it.
Touching the key , you can select
another user and start the device again.
Switching off
By selecting the power-off command, the
device will be off. To restart, you will need
to press the button on the left of the device
or remove the power plug and reinsert it.

18
7 Simple weighing
After connecting the power, the green status LED on the left side of the device will light up.
This phase will last about 20 seconds, and the display will remain off all the time. After the
data loading phase, a screen will show the capacity and resolution of the balance. Then the
device will be placed in the simple weighing screen.
At first power on, the device starts by activating the default user with the factory settings.
In the weighing screen, the area displaying the
weight shows the value of the weight on the
weighting plate.
Use the -0- key to set a new zero point and reset
all tare values.
If you work with weighing boxes, first zero the
balance. Place the container and press the “-T-
”key.
Or use the T Man key to enter a known tare value
manually.
The Net symbol on the display indicates the net
weight. Press “Net” to see the gross weight
“Lrd”.
“T= “ indicates the tare value captured.

19
Place the material to weight on the balance and
wait for the stability symbol to light up before
detecting the value.
Press “Lrd” and “Net” to display the gross and net
weights and vice versa.
To reset the balance, remove all items from the
plate and press the “- 0 -“ key.
If you entered a manual tare, press “ T-Man” and
“C” key to clear the tare value.
This manual suits for next models
43
Table of contents
Other VWR Scale manuals