walimex GXR-400 User manual

Gewerbering 26
86666 Burgheim
Tel. +49 84 32 / 9489-0
Fax. +49 84 32 / 9489 - 8333
E-mail: info@foto-walser.de
www.foto-walser.de
Copy of Instruction Manual
Portable Ring Flash Set GXR-400 / GXR-600
Portable Flash Set GXR-400 / GXR-600
Flash Head for GXB-400 / GXB-600
Ring Flash GXR-400 / GXR-600

Content
1. How to understand the instruction manual......................................3
1.1. Symbols on the device ................................................................3
1.2. Symbols in this manual ...............................................................4
2. Important safety notes......................................................................4
3. Unpack and check device ..................................................................8
4. Operation of the device ..................................................................10
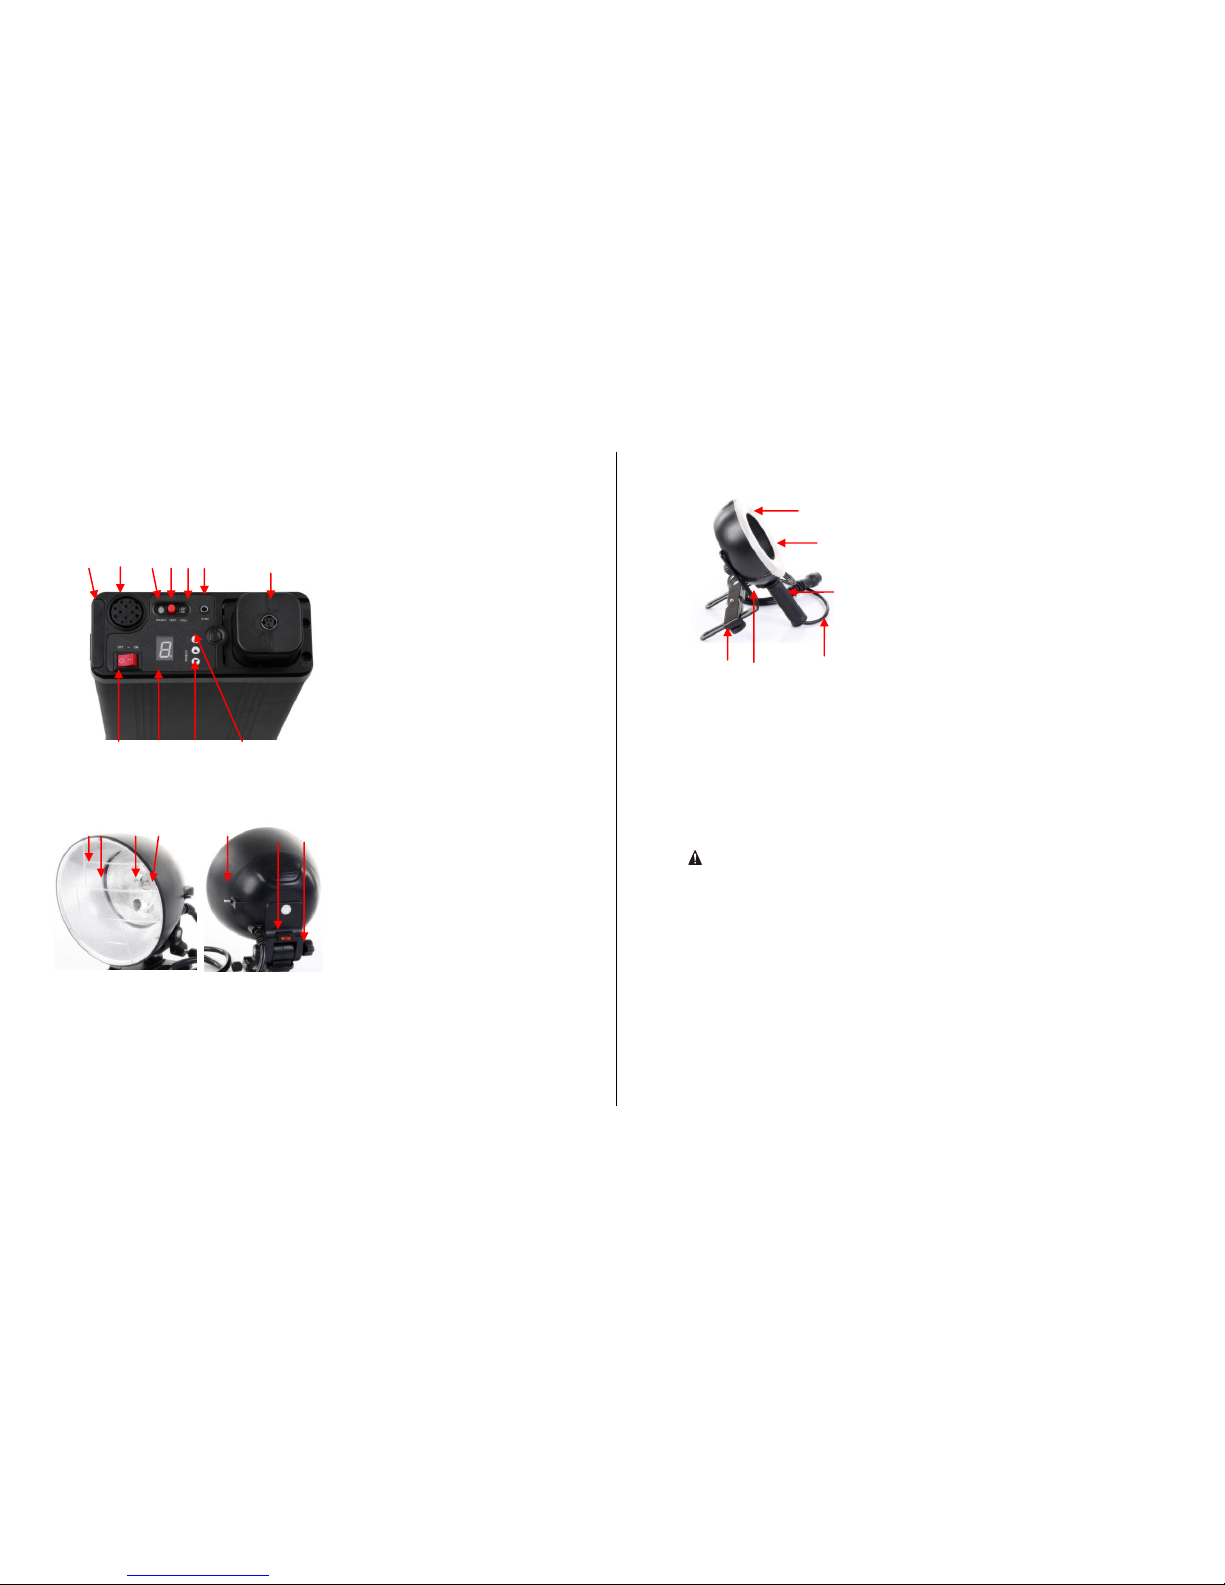
4.1. Overview of device elements walimex pro powerpack............10
4.2. Overview of device elements walimex pro flash GXB...............10
4.3. Overview of device elements walimex pro ring flash GXR .......11
5. Quick-start guide.............................................................................11
6. Prepare powerpack for operation...................................................12
6.1. Charge battery..........................................................................12
6.2. Flash GXB-Series.......................................................................12
6.3. Ring Flash GXR-Series ...............................................................13
7. Connect flash to powerpack............................................................14
8. Switch device on and off .................................................................15
9. Adjusting the device........................................................................15
9.1. Prepare flash output ................................................................15
9.2. Prepare and adjust flash trigger................................................15
10.Trigger flash.....................................................................................16
11. Transport and store device .............................................................16
12.Solve problems................................................................................17
13.Maintenance of the device..............................................................17
13.1. Continuous inspection and maintenance of the device .........17
13.2. Cleaning of the device.............................................................18
14. Accessories and options..................................................................18
15. Spare parts ......................................................................................19
16.Disposal and environment protection.............................................19
17. Technical specifications...................................................................20
We would like to thank you for your confidence and wish you much joy and
success with your GXR/GXB series. The walimex pro GXR/GXB series was
developed specifically for the ambitious beginner and for the professional
user.
The walimex pro GXR/GXB series is extremely well-suited for mobile use für
studio portrait, person, nude and product photography, among others.
The main features of your device are as follows:
ideal on location when you have to work network-independently
removable battery block with battery charger
carrying strap on the powerpack
Please read these instructions carefully before using your device for the
first time. It includes everything you need to know to avoid physical
injuries and damages.
Please pay attention to all safety notes in this instruction manual.
Please keep this manual safe. If you are selling or leaving the device to
another person, please ensure to hand this manual over as well.
1. How to understand this instruction manual
1.1. Symbols on the device
This symbol means that your device meets the safety
requirements of all relevant European Directives.
This symbol means that your device must be disposed of at local
disposal areas.

1.2. Symbols in this manual
Symbol
Meaning
Indicates the handling and consequences of safety
notes.
WARNING
Indicates a hazardous situation which, if not avoided,
may result in a serious injury or death.
CAUTION
Indicates a hazardous situation which, if not avoided,
may result in minor or moderate injury.
NOTE:
Indicates potential material damage and other
important information regarding your device.
2. Important Safety Notes
WARNING
Risk of retina damage
The flash light could damage the retina leading to the loss of vision, if the
flash is trigged in close distance to persons or animals.
Please do not trigger a flash in close distance to the eyes of persons or
animals.
Please ensure that the distance between persons and animals is at least
2m. Please avoid looking into the flash directly.
WARNING
Danger of crashing, crushing, burning, and fire due to device toppling over
The powerpack weighs approx. 3.1 kg, the charger approx. 0.48 kg, the ring
flash approx. 3.1 kg and the flash approx. 0.74 kg. The modeling lamp, the
flash tube and the reflector can heat up to 240 °C.
Ensure that the device is always kept in a tilt- and skid-resistant position
and stored securely.
Keep out of reach of children and animals. They could knock over the
device.
Avoid placing cables where they could be tripped over. The device could
be knocked over.
Only mount the device on a tripod that is designed for the weight and
dimensions of the device. See Technical specifications.
WARNING
Danger of electric shock, burn hazard
Please note that the device is still connected to the supply voltage when it
is switched off. Only when you disconnect the device from the powerpack
supply voltage by unplugging the power cord, it is really de-energized.
Switch off the device when it is not in use.
Switch off the device before assembly and maintenance and disconnect
from power supply by unplugging the power cord and removing the
battery.
Discharge the device before maintenance measures.
Protect your device against accidental power-on.
Cut off voltage supply when not in use for a longer period of time by
unplugging the power cord and removing the battery.
WARNING
Danger of electric shock, fire through short-circuit
A short circuit could be caused by defective cables and due to moisture or
wetness among other causes. A short circuit can heat up the conductors
resulting in the melting of their insulation or the conductors themselves.
This could lead to fire.
Please use exclusively the original cables, which are provided with the
device. They are tuned for your device and guarantee the necessary
safety for you and your device.
5
4

Do not operate the device with wet hands or feet.
Clean the device exclusively as described in this instruction manual.
Ensure that cables and conductors are not damaged. Damage could be
caused due to heat impact, chemical influence or due to mechanical
impacts such as rubbing, bending, tearing, rolling over, or nibbling
animals.
Prevent your device from falling.
In the case of falling, please have an electrician check the device before
switching it on again.
If your device is damaged or if you notice a burning smell:
Disconnect the power supply immediately by unplugging the power
cord and removing the battery. Never operate your device with a
damaged casing, defective reflector, defective modeling lamp, defective
flash tube or a damaged power cord. Do not open the device. Never
repair the device on your own. Have the device repaired exclusively by
an electrician
Please follow this instruction manual for maintaining your device.
Please only use spare parts which are conform to the required
specifications. See Technical specifications.
WARNING
Danger of fire by overheating
The device can overheat if you operate it with mounted protection cap or
with covered ventilation slots. The device itself or easily inflammable
materials in close distance could catch fire.
Do not operate the device with mounted protection cap.
Do not cover the ventilation slots of the device during operation.
Remove easily inflammable materials from the surroundings of the
device.
Please exclusively use spare parts, which are conform to the required
specifications. See Technical Specifications.
WARNING
Danger of fire due to hot device components
The modeling lamp and flash tube could heat up to 240°C and the reflector
up to 75°C. Easily inflammable materials could catch fire, if they get in
contact with hot device components.
Do not cover the ventilation slots of the device during operation.
Remove easily inflammable materials from the surroundings of the
device.
WARNING
Danger of burning on hot device components
The modeling lamp and flash tube could heat up to 240°C and the reflector
up to 75°C.
Do not touch device elements during use and during the cooling down
phase.
Allow for device to cool down for 30 minutes before beginning assembly
or maintenance measures.
WARNUNG
Danger of cutting and splitting due to breaking modeling lamp or
breaking or bursting flash tube
Even small residues of skin oil on the flash tubes can lead to the splitting
of the flash tube, due to the high heat impact during operation. Broken
glass can hurt eyes and skin.
Treat the modeling lamp and flash tube carefully to avoid them from
breaking.
Do not touch the flash tube with bare hands. Use a clean cloth or clean
gloves.
Avoid touching the flash tube accidentally when mounting or changing
accessories.
7
6

WARNING
The powerpack contains a rechargeable Ni-MH battery. Please pay
attention to the safety and disposal notes in the manual and on the
battery.
Keep children away from the powerpack.
Use exclusively the charger of the GXR/GXB series for charging the
battery.
Ideal environmental temperature 0-40°.
Battery can get hot. Allow for it to cool off before you recharge it.
Protect from moisture and wetness.
To ensure an optimal battery life, charge the battery even when you are
not using it every 3 months.
After completing the charging process remove the battery power
supply.
Dispose of the battery at the manufacturer or a local disposal point.
Only use the appropriate batteries for the powerpack
3. Unpack and check device
1. Please unpack the device carefully.
NOTE: Keep the packaging for later storage and transport of the device.
2. Please check if the scope of delivery is complete:
Article walimex pro Ring Flash Set GXR-400 / GXR-600
Article walimex pro Flash Set GXB-400 / GXB-600
o1 powerpack
o1 flash
o1 transport case
o1 battery
o1 power supply
o1 12V car cable
o1 carrying bag with shoulder strap
o1 sync cord
oremote trigger
oinstruction manual
Article walimex pro Flash GXB- 400 / GXB-600
o1 flash
o1 protective cap
o1 handle
oInstruction manual
Article walimex Ringblitz GXR-400 / GXR-600
o1 ring flash
o1 handle
oInstruction manual
3. Please check if the scope of delivery is undamaged. NOTE: If the scope of
delivery is incomplete or damaged, please contact info@foto-walser.de or
our service hotline with the telephone number +49 84 32 / 9489 - 0. We
reserve the right to make technical and optical modifications in the
course of product improvement.
8
9

4. Operation of the device
4.1. Overview of device elements walimex pro Powerpack
A
Powerpack
B
Connecting socket for flash devices
C
Ready display
D
Test button
E
Photo cell
F
Sync socket
G
Battery compartment with battery
H
Acoustic signal on/off switch
I
Output regulator
J
Display
K
On/off switch
4.2. Overview of device elements walimex pro Flash GXB Series
1
Flash
2
Standard reflector
3
Flash tube
4
Modeling lamp
5
Release lever standard reflector
6
On/off switch modeling lamp
7
Locking screw tilt angle
4.3. Overview of device elements walimex pro Ring Flash GXR Series
I
Ring flash
II
Lamp
III
Handle
IV
Connecting cord to the powerpack
V
Holding rail for adjustment of height
VI
Holding rail for attachment to tripod
and adjustment of depth
5. Quick-start guide
NOTE:
The detailed instruction for the following operations can be found in the
respective chapters in this instruction manual.
Maintain the order of the following operating steps when using the device for
the first time to avoid damaging the device.
WARNING
Please pay attention to the safety notes in the respective chapters
throughout operation.
1. Charge/insert battery.
2. Mount/demount standard reflector flash.
3. Connect device to power supply / insert battery.
4. Switch on device.
5. Adjust modeling lamp.
6. Adjust flash output.
7. Adjust acoustic standby signal.
8. Prepare flash release.
9. Mount device to a tripod (optional).
11
10
1
2
4
5
6
7
VI
V
IV
III
II
I
A
B
C
F
E
H
G
D
I
J
3
K

6. Prepare powerpack for operation
6.1. Charge battery
WARNING
Pay attention to the safety notes from pages 4-8.
A
B
C
D
Power cord
12V car cable
Power supply unit
Battery
Open the battery compartment lid on the powerpack.
Pull the battery from the shaft of the powerpack.
Connect your power supply unit to the electrical outlet and connect the
plug to the battery.
Note: Compare the local power network with the connected load of the
device. If the values differ, please contact info@foto-walser.de or Tel. +49
8432-94890.
The battery is being charged.
As soon as the battery is charged, the LED on the power supply unit
switches from red to green.
6.2. Flash GXB Series
Mount and demount reflector:
WARNING
Danger of bursting of flash tube
Ensure not to accidentally touch the flash tube with bare hands.
WARNING! Danger of burning on reflector, modeling lamp and flash tube.
Let the device cool down for approx. 30 minutes.
A
B
Release lever
Tripod holding fixture
Switch off device.
See Switch device on and off.
Allow for device to cool off.
Demont reflector.
Push back release lever and hold down.
Insert reflector into the openings of the device.
Turn reflector clockwise until it notably locks into place.
Let go of release lever.
6.3. Ring Flash GXR Series
A
B
C
Locking screws for height adjustment
Locking screw for depth adjustment
Locking screw for tripod and camera fixation
A
A
1212
13
B
C
D
B
A
C
B

For adjusting the height please open the corresponding locking screws.
Adjust the device to the desired height.
Tighten the locking wheel.
For adjusting the depth please open the corresponding locking screws.
Adjust the device to the desired depth.
Tighten the locking wheel.
In order to mount the device on the tripod and your camera, open the
corresponding locking screw.
Take your tripod or camera and tighten the locking wheel.
WARNING Only mount the device on a tripod that is designed for the
weight and dimensions of the device. See Technical specifications.
WARNING Before each use ensure that the camera is mounted safely.
Check all locking screws.
7. Connect flash to powerpack
A
B
Connecting socket for flash devices
On/off switch
Switch on device.
See Switch device on and off.
Unscrew protective caps.
Plug connecting cable of the flash into the connecting socket of the
powerpack.
8. Switch device on and off
Switch device on:
Set main switch to I (ON).
The display lights up when the adjusted flash output is reached. The READY
indicator lights up.
Switch off device:
Set main switch to 0 (OFF).
All lights go out.
9. Adjusting the device
9.1. Adjust flash output
You can adjust the flash output of the flash heads steplessly from 1/1 full
output to 1/8 using the output regulator.
A
B
Sync socket
Output regulator
9.2. Prepare and adjust flash trigger
Prepare flash trigger by camera
NOTE: Please pay attention to the manual of the camera manufacturer about
flash synchronization.
1. Plug sync cable into connecting socket for the sync cable on the end of
the device.
2. Plug other end of the sync cable into the X-socket of your camera.
B
A
A
B
14
15

Prepare flash trigger with a radio receiver
NOTE:
Pay attention to the user manual of the radio trigger manufacturer.
Plug cable of the radio receiver into the connective socket 3.5mm for the
sync cable on the device.
Connect radio transmitter to hot shoe of camera.
10. Trigger flash
Switch on device. See Switch device on and off.
For check, trigger device with the test button (on the powerpack or on the
radio remote trigger).
Trigger flash according to the prepared method of flash trigger.
See Prepare and adjust flash trigger.
11. Transportation and storage of the device
Switch off device.
See Switch device on and off.
Allow for device to cool down completely.
WARNING! Danger of fire due to hot device components. Allow for
device to cool off completely.
Demount connecting cables.
Clean the device if necessary. See Cleaning of the device.
Put the device and all demounted elements into the original Styrofoam
packaging and transport and store them according to the requirements in
the technical specifications. See Technical specifications.
12. Solve problems
Problem
Possible cause
Solution
Device is switched on
but shows no function
Battery is not or not
sufficiently
charged/defective
Charge/exchange
battery
Flash shows function
but triggering a flash is
not possible
Powerpack or flash
device is defective
Contact Foto Walser
customer service
Flash tube is broken
Replace flash tube, if
needed with electrically
qualified person
13. Maintenance of the device
13.1. Continuous inspection and maintenance of the device
What you should do
Before each use
Check all cables and plugs for damages.
If damaged:
WARNING! Danger of electric shock and fire due to
short-circuit
Have the device/charger repaired by an electrician
immediately.
X
16
17

13.2. Cleaning the device
WARNING
Danger of bursting flash tube
Ensure not to touch the flash tube accidentally with bare hands.
WARNING
Danger of electric shock
Use exclusively the cleaning supplies as specified.
Never allow for the device to get in touch with wetness or water.
Always unplug power cord before cleaning the device. Remove battery.
Device component
Cleaning
Casing
Remove light and persistent stains with
microfiber cloth
Modeling lamp, flash
tube
Dab off with dust brush or dry, soft cloth
NOTE:
Do not clean the modeling lamp and flash tube
with water. Even small residues on the lamps
can cause the lamps to burst
Reflector
Remove stains with microfiber cloth
14. Accessories and options
You can find extensive accessories for your walimex pro studio flash in our
webshop.
15. Spare parts
Device component
Item Number
Replacement Flash Tube GXB-400
17243
Device component
Item Number
Replacement Flash Tube GXB-600
17244
Replacement Ring Flash Tube GXR-400
17245
Replacement Ring Flash Tube GXR-600
17246
Battery for GXR/GXB 3000mAh
17247
16. Disposal and environment protection
Please dispose of your device free of charge at a local disposal area. Please
pay attention to the disposal notes of the battery.
19
18

17. Technical specifications
Powerpack
Dimensions (LxWxD)
approx. 25.5x17x7cm
Operating voltage
DC 12V
Charging voltage
220-240V
Output
600W
Adjustment range
approx. 2 f-stops, 1/1-1/4 in 9 steps
Flash releases
up to approx. 140 (at max. output)
Weight
approx. 3100g
Radio Trigger
433Mhz
Battery
Dimensions(LxWxH)
approx. 21.5x5cm
Type
Ni-Mh
Charging time
approx. 4 hours
Capacity
3000mAh
Weight
approx. 770g
Ring Flash GXR
Output GXR-400 / 600
400Ws / 600Ws
Color temperature
5400-5600K
Cable length
approx. 140cm
Power supply
via powerpack DC12V
Weight
approx. 740g
Material
plastic, metal
Flash GXB
Output GXB-400 / 600
400Ws / 600Ws
Flash tube
„plug-in“, can be replaced by the
user
Power supply
via powerpack DC12V
Cable length
approx. 160cm
Dimensions (LxWxH)
approx. 17x17x10cm
Weight
approx. 1600g
Reference to declaration of conformity:
“Herewith Foto Walser GmbH & Co. KG declares that the device Radio Remote
Trigger conforms to the basic requirements and the remaining corresponding
regulations of the directive 1999/5/EG.” The declaration of conformity can be
20
21
This manual suits for next models
1
Table of contents
Other walimex Camera Accessories manuals

walimex
walimex CY-C User manual

walimex
walimex 16280 User manual

walimex
walimex daylight 450 User manual

walimex
walimex 16 angle User manual

walimex
walimex DaylightVC-6001F User manual

walimex
walimex Battery Grip User manual

walimex
walimex Daylight 250 User manual

walimex
walimex Daylight 150 User manual

walimex
walimex TR-D4 User manual

walimex
walimex Fresnel User manual