manuals.online logo
Brands
  1. Home
  2. •
  3. Brands
  4. •
  5. Walthers
  6. •
  7. Toy
  8. •
  9. Walthers CORNERSTONE WALTON & SONS LUMBER 933-3057 User manual

Walthers CORNERSTONE WALTON & SONS LUMBER 933-3057 User manual

NOTE: Before proceeding, decide on which version of the shed you wish to model. Then,
follow the appropriate instructions.
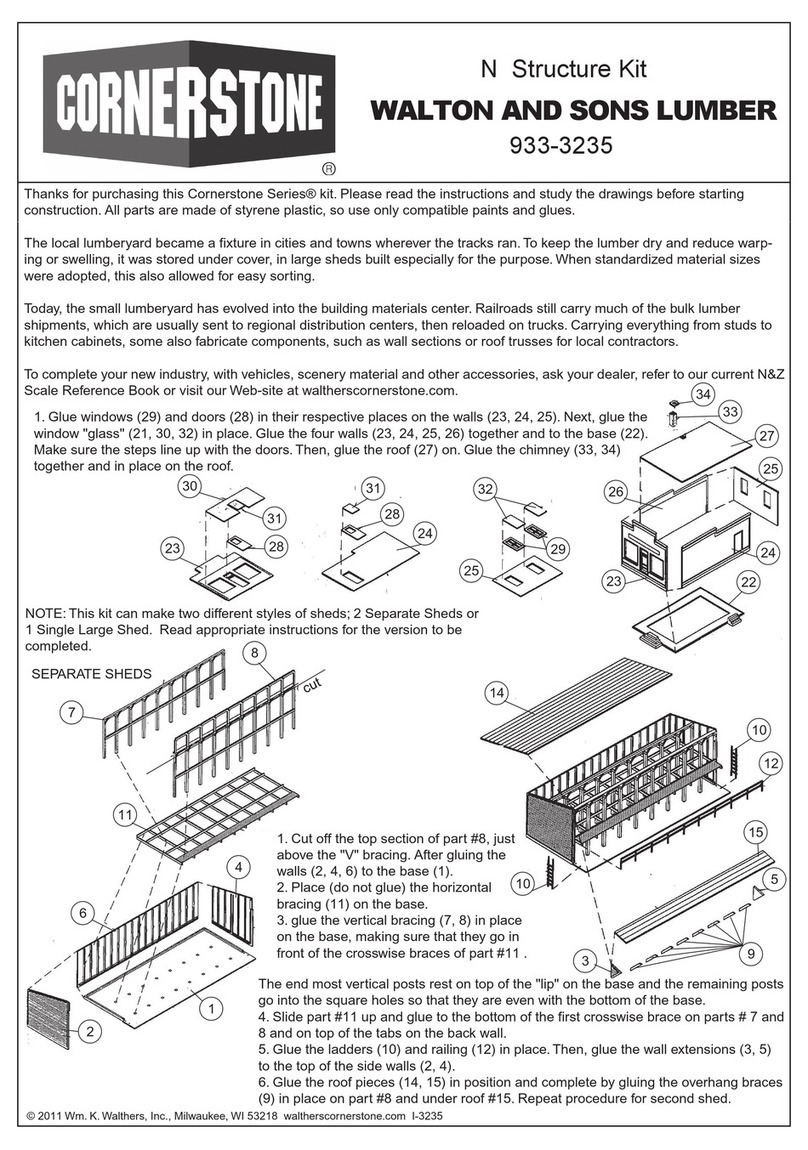
A. First, cut off the top section of part #8, just above the "V" bracing. After gluing the walls
(2, 4, 6) to the base (1), place (do not glue) the horizontal bracing (11) on the base. Now,
glue the vertical bracing (7, 8) in place on the base, making sure that they go in front of the
crosswise braces of part #11. The end most vertical posts rest on top of the "lip" on the
WALTON & SONS LUMBER
HO Structure Kit
933-3057
© 2012 Wm. K. Walthers, Inc., Milwaukee, WI 53218 waltherscornerstone.com I-933-3057
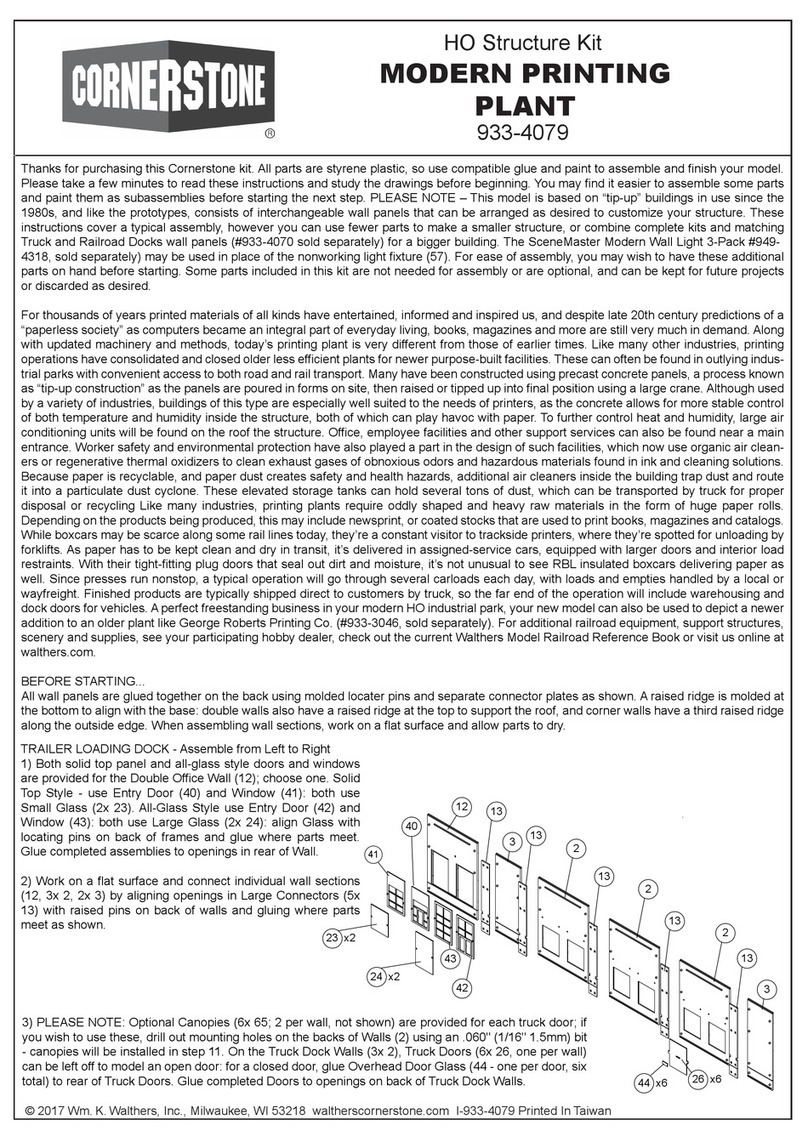
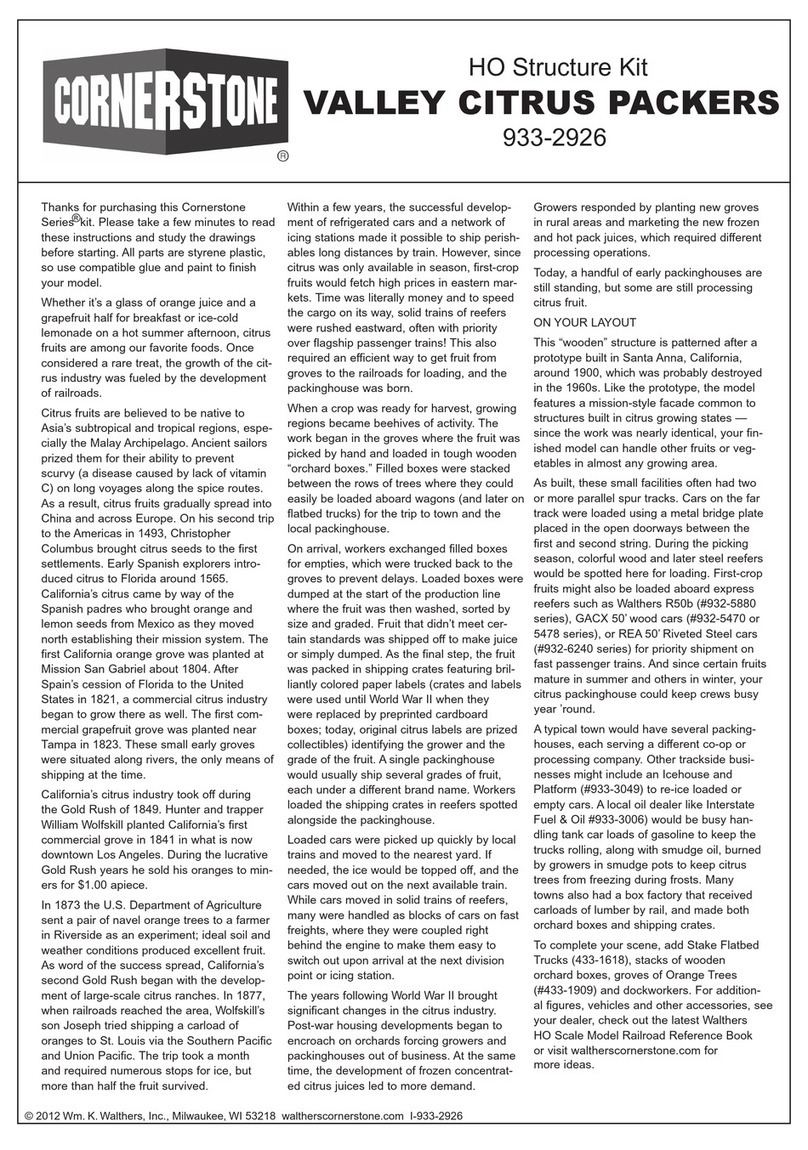
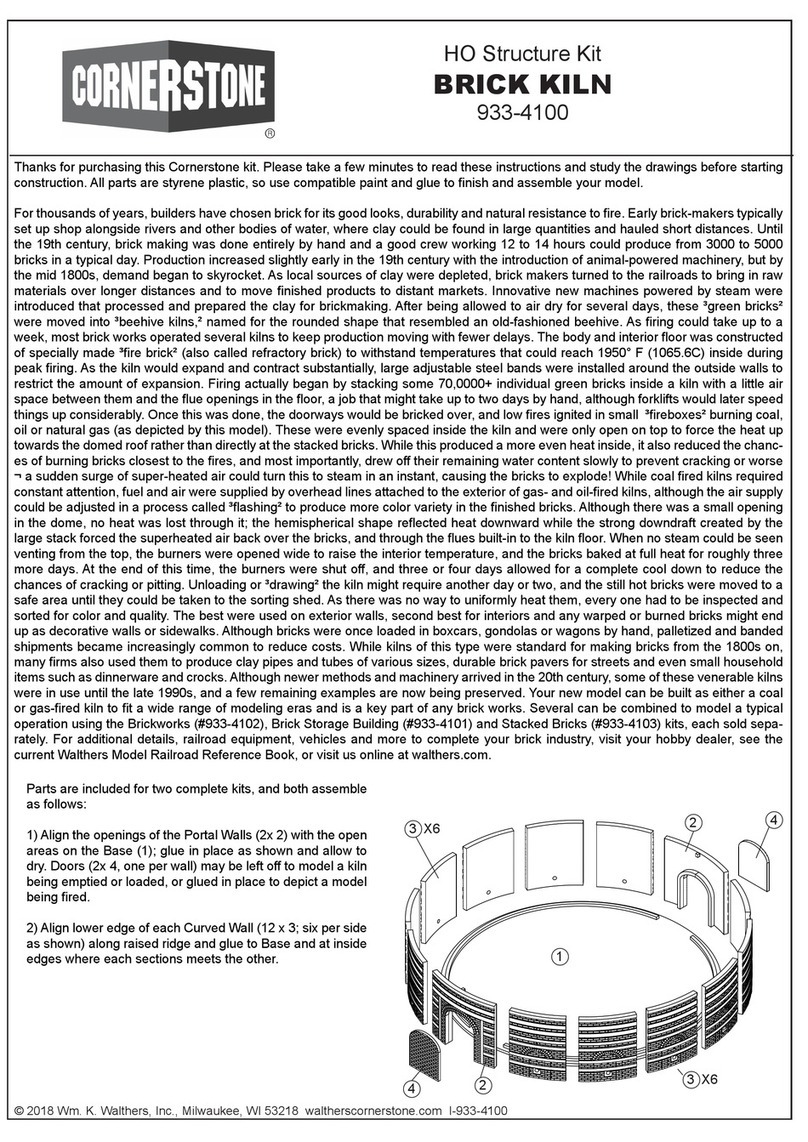
Thanks for purchasing this Cornerstone Series Kit. Please read all instructions before starting. All parts are molded in
styrene plastic. Use glues and paints which are compatible.
The local lumberyard became a fixture in cities and towns wherever the tracks ran. To keep the lumber dry and reduce
warping or swelling, it was stored under cover, in large sheds built especially for the purpose. When standardized material
sizes were adopted, this also allowed for easy sorting.
Today, the small lumberyard has evolved into the building materials center. Railroads still carry much of the bulk lumber
shipments, which are usually sent to regional distribution centers, then reloaded on trucks. Carrying everything from studs
to kitchen cabinets, some also fabricate components, such as wall sections or roof trusses for local contractors.
For more ideas to detail your scene, ask your dealer, visit our Web-site waltherscornerstone.com or see the latest Walthers
HO Scale Model Railroad Reference Book.
30
1. Start by gluing windows (29) and
doors (28) in their respective places
on the walls (23, 24, 25). Next, glue
the window "glass" (21,30,31) in
place. Glue the four walls (23, 24,
25, 26) together and to the base
(33). Make sure the steps line up
with the doors. Then, glue the roof
(27) on and finish by gluing the
chimney (33, 34) together and in
place on the roof.
base and the remaining
posts go into the square
holes so that they are even
with the bottom of the
base. Next, slide part #11
up and glue to the bottom
of the first crosswise brace
on parts # 7 and 8 and on
top of the tabs on the back
wall. Glue the ladders (10)
and railing (12) in place.
Then, glue the wall exten-
sions (3, 5) to the top of
the side walls (2, 4). Glue
the roof pieces (14, 15) in
position and complete by
gluing the overhang
braces (9) in place on part
#8 and under roof #15.
Repeat procedure for
second shed.
SEPARATE SHEDS
28
23
28
31
24
21 29
25
34 33 X2
26
25
23 24
27
33
CUT
7
8
11
6
2
4
1
14
10 15
3
5
9 X8
10
12
DECALING
1. After cutting out the decal, dip in water
for 10 seconds, remove and let stand for 1
minute. Slide decal onto surface, position
and then blot off any excess water.
2. Lightly brush Micro Sol® on top. This will
soften the decal allowing it to conform to
irregular surfaces. DO NOT TOUCH
DECAL while wet!
3. When the decal is thoroughly dry, check
for any trapped air bubbles. Prick them with
the point of a small pin or hobby knife
blade and apply more Micro Sol®.
A. Glue the walls (2, 4, 6) to the base (1). Then, place (do not
glue) the horizontal bracing (11) on the base. Now, glue the
vertical bracing (7, 8) in place on the base, making sure that
they go in front of the crosswise braces of part #11. The end
most vertical posts rest on top of the "lip" on the base and the
remaining upright posts go into the square holes so that they
are even with the bottom of the base. Next, slide part #11 up
and glue the bottom of the first crosswise brace on parts #Ss
7 and 8 and on top of the tabs on the back wall. Glue the
ladders (1 0) and railing (12) in place. Glue the windows (20)
and window "glass" (21) in place on clerestory wall (17) and
glue this to the top and back of part #8. Repeat for second
shed.
7
8
11
6
4
2
1
21 x4
20 x4
17
14
17
10
10
12
15
5
9 x8
3
B. Now, glue the clerestory end walls (16) to both the ends of
both sheds thereby, joining them into one. Then, glue the clere-
story braces (18) in place, one against each end and the others
in the middle, using the notches
and vertical ribs on part #8 to
locate. Glue the roof pieces (14, 19)
onto their respective places to
finish.
14
16
18 x10
16
19
DOUBLE SHED

Other Walthers Toy manuals

Walthers CORNERSTONE WALTON AND SONS LUMBER 933-3235 User manual

Walthers

Walthers CORNERSTONE WALTON AND SONS LUMBER 933-3235 User manual

Walthers Cornerstone 933-2926 Product guide

Walthers

Walthers Cornerstone 933-2926 Product guide

Walthers Cornerstone Series Product guide

Walthers

Walthers Cornerstone Series Product guide

Walthers Cornerstone 933-4600 User manual

Walthers

Walthers Cornerstone 933-4600 User manual

Walthers Cornerstone Series User manual

Walthers

Walthers Cornerstone Series User manual

Walthers CORNERSTONE BRICK KILN 933-4100 User manual

Walthers

Walthers CORNERSTONE BRICK KILN 933-4100 User manual

Walthers Cornerstone Series User manual

Walthers

Walthers Cornerstone Series User manual

Walthers CORNERSTONE INTERSTATE FUEL & OIL 933-3006 User manual

Walthers

Walthers CORNERSTONE INTERSTATE FUEL & OIL 933-3006 User manual

Walthers Cornerstone Series User manual

Walthers

Walthers Cornerstone Series User manual

Walthers Cornerstone 933-4079 User manual

Walthers

Walthers Cornerstone 933-4079 User manual

Walthers RAILKING EP-5 User manual

Walthers

Walthers RAILKING EP-5 User manual

Walthers Proto 2000 Series User manual

Walthers

Walthers Proto 2000 Series User manual

Walthers GP7 Phase II User manual

Walthers

Walthers GP7 Phase II User manual

Walthers Walthers Mainline RDC-1 User manual

Walthers

Walthers Walthers Mainline RDC-1 User manual

Popular Toy manuals by other brands

Hasbro Twirling Fun with Loop-De-La 60195/60337 instruction manual

Hasbro

Hasbro Twirling Fun with Loop-De-La 60195/60337 instruction manual

SG Models SEA 99N Assembly manual

SG Models

SG Models SEA 99N Assembly manual

Thames & Kosmos 623715 Experiment manual

Thames & Kosmos

Thames & Kosmos 623715 Experiment manual

Fisher-Price X4189 manual

Fisher-Price

Fisher-Price X4189 manual

Carl Goldberg Products Hot Stik ARF instructions

Carl Goldberg Products

Carl Goldberg Products Hot Stik ARF instructions

Mega Bloks Collector Series instructions

Mega Bloks

Mega Bloks Collector Series instructions

Faller BLACK FOREST FARM WITH BAKING COTTAGE instructions

Faller

Faller BLACK FOREST FARM WITH BAKING COTTAGE instructions

T-Motor AM-Link instructions

T-Motor

T-Motor AM-Link instructions

Fisher-Price DYH09 quick start guide

Fisher-Price

Fisher-Price DYH09 quick start guide

Value Hobby Sbach-342 EPP 3D Profile instruction manual

Value Hobby

Value Hobby Sbach-342 EPP 3D Profile instruction manual

Hexbug BattleBots Arena MAX manual

Hexbug

Hexbug BattleBots Arena MAX manual

Trix Minitrix BR182 user manual

Trix

Trix Minitrix BR182 user manual

Eduard Flakpanzer Wirbelwind quick start guide

Eduard

Eduard Flakpanzer Wirbelwind quick start guide

Eduard Zoom Swordfish Mk.I interior quick start guide

Eduard

Eduard Zoom Swordfish Mk.I interior quick start guide

LEGO 70800 Assembly instruction

LEGO

LEGO 70800 Assembly instruction

LEGO hobbit 79001 Assembly instructions

LEGO

LEGO hobbit 79001 Assembly instructions

Faller 144104 quick start guide

Faller

Faller 144104 quick start guide

PACIFIC CYCLE Hello Kitty KT1037WM user guide

PACIFIC CYCLE

PACIFIC CYCLE Hello Kitty KT1037WM user guide

manuals.online logo
manuals.online logoBrands
  • About & Mission
  • Contact us
  • Privacy Policy
  • Terms and Conditions

Copyright 2025 Manuals.Online. All Rights Reserved.