manuals.online logo
Brands
  1. Home
  2. •
  3. Brands
  4. •
  5. Warrior Products
  6. •
  7. Automobile Accessories
  8. •
  9. Warrior Products 1555 User manual

Warrior Products 1555 User manual

Warrior, Inc.
11100 SW Industrial Way
Tualatin, OR 97062
Phone: (888) 220-6861
Fax: (503) 692-0364
customerservice@warriorproducts.com
www.warriorproducts.com
KIT CONTENTS:
Item
Qty
Item
Qty
License Plate Mount
1
¼ x 1” Button Head Screw
6
LED license plate light
1
¼” Flat washer
12
Rubber edge trim
6 inches
¼” Nyloc nut
6
#6 x ½” black Torx screw
2
IMPORTANT INSTALLATION NOTES:
This Warrior Products license plate mount is
designed specifically for use with Warrior rear MOD
bumpers for the Jeep JL/JLU application where the
factory license plate location is on the rear bumper.
Some or all of the initial assembly steps may have
already been completed, in which case you may
skip that step.
1. Begin by passing the wires of the light
through the top-middle slot of the bracket.
2. Position the light against the mounting tab
as shown with the wires facing away from
the tab (the curved edges of the light will be
against the tab, and the sharp edges will be
away from the tab).
3. Align the holes of the light with the
corresponding holes in the tab.
4. Attach the LED light by inserting the two #6
black Torx screws through the holes in the
mounting tab and into the plastic housing of
the LED light.
5. Tighten the screws with a T15 Torx driver until
snug (overtightening may cause damage).
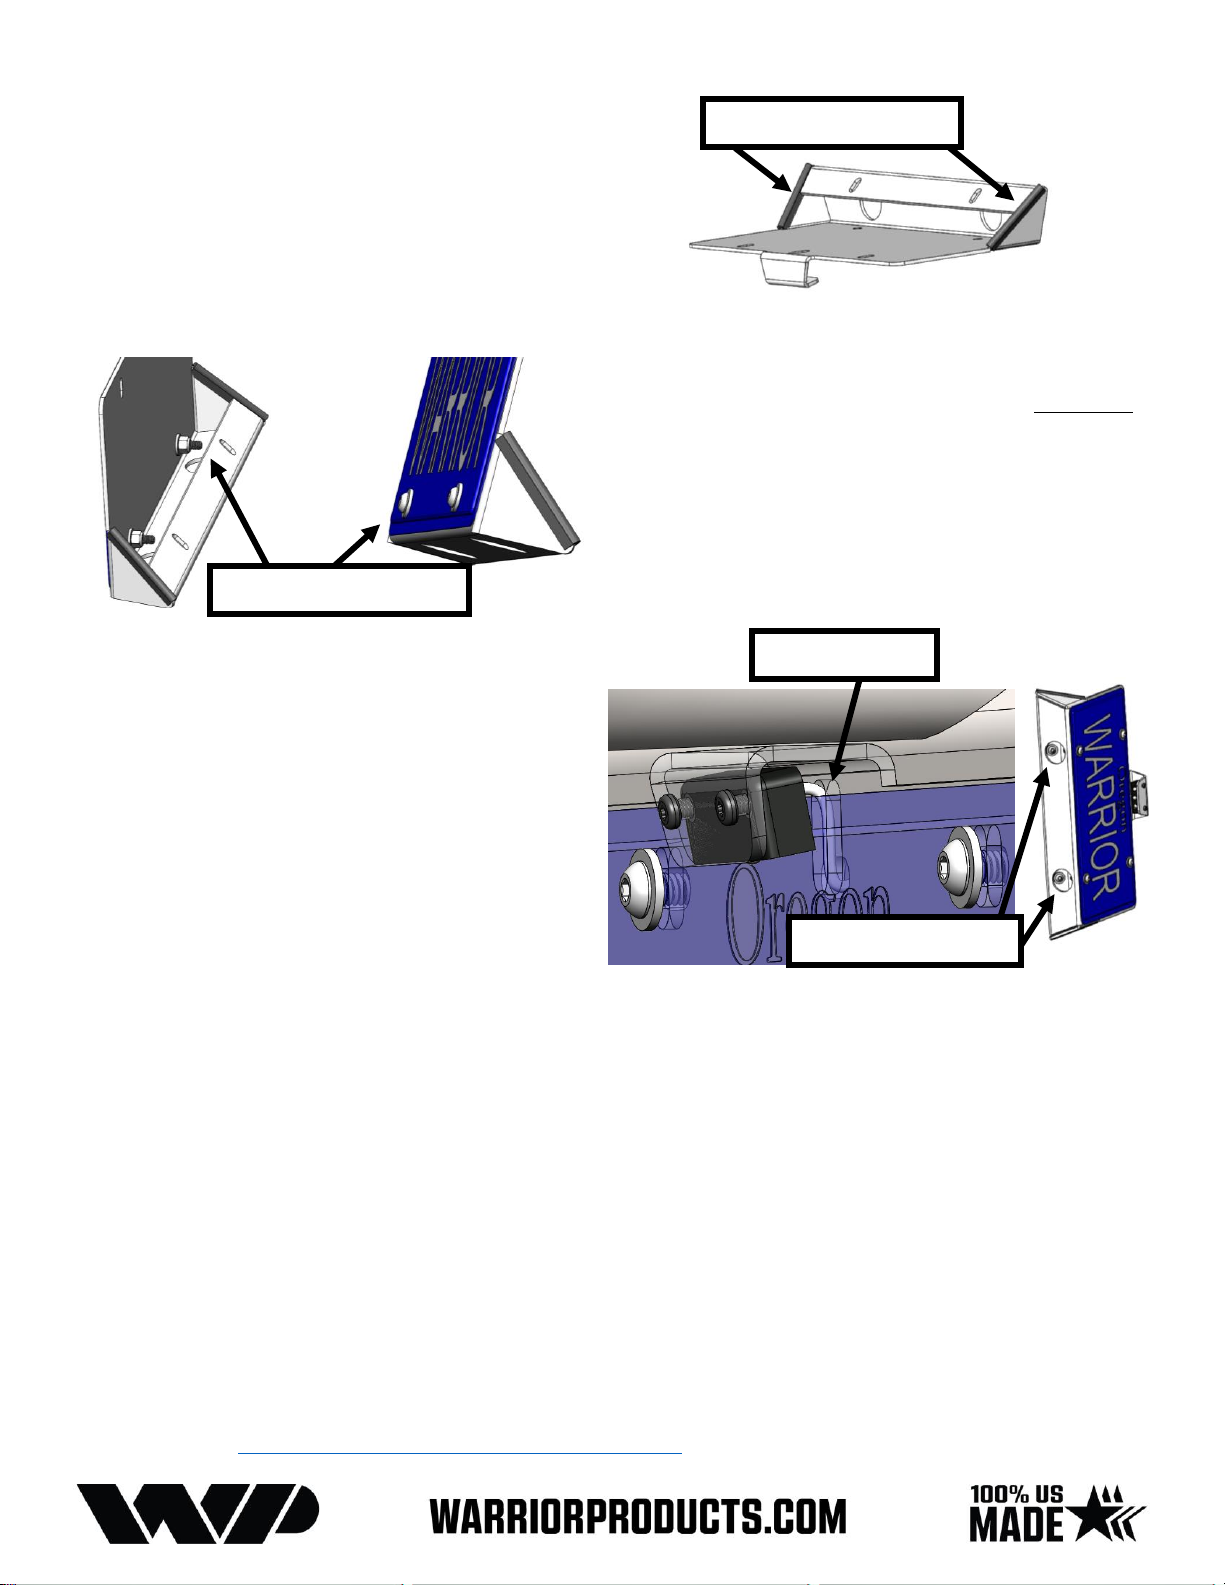
6. Place Rubber edge trim on the two edges of
the bottom angled contact surface as
shown. You must cut the supplied rubber
edge trim to size using a pair of diagonal
cutters, or scissors.
7. Cut the rubber edge trim at an angle for a
better appearance if you wish.
8. Discard the excess rubber edge trim.
9. Before attaching the license plate and mount
to the bumper, first install just the BOTTOM
Button Head screws with washers and Nyloc
nuts to attach the license plate to the mount
(it is easier to attach before bumper
installation).
10. Make sure to put your license plate frame on
at this time as well if you are using one.
11. Choose a side of the bumper to mount the
license plate (note that you may have to
extend the power wires for the light if
placing it on the passenger side). While
placing the mount, thread the light wires
through the top middle slot in the bumper
and take care not to pinch them.
12. Place the top two and bottom two Button
Head screws through the mount and
corresponding bumper slots (insert the
bottom screws through round openings).
13. Visually align the license plate mount and tighten the bottom two screws first while
holding the mount flat against the bumper face. After the bottom screws are tight,
tighten the top two screws. (Remember to make sure the wires are not pinched between
the license plate, mount, or bumper.)
14. Cut the socket pigtail off the end of your OEM license plate light wire. Splice the pigtail
wires to the LED wires coming through the back side of your bumper. The white wire of
the LED light is positive (+). The LED light is polarity sensitive and will not work if
connected backward (however this will not damage the light). Verify that your light
works with the headlight switch turned on before finalizing your spliced connections. If
the LED light does not work, try switching the two wires.
15. Installation is now complete. Enjoy your new Warrior Products license plate mount!
If you need further assistance installing your product, please contact us by email at
customerservice@warriorproducts.com or call us at (888) 220-6861.
Rubber Edge Trim
Bottom B.H. Screws
Wire Routing
Round Openings

Other Warrior Products Automobile Accessories manuals

Warrior Products 3520 User manual

Warrior Products

Warrior Products 3520 User manual

Warrior Products 4860 User manual

Warrior Products

Warrior Products 4860 User manual

Warrior Products 3830 User manual

Warrior Products

Warrior Products 3830 User manual

Warrior Products 4500-4 Instruction Manual

Warrior Products

Warrior Products 4500-4 Instruction Manual

Warrior Products 4525 User manual

Warrior Products

Warrior Products 4525 User manual

Warrior Products 3860 User manual

Warrior Products

Warrior Products 3860 User manual

Warrior Products 6567 User manual

Warrior Products

Warrior Products 6567 User manual

Warrior Products 4500-2 Instruction Manual

Warrior Products

Warrior Products 4500-2 Instruction Manual

Warrior Products 10936 User manual

Warrior Products

Warrior Products 10936 User manual

Popular Automobile Accessories manuals by other brands

JL Audio Stealthbox SB-GM-VETC6/10W3v2 installation guide

JL Audio

JL Audio Stealthbox SB-GM-VETC6/10W3v2 installation guide

Aries 2074142 installation manual

Aries

Aries 2074142 installation manual

Metra Electronics 99-5808 installation instructions

Metra Electronics

Metra Electronics 99-5808 installation instructions

Germid QK-073A-1H4W-T23 user manual

Germid

Germid QK-073A-1H4W-T23 user manual

Road Shower 4 user manual

Road Shower

Road Shower 4 user manual

Fortin EVO ONE THAR-ONE-HON6 Installation

Fortin

Fortin EVO ONE THAR-ONE-HON6 Installation

Brink 5968 Fitting instructions

Brink

Brink 5968 Fitting instructions

LXE VX7 user guide

LXE

LXE VX7 user guide

SCT X4 Power Flash quick start guide

SCT

SCT X4 Power Flash quick start guide

HaWeKo MBK380 installation manual

HaWeKo

HaWeKo MBK380 installation manual

ECS Electronics DA-005-BB Fitting instructions electric wiring

ECS Electronics

ECS Electronics DA-005-BB Fitting instructions electric wiring

JCROffroad BR6RMP Install instructions

JCROffroad

JCROffroad BR6RMP Install instructions

ARCOL eMirror user manual

ARCOL

ARCOL eMirror user manual

Camoplast ATV T4S Installation guidelines

Camoplast

Camoplast ATV T4S Installation guidelines

Soundoff Signal GHOST EGHST4 B-12 Series quick start guide

Soundoff Signal

Soundoff Signal GHOST EGHST4 B-12 Series quick start guide

JBA 1961S-3 installation instructions

JBA

JBA 1961S-3 installation instructions

STO N SHO SNS 49 Installation procedures

STO N SHO

STO N SHO SNS 49 Installation procedures

Voxx SB10MD1 owner's manual

Voxx

Voxx SB10MD1 owner's manual

manuals.online logo
manuals.online logoBrands
  • About & Mission
  • Contact us
  • Privacy Policy
  • Terms and Conditions

Copyright 2025 Manuals.Online. All Rights Reserved.