Wassermann Polyquick User manual
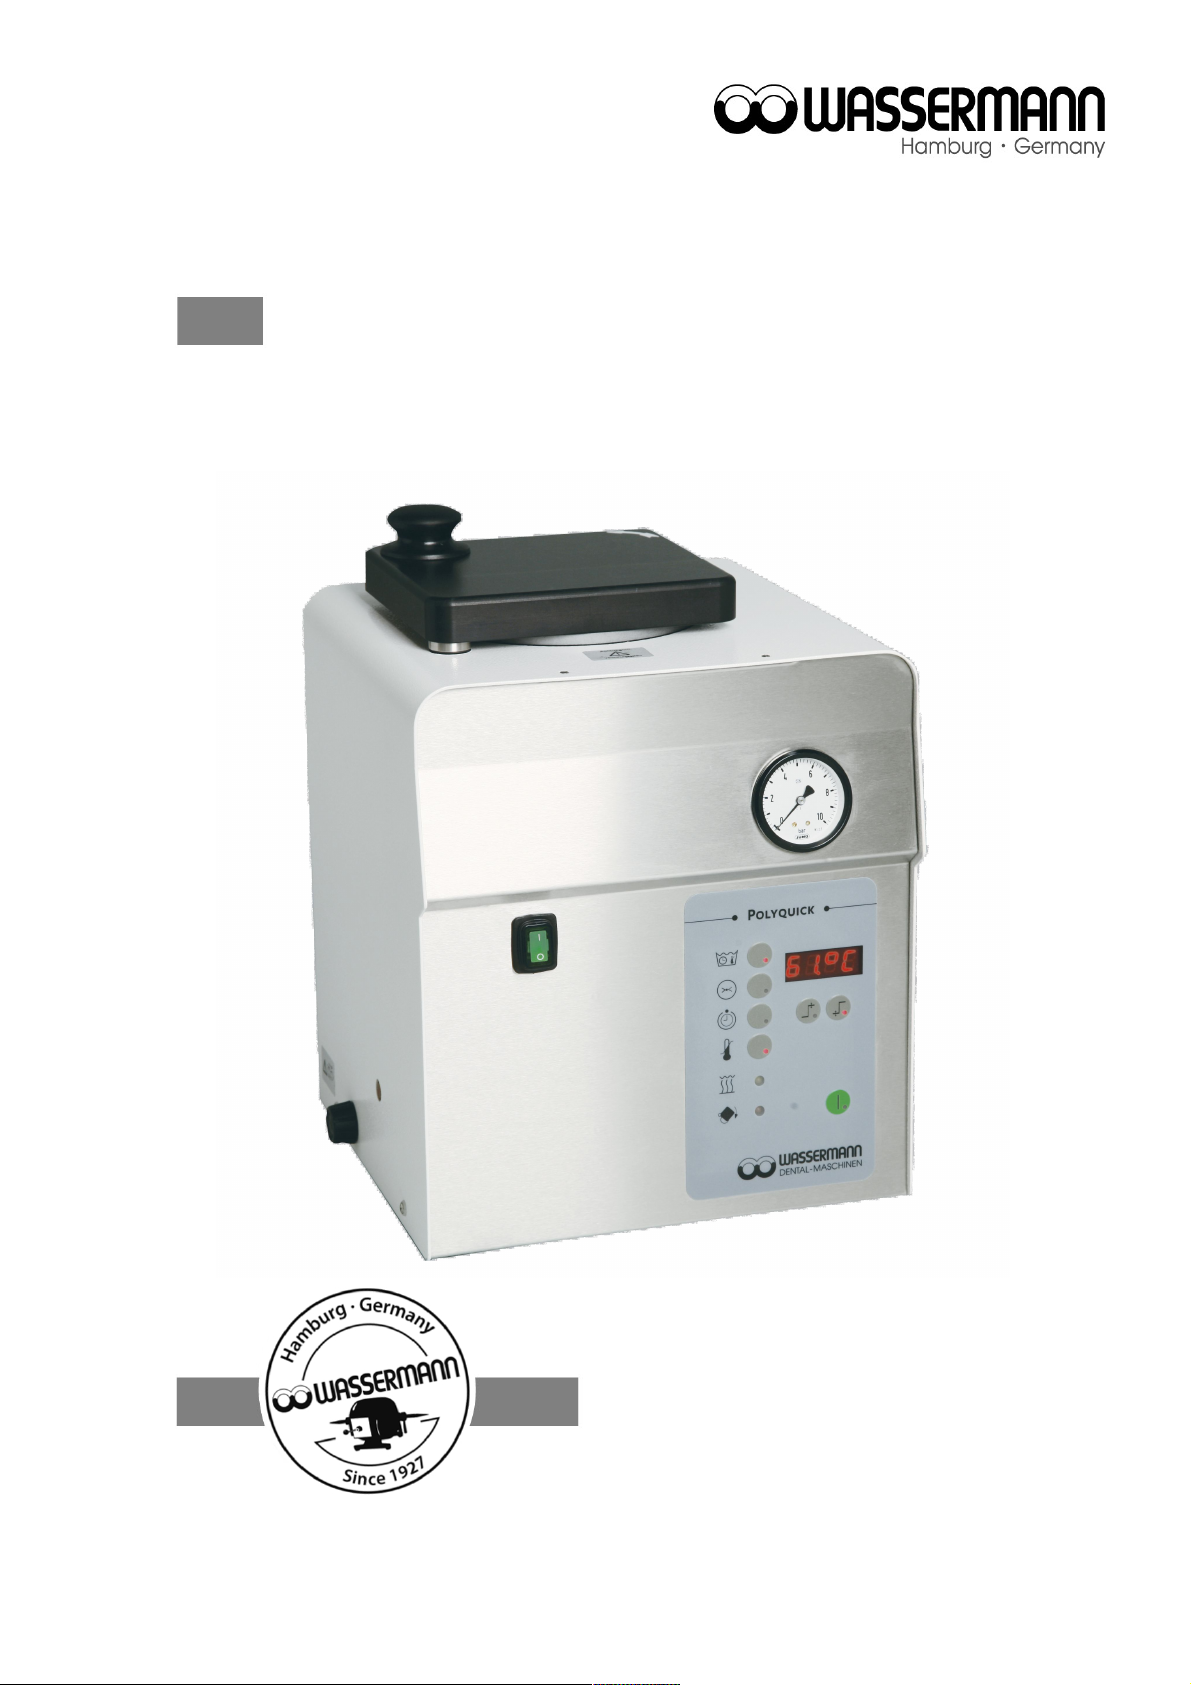
Polymerisation Unit
Polyquick
USER MANUAL
Dear customer,
Thank you for choosing a product from the Wassermann range Wassermann Dental-
Maschinen incorporates the highest standards of quality and the latest technology
In order to enjoy maximum performance and years of trouble-free operation, please read
this service manual carefully before you connect this device and start work, and operate
the device according to the recommended guidelines The operation safety and the
functionality of this device can only be guaranteed if you follow both the general safety
guidelines and the applying laws to prevent accidents as well as the precautions given in
this user manual We are not liable for any damages which occur due to inappropriate
usage or faulty operation of this device
Make sure that anyone using this device has read and understood this user
manual
Keep this user manual in a safe place where it can be referred to as required at
any time
The unit complies with the relevant EU guidelines
The unit is subject to the EU guidelines 2012/19/EU (WEEE Directive)
Company address:
Wassermann Dental-Maschinen GmbH
Rudorffweg 15-17
21031 Hamburg, Germany
Phone : +49 (0)40 730 926 -20/ -24 Fax : +49 (0)40 730 37 24
export@wassermann-dental com
www wassermann hamburg
Erstellt: 10 07 17/ msc Version: 2 Auftrag: 170999 ab #118033

Contents
1 Features 4
2 Safety symbols used in this manual 4
3 Safety guidelines 5
4 Responsibility for operation or damage 6
5 Application 6
6 Before Starting 6
6 1 Transport 6
6 2 Installation 7
6 3 Storage 7
7 Installation/ Start-up 8
7 1 Setting the Correct Pressure 8
8 Operation 9
8 1 General Operating Instructions 9
8 2 Conversion table °C - °F 9
8 3 Filling and Switching On 11
8 4 Programming 11
8 5 Operation: 12
8 5 1 Automatic Operation: 12
8 5 2 Manual Operation: 13
8 6 Draining the Water 14
9 Troubleshooting 14
10 Care and Maintenance 15
10 1 Cleaning 15
10 2 Maintenance 15
10 3 Repairs 15
10 4 Spare Parts 16
10 5 Service Hotline 0049 (0)40 730 926 -20/ -24 16
10 6 Scope of Delivery/ Accessories 16
10 7 Warranty 16
11 Technical Data 17
12 Disposing of the Unit 18
12 1 Information on Disposal for Countries within the EU 18
13 EU Declaration of Conformity 19

1 Features
Depending on your requirements, you can set the polymerisation time manually to the
maximum or automatically to a shorter period All functions are available in both cases
The polymerisation time is adjustable up to 59 hours and 40 minutes The maximum
pressure is 6 bar, and this is maintained by a non-return valve The required
polymerisation temperature can be set in 5 stages up to 95°C The heater cuts off
automatically when the set temperature is reached, so overheating is not possible The
unit has a dry-run safety device, which prevents it overheating, and a door safety switch,
which releases the compressed air only when the door is fully closed
•even polymerisation of up to 3 flasks in the flask holder or 2 cast resin flasks or
bottom feed mount and/or 6 settings
•fast emptying of hot water using compressed air and needle valve
•manual or timer-controlled operation according to requirements
•overpressure valve to protect against operational failures (7 bar)
•energy-saving holder thermal insulation
•durable, robust metal housing, plastic-powder-coated
•easy to use, very low maintenance
2 Safety symbols used in this manual
Warnin !
This is a warning of risk situations and dangers
Failure to observe this warning could be life-threatening These warnings has to
be observed
Information!
This symbol draws your attention to specific features that has to be observed
4
3 Safety uidelines
Configuring and operating this equipment requires precise knowledge and observance
of the instructions in this user manual The equipment is designed only for its intended
application
WARNING:
Servicing and repairs should be carried out only by authorised specialists
Disconnect the power plug before starting any maintenance work
Make sure that the equipment is connected to the correct power source
The safety valve on the pressure vessel opens automatically if the operating
pressure exceeds 7 bar
The pressure is switched on only after the door is fully closed, thanks to a safety
contact and an orange monitor light
Dry-run protection switches off at 112°C (brown knob, left side of unit)
Warnin : Scalding risk with hot polymerisation
Open the lid slowly!
5

4 Responsibility for operation or dama e
The responsibility for operating the device lies exclusively with the owner or user if said
device is incorrectly serviced, maintained or altered by persons not employed by an
authorised dealer or if the device is used in a manner contrary to its specified purpose
The unit has to be maintained and operated in accordance with this user manual
Wassermann Dental-Maschinen GmbH is not responsible for damage arising from the
nonobservance of these instructions
Warranty and responsibility provisions contained in the sales and supply conditions of
Wassermann Dental-Maschinen GmbH are not extended by these instructions
5 Application
The Polyquick is a pressure polymerisation unit for the hot and cold polymerisation of
plastics
It can be set to a maximum temperature of 95°C and a maximum polymerisation pressure
of 6 bar For automatic operation, you can select a polymerisation time between 2 minutes
and 59 hours 40 minutes; in manual mode, the polymerisation time is the maximum time
Only use the device for this type of application
6 Before Startin
6.1 Transport
Before transporting the unit, ensure that it has been unplugged from the power socket
Make sure that it is packed correctly in order to avoid accidental damage
Be sure to check for any transport damage when unpacking the goods Note down
any damage if found
6
6.2 Installation
Open the box, remove the packing materials, and carefully lift out the device and
accessories Check the included accessories
The device has to stand horizontally on a steady and even surface
Install the device in a place where it will not block the working area and the
functionality (take the dimensions into account)
Do not install the unit outdoors or in places without proper ventilation
Before start-up, be sure the device reaches room temperature
6.3 Stora e
The unit location is very important when it comes to workplace safety, even if it is only to
be set up there for a short period The room should be dry, well ventilated and vibration-
free An even temperature and wooden supports also help The unit should not be stored
or set up outdoors If the unit is to be stored for an extended period, protect it from
moisture and dust
7
7 Installation/ Start-up
Important!
Never operate the unit without water as the heater climbs immediately to 50°C
as soon as the power comes on
Before starting the unit, connect up the following:
•Connect up a compressed-air supply of at least 3.5 bar If using a long hose, make
sure its ID is at least 6 mm Provide each compressed-air hose with a maintenance
unit and use a regulator to set the pressure to a constant level
Finally, insert the power plug into the socket, making sure that the mains and the unit
operate on the same voltage
7.1 Settin the Correct Pressure
Before filling the container, you should remove the accessory and set the correct
polymerisation pressure To do so:
1 Turn on the main switch (green rocker switch)
2 Close the cover and check the door contact (6) control light is on
3 Turn off the heater switch (1); the red LED in the switch will go out
4 Switch on the pressure (2) and the Start/Stop switch (10) containing the red LED
The pressure is preset to 6 bar at the factory.
5 If the pressure is too low (min. 3.5 bar), increase it using the black control at the
rear of the unit (max 6 bar) You have to pull the control out to change it and then
push it in again
6 If the pressure is too hi h, turn off pressure switch (2) and let the pressure reduce
The pressure regulator at the rear of the unit must be turned several times in the
“minus“ direction Then, put the chamber under pressure The desired pressure,
(max. 6 bar), is set by turning the regulator in the “plus“ direction
7 Use the Start/Stop switch (10) to turn the unit off
8

8 Operation
8.1 General Operatin Instructions
All instructions for using the unit, whether in verbal or written form, are based on our own
experience and experimentation and can only be regarded as guidelines
8.2 Conversion table °C - °F
= (TF − 32) / 1,8
100 °C = 212 °F
95 °C = 203 °F
90 °C = 194 °F
85 °C = 185 °F
80 °C = 176 °F
75 °C = 167 °F
70 °C = 158 °F
65 °C = 149 °F
60 °C = 140 °F
9
Factory settings:
Heating 50°C
Time 10 min
Pressure 6 bar
Turnin on the main switch sets the pre-pro rammed heater temperature to 50°C.
This temperature is independent of any previously set temperature. When the set
temperature button (8) is pressed, the heater temperature is overridden and the unit
increases to the last set temperature.
Before startin the timer, allow a warm-up period of about 30 minutes.
10
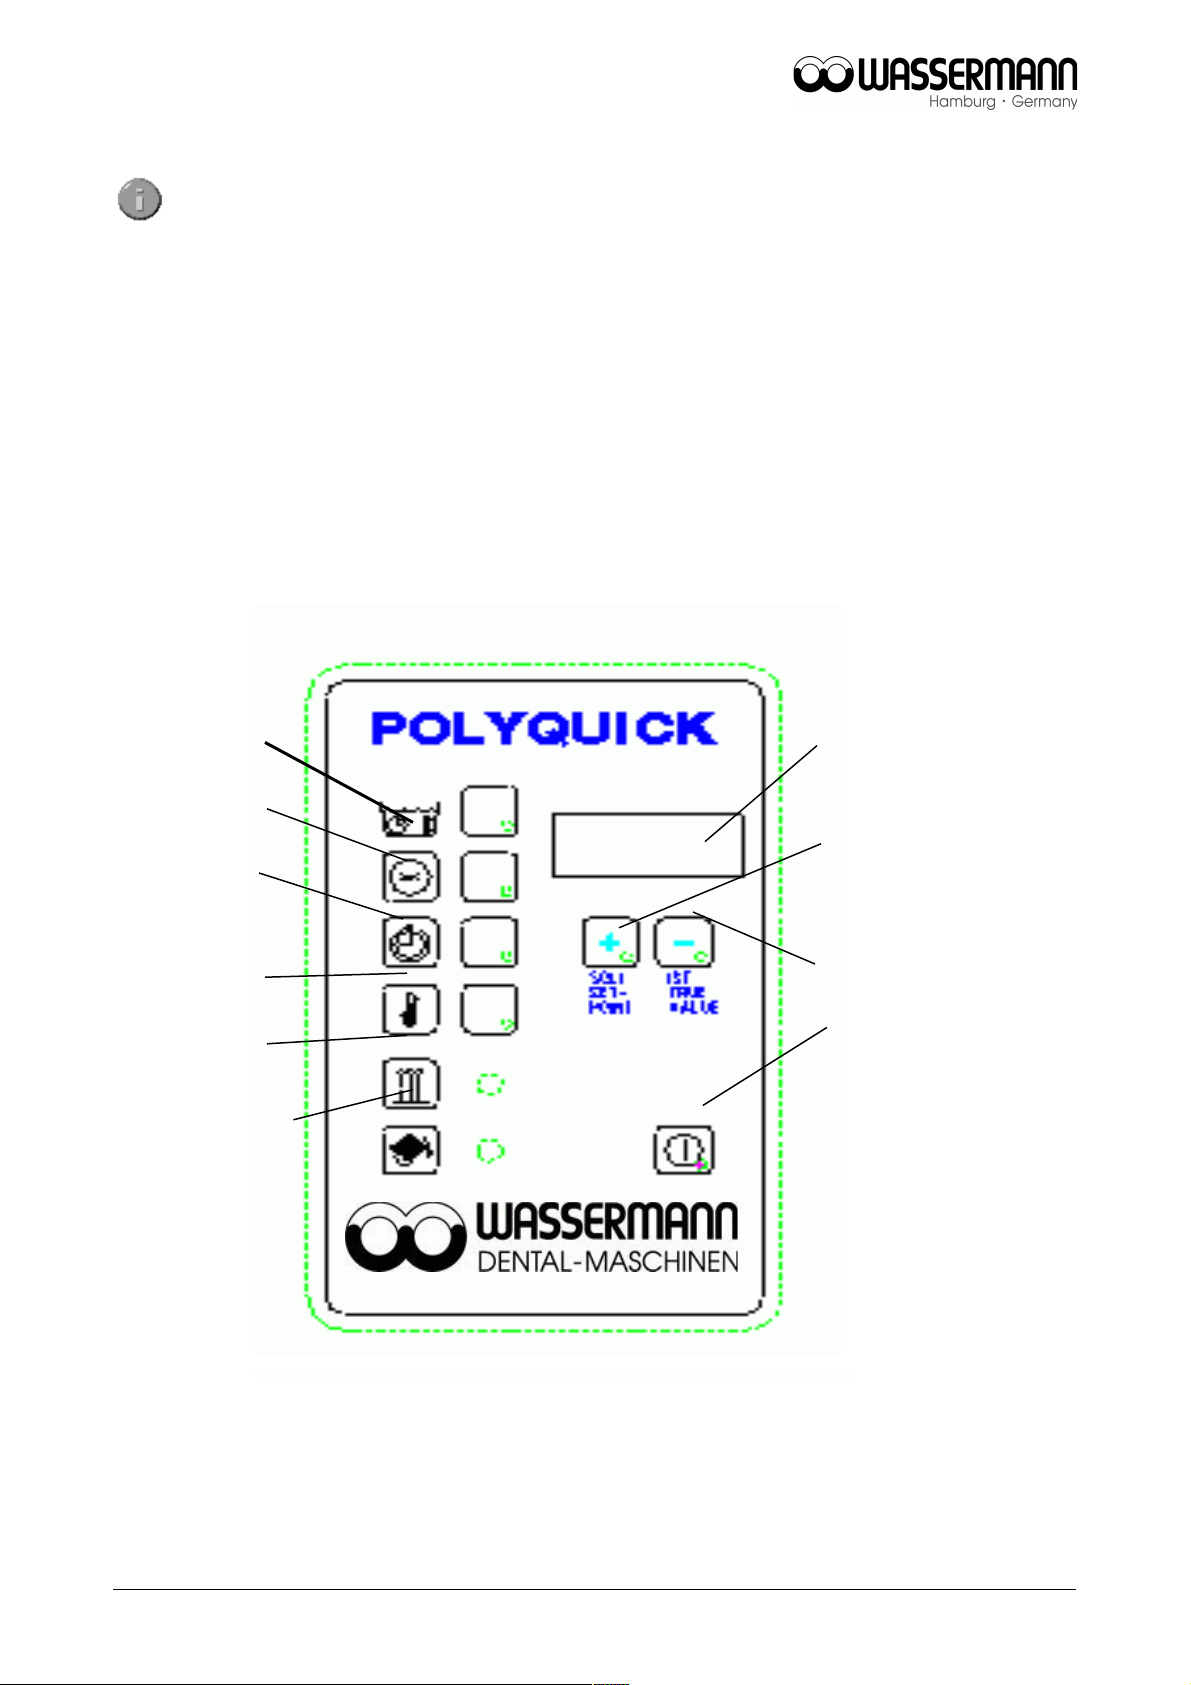
Heater On / Off 1
Pressure On / Off 2
Time 3
Temperature 4
Heater monitor 5
Door safety control 6
7 Di ital display
8 Set / Plus
9 Default / Minus
10 Start / Stop
Table of contents
Other Wassermann Laboratory Equipment manuals


Popular Laboratory Equipment manuals by other brands


Agilent Technologies
Agilent Technologies 5800 ICP-OES user guide

Endress+Hauser
Endress+Hauser Cleanfit CPA875 operating instructions

NI
NI PXI-5422 CALIBRATION PROCEDURE

Collomix
Collomix Aqix operating instructions

SPEX SamplePrep
SPEX SamplePrep 6875 Freezer/Mill Series operating manual

Ocean Insight
Ocean Insight FLAME-NIR+ Installation and operation manual

Parker
Parker ALIGN-MG-NA Installation, operation and maintenance manual

BD
BD 644787 user guide

DENTAURUM
DENTAURUM Compact Megaplus Instructions for use

Biuged Laboratory Instruments
Biuged Laboratory Instruments BGD 626 instruction manual

VWR
VWR SAS Super IAQ instruction manual

illumina
illumina MiSeqDx reference guide