WaterRower M1 SERIES User manual
PREVENTATIVE MAINTENANCE
AND TROUBLESHOOTING GUIDE
Congratulations on becoming a WaterRower Owner. This guide will
help make sure your WaterRower M1 unit is kept in good condition
and functioning at all times.
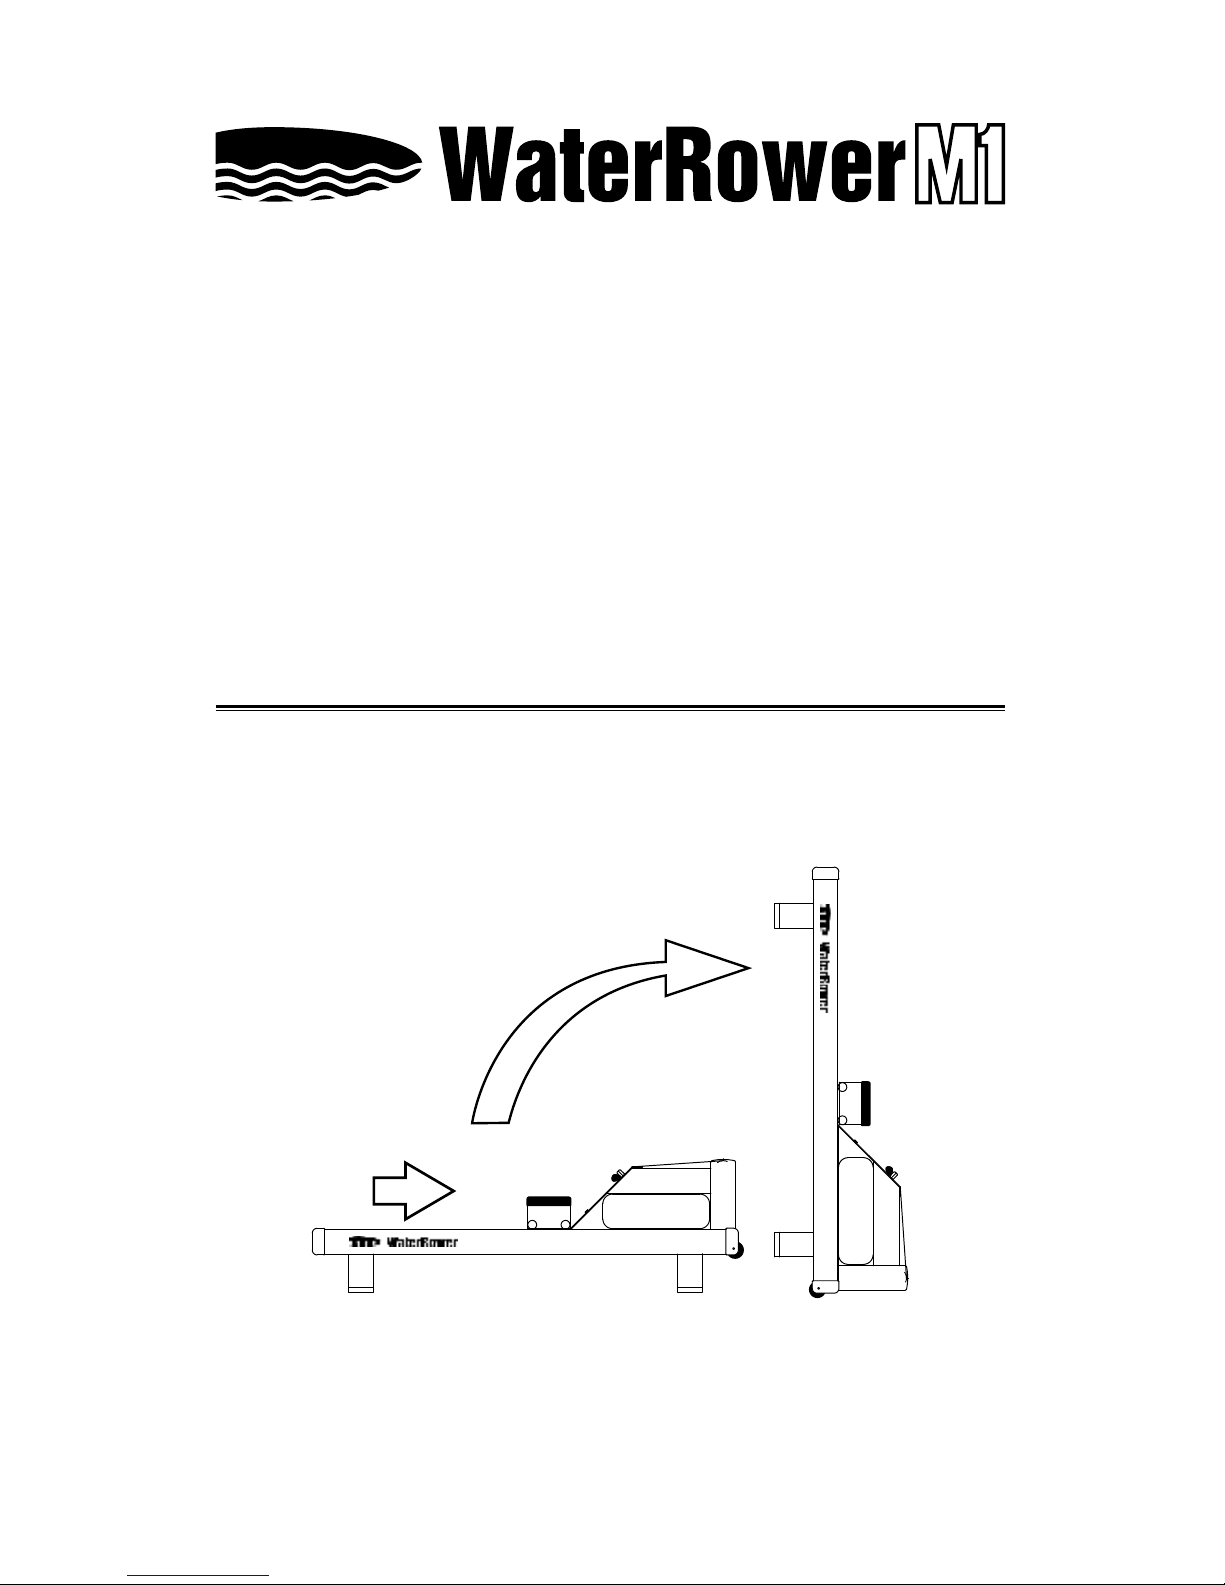
STORAGE
The WaterRower can be stored upright. To do so, lift the end of the
rower and move the WaterRower on the front wheels to the area of
storage.
Please note, when standing your unit upright, slide the seat forward
towards the footboard prior to lifting the rower.

2

3
Table of Contents
MAINTENANCE PAGE
Daily Maintenance............................................... 4
Weekly
Dust Build Up................................................... 4
Loose Bolts...................................................... 4
Alignment of the Belts...................................... 4
Quarterly
Clean Seat Wheels.......................................... 5
Check Tension of Recoil.................................. 5
Every 6 Months
Water Condition............................................... 5
Tank Stopper in Place...................................... 5
Every 1-2 Years
Replace Batteries............................................. 7
Replace Bungee.............................................. 7
TROUBLESHOOTING
Monitor................................................................. 10-11
Paddle................................................................. 12
Recoil.................................................................. 13
Seat.................................................................... 13
Water Discoloration............................................. 13
Noise................................................................... 14
Tank.................................................................... 14

4
MAINTENANCE SCHEDULE
DAILY MAINTENANCE
or after each workout
Cleaning
Wipe down handle, seat, rails and frame after
every row.
WEEKLY
Inspect the WaterRower M1
Dust Build Up
Dust tank and belts regularly.
Clean the top of the rails where the wheels run.
To do this, run a damp cloth along the top and
sides of the rails. This will remove the dirt, dust,
etc. which builds up with use.
In addition, clean any residue or build-up that has
accumulated on the wheels.
Loose Bolts
Each week, inspect the bolts along the tank
assembly and rail assembly to ensure they are
all secure in the frame of the rower. If necessary,
use a 5mm allen key to tighten any bolts that have
come loose.
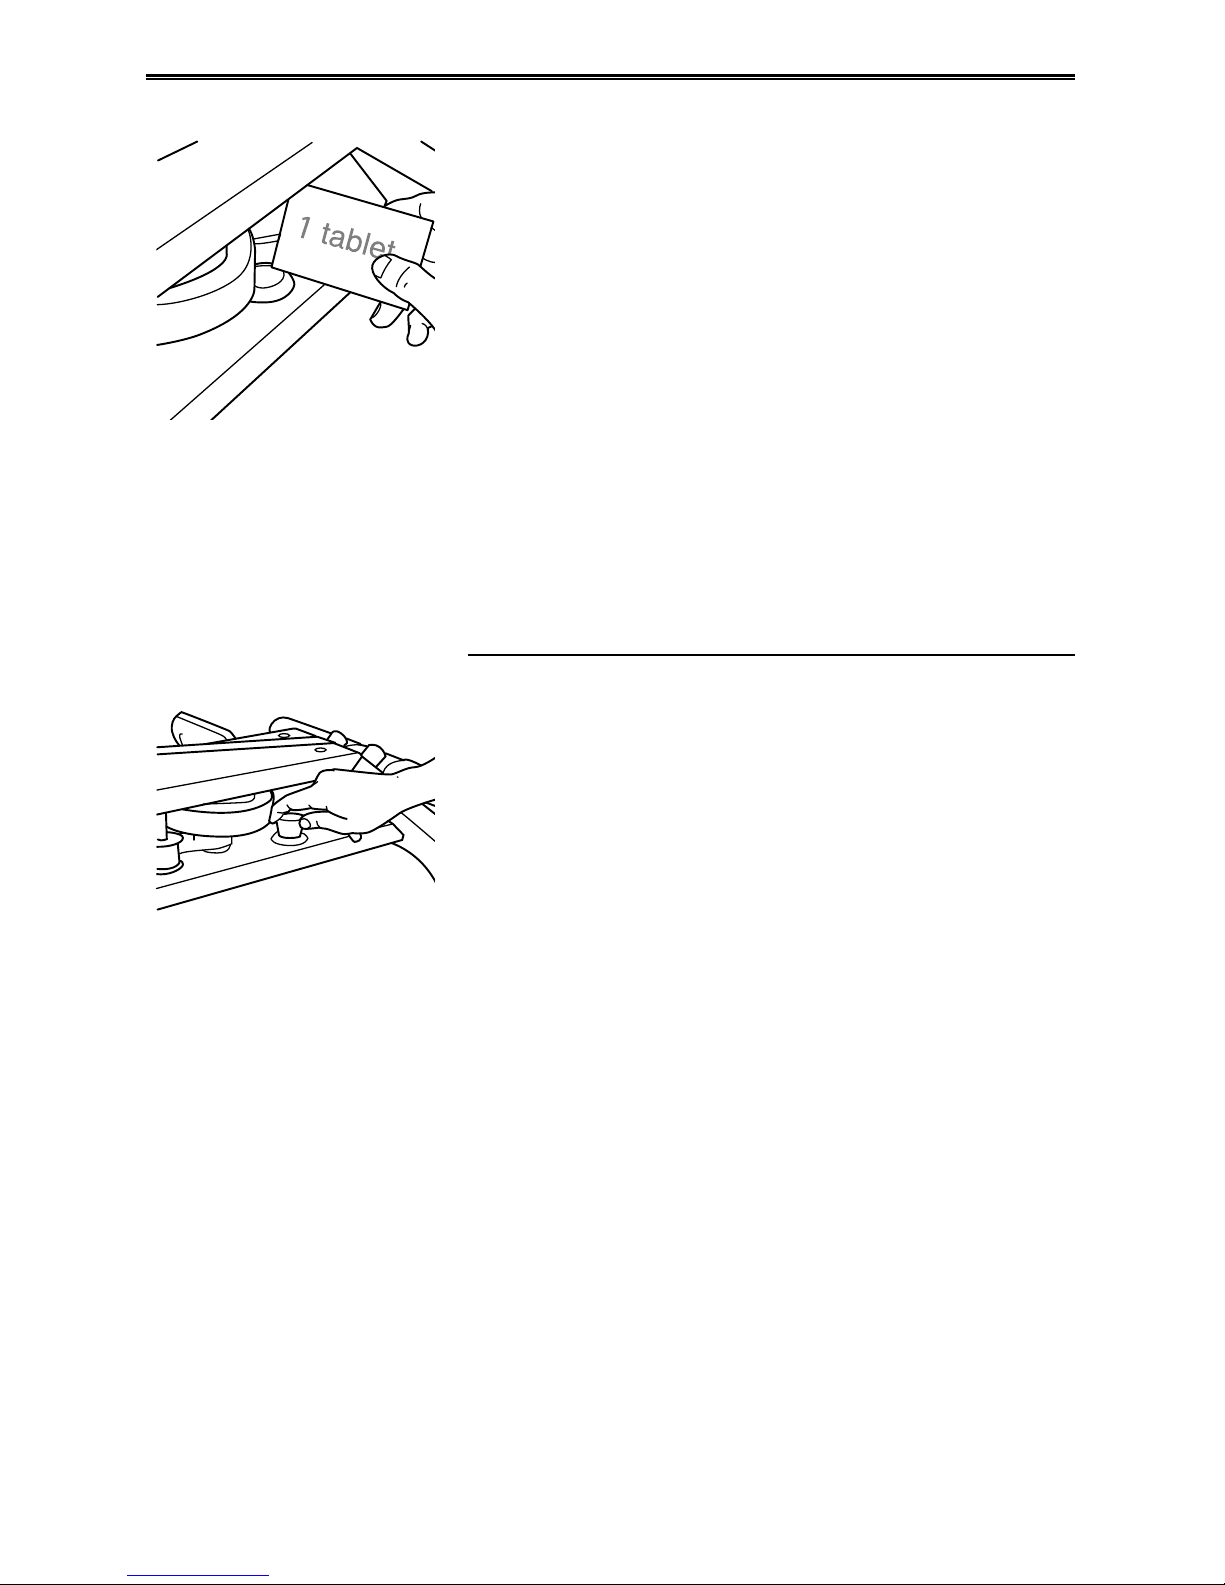
Weekly Belt Alignment and Monitor Test
On a weekly basis, row several strokes on the
rower to check the alignment of the recoil belt;
it can, sometimes, come misaligned on the front
pulleys (see picture).
If the recoil belt is off a pulley, the recoil of the
handle will be sluggish and not feel smooth. It can
also lead to fraying of the belt. If the recoil feels
misaligned, check that the recoil belt is aligned
and runs over each pulley correctly and smoothly
as seen in the second picture.
While checking the alignment, review the monitor
to ensure it is working correctly. Turn the monitor
on and it should ash all zeros, indicating it is
ready to start. As you begin rowing, the monitor
should register your stroke rate, speed, distance &
time. If not, please refer to the monitor section in
the troubleshooting guide (page 10).
AlignedMisaligned

5
EVERY MONTH
Handle Strap
Every 6 months, review the stitching and wear on
the handle strap. If you notice excessive wear,
replace the handle. Fraying can be caused by
incorrect use. Please see instructions on our
service site for replacing the handle.
EVERY 3 MONTHS
Check the Tension of the Recoil
To test the strength of the recoil, rst remove the
top deck cover. Next, lift the handle out of the
handle rests and release the handle so it slides
along the top deck cover, towards the forward
riser pulley. The handle should slide smoothly and
quickly all the way to the front.
If the recoil is sluggish or slow, please refer to
page 13 to troubleshoot.
6
EVERY 6 MONTHS
Water condition
We have included purication tablets in the kit. We
recommend adding 1 tablet to the water every 6
months. If the water turns cloudy and the tablet
does not clear up the water, then it may be best to
change out the water. Please use the hand syphon
pump and refer to our service website on how to
remove the water.
*Note: If you use the blue dye in your tank, it is not
recommended that you use the purication tablets.
Discoloration may occur if you do so. Instead,
please visually monitor water quality and change
when necessary. It is recommended that dyed
water is changed out every year.
Tank Stopper
The tank stopper can fall out, on occasion. If this
occurs, you will need to reinsert it into position.
Moisten the tank stopper to help with putting it
back into position.

7
EVERY 1 TO 2 YEARS
Replace the Batteries
If the monitor readings begin to fade or are
incorrect, we recommend changing the batteries.
Four AA batteries are located behind the monitor.
Using a Phillips screwdriver, unscrew the two
screws, one on left and one on the right of the
monitor, and gently lift to access the battery pack
located behind the monitor. Check the batteries
are positioned correctly in the battery pack.
Replace the batteries and reattach the screws to
the monitor housing.
Replace the Bungee
Over time, and with use, the bungee cord can
lose its elasticity, which will affect the recoil of the
machine. If this happens, it should to be replaced.
To perform this task, detach the bungee from
the recoil belt. Next, remove the two horizontally
positioned bolts with the 5mm allen key from the
bungee pod.
Remove the old bungee assembly and position
the new one into place on the rear bumper.
Replace the two horizontally positioned bolts with
5mm allen key.

M1 SERIES EXPLODED VIEW
WRPH1100
17” Handle Assembly
WRPS000M1
Seat Assembly
WRPB300
Guide Pulley
Forward Riser
Top Deck
Top Deck Cover
WRPT004
Tank Assembly
with Clutch
WRPB510
M1 Front End
Pad Assembly
WRPB505
M1 Button
Screw Kit
WRPB520
M1 Rear End
Pad Assembly
WRPB510
M1 Button Head
Cap Screw and
Washer Set
WRPK500
M1 Bungee Assembly
WRP-P455
WRP-P430
Handle Rest Bolt Set (2)
Handle Rest Set (2)
WRP-P1720 M1
Coverplate
WRP-P1710
Footstrap
Assembly
WRP-P100
WaterRower
Emblem
WRP-P1700
Heelrest/
Footpad Set
(2)
WRP-P715
Footstrap Assembly
WRP-P1715
M1 Cover Plate Screw Set (4)
WRP-P725
M1 Footboard
Spacer Set (2)
WRP-P1000M1
M1 Footboard
S4 Monitor
WRPD510
M1 Dolley
Wheel Set (2)
WRPF500
M1 Forward
Riser Cap
WRPT730
Tie Rod
Assembly (4)
WRPB505
M1 Button Head
Cap Screw &
Washer Set
WRPS201
M1 M8x30mm
Button Cap Screws
WRPB905
Recoil Belt
M1 SERIES EXPLODED VIEW
WRPH1100
17” Handle Assembly
WRPS000M1
Seat Assembly
WRPB300
Guide Pulley
Forward Riser
Top Deck
Top Deck Cover
WRPT004
Tank Assembly
with Clutch
WRPB510
M1 Front End
Pad Assembly
WRPB505
M1 Button
Screw Kit
WRPB520
M1 Rear End
Pad Assembly
WRPB510
M1 Button Head
Cap Screw and
Washer Set
WRPK500
M1 Bungee Assembly
WRP-P455
WRP-P430
Handle Rest Bolt Set (2)
Handle Rest Set (2)
WRP-P1720 M1
Coverplate
WRP-P1710
Footstrap
Assembly
WRP-P100
WaterRower
Emblem
WRP-P1700
Heelrest/
Footpad Set
(2)
WRP-P715
Footstrap Assembly
WRP-P1715
M1 Cover Plate Screw Set (4)
WRP-P725
M1 Footboard
Spacer Set (2)
WRP-P1000M1
M1 Footboard S4 Monitor
WRPD510
M1 Dolley
Wheel Set (2)
WRPF500
M1 Forward
Riser Cap
WRPT730
Tie Rod
Assembly (4)
WRPB505
M1 Button Head
Cap Screw &
Washer Set
WRPS201
M1 M8x30mm
Button Cap Screws
WRPB905
Recoil Belt

10
TROUBLESHOOTING
MONITOR The Monitor Turns On but Does Not Start
Check the connection of the sensor cable and the
monitor cable. Check that the wiring on both the
monitor and sensor cable is intact.
Remove the top deck cover and check the position
of the sensor disk underneath the top deck.
It may be necessary to shift the sensor disk up to
a position that is closer to the optical sensor. To do
so, use a at instrument to gently raise the disk up.
Remove handle
rests so the
footboard
swings back.
Sensor Sensor Disk

11
Frozen Monitor Screen
If the monitor screen is frozen, statistics stay the
same or if the monitor does not turn off, remove
the batteries for 10 seconds and replace the
batteries.
If the problem persists, contact your
nearest WaterRower ofce or email:
support@waterrower.com.
If the monitor does not turn on, it could mean the
batteries are faulty and need to be replaced. To
replace the batteries refer to page 7.
If the monitor does not turn on after replacing the
batteries or there is a break in the wires, contact
you nearest WaterRower ofce or email
support@waterrower.com for replacement parts.
Erratic Numbers
If the monitor is reading higher than usual
numbers, we recommend trying the following:
1. Using a can of compressed air, spray the
sensor disk and clean the sensor (you may
need to remove the top deck).
2. Use a dryer sheet or anti-static spray to clean
the sensor and sensor disk.
3. If in direct sunlight, move your WaterRower to
the shade. The S4 sensor is optical and light
may interfere with readings.
4. Check for loose wires in the wire harness
between the monitor and sensor.
5. Replace the 4 AA batteries, erratic numbers
can result due to low battery power.
6. Check the sensor disk for misaligned teeth.
7. Replace the sensor and sensor disk.

12
PADDLE Tank Paddle is Rubbing
First, remove the top deck cover.
With the 5mm allen key, loosen all the bolts (in the
order of: 1, 2, and 3) on the tank assembly. Take a
few gentle pulls to see if rubbing continues.
If rubbing has stopped, gently retighten the bolts in
the same order. Replace the top deck cover.
If this does not solve the problem, determine
where the paddle is rubbing in the tank: right side/
left side, top/bottom or front/back of the tank.
Please refer to the Troubleshooting section on our
Service website www.waterrowerservice.com, or
contact your nearest WaterRower ofce. You can
email: support@waterrower.com.
2 - Forward
Riser Bolts
3 - Inner Rail Bolts
1 - Top Deck Bolts
Remove handle
rests so the
footboard
swings back.

13
RECOIL
Sluggish Recoil
First, remove the top deck cover and check
the belt alignment to make sure all straps are
positioned correctly on the pulleys.
Second, when the handle is in its full forward
position next to the forward riser pulley. Check the
recoil belt is wound 1½ times around the shaft of
the paddle, underneath the clutch.
Third, shorten the recoil strap by readjusting the
strap in the buckle. Be careful not to make the
recoil belt too short, as the connector may catch
on the forward riser.
Replace the bungee cord if necessary (refer to
page 7).
Please contact support@waterrower.com or call
your nearest WaterRower ofce to order a new
bungee.
SEAT Ensure the seat is correctly positioned on the rails.
The rail extrusions and the guide wheels are under
the lip on the extrusion. If the seat does not slide
smoothly with rst use, check the rails are clean
and free from obstruction. If the seat feels rough,
clean the rails and the seat wheels.
If the problem persists, please contact your
nearest WaterRower ofce, or email:
support@waterrower.com.
Wrapped 1½
times around
Load
Wheels
Guide
Wheels

14
WATER DISCOLORATION If the water begins to turn cloudy, add in one
purication tablet.
If after two weeks the water has not cleared, drain
the water from the tank, ll the tank with fresh
water and add in a purication tablet.
*Note: If you use the blue dye in your tank, it is not
recommended that you use the purication tablets.
Discoloration may occur if you do so. Instead,
please visually monitor water quality and change
when necessary. It is recommended that dyed
water is changed out every year.
NOISE Rower Makes Noise While Rowing
When taking the rst few pulls on your rower, the
only sound you should hear is the swishing of
the water. If there are any other sounds, please
determine where the sound is coming from and
contact your nearest WaterRower ofce (details on
back page).
TANK Tank is Leaking Water
First check the level of water is not lled above the
maximum level. Please refer to the level gauge
sticker on the side of the tank.
If the tank is lled to the correct level, determine
where the water is coming out of the tank and
contact your nearest WaterRower ofce or email
support@waterrower.com

15
To help a customer service representative expedite your call, please have your
serial number available; the serial number of your rower can be found on a silver
sticker attached to the back of your monitor
For easy reference, write your serial number below:
S/No:
Made in USA
SN: 000000
WaterRower
US +1 (401) 247 7742 • UK +44 (0)20 8749 9090
DE +49 (0)5921 1798400 • NL +31 (0)180 590697
FR +33 (0)3.20.67.20.07 • IT +39 0422 307016
ES +34 91 640 7004 • AU +61 (0) 2 9681 4221
www.waterrower.com

WRM7074
United Kingdom
19 Acton Park Estate
The Vale, London W3 7QE
Tel: +44 (0)20 8749 9090
info@waterrower.co.uk
www.waterrower.co.uk
United States
560 Metacom Avenue
Warren, RI 02885
Tel: +1 (401) 247 7742
info@waterrower.com
www.waterrower.com
Australia
72 South Street
Rydalmere NSW 2116 Australia
Tel: +61 (0)2 9681 4221
info@waterrower.com.au
www.waterrower.com.au
Other manuals for M1 SERIES
4
Table of contents
Other WaterRower Fitness Equipment manuals

WaterRower
WaterRower WOODEN DUAL RAIL Installation instructions

WaterRower
WaterRower OTF GEN 2 ROWER User manual

WaterRower
WaterRower Indo-row A1 User manual

WaterRower
WaterRower S4 M1 User manual

WaterRower
WaterRower M1 SERIES User manual

WaterRower
WaterRower S4 User manual

WaterRower
WaterRower S1 User manual

WaterRower
WaterRower WRM7060 User manual

WaterRower
WaterRower Indo-row A1 Use and care manual

WaterRower
WaterRower Indo-row A1 User manual


