manuals.online logo
Brands
  1. Home
  2. •
  3. Brands
  4. •
  5. Watts Industries
  6. •
  7. Thermostat
  8. •
  9. Watts Industries BELUX User guide

Watts Industries BELUX User guide

D
I
I
E
NL
F
GB
D
E
NL
GB
CARACTERISTICAS PRINCIPALES :
A/ Termostato ambiente con funcionamiento electromecánico
mediante membrana expandible de acero y vapor saturado.
B/ Posibilidad de bloqeo de la temperatura de trabajo deseada.
C/ Algunos modelos incorporan resistencia anticipadora,
interruptor Paro/Marcha-Frio/Calor y lámpara-neón indicadora
de funcionamiento.
PRINCIPALI CARATTERISTICHE :
A/ Termostato ambiente con funzionamento elettromeccanico
mediante membrana espandible in acciaio inossidabile e vapore
saturado.
B/Possibilitá di bloccaggio della temperatura di lavoro
desiderata.
C/ Alcuni modelli integrano resistenza di anticipazione,
interruttore Arresto/Marcia-Freddo/Caldo e lampada neon di
avviso funzionamento.
HAUPTMERKMALE:
A/ Raumthermostat mit elektromagnetischem Betrieb mittels
ausdehnbarer Membrane aus rostfreiem Stahl.
B/Begrenzung der gewünschten Temperatur möglich.
C/Thermische Rückführung, 230 VAC, NC
MAIN CHARACTERISTICS:
A/ Ambient thermostat with electro-mechanical operation by means
of saturated vapour and expandable stainless-steel membrane.
B/Possibility of blocking desired working temperature.
C/ Thermal feedback, 230 VAC, NC.
HOOFD KARAKTERISTIEKEN:
A/ Omgevingsthermostaat voorzien van een elektro-mechanische
functie door middel van een gascapsule (verzadigde stoom).
B/ Mogelijkheid tot het blokeren van de gewenste temperatuur
C/ Sommige modellen bezitten een anticipatie weerstand, een
schakelaar aan/uit, koud/warm en een indicatieve functie-
indicator.
F
CARACTERISTIQUES PRINCIPALES:
A/ Thermostat d’ambiance muni d’un fonctionnement
électromécanique utilisant une membrane expansible en acier
inoxydable et à vapeur saturée.
B/ Possibilité de blocage de la température désirée.
C/ Certains modèles incorporent une résistance d’anticipation, un
interrupteur Arrêt/Marche, Froid/Chaud et un voyant indicateur de
fonctionnement.
PPLIMW01150 B
CARACTERISTICAS TECNICAS:
Regulación : +5°C a +30°C
Diferencial de temperatura : 0.6°C a 20°C (modelos sin resistencia)
0.4°C a 20°C (modelos con resistencia)
Gradiente de temperatura : 1K/15min.
Potencia de contactos : 10(3)A/250V
Contactos : Plata 1000/1000
Alimentación : 230V/50Hz
Protección eléctrica : Clase II IP30
Dimensiones : 83x86x39mm
CARATTERISTICHE TECNICHE :
Regolazione : da +5°C a +30°C
Differenziale temperatura : da 0.6°C a 20°C(modelli senza resistenza)
da 0.4°C a 20°C (modelli con resitenza)
Gardiente temperatura : 1K/15min.
Potenza contatti : 10(3)A/250V
Contatti : Argento 1000/1000
Alimentazione : 230V/50Hz
Protezione elettrica : Classe II IP30
Dimensioni : 83x86x39mm
TECHNISCHE MERKMALE :
Regulierung : +5°C bis +30°C
Temperaturdiferential : 0.6°C bis 20°C (Modelle ohne Widerstand)
0.4°C bis 20°C (Modelle mit Widerstand)
Temperaturgradient: 1K/15min.
Kontaktstärke: 10(3)A/250V
Kontakte: Silber 1000/1000
Zufuhr: 230V/50Hz
Elekrischer Schutz: Klasse II IP30
Masse: 83x86x39mm
TECHNICAL CHARACTERISTICS:
Regulation: +5°C to +30°C
Temperature differential: 0.6°C to 20°C (models without resistance)
0.4°C to 20°C (models with resistance)
Temperature gradient: 1K/15min.
Contacts power: 10(3)A/250V
Contacts: Silver 1000/1000
Feed: 230V/50Hz
Electrical protection: Class II IP30
Dimensions: 83x86x39mm
CARACTERISTIQUES TECHNIQUES:
Réglage: +5°C à +30°C
Différentiel de température: 0.6°C à 20°C(modèles sans résistance)
0.4°C to 20°C(modèles avec résistance)
Gradient de température : 1K/15min.
Puissance de contacts : 10(3)A/250V
Contacts : Argent 1000/1000
Alimentation : 230V/50Hz
Protection électrique : Class II IP30
Dimensions : 83x86x39mm
TECHNISCHE KARAKTERISTIEKEN
Regeling: +5°C tot+30°C
Differentieel temperatuur: 0.6°C à 20°C(modellen zonder weerstand)
0.4°C to 20°C(modellen met weerstand)
Temperatuur gradient : 1C/15min.
Voeding contacten : 10(3)A/250V
Contacten : Zilver 1000/1000
Voeding : 230V/50Hz
Electrische bescherming : Class II IP30
Afmetingen : 83x86x39mm
Limitación Limitation Limitazione
Limitacion Begrenzung Begrenzing
D
GB
F
E
NL
I
29°C 6°C
25°C 10°C
21°C 14°C
18°C 17°C
BELUX
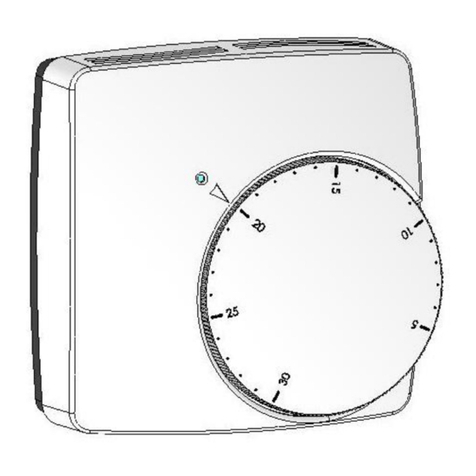
Termostato de ambiente
Ambient thermostat
Termostato d’ambiente
Thermostats d’ambiance
Raumthermostat
Omgevings thermostaat
Instrucciones de instalación, montaje y funcionamiento para el instalador y usuario.
Instruction for installation, assembly and operation for installer and user.
Istruzioni per l’installazione, il montaggio ed il funzionamento del termostato per installatore ed utente.
Instructions d’installation, montage et fonctionnement à usage de l’installateur et de l’usager.
Anleitungen zur Installation, Montage und Betrieb für den Installateur und Benutzer.
Installatie- en gebruikershandleiding voor de installateur en gebruiker.
D
I
E
Conforme a las Directivas Europeas 89/336/CEE de Compatibilidad Electromagnética y 73/23/CEE de Baja Tensión.
It complies with European Directives 89/336/CEE of Electro-Magnetic Compatibility and 73/23/CEE of Low Tension.
Di conformitá con le Direttive Europee 89/336/CEE sulla Compatibilitá Elettromagnetica e 73/23/CEE sulla Bassa Tensione.
Conforme aux Directives Européennes 89/336/CEE relative à la Compatibilité Electromagnétique et 73/23/CEE de Basse Tension.
In Übereinstimmung mit dem Europäischen Vorstand 89/336/CEE der Elektromagnetischen Vereinbarkeit und 73/23/CEE der Niederspannung
Conform aan de Europese richtlijn 89/336/CEE betreffende de electromagnetische kompatibiliteit 73/23/CEE op laagspanning.
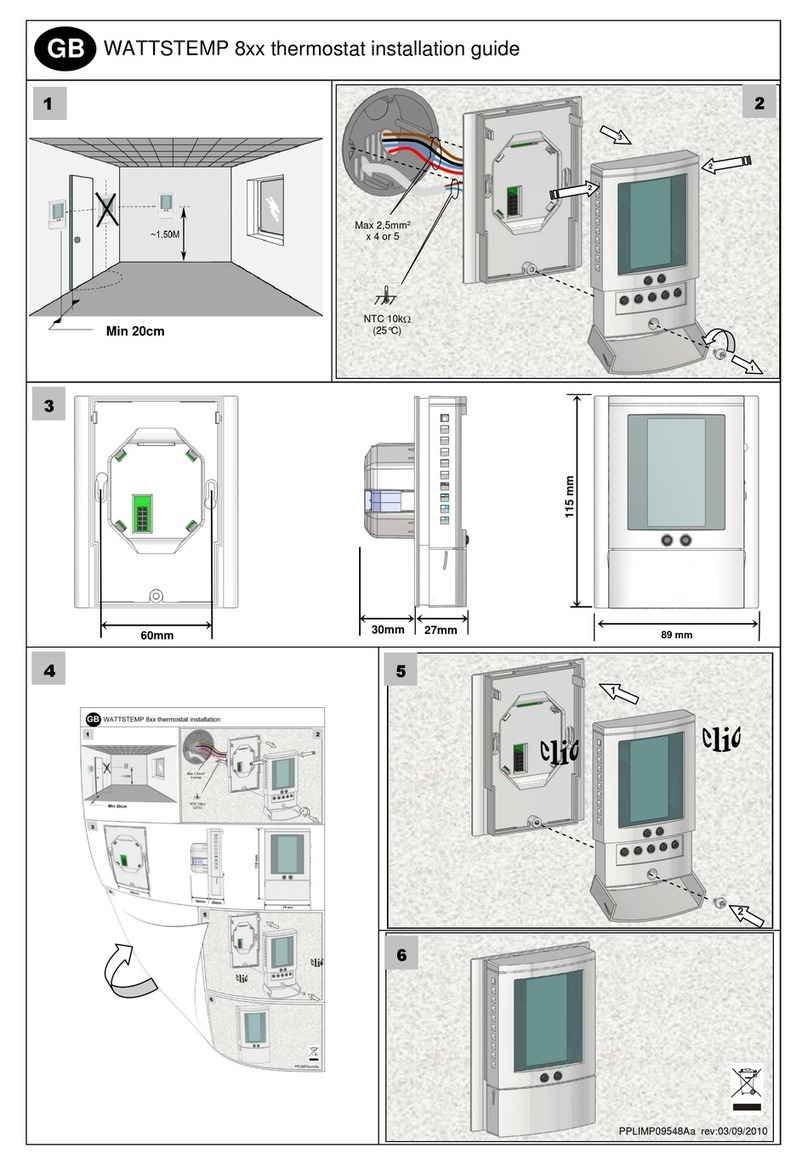
INSTALACIÓN Y MONTAJE :
El termostato debe ser colocado para un correcto funcionamianto a 1,5
metros del suelo aproximadamente, y siempre evitando las corrientes de
aire y las fuentes de calor, segùn muestra la Figure A.
Puede ir fijado tanto a través de una caja de conexión empotrada, o
directamente a la pared, mediante dos de los orificios de la parte posterior
de la base del termostato. (Importante : situario sobre una superficie
completamente plana sin rugosidades utilizando tornillos de medida 3x22mm
como máximo).
1.Extraer el botón regulator hacindo une suave presión hacia fuera
medianteun destomillador de punta fina entre el botión y la tapa.
2.Aflojar el ùnico tornillo para poder retirar la tapa.
3.Fijar la base del termostato directamente a la pared o cajetin eléctrico.
4.Conectar los cables eléctricos en los bornes de acuerdo con el esquerna de
conexión representado en el interior de la tape del propio termostado.
5.Montar la tapa apretando el tornillo correspondiante y colocar de nuevo el
botón regulador con una suave presión manual.
INSTALLAZIONE E MONTAGGIO :
Il termostado deve essere collocato per un corretto funzionamento a 1,5
metri dal suoio circa, e sempre evitando le correnti d’aria e le fonti di
cabre, come illustrado sulla Figura A.
Potrá essere fissato sia tramita scatola di connessione incastra o
direttamente sulla parete, tramite due dei fori della parte posteriore della
base del termostato. (Impotante : collocarlo su di una superficie
completamente piatta, senza rugositá, utilizzando viti di massimo 3x22mm).
1. Estrarre il pulsante di regolazione con una leggera pressione verso fuori
adoperando un cacciavite a punta fine tra il pulsante ed il coperchio.
2. Allentare la vita del coperchio per poterlo estrarre.
3. Fissare la base del termostato direttamente sulla parete o nella cassetta
di distribuzione.
4. Collegare i cavi elettrici sui terminali come sullo schema elettrico
riprodotto all interno del coperchio del termostadostesso.
5. Sistemareil coperchio serrandone la vite e remettere il pulsante di
regolazione con una leggere pressione manuale.
INSTALATION UND MONTAGE:
Der Thermostat muss für einen korrekten Betrieb in einem Abstand von
ungefähr 1,5 Metern vom Boden befestigt werden, unter Vermeidung von
Zugluft und Wärmequellen, wie in Figur A Vorgegeben.
Er kann entweder durch einen eingebauten Verbindungskasten oder direkt
an der Wand mittels der zwei Öffnungen des hinteren Teiles des
Thermostatbasis befestigt werden. (Wichtig: Sie es auf eine vollständig
flache Oberfläche, ohne Verhärtungen, durch Benutzung von Schrauben mit
den Höchstmassen 3x22mm,an).
1. Ziehen Sie den Regelknopf mit leichtem Druck, mit Hilfe eines
Schraubenziehers mit feiner Spitzte, zwischen Taste und Deckel nach
aussen.
2. Lockern Sie die einzige Schraube um den D Deckel entfernen zu können.
3. Befestigen Sie die Thermostatbasis direkt an die Wand oder an den
elektrischen Kasten.
4. Verbinden Sie die Elektrokabel an den Klemmen wie im
Verbindungsschema im Deckelinneren des gleichen Thermostates dargestellt
wird.
5. Montieren Sie den Deckel indem Sie die entsprechende Schraube
anziehen und stecken den Regelknopf wieder an.
Fig. A
N
L
t°C
1
3
4
83mm
60mm
39mm
86mm
F
INSTALLATION AND ASSEMBLY:
For correct operation, the thermostat must be positioned approx. 1,5m from
the floor, and always away from draughts and heat sources as shown in
Figure A. It can be fixed either through a built-in connection box, or
directly to the wall, by means of two of the holes on the back part of the
thermostat base. (Important: locate it on an absolutely flat surface with no
bumps, using screws size 3x22mm as a maximum).
1. Remove the regulator button by pressing gently outwards with a
narrow screwdriver between the button and the cover.
2. Loosen the single screws to be able to withdraw the cover.
3. Fix the thermostat base directly to the wall or electric cabinet.
4. Connect the electric cables to the terminals in accordance with the
attached electrical diagram, which is shown inside the thermostat lid.
5. Assemble the cover by pressing on the corresponding screw and
position the regulator button again with gentle manual pressure.
INSTALLATION ET MONTAGE:
Le thermostat doit être situé, pour obtenir un fonctionnement optimal, à
1,5 mètres du sol approximativement, et en évitant toujours de le situer à
un endroit propice aux courants d’air et aux sources de chaleur, voir
Figure A.
Il peut être aussi bien fixé au moyen d’un boîtier de connexion encastré,
ou bien directement contre le mur, en utilisant les deux orifices de la
partie postérieure de la base du thermostat. (Il est important de le situer
sur une superficie complètement plane non rugueuse et en utilisant des vis
dont la mesure doit être 3x22 mm au maximum).
1. Extraire le bouton de réglage en faisant pression de manière très douce
vers vous en utilisant un tournevis fin qu’il faudra placer entre le bouton
et le boîtier.
2. Dévisser l’unique vis pour pouvoir retirer le boîtier.
3. Fixer la base du thermostat directement contre le mur ou au boîtier
électrique.
4. Connecter les câbles électriques aux bornes en respectant le schéma de
connexions qui figure à l’intérieur du boîtier du thermostat.
5. Monter le boîtier en vissant la vis correspondante et placer de nouveau
le bouton de réglage en faisant une légère pression manuelle.
INSTALLATIE EN MONTAGE:
Voor het optimaal functioneren moet de thermostaat op ongeveer 1,5m
boven de grond gemonteerd worden, bovendien dient men luchtstromingen
en warmtebronnen te vermijden, zie figuur A.
De thermostaat kan bevestigd worden door middel van de 2 openingen in
de achterwand van het toestel.
(Het is belangrijk de thermostaat te bevestigen op een volledig vlak en
glad oppervlak gebruik makend van schroeven met maximum afmetingen
3x22mm)
1. Verwijder de regelknop door lichte druk uit te oefenen naar u toe met
een schroevendraaier die u plaatst tussen de knop en de doos.
2. Verwijder de enige vijs om de doos te verwijderen.
3. Bevestig de achterkant van de thermostaat direct tegen de muur.
4.Verbind de elektrische kabels volgens het aansluitschema dat zich aan
de binnenkant van de thermostaat bevindt.
5. Stel de thermostaat samen door het plaatsen van de corresponderende
schroef en de regelknop (licht drukken).
GB
NL
2
|
~

Other Watts Industries Thermostat manuals

Watts Industries Thermostat User manual

Watts Industries

Watts Industries Thermostat User manual

Watts Industries MILUX User manual

Watts Industries

Watts Industries MILUX User manual

Watts Industries MILUX User manual

Watts Industries

Watts Industries MILUX User manual

Watts Industries MILUX RF User manual

Watts Industries

Watts Industries MILUX RF User manual

Watts Industries BT DP-01 User manual

Watts Industries

Watts Industries BT DP-01 User manual

Watts Industries MILUX RF User manual

Watts Industries

Watts Industries MILUX RF User manual

Watts Industries WFHTRF-HC User manual

Watts Industries

Watts Industries WFHTRF-HC User manual

Watts Industries WFHT BASIC 24V User manual

Watts Industries

Watts Industries WFHT BASIC 24V User manual

Watts Industries MILUX User manual

Watts Industries

Watts Industries MILUX User manual

Watts Industries BT DRF-01 User manual

Watts Industries

Watts Industries BT DRF-01 User manual

Watts Industries WATTSTEMP 8 series User manual

Watts Industries

Watts Industries WATTSTEMP 8 series User manual

Watts Industries WFHT BASIC RF User manual

Watts Industries

Watts Industries WFHT BASIC RF User manual

Watts Industries Ecolux 04.07.605 User manual

Watts Industries

Watts Industries Ecolux 04.07.605 User manual

Watts Industries BT-DPRF-02 User manual

Watts Industries

Watts Industries BT-DPRF-02 User manual

Popular Thermostat manuals by other brands

Honeywell Home RLV450 user guide

Honeywell Home

Honeywell Home RLV450 user guide

Johnson Controls T8690 Owner's manual and installation instructions

Johnson Controls

Johnson Controls T8690 Owner's manual and installation instructions

Carrier TSTTCCPB101 user manual

Carrier

Carrier TSTTCCPB101 user manual

Honeywell RTH2310 Quick installation guide

Honeywell

Honeywell RTH2310 Quick installation guide

SmartWay Solutions Talking Thermostat VT3000 user guide

SmartWay Solutions

SmartWay Solutions Talking Thermostat VT3000 user guide

Heatmiser neoX quick start guide

Heatmiser

Heatmiser neoX quick start guide

Control M6003 Instruction manua

Control

Control M6003 Instruction manua

JUMO ETH-20 operating manual

JUMO

JUMO ETH-20 operating manual

Hunter 40020 installation instructions

Hunter

Hunter 40020 installation instructions

Tekmar 508 User brochure

Tekmar

Tekmar 508 User brochure

Airxcel Coleman-Mach 9420 381 Operation guide

Airxcel

Airxcel Coleman-Mach 9420 381 Operation guide

Moehlenhoff AR HK 4010 K user manual

Moehlenhoff

Moehlenhoff AR HK 4010 K user manual

Braeburn Builder 1000NC user guide

Braeburn

Braeburn Builder 1000NC user guide

Belimo EXT-RCF-24 installation manual

Belimo

Belimo EXT-RCF-24 installation manual

Aube Technologies TH111GFCI-NP owner's manual

Aube Technologies

Aube Technologies TH111GFCI-NP owner's manual

ICC RONER manual

ICC

ICC RONER manual

Honeywell T7200 owner's manual

Honeywell

Honeywell T7200 owner's manual

Beok Controls TOL63R quick start guide

Beok Controls

Beok Controls TOL63R quick start guide

manuals.online logo
manuals.online logoBrands
  • About & Mission
  • Contact us
  • Privacy Policy
  • Terms and Conditions

Copyright 2025 Manuals.Online. All Rights Reserved.