WaveSplitter WST-POT001 User manual

Copyright © 2020 Wavesplitter AV Technology |Wavesplitter .com
TEL:1-510-0651-7800 MAIL:sales@wavesplitter.com
OPERATION MANUAL
Model No. WST-POT001
HDMI 4X4 Seamless Matrix with Videowall &Multiviewer
Safety Instruction

Copyright © 2020 Wavesplitter AV Technology |Wavesplitter .com
TEL:1-510-0651-7800 MAIL:sales@wavesplitter.com
OPERATION MANUAL
Introduction
This model connects 4 HDMI video sources to any of 4 HDMI displays. It supports Matrix, Video wall and Multiview mode,
including seamless switching and has various control methods. It is a perfect solution for projects that requires multiple HDMI
sources and multiple HDMI displays such as control centers, home theater or conference room, etc.
Key Feature
4 x HDMI inputs, 4 x HDMI outputs.
Supports resolutions up to 4K@30Hz.
Supports HDCP1.4/2.2.
Supports seamless switching.
Supports Matrix mode, Video wall mode, Multiview mode.
Multiple Control Methods –via pushbuttons, remote control, RS232, TCP/IP.
Supports 1U rackmount.
Package Content
4x4 Matrix x 1 | Remote Control x 1 | 12V/2A Multi-Country Power adapter x 1 | Table mount brackets with screws x 2
Panel Description
Note:
Lock/Unlock button:Press and hold on one second to lock and unlock the function of all the keys.

Copyright © 2020 Wavesplitter AV Technology |Wavesplitter .com
TEL:1-510-0651-7800 MAIL:sales@wavesplitter.com
OPERATION MANUAL
Remote Control Description
1. Power on/off.
2. Mute button.
3. previous source and next source.
4. Enter the seamless matrix mode(red).
5. Enter the video wall mode(green).
6. Enter the multi-viewer mode(blue).
7. Enter the mirror viewer mode(yellow).
8. MENU button: To enter the main menu interface or return to the previous menu interface.
9. All button: choose all Output port.
10. ▲▼◄►:Moves the highlight to select a displayed.
OK:Enters the selected item.
11. Display and mask the OSD menu.
12. Same as the menu button.
13. Select the input sources under video matrix mode.
14. The menu button that the scenario recalls and save.
15. Output 1 display input 1, Output 2 display input 2.
Output 3 display input 3, Output 4 display input 4.

Copyright © 2020 Wavesplitter AV Technology |Wavesplitter .com
TEL:1-510-0651-7800 MAIL:sales@wavesplitter.com
OPERATION MANUAL
Specification
Interface
Inputs
HDMI Type-A Female x 4
USB Micro-B Female x 1 (For firmware update only)
Outputs
HDMI Type-A Female x 4
Control
RS-232 Female x 1
RJ-45 Female x 1
Transmission
Resolutions
3840x2160@30Hz / 2560x1440@60Hz / 1920x1200@60Hz / 1920x1080P@60Hz / 1920x1080i@60Hz /
1360x768@60Hz / 1280x720@60Hz
Communication and Control
Seamless Switching
Supported
HDCP
HDCP 1.4 & HDCP 2.2
IR
38KHz
Power
Power Supply
12V/2A
Power Consumption
20W
Environment
Operating Temperature
0˚C~40˚C
Storage Temperature
-20˚C~60˚C
Product Structure
Housing Material
Metal
W x H X D
205 x 44 x 438 mm
Weight
2710g
Country of Origin
China
Certification
Safety & Emission
CE / FCC / RoHS / REACH

Copyright © 2020 Wavesplitter AV Technology |Wavesplitter .com
TEL:1-510-0651-7800 MAIL:sales@wavesplitter.com
OPERATION MANUAL
Panel control
Video switch operation
Signal switching includes 4 switching channels, which can be randomly configured as input/output according to requirements to
form a matrix of 1×4~4×1. It can switch any input signal to 1 channel of output or all channels of output.
Operation format: "output channel" + "input channel"
For example:
1. Switch output 1 to input 2 source
Operation:press "1" in Output + "2" in Input to complete the switch.
2. Output 1, 2, 4 switch to input 3 source
Operation:press "1", "2" and "4" in Output + "3" in Input to complete the switch.
3. Go directly into the video wall mode of input 2 signal source
Operation:press the number "2" in Input to complete the switch.
Video control
There are five submenus in the Video interface:

Copyright © 2020 Wavesplitter AV Technology |Wavesplitter .com
TEL:1-510-0651-7800 MAIL:sales@wavesplitter.com
OPERATION MANUAL
Video
1). Video switch
Operation:
①In the main menu, select "Video" and press "OK".
②Press “up and down” button to select "Output1" (The fifth ALL option means that all outputs are selected).
③Click on "OK" to enter the next sub-menu.
④Press “up and down” button to select "Switching" to select the input signal source. The color of the selected input is in
white.
⑤Click "OK" to enter the next sub-menu.
⑥Press the ”up and down” button to select "Input" , and the color of the selected input port becomes white.
⑦Click on "OK" button to complete switching.
You can switch any output to any input, or all output to the same input.
2). Output switch control
You can turn on/off any of the output port.
Operation:
①In the main menu, select "Video" and press "OK".
②Press “up and down” button to select "Output1" (The fifth ALL option means that all outputs are selected).

Copyright © 2020 Wavesplitter AV Technology |Wavesplitter .com
TEL:1-510-0651-7800 MAIL:sales@wavesplitter.com
OPERATION MANUAL
③Click "OK" to enter the next sub-menu.
④Press the “up and down”button to select "On/Off".
⑤Click "OK" to enter the next sub-menu.
⑥Press “up and down” button to select Off or On.
⑦Press "OK" button to confirm that the output port turned on/off.
3). Output resolution selection
You can choose any one of the output video resolution, or choose all of the output video resolution, the system default use Auto
(this option is the product according to the displays judgment).
Operation:
①In the main menu, select "Video" and press "OK".
②Press “ up and down” button to select "Output1" (The fifth ALL option means that all outputs are selected).
③Click "OK" to enter the next submenu.
④Press “up and down” button to select "Resolution".
⑤Click "OK" to enter the next submenu.
⑥Press ”up and down” bottom to complete selection (There are 6 output resolution:4K@30Hz, 1080P@60Hz, 720P@60Hz,
2560x1440, 1920x1200, 1360x768 and AUTO, as shown in below picture. Default is Auto). The color of the selected output
resolution become in white.
⑦Click "OK" button to complete the output video resolution setting.

Copyright © 2020 Wavesplitter AV Technology |Wavesplitter .com
TEL:1-510-0651-7800 MAIL:sales@wavesplitter.com
OPERATION MANUAL
4). OffSet
Offset is the margin of the display screen. Offset apply to video wall mode only.
Operation:
①In the video wall mode, select "Video" in the main menu and press "OK" button.
②Press “up and down”button to select "Output1"(select the output you want to adjust) or the 5th option "ALL" which means
that all outputs are selected.
③Click "OK" to enter the next submenu.
④Press “up and down”button to select the "Offset".
⑤Click "OK" to enter the next submenu.
⑥Press “up and down” button to select X and Y. X and Y have 301 sub-items, the minimum is 0, the maximum is 600, the
number adjustment interval is 2.
⑦Click "OK" button to complete the offset setting.

Copyright © 2020 Wavesplitter AV Technology |Wavesplitter .com
TEL:1-510-0651-7800 MAIL:sales@wavesplitter.com
OPERATION MANUAL
5). Rotate
The rotation is 180° clockwise.
Operation:
①In the main menu, select "Video" and press the "OK".
②Press “up and down” button to select "Output1" (The fifth ALL option means that all outputs are selected).
③Click "OK" to enter the next submenu.
④Press the “up and down”to select "Rotate".
⑤Click "OK" to enter the next submenu.
⑥Press “up and down” button to select "Yes" to rotate or "No" to cancel.
⑦Click "OK" button to complete the setting.
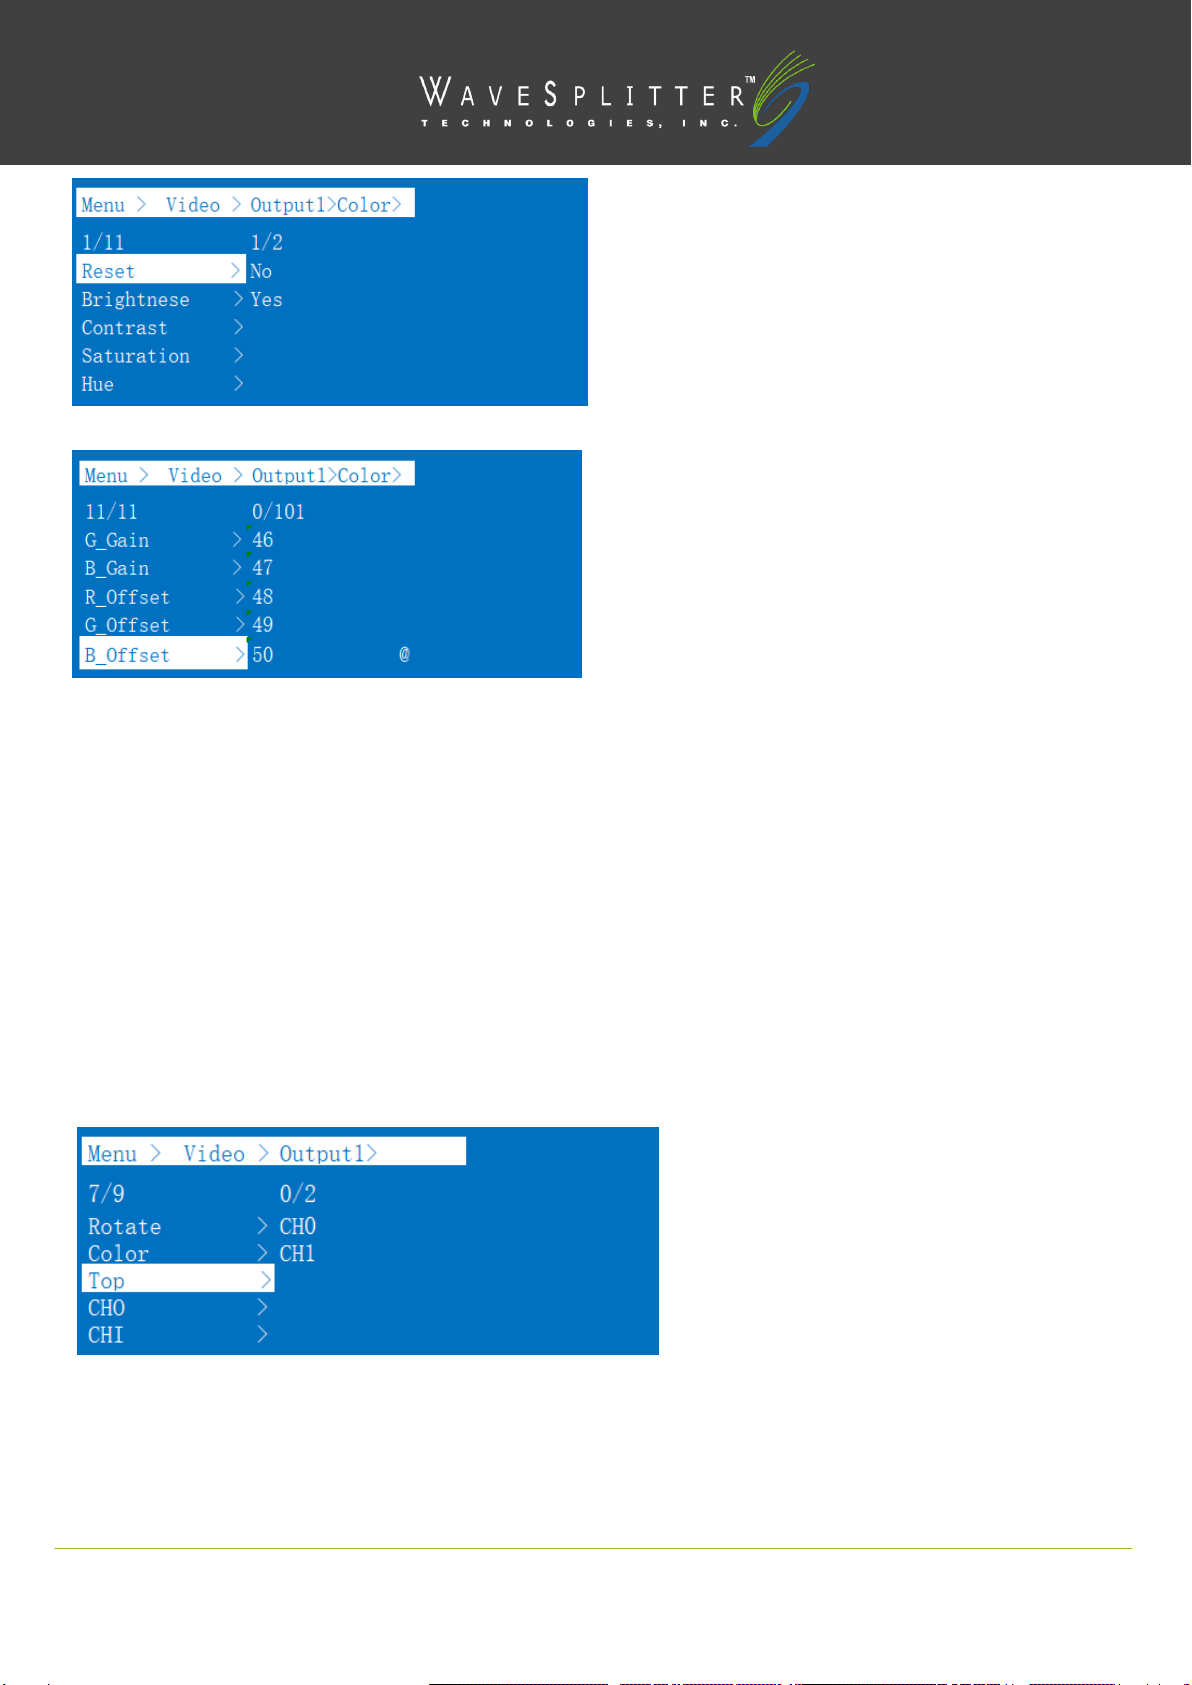
6). Advanced
You can choose any output’s color settings. It is able to adjust the contrast, brightness, saturation, color, and R, G, B offset, etc.
You also can choose “Reset” to restore all the default settings. Each option can be set 0-100 (the system default parameters for
50), the color of the above parameters can be set according to your own preferences.
Operation:
①In the main menu, select "Video" and press the "OK".
②Press “up and down” button to select "Output1" (The fifth ALL option means that all outputs are selected).
③Click "OK" to enter the next submenu.
④Press “up and down”button and select "color".
⑤Click "OK" to enter the next submenu.
⑥Press “up and down” button to select "Yes" to confirm or "No" to cancel.
⑦Click "OK" button to complete the color setting.
Copyright © 2020 Wavesplitter AV Technology |Wavesplitter .com
TEL:1-510-0651-7800 MAIL:sales@wavesplitter.com
OPERATION MANUAL
7). Top
You can choose the Top area (one of the output port’s) to display CH0 or CH1.
Operation:
①In the main menu, select "Video" and press "OK".
②Press “up and down” button to select "Output1" (The fifth ALL option means that all outputs are selected).
③Click "OK" to enter the next submenu.
④Press “up and down”button to select "Top".
⑤Click "OK" to enter the next submenu.
⑥Press “up and down” button to select "CH0" or “CH1” to display.
⑦Click "OK" button to complete the setting.

Copyright © 2020 Wavesplitter AV Technology |Wavesplitter .com
TEL:1-510-0651-7800 MAIL:sales@wavesplitter.com
OPERATION MANUAL
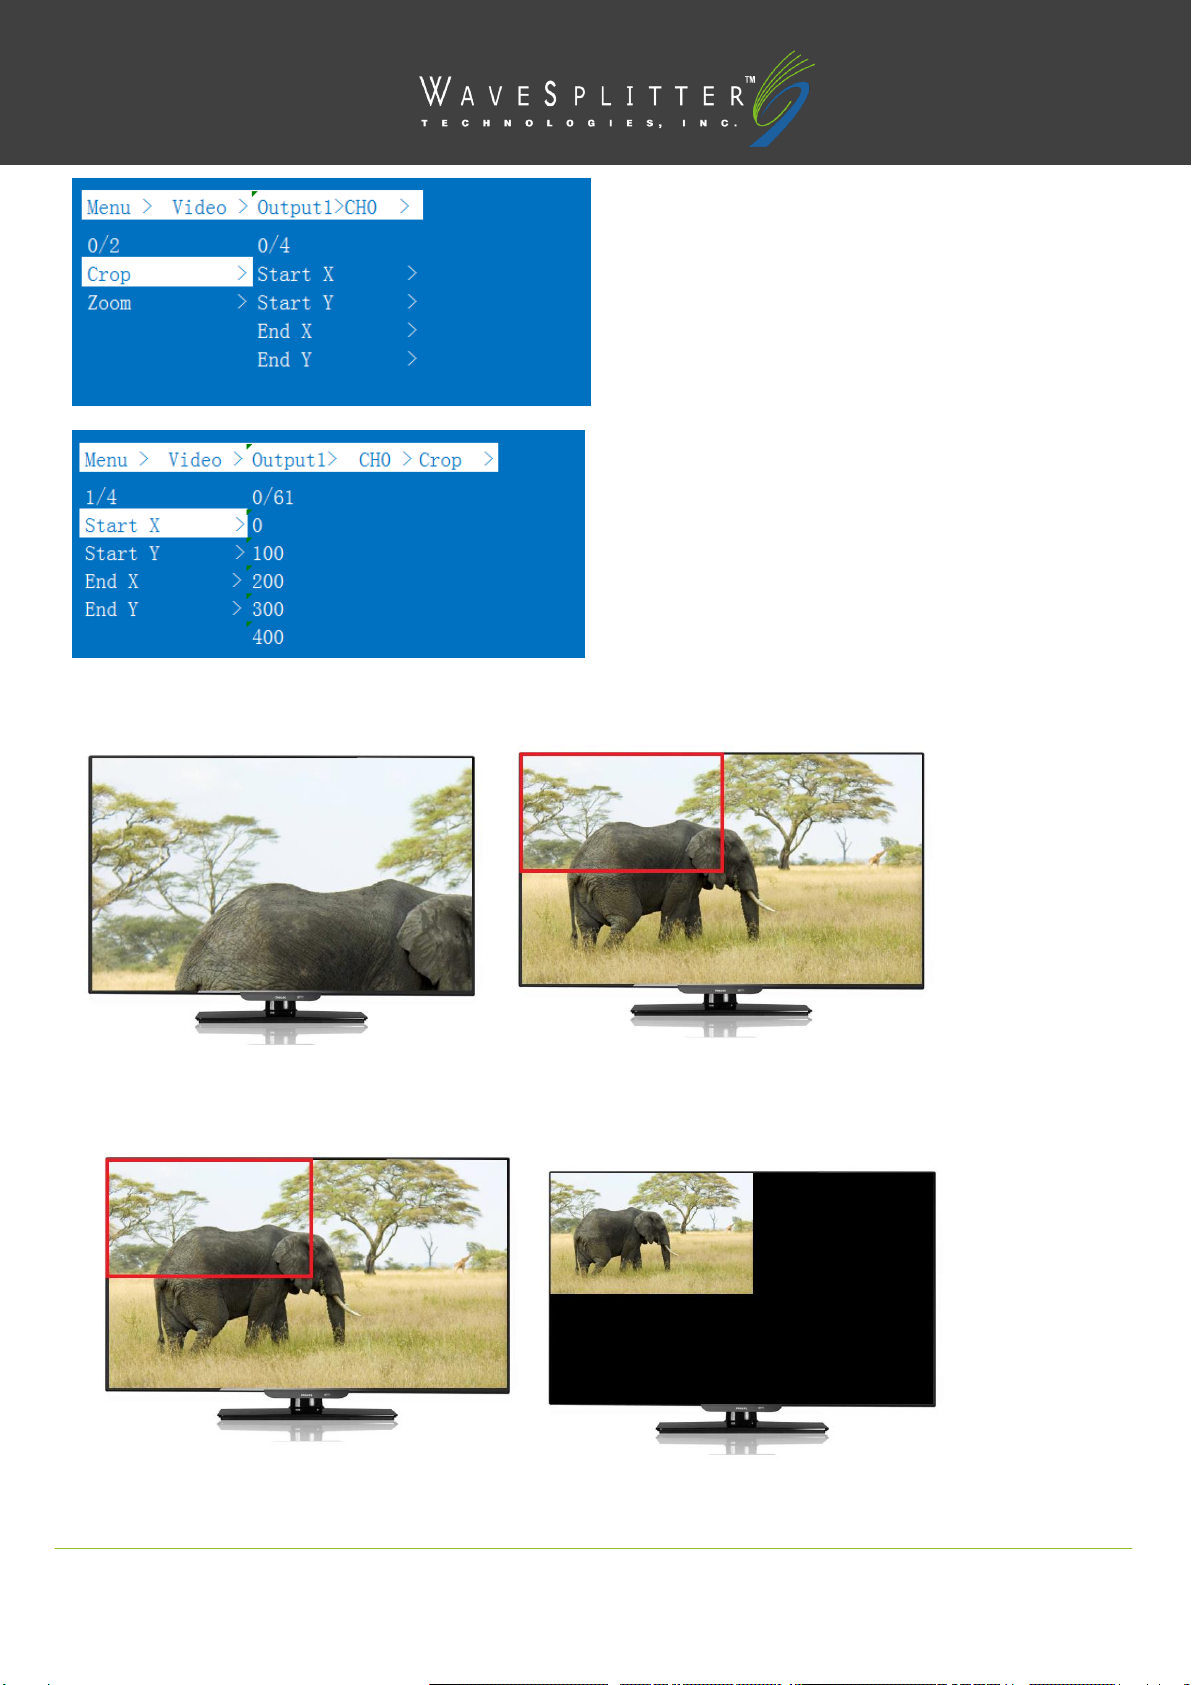
8). CHO
You can set CH0 as one of the output video screen size and the size of the cutting video screen, or select all CH0 output video
screen size and the size of cutting all output video image. The size of the coordinates of the output displays in the upper left
corner and the lower right corner, full screen coordinates (0, 0, 6000, 6000). Set the starting point and end point to adjust the
picture size and cut size.
For example, set the image size of CH0’s Output 1 as 1/4, upper left corner, when the crop unchanged, CH1 does not change.
TOP is CH0.
Operation steps:
①In the main menu, select "Video" and press "OK".
②Press “ up and down” button to select "Output1" (The fifth ALL option means that all outputs are selected).
③Click "OK" to enter the next submenu.
④Press “up and down” button to select "CH0".
⑤Click "OK" to enter the next submenu and there are two submenus of CH0: Crop and Zoom.
⑥Press “up and down” button to select “Crop” to set Start X = 0, Start Y = 0, End X = 6000, End Y = 6000 (There are 61
options under each coordinate, minimum 0, maximum 6000. Each value interval 100. The defaults value of selected video is:(The
upper left corner Start (0, 0). The lower right corner End (6000, 6000), midpoint (3000, 3000) ).
⑦Click "OK" button to complete the setting.
⑧Press “up and down” button to select “Zoom”. There are four options under Zoom:Start X = 0, Start Y = 0, End X =
3000, End Y = 3000.
⑨Click "OK" button to complete the setting.
Copyright © 2020 Wavesplitter AV Technology |Wavesplitter .com
TEL:1-510-0651-7800 MAIL:sales@wavesplitter.com
OPERATION MANUAL
Corp:
Zoom:

Copyright © 2020 Wavesplitter AV Technology |Wavesplitter .com
TEL:1-510-0651-7800 MAIL:sales@wavesplitter.com
OPERATION MANUAL
9). CH1
CH1 has one more “Select”function compares to CH0. Crop and Zoom are the same as the operation steps of CH0 main
channel. You can set one of the CH1 output video screen size and the size of the cutting video screen, or set the size of all CH1
output video screen and the size of the all output cutting video screen.
Operation:
①In the main menu, select "Video" and press "OK".
②Press “up and down” button to select "Output1" (The fifth ALL option means that all outputs are selected).
③Click "OK" to enter the next submenu.
④Press “up and down” button to select ”CH1”.
⑤Click "OK" to enter the next submenu. There are 3 options: Crop, Zoom and Source.
⑥Crop, Zoom is the same as the CH0 operation.
⑦Selct “Source”, there are three options: Matrix, Next, and Mute.
⑧When click "Matrix", the CH1 is the same as the CH0 signal source, and the image is the same.
⑨When click "Next", then the signal source of CH1 is the next signal source from CH0, and the output screen is the image of the
next signal source.
⑩When click "Mute", then close the CH1 image. After we select “Mute”, the CH1 screen will switch to black screen.
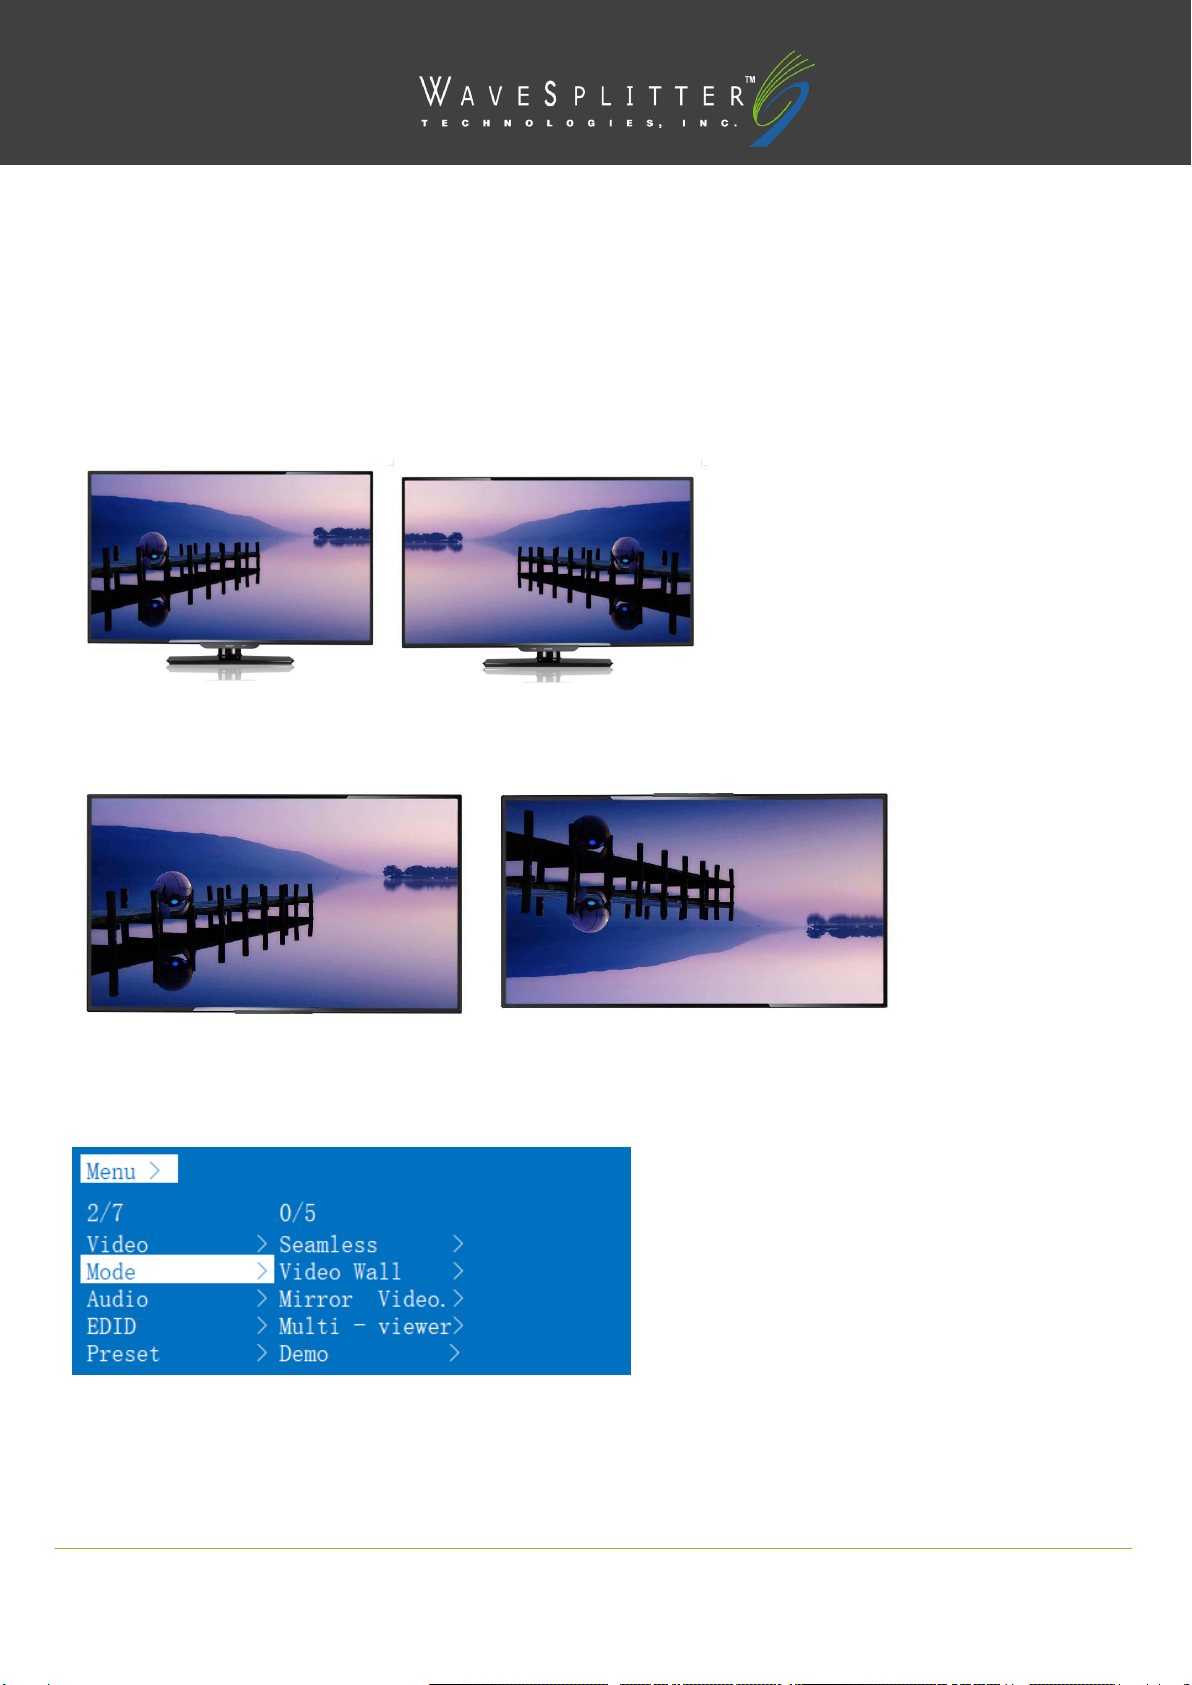
10). CH0, CH1 mirror Settings
You can set CH0 or CH1 to mirror the X-axis or Y-axis image.
Operation:
①In the main menu, select "Video" and press "OK".
Copyright © 2020 Wavesplitter AV Technology |Wavesplitter .com
TEL:1-510-0651-7800 MAIL:sales@wavesplitter.com
OPERATION MANUAL
②Press “up and down” button to select "Output1" (The fifth ALL option means that all outputs are selected).
③Click "OK" to enter the next submenu.
④Press “up and down” button to select "CH0".
⑤Click "OK" to enter the next submenu. Press “up and down” button to select “Crop”.
⑥Set Start X = 0, Start Y = 6000, End X = 6000, End Y = 0.
⑦Click "OK" button to confirm.
⑧Horizontal mirror screen setup complete.
Vertical mirror diagram
Horizontal mirror diagram
Mode
1). Seamless (Matrix Mode)
“Seamless”is for matrix mode. Seamless can seamlessly switch all input signal source. It can choose 1~4 signal sources to 1-4
output displays.

Copyright © 2020 Wavesplitter AV Technology |Wavesplitter .com
TEL:1-510-0651-7800 MAIL:sales@wavesplitter.com
OPERATION MANUAL
Operation:
①In the main menu, select "Mode" and press "OK".
②Press “up and down” button to select "Seamless".
③Click "OK" to enter the next submenu.
④Press “up and down” button to select "Input x" (the first option is P2P mode).
⑤Click "OK" to complete the switch.
2). Video Wall Mode
Video Wall mode can make 4 output displays to be a single image. There are 10 preset scenes (2x2, 1x2x2, 1x2, 2x1x2, 2x1, 2x1 1x2,
1x3, 3x1, 1x4, 4x1). After clicking, you can select the scene you need.
Operation:
①In the main menu, select "Video Wall" and press "OK".
②Press ”up and down” button to select the scene you want.
③Click "OK" to complete the setting.
-2x2

Copyright © 2020 Wavesplitter AV Technology |Wavesplitter .com
TEL:1-510-0651-7800 MAIL:sales@wavesplitter.com
OPERATION MANUAL
-1x2 –total 2 -1x2
-2x1 –total 2 -2x1
-3x1 -1x3

Copyright © 2020 Wavesplitter AV Technology |Wavesplitter .com
TEL:1-510-0651-7800 MAIL:sales@wavesplitter.com
OPERATION MANUAL
-4x1 -1x4
* Each black frame represents a TV and each different picture represents different input source.
3). Mirror Video Wall Mode
Mirror video Wall can select 4 mirror display sets to make a picture, there are 10 preset scenes, select the required scene (this
function is to Mirror the preset scene of Video wall)
Operation:
①In the main menu, select "Mirror Video Wall" and press "OK".
②Press “up and down” button to select the scene you want.
③Click "OK" to complete the setting.
4). Multi-viewer Mode
Multi-viewer can select a preset segmentation scene. The image segmentation can only display on one of the output.
Operation:
①In the main menu, select "Multi-viewer" and press "OK".
②Press “up and down” button to select "Output".

Copyright © 2020 Wavesplitter AV Technology |Wavesplitter .com
TEL:1-510-0651-7800 MAIL:sales@wavesplitter.com
OPERATION MANUAL
③Click "OK" button to confirm.
④Press “up and down” button to select multi-viewer scene.
⑤Click "OK" to complete the setting.
* The black frame represents a single display (output1-4 that you selected). The pictures are showing four input sources.
5). Demo
When turn on Demo Mode, it’ll automatically display all the preset scenes (all scenes in Mode), including matrix, video wall,
multi-viewer, mirror, etc. Each display playback can choose for the switching seconds, including: 2S, 5S, 10S, 30s, 60S, 180S, 600s.

Copyright © 2020 Wavesplitter AV Technology |Wavesplitter .com
TEL:1-510-0651-7800 MAIL:sales@wavesplitter.com
OPERATION MANUAL
Audio Settings interface
You can choose Mute the audio signal or Delay it. Select the corresponding output you want.
Operation:
①Select "Audio" in the main menu and press "OK" to confirm.
②Press “up and down” button to select "Output1" (The fifth ALL option means that all outputs are selected).
③Click "OK" to enter the next submenu.
④Press “up and down” button to select "Delay" mode.
⑤Click "OK" to enter the next submenu, and select “10ms” (Factory default is 30ms).
⑥Click "OK" to confirm.
⑦The audio delay setting is complete, audio output will delay 10 mini seconds.

Copyright © 2020 Wavesplitter AV Technology |Wavesplitter .com
TEL:1-510-0651-7800 MAIL:sales@wavesplitter.com
OPERATION MANUAL
EDID Settings
EDID setting interface can set EDID of each input port. You can select the built-in EDID which are 2160P and 1080P.
Operation:
①In the main menu, select "EDID" and press "OK".
②Press “up and down” button to select "Intput1" (The fifth ALL option means that all intputs are selected).
③Click "OK" to enter the next submenu.
④Press “up and down” button to select the resolution.
⑤Click "OK" to confirm.
⑥EDID setup complete.
Table of contents
Other WaveSplitter Matrix Switcher manuals


