Weathermatic SoloRain 8024 DC Series User manual

8024 DC Series
Battery Operated Valve Controller
Controller Models
80424C
SoloRain
®
Owner’s Manual


Thank you for selecting Weathermatic's SoloRain™ battery
operated valve controller. This unit has the latest technology and
will provide many years of reliable service.
Please read the following instructions carefully to get familiar
with important precautions, programming, operation, and
installation instructions.
NOTE: In our eorts to continually improve and update our
products, features and specifications in this manual may change
without notice.
This controller is not intended for use by young children or the
infirm without supervision. Young children should be supervised
to insure they do not play with this appliance.
If the supply cord is damaged it must be replaced by the
manufacturer, an authorized service agent or a similarly qualified
person in order to avoid a hazard.
U.S. Patent No. 6,314,340
TRADEMARKS:
Weathermatic®
SmartLine®
Smart Solutions for the Professional®
Help Desk
Online: support.weathermatic.com
Email: suppor[email protected]
Telephone: 888-484-3776
Scan with smartphone to
go to web-based help.
www.weathermatic.com
Introduction

Table of Contents
1.0 Getting Acquainted With Your SoloRain Controller
1.1 Controllers Features.................................................... 1
1.2 Electrical Specifications............................................. 1
1.3 Technical Data .............................................................. 1
2.0 Installing the SoloRain Controller .............................. 1
2.1 Connecting a Rain/Freeze/Wind Sensor .............. 1
3.0 Programming the Controller.......................................2
3.1 Setting the Time and Date........................................ 2
3.1.1 Set Current Time....................................................... 2
3.1.2 Set Current Date....................................................... 2
3.1.3 Set Current Year........................................................ 2
3.2 Setting the Watering Schedule ............................... 3
3.2.1 Set Program Start Times (A, B, C)..................... 3
3.2.2 Set Zone Run Time .................................................. 3
3.2.3 Set Schedule .............................................................. 3
3.2.3.1 Set Days ................................................................ 3
3.2.3.2 Set IntervalOdd/Even Days ........................... 3
3.2.3.3 Set % Water Budget ......................................... 4
4.0 Running Your Controller ............................................. 4
4.1 Running Your Scheduled Your
Watering Program ...................................................... 4
4.2 Manually Running Your Controller.......................... 4
4.3 Running the Controller on a Cycle.......................... 4
4.4 Running the Controller on a 3 Minute Cycle......... 5
4.5 Clearing All Scheduled Programs ........................... 5
4.6 Turning the Controller O ........................................ 5
5.0 Maintenance...................................................................5
5.1 Battery Replacement ................................................. 5
5.2 Plunger Cleaning......................................................... 5
6.0 Troubleshooting........................................................... 6

1
http://support.weathermatic.com
1.0 Getting Acquainted With Your SoloRain Controller
1.1 Controller Features
• Three start times per program (9 total start times)
• Three independent programs
• Stacking start times
• Length of programmable watering time (1 minute to 3hr
59min per zone)
• Four scheduling options to suit the needs of plant material
or to comply with watering restrictions (days of the week,
1-30 day interval, true odd/even)
• Leap year compatible-automatically includes Feb 29th every
four years
• 0-200% Watering Budget per program
• LCD display
• Easy Select & Adjust™ programming
• Three test cycles (manual open, cycle, and 3 minute test)
1.2 Electrical Specifications
Powered by 2 standard Energizer Alkaline AA batteries.
1.3 Technical Data
• Operating temperature range 32° to 120°F
• Dimensions 4.25" H x 3.25" W
• Battery cover screw dimensions 3 x 10mm
• Made of ABS plastic construction
• Operating pressure: 7 to 150 PSI
• Protective cover included
2.0 Installing the SoloRain Controller
Replace the AC solenoid and bleed collar (if one exists) with the
8020 DC solenoids. Do not over tighten.
Use the wiring diagram below to wire the 8020 battery operated
controller with the DC solenoids.
Use either the mounting plate or stake to
mount the 8020 in the valve box. The 8020 DC
solenoids fits the Signature valve models 7900
1” series, 9000 1” series, and the 9500 1 1/2” and
2” series. Adapters are available for most others
manufacturers vavles.
1.0
Getting Acquainted With Your SoloRain Controller
SoloRain
®

2
http://support.weathermatic.com
3.0 Programming the Controller
2.1 Connecting a Rain/Freeze/Wind Sensor
The 8024 is equipped to operate with any sensor with normally-
closed leads. To install a sensor, follow the supplied wiring diagram.
NOTE: If no sensor will be used the sensor leads of the 8020 must
be connected to each other (as supplied).
3.0 Programming the Controller
To access the control panel, remove
the protective cover from the 8024
SoloRain. Squeeze the side tabs and
lift o the cover. Always replace the
cover for added protection.
Use the + / - buttons
to scroll through
available options.
3.1 Setting the Time and Date
The 8024 defaults to the 12-hour clock mode.
To change to the 24-hour mode, turn the left dial to any of these
three positions: YEAR, DATE, or TIME. Then press the + and –
buttons simultaneously to switch back and forth between 12hr
mode and 24hr mode. Once in 24hr mode the A.M./P.M. indicator
will disappear and the date will also be in Day:Month format.
3.1.1 Set Current Time
With the Set dial in any position, turn the Select dial to TIME.
Use the + and – buttons to adjust to the current time. P.M will be
indicate by a "P" in the display and an A to indicate A.M. only in
12hr mode.
3.1.2 Set Current Date
With the Set dial in any position, turn the Select dial to DATE. Use
the + and – buttons to scroll to the correct date. When the 8024 is
in 12-hour default mode the left digit represents the month and the
right digit represents the day. When the 8020 is set in 24hr mode
the left digit represents the day and the right digit represents the
month.
3.1.3 Set Current Year
With the Set dial in any position, turn the Select dial to YEAR. Use
the + and – buttons to scroll to the current year.
NOTE: When date and year are selected, the day of the week is
automatically set. The 8020 SoloRain is leap year compatible.
SoloRain®
Select
Dial Set
Dial
SoloRain®
AM/PM Indicator (A or P)
Sensor Suspend Symbol
Low Battery Symbol

3
http://support.weathermatic.com
3.2 Setting a Watering Schedule
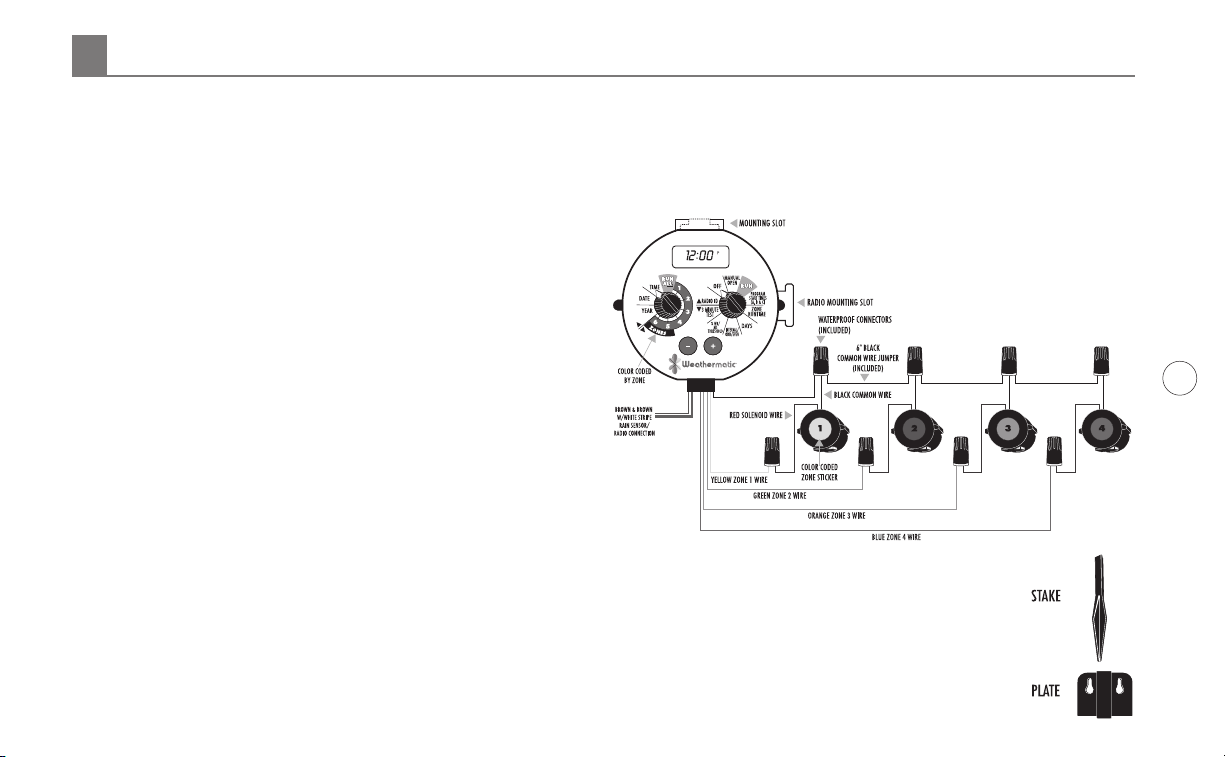
The 8020 SoloRain can be programmed to run 3 programs with up
to 3 start times per program. This means you can start and stop the
watering from 1 to 9 times in a 24-hour period (or 2 to 18 times if
you have the Water Budget feature set to 110% or greater). To set a
watering schedule follow the steps below in order. Note: To select a
dierent program (A,B,C) press the + and – buttons simultaneously
until you reach the program of your choice.
3.2.1 Set Program Start Times (A, B, C)
Turn the Set dial to the PROGRAM START TIME position and the
Select dial to the RUN ALL position. The program and the start
time number will be shown on the bottom left corner of the LCD.
To scroll between the dierent programs and start times press the
+ and – buttons simultaneously until you reach the program and
start time of choice. After you have selected your program use the
+ and – buttons to adjust to the desired start time.
To delete a start time, select the position between 11:59p.m. and
12:00a.m. --:-- will appear on the LCD indicating that there is no
start time.
3.2.2 Set Zone Run Time
Turn the Set dial to the ZONE RUNTIME position and the Select dial
to the zone position you want to change. Use the + and – button to
adjust the runtime for that zone.
NOTE: The RUNTIME applies to all start times within a program.
3.2.3 Set Schedule
The controller has three scheduling options. You may only choose
one of the following settings per program (days/interval/odd/
even).
3.2.3.1 Set DAYS
DAYS, or daily, lets you choose which days of the week you
want to water (i.e., Monday, Wednesday, Friday only).
The controller default is set to run daily. To select the days
you want your program to run, turn the Set dial to the DAYS
position and the Select dial to the RUN ALL position.
The day of the week is indicated by a number. For example, 1 =
Sunday and 7 = Saturday. Use the + button to select a day for
watering and the – button to deselect that day for watering.
Once a selection is made the controller will advance to the
next day.
NOTE: On the LCD the letter “Z” will indicate zone reference.
3.2.3.2 Set INTERVAL/ODD/EVEN DAYS
To enable watering schedule for interval/odd/even days, turn
the Select dial to the INTERVAL/ODD/EVEN position and the
Set dial to the RUN ALL position. The default is “–”, which
means that there is no interval/odd/even schedule enabled.
Press the + or – button to select the schedule of your choice.
INTERVAL waters every X number of days (from 1 to 30 days)
(i.e., water every 3 days, waters every 10 days, etc.). A value of
1 in an interval schedule means to water every day. When using
3.0 Programming the Controller

4
http://support.weathermatic.com
the interval option, you have the flexibility to tell the controller
what day to start the interval program on (up to 30 days out).
To water on an interval use the + / - buttons to choose the
number days you would like to water.
ODD/EVEN tells the controller to water on either the odd or
even days of the month (i.e., the controller will water on the
31st and the 1st when an ODD schedule is chosen).
An "O" or "E" will be illuminated on the left hand side of the
LCD to indicate Odd or Even schedule. Use the + or – button
to select "O" to water every Odd day or "E" to water every
Even day.
3.2.3 Set % Water Budget
Turn the Set dial to the % WATER BUDGET and the Select dial to
the RUN ALL position. The default is set at 100%, which means
that the 8024 will water for 100% of the time you entered in the
Zone Runtime position. To adjust the watering percentage press
the + or – button until you have selected the percentage of your
choice for that program. At or above 110%, the program will run
as a split cycle, which means it will run each zone for 1/2 of its
scheduled time and then run the remaining 1/2 after the last zone
has completed its cycle. For example, if you set a zone runtime for
10 minutes and set the watering budget for 200%, you will actually
water for 20 minutes in two 10 minute intervals, which is a split
cycle.
4.0 Running Your Controller
4.1 Run Your Scheduled Watering Program
You can choose to run up to all four zones or select any one of
the four zones. Turn the SELECT dial to the zone of your choice or
RUN ALL to run all zones. Turn the SET dial to the RUN position.
4.2 Manually Running Your Controller
Turn the SET dial to the MANUAL OPEN position and the SELECT
dial to the zone you want to open manually. The LCD display will
flash 10 minutes of run time. There is a 30-second delay to open or
close the valve. You can adjust the desired run time from 1 minute
to 3 hours 59 minutes by using the + and - buttons.
To return to automatic operation, turn the SET dial and the SELECT
dial to their original positions before you started to run the zones
manually. The manual operation that you selected will finish and
the timer will return to automatic operation as scheduled.
4.3 Running the Controller on Cycle
Turn the SET dial to the MANUAL OPEN position and the SELECT
dial to the RUN ALL position. The LCD display will flash the 1st
zone runtime. There is a 30-second delay to open or close the
valve. You can select which program you want to run by pressing
the + and - buttons simultaneously until you reach your desired
program.
4.0 Running Your Controller

5
http://support.weathermatic.com
To return to automatic operation, turn the SET dial and the SELECT
dial to their original positions before you started to run the zones
manually. The manual operation that you selected will finish and
the timer will return to automatic operation as scheduled.
4.4 Running the Controller on a 3 Minute Cycle
Turn the SET dial to the 3 MINUTE TEST position and the SELECT
dial to the RUN ALL position. This will run all zones that have a
runtime in any program for 3 minutes.
To return to automatic operation, turn the SET dial and the SELECT
dial to their original positions before you started to run the zones
manually. The manual operation that you selected will finish and
the timer will return to automatic operation as scheduled.
4.5 Clearing All Scheduled Programs
Turn the SET dial to the OFF position and the SELECT dial to the
RUN ALL position. Press the + and – buttons simultaneously and
hold for 3 seconds. The LCD screen will go blank indicating that
all scheduled programs have been cleared. When you release the
buttons the time will reappear.
4.6 Turning the Controller O
To discontinue watering when the timer is in operation or to
prevent automatic operation, turn the SET dial to the OFF position.
To return to automatic operation, return the SET dial to the RUN
position.
5.0 Maintenance
5.1 Battery Replacement
The two Alkaline AA batteries are replaceable. Remove the four
screws that are located on the bottom of the unit. Replace the
two batteries making sure you place them in the correct polarity
position. Then carefully replace the battery cover and the four
screws.
NOTE: Make sure not to get any water in the battery housing as
you are replacing the batteries. To seal the battery cover properly,
all 4 screws must be used.
5.2 Plunger Cleaning
To clean the plunger and plunger tube gently remove the plastic
plunger retainer with needle-nosed pliers. Clean debris from the
plunger and plunger tube. Then replace the plunger retainer.
5.0 Maintenance

6
http://support.weathermatic.com
6.0 Troubleshooting the Controller
SYMPTOM POSSIBLE CAUSE SOLUTION
Valve not operating Debris in valve Clean valve
Valve not operating Debris in plunger See 5.2 Plunger Cleaning
LCD is not working Dead battery Replace with a new
battery
Flashing battery symbol
appears
Low battery Replace with a new
battery
6.0 Troubleshooting the Controller

7
WARRANTY
Limited Warranty
Weathermatic, Inc. warrants all electronic products to be free of defects in material and workmanship for a period of two (2) years from the original date of purchase. In the event
of such defects, Weathermatic will repair or replace, at it’s option, the product or the defective part. This warranty does not extend to damage to a Weathermatic product or part
resulting from accident, misuse, alteration, neglect, abuse, improper installation or normal wear and tear, or to exterior appearance and color. This warranty extends only to the
original user of the Weathermatic product. If defect arises in a Weathermatic product or part within the warranty period, you should contact your installing contractor, Weathermatic
retailer, distributor, or Weathermatic. Weathermatic may, at its option, require that the product or part be returned to a Weathermatic service point or your retailer or distributor.
Weathermatic will determine whether the claimed defect is covered by the warranty. If coverage is found, the product will be repaired or replaced. Please allow 4 to 6 weeks for
completion of repairs or replacement and return of the product or part. If a product or part is replaced, the replacement is warranted only for the remainder of the original product
or part warranty period.

ADSR-8024-MN_REVB
This manual suits for next models
1
Table of contents
Other Weathermatic Controllers manuals

Weathermatic
Weathermatic smartline SL800 User manual

Weathermatic
Weathermatic smartline SL800 User manual

Weathermatic
Weathermatic Smartlink Aircard User manual

Weathermatic
Weathermatic PROLINE PL800 Instruction Manual

Weathermatic
Weathermatic PROLINE PL800 User manual

Weathermatic
Weathermatic SoloRain 8014 Series User manual

Weathermatic
Weathermatic ProLine 800 Series User manual

Weathermatic
Weathermatic SmartWire 9600TW User manual

Weathermatic
Weathermatic smartline SL800 User manual

Weathermatic
Weathermatic PROLINE PL800 User manual