Well Straler HI-LOW T3 User manual

2
Index
1. Introduction ............................................................................................................................................................ 3
1.1. Welcome................................................................................................................................................................. 3
1.2. Warranty................................................................................................................................................................. 3
1.3. Security ................................................................................................................................................................... 3
1.3.1. Built-in safeties in the control system .................................................................................................................... 3
1.3.2. Communication safety - transmitter ...................................................................................................................... 3
1.3.3. Safety for temperature sensor of transmitter……………………………………………………………………………………………………4
1.3.4. Safety for temperature sensor of receiver………………………………………………………………………………………………………….4
1.3.5. Thermo-safety –receiver........................................................................................................................................ 4
1.3.6. Child Protection (CP)............................................................................................................................................... 4
1.4. Appliances with ventilator ...................................................................................................................................... 4
2. Commands of your appliance ................................................................................................................................. 5
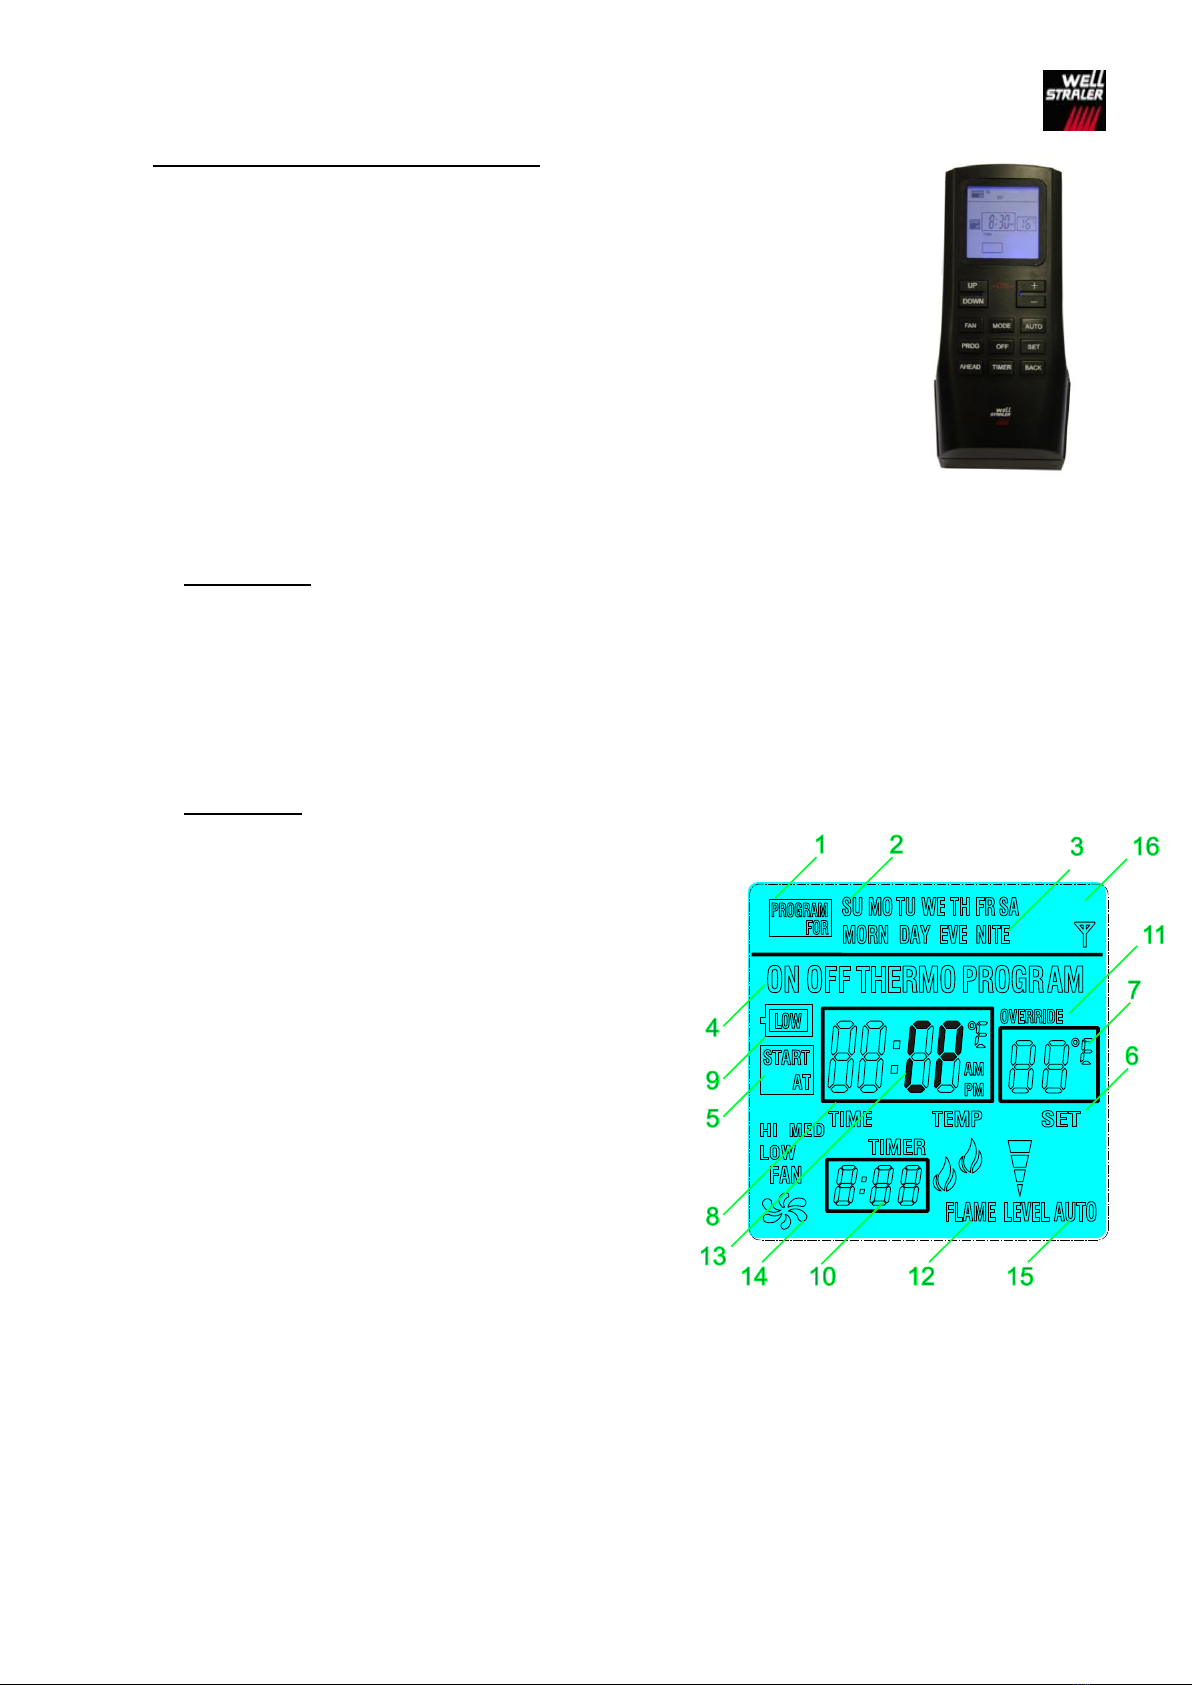
2.1. Transmitter ............................................................................................................................................................. 5
2.2. LCD-screen .............................................................................................................................................................. 5
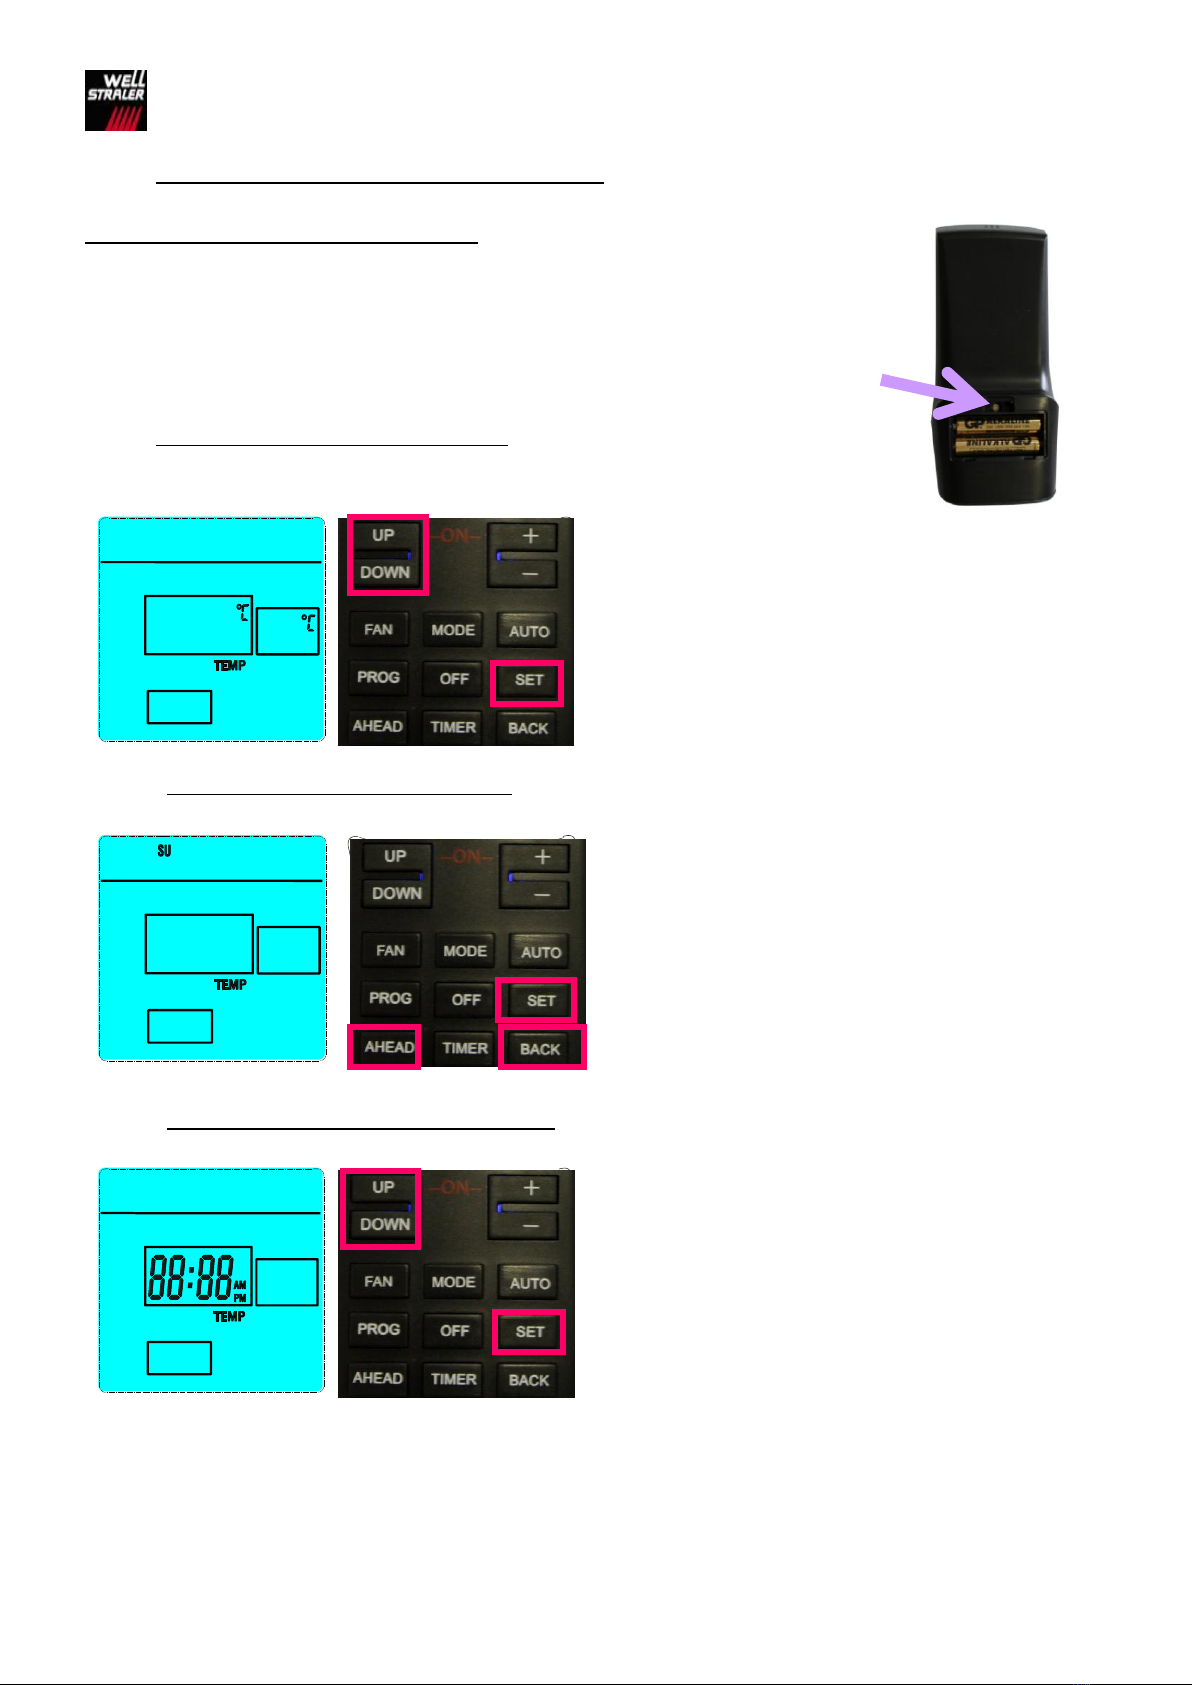
2.3. Initial set-up programming of transmitter.............................................................................................................. 6
2.3.1. Changing temperature scale (°C - °F)...................................................................................................................... 6
2.3.2. Setting the current day of the week ....................................................................................................................... 6
2.3.3. Setting of the current hour and minutes ................................................................................................................ 6
2.3.4. Setting of swing ...................................................................................................................................................... 7
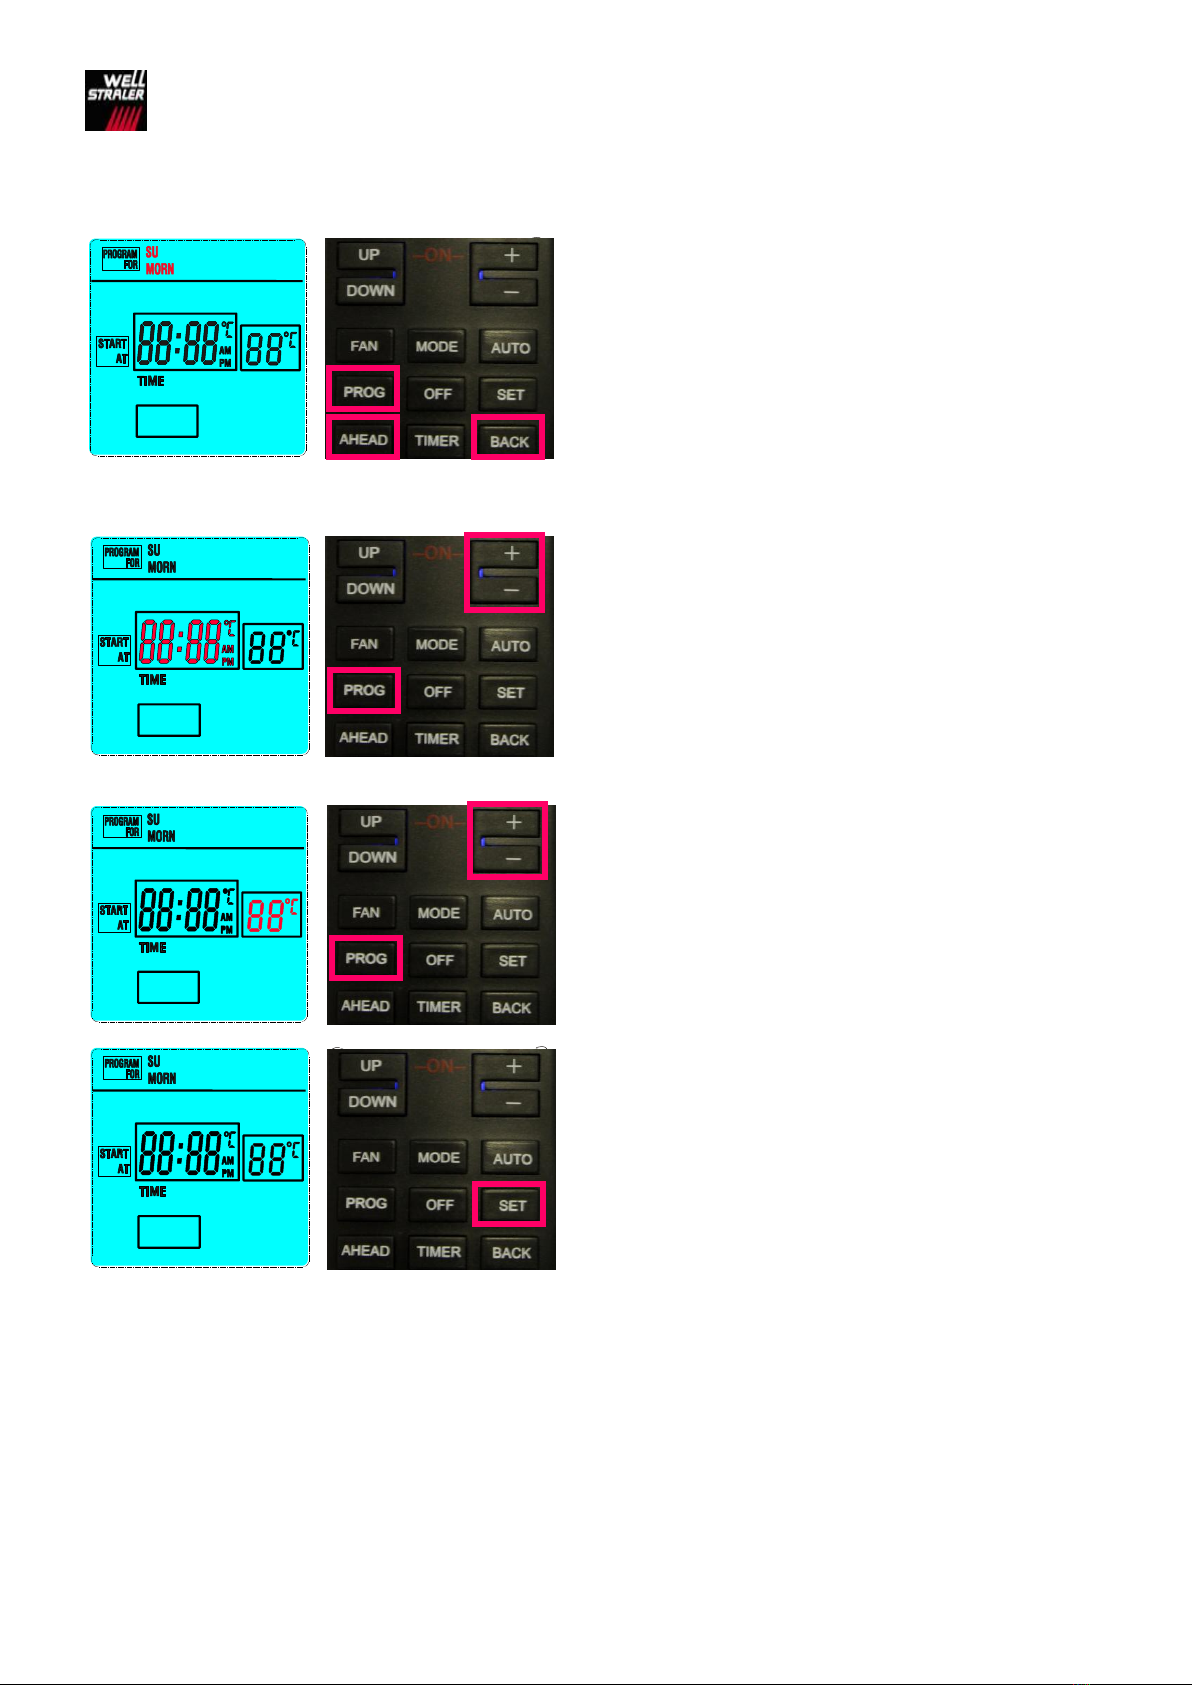
2.4. Program operation of remote control .................................................................................................................... 7
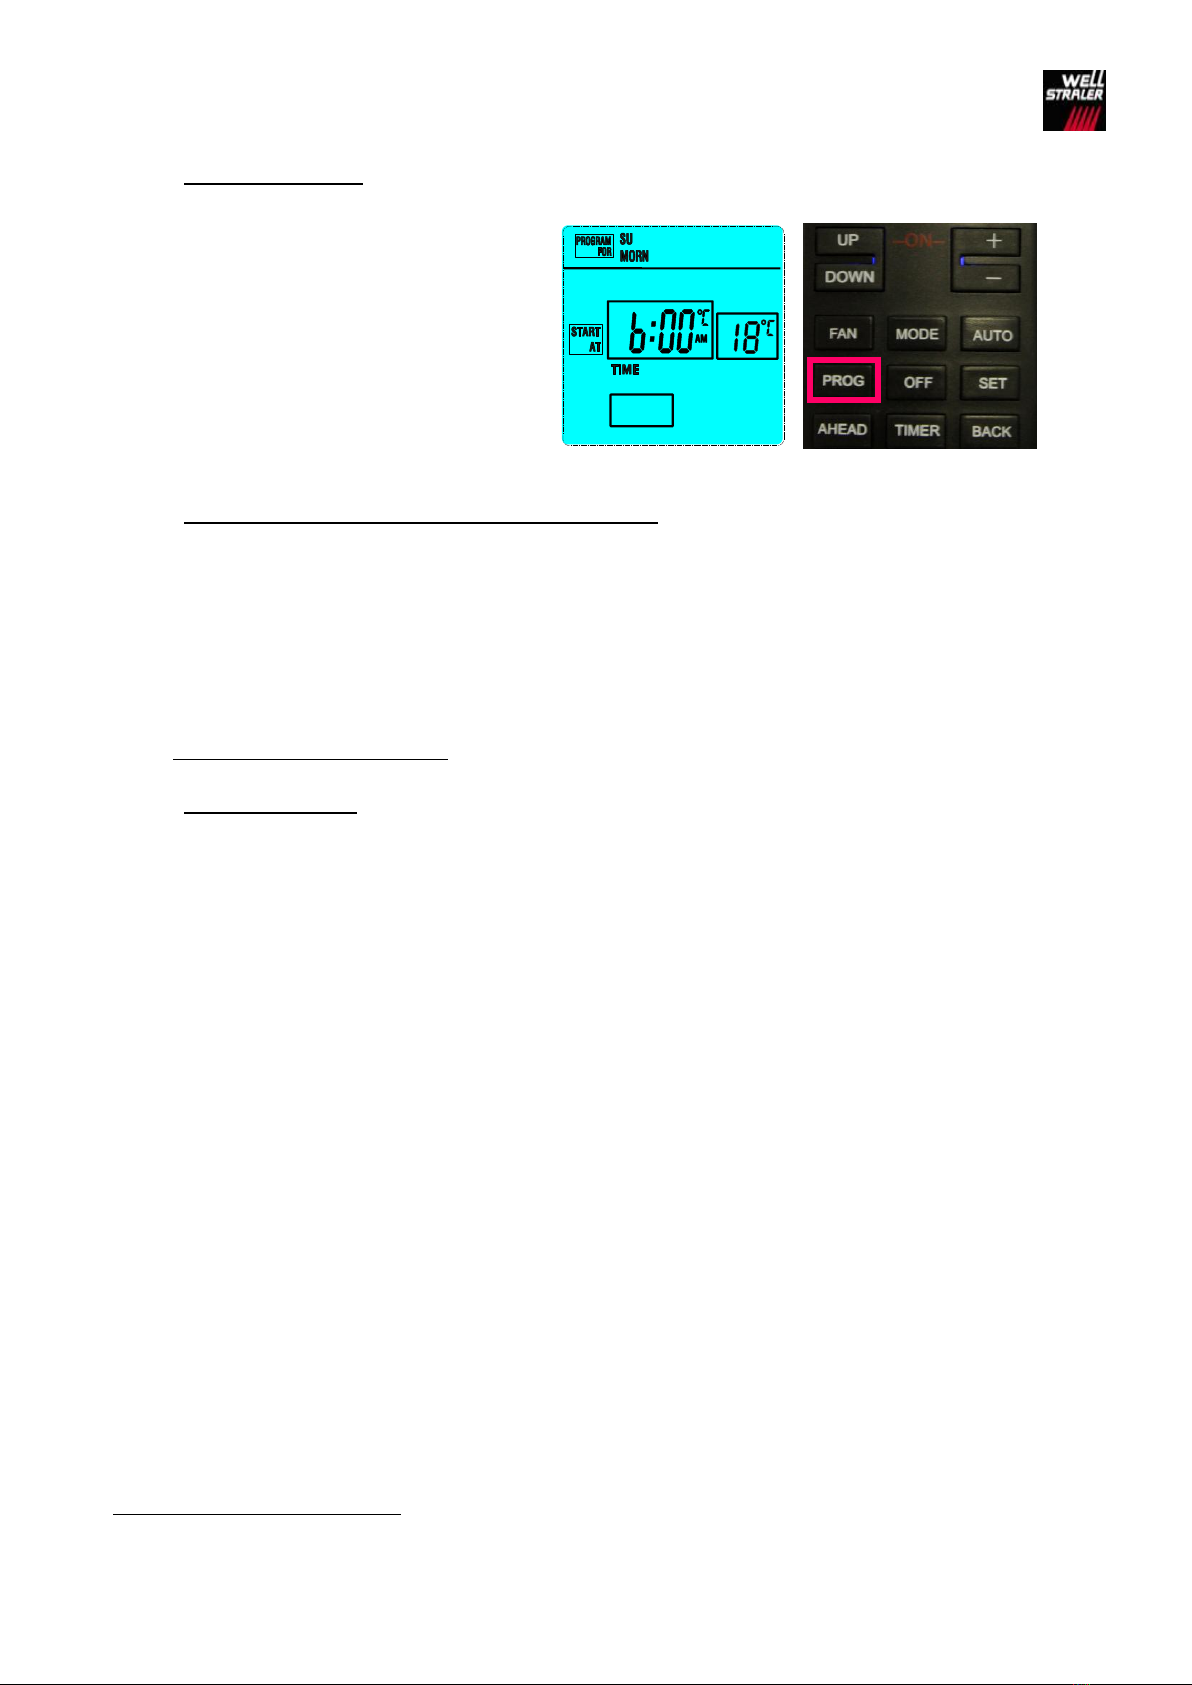
2.4.1. Programming day/period of day/temperature....................................................................................................... 7
2.4.2. Program overview................................................................................................................................................... 9
2.4.3. Program cancellation –return to factory settings.................................................................................................. 9
2.5. Operating your appliance ....................................................................................................................................... 9
2.5.1. Manual (ON/OFF).................................................................................................................................................... 9
2.5.2. Thermo operation (ON/OFF BASED ON SET TEMP SETTING) ............................................................................... 10
2.5.3. Automatic (PROGRAM) ......................................................................................................................................... 10
2.5.4. Adjusting the flame height (FLAME-/+ en AUTO) ................................................................................................. 10
2.5.5. Adjusting FAN speed ............................................................................................................................................. 11
2.5.6. Temperature OVERRIDE (operates only in PROGRAM mode) .............................................................................. 11
2.5.7. Time of day display ............................................................................................................................................... 11
2.5.8. Setting the countdown timer................................................................................................................................ 12
2.5.9. Low battery indicator............................................................................................................................................ 12
2.5.10. Location of the remote control system ................................................................................................................. 12
2.6. Receiver ................................................................................................................................................................ 13
2.6.1. Manual control ..................................................................................................................................................... 13
2.6.2. Matching security codes (LEARN) ......................................................................................................................... 13
2.6.3. Connecting the receiver........................................................................................................................................ 14
2.6.4. Fixation of the sensor of thermostat………………………………………………………………………………………………………….……15
2.7. Problem solver ……………………………………………………………………………………………………………………………………………….15
2.8. Reset by failure………………………………………………………………………………………………………………………………………………..16
2.9. Informations about keys….. ............................................................................................................................ .. .156
.

3
1. Introduction
1.1. Welcome
Thank you for buying your Well Straler gas heater! We are glad to have you as a customer. With this quality product
you will enjoy the cozy warmth and unique flame dance for many years.
Before using the heater, please read the instructions carefully and keep them in a safe place.
Installation must be carried out by a suitably qualified gas technician in accordance with the gas safety regulations
that are currently in effect. Make sure that you get informed by your technician about how to use, operate and
maintain your appliance. Every appliance has been tested, carefully adjusted and sealed in the factory in accordance
with I2+ or I3P category. The warranty will only be valid if the service has been completed by a competent person
(according the gas safety regulations in force). Failure to install the fire correctly could lead to prosecution.
The appliance is covered with a heat-resistant surface coating. During the first few hours of use, it is absolutely
normal that a harmless temporary odor is produced. This disappears after a short period. We advise you to let the
appliance work for a few hours in a well ventilated room.
1.2. Warranty
This product has a 2 year warranty counting from the date of installation, and this for manufacturing defects only.
The warranty is limited to a simple exchange of parts that are recognized as defective by our technical department
and not giving cause by any means to further liability. Shipping costs and labor are not part of the warranty and
have to be paid by the user. Warranty will be invalidated if the appliance has been poorly maintained, used in a
wrong way, has been damaged in an accident or catastrophe of which the origin has no connection with the
appliance itself, or if service has been done by an unauthorized person. Delicate parts in contact with fire like glass
etc. are not covered by warranty. Complaints are only accepted when made through a recognized dealer.
1.3. Security
1.3.1. Built-in safeties in the control system
The system operates on radio frequency signals that are sent by the transmitter (remote) to the receiver in the
appliance. We recommend that the transmitter always be located within the operating range (± 6 m) of the
receiver. Install the remote in vertical position (use the delivered holder) in order to get better communication.
To avoid unpleasant situations, the system has several built-in safety measures that alert the user when action is
needed.
1.3.2. Communication safety –transmitter/receiver
The transmitter has a communication safety function built into its software. It provides an extra margin of safety
when the appliance is in the THERMO or PROGRAM mode.
The communication safety is activated when the transmitter is moved beyond the maximum recommended
operating area, which is ± 6 m. It is also activated when batteries become weak or are removed from the
transmitter. The communication safety operates in the following manner (only in THERMO or PROGRAM mode):
The room temperature is measured every 2 minutes by the transmitter and compared to the SET temperature. In
the same time, the transmitter sends an RF signal to the receiver, signaling that the transmitter is still in the
operating area. Should the receiver NOT receive a transmitter signal within the 5 minutes, it means that the receiver
is out of reach and no more able to transmit orders. The red led of the receiver will start blinking (0.5 second on, 0,5
second off) and the system will switch to the temperature sensor of the receiver. The fire will continue working in
the operating mode in which he stood for the disappearance of the RF-signal.
Besides, the symbol of antenna will slowly blink on the display of the transmitter. When the receiver will come
again within reach, the fault led will extinguish, the symbol of antenna will disappear and the temperature will be
controlled again by the transmitter

4
1.3.3. Safety for temperature sensor of transmitter
By defect of the temperature sensor of the transmitter, the red led will also start blinking (0.5 second on, 0,5
second off) and the system will switch to the temperature sensor of the receiver. All other functions of the
transmitter will continue to function normally.
1.3.4. Safety for temperature sensor of the receiver
By defect of the temperature sensor of the receiver, the red led will also start blinking (short on, long off). As
long as the transmitter stays in the operating area of the receiver, the fire will work normally because the
temperature will be controlled by the sensor in the transmitter.
If the signal from the transmitter is lost, the receiver does not get more accurate information and will go into
failure: the fire will extinguish and the red led will glow constantly. When the transmitter will come again
within reach, the receiver has first to be reset before activating the fire. For this purpose, press on OFF on the
transmitter or on RESET on the receiver. During this operation, the receiver will peep several times in quick
succession.
1.3.5. Thermo-safety –receiver
The system has a thermo-safety feature that is built into the receiver. This feature is temperature-activated
and it provides an extra margin of safety in case the receiver should be placed where ambient temperatures
exceed 65°C. At 65°C the thermostat will automatically shut down the fireplace and the receiver will begin
emitting a series of 4 beeps every 2 seconds. When the ambient temperature near the receiver drops under
50°C, you can reactivate the appliance.. The system resets itself.
1.3.6. Child Protection (CP)
The system includes a child-proof ‘lock-out’ feature that allows the user to ”lock-out’operation of the
appliance from the transmitter.
REMARK: It only prevents the manual operation of the transmitter. The appliance will continue working
normally in the operating mode that was selected before activation of the CP “lock-out”.. To totally”lock-out”
the operation of the transmitter’soperating signals, the transmitter’s mode must be set to OFF before
activation of CP..
OFF
MODE
RETURN
ON
RESET
FLAME+FLAME-
REVIEW
BACKTIMER
AHEAD
AUTOMODE
FAN
OFF
MODE
RETURN
ON
RESET
FLAME+FLAME-
REVIEW
BACKTIMER
AHEAD
AUTOMODE
FAN
OFF
MODE
RETURN
ON
RESET
FLAME+FLAME-
REVIEW
BACKTIMER
AHEAD
AUTOMODE
FAN
-
OFF
MODE
RETURN
ON
RESET
FLAME+FLAME-
REVIEW
BACKTIMER
AHEAD
AUTOMODE
FAN
-
+
OFF
MODE
RETURN
ON
RESET
FLAME+FLAME-
REVIEW
BACKTIMER
AHEAD
AUTOMODE
FAN
-
+
+
OFF
MODE
RETURN
ON
RESET
FLAME+FLAME-
REVIEW
BACKTIMER
AHEAD
AUTOMODE
FAN
-
+
-
OFF
MODE
RETURN
ON
RESET
FLAME+FLAME-
REVIEW
BACKTIMER
AHEAD
AUTOMODE
FAN
+
-
OFF
MODE
RETURN
ON
RESET
FLAME+FLAME-
REVIEW
BACKTIMER
AHEAD
AUTOMODE
FAN
+
-
OFF
MODE
RETURN
ON
RESET
FLAME+FLAME-
REVIEW
BACKTIMER
AHEAD
AUTOMODE
FAN
+
-
OFF
MODE
RETURN
ON
RESET
FLAME+FLAME-
REVIEW
BACKTIMER
AHEAD
AUTOMODE
FAN
+
OFF
MODE
RETURN
ON
RESET
FLAME+FLAME-
REVIEW
BACKTIMER
AHEAD
AUTOMODE
FAN
-
+
1. To activate the ”LOCK-OUT‘, press and hold
the TIMER and FAN buttons together for
5 seconds. The letters CP will appear in the
TEMP frame on the LCD-screen.
2. To disengage the ”LOCK OUT,‘ again press and
hold the TIMER and FAN buttons together for
at least 5 seconds.
1.4. Appliances with ventilator
To prevent cold air to flow out of the cooled-down appliance, the ventilator begins working after the appliance
has warmed up (± 7 minutes warming up at the maximum rate). After extinction of the burner the ventilator
keeps working for ± 25 minutes, in order to use the residual warmth.

5
2. Commands of your appliance
Some advantages of the Well Straler new product generation:
Automatic ignition without steady pilot;
Precise digital temperature control in a range of ± 6 m from the heater;
Wireless RF remote control of all the functions of your heater in a range of
± 6m;
Four different operation modes: (ON/OFF –THERMOSTAT –WEEKLY
PROGRAM –COUNTDOWN TIMER);
Full automatic pre-programmed weekly program with 4 independent
temperature ranges each day, seven days a week.
Manual setting of the flame height at the receiver;
Flame height adjustable by the transmitter.
IMPORTANT For the device to work properly, the emitter and receiver must be well tuned to each other (cfr.
LEARN, p.14). If the range is lower than 6 m, the antenna of the receiver (black wire on the side) must be moved.
2.1 Transmitter
The transmitter operates on 2 AAA-size 1,5V batteries. We recommend the use of ALKALINE BATTERIES for
maximum operation performance. Insert batteries into the battery compartment on the back of the transmitter,
positioning the (+) and (-) ends of the batteries as indicated. Once batteries are inserted, the blinking symbol of
antenna or the text “LEARN” will display. If this is not the case please check that batteries are inserted properly
(check polarity).
CAUTION: always use the correct type of batteries, in order to avoid explosion. Remember to preserve our
environment and bring the used batteries to a collection point.
2.2 LCD-screen
1. PROGRAM FOR: Displays when programming days and
periods of day.
2. DAY: Current day of week.(MO, TU, WED, THU, FR, SAT, SUN)
3. PERIOD: Current period of day.
4. MODE:Indicates operation mode of system
ON (Indicates system is on, regardless of the ambient
temperature))
OFF (Indicates system is turned off)
THERMO (Indicates the system will automatically cycle,
depending on the programmed SET temperature)
PROGRAM (Indicates the system is operating with
programmed settings).
5. START AT: Appears while programming the time to turn the
system on.
6. SET: Indicates desired SET room temperature..
7. F°/C°:Temperature, in Fahrenheit or Celsius.
8. TIME/TEMP: Displays current room temperature. In the same
frame, the current time will display in AM or PM. Press TIMER
to display current time.
9. LOW: Battery power is LOW. Replace batteries within two
weeks.
OFF
MODE
RETURN
ON
RESET
FLAME+FLAME-
REVIEW
BACKTIMER
AHEAD
AUTOMODE
FAN
OFF
MODE
RETURN
ON
RESET
FLAME+FLAME-
REVIEW
BACKTIMER
AHEAD
AUTOMODE
FAN
OFF
MODE
RETURN
ON
RESET
FLAME+FLAME-
REVIEW
BACKTIMER
AHEAD
AUTOMODE
FAN
-
OFF
MODE
RETURN
ON
RESET
FLAME+FLAME-
REVIEW
BACKTIMER
AHEAD
AUTOMODE
FAN
-
+
OFF
MODE
RETURN
ON
RESET
FLAME+FLAME-
REVIEW
BACKTIMER
AHEAD
AUTOMODE
FAN
-
+
+
OFF
MODE
RETURN
ON
RESET
FLAME+FLAME-
REVIEW
BACKTIMER
AHEAD
AUTOMODE
FAN
-
+
-
OFF
MODE
RETURN
ON
RESET
FLAME+FLAME-
REVIEW
BACKTIMER
AHEAD
AUTOMODE
FAN
+
-
OFF
MODE
RETURN
ON
RESET
FLAME+FLAME-
REVIEW
BACKTIMER
AHEAD
AUTOMODE
FAN
+
-
OFF
MODE
RETURN
ON
RESET
FLAME+FLAME-
REVIEW
BACKTIMER
AHEAD
AUTOMODE
FAN
+
-
OFF
MODE
RETURN
ON
RESET
FLAME+FLAME-
REVIEW
BACKTIMER
AHEAD
AUTOMODE
FAN
+
OFF
MODE
RETURN
ON
RESET
FLAME+FLAME-
REVIEW
BACKTIMER
AHEAD
AUTOMODE
FAN
-
+
10. TIMER: When displayed, indicates countdown timer in operation.
11. OVERRIDE:Displays when the set temperature is overridden.
12. FLAME:Single or double flame symbol indicates burner is operational in LOW/HI mode.
13. CP: Displays when CHILD PROOF—LOCK OUT“ is engaged. Pressing TIMER and FAN buttons together for more
than 5 seconds, engages or disengages CP.
14. FAN: indicates the FAN is operating in normal speed LOW or HI speed.
15. TRANSMIT: Symbol of antenna lights up shortly whenever a signal is send from the transmitter to the receiver
and blinks slowly when the transmitter doesn’t find connection with the receiver. .

6
2.3. Initial set-up programming of transmitter
Follow the procedure below before first use:
To program settings, remove the battery cover on the back of the trans-
mitter. If you haven’t already installed the 2 AAA batteries, this is the time
to do so
The temperature level, the day of the week and the correct time were
already set up in our factory.
If you want to change these settings, follow instructions underneath.
2.3.1. Changing temperature scale (°C - °F)
OFF
MODE
RETURN
ON
RESET
FLAME+FLAME-
REVIEW
BACKTIMER
AHEAD
AUTOMODE
FAN
OFF
MODE
RETURN
ON
RESET
FLAME+FLAME-
REVIEW
BACKTIMER
AHEAD
AUTOMODE
FAN
OFF
MODE
RETURN
ON
RESET
FLAME+FLAME-
REVIEW
BACKTIMER
AHEAD
AUTOMODE
FAN
-
OFF
MODE
RETURN
ON
RESET
FLAME+FLAME-
REVIEW
BACKTIMER
AHEAD
AUTOMODE
FAN
-
+
OFF
MODE
RETURN
ON
RESET
FLAME+FLAME-
REVIEW
BACKTIMER
AHEAD
AUTOMODE
FAN
-
+
+
OFF
MODE
RETURN
ON
RESET
FLAME+FLAME-
REVIEW
BACKTIMER
AHEAD
AUTOMODE
FAN
-
+
-
OFF
MODE
RETURN
ON
RESET
FLAME+FLAME-
REVIEW
BACKTIMER
AHEAD
AUTOMODE
FAN
+
-
OFF
MODE
RETURN
ON
RESET
FLAME+FLAME-
REVIEW
BACKTIMER
AHEAD
AUTOMODE
FAN
+
-
OFF
MODE
RETURN
ON
RESET
FLAME+FLAME-
REVIEW
BACKTIMER
AHEAD
AUTOMODE
FAN
+
-
OFF
MODE
RETURN
ON
RESET
FLAME+FLAME-
REVIEW
BACKTIMER
AHEAD
AUTOMODE
FAN
+
OFF
MODE
RETURN
ON
RESET
FLAME+FLAME-
REVIEW
BACKTIMER
AHEAD
AUTOMODE
FAN
-
+
1. Press button on back of transmitter ONCE.
°C symbol will begin flashing on the LCD-
screen.
2. To change °C to °F, press the UP or DOWN
button on the front of the transmitter.
3. After setting/confirming the preferred
temperature scale, press SET.
REMARK: If you choose to keep the set
temperature (°C), push SET after step 1.
2.3.2. Setting the current day of the week
OFF
MODE
RETURN
ON
RESET
FLAME+FLAME-
REVIEW
BACKTIMER
AHEAD
AUTOMODE
FAN
OFF
MODE
RETURN
ON
RESET
FLAME+FLAME-
REVIEW
BACKTIMER
AHEAD
AUTOMODE
FAN
OFF
MODE
RETURN
ON
RESET
FLAME+FLAME-
REVIEW
BACKTIMER
AHEAD
AUTOMODE
FAN
-
OFF
MODE
RETURN
ON
RESET
FLAME+FLAME-
REVIEW
BACKTIMER
AHEAD
AUTOMODE
FAN
-
+
OFF
MODE
RETURN
ON
RESET
FLAME+FLAME-
REVIEW
BACKTIMER
AHEAD
AUTOMODE
FAN
-
+
+
OFF
MODE
RETURN
ON
RESET
FLAME+FLAME-
REVIEW
BACKTIMER
AHEAD
AUTOMODE
FAN
-
+
-
OFF
MODE
RETURN
ON
RESET
FLAME+FLAME-
REVIEW
BACKTIMER
AHEAD
AUTOMODE
FAN
+
-
OFF
MODE
RETURN
ON
RESET
FLAME+FLAME-
REVIEW
BACKTIMER
AHEAD
AUTOMODE
FAN
+
-
OFF
MODE
RETURN
ON
RESET
FLAME+FLAME-
REVIEW
BACKTIMER
AHEAD
AUTOMODE
FAN
+
-
OFF
MODE
RETURN
ON
RESET
FLAME+FLAME-
REVIEW
BACKTIMER
AHEAD
AUTOMODE
FAN
+
OFF
MODE
RETURN
ON
RESET
FLAME+FLAME-
REVIEW
BACKTIMER
AHEAD
AUTOMODE
FAN
-
+
4. Following step 3 above, the day of the week
will begin flashing on the LCD-screen.
5. To change to the current day of the week,
press the AHEAD or BACK button.
6. After setting the current day of the week,
press SET to confirm.
REMARK: If you choose to keep the set day,
push SET after step 3.
2.3.3. Setting of the current hour and minutes
OFF
MODE
RETURN
ON
RESET
FLAME+FLAME-
REVIEW
BACKTIMER
AHEAD
AUTOMODE
FAN
OFF
MODE
RETURN
ON
RESET
FLAME+FLAME-
REVIEW
BACKTIMER
AHEAD
AUTOMODE
FAN
OFF
MODE
RETURN
ON
RESET
FLAME+FLAME-
REVIEW
BACKTIMER
AHEAD
AUTOMODE
FAN
-
OFF
MODE
RETURN
ON
RESET
FLAME+FLAME-
REVIEW
BACKTIMER
AHEAD
AUTOMODE
FAN
-
+
OFF
MODE
RETURN
ON
RESET
FLAME+FLAME-
REVIEW
BACKTIMER
AHEAD
AUTOMODE
FAN
-
+
+
OFF
MODE
RETURN
ON
RESET
FLAME+FLAME-
REVIEW
BACKTIMER
AHEAD
AUTOMODE
FAN
-
+
-
OFF
MODE
RETURN
ON
RESET
FLAME+FLAME-
REVIEW
BACKTIMER
AHEAD
AUTOMODE
FAN
+
-
OFF
MODE
RETURN
ON
RESET
FLAME+FLAME-
REVIEW
BACKTIMER
AHEAD
AUTOMODE
FAN
+
-
OFF
MODE
RETURN
ON
RESET
FLAME+FLAME-
REVIEW
BACKTIMER
AHEAD
AUTOMODE
FAN
+
-
OFF
MODE
RETURN
ON
RESET
FLAME+FLAME-
REVIEW
BACKTIMER
AHEAD
AUTOMODE
FAN
+
OFF
MODE
RETURN
ON
RESET
FLAME+FLAME-
REVIEW
BACKTIMER
AHEAD
AUTOMODE
FAN
-
+
7. Following step 6 above, the hour digits will
begin flashing in the TIME frame.
8. To set the current hour, press UP or DOWN
button.
9. After setting the current hour, press SET
and the minute digits will begin flashing.
10. To set the minutes, press UP or DOWN
button..
11. After setting hours and minutes press SET
to confirm your settings.
THE INITIAL SET-UP/PROGRAMMING OF THE TRANSMITTER IS NOW COMPLETE. BE SURE THE SLIDE-ON
BATTERY COVER IS REINSTALLED. THE LCD-SCREEN IS NOW IN ITS NORMAL STATE.

7
2.3.4 Setting SWING
1. Press AHEAD and BACK buttons together. De
actual set SWING (difference in temperature
between on and off mode of thermostat) will
appear in the SET TEMP window, together with
the mention SWING on the display.
2. Press UP/DOWN to change the SWING.
3. Press SET to confirm
2.4 Program operation of remote control
The transmitter has a factory built-in standard program. Each day has been broken into four periods and each
period has its own starting time and temperature. A chart of the built-in programs is pictured below
You may change any of the factory settings by following the procedures below. Should you wish to return to
the factory program, follow the procedure under heading 2.4.3 Program cancellation.
2.4.1. Programming day/period of day/temperature
CUSTOM PROGRAM:
DAY
Morning
Day
Evening
Night
Hour
Temp
Hour
Temp
Hour
Temp
Hour
Temp
SU
MO
TU
WE
TH
FR
SAT
You may change the built-in time and temperature programs to suit your personal schedule (see 2.4. week
programming). Each day is divided into four periods: MORNING, DAY, EVENING and NIGHT. A blank
programming chart is provided above to record your customized time and temperature settings If desired, you
may change a single day or all seven days that have the built-in factory program. To change one or all seven
days, complete the following steps.
NOTE: Before modifying the standard program, be sure that day and hour are correctly set.
DAY
PERIOD
hour / temperature
Every day of the week
MORN
6:00 am
21°C
DAY
8:30 am
16°C
EVE
3:00 pm
21°C
NIGHT
11:00 pm
18°C

8
To make changes in the standard program:
OFF
MODE
RETURN
ON
RESET
FLAME+FLAME-
REVIEW
BACKTIMER
AHEAD
AUTOMODE
FAN
OFF
MODE
RETURN
ON
RESET
FLAME+FLAME-
REVIEW
BACKTIMER
AHEAD
AUTOMODE
FAN
OFF
MODE
RETURN
ON
RESET
FLAME+FLAME-
REVIEW
BACKTIMER
AHEAD
AUTOMODE
FAN
-
OFF
MODE
RETURN
ON
RESET
FLAME+FLAME-
REVIEW
BACKTIMER
AHEAD
AUTOMODE
FAN
-
+
OFF
MODE
RETURN
ON
RESET
FLAME+FLAME-
REVIEW
BACKTIMER
AHEAD
AUTOMODE
FAN
-
+
+
OFF
MODE
RETURN
ON
RESET
FLAME+FLAME-
REVIEW
BACKTIMER
AHEAD
AUTOMODE
FAN
-
+
-
OFF
MODE
RETURN
ON
RESET
FLAME+FLAME-
REVIEW
BACKTIMER
AHEAD
AUTOMODE
FAN
+
-
OFF
MODE
RETURN
ON
RESET
FLAME+FLAME-
REVIEW
BACKTIMER
AHEAD
AUTOMODE
FAN
+
-
OFF
MODE
RETURN
ON
RESET
FLAME+FLAME-
REVIEW
BACKTIMER
AHEAD
AUTOMODE
FAN
+
-
OFF
MODE
RETURN
ON
RESET
FLAME+FLAME-
REVIEW
BACKTIMER
AHEAD
AUTOMODE
FAN
+
OFF
MODE
RETURN
ON
RESET
FLAME+FLAME-
REVIEW
BACKTIMER
AHEAD
AUTOMODE
FAN
-
+
1. Press PROG for 4 sec. The shaded boxes on
the LCD-screen with the words PROGRAM
FOR and START AT will begin to flash. The
current day, period, time and set temperature
of the built-in factory program will also be
displayed.
2. To program the day and period of day, press
AHEAD or BACK to display the DAY and
PERIOD you wish to program.
3. Press PROG to confirm, and TIME will flash on
the LCD-screen.
OFF
MODE
RETURN
ON
RESET
FLAME+FLAME-
REVIEW
BACKTIMER
AHEAD
AUTOMODE
FAN
OFF
MODE
RETURN
ON
RESET
FLAME+FLAME-
REVIEW
BACKTIMER
AHEAD
AUTOMODE
FAN
OFF
MODE
RETURN
ON
RESET
FLAME+FLAME-
REVIEW
BACKTIMER
AHEAD
AUTOMODE
FAN
-
OFF
MODE
RETURN
ON
RESET
FLAME+FLAME-
REVIEW
BACKTIMER
AHEAD
AUTOMODE
FAN
-
+
OFF
MODE
RETURN
ON
RESET
FLAME+FLAME-
REVIEW
BACKTIMER
AHEAD
AUTOMODE
FAN
-
+
+
OFF
MODE
RETURN
ON
RESET
FLAME+FLAME-
REVIEW
BACKTIMER
AHEAD
AUTOMODE
FAN
-
+
-
OFF
MODE
RETURN
ON
RESET
FLAME+FLAME-
REVIEW
BACKTIMER
AHEAD
AUTOMODE
FAN
+
-
OFF
MODE
RETURN
ON
RESET
FLAME+FLAME-
REVIEW
BACKTIMER
AHEAD
AUTOMODE
FAN
+
-
OFF
MODE
RETURN
ON
RESET
FLAME+FLAME-
REVIEW
BACKTIMER
AHEAD
AUTOMODE
FAN
+
-
OFF
MODE
RETURN
ON
RESET
FLAME+FLAME-
REVIEW
BACKTIMER
AHEAD
AUTOMODE
FAN
+
OFF
MODE
RETURN
ON
RESET
FLAME+FLAME-
REVIEW
BACKTIMER
AHEAD
AUTOMODE
FAN
-
+
4. Press + or - to program the start time.
Programmed start time settings are in
15 min.-segments. The new start time will
display on the LCD-screen.
5. Press PROG to confirm: SET TEMP will flash on
the LCD-screen.
OFF
MODE
RETURN
ON
RESET
FLAME+FLAME-
REVIEW
BACKTIMER
AHEAD
AUTOMODE
FAN
OFF
MODE
RETURN
ON
RESET
FLAME+FLAME-
REVIEW
BACKTIMER
AHEAD
AUTOMODE
FAN
OFF
MODE
RETURN
ON
RESET
FLAME+FLAME-
REVIEW
BACKTIMER
AHEAD
AUTOMODE
FAN
-
OFF
MODE
RETURN
ON
RESET
FLAME+FLAME-
REVIEW
BACKTIMER
AHEAD
AUTOMODE
FAN
-
+
OFF
MODE
RETURN
ON
RESET
FLAME+FLAME-
REVIEW
BACKTIMER
AHEAD
AUTOMODE
FAN
-
+
+
OFF
MODE
RETURN
ON
RESET
FLAME+FLAME-
REVIEW
BACKTIMER
AHEAD
AUTOMODE
FAN
-
+
-
OFF
MODE
RETURN
ON
RESET
FLAME+FLAME-
REVIEW
BACKTIMER
AHEAD
AUTOMODE
FAN
+
-
OFF
MODE
RETURN
ON
RESET
FLAME+FLAME-
REVIEW
BACKTIMER
AHEAD
AUTOMODE
FAN
+
-
OFF
MODE
RETURN
ON
RESET
FLAME+FLAME-
REVIEW
BACKTIMER
AHEAD
AUTOMODE
FAN
+
-
OFF
MODE
RETURN
ON
RESET
FLAME+FLAME-
REVIEW
BACKTIMER
AHEAD
AUTOMODE
FAN
+
OFF
MODE
RETURN
ON
RESET
FLAME+FLAME-
REVIEW
BACKTIMER
AHEAD
AUTOMODE
FAN
-
+
6. Press + or - to program the SET temperature.
7. When the desired SET TEMP displays, press
PROG to confirm.
8. After pressing the PROG button in step 7, the
next period of the same day or next day will
display on the LCD-screen.
OFF
MODE
RETURN
ON
RESET
FLAME+FLAME-
REVIEW
BACKTIMER
AHEAD
AUTOMODE
FAN
OFF
MODE
RETURN
ON
RESET
FLAME+FLAME-
REVIEW
BACKTIMER
AHEAD
AUTOMODE
FAN
OFF
MODE
RETURN
ON
RESET
FLAME+FLAME-
REVIEW
BACKTIMER
AHEAD
AUTOMODE
FAN
-
OFF
MODE
RETURN
ON
RESET
FLAME+FLAME-
REVIEW
BACKTIMER
AHEAD
AUTOMODE
FAN
-
+
OFF
MODE
RETURN
ON
RESET
FLAME+FLAME-
REVIEW
BACKTIMER
AHEAD
AUTOMODE
FAN
-
+
+
OFF
MODE
RETURN
ON
RESET
FLAME+FLAME-
REVIEW
BACKTIMER
AHEAD
AUTOMODE
FAN
-
+
-
OFF
MODE
RETURN
ON
RESET
FLAME+FLAME-
REVIEW
BACKTIMER
AHEAD
AUTOMODE
FAN
+
-
OFF
MODE
RETURN
ON
RESET
FLAME+FLAME-
REVIEW
BACKTIMER
AHEAD
AUTOMODE
FAN
+
-
OFF
MODE
RETURN
ON
RESET
FLAME+FLAME-
REVIEW
BACKTIMER
AHEAD
AUTOMODE
FAN
+
-
OFF
MODE
RETURN
ON
RESET
FLAME+FLAME-
REVIEW
BACKTIMER
AHEAD
AUTOMODE
FAN
+
OFF
MODE
RETURN
ON
RESET
FLAME+FLAME-
REVIEW
BACKTIMER
AHEAD
AUTOMODE
FAN
-
+
9. To program the next period, follow steps 3, 4,
5, 6 and 7.
10. Continue to follow steps 3, 4, 5, 6 and 7 until
all 7 days and the 4 time periods in each day
are programmed.
11. Once all the programming has been
completed, press SET. The programming data
that has been entered will now over-ride the
factory built-in program and operate your
remote control system.
NOTE: Once you are in the programming process and you want to advance the programming procedure, you
may bypass some of the DAYS or PERIODS OF DAY, by pushing the AHEAD or BACK buttons. This allows you to
eliminate the need to enter the TIME and TEMP for each DAY/PERIOD, speeding up the programming process
by skipping some of the ‘software prompts‘. Once the DAY/PERIOD you want to reprogram is displayed by the
LCD-screen, press PROG and follow the programming steps outlined above.

9
2.4.2. Program overview
If you want to review the settings for either the
factory program and/or your customized
program, you may do so by (in OFF-mode)
pressing the PROG button for 1 second. By
pushing this button repeatedly you can review
the complete program.
Press SET to return to the normal mode.
If you press the PROG button for 4 seconds then
you enter the programming process.
Press the SET button to cancel this.
OFF
MODE
RETURN
ON
RESET
FLAME+FLAME-
REVIEW
BACKTIMER
AHEAD
AUTOMODE
FAN
OFF
MODE
RETURN
ON
RESET
FLAME+FLAME-
REVIEW
BACKTIMER
AHEAD
AUTOMODE
FAN
OFF
MODE
RETURN
ON
RESET
FLAME+FLAME-
REVIEW
BACKTIMER
AHEAD
AUTOMODE
FAN
-
OFF
MODE
RETURN
ON
RESET
FLAME+FLAME-
REVIEW
BACKTIMER
AHEAD
AUTOMODE
FAN
-
+
OFF
MODE
RETURN
ON
RESET
FLAME+FLAME-
REVIEW
BACKTIMER
AHEAD
AUTOMODE
FAN
-
+
+
OFF
MODE
RETURN
ON
RESET
FLAME+FLAME-
REVIEW
BACKTIMER
AHEAD
AUTOMODE
FAN
-
+
-
OFF
MODE
RETURN
ON
RESET
FLAME+FLAME-
REVIEW
BACKTIMER
AHEAD
AUTOMODE
FAN
+
-
OFF
MODE
RETURN
ON
RESET
FLAME+FLAME-
REVIEW
BACKTIMER
AHEAD
AUTOMODE
FAN
+
-
OFF
MODE
RETURN
ON
RESET
FLAME+FLAME-
REVIEW
BACKTIMER
AHEAD
AUTOMODE
FAN
+
-
OFF
MODE
RETURN
ON
RESET
FLAME+FLAME-
REVIEW
BACKTIMER
AHEAD
AUTOMODE
FAN
+
OFF
MODE
RETURN
ON
RESET
FLAME+FLAME-
REVIEW
BACKTIMER
AHEAD
AUTOMODE
FAN
-
+
2.4.3. Program cancellation –return to factory settings
To cancel the customized program that you have entered and to return to the factory settings:
In OFF-mode, press and hold PROG and SET for a long period. The customized program will be cancelled when P
appears on the display. You will also hear a peep at the same time. Press SET to return the LCD-screen to normal
state.
2.5 Operating your appliance
2.5.1. Manual (ON/OFF)
Push the UP-and +buttons simultaneously until the LCD-screen displays ON. Together with ON the LCD-screen will
display FLAME and 1 flame symbols.
At this point the spark electrode will begin sparking to ignite the pilot for a period of maximum 60 seconds. As soon
as a flame is detected the sparking will stop, and after a few seconds the main burner will ignite. The flame height at
this stage will be LO. The appliance will burn as long as it is not turned off manually, regardless of the room
temperature.
REMARK: In case of a new installation, it is possible that the pilot does not ignite after 60 seconds, due to air in the
gas pipes. In this case the appliance will shut down and turn to secure mode (red alert LED is lit). Before you can use
the appliance again it has to be reset. To reset the appliance press OFF on the transmitter, or RESET on the receiver.
To re-ignite: press the UP-and + buttons until the LCD-screen displays ON. Repeat this procedure until there is no
more air in the gas pipes, and the pilot ignites.
Once the pilot is on and the main burner is burning low, it is possible to change the flame height and the speed of
the fan with the FLAME-/+ and FANtoggle keys:
Flame height (gradually adjustable): push UP/DOWN
Speed of the ventilator: push FAN (LO- -HI)
To switch off the device, push OFF (OFF appears). The pilot as well as the main burner will be quenched.
After this, the fan will still turn for about 25 minutes, until the remaining heat is fully utilized.
*only for devices equipped with a fan

10
2.5.2. Thermo operation (ON/OFF BASED ON SET TEMP SETTING)
The system can control your appliance thermostatically when operating in THERMO mode.
OFF
MODE
RETURN
ON
RESET
FLAME+FLAME-
REVIEW
BACKTIMER
AHEAD
AUTOMODE
FAN
OFF
MODE
RETURN
ON
RESET
FLAME+FLAME-
REVIEW
BACKTIMER
AHEAD
AUTOMODE
FAN
OFF
MODE
RETURN
ON
RESET
FLAME+FLAME-
REVIEW
BACKTIMER
AHEAD
AUTOMODE
FAN
OFF
MODE
RETURN
ON
RESET
FLAME+FLAME-
REVIEW
BACKTIMER
AHEAD
AUTOMODE
FAN
-
+
OFF
MODE
RETURN
ON
RESET
FLAME+FLAME-
REVIEW
BACKTIMER
AHEAD
AUTOMODE
FAN
OFF
MODE
RETURN
ON
RESET
FLAME+FLAME-
REVIEW
BACKTIMER
AHEAD
AUTOMODE
FAN
OFF
MODE
RETURN
ON
RESET
FLAME+FLAME-
REVIEW
BACKTIMER
AHEAD
AUTOMODE
FAN
-
+
NOTE: To prevent repeated thermo-cycling of the gas
appliance, changes in temperature are only recorded every
2 minutes.
1. Starting in OFF mode, press MODE until the
LCD-screen displays THERMO.
2. Press +/- to set the desired room temperature.
The highest SET temperature is 32°C (99°F), the
lowest SET temperature is 6°C (45°F). The
transmitter will measure the room
temperature every 2 minutes, automatically
turning the appliance ON or OFF
thermostatically, according to the SET
temperature. The flame height can be set by
pressing on UP & DOWN buttons..
3. Press FAN (only for appliances equipped with a
fan) to modify the ventilator speed (see
chapter 2.5.5. Changing FAN speed). Unless
you change the operating mode, the fan will
keep functioning at this speed.
2.5.3. Automatic (PROGRAM)
In OFF mode, press MODE for 3 seconds until OFF
THERMO is displayed on the LCD-screen. Push MODE
again (ON or OFF PROGRAM). The following is displayed
on the LCD-screen:
Current period of the day (MORN/DAY/EVE/NITE),
depending on the set program;
ON/OFF to mark if the appliance is turned on or not;
Room temperature (TEMP).
Desired set temperature for this period (SET);
FAN LOW/MED/HI indicates the fan speed.
The appliance will operate automatically depending on
the pre-programmed weekly program and changes in
temperature.
OFF
MODE
RETURN
ON
RESET
FLAME+FLAME-
REVIEW
BACKTIMER
AHEAD
AUTOMODE
FAN
OFF
MODE
RETURN
ON
RESET
FLAME+FLAME-
REVIEW
BACKTIMER
AHEAD
AUTOMODE
FAN
OFF
MODE
RETURN
ON
RESET
FLAME+FLAME-
REVIEW
BACKTIMER
AHEAD
AUTOMODE
FAN
OFF
MODE
RETURN
ON
RESET
FLAME+FLAME-
REVIEW
BACKTIMER
AHEAD
AUTOMODE
FAN
-
+
OFF
MODE
RETURN
ON
RESET
FLAME+FLAME-
REVIEW
BACKTIMER
AHEAD
AUTOMODE
FAN
OFF
MODE
RETURN
ON
RESET
FLAME+FLAME-
REVIEW
BACKTIMER
AHEAD
AUTOMODE
FAN
OFF
MODE
RETURN
ON
RESET
FLAME+FLAME-
REVIEW
BACKTIMER
AHEAD
AUTOMODE
FAN
-
+
2.5.4. Adjusting the flame height (UP/DOWN en AUTO)
This setting is possible in the ON-mode.
To adjust the flame height of the main burner:
push UP to increase the flame height
push DOWN to decrease the flame height.
OFF
MODE
RETURN
ON
RESET
FLAME+FLAME-
REVIEW
BACKTIMER
AHEAD
AUTOMODE
FAN
OFF
MODE
RETURN
ON
RESET
FLAME+FLAME-
REVIEW
BACKTIMER
AHEAD
AUTOMODE
FAN
OFF
MODE
RETURN
ON
RESET
FLAME+FLAME-
REVIEW
BACKTIMER
AHEAD
AUTOMODE
FAN
OFF
MODE
RETURN
ON
RESET
FLAME+FLAME-
REVIEW
BACKTIMER
AHEAD
AUTOMODE
FAN
-
+
OFF
MODE
RETURN
ON
RESET
FLAME+FLAME-
REVIEW
BACKTIMER
AHEAD
AUTOMODE
FAN
OFF
MODE
RETURN
ON
RESET
FLAME+FLAME-
REVIEW
BACKTIMER
AHEAD
AUTOMODE
FAN
OFF
MODE
RETURN
ON
RESET
FLAME+FLAME-
REVIEW
BACKTIMER
AHEAD
AUTOMODE
FAN
-
+

11
2.5.5. Adjusting FAN speed*
The speed of the FAN can be adjusted only in the following modes: ON - THERMO –PROGRAM.
OFF
MODE
RETURN
ON
RESET
FLAME+FLAME-
REVIEW
BACKTIMER
AHEAD
AUTOMODE
FAN
OFF
MODE
RETURN
ON
RESET
FLAME+FLAME-
REVIEW
BACKTIMER
AHEAD
AUTOMODE
FAN
OFF
MODE
RETURN
ON
RESET
FLAME+FLAME-
REVIEW
BACKTIMER
AHEAD
AUTOMODE
FAN
OFF
MODE
RETURN
ON
RESET
FLAME+FLAME-
REVIEW
BACKTIMER
AHEAD
AUTOMODE
FAN
-
+
OFF
MODE
RETURN
ON
RESET
FLAME+FLAME-
REVIEW
BACKTIMER
AHEAD
AUTOMODE
FAN
OFF
MODE
RETURN
ON
RESET
FLAME+FLAME-
REVIEW
BACKTIMER
AHEAD
AUTOMODE
FAN
OFF
MODE
RETURN
ON
RESET
FLAME+FLAME-
REVIEW
BACKTIMER
AHEAD
AUTOMODE
FAN
-
+
Press FAN to change the FAN speed. FAN
LOW or FAN HI will be displayed on LCD-
screen. to MED or HI.
This symbol is only displayed when the fan is
effectively blowing:
The transmitter always remembers the last setting of the FAN speed, and this for the entire mode of operation
(ON - THERMO and PROGRAM mode). Only when you change manually the setting, the speed of the fan will
change and this for all the period of this operation.
*Remark: Only for appliances equipped with a fan.
2.5.6. Temperature OVERRIDE (operates only in PROGRAM mode)
You can change the current SET temperature without changing the programs stored in the transmitter‘s
memory. The OVERRIDE feature will be automatically cancelled at the start of the next PROGRAM PERIOD.
OFF
MODE
RETURN
ON
RESET
FLAME+FLAME-
REVIEW
BACKTIMER
AHEAD
AUTOMODE
FAN
OFF
MODE
RETURN
ON
RESET
FLAME+FLAME-
REVIEW
BACKTIMER
AHEAD
AUTOMODE
FAN
OFF
MODE
RETURN
ON
RESET
FLAME+FLAME-
REVIEW
BACKTIMER
AHEAD
AUTOMODE
FAN
OFF
MODE
RETURN
ON
RESET
FLAME+FLAME-
REVIEW
BACKTIMER
AHEAD
AUTOMODE
FAN
-
+
OFF
MODE
RETURN
ON
RESET
FLAME+FLAME-
REVIEW
BACKTIMER
AHEAD
AUTOMODE
FAN
OFF
MODE
RETURN
ON
RESET
FLAME+FLAME-
REVIEW
BACKTIMER
AHEAD
AUTOMODE
FAN
OFF
MODE
RETURN
ON
RESET
FLAME+FLAME-
REVIEW
BACKTIMER
AHEAD
AUTOMODE
FAN
-
+
1. Press +/- to change the SET temperature.
Setting will be cancelled automatically
when next program period begins). The
word OVERRIDE will appear over the SET
frame on the LCD-screen.
2. This modification will automatically
disappear as soon as you enter a new
period (MORN/DAY/EVE/NIGHT)
2.5.7. Time of day display
OFF
MODE
RETURN
ON
RESET
FLAME+FLAME-
REVIEW
BACKTIMER
AHEAD
AUTOMODE
FAN
OFF
MODE
RETURN
ON
RESET
FLAME+FLAME-
REVIEW
BACKTIMER
AHEAD
AUTOMODE
FAN
OFF
MODE
RETURN
ON
RESET
FLAME+FLAME-
REVIEW
BACKTIMER
AHEAD
AUTOMODE
FAN
OFF
MODE
RETURN
ON
RESET
FLAME+FLAME-
REVIEW
BACKTIMER
AHEAD
AUTOMODE
FAN
-
+
OFF
MODE
RETURN
ON
RESET
FLAME+FLAME-
REVIEW
BACKTIMER
AHEAD
AUTOMODE
FAN
OFF
MODE
RETURN
ON
RESET
FLAME+FLAME-
REVIEW
BACKTIMER
AHEAD
AUTOMODE
FAN
OFF
MODE
RETURN
ON
RESET
FLAME+FLAME-
REVIEW
BACKTIMER
AHEAD
AUTOMODE
FAN
-
+
1. To check the current TIME of day, press
TIMER on the transmitter for less than
1 second. The current TIME of day will
appear in the TIME/TEMP frame
replacing the temperature reading.
2. The temperature will reappear
automatically in 15 seconds, or you can
press SET to cancel the display of TIME
immediately.

12
2.5.8. Setting the countdown timer
This system can operate with a built-in COUNTDOWN timer when the transmitter is in the ON or THERMO mode
(THERMO or ON must be displayed on the LCD-screen).
When the set time period has elapsed, the device will automatically switch off.
OFF
MODE
RETURN
ON
RESET
FLAME+FLAME-
REVIEW
BACKTIMER
AHEAD
AUTOMODE
FAN
OFF
MODE
RETURN
ON
RESET
FLAME+FLAME-
REVIEW
BACKTIMER
AHEAD
AUTOMODE
FAN
OFF
MODE
RETURN
ON
RESET
FLAME+FLAME-
REVIEW
BACKTIMER
AHEAD
AUTOMODE
FAN
OFF
MODE
RETURN
ON
RESET
FLAME+FLAME-
REVIEW
BACKTIMER
AHEAD
AUTOMODE
FAN
-
+
OFF
MODE
RETURN
ON
RESET
FLAME+FLAME-
REVIEW
BACKTIMER
AHEAD
AUTOMODE
FAN
OFF
MODE
RETURN
ON
RESET
FLAME+FLAME-
REVIEW
BACKTIMER
AHEAD
AUTOMODE
FAN
OFF
MODE
RETURN
ON
RESET
FLAME+FLAME-
REVIEW
BACKTIMER
AHEAD
AUTOMODE
FAN
-
+
1. Press TIMER on the transmitter during 2 to 3
seconds. The word TIMER and 0:15 flash on
the LCD-screen.
2. Press +/- to begin advancing through each of
the countdown time options. Available
countdown times are 15 min. / 30 min. /
45 min./… up to 9hrs.
3. To set the TIMER press SET.
4. If the system is ON, it will remain on until the
timer time has expired.
5. If the system is in the THERMO mode, it will
cycle ON and OFF as the room temperature
requires.
6. To cancel the TIMER function, press the
TIMER button for at least 5 seconds (until the
timer time disappears).
2.5.9. Low battery indicator
OFF
MODE
RETURN
ON
RESET
FLAME+FLAME-
REVIEW
BACKTIMER
AHEAD
AUTOMODE
FAN
OFF
MODE
RETURN
ON
RESET
FLAME+FLAME-
REVIEW
BACKTIMER
AHEAD
AUTOMODE
FAN
OFF
MODE
RETURN
ON
RESET
FLAME+FLAME-
REVIEW
BACKTIMER
AHEAD
AUTOMODE
FAN
OFF
MODE
RETURN
ON
RESET
FLAME+FLAME-
REVIEW
BACKTIMER
AHEAD
AUTOMODE
FAN
-
+
OFF
MODE
RETURN
ON
RESET
FLAME+FLAME-
REVIEW
BACKTIMER
AHEAD
AUTOMODE
FAN
OFF
MODE
RETURN
ON
RESET
FLAME+FLAME-
REVIEW
BACKTIMER
AHEAD
AUTOMODE
FAN
OFF
MODE
RETURN
ON
RESET
FLAME+FLAME-
REVIEW
BACKTIMER
AHEAD
AUTOMODE
FAN
-
+
The word LOW outlined by the shape of a battery on the left side of the LCD-
screen will appear when the batteries need to be replaced. At this time,
approximately two weeks of battery power remains until the transmitter
experiences partial or complete loss of functions. The batteries should be
replaced as soon as possible.
(REMARK: Wrong positioning of the batteries will also result in the apparition of
LOW on the screen.)
Here’s how to replace the batteries:
1. Push the OFF-button until OFF appears on the screen;
2. Wait for 2 minutes (the system closes the current operational mode completely);
3. Remove the batteries one by one;
4. Place new batteries, minding their polarity.
Replacing the batteries in an operational mode (ON –THERMO –PROGRAM) can damage the microprocessor!
2.5.10.Location of the remote control system
Seen the transmitter is also the thermostat of your appliance, it is preferable to locate the bracket on an inside wall,
sufficiently far away from direct sources of heat such as a fireplace, incandescent lighting or sunlight, in order for it
to detect actual ambient room temperatures, and not a single heat source. Before fixing the bracket to the wall,
check if the transmitter is not outside the operating range of the receiver! Normal operating range is ± 6 m, but can
vary.
The system operates on RF-signals. The place of the antenna (black thread on the side of the receiver) determines
the operating range of the system. In order to get the system to function as good as it may, the antenna must be
free in the appliance and the transmitter must be placed vertically.
Be careful: Transmitter and receiver must be placed at at least 1 meter from electromagnetic fields (such as
TV, radio, PC, microwave oven,…). Repeated exposure to magnetic fields reduces the operating capacity of
the appliances.

13
2.6 Receiver
The receiver is built-in in your appliance and has a 3-position slide button:
LEFT: REMOTE (the system only operates if the receiver receives commands from the transmitter)
MIDDLE: ON (the system works manually)
RIGHT: OFF (the system is OFF)
We advise you to put the slide switch in the OFF position if you will be away from your home for an extended
period of time or during summer. This will enhance the lifespan of the controls!
There’s 4 additional buttons:
LEARN: (see 2.6.2)
FLAME- & FLAME+: manual control of the flame height (see 2.6.1.)
RESET: (see 2.5.1 and 2.6.1)
2.6.1. Manual control
In case the transmitter shouldn’t function, you can control your heater manually. Place the slide button on the
receiver in the ON-position, and next push the FLAME-DOWN and FLAME-UP buttons simultaneously during 3
seconds to ignite the heater. With these same buttons you can control the flame height manually (FLAME UP= big
flame, FLAME DOWN=small flame).
To switch of the heater again, push the RESET button
2.6.2. Matching security codes (LEARN)
Each transmitter can use one of the 1.048.576 security codes. .
When matching security codes, be sure the slide button on the RECEIVER is in the REMOTE position and also make
sure the transmitter is switched OFF.. The code will not LEARN if the slide switch is in the ON or OFF position..
Program the remote RECEIVER to LEARN a new security code by pushing in the LEARN-button on the RECEIVER for
3 seconds, until you hear a beep. Then, within 10 seconds, press UP and DOWN simultaneously on the
TRANSMITTER. The TRANSMITTER will automatically be switched ON, and the RECEIVER will emit a series of 4 rapid
beeps indicating the transmitter‘s code has been programmed into the receiver.

14
2.6.3. Connecting the receiver
EXTREMELY IMPORTANT: MAKE SURE THE WIRES ARE CONNECTED IN THE RIGHT WAY!!
Fan
24V connection
High/low On/Off

15
2.6.4 Fixation of sensor of thermostat
The receiver is equipped with an extra thermostatic sensor that will be activated if the signal of the
transmitter disappears. This sensor is self adhesive and can be stuck on any smooth surface. Take care that
the sensor is installed where normal air convection is possible. The installer has to find the best location.
The antenna of the receiver may not touch the ignition cable (min. 2 cm).
2.7. Problem solver
PROBLEM
CAUSE
Only symbol of antenna
blinking slowly or LEARN
visible on LCD after
insertion of the batteries
The receiver is not tuned to the
transmitter
Execute “LEARN” procedure (see 2.6.2)
The appliance does not
react on transmitter
The receiver is in ‘OFF’ position
Place the receiver button in ‘REMOTE’
position
The receiver is not tuned to the
transmitter
Execute “LEARN” procedure (see 2.6.2)
The receiver is out the operating
area of the transmitter.
Move the antenna to a free space (the
outside of the appliance is the maximum
range area) so that the operating range is
wider
Thermostatic sensor
Antenna

16
PROBLEM
CAUSE
SOLUTION
A red led is blinking on the
receiver (0,5 sec. On/0,5
sec. Off)
The temperature sensor in the
transmitter is out of service.
Replace transmitter
A red led is blinking on the
receiver (0,5 sec. On/0,5
sec. Off) and the symbol of
antenna is blinking slowly
on the LCD-screen.
The transmitter is positioned out
of the reception range of the
receiver (temperature sensor of
the receiver will temporarily take
over).
The fire will continue to work. Blinking
will stop when transmitter will be
positioned again in the range of the
receiver
The red led on the receiver
flashes briefly and long
out.
The thermostatic sensor in the
receiver is out of service.
Replace the temperature sensor
The red led on the receiver
is glowing continuously.
The thermostatic sensor in the
receiver is out of service and the
transmitter is positioned out of
reception range of receiver.
Place transmitter again in reception
range.
Reset receiver (see 2.8)
Replace temperature sensor
The fire goes out; the red
led on the receiver is
glowing continuously. And
the receiver peeps 4 times
briefly every 2 sec.
The receiver got overheated
(possible causes are: ventilator
out of service or dirty, glass does
not close properly…)
After cooling down of the receiver, de red
led will goes out and the peeping will
stop. It will be possible to operate again
the fire.
Eliminate cause of overheating.
Only CP visible on the
display
Children protection “CP” is
activated
Switch off “CP”
The fire goes out; the red
led is glowing continuously
The unit is in security device.
Make a reset of the receiver (see 2.8)
2.8. Reset by failure
When the receiver is in failure (red led glowing continuously) a reset can be executed in two different ways:
-By pressing on OFF on the transmitter
-By pressing on the RESET button of the receiver (receiver has to be in position REMOTE or ON)
During this operation you will hear it beeping several times shortly.
After being reset, the fire will come in manual OFF position.
The possibility exists that the module is in malfunction if the problem that caused the failure is still present.
2.9. Informations about keys
Some keys have different functions depending on whether they are short or long press:
Key MODE: press more than 3 sec. To switch from mode Manual to mode THERMO
Press shortly to switch between mode THERMO and PROGRAM
Key PROG: press more than 4 sec. to go to mode PROGRAM
Press briefly to scroll through program
Key TIMER: press more than 2 sec. to program TIMER
Press briefly to view current time
Key TIMER + FAN: press more than 5 sec. to activate “CP”
Key UP + PLUS: press more than 3 sec. to ignite
All times shorter than the specified times are considered to be a short press.
Table of contents
Other Well Straler Heater manuals
Popular Heater manuals by other brands

Klarstein
Klarstein Hot Spot Crystal Reflect Smart manual

TZS First AUSTRIA
TZS First AUSTRIA FA-5571-3 instruction manual

Heinner
Heinner HOH-Y13S manual

Zibro
Zibro SRE 157 owner's manual

Twin-Star International
Twin-Star International Duraflame 9HM7000 manual

Sunhouse
Sunhouse SPHN Installation and operating instructions