Welltec System postmate 3 User manual

User’s Manual
User’s Manual
Postmate 3 User’s Manual
Rev. 070514
Postmate 3
3

- 1 -
Postmate 3 User’s Manual
Greeting
Thank you for purchasing Welltec System’s product.
This manual is prepared to provide guidelines on how to properly operate and maintain
Postmate 3.
Copyright
Any of the contents should not be copied, re-printed or translated by other languages
without Welltec System’s approval.
Postmate is the registered trademark of Welltec System.
Notice
Caution : Physical injury and serious mechanical damage will occur when
disregarding this information.
Important : This information is contained with useful information and guidance.
Reference : This information guides the chapter which detailed contents.

Postmate 3 User’s Manual
- 2 -
Table of Contents
Chapter 1 - Installation
1-1 Installation Environment
1-2 Unpacking
1-3 Removing Safety Tapes and Styrofoam
1-4 Power Connection
Chapter 2 - Before Operating
2-1 Identifying Parts
Chapter 3 - Operation
3-1 Paper Size
3-2 Paper Feeding
3-3 Setting of Paper and Fold Type
3-4 Setting of Count
3-5 Fine Setting of Fold Position
3-6 Memorizing Present Fold Set-Up
3-7 Memorized Fold Set-Up
3-8 Setting Alarm Function
3-9 “Auto Start” Function
3-10 Thickness Sensor
3-11 “Jam Free” Function
Chapter 4 - Handling Errors
4-1 Understanding Error Message
4-2 Handling Paper Jams
Chapter 5 - Maintenance
5-1 Feed Roller Assembly Exchange
5-2 Cleaning Rollers
Chapter 6 - Troubleshooting
6-1 Pewer Off
6-2 Incorrect Folding
6-3 Power on but No Start
6-4 Frequent Double or More Feeding
6-5 ‘Not Available’ Shown on Panel

- 3 -
Postmate 3 User’s Manual
Chapter 1 - Installation
1-1 Installation Environment
1. Input power : 100~110V (5A), 220~240V (3A)
2. Machine size(mm) : 415 x 600 x 385 (without conveyor)
3. Machine weight : 45kg
- Since the weight of a product is heavy, please use appropriate table for putting it on.
- Please use grounded power cable.
1-2 Unpacking
Please check if all of the following parts are included in the box.
- Main body, power cord, user’s manual and jam removal handle.
1-3 Removing Safety Tape and Styrofoam Location
Please remove all safety tapes and styrofoam before operation.
2
1
3
4
1. Safety cover of feeding unit (2ea)
2. Safety cover of upper cassette (2ea)
3. Lower cassette cover (2ea)
4. Upper cassette (1ea)
5
66
5. Paper tray (upper/1ea)
6. Paper tray (lower/2ea)
7
7. Upper cassette (1ea)
1-4 Power Connection
Please refer to the label for electric information which is located at the back side of the machine. When the
power cable is properly connected, please switch the machine on and check whether ‘Ready’ sign is dis-
played on the display panel. If not, please contact your local dealer for service.

Postmate 3 User’s Manual
- 4 -
Chapter 2 - Before Operating
2-1 Identifying Parts and Functions
1. Feeding Unit Safety Cover
2. Upper Fold Cassette Safety Cover
3. Lower Fold Cassette Door
4. Control Panel
5. Conveyor (option)
3
12
5
4

- 5 -
Postmate 3 User’s Manual
3
1. Feed Assist Hanger
2. Feed Guide (Left)
3. Feed Guide (Right)
4. Locking Knob
5. Infeed Roller
1
2
5
2
1
3
1. Lower Cassette
2. Stopper
3. Stopper Adjustment Knob
4. Folding Scale Label
5. Stopper Locking Knob
3
2
1
1. Folding Scale Label
2. Stopper Adjustment Knob
3. Stopper Locking Knob
4. Fold Position Marker
5
4
Large Capacity Tray
Lower Cassette
Upper Cassette
4
4

Postmate 3 User’s Manual
- 6 -
1. Power Switch
2. Main Power Socket
3. Conveyor Power Socket
4. Lower Press Roller Cover
5. Upper Press Roller Cover
Outfeed Unit
5
4
3
2
1

- 7 -
Postmate 3 User’s Manual
1
3
2
8
7
6
10 12 11
4
13
5
9
Name and Function of Each Button (Postmate 3 L)
-
+
1. Display Panel : shows the setting condition and working of the machine.
2. Start/Stop button : starts and stops the machine. If you press during setting, it returns to the prior
condition.
3. Set/Store button : sets and stores the selected function.
4. Mem button : memorizes the present selected fold type and call the memorized setting fold type.
5. Paper setting button : set the length of sheet. (ex: A4, Letter, etc.)
6. Folding type setting button : sets the folding type.
7. Fine adjustment button for fold cassette : adjusts the position of folding cassette stopper.
8. Count setting button : sets the job volume in order to process.
9. No/Yes (- / +) button : selects yes/no or increase/decrease numerical value when you set.
10. Function button for sensing double feeding : protects the double or multiple feeding by sensing the
characteristics of paper by digital sensor.
11. Alarm setting button : notifies the error or setting with alarm.
12. Jam free button : automatic removal of paper jam at folding roller or press roller.
13. Auto start button : re-starts the process after selected time when the job reaches preset count.

Postmate 3 User’s Manual
- 8 -
2
1
3
10
9
8
7
4
6
5
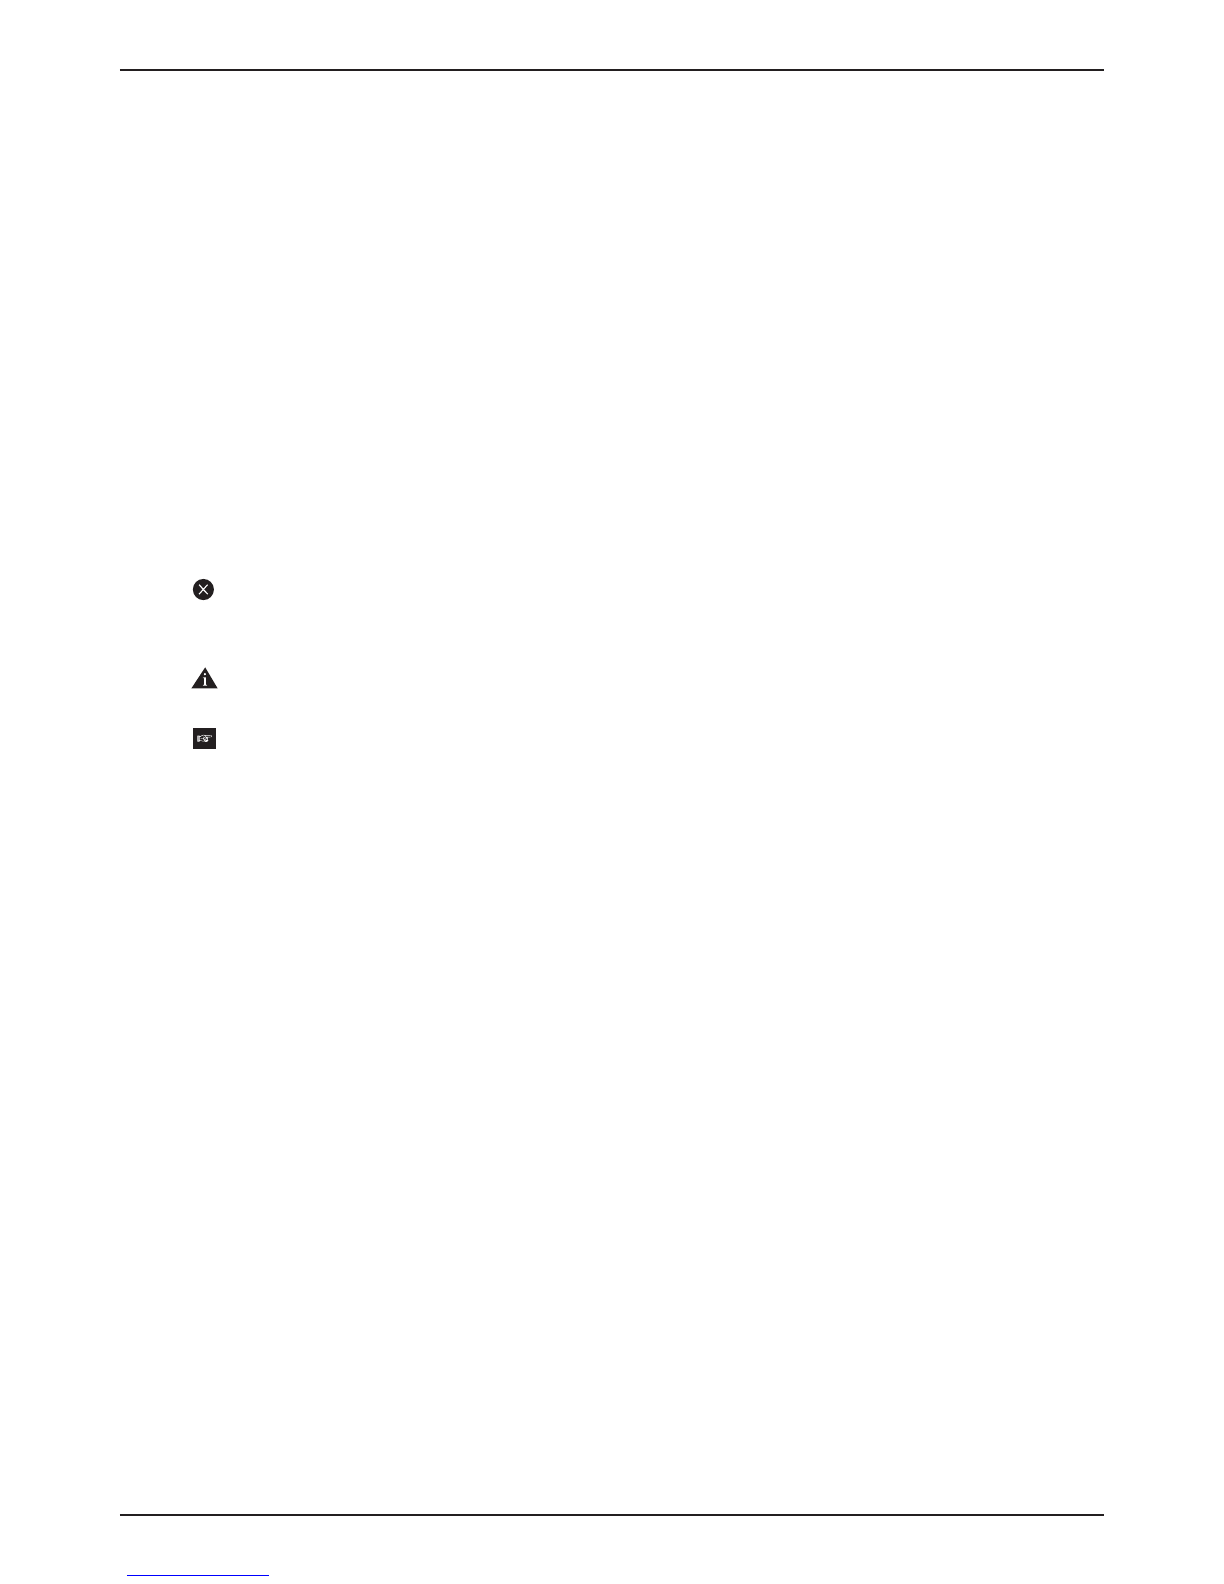
Name and Function of Each Button (Postmate 3 M)
1. Display Panel : showing the setting condition and working of the machine.
2. Start/Stop button : starts and stops the machine. If you press during setting, it returns to the prior
condition.
3. Set/Store button : sets and stores the selected function.
4. Mode button : enters to mode function.
5. Batch counter button : enables you to set the number of forms that you wish to process and have the
machine stop automatically until you press the start button. For example, if you
set the batch counter at 100, after 100 forms are processed, the machine will not
start until you press the start button.
- Press the batch counter button and the light will blink.
- Change the displayed value by using select button and when ready, press the set button.
- When changing the value, press the batch counter button to increase the value by 50 up to
500.
- This setting is not stored after rebooting the machine.
6. Select button : selects yes/no or increase/decrease numerical value when you set.
7. Count reset button : clears the count on the display panel.
8. Function button for sensing double feeding : protects the double or multiple feeding by sensing the
characteristics of paper by digital sensor.
9. Auto start button : re-starts the process after selected time when the job reaches preset count.
10. Jam free button : automatic removal of paper jam at folding roller or press roller.

- 9 -
Postmate 3 User’s Manual
148
210
357
264
Chapter 3 - Preparing for operation
3-1 Paper Size
Postmate 3 handles any form that is larger or smaller than the following forms.
Reference
- Using forms that do not fall under the specified size may result in paper
jam or machine damage.
Important
- Please check whether any forms are stapled. Staples will seriously damage
the machine.
3-2 Paper Feeding
1. Before loading the forms onto the machine, please make sure all forms are aligned and
fanned. Please refer to the images below.
Good
Bad
If the condition of forms are not good as the picture above (Bad), place appropriate quan-
tity of forms, unless forms will be jammed.

Postmate 3 User’s Manual
- 10 -
5. Tighten back the green knobs on both paper guides.
6. Once loading is complete, please close the safety cover. The feed tray will go
up.
Caution
- Poor quality forms may cause frequent paper jams.
- Make sure the paper guides are not set narrower or wider than the width of
the paper.
2. Open the safety cover of the feeding unit. The tray will go down.
3. When the feed tray is down to the bottom, loosen the green knobs on both paper
guides.
4. Load the aligned forms onto the feed tray and adjust the paper guides so they
are gently covering the sides of the stacked forms.
Good Bad

- 11 -
Postmate 3 User’s Manual
3-3 Setting of Paper and Folding Type (Postmate 3-M)
1. Unlock the fold position of the lower cassette by turning the stopper locking knob
counter clockwise.
2. Adjust the stopper so the surface of the rubber is lined up at 99mm.
3. Lock the stopper by holding the stopper adjustment knob and turning the stopper
locking knob clockwise.
1. Unlock the fold position of the upper cassette by turning the stopper locking knob
counter clockwise.
2. Adjust the stopper so the red marker is lined up at 99mm.
3. Lock the stopper by holding the stopper adjustment knob and turning the stopper
locking knob clockwise.
1. Lower Cassette Fold Setting - 99mm
2. Upper Cassette Fold Setting - 99mm
The following instruction shows how to set A4 size Z-Fold.
(Note: Please be noted that the position marker doesn’t guarantee 100% positioning.)

Postmate 3 User’s Manual
- 12 -
(Postmate 3-L)
1. Press Paper button. The LED will light on.
2. Press - / + button until the correct paper shows.
3. It will change A5 - B5 - LET -A4 - LEG - USR. If the paper is non-standard, please press Set
button on USR and select the paper length by - / + button. Press Set button again.
Reference (Paper size)
A5 : 148 X 210 (mm)
B5 : 182 X 257 (mm)
Letter : 216 X 279 (mm)
A4 : 210 X 297 (mm)
Legal : 216 X 356 (mm)
USR : non-standard
4. Press Folding Type button. In case you like to operate current set of fold type, you do not
have to press the button again.
5. Press - / + button until the correct fold type is set.
Important
In case you select the wrong fold type, press Stop/Start button to stop setting. Then, try again.
6. Press set button, then the folding position will be set automatically and one test paper will
come out. ‘Ready’ will be shown on the display panel.

- 13 -
Postmate 3 User’s Manual
It is important to understand how Postmate 6 folds paper in order to accurately set
the fold setting. Please read the following information carefully to fully understand
the folding mechanism of Postmate 6.
1. The folding unit is composed of rollers, cassettes and stoppers.
2. The form enters in between the two front fold rollers.
3. The form hits the upper cassette stopper and buckles in the middle. Then the folded
portion enters in between the middle two rollers.
Understanding Folding Mechanism

Postmate 3 User’s Manual
- 14 -
5. The folded form then exits the fold rollers and then are sent to the press unit.
4. The form hits the lower cassette stopper and forms a buckle. The folded form
then enters in between the two outer rollers.

- 15 -
Postmate 3 User’s Manual
Upper Cassette
Lower Cassette
Paper
Stopper
First Fold
(Upper Cassette)
Second Fold
(Lower Cassette)
When setting a Z-Fold, please read the following steps.
1. Measure the length from line 1 to line 2 of the form as indicated in the
image above. That measurement is the fold setting for the first (upper
cassette) fold.
2. Measure the length from line 2 to line 3 of the form as indicated in the
image above. That measurement is the fold setting for the second
(lower cassette) fold.
2
31
A
Infeed Direction
A
Z-Fold Setting
Infeed
Direction Outfeed
Direction

Postmate 3 User’s Manual
- 16 -
V-Fold Guide
First Fold (Upper Cassette)
When setting a V or a Single-Fold, please read the following steps.
1. Measure the length from line 1 to line 2 of the form as indicated in the
image above. That measurement is the fold setting for the first (upper
cassette) fold.
2. Make sure the V-fold guide is placed at the entrance of the lower
cassette.
21
A
Infeed Direction
V-Fold Setting

- 17 -
Postmate 3 User’s Manual
First Fold (Upper Cassette)
When setting a C-Fold, please read the following steps.
1. Measure the length from line 1 to line 3 of the form as indicated in the
image above. That measurement is the fold setting for the first (upper
cassette) fold.
2. Measure the length from line 3 to line 2 of the form as indicated in the
image above. That measurement is the fold setting for the second
(lower cassette) fold.
2
31
A
C-Fold Setting
Infeed Direction
A
Second Fold
(Lower Cassette)

Postmate 3 User’s Manual
- 18 -
When setting a Double-Fold, please read the following steps.
1. Measure the length from line 1 to line 3 of the form as indicated in the
image above. That measurement is the fold setting for the first (upper
cassette) fold.
2. Measure the length from line 3 to line 2 of the form as indicated in the
image above. That measurement is the fold setting for the second
(lower cassette) fold.
A
Double Folding
Infeed Direction
First Fold (Upper Cassette)
Second Fold
(Lower Cassette)
321
A

- 19 -
Postmate 3 User’s Manual
Second Fold (Lower Cassette)
When setting a Window-Fold, please read the following steps.
1. Measure the length from line 1 to line 4 of the form as indicated in the
image above. That measurement is the fold setting for the first (upper
cassette) fold.
2. Measure the length from line 4 to line 2 of the form as indicated in the
image above. That measurement is the fold setting for the second
(lower cassette) fold.
2
31
4
A
Infeed Direction
Window Folding
First Fold (Upper Cassette)
A
Table of contents
Popular Postal Equipment manuals by other brands

Neopost
Neopost ij25 user guide

Pitney Bowes
Pitney Bowes DM100 Series Resetting Normal Presets

SSS Siedle
SSS Siedle RG/SR 611-2/1 Series Product information

Francotyp-Postalia
Francotyp-Postalia PostBase Mini installation instructions

Neopost
Neopost ij25 manual

Step 2
Step 2 Home MAILMASTER 5317 quick start guide