welltherm RL0606 User manual

DE
1
DE Bedienungsanleitung
Glas Infrarotheizungen Typ RA und RL
GB Manual glass infrared
heating elements type RA and RL
DE Technische Daten:
GB Technical Data:
Modellnummer
model number RL0606 /
RA0606
RL0609 /
RA0609
RL0612 /
RA0612
RL0615 /
RA0615
RL0409 /
RA0409
RL0415 /
RA0415
Abmessungen
dimension
600
mm x 600
mm
x 30 mm /
603 mm x 603 mm
x 30 mm
600
mm x 900
mm
x 30 mm /
603 mm x 903 mm
x 30 mm
600
mm x
1200
mm
x 30 mm /
603 mm x 1203 mm
x 30 mm
600
mm x 1500
mm
x 30 mm /
603 mm x 1503 mm
x 30 mm
400
mm x 900
mm
x 30 mm /
403 mm x 903 mm
x 30 mm
400
mm x 1500
mm
x 30 mm /
403 mm x 1503 mm
x 30 mm
Leistung
power 370 W 580 W 780 W 930 W 360 W 630 W
Nennspannung
voltage 230 V~ 50-60 Hz
Nennstrom
current 1,7 A 2.5 A 3,4 A 4,3 A 1,6 A 2,7 A
Schutzklasse
protection
class
Gewicht
weight 9,6 kg 13,5 kg 17,3 kg 22 kg 9,4 kg 15 kg
Anschlusskabel
connection lead
1,5 m / 1,9 m Kabel mit Stecker
1,5 m / 1,9 m cable with plug
Frontmaterial
front material
5 mm Spezialglas maximale Oberflächentemperatur 120°C
5 mm special glass max. surface temperature 120°C

DE
2
DE
Inhaltsverzeichnis:
Seite
1. Sicherheitshinweise 3 - 4
2. Einführung 5
3 Allgemeine Informationen 5
4. Bestimmungsgemäßer Gebrauch 5
5. Entsorgung 5
6. Lieferumfang 5
7. Reinigung und Pflege 6
8. Garantiebedingungen 6
9. Installation 7 - 9
GB
Contents:
page
1. Safety advice 10 - 11
2. Introduction 12
3. General information 12
4. Intended use 12
5. Waste management 12
6. Scope of delivery 12
7. Cleaning and care 12
8. Terms of guarantee 13
9. Installation 14 -16

GB
10
1. Safety advice
1.1. The heater must not be covered (for example by textiles or similar)!
ATTENTION: Danger of overheating and fire hazard!
1.2. The heater can be used by children over 8 years and by persons with defizits
in the physical, sensorical or mental power or which are short of experience and
science if they are supervised or are instructed about the safely usage of the
gadget and have understood the resulting dangers. Children are not allowed to
play with the heater nor to clean or to service it without supervision.
Children under 3 years have to be kept away from the gadget or have to be
supervised all the time.
Children over 3 years and up to 8 years are just allowed to switch the gadget on
and off if they are supervised and are teached to handle the gadget safely and
have understood the resulting danger. The basic for this is the mounting and the
installation of the heater in the normal position of usage. Children over3 years
and under 8 years must not connect the plug to the power supply, control the
product and/or do the customer maintenance.
DANGER: Some parts of the product will reach high temperatures and may
cause burns!
Special care has to be taken by the presence of children and of persons who
need protection.
1.3. Welltherm infrared heating panels are designed for use with AC 230 V, 50
Hz. If you intend to install several heaters please contact an electrically skilled
person to check the suitability of the electrical installation!
1.4. Welltherm infrared heating panels type RA / RL are not equipped with an
inbuilt temperature controller. Therefore it is recommended not to use the
heating element in very small rooms with inhabitants which are not able to leave
the room on their own!
1.5. To avoid the danger of electrical shock the Welltherm infrared panel heater
must not be opened, modified or repaired by the user!
If the power cord is damaged it has to be replaced by the specialists of company
Welltherm GmbH or by a skilled electrician!
1.6. The glass material is a security glass. This is mechanically more stable and
will break in small, less sharp edged parts. Nevertheless the place of installation
should be chosen carefully so that no people can be harmed by a potential
damage of the glass!

GB
11
Attention: avoid mechanical stress on the glass!
If the glass is damaged immediately
-separate it from the electrical network and don’t connect it again!
-unmount the panel heater to avoid the risk of down falling parts!
1.7. Welltherm infrared heating panels will not withstand higher humidity rates!
It is not allowed to use the heater in short distance to showers, bath tubs or
pools!
1.8. It has to be secured that the electrical circuit of the panel heater can be de-
energized by switch, fuse or thermostat at any time!
1.9. The minimum distance to other objects should be 400mm on the front and
200mm on the sides. Welltherm infrared heating panels must not be positioned
directly under a wall outlet!
1.10. For mounting the Welltherm infrared panel heaters to brick walls or stone
walls use the delivered assembly materials. For mounting the infrared panel
heaters to different fixation basics please use suitable special towels and
screws which fulfill the demands on load capacity!
1.11. The Welltherm infrared panel heater must be remounted, cleaned and
transported in cold condition only!

GB
12
2. Introduction
Dear customer,
Thank you very much for purchasing our product.
This Welltherm infrared heater was developed and produced carefully.
In this manual you will find important information on how to start running your Welltherm infrared heater.
The Welltherm infrared heater will satisfy you by easy installation, flexibility in mounting and it is maintenance free.
Please read this manual carefully before you get started for your safety.
Hold this manual in reach and don’t forward the infrared heater without this manual!
Thank you for your trust!
3. General information
The heating element will not work as a conventional convection heater for it uses the infrared heat. With energizing the heater
for the first time the cold surroundings (ceiling, floor, furniture, walls) have to be heated up first. If you will not get a pleasant
temperature directly please hold the heater energized until you will get a convenient indoor climate. This process can last some
hours up to some days. When all solid frames are warmed up there will be a comfortable temperature in the room.
With this condition the turn on time of the heater can be reduced to minimum.
For an efficient and effective control of your Welltherm infrared heater we recommend the use of our quality wireless
thermostats. Please contact us for further information.
4. Intended use
The Welltherm infrared heating panels are due to be used as wall or ceiling heater (see first side).
Please note that the notice of this manual is part of the intended use.
Please don’t use the heater for outdoor purposes. Also the heater is not suitable for rooms where it is exposed to water and for
all applications which are not explicitly named intended use.
The Welltherm infrared panel and the power outlet must not be mounted in the protection zone 0, 1, 2 of plumbed rooms.
5. Waste management
Please depollute the package material and the device according to its specification.
Electrical equipment contents recourses as also polluting materials. Therefore it has to be disposed
of as hazardous waste. Follow your regional regulations.
6. Scope of delivery
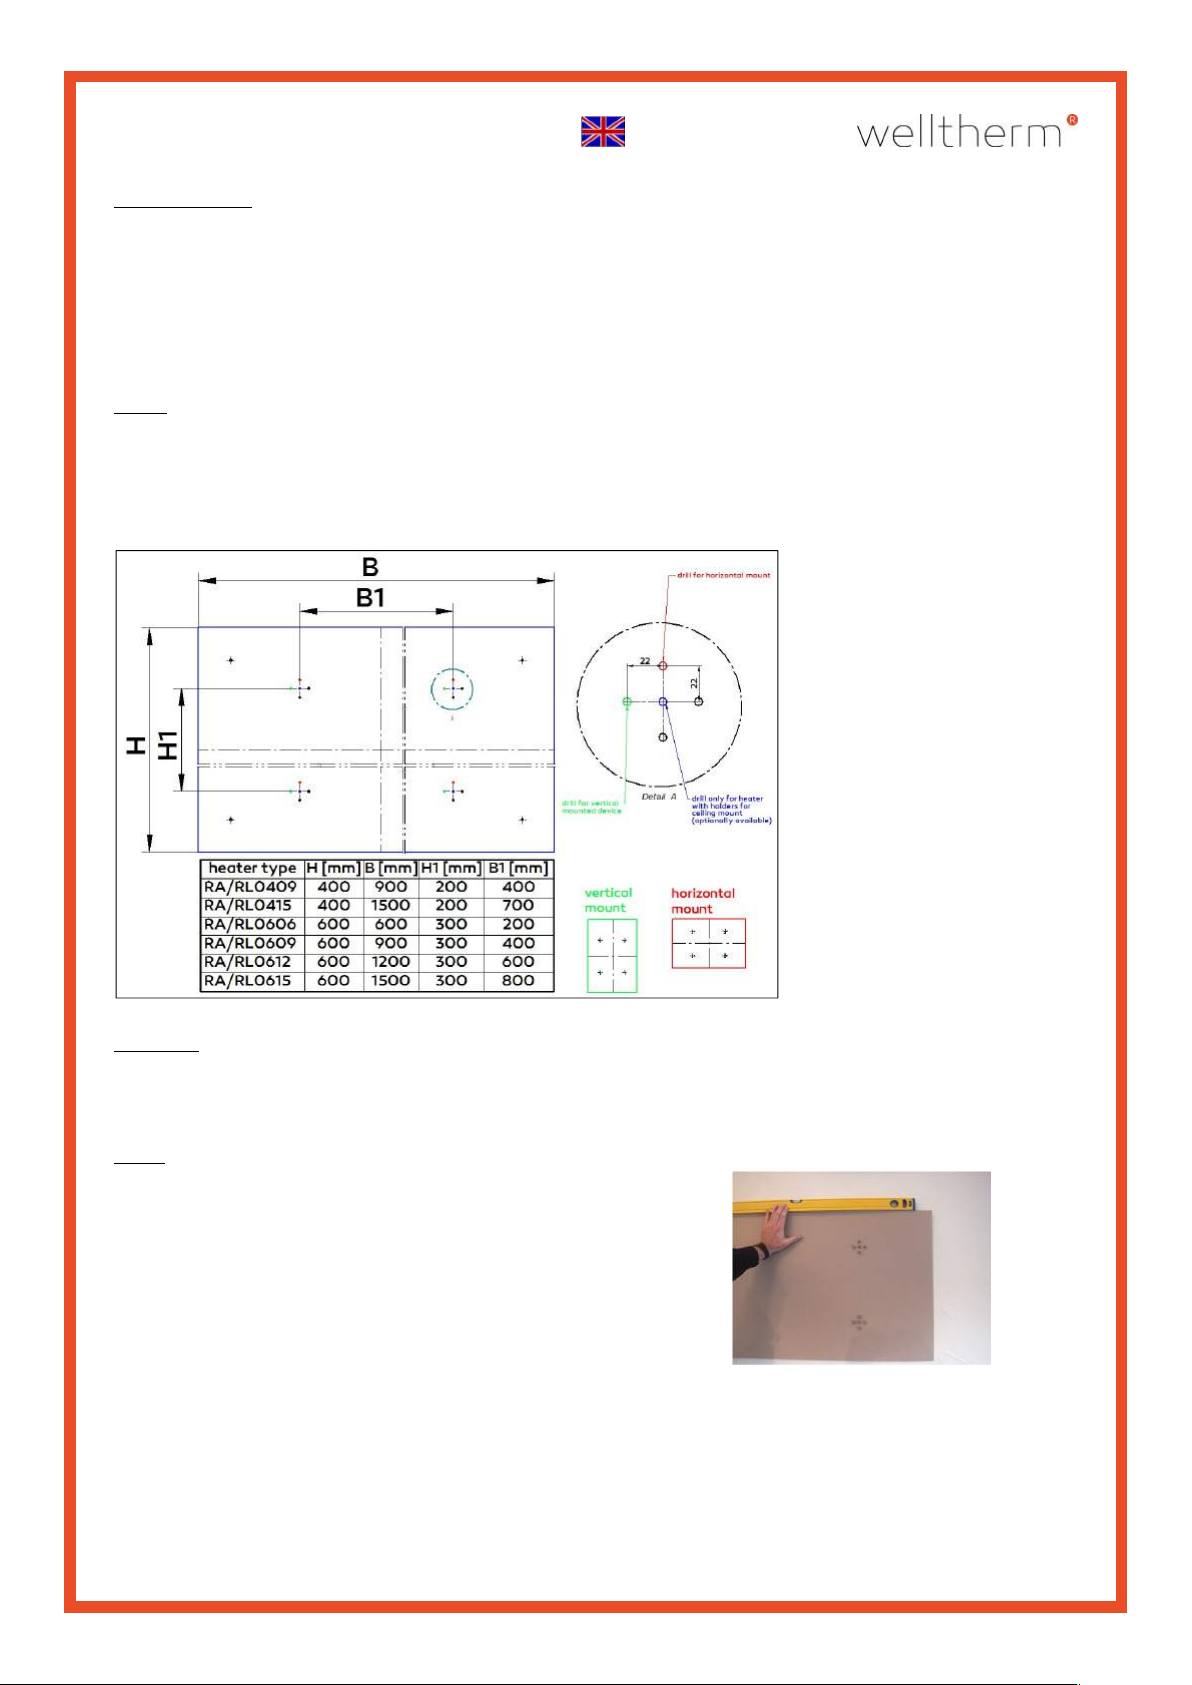
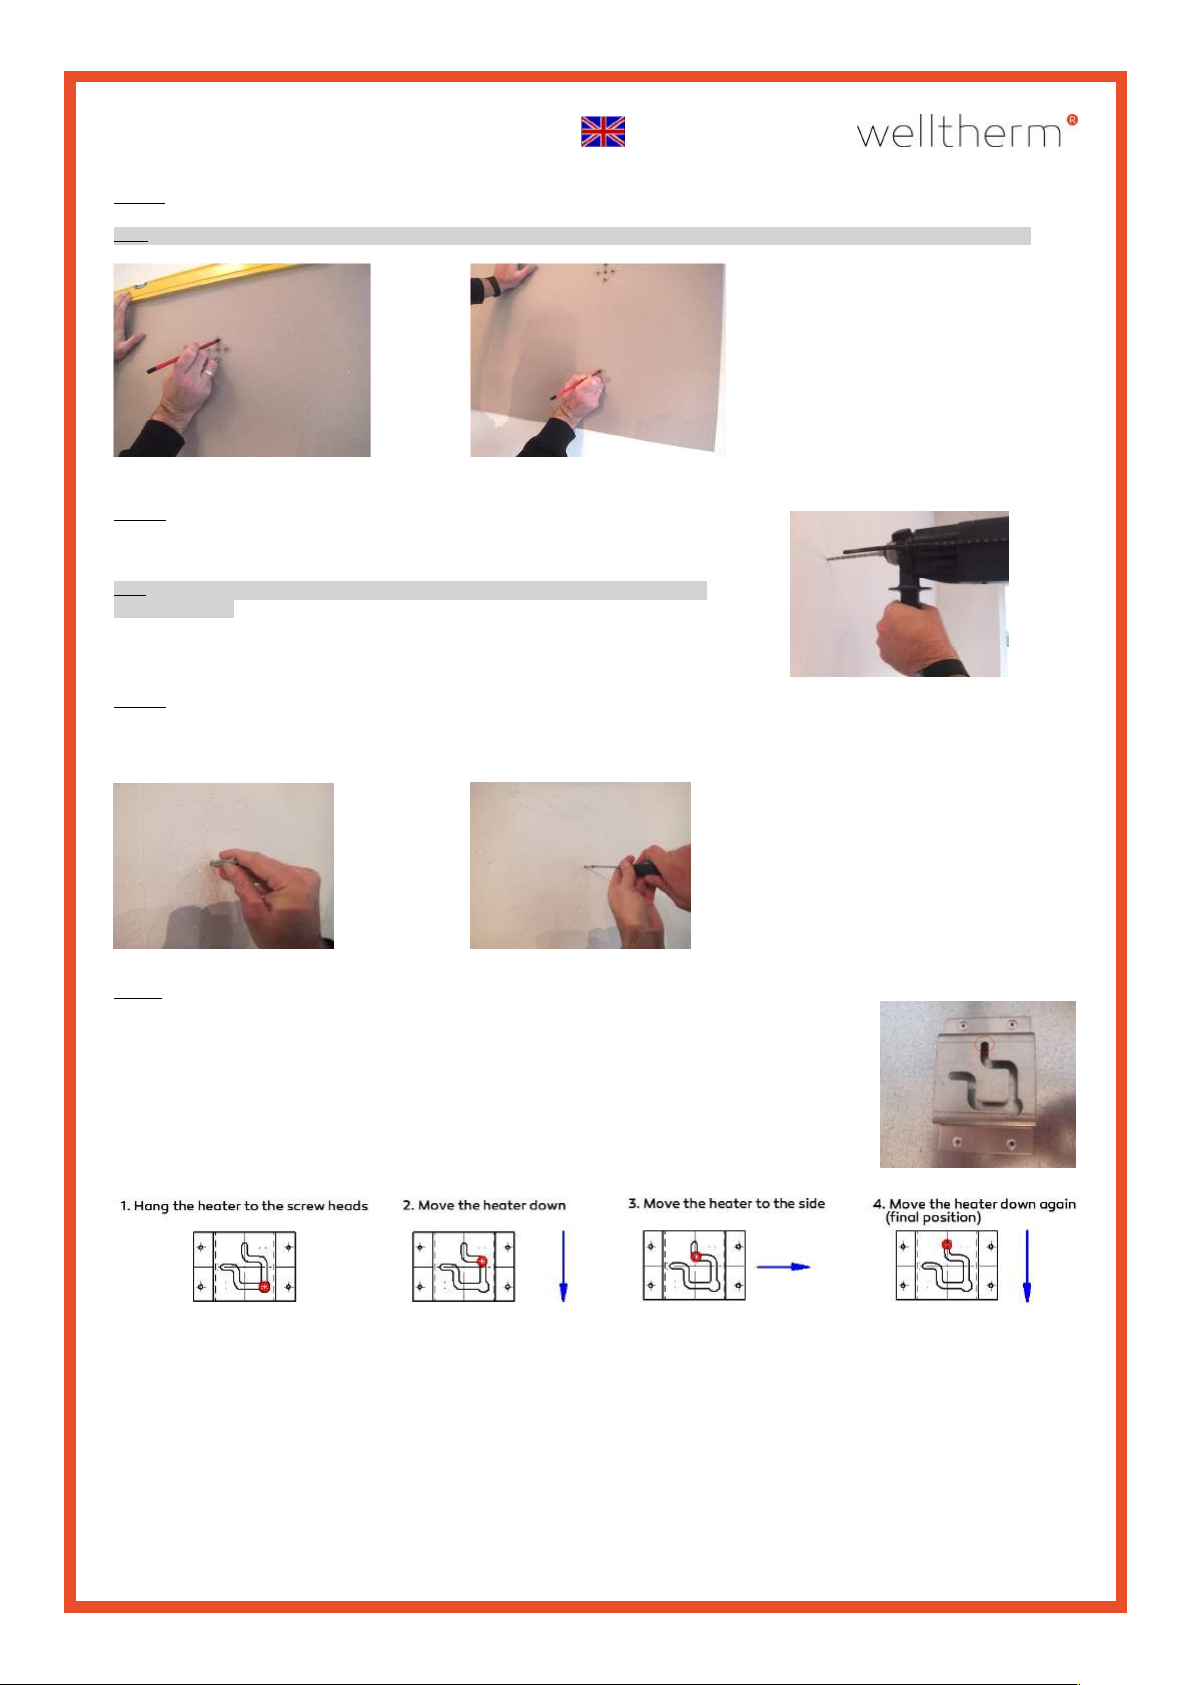
The delivered content consists on heating panel, drilling template and standard mounting set.
The delivered dowels UX6 and screws 6x45 are suitable for normal brickwork made of beton, clay bricks and lime stone. With
different brickwork the suitability of the fixation material has to be ensured. When you are not sure about that please get in
touch with a specialized dealer for towels and screws. For ceiling mount a ceiling mount set is optional available!
4 x Spax® 6 x 45 4 x UX6 1 x drilling template
7. Cleaning and care on Welltherm infrared panel heaters
A frequent cleaning of the panel heater will ensure faultless operation and a long lifetime circuit of your infrared panel heater.
Please switch off the heater and cool it down to room temperature before you clean the surface. For cleaning use a wet
cleaning cloth or glass cleaner. Don’t use any abrasive powder cleaner or furniture polish for this will damage the surface.

GB
13
8. Terms of guarantee
We will offer you a 60 month guarantee beginning with the date of the invoice or shipping note.
Within this period we will regulate all faults caused by material or production by repair or refund of the defect parts.
The guarantee will only be accepted when the heating panel was properly treated.
Additional claims are explicitly excluded!
The guarantee will only include the repair/refund of the infrared heating panel.
We will not assume liability for damages caused by kicks, wrong handling, humidity or by external treatment.
Clicking noises caused by thermal expansion or by wall unevenness are no reason for complaints and will not impact the
heating function.
Optical distortions on the sides of the mirror heating elements are technical caused and no reason for complaint.
In case of guarantee the infrared heating element has to be sent to our head office.
As an attachment you have to add the invoice or the shipping note and a detailed description of the defect and to use a
suitable package.

GB
14
9. Installation
Please find the optimal place of installation before you start to mount the Welltherm infrared panel heater.
Ensure that nothing will disable the function of the infrared waves and that all safety distances comply with our guidelines
(look chapter “safety advice”).
The Welltherm infrared heaters will only heat up solid materials which will also reflect the heat back to other solid materials.
It is recommended to mount the infrared panel in a way that it will directly ray on the persons.
Please find the additional advices in the text before.
After having chosen the area for mounting you have to start the mounting process as described below.
Step 1:
Deposit the packed Welltherm panel on the floor so that the label is on the upper side of the carton. Now open the cover plate
carefully. Lift the infrared heater on the side and take the drilling template out (it is under the panel). To reduce the danger of
damages please open the heater package in the room where you intend to install the heater.
Note that an exact positioning of the screws is the basic for the simple and trouble-free assembly.
Important:
The drilling template has 5 drills for marking. Depending on the orientation of the heating element the upper drills are relevant
for wall mounting. The central drills are the markings for the optional ceiling mount holders.
For marking the holes the drilling template is provided with cuttings (see picture above).
Step 2
Hold the drilling template on the wall/ceiling and orientate it by using a water
level.

GB
15
Step 3
Mark the 4 drill positions (Please note that only the upper holes of the drilling template are relevant for wall mounting).
Tip: Before drilling the holes please check if there no tubes or wires are present in this area. Use a suitable metal detector.
Step 4
Drill the 4 holes by using a Ø6mm drill (depth=length of the dowel’).
The depth of the holes should not differ much from the dowel length (50mm).
To ensure this demand please mark the drill or use a depth stop.
Tip: To avoid the formation of dust it is recommended to use a vacuum cleaner
simultaneously.
Step 5
Push the dowels in the holes and screw the screws in. The distance between the heads of the screws and de dowel should be
about 2,5 to 3mm!
Step6
Hang the heater to the 4 screws. The heating panel has to be moved on the wall in a way that the
screw will be positioned on the upper point of the groove (red marked circle in the picture below).
The panel heater is fixed on the wall now.

GB
16
Important: Although the infrared panel heater is equipped with a good thermal insulation there will be higher temperatures
also on the backside of the panel. If the heater is too close to the wall or ceiling there could be a heat accumulation on the back.
The mounting distance of 23mm must not be underrun. An continual airflow on the backside of the heater must be guaranteed.
Step 7
Congratulations! The heater is mounted completely and is ready for use now. The plug can be inserted.
We recommend the use of wireless thermostats to optimize the efficiency and to reduce the consumption costs.
Please don’t hesitate to contact us for further information!
We wish you a lot of fun with your Welltherm infrared heating panel!
This manual suits for next models
6
Table of contents
Other welltherm Heater manuals
Popular Heater manuals by other brands

ARDES
ARDES AR4R07M2 Instructions for use

CATCHPOLE & RYE
CATCHPOLE & RYE The Mercantile Arched installation guide

Dimplex
Dimplex BRENTA BNT20 manual

Soleil Heaters
Soleil Heaters PTC-901A User instructions

SANNOVER
SANNOVER CHAUFFAGE FRANCAIS LEXIA 500W Operation manual

THERMOCOAX
THERMOCOAX isopad IGB-G Series operating instructions

Marley
Marley 2500 & C2500 Series Installation, operation & maintenance manual

Toyotomi
Toyotomi Zibro LC-32GF operating manual

Saunum
Saunum Spa Session Instructions for use and installation

Goldair
Goldair GPOC418 instructions

PANDROL
PANDROL HFP 36V Operation and maintenance manual

EINHELL
EINHELL PS 12 operating instructions