Whittemore Enterprises Inc. WE-200 User manual

1
Whittemore Enterprises, Inc.
11149 Arrow Route
Rancho Cucamonga, CA 91730
909-980-2452 - 800-999-2452
Fax 909-989-9976
WE-200
VIDEO ENDOSCOPE
OPERATION MANUAL

2
CONTENTS
Endoscope Nomenclature Pg. 2
Leak Test Preparation Pg. 3
Cleaning and Disinfecting Pg. 4
Endoscope Specifications Pg. 5
WE-200 Setup Pg. 6
WE-200 Bulb Replacement Pg. 6
WE-200 Functions and Features Pg. 7

3
Endoscope Functions and Features

4
Preparing the endoscope for leak testing
Before Leak Testing, remove the (optional) LCD screen. Then screw on the water-resistant cap attached the top of
operating handle.
Leak Testing

5
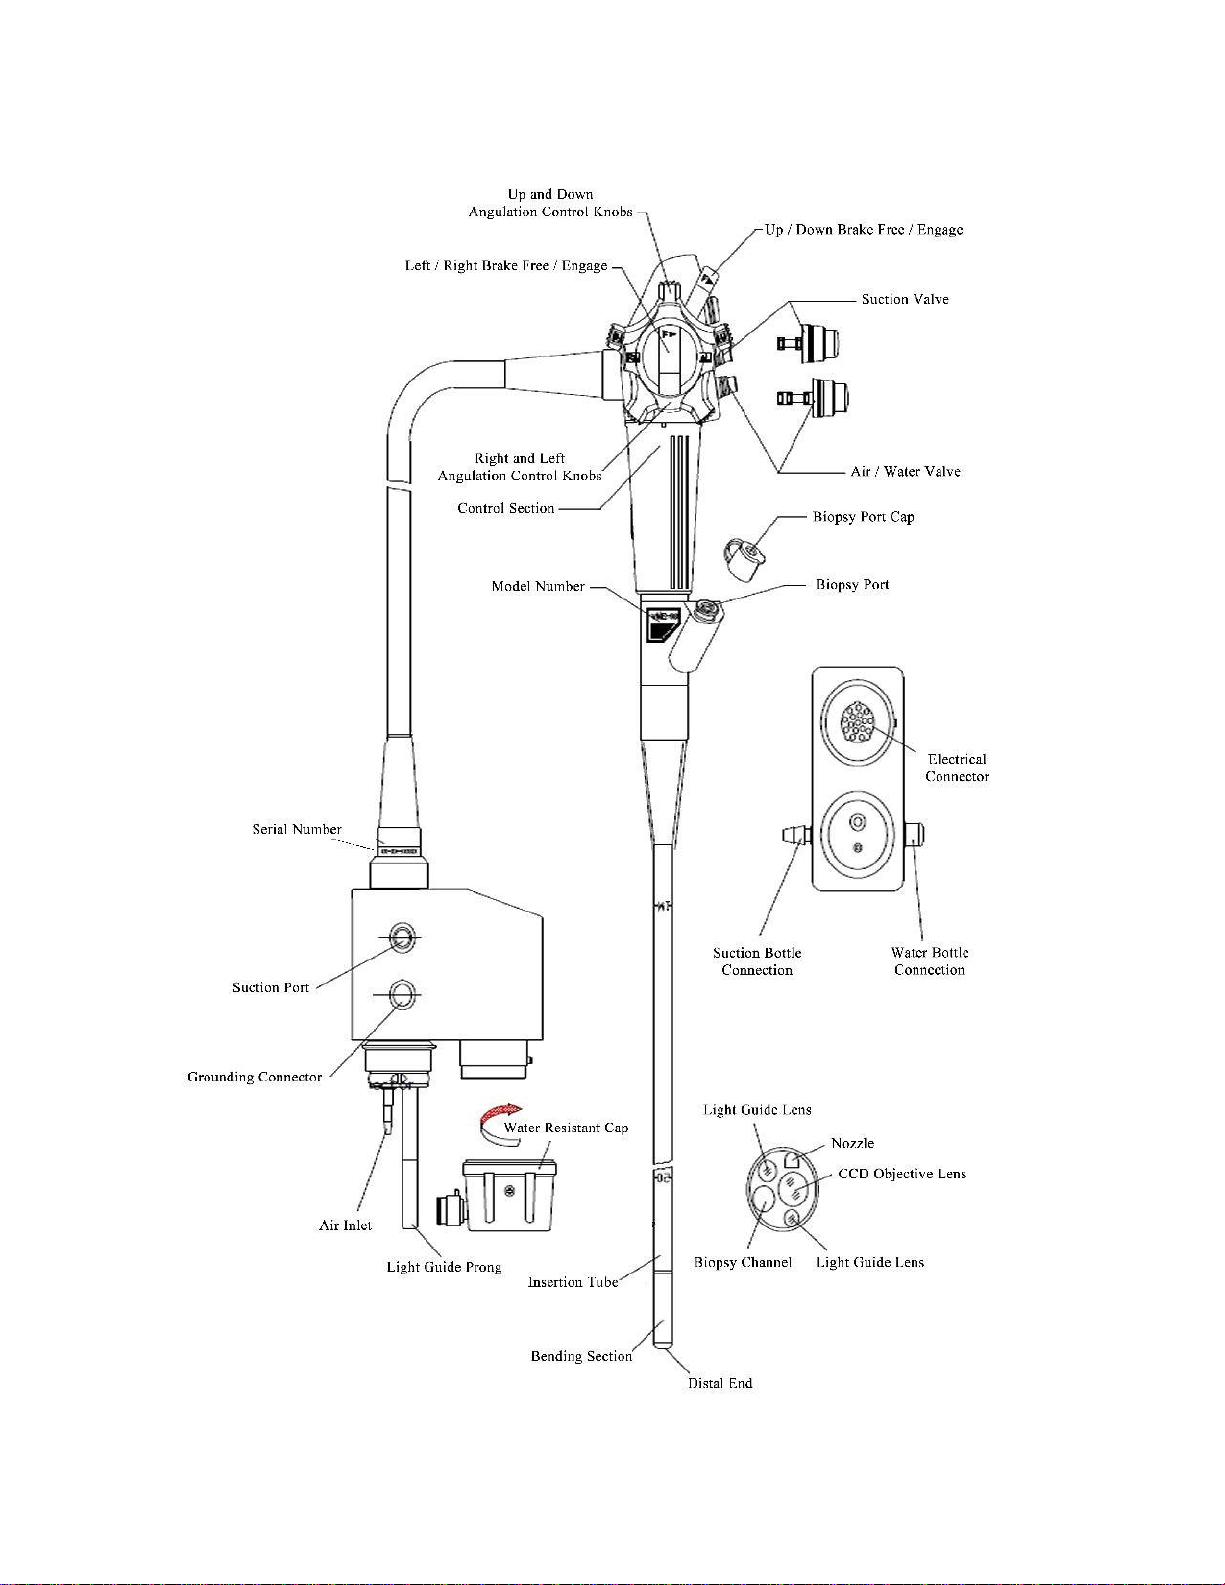
Cleaning and Disinfecting Endoscopes
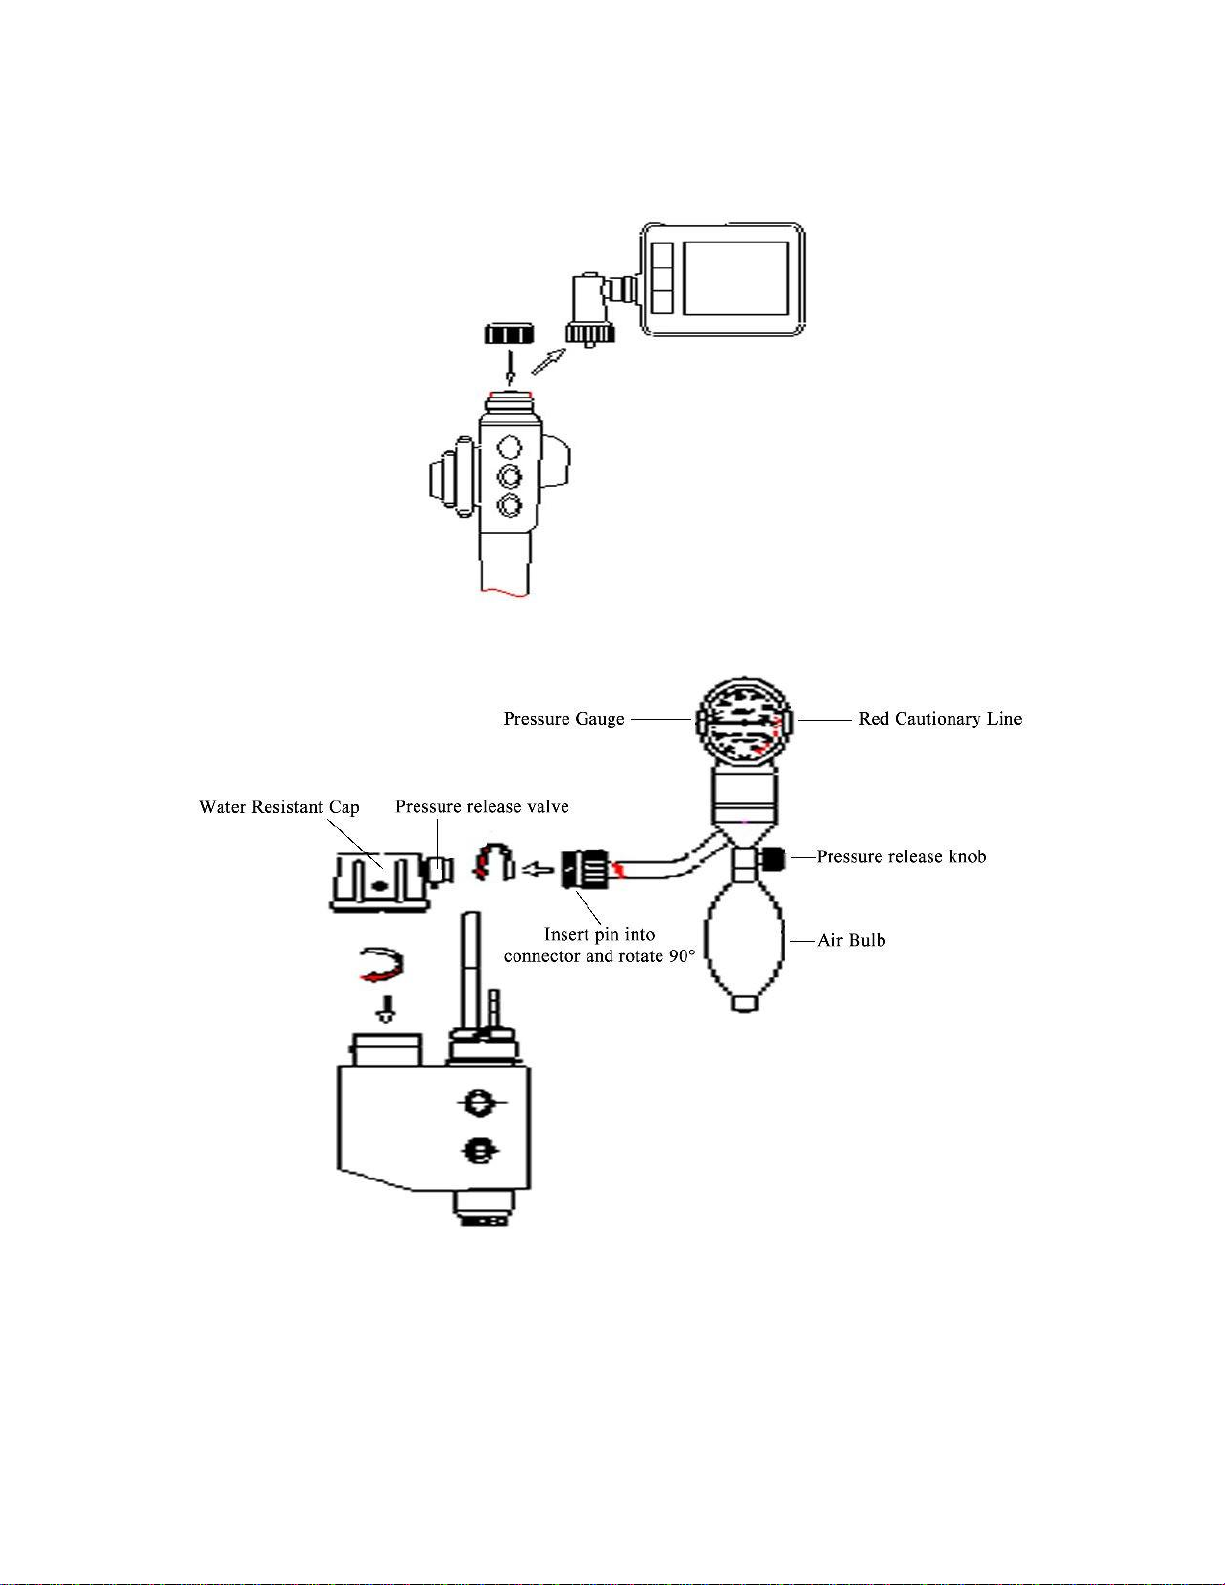
Always attach the water resistant cap and leak tester before leak testing and cleaning!
Dry Leak Test :
Attach leak tester to endoscope connector, tighten knob, pump until dial is at 12:00 position, if dial remains in place
for 2 minutes, there are no leaks.
Prepare for Cleaning :
Fill sink with water and disinfecting solution according to disinfectant solutions ratio.
Remove air/water valve, suction valve, and biopsy cap.
With leak tester on and pressure holding, immerse the entire endoscope. (Do Not immerse leak tester)
Brushing:
Using the cleaning brush , start at the hole in the back of the suction cylinder where the red suction valve was
removed from. When cleaning the suction channel, propel brush until it comes out of the suction port on light guide
connector.
Use the brush to clean the biopsy channel starting at the port on the control handle and pushing all the way until it
comes out of the distal end.
Once brush cleaning is done, place sealant cleaning caps on the biopsy port and the suction cylinder.
(These sealant cleaning caps are attached to the diagram card)
Flushing the suction system:
Attaching the syringe accessories
The blue tube attaches to the suction port on the light guide connector of the endoscope.
The white cap at the end of clear tube stays immersed in the sink with the scope.
The T in the tubing has a one way valve so you can pull back the plunger of the syringe and it will pull from the end
with the white cap. When the syringe is emptied it will force the cleaning solution through the entire suction system
through the blue tube attached to the suction port on the light guide connector.
Fill the syringe with the disinfecting solution (sink water) and flush - this flushes both the suction and biopsy
channels. Do this for the duration recommended by you cleaning solution directions.
After the cleaning procedure, soak the entire scope according to the duration as directed by your cleaning solution
directions. During this soak, remove the biopsy and suction cleaning adapters and syringe.
Once the endoscope is out of the sink, remove the leak tester and water resistant cap. Hang the scope and towel dry.
Flush the suction and biopsy channels with alcohol to ensure that the chemicals are out of the channels.
The leak tester ALWAYS remains attached during immersion!

6
Cleaning the air / water channels:
Fill the water bottle (the one used in procedures) with the disinfecting solution following the ratio recommended by
the cleaning solution manufacturer.
Plug the endoscope light guide connector into the WE-200 and plug the water bottle into the water bottle connection.
Attach the air / water cleaning adapter cap (attached to the diagram card) to the air / water cylinder.
Put scope distal end in sink as the liquid will be coming out of the scope
Turn on the air pump on the WE-200 and flush the air / water channel.
Fill water bottle again and run with regular alcohol to make sure the channels are clear of all chemicals.
Wipe down entire endoscope with gauze and alcohol - this removes any debris from the outside of scope
Hang to dry
Other notes regarding cleaning :
Keep all valves and caps off of the scope until the next use. This will help to dry the equipment completely and also
keep the valve o-rings in good condition by not letting the valves dry in a the scope.
The biopsy forceps, brushes and basket are to be cleaned by soaking in disinfectant as well. Immerse them in the sink
filled with disinfectant and follow the cleaning solution recommendations for soaking.
VERY IMPORTANT : To maintain the health of the endoscope, it is very important to keep the channel clean. To
avoid any build up or drying of blood that will clog the channel, it must be flushed with water by depressing the air /
water (blue button). This should be done occasionally if you have a long procedure where the channel may be sitting
for awhile or if there is going to be a delay before end of procedure cleaning / disinfecting takes place.
After every operation, clean endoscopes thoroughly with detergent or water and then towel dry completely to prevent
dirt and rust which damages endoscope and affects the external appearance, normal usage and performance.
Specifications of Veterinary Videoscope:
Optical System: Field of View :120°
Direction of View : 0°
Depth of field :5-100mm
Resolution :440K pixels
Display System:Full Screen
OuterDiameter: Distal End Outer Diameter :Φ8.5mm / Φ 9.2mm / Φ 12.9mm
Insertion TubeOuter Diameter :Φ8.0mm / Φ 9.2mm / Φ 12.9mm
Inner Diameter ofInstrument Channel :Φ2.0mm / Φ 2.8mm / Φ 3.2mm
Bending section: range of tip bending (4-ways): 180°Up,90°Down, 100°Right/Left
Working environment, storage environment of this device should meet the following requirements:
Temperature: -10 ℃~ 40 ℃. / 50°F - 104°F
Voltage: 110v –240 VAC

7
WE-200 Semi Portable Processor / Light Source
The WE-200 processor is a combination of image, light and air. The digital images are reproduced in very high
resolution. The outputs on this device enable the video image to be sent to a variety of displays.
Methods of operation.
1.Plug the light guide section into the socket of light source.
2.Connect BNC or y/c (s-video) type cable to Video Out on the rear of the WE-200 PALtype Monitor.
3.Power on both Processor and Monitor. Press the Button on the face of the WE-200 labeled “STANDBY”. The
image will be shown on the monitor. If the color is abnormal, please press W.B. (white balance) to reset the color.
(Aim the distal end toward a pure white object while pressing the W.B. button. Once the light next to the button is
on the screen will say “BALANCED” and the white balance setting is finished.
4.Adjust the light control knob until the brightness is suitable for observation. (LED unitsonly)
Replacement for Bulb (for non LED units)
Before replacing the lamp, unplug the power cord from the back of the unit. To exchange the bulb, remove the door
located on the under side of the processor with a screwdriver or turning the small thumb screws counter clockwise.
Once the door is removed, release the bulb my detaching the wire pressure arms that hold the bulb in place. Release
the wire harness to replace the bulb. ( Bulb Type : Welch Allyn : M21E001 )

8
WE-200 Front Panel Descriptions and Functions
Electrical Connector: This is the socket that connects to the electrical pins on the light guide connector of the
endoscope.
Light Output: The light guide prong end on the light guide connector contains a fiberoptic light bundle that gathers
light from the internal lamp and sends it to the distal end of the scope to illuminate the viewing area.
Air Output: When the endoscope is connected to the WE-200 and the pump switch is in the ON position the air and
water feature is enabled. The air and water action is controlled by the air/water valve.
Standby: When your scope is connected to the WE-200, the standby button must be pressed in order to display your
video on the monitor.
ALC: Automatic light control –Use this button in different areas where the camera iris needs to be adjusted to create
a better lighting profile for your situation. Peak and Average are the 2 lighting mode options.
W.B.: Press W.B (white balance) to reset the color. Aim the distal end toward a pure white object while pressing the
W.B button. Once the light next to the button is on, the screen will say BALANCED and the white balance
setting is finished.
Sharp: This button has 3 modes of image enhancement. Each time you press the sharp button the image will become
clearer.
Capture: Captures images in a sub-frame in the top right corner.
Menu: Pressing this button will cycle you through the Yellow, Red and Blue color controls and Gain control to adjust
the signal input level.
Back: Use the back button to review stored WE-200 images.
Pump: Turn on this switch to use the air and water feature.
Power: Main power switch for the WE-200
Table of contents