Wichard PROFURL MK 1R User manual

MK 1R
1
26/01/10
PROFURL IN-BOOM REEFING SYSTEM
MK 1R
SERIAL NUMBER :.........................................................................................
INSTALLATION MANUAL
IMPORTANT NOTICE TO RIGGERS :
PLEASE GIVE THIS MANUAL TO THE BOAT OWNER AND ASK HIM
(HER) TO CAREFULLY READ IT BEFORE USING THE SYSTEM.
RECEIPT OF GOODS
All goods must be checked on delivery and the Buyer should claim from the carrier
verbally within three days in the event of loss or damage, and in writing within seven
days.
WICHARD
Z.I. de Felet
BP 85
63307 THIERS CEDEX
France
Tel : +33 (0)4.73.51.65.00 - Fax : +33 (0)4.73.80.62.81
www.profurl.com
WICHARD
33 rue de l’Etoile du Matin
44600 – Saint Nazaire
FRANCE
Tel : +33 (0)4.73.51.65.00
Fax : +33 (0)4.73.80.62.81
E mail : hotline
@
wichard.com
WICHARD, Inc
47 High Point Ave.
Portsmouth, R.I. 02871
USA
Tel : +1 401 683 5055
Fax : +1 401 683 5077
E mail : info
@
wichard-usa.com
WICHARD Pacific
Unit 13, 2 Bishop Street
St Peters, NSW 2044
AUSTRALIA
Free call : 1800 639 767
Tel + 61 2 9516 0677
Fax +61 2 9516 0688
Email: info
@
wichard.com.au

MK 1R
2
Congratulations for the purchase of your PROFURL
in-boom reefing furling system.
Please read carefully this manual. It will give you to all information for fitting and using
your system in order to give you many years of dependable service.
IMPORTANT WARNING FOR USING
YOUR SYSTEM :
!The PROFURL boom is obviously heavier than a conventional boom.
Avoid uncontrolled gibing, specially with strong wind, as you could
permanently damage your system.
Reminder to gibe :
1 - take in or winch your main traveller and main sheet
2 - turn your boat to gibe
3 - gradually release your main traveller and main sheet.
You can even better fit a tackle as boom preventer (see drawing).
A boom brake is supplied with your system: it must be used and adjusted
at any time. You should not forget to completely release it each time you
want to operate your system.
CONTENTS

MK 1R
3
I. PRELIMINARY.......................................................................................................................................4
I.1 General description ........................................................................................................................4
I.2 TOOLS NEEDED FOR FITTING....................................................................................................6
II. PREPARATION..................................................................................................................................6
II.1 Unfitting the hardware FROM the mast..........................................................................................6
III. INSTALLATION..................................................................................................................................7
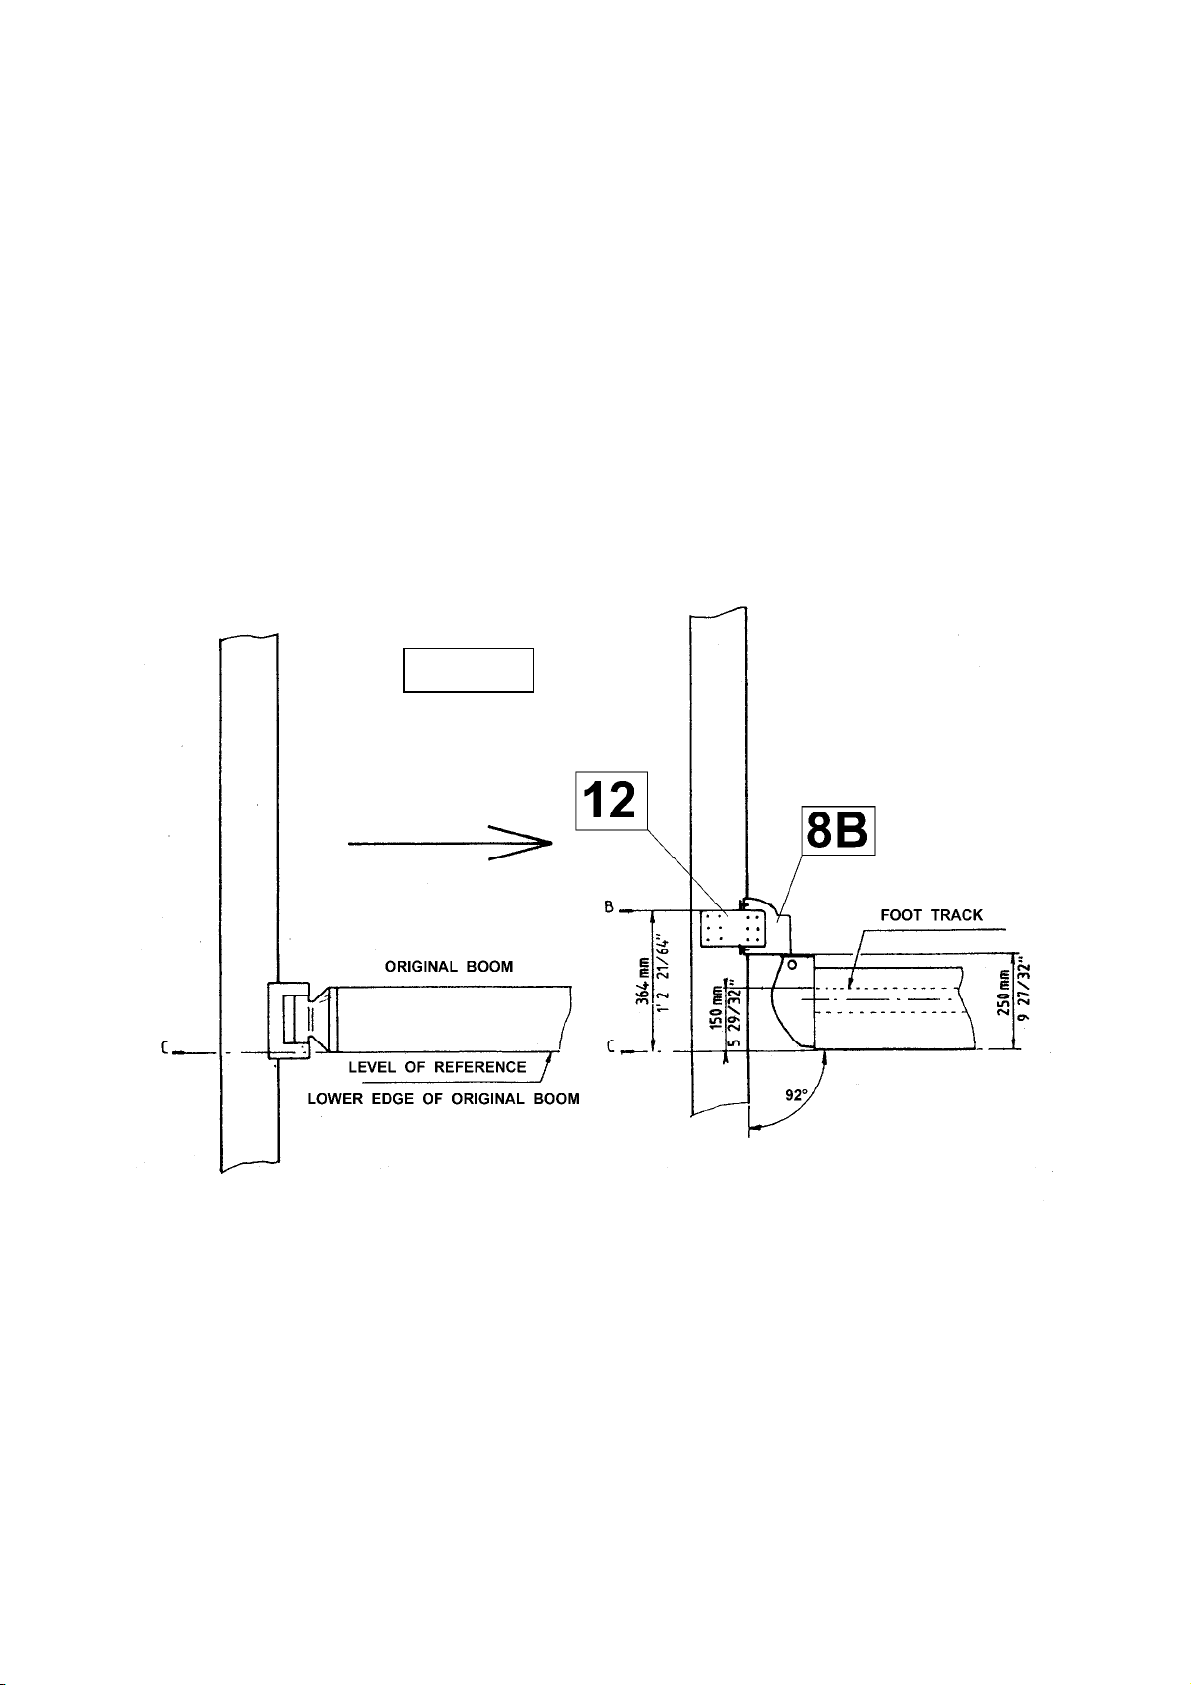
III.1 DETERMINING THE HEIGHT OF THE GOOSENECK................................................................7
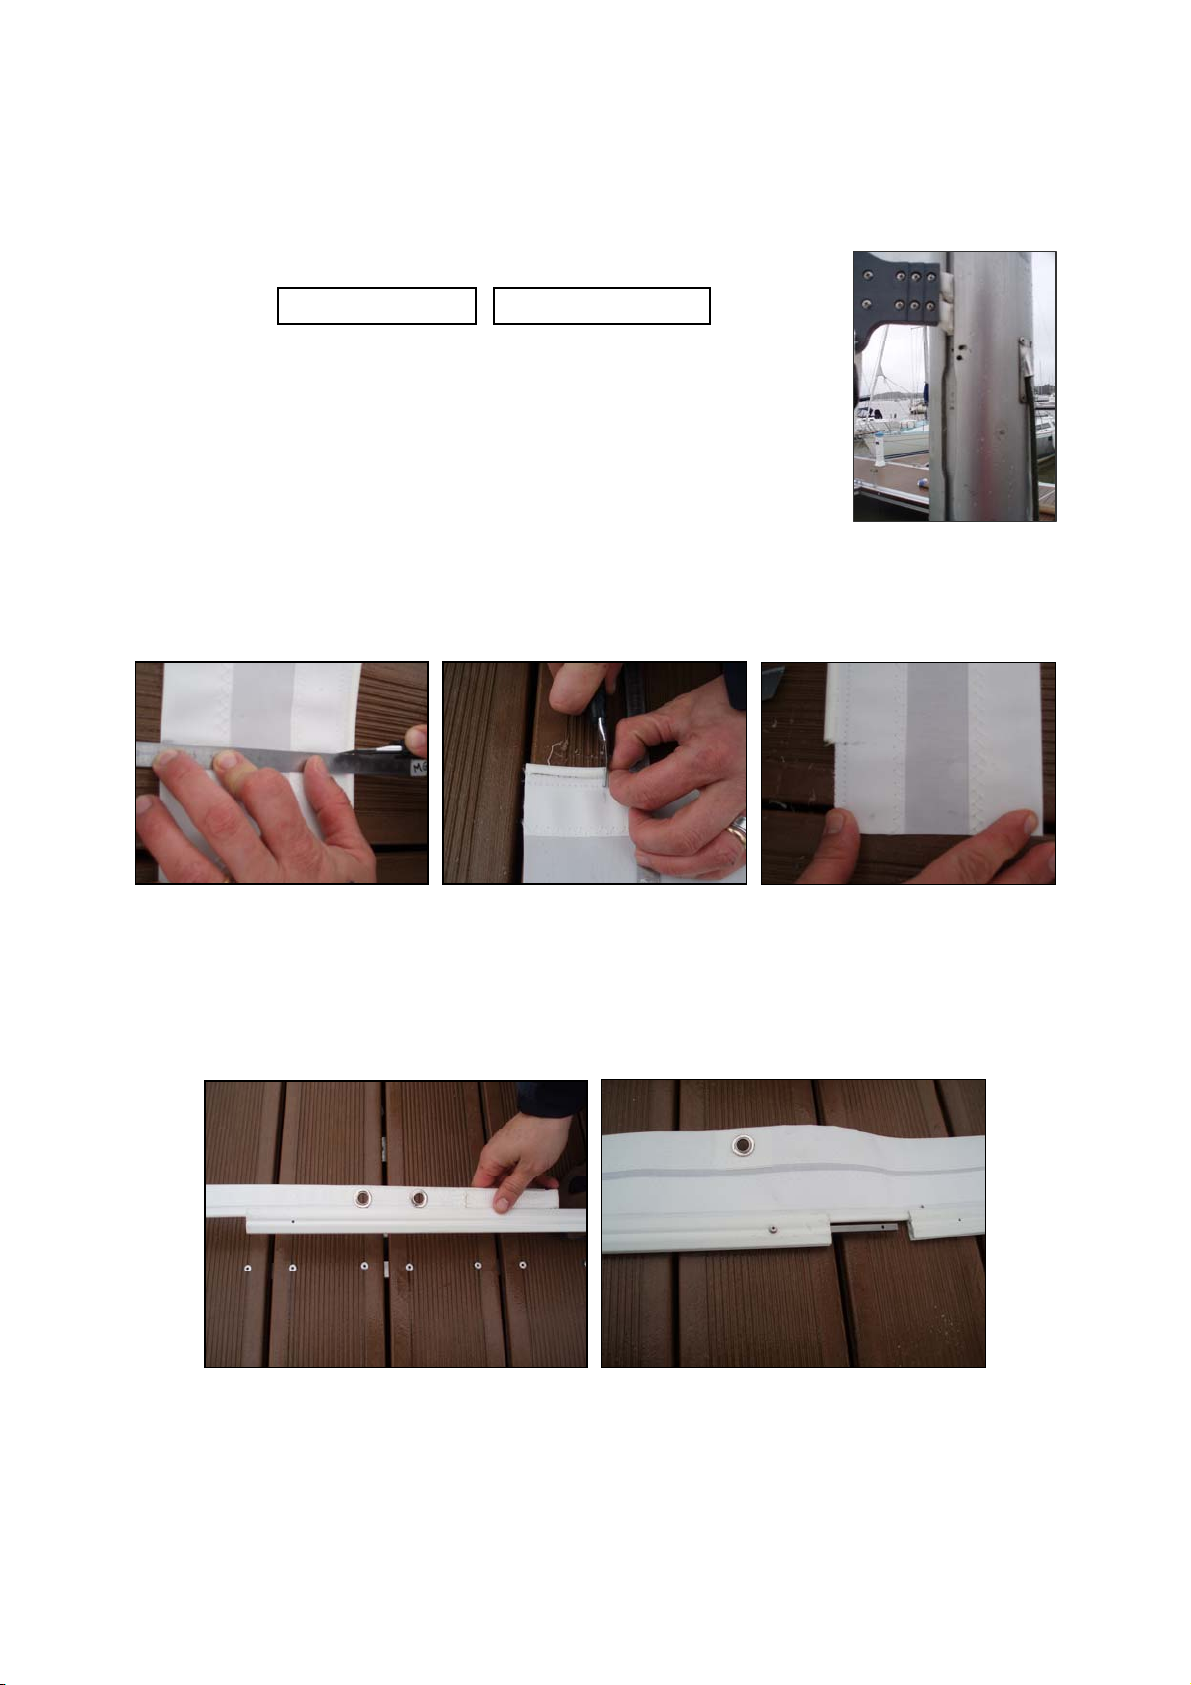
III.2 FITTING THE SLIDE SCREWS INTO THE MAST TRACK........................................................... 7
III.3 FITTING THE GOOSENECK .........................................................................................................8
III.4 FITTING THE HALYARD SPREADER ..........................................................................................8
III.5 ASSEMBLING THE LUFF SECTION & LUFF TRIANGLE & FEEDER .........................................9
III.6 CUTTING THE BOOM SECTION AND THE MANDREL TO LENGTH.......................................14
III.6.A How to calculate the length of the boom SECTION..............................................................14
III.6.B Cutting the mandrel (11F) to length ......................................................................................16
III.6.C Fitting the mandrel onto the boom ........................................................................................16
III.7 Fitting the boom onto the gooseneck ...........................................................................................18
III.8 FITTING THE BOOMVANG HOUND AND THE BOOMVANG....................................................19
III.9 FITTING OF THE LUFF TRIANGLE ON THE MAST .................................................................. 20
III.10 ADJUSTING THE POSITION OF THE MAINSHEET BALES (1)............................................ 20
III.11 INSTALLATION OF THE CONTROL LINES TO THE COCKPIT ............................................21
IV. FITTING THE MAINSAIL .................................................................................................................22
V. ADJUSTMENT OF THE BOOMVANG ANGLE TO THE MAST......................................................24
VI. USING THE PROFURL IN-BOOM REEFING SYSTEM .................................................................24
VI.1 Rules of thumb : ...........................................................................................................................24
VI.2 LIMITS FOR USING THE SYSTEM IN RELATION WITH APPARENT WIND............................25
VII. WARRANTY.....................................................................................................................................26
VIII. MK1R SPARE PARTS LIST ............................................................................................................27
IX. MAINSAIL DESIGN SPECIFICATIONS................................................. 29
IX.1 GEOMETRY .................................................................................................................................29
IX.1.A Luff curve design ...................................................................................................................29
Luff curve: ............................................................................................................................................29
IX.1.B Foot curve design..................................................................................................................29
IX.1.C Roach ....................................................................................................................................29
IX.2 FINISH DESIGN ...........................................................................................................................29
IX.2.A Luff tape material...................................................................................................................29
IX.2.B Foot tape diameter ................................................................................................................30
IX.2.C Luff and foot TAPE diameter.................................................................................................30
IX.2.D battens...................................................................................................................................30
IX.2.E Clew tack and head assembly ..............................................................................................30
PRELIMINARY CAUTIONS
The PROFURL in-boom mainsail reefing system is not designed to be
installed on wooden masts, or aluminium masts with track added with
screws, rivets, glue or any similar assembly. Fitting on a carbon mast is not
recommended as it requires specialized knowledge and skills. Please
contact us.
Please check that there is no sign of corrosion on the mast which may
compromise the strength of the assembly.
The person in charge with fitting will be fully responsible for installation and
adaptation on board according to the specifications shown in this manual.

MK 1R
4
I. PRELIMINARY
I.1 General description
Note : names in bold refer to parts shown on the exploded view page 5
The PROFURL MK0 / R in-boom furling system includes :
1. One set of plastic luff sections (16), each being 3 meter long, a sailcloth luff triangle (15),
and a feeder (10). (15) and (10) are linked to the mast with conventional mast slugs (not
provided).
One of the luff section (1) and the lower end of the luff triangle (2) will be re-cut to length to
match the expected luff length of the mainsail.
2. Joiners (9) are used to connect the various luff sections (16). They are locked by mean of
screws- washers and nuts (9B).
3. The bottom end of the luff sections (16) are screwed (10D) to the feeder (10). The luff
triangle (15) is linked to the foil sections by a luff rope.
4. The luff triangle (15), the mast slugs strap (10F) and the feeder (10) are assembled by
threading (10C) of the two half feeder. The strap (10F) immobilization during assembly is
made with adhesive (10G).
5. The assembly luff section + luff triangle + feeder is pulled up on masthead with the
topping lift or a lashing. The stretch strap (17) passing by the mainsheet bails (1) keep the
luff section tight.
6. A gooseneck (8) fit on the mast with 2 slide screws (5), and two gooseneck plates (13)
bent to the mast’s shape while fitting, and then riveted onto the mast with the pop rivets (14)
supplied.
7. A boom section (11G) which has been delivered either in 4 (13’ 2’’) or 5 (16’ 5’’) meters. It
may be necessary to re-cut the boom profile to length.
8. A mandrel (11F) turns on bearings (11D and 11M) rotating around a bearing holder (11J)
at the rear end of the boom, and on the drum-bearing holder (11H) at the front, turning
around a pin (11E) inserted in each of the boom end fittings (11B and 11C). When re-
cutting the boom profile (11G) to length, the mandrel (11F) should also be re-cut by the
same amount.
9. A drum boom end fitting (11B) includes the drum-bearing holder (11H) fitted into the
mandrel (11F) :when the drumis loaded with the furling line, pulling on the furling line while
releasing the mainsail halyard will rotate the mandrel (11F), which will furl the sail.
10. 4 adjustable mainsheet bails (1) : 2 to fix main sheet blocks, 1 to fix the boom brake or a
boom preventer, and 1 to fix the stretch trap (17).
11. A special boom strut (6). It is attached :
- to the mast by means of a boom strut attachment (7), including a gooseneck (7A)
attached to the mast with 2 slide screws (5) and two gooseneck plates (12) which will
be bent and riveted to the mast with the pop rivets (14) supplied. The boom strut
upper end will be attached onto an articulation fitting (7B) rotating in the boom vang
gooseneck.
-to the boom with an adjustable boom vang hound (2).
12. A ball bearing block
13. A furling line
14. A boom brake

MK 1R
5
1
2
2B
2A
4
3
11I 11K
11D 11A
11J
11L
11C
11G
11F
3
11H
11M11L
11K
11I
11E
11A
11E
11B
11
6
6A
6A
5
12
7B
7
7A
16
15
18
17
10A
10E
10F
10C
10B
10D
10D
10G
10
9
9A
9B
8B
8C
8D
8
Schéma d’ensemble et repères
11A
11B
20

MK 1R
6
I.2 TOOLS NEEDED FOR FITTING
In all cases of fitting
A tape line
An electric drill
A set of drills
A hack saw with a (new) blade with small teeth
A file
A pencil
A plastic hammer
Metrics 6 mm, 10 mm, 17 mm pipe-wrench.
A dynamometrical wrench (1daN/m)
1 set of Allen wrenches (supplied)
2 clamps with a minimum opening 250 mm (9 27/32’’)
Universal pliers
A cutter blade (with new blades)
A large sheet of paper with corners perfectly at 90° and adhesive tape
Several small plywood or rubber shims.
A pop rivet gun for 5 mm rivets.
A cross recess screwdriver
A hollow punch (supplied)
2 standard mast slug (1 17/64’’ long max) (non supplied) fitted to the mast.
Note : the plates to fit the gooseneck and boom vang attachments are 4 mm thick and made out of
aluminium. A convenient set of clamps with minimum 150 mm (6”) opening should be used to bend them
at the mast shape
If the fitting is made on a standing mast
A Boson’s chair (while assembling the halyard spreader (20)).
Some short ropes of 6 or 8 mm (1/4” or 5/16”) diameter
Please purchase a 6 mm furling line and a ball bearing block to lead the furling line to the cockpit.
II. PREPARATION
II.1 Unfitting the hardware FROM the mast
II.1.A - Dismantle the original gooseneck, as well as cleats, winches and winches
brackets on the mast, as well as any piece of equipment which would interfere with the
fitting of the new gooseneck and with the ability for the forward boom end fitting to rotate
when the boom will swing from one side to the other.
Please see § III.1.and drawing 1 for dimensions of the new gooseneck in relation with mark
« C » on the mast.
II.1.B - The original boom vang attachment should not be used, as the rotation
axis of the boom and of the new gooseneck need to be in line, which would never be
the case with the original boom vang attachment.
II.1.C - Dismantle the original feeder (if any) at the mast track entrance.
II.1.D - Check that the slide screws (5) supplied have suitable dimensions for the
mast track. If not, their width should be modified (turned, machined, grinned, filed)
accordingly.
In all other cases please contact us.

MK 1R
7
III. INSTALLATION
III.1 DETERMINING THE HEIGHT OF THE GOOSENECK
III.1.A -To avoid any potential conflict between the boom and the cabin top, a
bimini, a lifeline or any other piece of equipment, please accurately mark the level of the
lower edge of the original boom. See drawing 1. and draw the line “C” on the mast.
III.1.B - Check that the boom vang (6) delivered with your system will make once
installed a minimum 30° angle with the mast and the boom. Should it not be the case,
the position of the new gooseneck (8) must be raised on the mast in order to obtain at
least this 30°angle .
Note pin to pin boom vang length : 1400 mm 4’ 7 1/8”) open / 1305 mm (4’ 3 3/8”) closed
III.1.C - Draw a line « B »on the mast at 364mm (1’ 2 21/64”) above line
« C ».The line « B » will correspond to the level of the upper edge of the gooseneck
plates (12) once fit on the mast.
III.2 FITTING THE SLIDE SCREWS INTO THE MAST TRACK
III.2.A - 2 slide screws (5) are needed for the boomvang attachment (7)(See
Drawing 7). Slide these slide screws (5) down to the mast foot to later fit the boom vang
attachment (7) (See §III.8 p 18 ).
III.2.B - Slide 2 extra slide screws (5) into the mast track for fitting the
gooseneck(8).
Drawing 1

MK 1R
8
III.3 FITTING THE GOOSENECK
III.3.A - Attach the gooseneck (8) at the convenient height (§ III 1) with the 2
corresponding slide screws (see § III.2.B), washers and locknuts (5). Tightening torque
must be 1 to 1.5 daN/m.
III.3.B - Bend the aluminium gooseneck side plates (12) with clamps to accurately
camber them to the mast shape. During bending please protect the plates from dings
and dents.
III.3.C - Screw the sideplates (13) onto the
gooseneck. Would the sideplates be too long, they
can be re-cut if necessary, keeping in mind too much
length is always better than too little.
III.3.D - Draw lead lines for drilling (Ø5 mm 13/64”
drill) on the side plates (12) (suggested jig drill
provided) and machine holes so that the conical heads
of the pop rivets will be flush with the surface of the
side plates. Press the side plates on the mast with
clamps ( please protect the plates with any convenient
means). There should have at least 8 pop rivets (13)
on the mast on each side plate (12).
III.4 FITTING THE HALYARD SPREADER
The halyard spreader (20) is necessary if the sheave from the mast crane don’t
carried out enough (50mm 1 31/32’’ minimally) the halyard from the mast bottom part.
ADVISING : We advise the rigger to pull up itself to the mast thanks to the topping lift.
EASY WAY : When rigger pull up itself with the main sail halyard, position the halyard
spreader on the main sail halyard before fixing the boson’s chair.
III.4.A – Position the halyard spreader on the
mast (the highest possible).
III.4.B – Point the mast according the drill on
the halyard spreader and bore at Ø5mm
(13/64”).
III.4.C – Hang the halyard spreader to the mast
with pop rivet (supplied).

MK 1R
9
III.5 ASSEMBLING THE LUFF SECTION & LUFF TRIANGLE & FEEDER
III.5.A – Pull up the main sail halyard to the masthead and measure with tape
line lenght “X” to the “C” drawing previously marked.
Deduct 520mm (1’8 15/32’’) from this value :
Caution : Ensure that “Y” measure do not occur with the mast luff
track entrance. If it is the case, you would increase or decrease
the “Y“ value of 100mm (3 15/16’’).
III.5.B – Cut carefully with cutter blade the lower part from the luff triangle
(15) to the “Y” value from the upper part (Picture A). Cut up the luff line 50mm (1 31/32’’)
shorter than the cut (Picture B and C).
Photo A Photo B PhotoC
III.5.C – Thread the luff section (16) on to the luff tape of the luff triangle (15)
(Picture D) and assemble them with the connector (9) (Picture E). Fit the connector’s
screw (9B) (Picture G) after coating the end part of the threading with Profurl adhesive
52052 (Picture F).
Photo D Photo E
Y
=
X
–
620mm
Y
= X
–
2’ 13/32’’

MK 1R
10
Photo F Photo G
III.5.D – Position then this foil section so as it rise to the surface to the
extremity part of the luff line in the lower part of the luff triangle (15) (Picture H). Cut
surplus foil section (16) exceeding on upper part : it end would have to respectively
raise the high end of the luff triangle (Picture I). Burr the cut (Picture J).
Photo H Photo I Photo J
III.5.E – Feeder fitting : Most of the time the front part of the feeder (10) will
have to be recur (Picture K). The feeder will have to be shortened so as been the luff
triangle (15). The cut will be done according the appropriate groove (closest upper
groove) so as to the drawing 2 arrangement.
Drawing 2

MK 1R
11
Position temporarily the 2 half-feeder (10A and 10B) to identify the cutting
groove (Picture L). Cut and burr.
Photo K Photo L
III.5.F – Arrange the double coated tape adhesive (10G) onto the 2 half
feeder nick design for (Picture M). Shorten it if necessary (Picture N).
Photo M Photo N
III.5.G – Arrange the two half feeder (10A and 10B) in opposite (Picture O).
Get pass the mast slugs strap (10F) onto mast slugs (not provided) (Picture P).
Photo O Photo P
Put the strap flatly onto the two half feeder neck designed. Cut off the extra
length of the strap (Picture Q) if necessary so as, while the feeder is closed, to keep the
mast slugs at 5mm (13/64’’) from the feeder mast part extremity (Picture R). Take out the
protection from the double coated tape adhesive and stick definitively the strap on.

MK 1R
12
Photo Q Photo R
III.5.H – Close the two half feeder (10A and 10B) to shut away the lower part
of luff triangle (15) and the foil section (16) into the corresponding shape (Picture T).
The two lower parts, from the luff triangle and from the feeder will have to coincide
(Picture S). If a grommet from the luff triangle hemp the feeder closing, just suppress it
tidily.
Photo S Photo T
III.5.I – Fit the two half feeder (10A and 10B) with the self-tapping screw
provided (10C) (Picture U). Do not force the binding!
III.5.J – Position and crimp the thimble (10E) with the hollow punch
(provided) (Picture V).
Photo U Photo V

MK 1R
13
III.5.K – Drill the lower part, Ø4 mm (5/32’’) hole of the foil section (16)
according to the feeder shaped hole. Fit by screw and nut (10D) the feeder (10) and the
foil section (16) (Picture X).
Photo W Photo X
III.5.L – Mast slide: Take out the mast slide from the original main sail.
Caution: Keep this mast slide as it will be fitted on the front part of the luff section (15)
thanks to the snap-in shackles provided (Picture Y). (See mainsail design specification
IX.2.D)
Photo Y

MK 1R
14
III.6 CUTTING THE BOOM SECTION AND THE MANDREL TO LENGTH
III.6.A How to calculate the length of the boom SECTION.
Case # 1: PROFURL took care of cutting the boom for you to your specific length
Case # 2: The PROFURL boom being delivered in over length (standard length), the
opportunity may be taken to make the boom longer. Caution : changing
the boom length and foot length of the sail will affect the balance at the
helm when sailing under sails. In this case check that the aft end of the
boom cannot touch the backstay or any other piece of equipment on
board.
Drawing 3 refer to case #1 for dimensions.
The PROFURL in-boom reefing system is delivered pre-assembled. In case #2
the boom section (11G) and the mandrel (11F) may have to be re-cut to length to match
the boat’s requirements when fitting the system.
CAUTION : should the complete length of the boom profile be used, the rear
boom end fitting is just temporarily attached to the boom profile for
shipping. Please follow the rear end boom fitting assembly procedure from §
III.6.C.5 and on as if the boom profile had been re-cut.
Drawing 3

MK 1R
15
III.6.A.1 - To cut the boom section (11G) and the mandrel (11F) to length, first
dismantle the rear boom end fitting (11C) from the boom section and pull out the
mandrel (11F) from the boom section.
Caution : during dismantling, the mandrel (11F) will not be held any more. Please
control the mandrel as it potentially may fall down, when pulled backwards. Also take
care not to lose the washers (11I & 11K) located forward of the drum (11H).
III.6.A.2 - To re-cut the boom section (11G) to length, and to make sure that the
cut is accurately perpendicular to the section, wrap a sheet of paper or Mylar (with
accurate right angle corners) so that the edges are in perfect line, and attach it with
adhesive tape. Please see drawing 4. Draw a line on the boom profile, following the
edge of the sheet where the boom profile will be cut.
III.6.A.3 - Cut the boom profile according to the line and file smooth.
Drawing 4

MK 1R
16
III.6.B Cutting the mandrel (11F) to length
The mandrel (11F) should be re-cut of exactly the same length of the one having
been cut off from the boom section.
III.6.B.1 – Remove the bearing holder (11J) + bearing (11D) assembly from the
rear end of the mandrel (11F).
III.6.B.2 - Cut the mandrel (11F) at its rear end with the same method as the one
having been used for cutting the boom section (11G). Same as § III.6.A.2, File the rear
(cut) end of the mandrel and foot track ends smooth.
Caution : the forward (drum) end of the mandrel (11F) must not be cut !
III.6.B.3 - Fit again the bearing (11D) and bearing holder (11J)(11l+11K) into the
cut/rear end of the mandrel. Drill at 7mm (9/32’’) and tap at M8 (8mm) at 50 mm (1
31/32’’) from the cut end. Fit and tighten the set screw (11A).
III.6.B.4 - In case the mandrel has been cut a little too short, the fore and aft play
must be reduced to a minimum. To do this, loosen screw (11A), push the mandrel
forward, and then pull out the bearing holder (11J) so that the washer (11I) touches
backwards, tighten again screw (11A).
III.6.C Fitting the mandrel onto the boom
III.6.C.1 - Fit the mandrel (11F) into the boom section (11G), fit the washers (11I
and 11K), the drum (11H) and the drum bearing (11M) onto the stainless steel pin (11E)
inserted in the drum boom end fitting (11B).
III.6.C.2 - Check that the mainsheet bales (1) and boom vang hound (2) are
properly fitted in the bottom track of the boom section as shown on drawing 6.
III.6.C.3 - Slide the bearing (11D and 11J) and the washers (11I and 11K) located
at the rear end of the mandrel (11F) onto the stainless steel pin inserted in the rear
boom end fitting (11C).
III.6.C.4 - Completely insert the rear boom end fitting over the rear (cut) end of the
boom profile (11G). A ratchet tie down strap is a handy and powerful tool to achieve this if
necessary.
III.6.C.5 - Drill holes ∅5mm (13/64’’)at the rear end of the boom profile (11G)
through the pre-drilled holes of the rear boom end fitting (11C). Fit the corresponding
pop rivets (11L) supplied into these holes to permanently attach the boom end fitting
onto the boom profile.
Drawing 5

MK 1R
17

MK 1R
18
III.7 Fitting the boom onto the gooseneck
III.7.A - Hoist the boom with a halyard and a topping lift (see drawing 6) by
keeping it as horizontal as possible.
III.7.B – Fit horizontal pin (8D) . Fit and open split pin (8A).
Caution : do not drop or raise the boom more than 15° from horizontal position as
it could cause permanent damage to the gooseneck (8).
CAUTION : The axis hole who must receive the spit plin must be positioned
oppositely to the Ø18mm ( 45/64’’) hole.
Drawing 6

MK 1R
19
III.8 FITTING THE BOOMVANG HOUND AND THE BOOMVANG
Reminder: the ideal working angle of the boomvang being 45° the boomvang must not
angle less than 30 ° with the mast or boom.
III.8.A -Fit the boom vang attachment (7) with the 2 slide screws (5) which had
been stored at the mast foot (please see § III.2.B).
III.8.B - Bend the aluminium gooseneck side plates (12) to the mast shape.
During bending please protect the plates from dings and dents.
III.8.C - Draw lead lines for drilling on the side plates (12) (suggested jig drill
provided) Drill at Ø 5 mm (13/64’’) and machine holes so that the conical heads of the
pop rivets will be flush with the surface of the side plate. Fit the pop rivets (13) on the
side plates. There should have at least 8 pop rivets (13) on the mast on each side plate.
III.8.D - Fit the boom vang (6) onto the articulation eye (7B) and onto the boom
vang hound (2). Fit the pins (6A) and the split pins.
III.8.E - Fit the stickers onto the plates to hide the head of the pop rivets. Do the
same for the gooseneck plates.
Drawing 7

MK 1R
20
III.9 FITTING OF THE LUFF TRIANGLE ON THE MAST
III.9.A – Insert the mast slug into the mast luff track and pull up the luff
triangle to masthead.
During this step avoid excessive bending from the foil section. Side mast
approach is advised.
III.9.B – Pass the strecht strap (17) into the feeder’s thimble (10E) and into
the mainsheet bales on mast side. Close and stretch moderately the stretch strap
buckle. (Picture Z1 and Z2).
Photo Z1 Photo Z2
III.9.C – Move backwards the mainsheet bales (1) to hardly stretch the strap
(17) and immobilize it with its two set screws (1B).
III.10 ADJUSTING THE POSITION OF THE MAINSHEET BALES (1)
III.10.A - Adjust the position of the mainsheet bales (1) with the set screws which
can be reached from underneath the boom section. Fasten the mainsheet blocks on the
mainsheet bales.
CAUTION: on boats with a mainsail track or mainsail block attachment on deck ahead
of the main hatch the mainsheet bales (1) must be re-positioned as far backward as
possible.
III.10.B - Push the boom by hand over the lifelines as far as possible and tie a knot
on the mainsheet so that in no case the boom section can be damaged by the rearmost
shrouds when running downwind or jibing.
Table of contents
Other Wichard Boating Equipment manuals