Wilbur Curtis Company Gemini IntelliFresh GEMTIF User manual

1
Symbols
WARNINGS – To help avoid personal injury
Important Notes/Cautions – from the factory
Sanitation Requirements
Important Safeguards/Conventions
This appliance is designed for commercial use. Any servicing other than cleaning and preventive maintenance
should be performed by an authorized Wilbur Curtis service technician.
•DONOTimmersetheunitinwateroranyotherliquid
•Toreducetheriskofreorelectricshock,DONOTopentheservicepanels.Therearenouserservice-
able parts inside.
•Keephandsandotheritemsawayfromhotsurfacesofunitduringoperation.
•Nevercleanwithscouringpowders,bleachorharshchemicals.
Your IntelliFresh brewer is Factory Pre-Set and Ready to Go… Right from the Box.
Following are the Factory Settings for IntelliFresh brewer:
• Brew Temperature = 200°F • Water Bypass = On LARGE & MEDIUM brew only
• Brew Volume = Large-Medium-Small • Energy Save Mode = Off
• Quality Timer = 120 Minutes • Warmer Auto-Off = 10 Hours
System Requirements:
• Water Source 20 – 90 PSI (Minimum Flow Rate of 1 GPM)
• Electrical: See attached schematic for standard model or visit www.wilburcurtis.com for your model.
SETUP STEPS
Theunitshouldbelevel(lefttorightandfronttoback)andlocatedonasecurecountertop.Connectawater
linefromthewaterlterwithaminimumowrateof1gallonperminutetothebrewer.
NOTE:Awaterltrationsystemmustbeusedtohelpmaintaintrouble-freeoperation.Air must be purged
from the cartridge prior to connection to equipment.Inareaswithextremelyhardwater,wehighlyrec-
ommendtheuseofaCurtisapprovedwaterlter.Forourfulllineoflters,logontowww.wilburcurtis.com.
1.A3/8”Flarex3/8”Malepipeelbowissuppliedwiththebrewerforwaterlineconnection.Usetubingsized
sufcientlytoprovideaminimumof1.0GPM.
2.Connecttheunittoanappropriateelectricalpowercircuit.
3.Turnonthetoggle(STANDBY/ON)switchbehindtheunit.Theheatingtankwillstarttoll.Whenthewater
levelinthetankrisestothecorrectvolume,theheatingelementswillenergizeautomatically.Withthe
IntelliFreshbrewer,thereisnodangerofelementburnoutcausedbyoverheatinganemptytank.
4.Theheatingtanktypicallyrequires20to30minutestoreachoperatingtemperature(200°F),indicated
whenREADYisdisplayedontheLCDscreen.
5.Priortobrewing,dispense12ouncesofhotwaterthroughthehotwaterfaucet.
6. Brewacycleofatleast12ounces,topurgethewaterlinesofanyairthatmaybetrappedafterlling.
Wilbur Curtis Company, inC.
Models
GEMTIF
GEMSIF
GEM3IF
Service Manual – Gemini IntelliFresh Brewer
CAUTION:DONOT
connectthisbrewertohot
water.Theinletvalveis
notratedforhotwater.
CAUTION:Pleaseuse
this setup procedure
before attempting to use
thisbrewer.Failuretofollowthe
instructions can result in injury or the
voidingofthewarranty.
IMPORTANT:Equipment
to be installed to comply
withapplicablefederal,
state,orlocalplumbing/electrical
codes having jurisdiction.
FOR THE LATEST SPECIFICATIONS AND INFORMATION GO TO WWW.WILBURCURTIS.COM
ISO9001:2008
Wilbur Curtis Company
Montebello,CA90640
Tel:(323)837-2300
www.wilburcurtis.com
NSFInternationalrequiresthefollowingwaterconnection:
1. Aquickdisconnectoradditionalcoiledtubing(atleast2xthedepthoftheunit)sothatthemachine
can be moved for cleaning underneath the unit.
2. Thisequipmentistobeinstalledwithadequatebackowprotectiontocomplywithapplicable
federal,stateandlocalcodes.
3. Waterpipeconnectionsandxturesdirectlyconnectedtoapotablewatersupplyshallbesized,
installedandmaintainedinaccordancewithfederal,state,andlocalcodes.

2
GEMINI IF BREWER
SATELLITE
UCM CONTROL
IF CONNECTOR
INTELLIFRESH FUNCTION & FEATURES
WARNING: AVOIDSCALDING,Donotremovebrewconewhilebrewlightisashing.
1.BrewershouldbeON.Conrmthisatreartoggleswitch,thenpresstheON/OFFbuttonontheUCM(UniversalControlModule).Ready-to-
Brewshouldbeonthedisplay.IfthebrewerisconnectedtoanInterLockgrinder,thegrindershouldbeon.WhenInterlockconnectionis
made,grindcoffeeatthistime.
2.PositionanemptySatelliteontothebrewdeck.
NOTE:OnlyuseIntellifreshSatellitesonIntellifreshBrewers.
6. Pressappropriate
brewbutton.
Brewingwillbegin
immediately.
5. Transferlledbrew
conetobrewer.
3. Placeacleanlter
intothebrewcone. 4. Fillbrewconewith
appropriate amount
of ground coffee.
INTELLIFRESH BREWING INSTRUCTIONS
TheIntelliFreshsystemwillalertyouwhenthecoffeehasexceededthedesiredhold-
ing time. The Intellifresh system is activated by a connector on the Satellite connecting
tothecorrespondingconnectoronthecenterpanel.IntelliFreshisadjustablethrough
theUCMcontrolleronthebrewer.
Quality Timer(FactorySetto2hours)
Press¤toselect,press<or>tochoosethedesiredsetting.Range20min.to240
min.Thetimerisintendedtonotifytheuserwhenthecoffeelosesitsfreshness.The
indicatorlight(LED)onthesatellitewillremainsolidreduntiltheQualityTimerexpires
(FactorySetto2hours).AtexpirationtheLEDwillashandremainashingatthe
factory setting for an additional 8 hours. The additional 8 hours is controlled by the
WarmerAuto-Offsetting(seebelowWarmerAutoOff).
• SettingRange:20–240minutes.Thedefaulttimeis2hours.
• TimeExpirationIndicator:LEDashesafterexpirationofQualityTimerSetting
foruptoatotalof12hours.Thedefaulttimeis8hoursafterexpirationofthe
QualityTimer.
Warmer Auto-Off (Factorysetto10Hrs.)
Press¤toselect<or>toadjustfrom1-12
hours. This feature has higher priority than the
QualityTimer.Itshutsoffthewarmersaftera
pre-determinedtime(factorysetat10hours)
startingwhentheBrewButtonispushed.The
QualityTimerdoesnotaffectthisfunction.

3
The G3/Gold Cup Series Brewing System is Factory Pre-Set for Optimum Performance.
After connection to water and power; the rear toggle switch must be on. You will hear a beep sound, indicating power is available to the controller.
The control displays . Press ON/OFF button and the screen will display . After three seconds, is displayed.
Water will ll the tank (approximately 2-3 minutes depending on water ow rate). When the proper level is reached will appear on the
screen. It takes approximately 20 minutes to reach setpoint temperature of 200°F.
Control will display when temperature reaches the setpoint (200°F). Unit is now ready to brew.
<GEMINI TWIN>
WILBUR CURTIS
CURTIS CURTIS
FILLING
CURTIS
HEATING
CURTIS
READY
PROGRAM
MENUS
Allprogrammingselectionsareperformedwiththethreecenter
buttons.
Thesymbolsbelowthebuttonsare:
ScrollLEFT
¤SELECTIONorENTERtosavenewparameter
ScrollRIGHT
IMPORTANTNOTE:
GEM INTELLIFRESH

4
Program Menus GEMIF Brewer
ProgramMenus
Temperature
EnergySaveMode
BrewCountOdom
Global Recipes
BannerName
Access Code
Service Call
MasterReset
ColdBrewLock
BrewCountTotal
From Program Menus press > display will show the next feature Global Recipes.
QualityTimer
NON-BREW PROGRAMMING
Temperature (Factory set to 200ºF)
Press ¤ to Select. Press < or > to move to desired temperature and then ¤ to set. Temperature is programmable from
170ºF to 206ºF in 2-degree increments.
Energy Save Mode (Factory set to OFF)
Press ¤ to Select, < or > ON, OFF or ON 140ºF , ¤ to set. When in ON, unit will automatically shut off 4 hours from last
brew. When feature is OFF, unit does not utilize the energy saving mode.
In the ON 140ºF position, temperature lowers to 140ºF, if unit has not brewed in 4 hours. This feature will save energy by
maintaining a lower temperature in the tank in periods of non-operation.
Brew Count Odom
Press ¤ to display total brew cycles. Press EX or Reset.
Quality Timer (Factory set to 120 Minutes)
Press ¤ to select, press < or > to choose desired setting. Range 20 min. to 240 min. The timer is intended to notify the
user when the coffee loses its freshness. The indicator light (LED) on the satellite will remain solid until the Quality Timer
expires (Factory Set to 120 minutes). At expiration the LED will ash and remain ashing at the factory setting for an ad-
ditional 8 hours. The additional 8 hours is controlled by the Warmer Auto-Off setting.
NOTE: LED solid means fresh coffee. LED ashing means freshness expired. LED off means warmer off.
Brew Count Total
Press ¤ to Select, Shows total gallons and total brew cycles on the unit. Cannot be reset.
Cold Brew Lock . . . (Factory set to 5º )
Press ¤ to select, < or > to select desired setting (CBL 5, 15 or OFF),¤to set.
The Cold Brew Lock feature allows the brewer to brew at three different temperature levels from the actual set point. The
rst setting is within 5 degrees of set point, next is within 15 degrees of set point, OFF is within 30 degrees of set point for
the Ready to Brew message, however, it will brew at any temperature.
Master Reset
Press ¤ to display Are You Sure?
Then < for Yes, > for No. Brewer factory defaults are then reset.
Service Call (Phone number Factory set to 1-800-000-0000 X0000)
Press ¤ to display number and change number or < to move place and EX to exit when complete. This number will be
displayed during a Heating system SENSOR ERROR or during a WATER ERROR.
Access Code (Factory set to 1-2-3-4)
Press ¤ to display number and change number, (the number can be changed 1 to 4) or < to move place and EX to exit
when complete.
Banner Name (Factory set to CURTIS)
Press ¤ to display letters and change letters or < to move place and EX to exit when complete
This feature allows up to 14 letters to be programmed for company name or regional name. Programming all blanks dis-
ables Banner Name. If programmed, Banner Name is displayed every 5 sec. on and off.
Warmers Auto – Off (Factory set to 10 Hrs.)
Press ¤ to select < or > to adjust from 1-12 hours. This feature has higher priority than the Quality Timer. It shuts off the
warmers after a pre-determined time factory set at 10 hours starting when the Brew Button is pushed. The Quality Timer
does not affect this function.
GLOBAL RECIPES
Global Recipes (Factory set to Gourmet STD)
Press ¤ to select. If selected, press < or > to choose a recipe based on the type of coffee being brewed. Selections are
Gourmet STD, Light Roast, Dark Roast, High Yield, Filter Pack, or Decaf. Press ¤ to select the desired recipe.
WarmersAuto-Off

5
Program Menus GEMIF Brewer
P-Maintenance
BrewByTime
BrewByVolume
Displ.BrewTime
Pre-infusion
PulseBrew
P-Maintenance (Factory set to OFF)
Press ¤ to Select, Set gallons brewed to indicate P-Maintenance. Press < or > to adjust from Off to 9500 gallons. This
feature advances in 100 gallon increments. Press ¤to exit.
Beeper On/Off (Factory set to ON)
Press ¤ to display ON or OFF. Pressing either < or > toggles between on and off. ¤ to set. When ON, this feature allows
you to hear a short beep each time a button is pressed.
Drip-out Mode (Factory set to 2 minutes)
Press ¤ to Select. Press < or > to move to desired time. Settings are OFF, 1, 2, 3, 4 and 5 minutes. Press ¤to Select
time.
Warmers Default (Factory setting - MED)
Press ¤ to Select. Press < or > to adjust from OFF, HIGH (185ºF), MED (182ºF) or LOW (178ºF). These temperatures
are ±3ºF.
Displ. Brew Time (Factory set to ON)
Press ¤ to display ON or OFF. Pressing either < or > toggles between on and off. After Display Brew Time an EXIT screen
will return you to Non-Brew Prog.
Display Messages (Factory set to On)
Display Messages allows the operator to change the screen display to read “Rinse Server Before Brewing” or to turn it off.
Press ¤ to display ON or OFF. Pressing either < or > toggles between on and off. ¤to set.
Display Timers (Factory set to OFF)
Press ¤ to display ON or OFF. Pressing either < or > toggles between on and off. This feature allows the operator to turn
off or on the display for the Quality Timer count-down. At the same time, it also turns off or on the audible alarm. Press ¤to
set and exit.
Drip-outMode
BeeperOn/Off
WarmersDefault
BREW BUTTON PROGRAMMING
Brew by Volume (Factory settings: LARGE 200oz ±8oz. MEDIUM 132oz±4oz. SMALL 64oz±4oz.)
Press ¤ to Select. Display will ask you to select a brew button, Large, Medium or Small. Press the desired brew button to
begin... when desired volume is reached press the same brew button to stop the ow. Now the volume has been set.
Brew by Time (Factory settings: LARGE 5min-25sec. MEDIUM 3min-32sec. SMALL 1min-52sec.)
Next item in the sequence is Brew by Time. Press ¤ to Select to change the brew time. Display will now show the current
time. By pressing < or > you can toggle back and forth from minutes to seconds to exit (ex). Change the time or set and exit
by pressing the ¤button.
Pre-Infusion (Factory Disabled)
Press ¤ to Select. Current setting in seconds is displayed < to decrease or select > to increase (range from OFF to 10
through 60 seconds), ¤to set.
If Pre-infusion is selected (ON), Cold Brew Lock is set within 5ºF of set point and Cold Brew Lock disappears from the list of
program selections. When Pre-infusion is ON, Pulse Brew disappears from the list of program selections.
Pulse Brew (Factory setting C)
Press ¤ to select, < or > to select OFF or one of ve pulse patterns (A to E) . The ve Pulse Brew options help “tune” or
change the coffee avor.
Guidelines for Pulse Brew:
Filter Pack type coffees typically extract better with the Aand B pulse setting.
Decaf coffees typically extract better with the B pulse setting.
High-Yield coffees typically extract better with the C pulse setting. Of course, any of the A, B or Csettings may be used to
suit your taste prole.
Settings Dand E are manual pulse counts.
To exit from the Pulse Brew mode, select 0for the time.
If Pulse Brew is on, Cold Brew Lock is set within 5ºF of set point and Cold Brew Lock disappears from the list of program
selections. When Pulse Brew is on, Pre-infusion disappears from the list of program selections.
DisplayMessages
DisplayTimers

6
Error Message
Anerrormessagewillappearonthe
screen in the event of a malfunction
underthefollowingconditions:
1.Waterleveloverow.
2.Breakintemperaturecontrol
circuit.
3.Excesstemperatureinheating
tank
4. Scalebuild-uponliquidlevel
probe,insidetheheatingtank.*
Toturnoffanerrormessage,pressthe¤buttonforveseconds.
*TheScaleerrorfeatureswillbeginappearinginlaterversionsofGEMIntellifreshbrewers.
Warmers
Thewarmer,withinthesatellitewillturnonautomaticallywhenthecoffeebrewcyclestarts.Thewarmersmaybeswitchedonandoffusingthe
WARMERbuttonsonthecontrolpaneloftheGEMIFbrewer.
TransferringanIntelliFreshsatellitefromthecoffeebreweraremotestandwillnotaffecttheQualityTimersetting.
ModelSelect
Model Select (Factory set to Gemini-Twin IF)
Press ¤ to select, < or > to select model. The selections are: ThermoPro-Twin, ThermoPro-Single, Gemini-Twin, Gemini-
Single, Milano-Twin, Milano-Single, Gemini-Twin IF, and Gemini-Single IF. Press ¤ to set. When the Model Select feature is
changed, all settings are reset to the defaults of the newly selected model. Also, the next feature Batch Select appears.
Batch Select (Factory set to One Batch)
Press ¤ to select, < or > to select One Batch, Two Batch or Three Batch. Press ¤ to set. Display exits programming mode
and returns to normal operation.
Program Menus GEMIF Brewer
Language (Factory set to English)
Press ¤ to Select. Press < or > to move to English or French. This feature is programmable for changing and adding
languages.
Language
By-Pass (Factory settings: LARGE 35%. MEDIUM 10%. SMALL Off.)
The By-Pass option helps with controlling extraction with larger brews. Contact time that is too long will extract undesirable
bitter, harsh avor compounds. By-passing some of the brew water around the coffee bed will balance the extraction.
Press ¤ to display current setting. Press < or > to change settings; OFF, 5% to 50%, in 5% increments. Press ¤to set.
By-Pass

7
GEMTIF
Rough-In Drawings
GEMSIF

8
1
2
3
4
5
32
19
6
7
8
9
10
11
12
42
13
39
15
17
18
43
44
45
20
21
22
30
31
25
26
23
27
24
28
29
33
34
35
41
36
46
537
16
14
40
38
47
Illustrated Parts List
GEMTIF

9
Illustrated Parts List
GEMTIF DESCRIPTIONINDEX Nº PART Nº
* SUGGESTED PARTS TO STOCK
1
2
3
4
5
6
7
8
8A
9
10
11
12
13
13A
14
15
16
17
18
19
20
21
22
23
24
25
26
27
28
29
30
31
32
33
34
35
36
37
38
39
40
41
42
42A
43
44
45
46
47
GEM3IF
WC-37121*
WC-442
WC-2977-101K*
WC-844-101*
WC-39744
WC-37388*
WC-39755*
WC-39756*
WC-29050*
WC-8559*
WC-3417*
WC-39745
WC-61960
WC-61960-BLK
WC-61963
WC-38504
WC-61962
WC-37008*
WC-43067*
WC-5527K*
WC-934-04*
WC-4382*
WC-1438-101*
WC-62033
WC-29044
WC-2402P*
WC-847 *
WC-37122 *
WC-1501*
WC-102*
WC-522 *
WC-43055*
WC-61955
WC-3528 *
WC-1809*
WC-5310*
WC-5231*
WC-3765L*
WC- 571K-R
WC- 571K-L
WC-43133
WC-5350*
WC-61954
WC-61954-BLK
WC-37266*
WC-37317*
WC-37365*
WC-37132*
GEM-6
SATELLITE, INTELLIFRESH
DUMP VALVE LEFT
SOLENOID, LOCK BREW CONE RIGHT 120V
KIT, SPRAY HEAD FITTING, GASKET, & JAM NUT
VALVE, BY-PASS, NON-ADJUSTABLE W/RSTRCTR
LABEL, UCM & OUTER 3-BATCH GEM-IF
KIT, LABEL & UCM GEMTIF 3-BATCH CURTIS
LABEL, UCM OVERLAY 1-BATCH
LABEL, UCM OVERLAY 2-BATCH
SPRAY HEAD, AFS-AMBER
RELAY, SOLIDSTATE 40A W/HEAT SINK
BREW CONE, ASSY W/SPLASH POCKET BROWN COFFEE
LABEL, BOTTOM PANEL
COVER, FRONT WELD ASSEMBLY SS
COVER, FRONT WELD ASSEMBLY BLACK POWDER COAT
HOLDER, IF CONNECTORS FEMALE GEMTIF
LABEL, WARNING SHOCK HAZARD
DECK, WARMER WELD ASSY
KIT, TANK LID ROUND
O’RING, 4.5” ID SILICONE
KIT, PROBE, ASSY WATER LEVEL W/FITTING, O-RING, NUT
ELEMENT HEATING 2.5KW 220V
GUARD, SHOCK HEATING ELEMENT
SENSOR, HEATING TANK
TANK, COMPLETE GEMTS NON-METAL FITTINGS
SLEEVE, OVERFLOW ASSY GEN USE
ELBOW, 3/8”FL x 3/8” NPT PLATED
VALVE, INLET 2 GPM 120V 10W GEN USE YEL BODY
DUMP VALVE RIGHT
FUSE HOLDER ASSY W/5A FUSE
SWITCH, RESISTIVE TOGGLE NON-LIT SPST 125/250VAC
THERMOSTAT, RESET
GUARD, SHOCK RESET T-STAT
COVER, TOP SS
LEG, 4” ADJUST 3/8-16 THREAD STYLIZED
FAUCET, PS/HPS SERIES HOT WTR
TUBE, 5/16 ID x 1/8W SILICONE
COMPOUND, SILICONE
KIT, VALVE REPAIR USE ON WC-847
KIT, IF CONNNECTOR-RIGHT
KIT, IF CONNECTOR- LEFT
O-RING, 1.424ID X 1.630 OD X .103 WALL GEMIF’s
TUBE, SILICONE Ø1/2” ID x Ø3/4” OD x 1/8” WALL
PLATE, BREWCONE STOP STAINLESS STEEL
PLATE, BREW CONE STOP BLACK POWDER COAT
KIT, TANK OVERFLOW FITTING WITH BUSHING
KIT, STRAIGHT FITTING WITH BUSHING
KIT, TANK INLET FITTING WITH BUSHING
KIT, VALVE REPAIR USE ON WC-844-101
FILTER, 500/PKG

10
Electrical Schematic
GEMTIF

11
5
6
7
8
9
10
11
12
14
40
36
16
17
18
19
20
21
22
25
23
24
26
27
28
29
30
31
32
33
1
2
43
3
4
34
37
38
39
42
7
13
15
35
Illustrated Parts List
GEMSIF

12
Illustrated Parts List
GEMSIF
1
2
3
4
5
6
7
8
9
9A
9B
10
11
12
13
14
15
16
17
18
19
20
21
22
23
24
25
26
27
28
29
30
31
32
33
34
35
36
37
38
39
40
41
42
43
SATELLITE, INTELLIFRESH
COVER, TOP
DUMP VALVE RIGHT
KIT, SPRAY HEAD FITTING, GASKET, & JAM NUT
BREW CONE, ASSY W/SPLASH POCKET BROWN COFFEE
SOLENOID, LOCK BREW CONE L/R LABEL
VALVE BY-PASS NON-ADJUSTABLE
KIT, LABEL & UCM GEMSIF 3-BATCH CURTIS
LABEL, UCM PANEL 3-BATCH GEMSIF
LABEL, UCM PANEL 2-BATCH GEMSIF
LABEL, UCM PANEL 1-BATCH GEMSIF
RELAY, SOLIDSTATE 40A W/HEAT SINK
COVER, FRONT
LABEL, BOTTOM WRAP GEMSIF
FAUCET, PS/HPS SERIES HOT WATER
HOLDER, IF CONNECTOR
LEG, 4” ADJUST 3/8-16 THREAD STYLIZED
DECK, WARMER W/A
ELBOW, 3/8”FL x 3/8” NPT PLATED
FUSE HOLDER ASSY W5A FUSE
PANEL, BACK GEMSS
SWITCH, TOGGLE NON-LIT DPST 25A 125/250VAC RST
VALVE, INLET 2 GPM 120V 10W GEN USE YEL BODY
SPRAY HEAD, AFS-AMBER
COVER, TOP HEATING TANK
GASKET, TANK LID
KIT, PROBE, ASSY WATER LEVEL W/FITTING, O-RING, NUT
TANK, COMPLETE GEMSS W/ULTEM FITTINGS
KIT,ELEMENT, HEATING 1.6KW120V W/JAM NUT, WASHERS
SENSOR, HEATING TANK
GUARD, SHOCK HEATING ELEMENT
THERMOSTAT, RESET
GUARD, SHOCK RESET THERMOSTAT
TUBE, 5/16 ID x 1/8W SILICONE
COMPOUND, SILICONE
KIT, VALVE REPAIR
KIT, IF CONNNECTOR-RIGHT
LABEL, WARNING SHOCK HAZARD
KIT, TANK OVERFLOW FITTING WITH BUSHING
KIT, STRAIGHT FITTING WITH BUSHING
KIT, TANK INLET FITTING WITH BUSHING
O-RING, 1.424ID X 1.630 OD X .103 WALL GEMIF’s
SLEEVE, OVERFLOW ASSY GEN USE (NOT SHOWN)
KIT, BY-PASS VALVE USE ON WC-844-101
FILTER, 500PK 12½ x 4
* SUGGESTED PARTS TO STOCK
GEM3IF
WC-61928
WC-37122*
WC-2977-101K*
WC-3417
WC-442
WC-844-101*
WC-37389
WC-39801*
WC-39802*
WC-39803*
WC-8559*
WC-61927
WC-39800
WC-1809*
WC-61963
WC-3528 *
WC-61930
WC-2402P*
WC-1501
WC-59020
WC-103*
WC-847 *
WC-29050*
WC-5853-102
WC-43062*
WC-5527K*
WC-62035
WC-904-04*
WC-1438-101*
WC-4394*
WC-522 *
WC-43055*
WC-5310*
WC-5231*
WC-3765L*
WC-571K-R
WC-38504
WC-37266*
WC-37317*
WC-37365*
WC-43133
WC-29044
WC-37132*
GEM-6
DESCRIPTIONINDEX Nº PART Nº

13
Electrical Schematic
GEMSIF(-10Only)
14
2
3
4
5
6
1
7
11
10
12
13
16
18
19
8
9
14
20
15
17
A
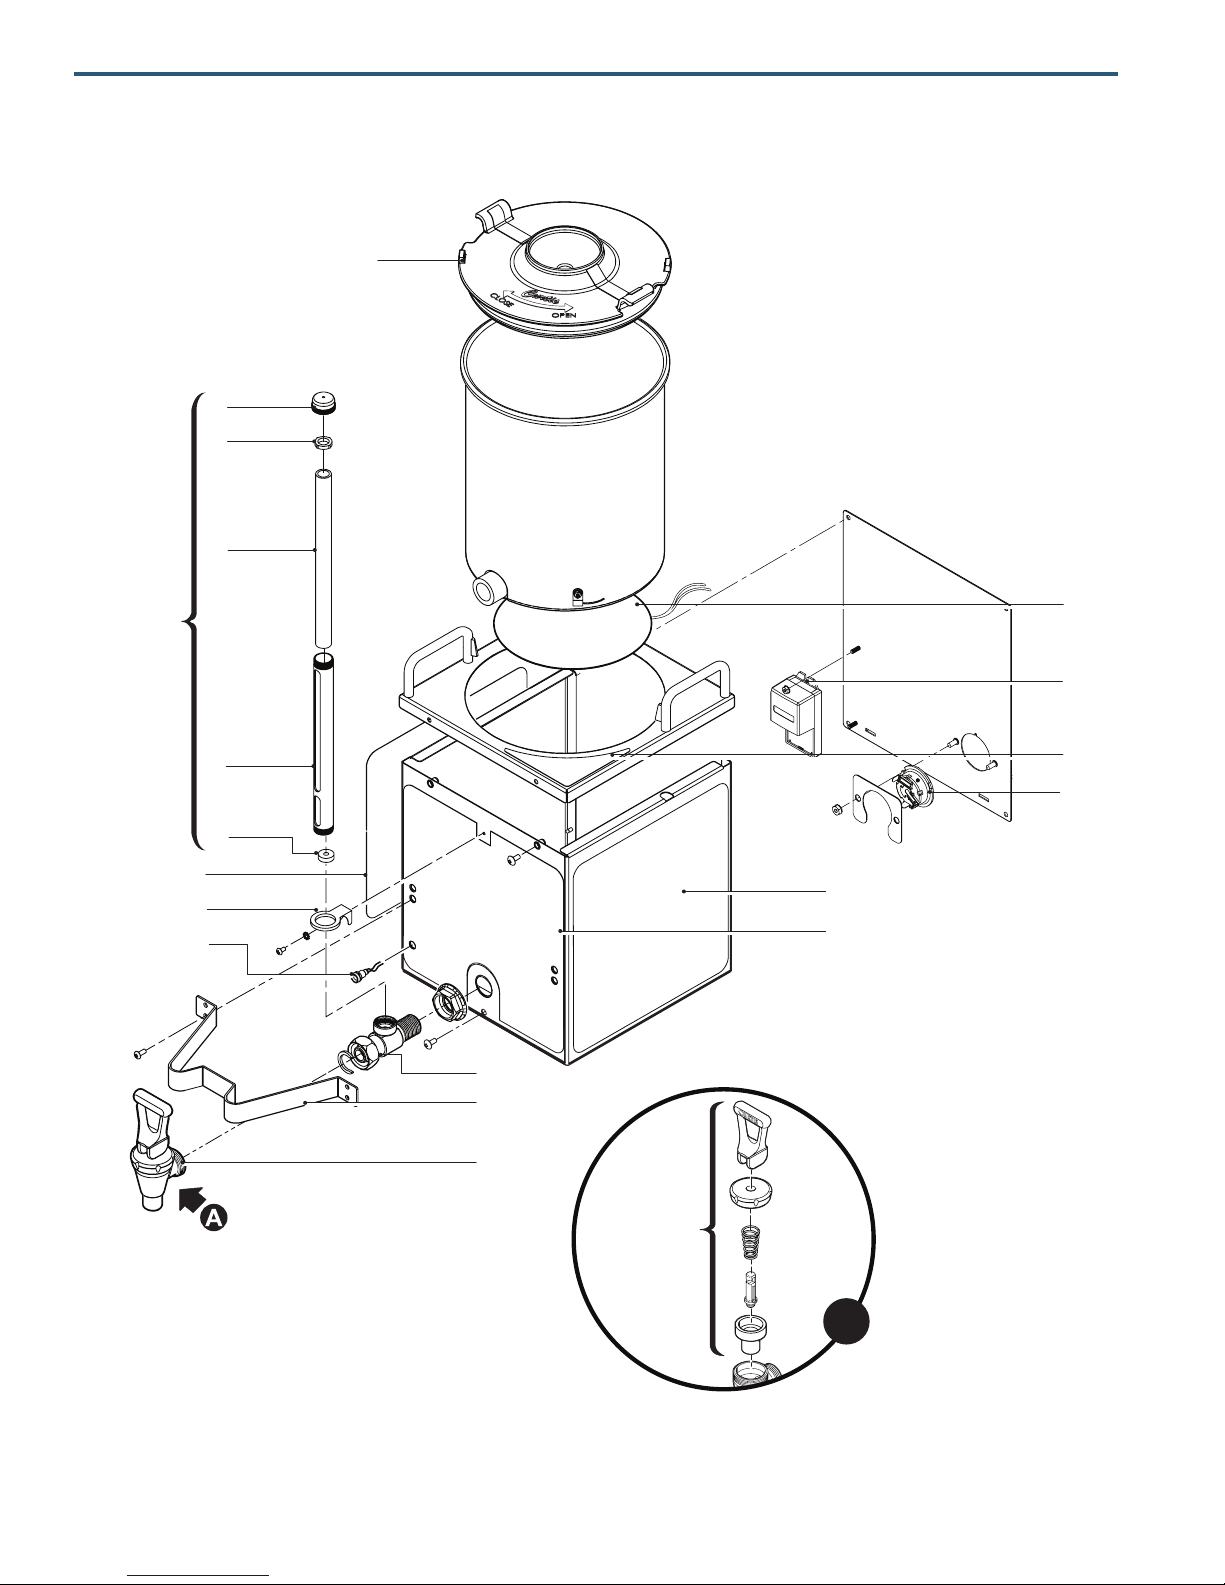
Illustrated Parts List
GEM3IF

15
Illustrated Parts List
GEM3IF
Rough-In Drawing
GEM3IF
* SUGGESTED PARTS TO STOCK
** FOR UNITS BUILT AFTER 3/2015
1
2
3
4
5
6
7
8
9
10
11
11A
12
13
13A
14
15
16
17
18
19
20
WC-5622*
WC-2001
WC-2005*
WC-2025*
WC-2010C
WC-2006*
WC-2102
WC-39747
WC-2007
WC-6417
WC-1901A
WC-1901A-103K **
WC-1800*
WC-37543*
WC-37552 **
WC-37544*
WC-39746
WC-37545*
WC-3705*
WC-38151
WC-13426
WC-39747
LID, BLACK PLASTIC GEM-3
CAP, SHIELD W/VENT
WASHER, SHIELD CAP 1/8”
GLASS, GAUGE 8”
SHIELD, GAUGE GLASS ¾” D. x 8”
WASHER, .188ID x .188 THK BOTTOM
GAUGE GLASS ASSEMBLY 8”
LABEL, SIDE GEM3IF CURTIS LOGO
BRACKET, GAUGE GLASS GEM-3
GUARD, FAUCET GEM-3
SHANK, FAUCET W/SHIELD BASE
KIT, SHANK ASSY, FAUCET W/ SHIELD BASE & O-RING
FAUCET, S’ SERIES NON-LOCKING
KIT, INTELLIFRESH HEATER GEM3IF
KIT, INTELLIFRESH HEATER WC-981 GEM3IF
KIT, RED LED LIGHT GEM3IF
LABEL, FRONT GEM3IF CURTIS LOGO
KIT, HYBRID TEMPERATURE CONTROL
KIT, FAUCET S’ SERIES
LABEL, LOCK/UNLOCK GEM3
IF CONNECTOR, FEMALE W/WIRES
LABEL, SIDE GEM-3IF CURTIS LOGO
DESCRIPTIONINDEX Nº PART Nº

16
Electrical Schematic
GEM3IF
Regularcleaningofyourcoffeebrewerwillmaintainthehighestqualitycoffeeyourequipmentiscapableofproducing.Apropercleaningis
essentialinpreservingtheappearanceandperformanceofthebrewer.
CAUTION:DONOTuseundilutedbleachorchlorine.
1. Turn off the unit at the button on the front control panel.
2. Wipeexteriorsurfaceswithadampcloth,removingspillsanddebris.
3. Slidethebrewconeoutandcleanit.Thoroughlysoapthesprayheadareawithamilddetergentsolution.
4. Washthebrewbasket.Useasoftbristledbrushforhardtocleanareas.Washbothpartswithadetergentsolutionorputtheseparts
throughadishwasher.
Cleaning

17
CAP
WASHER
GLASS TUBE
WASHER
SEAT
CUP
WARNING: Disconnect electrical power before removing access panels!
CAUTION: This procedure involves working with hot water and hot surfaces!
A daily routine of cleaning the GEM3IF Satellite will maintain the appearance of the unit and ensure great tasting cof-
fee. To clean the Satellite components, prepare a mild solution of detergent and warm water.
CAUTION – Do not use cleansers, liquids containing bleach, powders or any other substance containing chlo-
rine. These products promote corrosion and will pit the stainless steel. USE OF THESE PRODUCTS WILL
VOID THE WARRANTY.
Cleaning the Gem3IF Satellite
Cleaning the Satellite Server
DO NOT immerse the Satellite in water or any other liquid.
1. Remove lid from Satellite. Clean the lid at the funnel area with a spiral brush and detergent solution.
2. Rinse the lid, removing all traces of cleaning solution.
3. Clean inside of the Satellite. Remove coffee residue with the detergent solution.
4. Thoroughly rinse out the Satellite with clean warm
water.
5. Unscrew the handle/bonnet assembly and remove it
from the dispensing faucet.
6. Inspect the silicone seat cup for wear, cracks, or
hardening. If okay, then leave the seat cup attached
on the handle/bonnet assembly. Soak then wipe
clean. Replace the seat cup if damaged.
7. Remove the gauge glass tube by unscrewing the
gauge glass cap.
8. Clean the gauge glass tube with a gauge brush
soaked with detergent solution. Soak and wipe the
two washers. Rinse with clean water. Dry the parts
and assemble them onto the Satellite. Hand tighten
the cap.
9. Clean all parts. Thoroughly rinse with clean warm
water.
10. Dry and assemble the parts. Hand-tighten when the
assembling.
Liquid Level Probe
Cleaning intervals for the probe are to be determined by the user or the service tech based on water conditions. The
use of water lters, or the type of water lter that is being used can impact the service interval. Intervals can be from
one month to several years, however, replacing rather than cleaning the probe is preferable.
1. Unplugthepowercordandshutoffthewaterline.
2. Removethetopcoveroftheunit.Locatethetopofthetankandremovethecover.
3. Drainthetanktoalevelabout3”belowthetipoftheprobe.
4. Allowsometimefortheprobetocoolbeforeworkingonthebrewer.
5. CleanthetipoftheprobeusingaScotch-Brite™scuffpad.
6. Ifaresidualwhitelayerisstillvisibleontheprobe,removetheprobeandsoakitinvinegarorascaleremovingchemical.Repeatthisstep
untilthewhitelayerisremoved.

18
ECN16212.10/10/[email protected]revJ
ECN14810.3/6/[email protected].revH
ECN14475.10/17/[email protected].revG
ECN14401.8/29/12@13.5.revF
ECN13971.4/2/12@15.5
ECN12835.12/27/[email protected]
ECN12640.9/30/[email protected]
ECN12400.6/15/10@12.7
edr7091.3/23/10@12.2
Printed in U.S.A. 10/2014 . F-3691 . rev J
WILBUR CURTIS CO., INC.
6913AccoSt.,Montebello,CA90640-5403USA
Phone:800/421-6150 Fax:323-837-2410
TechnicalSupportPhone:800/995-0417(M-F5:30A-4:00PPST) E-Mail:[email protected]
WebSite:www.wilburcurtis.com
ProductWarrantyInformation
TheWilburCurtisCompanycertiesthatitsproductsarefreefromdefectsinmaterialandworkmanshipundernormaluse.Thefollowinglimited
warrantiesandconditionsapply:
3 Years,PartsandLabor,fromOriginalDateofPurchaseondigitalcontrolboards.
2 Years,Parts,fromOriginalDateofPurchaseonallotherelectricalcomponents,ttingsandtubing.
1 Year,Labor,fromOriginalDateofPurchaseonallelectricalcomponents,ttingsandtubing.
Additionally,theWilburCurtisCompanywarrantsitsGrindingBurrsforForty(40)monthsfromdateofpurchaseor40,000poundsofcoffee,
whichevercomesrst.StainlessSteelcomponentsarewarrantedfortwo(2)yearsfromdateofpurchaseagainstleakingorpittingandreplace-
mentpartsarewarrantedforninety(90)daysfromdateofpurchaseorfortheremainderofthelimitedwarrantyperiodoftheequipmentinwhich
the component is installed.
Allin-warrantyservicecallsmusthavepriorauthorization.ForAuthorization,calltheTechnicalSupportDepartmentat1-800-995-0417.Effective
dateofthispolicyisApril1,2003.
Additional conditions may apply. Go to www.wilburcurtis.comtoviewthefullproductwarrantyinformation.
CONDITIONS & EXCEPTIONS
Thewarrantycoversoriginalequipmentattimeofpurchaseonly.TheWilburCurtisCompany,Inc.,assumesnoresponsibilityforsubstitutereplace-
ment parts installed on Curtis equipment that have not been purchased from the
WilburCurtisCompany,Inc.TheWilburCurtisCompanywillnotacceptanyresponsibilityifthefollowingconditionsarenotmet.Thewarranty
doesnotcoverandisvoidunderthefollowingcircumstances:
1) Improper operation of equipment: The equipment must be used for its designed and intended purpose and function.
2) Improper installation of equipment: This equipment must be installed by a professional technician and must comply with all local electrical,
mechanical and plumbing codes.
3) Improper voltage: Equipment must be installed at the voltage stated on the serial plate supplied with this equipment.
4) Improper water supply: This includes, but is not limited to, excessive or low water pressure, and inadequate or uctuating water ow
rate.
5) Adjustments and cleaning: The resetting of safety thermostats and circuit breakers, programming and temperature adjustments are the
responsibility of the equipment owner. The owner is responsible for proper cleaning and regular maintenance of this equipment.
6) Damaged in transit: Equipment damaged in transit is the responsibility of the freight company and a claim should be made with the car-
rier.
7) Abuse or neglect (including failure to periodically clean or remove lime accumulations): Manufacturer is not responsible for variation
in equipment operation due to excessive lime or local water conditions. The equipment must be maintained according to the manufacturer’s
recommendations.
8) Replacement of items subject to normal use and wear: This shall include, but is not limited to, light bulbs, shear disks, “0” rings, gaskets,
silicone tube, canister assemblies, whipper chambers and plates, mixing bowls, agitation assemblies and whipper propellers.
9) Repairs and/or Replacements are subject to our decision that the workmanship or parts were faulty and the defects showed up under normal
use. All labor shall be performed during regular working hours. Overtime charges are the responsibility of the owner. Charges incurred by
delays, waiting time, or operating restrictions that hinder the service technician’s ability to perform service is the responsibility of the owner
of the equipment. This includes institutional and correctional facilities. The Wilbur Curtis Company will allow up to 100 miles, round trip, per
in-warranty service call.
RETURN MERCHANDISE AUTHORIZATION: All claims under this warranty must be submitted to the Wilbur Curtis Company Technical
Support Department prior to performing any repair work or return of this equipment to the factory. All returned equipment must be repackaged
properly in the original carton. No units will be accepted if they are damaged in transit due to improper packaging. NO UNITS OR PARTS WILL
BE ACCEPTED WITHOUT A RETURN MERCHANDISE AUTHORIZATION (RMA). RMA NUMBER MUST BE MARKED ON THE CARTON
OR SHIPPING LABEL. Allin-warrantyservicecallsmustbeperformedbyanauthorizedserviceagent.CalltheWilburCurtisTechnicalSup-
portDepartmenttondanagentnearyou.
This manual suits for next models
2
Table of contents
Other Wilbur Curtis Company Brewing System manuals

Wilbur Curtis Company
Wilbur Curtis Company G4CBHS User manual

Wilbur Curtis Company
Wilbur Curtis Company D1000GT User manual

Wilbur Curtis Company
Wilbur Curtis Company Gemini GEM-612ILD User manual

Wilbur Curtis Company
Wilbur Curtis Company Gem-12D User manual

Wilbur Curtis Company
Wilbur Curtis Company ThermoPro Twin User manual


