5
STEPS 2 & 3
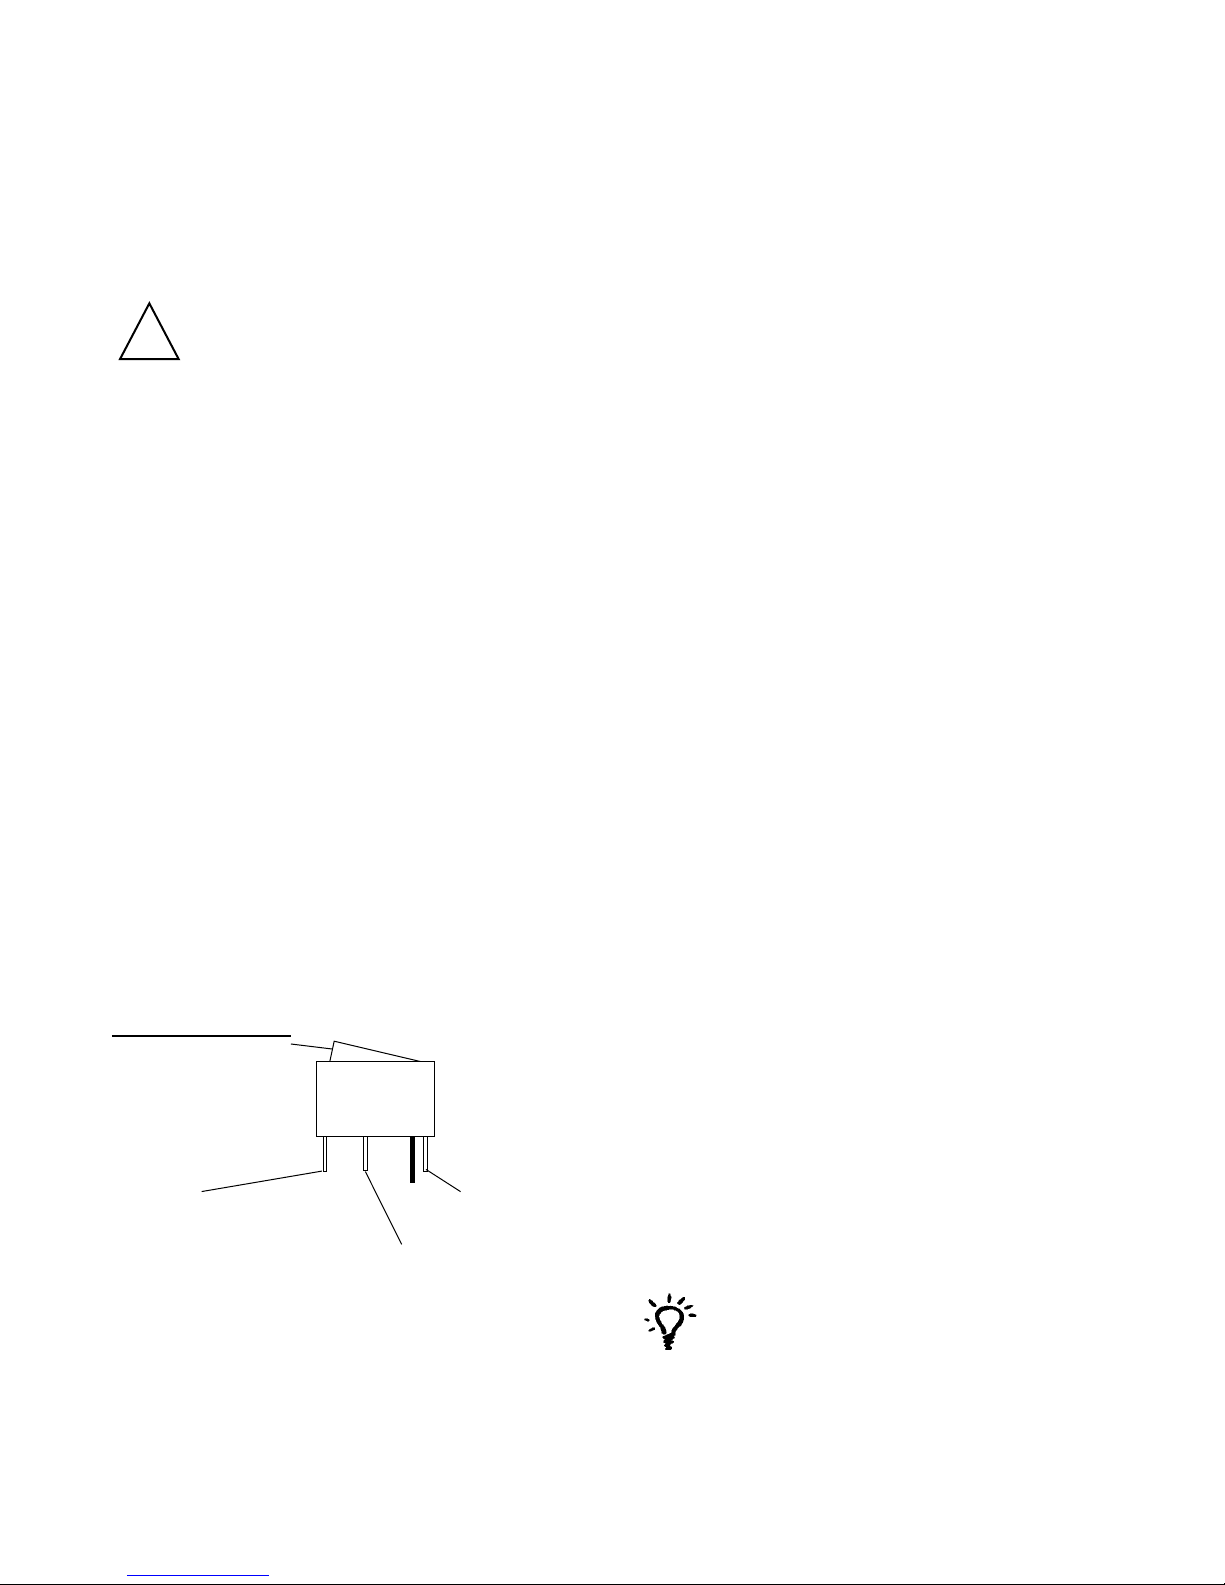
TWO GROUND WIRES
1 FROM VEHICLE
1 BLACK WIRE FROM
SATELLITE ANTENNA STEPS 4 & 5
RED POWER WIRE
FROM ANTENNA
STEPS 6 &7
+12 V FROM VEHICLE
ON/OFF ROCKER SWITCH
WITH LIGHT
(Shown in OFF position.)
FIGURE 7
Connecting TWO receivers
1. Connect the coax cable coming from the “MAIN”
port on the antenna to the “SATELLITE IN” input on the
primary receiver. The primary receiver should be
connected to the TV that will be watched most often.
2. Connect the secondary coax cable coming from the
“SEC” port on the antenna to the “SATELLITE IN” input
on the secondary receiver.
NOTE: The primary receiver will always control
which satellite the RoadTrip Mission nds. The
secondary receiver will be able to view any channel
on the satellite chosen by the primary re
ceiver.
3. See page 6 for receiver set-up.
Connecting ONE receiver
1. Connect the coax cable coming from the “MAIN”
port on the antenna to the “SATELLITE IN” on the
receiver.
2. See page 6 for receiver set-up.
CONNECTING RECEIVERS
Installing the power switch
1. Choose a location to install the RoadTrip Mission
power ON/OFF switch. Remember when selecting
a location, you will need to run the +12 VDC power
cable from the RoadTrip Mission antenna to the
switch. Be sure the switch is in the OFF position before
continuing. See Figure 7 below.
Drill 1-1/4” hole, pull wires through wall or panel.
2. Connect the ground wire from the vehicle and the
BLACK ground wire from the antenna together, using
large yellow ag connector.
3. Connect the YELLOW ag connector to the
switch.
4. Connect the RED wire from the antenna to the
small RED ag connector.
5. Connect small RED ag connector to the switch.
6. Connect the +12 V power wire from the vehicle to
a small RED ag connector.
7. Connect small RED ag connector to isolated
spade on switch.
Use your on-screen guide to locate your
channel rather than “channel surng”. This
will result in smoother operation.
1. Turn on receiver and television set. The RoadTrip
Mission antenna must be connected to a receiver that
is plugged into 120 VAC.
2. Verify that you are getting the receiver’s menu screens
on the television. These screens are available with or
without the dish nding the signal.
3.Turnthepowerswitch onfortheRoadTripMissionantenna.
The dish will detect if it is already on a satellite signal. If it
detects a signal, the dish will move to check it’s alternate
satellite and then move back to the original satellite
signal it was on.
NOTE: For Tracking or In-Motion units, the dish should
start moving, making one or two revolutions before it
stops to acquire GPS. This can take a few moments
or up to 10-15 minutes. Normal operation will be less
than a minute.
4. If no signal was detected, the dish will begin its search
to locate the primary satellite. Once the dish locates a
signal, it will pause long enough to identify which satellite
it has located. This may or may not be visible on your
receiver’s point dish screen.
5. After the unit has veried that it has the correct satellite,
it will move to check the alternate satellite and move back
to the primary satellite to complete the search routine.
6. If you do not have signal, see Troubleshooting, p.8.
NOTE: Because the RoadTrip Mission antenna uses
information from the last location that it was on a
signal, satellite acquisition may take longer if the
dish is inactive over long distance traveling.
Operating the RoadTrip Mission
Installing the RoadTrip Mission Dome -
(Not required for a DIRECTV installation - dome
installed at factory).
Place the RoadTrip Mission dome over the unit so that
the RoadTrip Mission decals on the dome face away
from the center line of the vehicle. Line up the holes
in the dome with the inserts in the RoadTrip Mission
base. Insert all of the dome screws and tighten using
a Phillips screwdriver.
DO NOT OVERTIGHTEN DOME SCREWS.
!
NOTE: If the vehicle does not move for six minutes,
the unit will toggle to it’s alternate satellite then toggle
back to the primary satellite and go to sleep. If vehicle
begins movement in straight line at 10 mph, the unit
will resume tracking mode.