manuals.online logo
Brands
  1. Home
  2. •
  3. Brands
  4. •
  5. Winmate
  6. •
  7. Tablet
  8. •
  9. Winmate M700DQ8 Series User manual

Winmate M700DQ8 Series User manual

M700DQ8Series
Rugged Tablet
Quick Start Guide v1.0
For the complete user manual and other helpful resources, go to
www.winmate.com
To change scanning settings
1) Open WDC application.
2) Open Barcode Settings , tap Trigger Settings.
3) Choose scan type and read time options.
MODE TRIGGER OPTIONS
Auto Scan – Barcode reader starts auto-scanning once the user leaves
the WDC application.
Multiple Scan – After pressing the trigger button barcode reader starts
continuously scanning and reading multiple codes within the time
duration specified in Read time option.
Continuing Scan (Default) – After pressing the trigger button barcode
reader can scan and read only a single code within the time duration
specified in Read time option.
To change the symbologies of barcode
1) Open WDC application.
2) Tap Barcode Setting .
3) Tap Barcode Preference.
4) Change the symbologies of barcodes.
To add command with the output of barcode
1) Open WDC application.
2) In Barcode Setting stap Prefix/Suffix.
3) Enter special characters at the beginning (prefix) or end (suffix)
of the scanned barcodes.
4) Tap Set to add to the data.
How to Change Scanning Settings
1) Tear off protective film from the barcode.
2) Press power button located on the top and swipe up from
bottom on the screen to unlock the screen.
3) Open Search application or other whichcan edit text.
4) Press triggerbutton located on the bottom.
5)
Scan the followingbarcode to checkif yourreader isworking properly.
Result will be displayed in Search application.
How to Scan a Barcode
How to Start your M700DQ8
Optimum scanning
Code-39
1) Charge the Battery
Use the bundled AC adapter and USB cable to charge the Tablet
for 4 hours.
2) Turn On the Tablet
There's more here.
•Keep your M700DQ8 updated, and find the latest
PC software, user manual, online help and more at
Winmate Download Center.
•Find more accessories for your M700DQ8 at
Winmate website www.winmate.com.
Note: For power saving purpose, please enable Connect to PC in
Accessibility settings. When connected to PC external 4G,
USB and LAN on Docking will be disabled.
Note: For the very first time using, we recommend you charge
with the AC adapter. Charging from PC’s USB port will take
6 hours or longer.
Note: We strongly recommend you always charge your
M700DQ8 Tablet with its original charger. Winmate’s
warranty does not cover damage to the mobile device
caused by other batteries and/or chargers.
DCin
To turn on your M700DQ8 series Tablet, press and hold the
power button for 3 seconds, located on the top side of the unit.
When the device viebrates, release the power button. The LED Indicator
will be solid blue during the launching process. The desktop screen will
then be displayed once operating system has been launched.
Before starting to use M700DQ8
1) Install Micro SD / SIM card (Optional)
The built-in storage space of your M700DQ8 Rugged Tablet is
mainly used for system operation. Some functions such as camera
or other APP require bigger storage space, please insert a Micro
SD card before using. If your M700DQ8 Rugged Tablet supports
3G, Remember to insert a SIM card to activate your data
connection.
2) Install and Charge the Battery
The battery in your new M700DQ8 Rugged Tablet is not charged
yet. Please charge with the bundled USB cable before your first use.
Caution! Please don’t remove the battery pack or try to take the
device apart while charging. These actions may result in some
damages and may invalidate your warranty.
Caution! Discontinue using device immediately if you notice the
battery is swelling, or looks puffy or misshapen. Do not attempt to
charge or use the device. Do not handle a damaged or leaking
battery. Do not let leaking battery fluid come into contact with your
eyes, skin or clothing.
3) Some tips for using and caring your Rugged Tablet.
The M70DQ8 Rugged Tablet is designed to resist damages from
certain rugged conditions. However, to help care for your
M700DQ8, please avoid prolonged or extreme exposure to those
conditions.
√To ensure the rugged design works and protects your Tablet,
please be sure the connector covers are closed and the back
cover is screwed properly.
√Don’t leave your Tablet near a heat source; this can damage
the device.
√Avoid dropping your Tablet on a hard surface; this can
potentially cause damage to the device.
√To clean your Tablet, use a dry soft cloth. Don’t use alcohol or
other cleaning solutions.
√Please don’t have your Tablet contact with water when the
cover is opened. The water-proof design works only when the
outer case is sealed properly.
Note: Certain apps and features may not be available in all
countries.
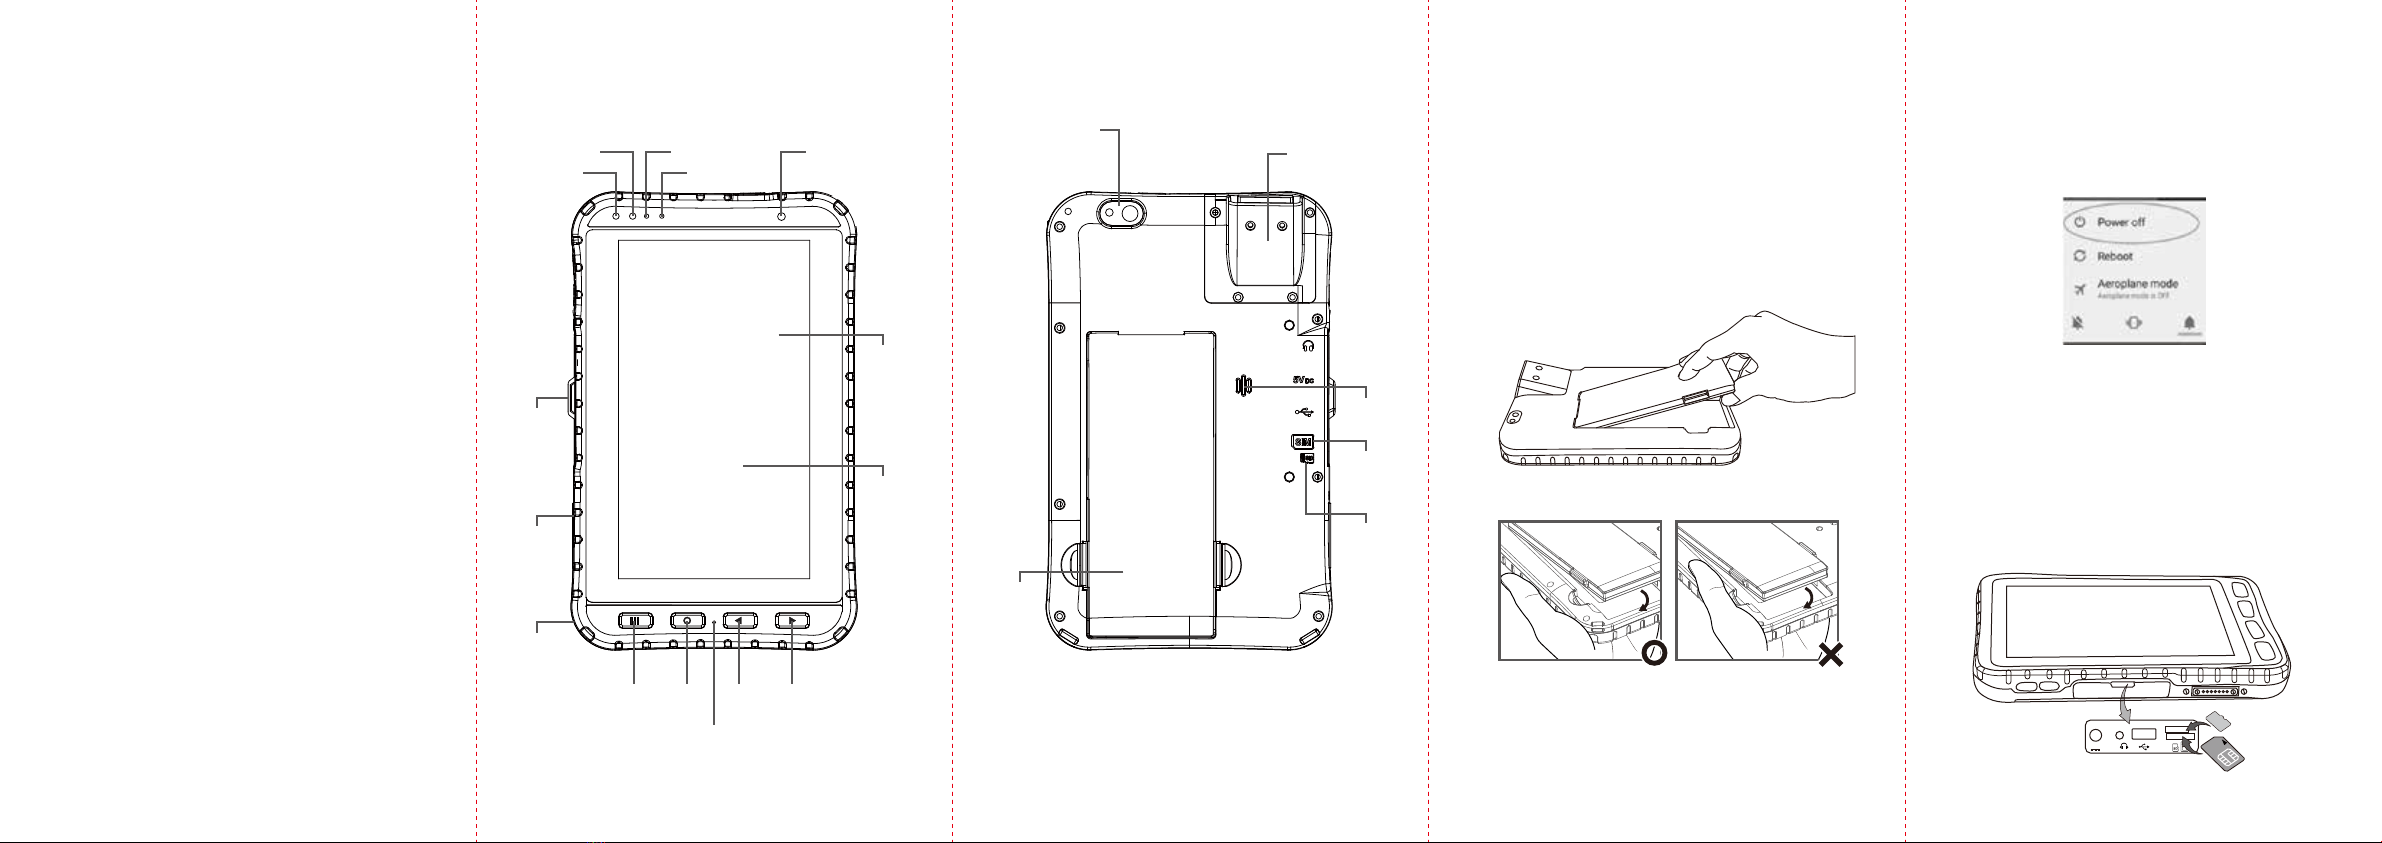
To know your M700DQ8
more
Front View (with Barcode Reader)
Rear View (with Barcode Reader)
P-Sensor
Light Sensor LED Indicator
Microphone
8MP Front Camera
I/O
Protection
Cover
13MP Rear
Camera with
LED auxiliary
light
Docking
Connector
3.7V
5300mAh
Hotswap
Removable
Battery
Waterproof
Speaker
Inside
SIM Card
Slot
Caution:The lithium battery used in this tablet may swell after being
charged/ discharged many times, but there is no problem regarding
safety. Continued use in such a state may result in the battery getting
jammed, so please stop using the battery, and purchase a new one.
1) Turn Off the Tablet
Disconnect AC adapter and power cord from the device.
Turn the device over, back facing up.
2) Insert the Battery
Push the battery latchInsert the battery on the connector-pins side
first, and then lower the battery into the battery compartment.
Continue to hold the Battery Release Slider before battery is fully
inserted.
2) Open the I/O Cover
Pull out the latch to open the I/O cover located on the left side.
3) Insert SIM Card
Insert SIM card with the gold parts facing up and cut-off corner
facing in) in the direction of the arrow as shown in the figure.
4) Insert MicroSD Card
Pick and raise the SD card holder up in upright position and then
put the SD Card into the socket.
5) Close the I/O Cover
Pull back the latch to close the I/O cover.
Caution: Do not insert your fingers into contact hole when inserting
the battery.
How to Install Battery
Note: You can also force the system to shutdown anytime under
any operating system by holding the Power button about 8
seconds.
1) Turn Off the Tablet
Make sure the Tablet is powered off and the USB cable is not
connected.
Note: To turn off your M700DQ8 series Tabletin Android settings,
press and hold Power button till the following window show
up. Tap Power off.
How to Insert SIM / Micro SD Card
All-around
Elastomeric
Rubber
Optical-
bonded
Touchscreen
7-inch
1280 x 720
Display
Home Menu Return Trigger
Microphone
Optional 2D
Barcode Reader
Inside
Micro SD
Card Slot
SD
SIM
DCin
FCC Warning
This device complies with part 15 of the FCC Rules. Operation is subject to the condition that this device
does not cause harmful interference..
Any Changes or modifications not expressly approved by the party responsible for compliance could void
the user's authority to operate the equipment.
Note: This equipment has been tested and found to comply with the limits for a Class B digital device,
pursuant to part 15 of the FCC Rules. These limits are designed to provide reasonable protection against
harmful interference in a residential installation. This equipment generates uses and can radiate radio
frequency energy and, if not installed and used in accordance with the instructions, may cause harmful
interference to radio communications. However, there is no guarantee that interference will not occur in a
particular installation. If this equipment does cause harmful interference to radio or television reception,
which can be determined by turning the equipment off and on, the user is encouraged to try to correct the
interference by one or more of the following measures:
-Reorient or relocate the receiving antenna.
-Increase the separation between the equipment and receiver.
-Connect the equipment into an outlet on a circuit different from that to which the receiver is connected.
-Consult the dealer or an experienced radio/TV technician for help.
IC Warning
This device complies with Industry Canada’s licence-exempt RSSs. Operation is subject to the
following two conditions:
(1) This device may not cause interference; and
(2) This device must accept any interference, including interference that may cause undesired
operation of the device.
Cet appareil est conforme aux CNR exemptes de licence d'Industrie Canada. Son
fonctionnement est soumis aux deux conditions suivantes :
( 1 ) Ce dispositif ne peut causer d'interférences ; et
( 2 ) Ce dispositif doit accepter toute interférence , y compris les interférences qui peuvent
causer un mauvais fonctionnement de l'appareil.
The device for operation in the band 5150–5250MHz is only for indoor use.
(1) This device may not cause interference; and
(2) This device must accept any interference, including interference that may cause undesired
operation of the device.
RF Exposure Information and Statement
The SAR limit of USA/Canada (FCC/IC) is 1.6 W/kg averaged over one gram of tissue. Device types:
M700DQ8 (FCC ID: PX9M700DQ8002, IC: 9911A- M700DQ8002) has also been tested against this
SAR limit. The highest SAR value reported under this standard during product certification for use the
body is 1.459W/kg. This device was tested for typical body-worn operations with the back of the handset
kept 0mm from the body. To maintain compliance with FCC RF exposure requirements, use accessories
that maintain a 0mm separation distance between the user's body and the back of the handset. The use
of belt clips, holsters and similar accessories should not contain metallic components in its assembly.
The use of accessories that do not satisfy these requirements may not comply with FCC RF exposure
requirements, and should be avoided.
Le SAR limite pour les USA/Canada (FCC/IC) est de 1.6 W/kg moyen sur un seul gramme de tissu.La
valeur maximale déclarée sous ce critère lors de la certification du produit pour l’utilisation du corps est
de 1,345 W/kgOpérations typiques avec la partie arrière de la manoeuvre gardée à0mm du corps, afin
de maintenir la conformité avec les exigences du FCC relatives à l’exposition RF,L’utilisation des
accessoires qui maintiennent une distance de séparation de 0mm entre le corps de l’utilisateur et le dos
de la main.L’utilisation des accessoires qui ne satisfont pas àces exigences peut ne pas être conforme
aux exigences du FCC relatives à l’exposition à la RF.Et devrait être évité.
Body-worn Operation
This device was tested for typical body-worn operations. To comply with RF exposure requirements, a
minimum separation distance of 0mm must be maintained between the user’s body and the handset,
including the antenna. Third-party belt-clips, holsters, and similar accessories used by this device should
not contain any metallic components. Body-worn accessories that do not meet these requirements may
not comply with RF exposure requirements and should be avoided. Use only the supplied or an approved
antenna.
Cet appareil a ététestépour un fonctionnement typique du corps sous pression, pour satisfaire aux
exigences relatives à l’exposition RF, une distance minimale de séparation de 0mm doit être maintenue
entre le corps de l’utilisateur et la poignée.Y compris les antennes, les bandes de fréquences et les
satellites,Des accessoires similaires utilisés par cet appareil ne doivent pas contenir de composants
métalliquesSeule la fourniture ou une antenne agréée.
de 1,459 W/kgOpérations typiques avec la partie arrière de la manoeuvre gardée à0mm

Other Winmate Tablet manuals

Winmate M101P User manual

Winmate

Winmate M101P User manual

Winmate M700DM4 User manual

Winmate

Winmate M700DM4 User manual

Winmate M101Q8-ME Series User manual

Winmate

Winmate M101Q8-ME Series User manual

Winmate M9020 User manual

Winmate

Winmate M9020 User manual

Winmate M101B Series User manual

Winmate

Winmate M101B Series User manual

Winmate R08IP8M-RTU1GP User manual

Winmate

Winmate R08IP8M-RTU1GP User manual

Winmate M101B Series User manual

Winmate

Winmate M101B Series User manual

Winmate M101B Series User manual

Winmate

Winmate M101B Series User manual

Winmate M101BC User manual

Winmate

Winmate M101BC User manual

Winmate M9700 User manual

Winmate

Winmate M9700 User manual

Winmate M116P Series User manual

Winmate

Winmate M116P Series User manual

Winmate M101BC User manual

Winmate

Winmate M101BC User manual

Winmate M101B Series User manual

Winmate

Winmate M101B Series User manual

Winmate M900P User manual

Winmate

Winmate M900P User manual

Winmate M101P-L User manual

Winmate

Winmate M101P-L User manual

Winmate M133KML(HB) Series User manual

Winmate

Winmate M133KML(HB) Series User manual

Winmate M116PT User manual

Winmate

Winmate M116PT User manual

Winmate W07FA3S-EHT1 User manual

Winmate

Winmate W07FA3S-EHT1 User manual

Winmate M101Q8 Series User manual

Winmate

Winmate M101Q8 Series User manual

Winmate M101P-BH User manual

Winmate

Winmate M101P-BH User manual

Winmate M101EKB User manual

Winmate

Winmate M101EKB User manual

Winmate W10IB3S-PCH2AC-PoE S-Series User manual

Winmate

Winmate W10IB3S-PCH2AC-PoE S-Series User manual

Winmate M101S User manual

Winmate

Winmate M101S User manual

Winmate M101PR User manual

Winmate

Winmate M101PR User manual

Popular Tablet manuals by other brands

HARMAN/BECKER BE 7928 user manual

HARMAN/BECKER

HARMAN/BECKER BE 7928 user manual

Lenovo IdeaTab Lynx K3011 manual 

Lenovo

Lenovo IdeaTab Lynx K3011 manual 

Aaeon RTC-700C manual

Aaeon

Aaeon RTC-700C manual

Trevi TAB 7 C4 user manual

Trevi

Trevi TAB 7 C4 user manual

MOB MO9537 user manual

MOB

MOB MO9537 user manual

Vonino Onyx Z quick start guide

Vonino

Vonino Onyx Z quick start guide

Zeki TBDG773B user guide

Zeki

Zeki TBDG773B user guide

KOCASO MX9300 user manual

KOCASO

KOCASO MX9300 user manual

X10 AirPad7p owner's manual

X10

X10 AirPad7p owner's manual

Insignia Flex Series NS-P10A7100 user guide

Insignia

Insignia Flex Series NS-P10A7100 user guide

Samsung Galaxy Tab3 user manual

Samsung

Samsung Galaxy Tab3 user manual

Prestigio PMP5780D_DUO manual

Prestigio

Prestigio PMP5780D_DUO manual

EyeTech eyeon elite quick start guide

EyeTech

EyeTech eyeon elite quick start guide

Acer W510 user manual

Acer

Acer W510 user manual

Samsung SM-W728Y user manual

Samsung

Samsung SM-W728Y user manual

Chinavision CVUZ-74120 user manual

Chinavision

Chinavision CVUZ-74120 user manual

Sony SGPT11 Series quick start guide

Sony

Sony SGPT11 Series quick start guide

Durabook U11 user manual

Durabook

Durabook U11 user manual

manuals.online logo
manuals.online logoBrands
  • About & Mission
  • Contact us
  • Privacy Policy
  • Terms and Conditions

Copyright 2025 Manuals.Online. All Rights Reserved.