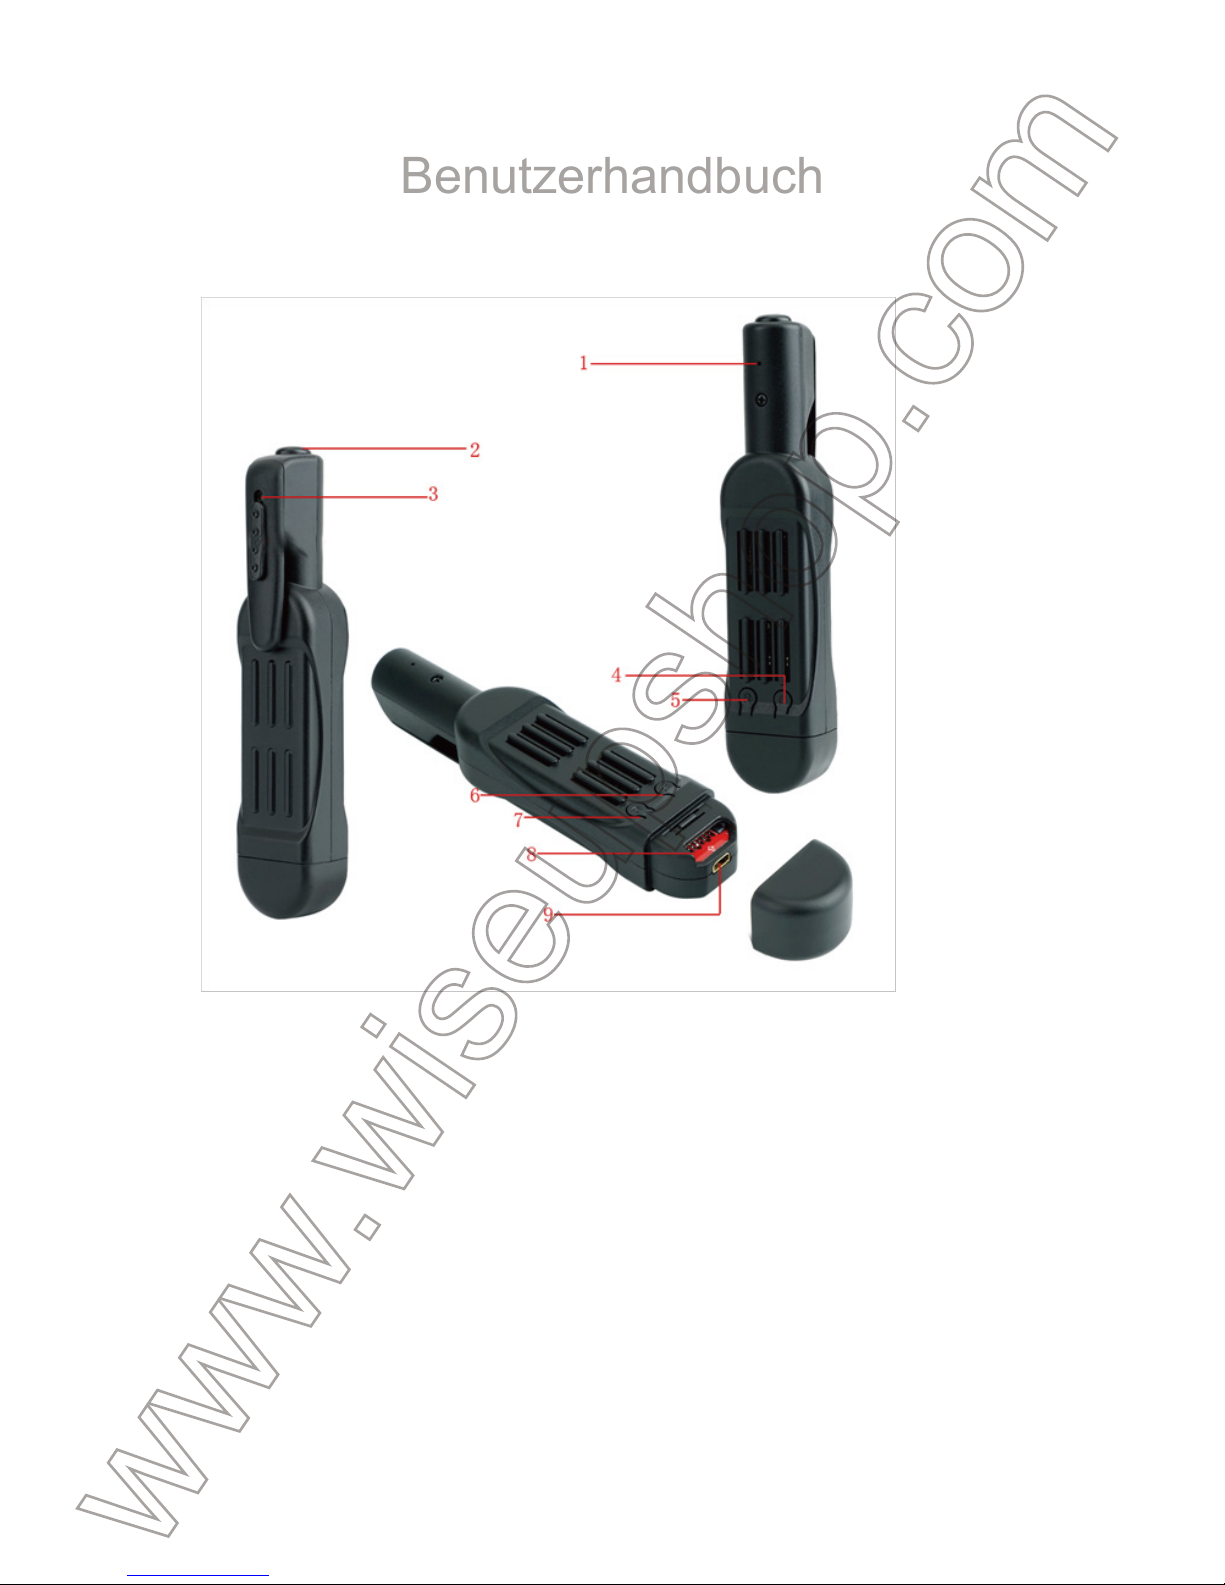
6. Yellow Indicator Light
7. blaue Anzeigelampe
8. Micro SD-Karten-Slot
9. Mini-USB-Anschluss
>> Bitte stellen Sie sicher, dass die Micro SD-Karte (4GB-32GB, formatieren Sie es
für die erste Nutzung) sicher in den SD-Kartensteckplatz der Kamera angebracht
sind, oder die Kamera wird nicht funktionieren. Eine SDHC Class 10 Micro-SD-Karte
wird empfohlen.
[Hinweis]: Wenn keine Micro-SD-Karte in die Kamera oder die SD-Karte ausgestattet ist, kann nicht
gelesen werden, die blaue und die gelbe Anzeige leuchtet, wird viermal aufleuchten und dann wieder
ab. Die Kamera schaltet sich automatisch aus.
3.1. EINSCHALTEN / AUSSCHALTEN
3.1.1. Schalten Sie die Kamera durch Power-Knopf für zwei Sekunden lang
drücken. Die blaue und gelbe Anzeige leuchtet, wird fünf Sekunden lang beleuchtet
werden. Dann wird das gelbe ausschalten, während die blaue beleuchtet wird
bleiben, was auf die Kamera hat sich automatisch in den Standby-Modus.
3.1.2. Schalten Sie die Kamera durch Power-Taste sieben Sekunden lang gedrückt,
wenn die Kamera aufzeichnet oder im Standby-Modus.
[Hinweis]: Die Kamera wird automatisch abgeschaltet, wenn er sich im Standby-Modus ohne
irgendeinen Betrieb mehr als eine Minute ist.
3.2. 720P-VIDEOAUFNAHME
3.2.1. Schalten Sie die Kamera durch Power-Knopf für zwei Sekunden lang
drücken. Die blaue und gelbe Anzeige leuchtet, wird fünf Sekunden lang beleuchtet
werden. Dann wird das gelbe ausschalten, während die blaue beleuchtet wird
bleiben, was auf die Kamera hat sich automatisch in den Standby-Modus.
3.1.2. Drücken Sie die Power-Taste einmal, um Video mit 1280 × 720p
Video-Auflösung aufzeichnen. Die blaue Anzeigelampe blinkt dreimal und dann
auszuschalten.
3.1.3. Drücken Sie die Power-Taste erneut zu stoppen Videoaufzeichnung. Die
blaue Anzeigelampe bleibt beleuchtet, was die Kamera in den Standby-Modus ist
zurück.
[Notizen]:
1). Eine Videodatei wird erzeugt und automatisch gespeichert, alle 5 Minuten werden.
2). Die Kamera kann Video kontinuierlich für 5,5 Stunden bei voller Ladung aufzunehmen.
3). Video Auflösung: 1920×1080P Videoformat: AVI
3.3. 1080P VIDEOAUFNAHME
3.3.1. Schalten Sie die Kamera durch Power-Knopf für zwei Sekunden lang
P9000
Benutzerhandbuch
I. Produktübersicht
1. Mikrofon
2. Power-Taste
3. Kamera-Objektiv
4. Kamera-Taste
5. Reset-Taste
II. Was ist in der Box
-1×Meeting-Recorder-Kamera
-1× USB/AV Kabel
III. Betrieb
>> Vor der Verwendung, stellen Sie sicher, dass die Kamera vollständig aufgeladen
ist.
drücken. Die blaue und gelbe Anzeige leuchtet, wird fünf Sekunden lang beleuchtet
werden. Dann wird das gelbe ausschalten, während die blaue beleuchtet wird
bleiben, was auf die Kamera hat sich automatisch in den Standby-Modus.
3.3.2. Halten Sie die Power-Taste für drei Sekunden Video mit 1920 × 1080p
Videoauflösung aufzeichnen. Die gelbe Kontrollleuchte blinkt dreimal und
auszuschalten.
3.3.3. Drücken Sie die Power-Taste einmal zu stoppen Videoaufzeichnung . Die
blaue Anzeigelampe bleibt beleuchtet, was die Kamera in den Standby-Modus ist
wieder da.
3.4. CAMERA / FOTOGRAFIE
3.4.1. Schalten Sie die Kamera durch Power-Knopf für zwei Sekunden lang
drücken. Die blaue und gelbe Anzeige leuchtet, wird fünf Sekunden lang beleuchtet
werden. Dann wird das gelbe ausschalten, während die blaue beleuchtet wird
bleiben, was auf die Kamera hat sich automatisch in den Standby-Modus.
3.4.2. Drücken Sie die Kamera-Taste einmal um ein Foto aufzunehmen. Die gelbe
Kontrollleuchte blinkt einmal und dann auszuschalten. Die blaue Anzeigelampe
bleibt beleuchtet, was die Kamera in den Standby-Modus ist zurück.
3.5. MICRO SD-KARTE FORMATIERUNG
3.5.1. Schalten Sie die Kamera durch Power-Knopf für zwei Sekunden lang
drücken. Die blaue und gelbe Anzeige leuchtet, wird fünf Sekunden lang beleuchtet
werden. Dann wird das gelbe ausschalten, während die blaue beleuchtet wird
bleiben, was auf die Kamera hat sich automatisch in den Standby-Modus.
3.5.2. Halten Sie die Kamera-Taste für drei Sekunden. Die blaue und gelbe Anzeige
leuchtet viermal blinken zuerst, dann werden sie fünf Sekunden lang beleuchtet
werden und die gelbe Kontrollleuchte erlischt und zeigt die SD-Karte Formatierung
abgeschlossen ist.
3.5.3. Die blaue Anzeigelampe bleibt beleuchtet, was die Kamera in den
Standby-Modus ist wieder da.
IV. Video- / Bilddateiuploads
4.1. Wenn die Kamera ausgeschaltet ist, entfernen Sie die Micro SD-Karte und in
einen Kartenleser ein.
4.2. Setzen Sie den Kartenleser in einen PC-Computer.
4.3. Die SD-Micro-Karte wird als Wechsellaufwerk erkannt werden.
4.4. Alle Dateien können im Ordner "DCIM" zugegriffen werden.
V. EINSTELLUNG VON UHRZEIT / DATUM-STEMPEL
5.1. Schließen Sie die Kamera an einen PC-Computer, wenn es ausgeschaltet ist,
5.2. Wechselplattenlaufwerk Ordner angezeigt wird.
5.3. Klicken Sie auf das Laufwerk im Stammverzeichnis und im Inneren des
Root-Verzeichnis eine Datei mit dem Namen "TIMERSET.TXT".
5.4. Schreiben Sie das aktuelle Datum und die Uhrzeit in der "TIMERSET.TXT"
Datei mit dem richtigen Format:
JahrMonatTagStundeMinuteSekunde Y. (Zum Beispiel: 20160412142432 Y).
Speichern Sie diese Datei. Wenn Sie den Stempel auf den Video-Dateien nicht
benötigen, ändern "Y" in "N" in der Datei.
5.5. Starten Sie die Kamera und das System-Upgrade, das Programm automatisch.
VI. Aufladen Nur
6.1. Entfernen Sie die Micro-SD-Karte aus der Kamera.
6.2. Schließen Sie die Kamera über das mitgelieferte USB-Kabel an einen PC an.
6.3. Es wird 3 Stunden eine volle Ladung zu erhalten.
6.4. Die blaue Anzeige leuchtet während des Ladevorgangs beleuchtetem bleiben.
6.5. Wenn die Kamera vollständig aufgeladen ist, bleiben die blauen und gelben
Anzeigelampen beleuchtet.
VII. Lade- und Aufnahme Gleichzeitig
7.1. Legen Sie eine SD-Micro-Karte in die Kamera ein.
7.2. Schließen Sie die Kamera über das mitgelieferte USB-Kabel an einen PC an.
7.3. Die blaue Anzeigelampe blinkt dreimal und dann wieder aus, was auf die
Kamera die Aufnahme von Video mit 1280x720P Videoauflösung.
7.4. Drücken Sie die Power-Taste einmal zu stoppen Videoaufzeichnung . Die blaue
Anzeigelampe bleibt beleuchtet, was die Kamera in den Standby-Modus ist wieder
da.
[Hinweis]: Sie könnten auch andere Funktionen der Kamera in den Ladevorgang erfahren.
VIII. Neueinstellung
Wenn aus irgendeinem Grund reagiert die Kamera hält oder nicht richtig
funktioniert, ein einfaches Zurücksetzen wird es in den Normalbetrieb
wiederherzustellen zurück.
Bedienung: Drücken Sie die Reset-Taste einmal, um die Kamera zu setzen. Die
blaue und gelbe Anzeige leuchtet, schaltet sich die Kamera automatisch
abgeschaltet.
IX. Live-Video-Ausgang
9.1. Schließen Sie die Kamera an einen Fernseher oder Monitor mit dem AV-Kabel
wie unten angegeben:
9.2. Wählen Sie die Kamera Videosignalquelle auf dem Fernseher oder Monitor.
9.3. Schalten Sie die Kamera und starten Sie die Aufnahme von Video (siehe 3.2
oder 3.3), dann können Sie die Kamera-Live-Videos auf dem TV oder während der
Videoaufzeichnung Prozess überwachen.
9.4. Sie könnten auch andere Funktionen dieser Kamera im Live-View-Modus
erleben.