Wolf M Series User manual

M Series Oven
Use and Care Guide
CLEANING, MAINTENANCE,
AND MORE

2 | Wolf Customer Care 800.222.7820
Contents
4Safety Precautions
6M Series Oven Features
7Oven Operation
18 Cooking Guide
21 Care Recommendations
22 Troubleshooting
23 Wolf Warranty
M Series Oven

wolfappliance.com | 3
Customer Care
The model and serial number are printed on the enclosed
product registration card. Both numbers are also listed
on the product rating plate. Refer to page 6 for rating
plate location. For warranty purposes, you will also need
the date of installation and name of your authorized Wolf
dealer. Record this information below for future reference.
SERVICE INFORMATION
Model Number
Serial Number
Date of Installation
Certified Service Name
Certified Service Number
Authorized Dealer
Dealer Number
If your product ever needs attention, be sure to use a
Wolf Factory Certified Service provider recommended
by our Customer Care Center, or select one from our list
of providers available at wolfappliance.com/locator. All
Factory Certified Service providers are carefully selected
and thoroughly trained by us.
Important Note
To ensure this product is installed and operated as safely
and eciently as possible, take note of the following types
of highlighted information throughout this guide:
IMPORTANT NOTE highlights information that is especially
important.
CAUTION indicates a situation where minor injury or prod-
uct damage may occur if instructions are not followed.
WARNING states a hazard that may cause serious injury or
death if precautions are not followed.
IMPORTANT NOTE: Throughout this guide, dimensions in
parentheses are millimeters unless otherwise specified.
M Series Oven

4 | Wolf Customer Care 800.222.7820
Safety Precautions
• Always use dry pot holders when removing
pans from this appliance. Wet or damp pot
holders can cause steam burns. Do not use a
towel or bulky cloth in place of pot holders.
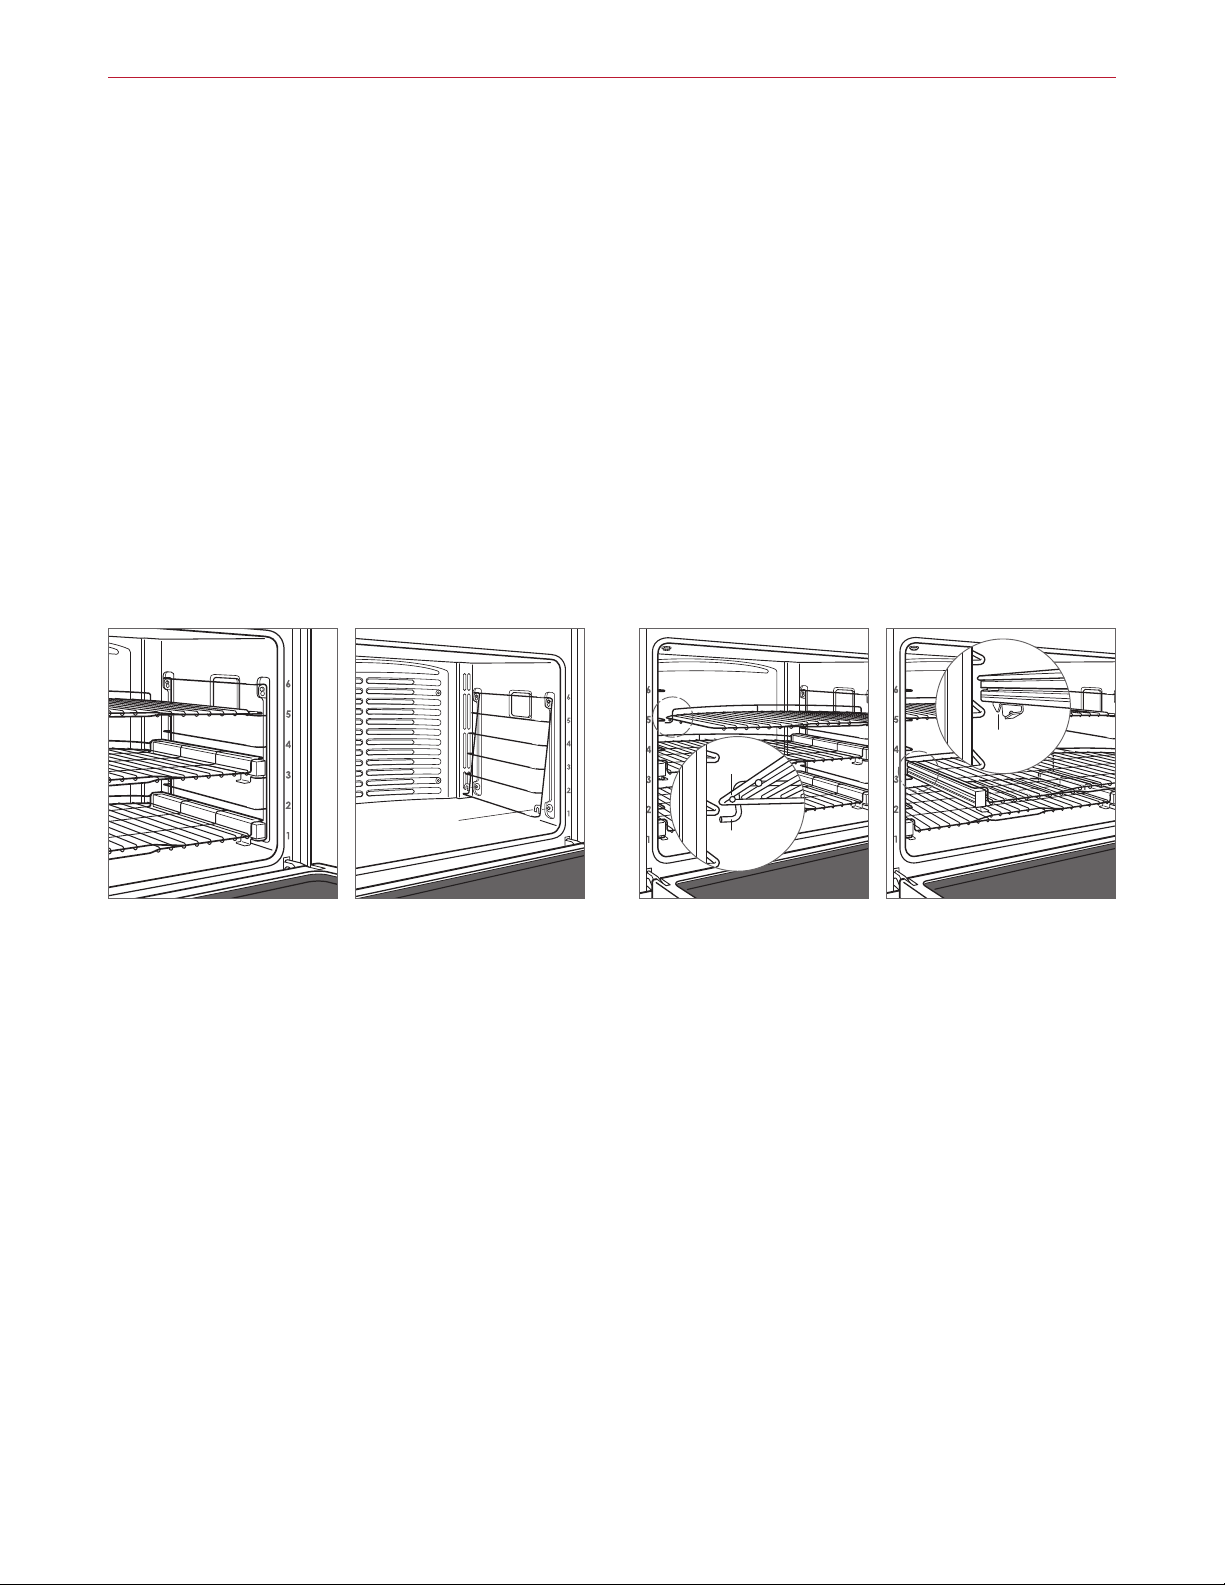
• Position oven racks in the desired locations
when the oven is cool. If a rack must be repo-
sitioned after the oven is already hot, be sure
the pot holder does not contact a hot heating
element in the oven.
• Do not repair or replace any part of this appli-
ance unless specifically recommended in litera-
ture accompanying this appliance.
• Do not use aluminum foil to line any part of this
appliance.
• Never use this appliance to warm or heat the
room.
• Do not leave children alone or unattended in
the area where this appliance is in use. Never
allow children to sit or stand on the appliance.
• Do not store items of interest to children above
or at the back of this appliance, as they could
climb on the appliance to reach items and be
injured.
CAUTION
Before using self-clean, remove broiler pan,
oven racks, oven rack guides, and any other
utensils.
IMPORTANT INSTRUCTIONS
GENERAL SAFETY PRECAUTIONS
• Read this guide carefully before using this
appliance to reduce risk of fire, electric shock,
or injury.
• This appliance must be properly installed
and serviced by a qualified installer or service
agency and grounded by a qualified technician.
• Clean only those parts listed in this guide.
• Do not use oven cleaners. No commercial oven
cleaner or oven liner protective coating of any
kind should be used in or around any part of
the oven.
• Do not touch heating elements or interior
surfaces of oven. Heating elements may be
hot even though they are dark in color. Interior
surfaces become hot enough to cause burns.
During and after use, do not touch, or let cloth-
ing or other flammable materials contact heat-
ing elements or interior surfaces of the oven
until they have had sucient time to cool.
• Exercise caution when opening the oven door.
Let hot air or steam escape before looking or
reaching into the oven.
• Be sure that the oven cool air intake (located
above the door) and oven exhaust vent (located
below the door) are unobstructed at all times.

wolfappliance.com | 5
IMPORTANT INSTRUCTIONS
GENERAL SAFETY PRECAUTIONS
• Do not use water on grease fires. Smother
the flame or use a dry chemical or foam-type
extinguisher.
• Do not heat unopened food containers, such as
baby food jars and cans. Pressure build-up may
cause the container to burst and cause injury.
• Do not store or use gasoline or other flam-
mable vapors and liquids in the vicinity of this or
any other appliance.
• Do not clean the oven gasket; rubbing or
moving the gasket may compromise the door
seal.
• Wear proper apparel. Loose-fitting or hanging
garments should never be worn while using this
appliance.
• For contemporary models, press the upper
middle section of the door firmly to open. To
close, rotate the door upward, then press firmly
to close. Refer to the illustration below.
PRESS TO OPEN
Contemporary model
WARNING
PROPOSITION 65 FOR CALIFORNIA RESIDENTS
Cancer and Reproductive Harm—
www.P65Warnings.ca.gov
Safety Precautions

6 | Wolf Customer Care 800.222.7820
M Series Oven Features
FEATURES
1Product Rating Plate (lower oven for double ovens)
2Adjustable Oven Rack
3Full-Extension Oven Racks
4Control Panel and Display
5Control Knobs (professional model)
6Convection Fans
7Temperature Probe Receptacle
8Halogen Lighting
Getting Started
We know you are eager to start cooking, but before you
do, please take some time to read this use and care guide.
Whether you are an occasional cook or an expert chef, it
will be to your benefit to familiarize yourself with the safety
practices, features, operation, and care recommendations
of your Wolf M Series Oven.
To ensure the best results, review the cooking modes and
special features on page 12.
CAUTION
Do not place cookware on the oven floor or use
aluminum foil or other material to line the oven
floor or side walls. Failure to adhere to this notice
will damage the porcelain interior and will void your
warranty.
M Series Single Oven (Transitional shown)
4
7
8
3
62
M Series Double Oven (Professional shown)
4
7
6
8
3
2
5
1

wolfappliance.com | 7
OVEN RACKS
To insert a standard rack in the oven, place the rack
anti-tip lock under the side rack guide rails. Slide the rack
back and lift up to clear the rack stops. Continue to slide
the rack back until completely inside the oven. Refer to
the illustration below.
To insert a full-extension rack, place the two rear tabs
onto the rack guide (one tab above and one below). Refer
to the illustration below. Angle the rack slightly and slide
back until the front rack notch engages the front rack
guide.
Oven Racks
OVEN RACK POSITION
The oven racks can be placed in any of the six positions
labeled on the front face of the oven. Refer to the illustra-
tion below.
OVEN RACK GUIDES
To insert the rack guides in the oven, locate the mount-
ing screws on the oven side walls. Place the rack guide
mounting tabs over the top screws, pivot inward and slide
down until fully seated. Refer to the illustration below.
Oven Operation
ANTI-TIP
LOCK
RACK
STOP
REAR TAB
Oven rack anti-tip lock
Full-extension rack
MOUNTING
TAB
Oven rack position
Oven rack guide

8 | Wolf Customer Care 800.222.7820
Interactive Control Panel
The interactive control panel utilizes touch technology to
select cooking modes and other functions. Refer to the
illustrations below. For professional models, cooking
modes and temperatures are selected using the selector
knobs.
COOKING OPTIONS
QUICK
START
Touch to initiate cooking, then select from options
on the control panel. For the professional model,
turn the selector knob to the desired mode.
GOURMET Touch to initiate Gourmet meal preparations, then
select from options on the control panel. For the
professional model, turn the selector knob to
Gourmet.
Home screen—single transitional and contemporary shown
Home screen—single professional shown
Oven Operation

wolfappliance.com | 9
Oven Operation
PRIOR TO USE
To ensure all residual oil from the manufacturing process
has been removed, each oven must go through the fol-
lowing procedure:
1 Clean the oven thoroughly with hot water and a mild
detergent. Rinse and dry with a soft cloth.
2 Turn on ventilation. Some smoke and odor is normal.
3 Touch or turn the knob to Convection Roast and adjust
the temperature to 500°F (260°C) for one hour.
4 Touch O (turn the knob for professional model) and
allow the oven to cool with the door closed.
PREHEAT
During preheat, the oven is heated as quickly and evenly
as possible and is not ideal for cooking. Preheat should be
used for all cooking modes except Broil, Warm, and some
modes in Gourmet. Once preheat is complete, a chime
indicates the oven has reached the set temperature.
Oven Operation
CLOCK
The clock is visible on the touchscreen during all cooking
modes. It is very important the clock is set to the correct
time if a timed cook feature is used. The clock must be
reset after a power outage.
The clock sets automatically if the unit is connected to
Wi-Fi. Refer to Connect This Appliance for more informa-
tion.
Setting clock:
1 Touch Settings, then select Time.
2 Touch 12 Hour or 24 Hour mode.
3 Use the slide bar to set the time of day, select AM or
PM, then touch Set. A chime indicates the clock has
been set.
Time can also be adjusted by touching the time display on
the home screen.
TIMER
Each timer can be set for a maximum of 11 hours and 59
minutes. Once a time is set, the countdown is illuminated
on the control panel display. The timer is independent
from the oven. Setting the timer does not aect the cook
time or stop time.
Setting timer:
1 Touch Timer 1 or Timer 2.
2 Use the slide bar to set the duration, then touch Set.
A chime indicates the timer has been set.
3 To cancel or edit, touch the countdown time on the
display.
4 The oven chimes and the time flashes when complete.
The timer continues to chime until canceled or reset.

10 | Wolf Customer Care 800.222.7820
Oven Operation
Cooking Modes
The oven has ten cooking modes—Bake, Roast, Broil,
Convection Roast, Convection, Gourmet, Proof, Stone,
Dehydrate, and Warm. Stone and Dehydrate require acces-
sories. Refer to the chart on page 12.
SETTING CONTROLS
1 Touch Quick Start. The oven defaults to Bake mode.
Touch or use the slide bar to select the desired cook-
ing mode. For the professional model, turn the selector
knob to the desired cooking mode.
2 Touch the temperature (Start for professional models)
to select the preset temperature. To change the
temperature, touch or use the slide bar to select the
desired temperature, then touch the temperature or
wait 5 seconds. The unit turns on automatically if the
temperature is not touched. For the professional model,
turn the selector knob to adjust the temperature.
3 Touch O to end the mode. For the professional model,
turn the selector knob to O.
Extended Options
Touch Settings to access the extended options. Touch or
use the slide bar to select the desired option. If more infor-
mation is needed, touch Info.
OPTIONS
Time Select 12 hour or 24 hour.
Sabbath Turn Sabbath on or o.
Clock Select digital, analog, blank, or logo.
Connect Turn connect on or o.*
Standby Turn standby power on or o.
Language Select: English, Spanish, French, Italian,
German, Dutch, or Chinese.
Units °F/Imperial or °C/Metric.
Showroom For showroom use only.
Info Access helpful tips and product information.
About For service only.
Temp Oset For service only.
Calibration Adjust display calibration.
Sound Mute, 1-5 and high, medium, low.
Brightness Adjust display brightness: 0-100%.
*To connect to the Sub-Zero Group Owner's App, connect must be
turned on.

wolfappliance.com | 11
Oven Operation
GOURMET GUIDE
MEAT Beef steak, tenderloin, roast,
prime rib, meatloaf, slow cook
Poultry whole bird, fresh pieces,
whole breast
Pork ribs, tenderloin, roast, steak,
chop, whole ham
Lamb leg, roast, rib rack
FISH Steak
Fillet
Breaded
BAKED GOODS Cookies
Cake sheet, fluted, angel, pound,
cupcakes
Pie single crust, double crust
Bread quick bread, yeast loaf,
yeast rolls, biscuits
PIZZA Fresh
Par-Baked
Calzone
VEGETABLES Roasted
Sweet Potato
Baked Potato
ONE DISH MEALS Casserole
Lasagna
Quiche
Cooking Modes
GOURMET
Gourmet provides a variety of quick and convenient meal
preparations. Gourmet also provides recommendations for
ideal rack positions and tips to ensure cooking confidence.
Refer to the instructions on the control panel to determine
whether preheat is required.
Choose from six categories—meat, fish, baked goods,
pizza, vegetables, and one dish meals. Each category can
be refined to ensure the most eective cooking mode and
rack position to create a cooking masterpiece. Refer to the
Gourmet guide.

12 | Wolf Customer Care 800.222.7820
Cooking Modes
MODE PRESET RANGE PROBE USES
BAKE 350°F
(175°C)
200–550°F
(95–290°C)
•Best for single-rack cooking, primarily baked foods. Use for
standard recipes.
ROAST 350°F
(175°C)
200–550°F
(95–290°C)
•Best for roasting less tender cuts of meat, such as chuck roasts
and stew meat that should be covered.
BROIL High
Med
Low
550°F (290°C)
450°F (230°C)
350°F (175°C)
Best for broiling meats, fish, and poultry pieces up to 1" thick.
Use a two-piece broiler pan and always broil with the oven door
closed.
CONVECTION ROAST 325°F
(165°C)
200–550°F
(95–290°C)
•Gently browns the exterior and seals in juices. Perfect for roast-
ing tender cuts of beef, lamb, pork, and poultry.
CONVECTION 325°F
(165°C)
200–550°F
(95–290°C)
•Uniform air movement makes it possible to multi-level rack
cook with even browning.
GOURMET — — •Gourmet provides quick and convenient meal preparations with
recommendations for cooking mode and rack position. Refer
to page 11. Preset temperature and range are dependent on the
food and desired doneness.
PROOF 85°F
(30°C)
85–110°F
(30–45°C)
Ideal for proofing, or rising bread dough. Refer to page 13.
STONE 450°F
(230°C)
200–550°F
(95–290°C)
•Baking on a ceramic stone. Great for pizza and bread. Stone
accessory required. Refer to page 13.
DEHYDRATE 135°F
(60°C)
110–170°F
(45–75°C)
Dry a variety of fruits, vegetables, herbs, and meat strips.
Accessory racks required. Refer to page 13.
WARM 180°F
(80°C)
140–200°F
(60–95°C)
•Designed to keep foods at serving temperature.
Oven Operation

wolfappliance.com | 13
Cooking Modes
PROOF
Setting controls:
1 Touch Quick Start, then select Proof. For the profes-
sional model, turn the selector knob to More, then
select Proof on the control panel.
2 Touch Start to select the preset temperature. To change
the temperature, touch or use the slide bar to select
the desired temperature, then touch Start. For the
professional model, turn the selector knob to adjust
temperature.
3 Touch O to end mode. For the professional model,
turn the selector knob to O.
STONE
Accessory kit required. Accessories are available through
an authorized Wolf dealer. For local dealer information,
visit the find a showroom section of our website, wol-
fappliance.com. Additional use and care information is
included with the accessory kit.
Setting controls:
1 Touch Quick Start, then select Stone. For the profes-
sional model, turn the selector knob to More, then
select Stone on the control panel.
2 Touch Start to select the preset temperature. To change
the temperature, touch or use the slide bar to select
the desired temperature, then touch Start. For the
professional model, turn the selector knob to adjust
temperature.
3 Touch O to end mode. For the professional model,
turn the selector knob to O.
DEHYDRATE
Accessory kit required. Accessories are available through
an authorized Wolf dealer. For local dealer information,
visit the find a showroom section of our website, wol-
fappliance.com. Additional use and care information is
included with the accessory kit.
Setting controls:
1 Place the door stop supplied with accessory kit.
2 Touch Quick Start, then select Dehydrate. For the pro-
fessional model, turn the selector knob to More, then
select Dehydrate on the control panel.
3 Touch Start to select the preset temperature. To change
the temperature, touch or use the slide bar to select the
desired temperature, then touch Start. For the profes-
sional model, turn the selector knob to adjust tempera-
ture.
4 Touch O to end the mode. For the professional model,
turn the selector knob to O.
Oven Operation

14 | Wolf Customer Care 800.222.7820
Temperature Probe
Use only the temperature probe shipped with this appli-
ance. Refer to the illustration below. The temperature
probe measures the internal temperature of food while
cooking. It can be used with all cooking modes except
Broil, Proof, and Dehydrate.
Setting controls:
1 Preheat the oven to the desired oven temperature in
the desired mode (Bake or Stone mode for breads).
2 Insert the probe into the thickest area of food. When
making bread, cook for approximately 10 minutes
before inserting the probe.
3 When preheat is complete, insert the probe into the
probe receptacle. Refer to the illustration below. Close
the oven door.
4 Touch Probe.
5 Touch Set to select the preset temperature. To change
the temperature, use the slide bar to select the desired
temperature, then touch Set.
6 A chime indicates the internal temperature has reached
the probe setpoint. Remove and reinsert the probe to
verify the internal temperature, then select Ok or O.
CAUTION
Pull straight down when removing the probe from
the receptacle. Bending or pulling the probe at an
angle during removal may damage the probe and
oven. Do not place a rack or accessory in rack posi-
tion six when using the probe, as it interferes with
probe removal.
CAUTION
The probe and probe receptacle will be very hot.
Handle with care.
Temperature probe
Probe receptacle
Oven Operation

wolfappliance.com | 15
Auto Program
TIMED COOK / DELAYED START
Timed cook automatically turns the oven o at a specified
time. The oven begins to heat immediately and turns o
at the desired stop time. Delayed start automatically turns
the oven on and o at specified times. The oven remains
idle until the desired start time and turns o at the desired
stop time. If preheat is required, the preheat time must
be accounted for when determining the cooking dura-
tion. The clock must be set to the correct time to function
properly. Use in any cooking mode except Broil, Gourmet,
or Stone.
Setting controls:
1 Touch Quick Start, then select the desired cooking
mode and temperature. For the professional model,
turn the selector knobs to the desired mode and tem-
perature.
2 Touch Timed Cook, then select the cooking duration.
3 Touch Set to confirm the stop time or use the slide bar
to select the desired stop time, then touch Set. The
cooking duration and stop time appear on the display.
The oven chimes with one minute remaining. The oven
chimes when complete and continues to chime until
canceled or reset.
4 To cancel, reset, or turn the oven o, touch Timed
Cook.
5 The oven automatically turns o when the cook time is
complete. Touch Ok to clear the display.
Oven Operation
Sabbath
This appliance is certified by Star-K to meet strict religious
regulations in conjunction with specific instructions found
on www.star-k.org.
Bake, Roast, Proof, and Warm modes can be used in
Sabbath.
Setting controls:
1 Turn the oven light on or o.
2 Touch Settings, then select Sabbath Mode.
3 Touch On, then touch Start.
4 Select the cooking mode and temperature, then touch
Start.
5 After ten seconds, the unit enters Sabbath.
6 To change the oven temperature while in Sabbath, use
the control panel to select the desired temperature,
then touch Start/Enter. The temperature changes
randomly after the new temperature is selected.
7 Touch O to end the mode. The Sabbath icon goes
away after ten seconds.

16 | Wolf Customer Care 800.222.7820
Oven Operation
DELAYED CLEAN
Setting controls:
1 Turn on ventilation. Some smoke and odor is normal.
2 Touch Quick Start, then touch Clean. For the profes-
sional model, turn the selector knob to More, then
touch Clean on the control panel.
3 Touch Delayed Clean and use the control panel to
select the desired start time, then touch Start.
4 Remove the oven racks and rack guides, then close the
door.
5 Touch Ok.
6 The oven door locks and stays locked until cleaning
is complete and the oven temperature is below 550°F
(290°C).
7 Touch O to clear. For the professional model, turn the
selector knob to O.
Clean
CAUTION
During clean, exterior surfaces may get hotter than
usual. Children should be kept away.
During Clean, the oven is heated to an extremely high
temperature to burn o food soil. The oven lights are dis-
abled. Clean lasts approximately four hours.
Porcelain is made from natural products and, therefore,
can chip or develop fine lines and cracks due to the expan-
sion and contraction that occurs as oven temperature
fluctuates (particularly when the self-cleaning function
is employed). This can result in cosmetic imperfections,
such as a cloudy, dull, or scratched appearance. Cosmetic
imperfections may be more visible in a colored oven cavity.
IMPORTANT NOTE: For double ovens, the other oven
cannot be used during Clean.
Setting controls:
1 Turn on ventilation. Some smoke and odor is normal.
2 Touch Quick Start, then touch Clean. For the profes-
sional model, turn the selector knob to More, then
touch Clean on the control panel.
3 Touch Start, then open the oven door.
4 Remove the oven racks and rack guides, then close the
door.
5 Touch Ok.
6 The oven door locks and stays locked until cleaning
is complete and the oven temperature is below 550°F
(290°C).
7 Touch O to clear. For the professional model, turn the
selector knob to O.

wolfappliance.com | 17
All O
All O turns all active ovens o. Touch to turn the
oven(s) o.
For Transitional and Contemporary Black Glass models, the
indicator only appears during Clean.
The indicator does not appear on Professional models. To
turn the oven(s) o, turn the knob(s) to O.
Oven Light
WARNING
Verify power is disconnected from the electrical box
before replacing a light bulb.
Allow the oven to cool completely, then remove oven
racks and rack guides. To remove the light cover, gently pry
the bottom edge with a flat screwdriver. Remove the exist-
ing bulb and replace with a 40-watt halogen bulb. Refer to
the illustration below.
To replace the light bulb located on the top of the
oven cavity, contact Wolf Factory Certified Service. For
the name of the nearest Wolf Factory Certified Service,
check the Product Support section of our website,
wolfappliance.com, or call Wolf Customer Care at
800-222-7820.
LIGHT
COVER
Light bulb replacement
ALL OFF INDICATOR
All O
Oven Operation

18 | Wolf Customer Care 800.222.7820
Cooking Guide
Wolf Cooking Guide
FOOD RACK(S) MODE OVEN TEMP POSITION TIME NOTES
BREADS
Biscuits 1 Roast 400°F (205°C) 3 5–10 min
2 Convection 425°F (220°C) 2, 5 5–10 min
3 Convection 425°F (220°C) 1, 3, 5 5–10 min
Cinnamon rolls 1 Bake 350°F (175°C) 3 20–25 min
2 Convection 325°F (165°C) 2, 5 20–25 min
3 Convection 325°F (165°C) 1, 3, 5 20–25 min
Garlic bread 1 Broil Med 5
Muns 1 Bake 400°F (205°C) 3 15–20 min
2 Convection 375°F (190°C) 2, 5 10–15 min
3 Convection 375°F (190°C) 1, 3, 5 10–15 min
Quick breads 1 Bake 350°F (175°C) 3 40–50 min
Toast 1 Broil High 5
Yeast bread (loaf pan) 1 Bake 350°F (175°C) 3 20–45 min
Yeast bread (no pan) 1 Stone 450°F (230°C) 1 15–45 min
Yeast rolls 1 Convection 375°F (190°C) 3 10–20 min
2 Convection 375°F (190°C) 2, 5 10–20 min
3 Convection 375°F (190°C) 1, 3, 5 10–20 min
CAKES
Angel food cake 1 Bake 350°F (175°C) 1 35–45 min
Bundt or pound cake 1 Bake 350°F (175°C) 3 40–50 min
Cupcakes 1 Bake 350°F (175°C) 3 20–25 min
2 Convection 325°F (165°C) 2, 5 15–25 min
3 Convection 325°F (165°C) 1, 3, 5 15–25 min
Mixes or from scratch 1 Bake 350°F (175°C) 3 20–30 min
2 Convection 325°F (165°C) 2, 5 20–30 min
3 Convection 325°F (165°C) 1, 3, 5 20–30 min
COOKIES
Cookies or bars 1 Bake 350°F (175°C) 3 10–25 min
2 Convection 325°F (165°C) 2, 5 10–25 min
3 Convection 325°F (165°C) 1, 3, 5 10–25 min
PIES
Cream pus 1 Convection 400°F (205°C) 3 20–30 min
Double-crust or streusel topped 1 Bake 375°F (190°C) 3 40–45 min
Lemon meringue 1 Broil Low 3 10–15 min
Pie crust (empty) 1 Bake 425°F (220°C) 3 10–15 min
Pu pastry 1 Bake 400°F (205°C) 3 10–15 min
2 Convection 375°F (190°C) 2, 5 10–15 min
3 Convection 375°F (190°C) 1, 3, 5 10–15 min
Pumpkin or custard 1 Bake 425°F (220°C) /
325°F (165°C)
3 see note Bake for 15 min at 425°F, reduce
temp to 325°F, and bake until pie is
set, 45–60 min.
Consuming raw or undercooked meats, poultry, seafood, shellfish, or eggs may increase your risk of foodborne illness.

wolfappliance.com | 19
Cooking Guide
Wolf Cooking Guide
FOOD MODE OVEN TEMP RACK TIME PROBE TEMP NOTES
BEEF
Chuck roast Conv Roast 325°F (165°C) 3 20–25 min/lb Med 150°F (65°C) Place in dish with liquid ⁄ the
height of the meat.
Roast 350°F (175°C) 3 20–25 min/lb Med 150°F (65°C)
Ground patties Broil High 5 10–15 min Turn over at 7 min.
Prime rib Roast 450°F (230°C) /
225°F (105°C)
2 see note Rare 130°F (55°C) No preheat required. Roast for
30 min at 450°F, reduce temp to
225°F, and cook to desired
internal temp.
Roast Roast 425°F (220°C) /
325°F (165°C)
2 see note Rare 135°F (60°C) Roast for 30 min at 425°F, reduce
temp to 325°F, and cook to
desired internal temp.
Slow roast Bake 300°F (150°C) 2 Place in covered dish with liquid
⁄ the height of the meat.
Steaks (< 1" thick) Broil High 5 10–15 min Turn over at 6 min.
Steaks (> 1" thick) Broil High 5 10–20 min Turn over at 8 min.
Tenderloin Conv Roast 450°F (230°C) 3 10–20 min/lb Rare 130°F (55°C)
POULTRY
Chicken, bone-in Conv Roast 325°F (165°C) 5 20–25 min Thigh 180°F (80°C)
Chicken boneless breast Broil Med 5 10–15 min Turn over halfway through broiling.
(flattened to ⁄" thick) Conv Roast 350°F (175°C) 3 15–20 min Breast 165°F (75°C)
Chicken quarters, thighs Broil Med 5 20–25 min Turn over halfway through broiling.
Roast 350°F (175°C) 3 30–40 min Thigh 180°F (80°C)
Conv Roast 325°F (165°C) 3 30–40 min Thigh 180°F (80°C)
Bake 350°F (175°C) 3 30–40 min Thigh 180°F (80°C)
Chicken, whole Conv Roast 325°F (165°C) 2 10–20 min/lb Thigh 180°F (80°C)
Cornish hen Conv Roast 325°F (165°C) 3 1 hour Thigh 180°F (80°C)
Roast 350°F (175°C) 3 1 hour Thigh 180°F (80°C)
Duck Conv Roast 325°F (165°C) 2 15–20 min/lb Thigh 180°F (80°C)
Goose Conv Roast 325°F (165°C) 2 15–20 min/lb Thigh 180°F (80°C)
Turkey breast, whole Conv Roast 325°F (165°C) 2 15–20 min Breast 165°F (75°C)
Roast 350°F (175°C) 2 15–20 min Breast 165°F (75°C)
Turkey pieces Conv Roast 325°F (165°C) 3 30–40 min Thigh 180°F (80°C)
Roast 350°F (175°C) 3 30–40 min Thigh 180°F (80°C)
Turkey, whole (brined) Bake 350°F (175°C) 1 10–15 min/lb Thigh 180°F (80°C)
Turkey, whole Conv Roast 325°F (165°C) 1 10–15 min/lb Thigh 180°F (80°C)
Roast 325°F (165°C) 1 10–15 min/lb Thigh 180°F (80°C)
Consuming raw or undercooked meats, poultry, seafood, shellfish, or eggs may increase your risk of foodborne illness.

20 | Wolf Customer Care 800.222.7820
Cooking Guide
Wolf Cooking Guide
FOOD MODE OVEN TEMP RACK TIME PROBE TEMP NOTES
PORK
Chops, steaks (⁄" thick) Broil High 5 5–10 min Turn over halfway through broiling.
Conv Roast 350°F (175°C) 3 10–15 min
Ham steak (< 1" thick) Broil High 5 5–10 min Turn over halfway through broiling.
Ham steak (> 1" thick) Broil High 5 10–15 min Turn over halfway through broiling.
Ham, whole Bake 335°F (170°C) 2 10–15 min/lb 160°F (70°C) Cover and rest 15 min.
Ribs Bake 300°F (150°C) 3 Place in foil packets or covered
dish with liquid ⁄ the height of
the meat.
Slow roast Bake 300°F (150°C) 2 Place in covered dish with liquid
⁄ the height of the meat.
Tenderloin Conv Roast 400°F (205°C) 3 15–20 min/lb Rare 130°F (55°C)
LAMB
Chops, steaks (⁄" thick) Broil High 5 5–10 min Turn over halfway through broiling.
Crown rack Conv Roast 325°F (165°C) 2 15–20 min/lb 145°F (65°C)
Leg Conv Roast 425°F (220°C) /
325°F (165°C)
2 see note 145°F (65°C) Roast for 30 min at 425°F, reduce
temp to 325°F, and cook to
desired internal temp.
Veal roast Conv Roast 300°F (150°C) 2 30–35 min/lb 140°F (60°C)
FISH
Fillet (< 1" thick) Broil Med 5 10–20 min
Fillet (> 1" thick) Conv Roast 375°F (190°C) 5 15–25 min
PIZZA
Calzones Stone 375°F (190°C) 1 10–15 min
French bread pizza Broil Med 5 10–15 min
Homemade pizza Stone 450°F (230°C) 1 5–15 min
VEGETABLES
Mixed vegetables Conv Roast 400°F (205°C) 4 10–20 min
Potatoes, sweet potatoes Bake 350°F (175°C) 3 45–60 min
OTHER
Meatloaf Roast 425°F (220°C) /
325°F (165°C)
2 see note 165°F (75°C) Roast for 20 min at 425°F, reduce
temp to 325°F, and cook to
desired internal temp.
Nachos Broil Low 3 15–20 min
One dish meals Bake 350°F (175°C) 3 45–60 min 175°F (80°C)
Quiche Bake 350°F (175°C) 3 40–50 min
Sausage, bratwurst (fresh) Broil Med 5 10–15 min Turn over halfway through broiling.
Consuming raw or undercooked meats, poultry, seafood, shellfish, or eggs may increase your risk of foodborne illness.
Other manuals for M Series
13
Table of contents
Languages:
Other Wolf Oven manuals

Wolf
Wolf M Series User manual

Wolf
Wolf e Series User manual

Wolf
Wolf E Series Configuration guide

Wolf
Wolf Speed SPO30S User manual

Wolf
Wolf CSO30TM User manual

Wolf
Wolf SO30-2F/S-TH User manual

Wolf
Wolf CSO24TE User manual

Wolf
Wolf L Series SO30U Instructions for use

Wolf
Wolf M Series Guide

Wolf
Wolf DO30PE/S/PH User manual

Wolf
Wolf E Series User manual

Wolf
Wolf SO36U Instructions for use

Wolf
Wolf MWD24-2U/S User manual

Wolf
Wolf DO30F User manual

Wolf
Wolf DO30U/P Owner's manual

Wolf
Wolf e Series User manual

Wolf
Wolf e Series User manual

Wolf
Wolf E Series DO30-2F/S User manual

Wolf
Wolf e Series User manual

Wolf
Wolf E Series SO30-2F/S User manual