manuals.online logo
Brands
  1. Home
  2. •
  3. Brands
  4. •
  5. Wooden City
  6. •
  7. Toy
  8. •
  9. Wooden City V8 Engine User manual

Wooden City V8 Engine User manual

V8 Engine
®
Assembly instruction
Package contains:
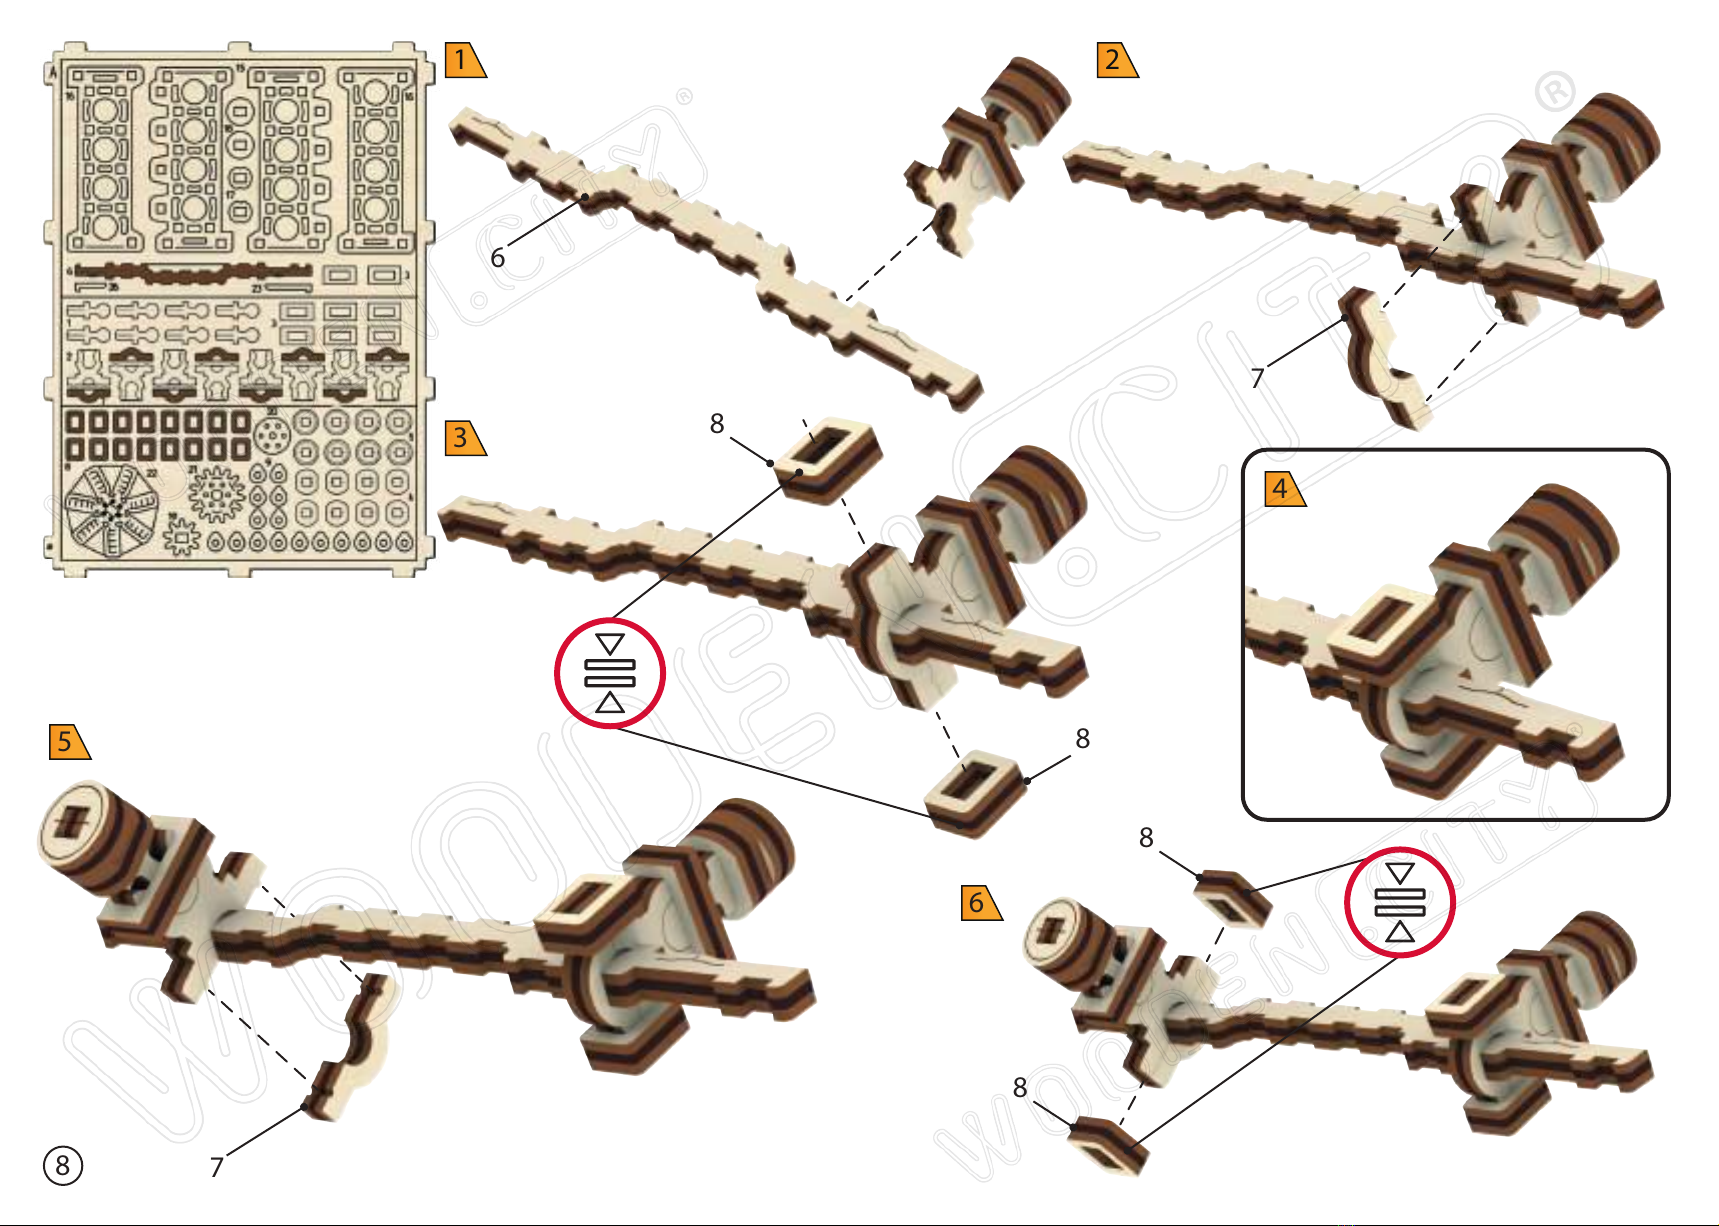
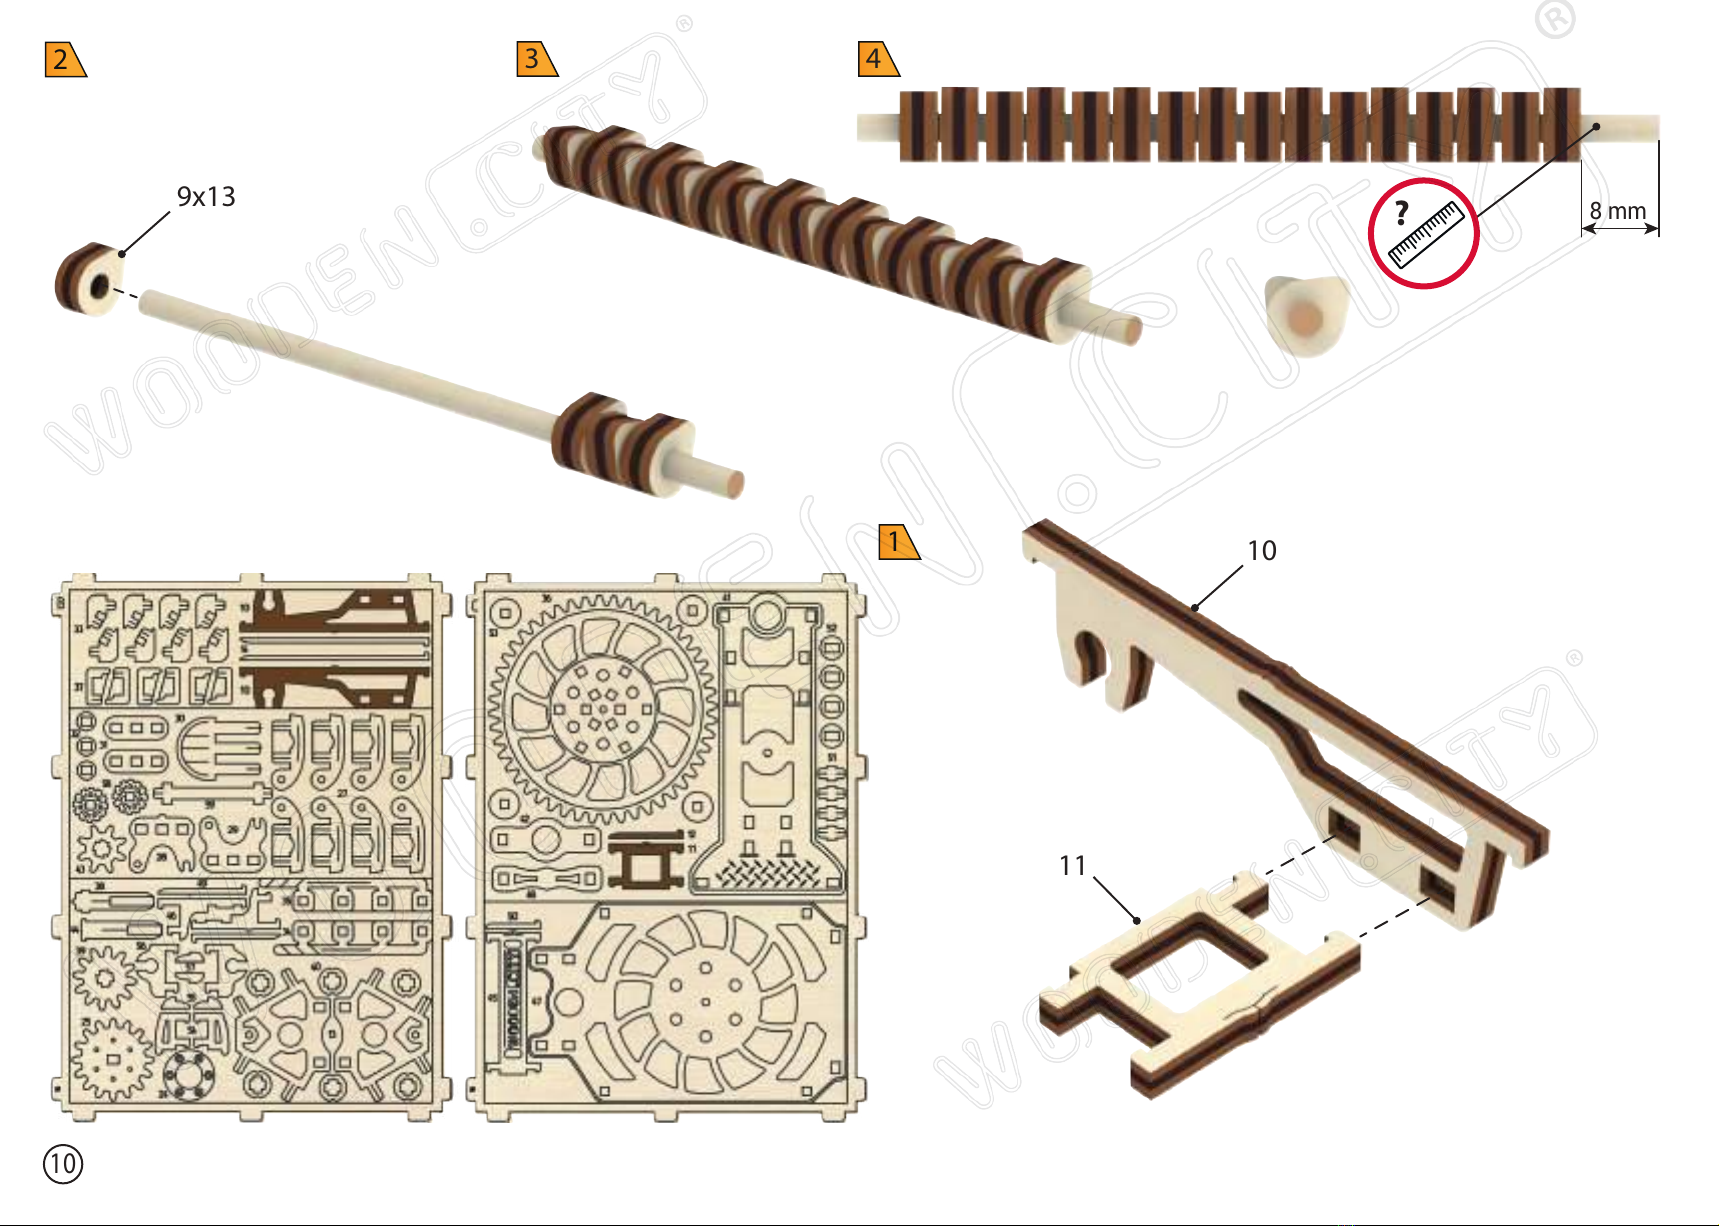
1. 182 parts on 3 ply sheets
2. 18 spare parts
3. Axles
4. Ruler (for checking dimensions)
You will need: razor blade, scissors, sandpaper and wax candle. Very
carefully push out the pieces from the front side of the board, taking care not
to break them. If the piece does not come out, gently cut the notches with
the razor blade. This model does not require glue or paint. To reduce friction,
the gear face and the axle rotation areas should be waxed. Assemble in a
well-lit area and follow the instructions carefully. You can also disassemble
this model in reverse order.
EN FR
PL
ES
Instrukcja składania
Zestaw zawiera:
1. 182 detali umieszczonych na 3 arkuszach sklejki
2. 18 części zapasowych
3. Osie
4. Linijka do sprawdzania wymiarów
Do złożenia modelu niezbędne będą: nóż techniczny, nożyczki, papier ścierny
oraz świeca woskowa. Detale wypycha się delikatnie od prawej strony
arkusza uważając, aby ich nie uszkodzić. Jeżeli wystąpi trudność z
wyciśnięciem pożądanego elementu, wówczas należy go delikatnie naciąć
nożykiem z lewej strony arkusza. Powinno się wypychać z arkusza tylko te
elementy nad którymi aktualnie się pracuje, w przeciwnym razie mogą się
pogubić. Model należy składać przy dobrze doświetlonym stanowisku zgod-
nie z instrukcją. Model można rozłożyć w odwrotnej kolejności. Model składa
się bez użycia kleju. W celu prawidłowego funkcjonowania mechanizmu,
należy osie i koła zębate natrzeć świecą woskową.
Instruction de montage
Composant modèle:
1. 182 pièces sur 3 panneau
2. 18 pièces de rechange
3. Axe
4. Il possède une règle pour vérifier les dimensions
Pour l’assemblage, vous auriez besoin: du couteau de papeterie, des ciseaux,
du papier de verre et d’une bougie de cire. Il faut enlever les détails tout
doucement du côté avant de la feuille, de soi, de façon qu'ils ne soient pas
endommagés. Si l'article ne peut pas être retiré, coupez-le avec le couteau de
papeterie. Le montage du modèle se fait sans colle et ne nécessite pas de
peinture. Pour éviter les blocages et pour une meilleur glissement du mécan-
isme, il faut graisser les extrémités des engrenages et l'axe dans les zones de
rotation avec la bougie de cire. Il est recommandé de monter le modèle ayant
une bonne illumination et strictement selon les instructions. Vous pouvez
également démonter ce modèle dans l'ordre inverse.
Instrucción de montaje
El paquete contiene:
1. 182 partes fijadas
en las 3 hojas de la madera contrachapada
2. 18 piezas de repuesto
3. Ejes
4. Regla para comprobar las dimensiones
Para el montaje necesitará: cuchillo de papelería, tijeras, papel de lija y una
vela. Con mucho cuidado exprimirá los detalles desde el anverso de la tabla,
tratando de no romperlos. Si, el detalle no sale, corte suavemente los
puentes con el cuchillo estacionario. Este modelo se monta sin pegamento
y no requiere la pintura. Para evitar el agarrotamiento y para reducir la
fricción, la cara del engranaje y las áreas de rotación del eje deben
encerarse. Es recomendable montar el modelo con buena iluminación y
seguir estrictamente las instrucciones.También puede desmontar este
modelo en orden inverso.
DE RU
Aufbauanleitung
Im Set enthalten:
1. 182 Teile in 3 Platten
2. 18 Ersatzteile
3. Achsen
4. Lineal zur Kontrolle
Fürs Zusammenbauen benötigen Sie: Messer, Schere, Schleifpapier und
eine Kerze. Die Einzelteile werden von der Oberseite nach unten
ausgedrückt. Wenn sich ein Teil nicht herausnehmen lässt, schneiden Sie
die Haltestege mit dem Messer leicht ein Um ein Steckenbleiben vorzubeu-
gen, schmieren Sie die Achsen und Zahnräder etwas mit dem Kerzenwachs
ein. Dieses Modell ist ohne Kleber montiert und erfordert keine Lackierung.
Sie beim Zusammenbau für eine gute Beleuchtung und setzen die
Einzelteile strickt nach der Anleitung zusammen. Modell kann auch wieder
auseinandergebaut werden.
裝配說明每盒模型包括:1、3片樺木板,合共182件零件2、18件備用零件3、轴
4、輔助測量尺
您会用到:美工刀、剪刀、砂纸、干蜡烛。请小心翼翼并从正对
着板材的方向将零件推出,注意不要折断。如果零件无法推出,
可以用美工刀小心地辅助。此模型无需用到胶水和油漆。为防止
交合和过大的摩擦,齿轮表面以及转动轴的区域可以擦上干蜡。
请在照明充足的情况下进行装配并且积极遵循说明书。也可以通
过逆向顺序对模型进行拆解。
Инструкция по сборке
Комплектация модели:
1. 182 детали, расположенных на 3 листах фанеры
2. 18 запасных деталей
3. Оси
4. Линейка для проверки размеров
Д
ля сборки Вам понад
обится: канцелярский нож, ножницы, наждачная
бумага и восковая свеча. Выдавливать детали нужно аккуратно с
лицевой стороны листа от себя, чтобы их не повредить. Если деталь не
вынимается, надрежьте перемычки канцелярским ножом. Модель
собирается без клея и не требует покраски. Для предотвращения
заклинивания и наилучшего скольжения механизма, необходимо
торец шестерни и оси в местах вращения смазать восковой свечой.
Собирать модель рекомендуется при хорошем освещении и строго по
инструкции. Разбирать можно в обратной последовательности.
IT
CN
Istruzioni di montaggio
La scatola contiene:
1. 182 pezzi situati sui 3 fogli
2. 18 pezzi di ricambio
3. Asse
4. La linea e/o dima per controllare le dimensioni
Il necessario per costruire: coltello di cancelleria, forbici, carta vetrata e cera
di candela. Premere delicatamente sui pezzi pretagliati, dalla parte
anteriore del foglio, per non rovinarli. Se il singolo pezzo non può essere
rimosso, fate piccoli tagli con un taglierino da cancelleria. Il modello si
monta senza colla e non ha bisogno di essere pitturato. Per evitare
inceppamenti e migliorare lo scivolamento dei meccanismi, attrezzarsi di
un prodotto lubrificante tipo cera di candela. Si consiglia di montare il
modello con la luce adeguata e seguendo le istruzioni. Lo smontaggio dello
stesso può avvenire con le dovute precauzioni. Smontare il modello
possibile in ordine inverso.
4
EN Notations FR Dèsignation symbollique ES Notas
PL Oznaczenia umowne DE Symbolbezeichnung RU Условные обозначения
IT Simboli CN 符号示意
EN Approximate assembly time.
FR Temps d’assemblage estimé.
ES Tiempo estimado de construcción.
PL Przybliżony czas składnia.
DE Aufbauzeit.
RU Примерное время сборки.
IT Tempo di costruzione stimato.
CN 预估组装时间
EN Check orientation of each piece before connecting.
FR Vérifiez l’emplacement des éléments.
ES Comprobar la posición de los elementos.
PL Uważnie sprawdź rozmieszczenie elementów.
DE Prüfen Sie die Positionen der Elemente.
RU Проверьте расположение элементов.
IT Controllare le posizioni degli elementi.
CN 检查零件位置
EN Check the measurements with the ruler.
FR Vérifiez les dimensions.
ES Comprobar los tamaños.
PL Sprawdź rozmiar.
DE Prüfen Sie die Abmessungen.
RU Проверьте размеры.
IT Controllare le dimensioni.
CN 检查零件尺寸
EN Cut off with a knife.
FR Coupez avec le couteau.
ES Cortar con el cuchillo.
PL Odetnij nożem.
DE Abschneiden.
RU Отрежьте ножом.
IT Taglierino.
CN 用美工刀切断EN Use sandpaper or razor blade to smooth notches
on each piece.
FR Les bavures après les coupures doivent être
poncées légèrement avec du papier de verre fin ou
coupées soigneusement avec un couteau de
papeterie.
ES Las rebabas en el puente deben ser amoladas
suavemente con el papel esmeril o cortadas
cuidadosamente con el cuchillo estacionario.
PL Uwaga: pozostałości po zaczepach technicznych
na detalach można usunąć drobnoziarnistym
papierem ściernym lub nożem technicznym.
DE Eventuell verbleibende Haltereste mit Messer
oder Schleifpapier entfernen. Das Modell wird ohne
Kleber zusammengesetzt.
RU Заусенцы от перемычек следует
отшлифовать легкими движениями мелкой
наждачной бумагой или аккуратно срезать
канцелярским ножом.
IT Le barbe dei ponticelli devono essere levigate
leggermente con la sottile carta vetrata o tagliati con
cautela con coltello di cancelleria.
CN
推出后的零件边缘可能会有毛刺,请用砂纸去除,
也可以用美工刀小心切除。
EN Use wax.
FR Lubrifiez les pièces avec la bougie.
ES Cera los detalles.
PL Natrzyj element świecą woskową.
DE Mit Kerzenwachs einschmieren.
RU Смажьте детали свечой.
IT Candela per Lubrificare le parti.
CN 给零件上干蜡
EN Remember spare pieces are included.
FR Pièces de rechange.
ES Detalles de repuesto.
PL Części zamienne.
DE Ersatzteile.
RU Запасные детали.
IT Pezzi di ricambio.
CN 备用零件
EN Press each piece all the way up to the stop.
FR Appuyez au maximum.
ES Presione hasta el tope.
PL Wciśnij do oporu.
DE Bis zum Anschlag zusammendrücken.
RU Прижмите до упора.
IT Premere per interrompere.
CN 向上压紧直至到位
EN Carefully move apart.
FR Faites séparer délicatement.
ES Separar cuidadosamente.
PL Delikatnie rozsunąć detale.
DE Vorsichtig auseinanderschieben.
RU Аккуратно раздвиньте.
IT Far scorrere delicatamente.
CN 分离时多加小心
?
EN The ruler is used for size check. FR La règle pour
vérifier les dimensions. ES La escala para la
verificación de tamaño. PL Linijka do sprawdzenia
wymiarów. DE Lineal um diverse Abmessungen zu
prüfen. RU Линейка для проверки размеров. IT La
linea per controllare le dimensioni. CN 辅助测量尺
EN This tool is for pushing the small pieces out of the board. Also may be used for
disassembly. FR La proéminence est conçue pour aider à presser et enlever les petits
détails de la feuille. On peut l’utiliser aussi pour pousser les petites pièces lors du
démontage du modèle. ES La repisa es para apretar los pequeños detalles fuera del
tablero. Además, también puede empujar los pequeños detalles en el proceso de
desmontaje. PL Występ w linijce przeznaczony jest do wyciskania małych detali z arkusza
sklejki. Można go wykorzystać również przy rozkładaniu modelu. DE Der Vorsprung dient
dazu, kleine Teile aus den Platten zu drücken. Er kann auch zum ausdrücken kleiner Teile
beim Auseinanderbauen des Modells benutzt werden. RU Выступ предназначен для
выдавливания из листа мелких деталей. Также им можно выталкивать мелкие
детали при разборке модели. IT Le proiezioni riportate sui fogli di istruzione sono utili
anche nella fase di smontaggio per estrarre i pezzi. CN
推件器是用于将小零件从板材上推
出。您可以遵照2张示意图中的拆解步骤将小零件推出。
EN These holes help to push thin axles through several of
the pieces. FR Les ouvertures indiquées vous aideront à
pousser l’axe fin à travers quelques détails. ES Estos
agujeros ayudan a empujar el eje delgado a través de varios
detalles sobre ejes. PL Otwory w linijce mogą być pomocne
przy przeciskaniu patyczków (osi) przez kilka elementów.
DE Die angegebenen Öffnungen helfen Ihnen, eine dünne
Achse durch mehrere Öffnungen zu schieben. RU
Указанные отверстия помогут протолкнуть тонкую
ось через несколько деталей. IT Questi piccoli fori
aiuteranno a spingere ed inserire l'asse attraverso le piccole
parti.
CN 小孔是用于帮助细轴穿过不同零件而设计的。
5
?
6
65 mm
Ø2 mm
0
56 mm
84 mm
16 mm
Ø3 mm
0
7
x8
2
1
3
4 5
6
2
4
5
3
1
8
21
3
4
5
6
7
7
6
8
8
8
8
9
84 mm
(1:1)
?
84 mm
x8
1
78
9
9
9
10
8 mm
?
2
1
43
10
9x13
11
11
2
1
34
10
13
12
13
12
23
4
5
13
6
7
8
14
15
15
14
14
1
9
10
1616
17
15
4
2
56
3
7
18
21
20
19
6x8 mm
8 mm
?
16
89
10
11 12 13
22
23
17
14
1
17
18
23
45
6
78 9
18
24
25
6x8 mm
26
8 mm
?
19
56 mm
(1:1)
(1:1)
?
?
1
2
3
4
27
28
27 27
27
56 mm
20
56 mm
(1:1)
?(1:1) ?
1 2
4
3
27
27
27
27
56 mm
29

Other Wooden City Toy manuals

Wooden City Biplan User manual

Wooden City

Wooden City Biplan User manual

Wooden City Biplane Limited Edition User manual

Wooden City

Wooden City Biplane Limited Edition User manual

Popular Toy manuals by other brands

Faller HEXENLOCH MILL manual

Faller

Faller HEXENLOCH MILL manual

MJX T10 Shuttle instruction manual

MJX

MJX T10 Shuttle instruction manual

Moni UNICORN instruction manual

Moni

Moni UNICORN instruction manual

Mattel Barbie BDF47 instructions

Mattel

Mattel Barbie BDF47 instructions

Hongda USA Gibbon Sushi M2011 instruction manual

Hongda USA

Hongda USA Gibbon Sushi M2011 instruction manual

AIRFIX North American B-25C/D Mitchell Assembly instructions

AIRFIX

AIRFIX North American B-25C/D Mitchell Assembly instructions

Hacker Model SKG BLANIK manual

Hacker Model

Hacker Model SKG BLANIK manual

Hasbro G.I. Joe Desert Coyote instructions

Hasbro

Hasbro G.I. Joe Desert Coyote instructions

Dancing Wings Hobby SCG38 instruction manual

Dancing Wings Hobby

Dancing Wings Hobby SCG38 instruction manual

KidKraft 53100B manual

KidKraft

KidKraft 53100B manual

ROBBE K-RAT II Instruction and user's manual

ROBBE

ROBBE K-RAT II Instruction and user's manual

Mattel Barie instructions

Mattel

Mattel Barie instructions

MGA Entertainment project mc2 547860 quick start guide

MGA Entertainment

MGA Entertainment project mc2 547860 quick start guide

Multiplex MULTIGyro G3 instruction manual

Multiplex

Multiplex MULTIGyro G3 instruction manual

Meccano Desert Adventure instructions

Meccano

Meccano Desert Adventure instructions

Halfords W313 instruction manual

Halfords

Halfords W313 instruction manual

BinaryBots Dimm Inventors manual

BinaryBots

BinaryBots Dimm Inventors manual

Eduard P-40N early interior S.A. quick start guide

Eduard

Eduard P-40N early interior S.A. quick start guide

manuals.online logo
manuals.online logoBrands
  • About & Mission
  • Contact us
  • Privacy Policy
  • Terms and Conditions

Copyright 2025 Manuals.Online. All Rights Reserved.